
:max_bytes(150000):strip_icc()/1.Clicks-arealkeyboardforiPhone-a038b4613f264346891315547780718f.jpg)
Ideal Recording Gear for Vloggers
Ideal Recording Gear for Vloggers
Best Microphone for YouTubers

Richard Bennett
Mar 27, 2024• Proven solutions
If you want your viewers to be glued to their screens then quality audio is just as important as quality video for your YouTube channel. People will watch your vlog because they want to hear what you are saying. It can be tempting to use the audio your camera records rather than buy a separate microphone. Unfortunately, the microphones built into most cameras will only record mediocre audio. In this case, we have researched and found out the following best microphones for YouTube videos based on its price and performance. Besides, we will also highlight the best microphones for different recording scenarios. Whether you’re making gaming videos or recording yourself singing, or filming inside or outside, you will get to know which one is best for your situation. Let’s check out now.
- Best Microphones for YouTube Videos
- Best Microphones for Different Types of YouTube Creators
- Tips for Recording YouTube Audio
- How to Sync your Audio in Filmora
Part 1: Best Microphones for YouTube Videos [Best for All]
Here are examples of some of the best external microphones for YouTube:
1. Blue Snowball USB Mic - $60
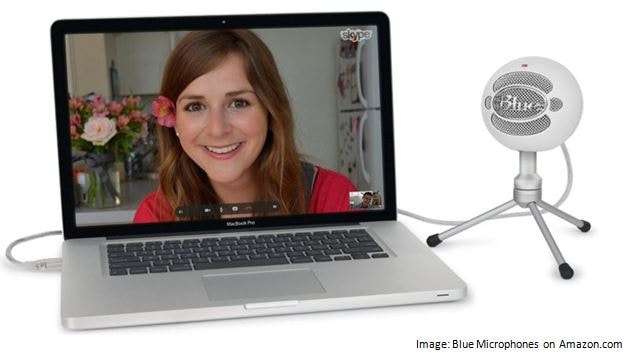
The Snowball is especially good for vlogging from your webcam because it is easy to hook up to your computer using a USB port. It will record your audio simultaneously while you are using your webcam. The biggest drawback of the Snowball is that it needs to be close to you while your record. This combined with its larger size means that it will probably need to be in your shot.
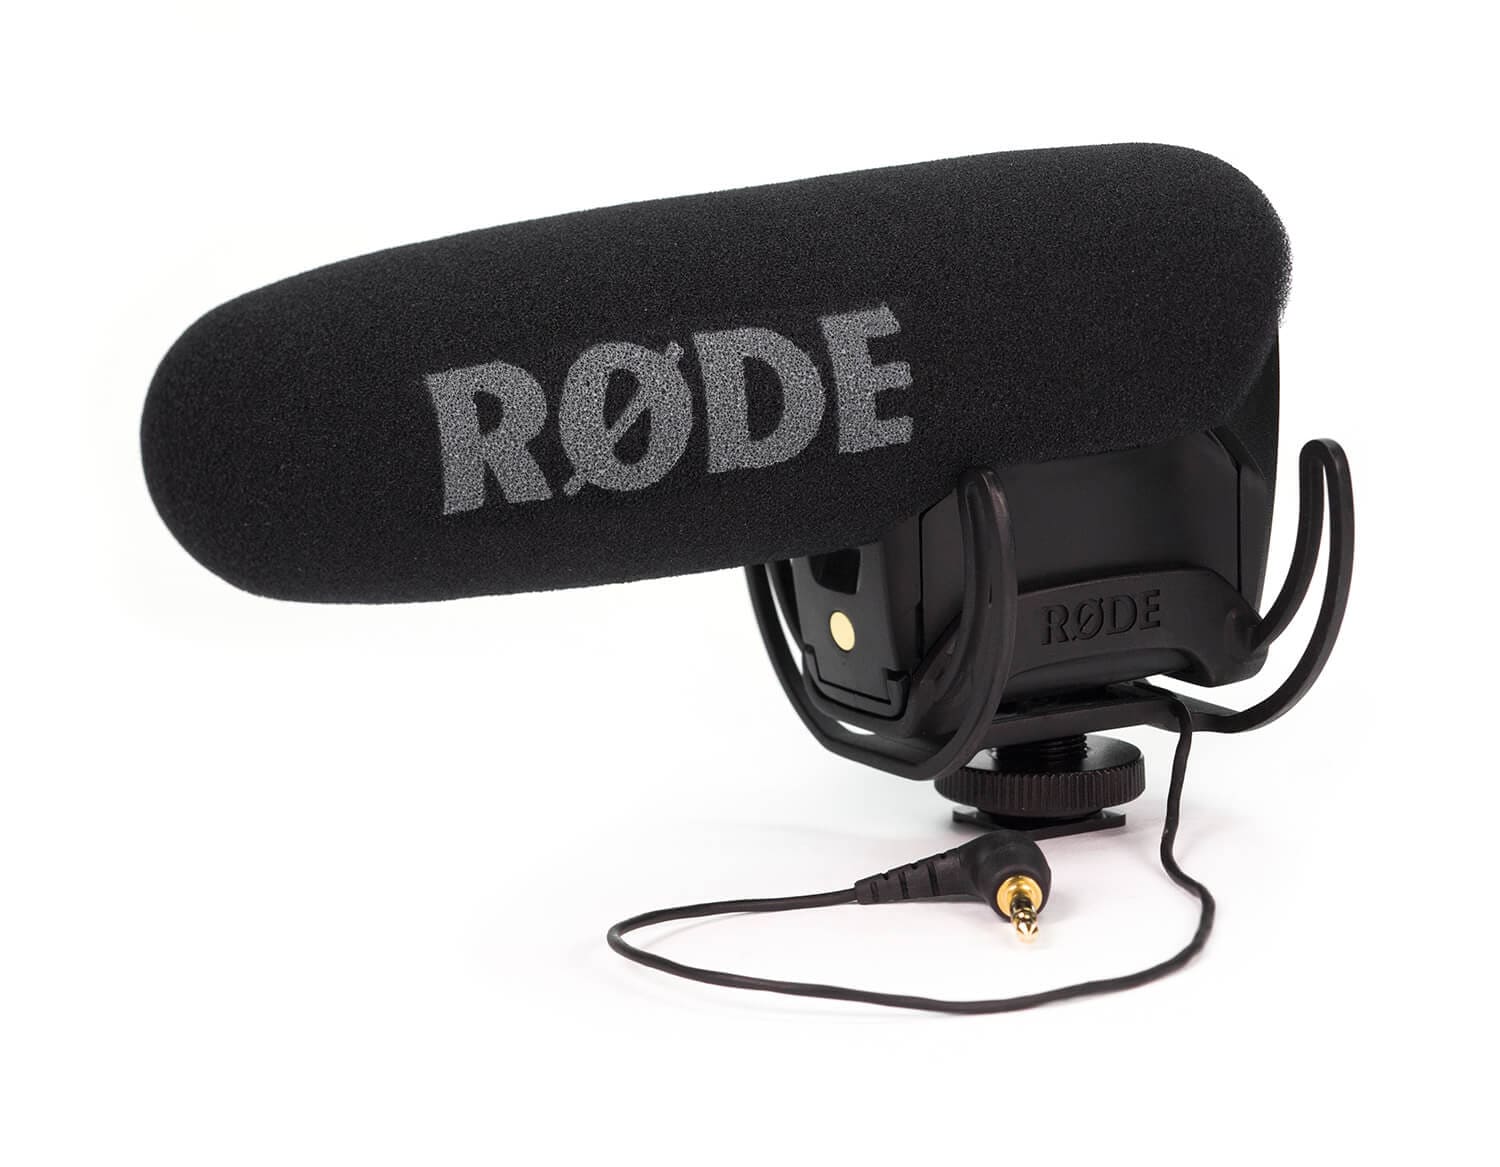
2. RØDE Video Shotgun Mic - $140
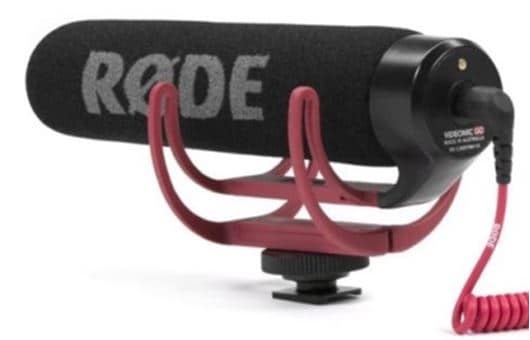
The Shotgun attaches to your DSLR camera and is great for capturing specific sounds, like dialogue, without a lot of background noise. To work well it needs to be pointing at the person who is speaking, and it should be fairly close to them as well. This means that the camera cannot be too far back from you while you vlog.
3. Audio-Technica AT875R Line + Gradient Condenser Microphone - $240
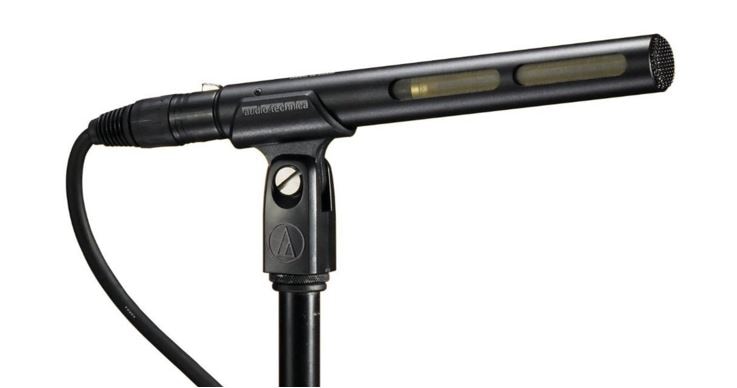
This microphone is similar to the ones you think of being mounted on boom poles on professional sets, and it can easily be mounted onto a pole and used the same way. This gradient condenser mic is good at picking up sound at a distance, and at only picking up sound coming from directly in front of it. If you are working alone then you can set this mic up on a stand so it is pointing at you, or if you have a friend to help you you can ask them to hold it on a boom pole.
4. Sony LAV Wireless Mic System - $600
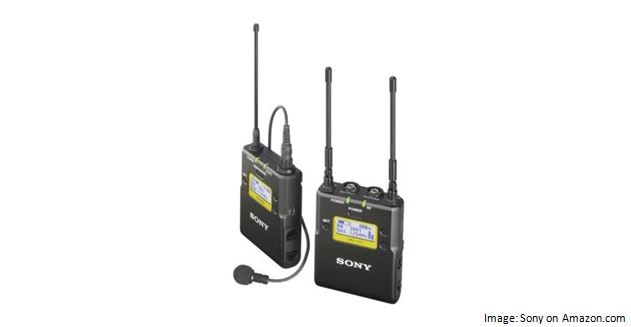
A LAV Mic, also called a lavalier or lapel mic, is a small microphone which can be clipped onto clothing. Wearing a LAV Mic while you vlog will allow you to move around freely and still capture great audio, rather than being stuck in range of a stationary mic. There are both wired and wireless options available in LAV Mics.
5. Roland R-05 WAVE/MP3 Recorder - $200
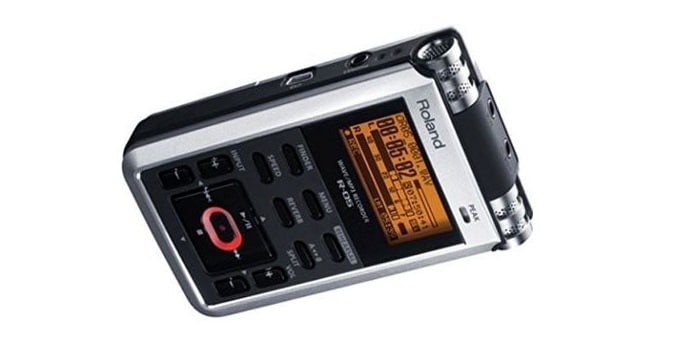
The R-05 is a pocket recorder that captures flawless audio. Its small size means you can hide it in your pocket and it will not show up in your video. Also, since it does not need to hook up to your camera or computer you will have freedom of movement.
Part 2: Best Microphones for All Types of YouTube Creators
If you have to invest in a new piece of equipment for your YouTube channel, consider upgrading your microphones. Your viewers can forgive your grainy video footage, poor lighting, and unsteady camera handling, but if your audio sounds like you’re speaking across the road on a busy highway, all your hard work will be wasted, because nobody will want to watch it.
But the thing about microphones is that they are not all created equal. Depending on the type of videos you’re filming and the environment where you’re recording, the capabilities of the microphone will differ.
1. Best Microphone for Live Streamers and Gamers
Blue Yeti USB - $150
As a live streamer, gamer, or vlogger such as beauty or lifestyle, you’ll want a balance of easy setup and high-quality audio. The Blue Yeti USB delivers on that.
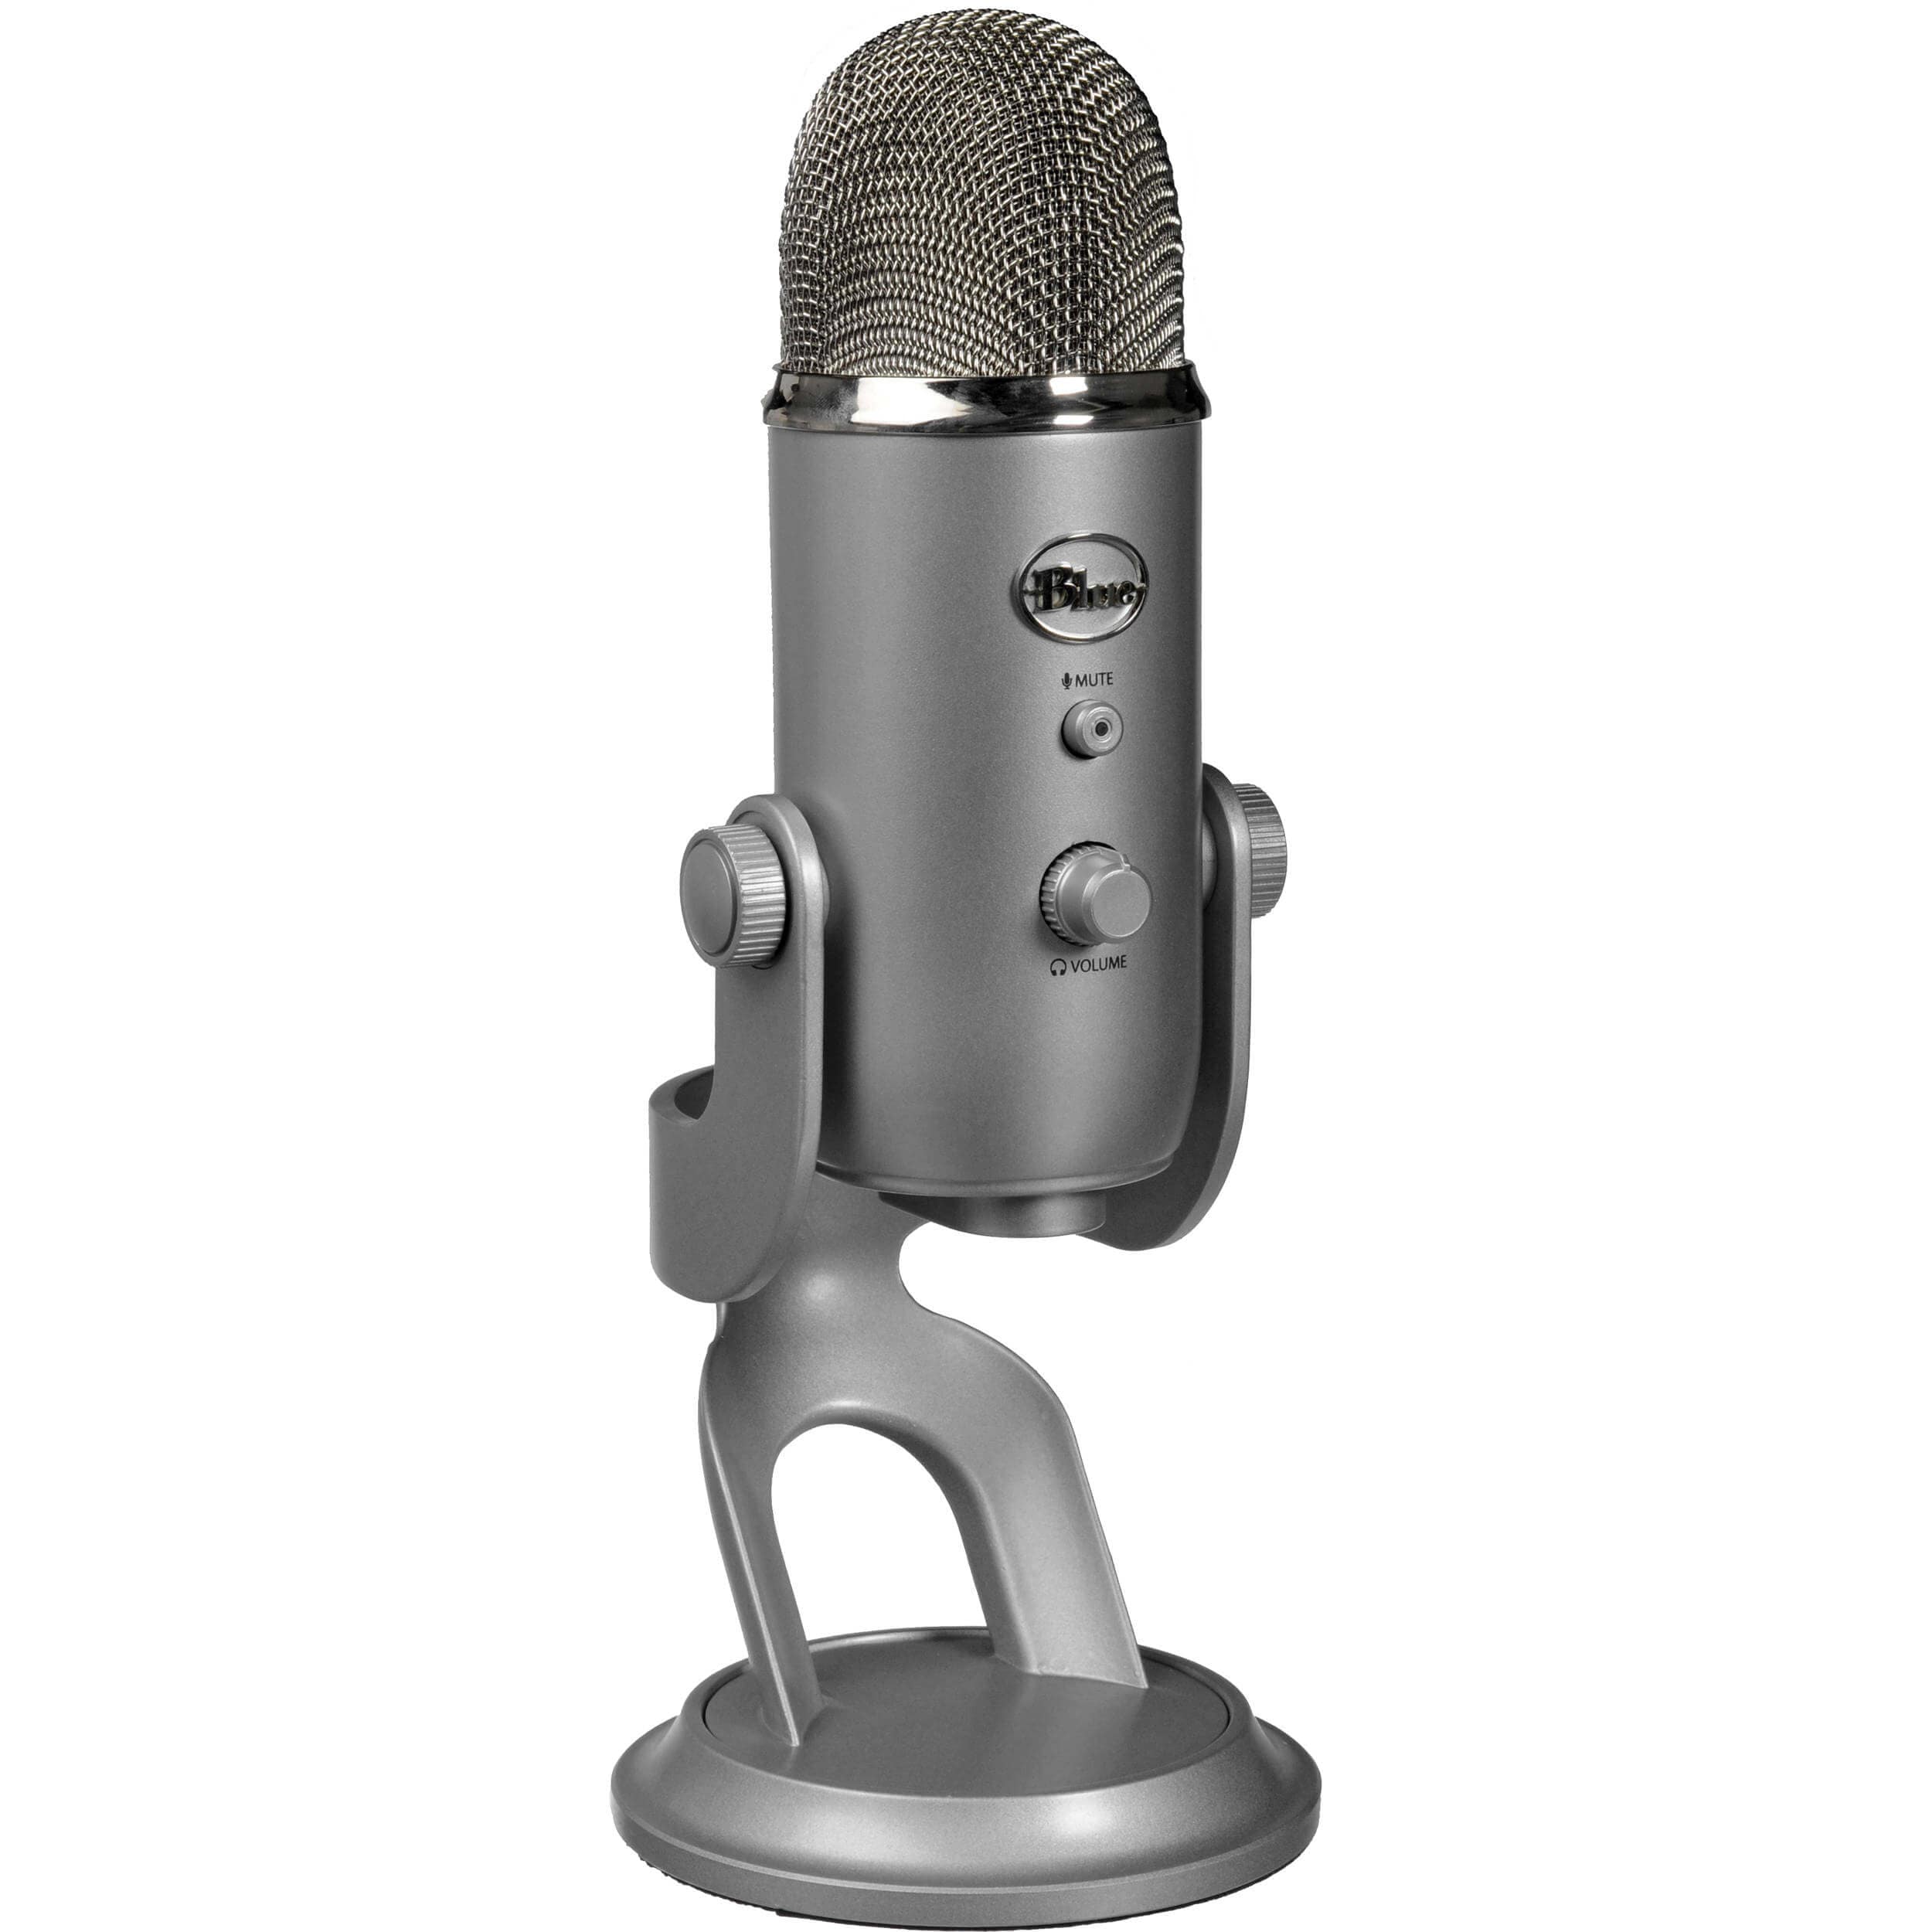
It’s the closest budget microphone to a professional studio mic on the market, and it feels that way when you hold its solid metal frame for the first time. Connecting directly to your computer via USB, the Blue Yeti comes with a 6-feet long USB cable. Out of the box, it sits upon a sturdy stand, which can be removed and the mic can be threaded a shock mount.
The Blue Yeti can pick up audio in four different polar patterns: cardioid, bidirectional, omnidirectional, and stereo. This makes it incredibly versatile, but if you are streaming, I recommend keeping it on cardioid.
Tip: In cardioid mode, speak into the front of the mic, not the top of it.
2. Best Microphones for Outdoor Locations
Rode VideoMic Pro Compact VMP Shotgun Microphone - $268
When you are filming outside, you are dealing with audio from all different directions: distant traffic, a gust of wind, the neighbor’s kids, etc.
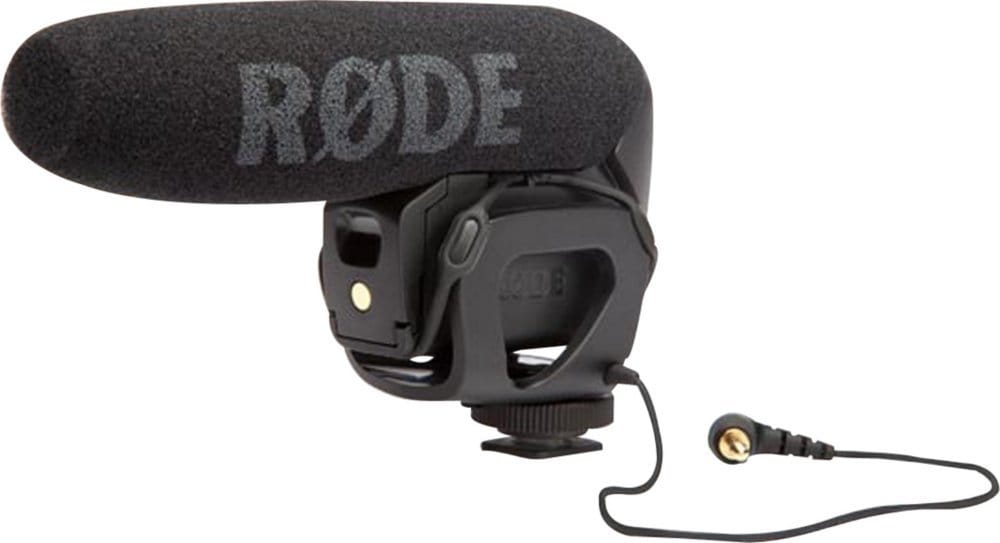
That’s why a shotgun mic is better than an omnidirectional one for outdoor situations. Shotgun microphones, such as the Rode VideoMic Pro, picks up audio only in the direction it’s pointing in. You can aim it at your subject and it will give you clear audio without a lot of background noises.
The Rode VideoMic Pro comes with a mount that attaches on top of your camera, if you are filming outdoors. So if you are holding the camera and vlogging, then the audio will be great. However, if you want to take advantage of the space, and set the camera further away, you should attach the mic on a boom or a stand to get the best audio.
Tip: With Rode VideoMic Pro, and any mic you use to shoot outdoors, always do a sound check to make sure the quality is up to standard. Ten seconds of your subject talking at the level they will be speaking in will be enough to judge the sound quality.
3. Best Microphone for Music (Vocals)
Audio-Technica AT2035 - $163
If you are a serious musician on YouTube, then you will need a serious microphone like the Audio-Technica AT2035. This microphone connects via an XLR cable and requires phantom power, so you will need to invest in an audio interface, if you don’t already have one.
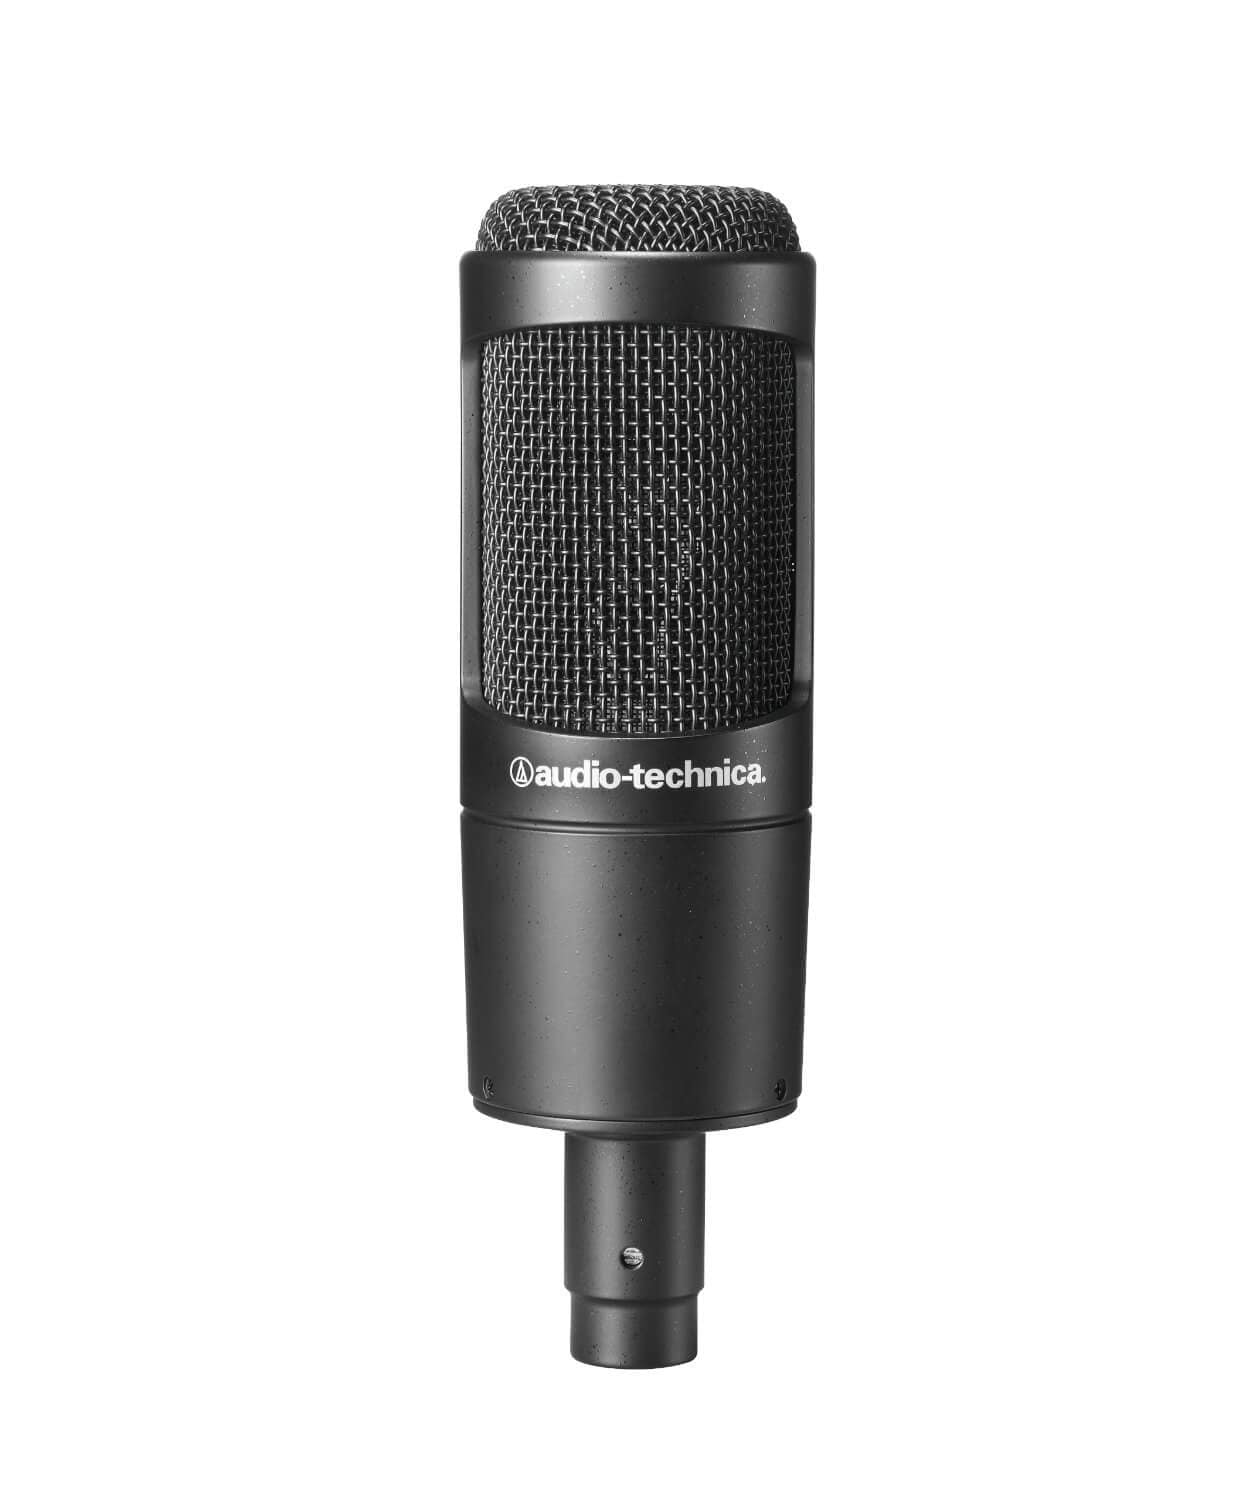
Nevertheless, this microphone does a fantastic job isolating the source of sound and eliminating background noise. Even if you’re recording in your bedroom, and not a professional studio, you’ll still get high quality vocals from this microphone.
Tip : Position yourself 8-12 inches away from the mic when singing. This allows your voice to sound more natural (too close and it’ll sound bassy) and it prevents the audio volume from fluctuating too dramatically as you move around or sing loudly one part and quietly at another.
4. Best Microphone for Voice Over
Rode NTK Tube Condenser Microphone - $529
The Rode NTK Tube is arguably one of the best microphone for its price. You can spend a thousand dollars and get a professional studio microphone, but you can’t do much better than the Rode NTK.
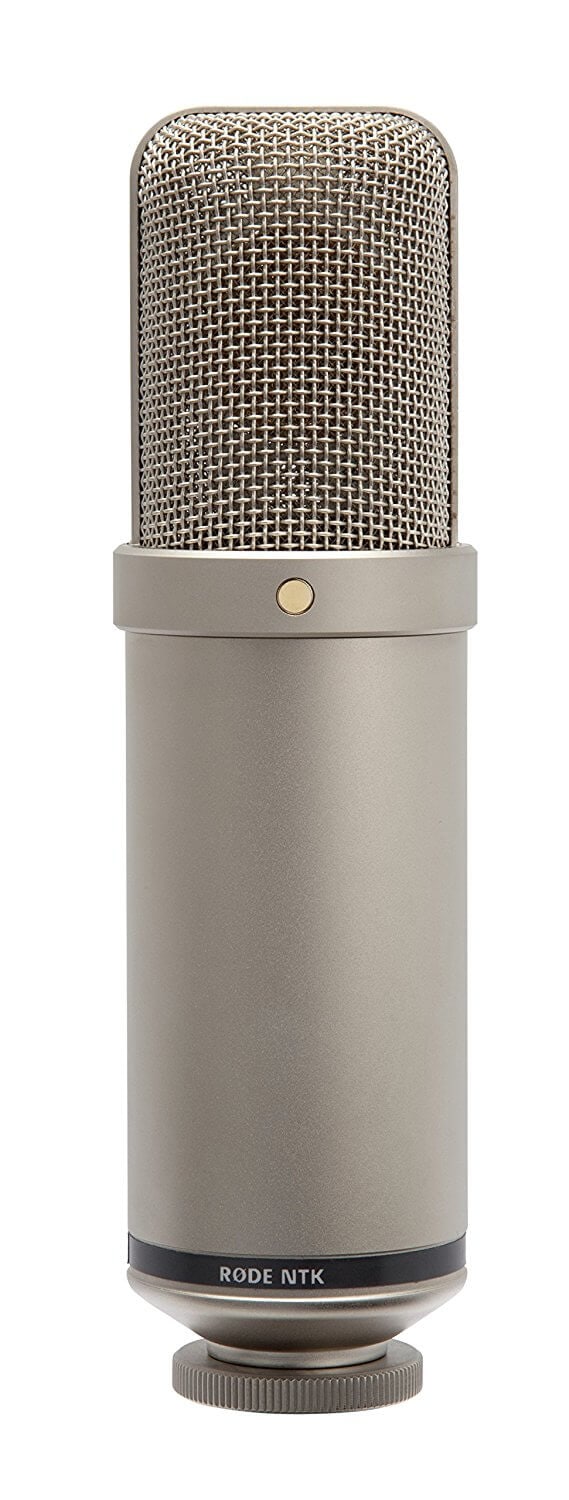
If you’re recording out of a studio environment, whether it’s a professional, semi-professional, or a closet with soft padded walls, the Rode NTK will give warmth and richness to every word you speak, while still offering crispness. Allow it to warm up for a few minutes before you start recording, and you’ll have awesome audio for your voice over.
This mic is great for YouTubers who are creating video essays, ADR, animated videos, or other videos that require top quality narrations.
Tip: Make sure you have a mic stand that you can raise to your standing height. Standing while recording voice over allows you diaphragm to open up, which will improve the quality of your voice.
5. Best Microphone for Big Echoey Space
Sennheiser MD 421 II Cardioid Dynamic Mic - $449
Commonly used to record isolated percussions or brass instruments, the Sennheiser MD 421 II is also wonderful if you need to record vocals in a large room. As a versatile dynamic mic, it doesn’t allow background noises or reverberations to bleed into the source vocal.
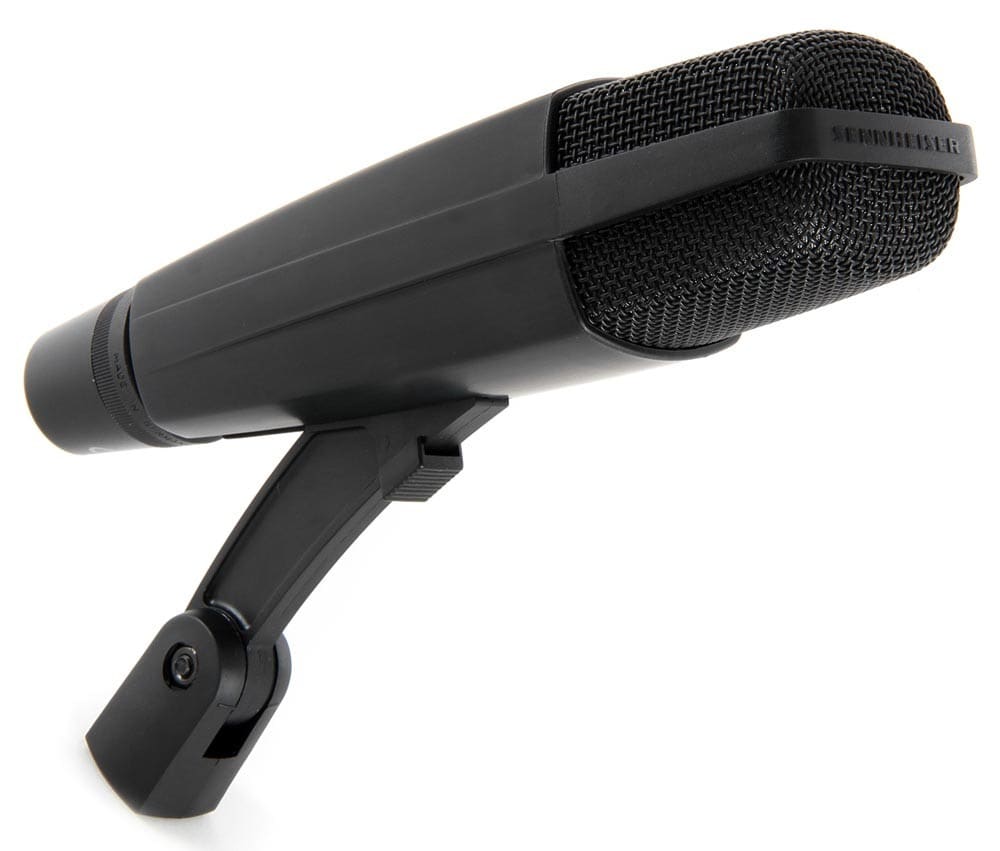
The Sennheiser MD 421 II has a rugged design as it’s built for live situations, such as concerts. This is a great microphone to have in your arsenal, should you end up recording in a large venue such as a conference or an arena.
If you are a YouTuber who makes a lot of video in warehouses, workshops, or rehearsal halls, then you should consider investing in a Sennheiser MD 421 II to get the most out of these acoustically complicated locations.
Tip : Sometimes audio in a loud, big environment can’t be saved by the best microphone. If that’s the case, film the source of the background noise. Get b-roll of people walking around, machinery operating, or whatever challenging sound you are dealing with in the large space. Cutting to these noise makers will give the audience a reference for the background noise, which helps conceal it.
6. Best Handheld Microphone for Interviews
Zoom ZH1 H1 Handy Portable Digital Recorder - $68.99
This unidirectional microphone delivers clear and crisp audio. Compact, portable, and lightweight, the Zoom ZH1 H1 is a terrific choice for YouTubers who are looking for a handheld option for a microphone.
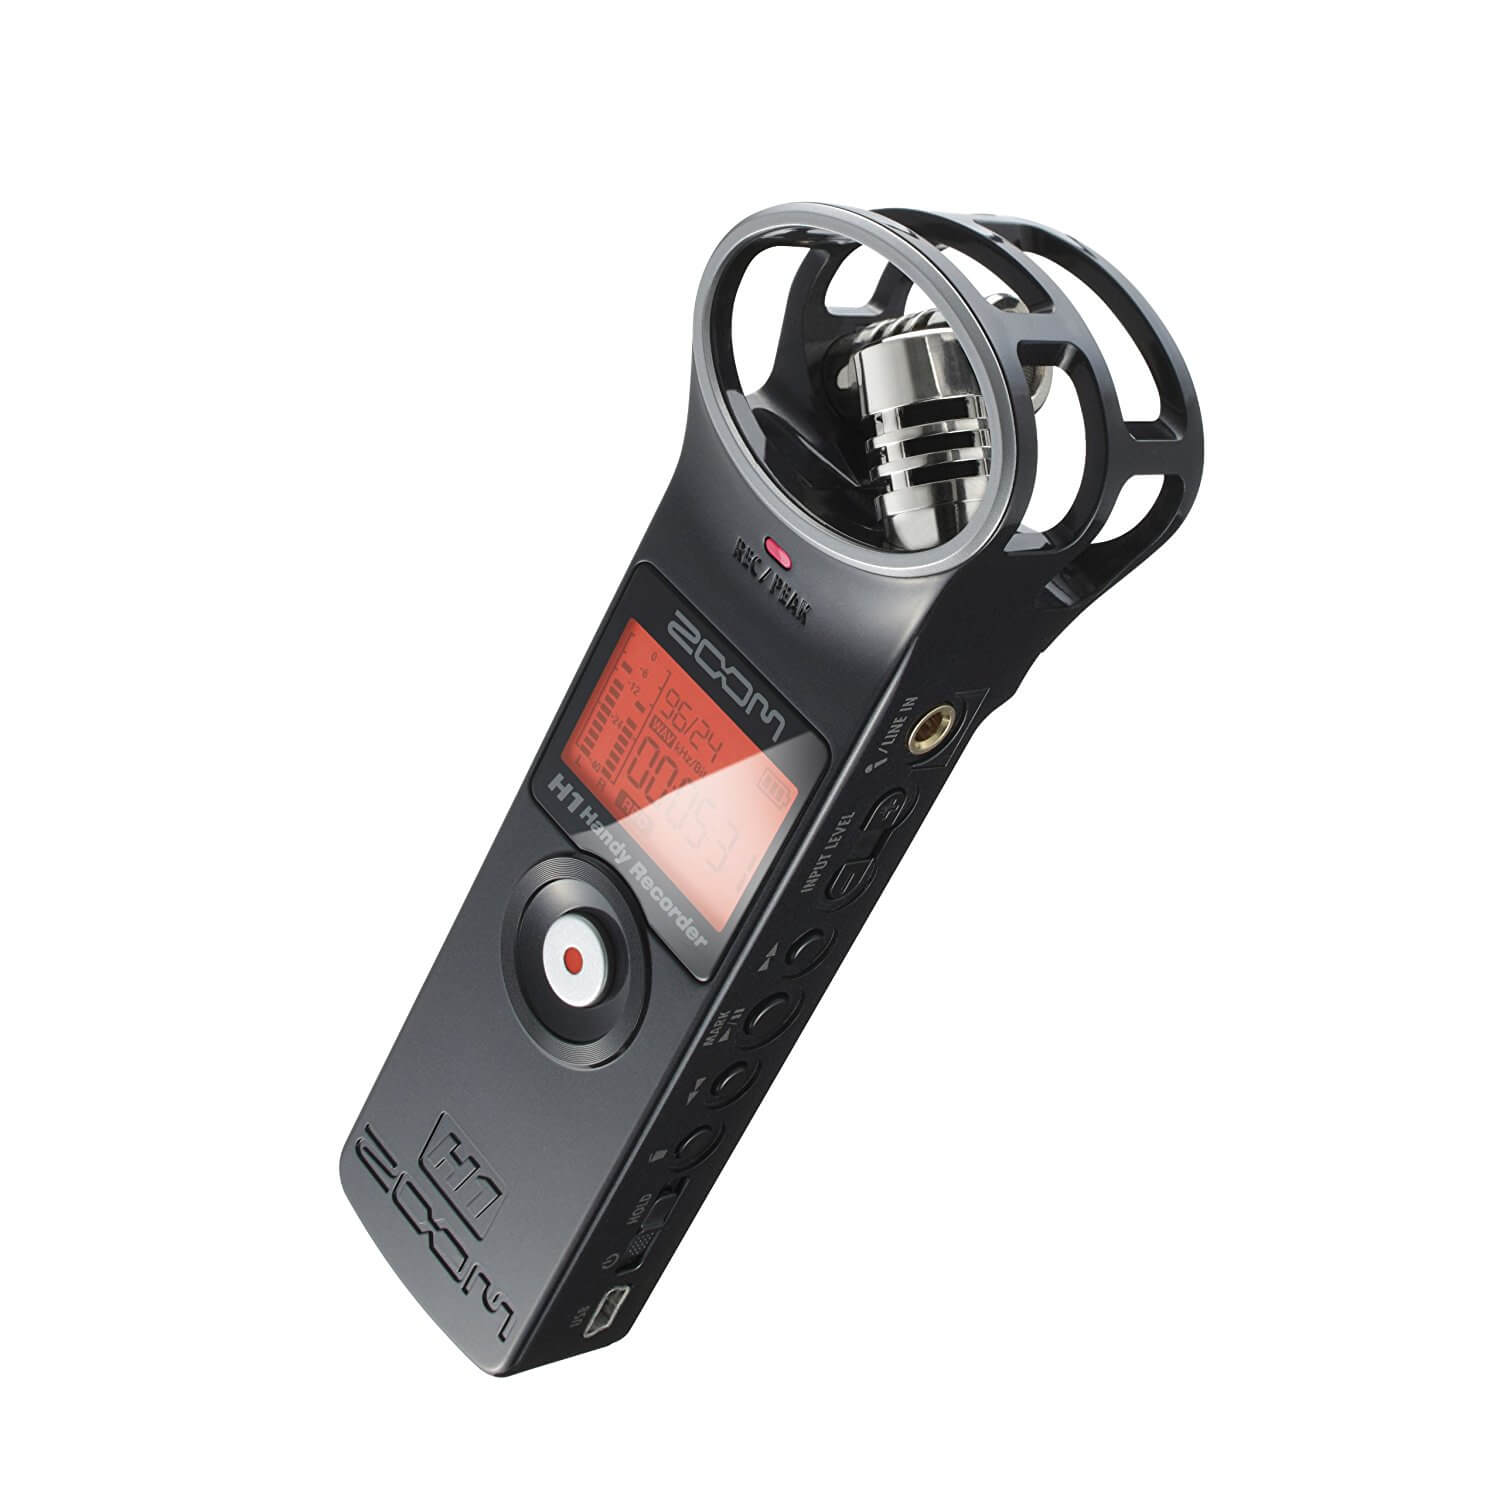
As a YouTuber, you may not have a crew to help you wrangle cable or a team member to help you monitor your audio levels, that is what makes Zoom ZH1 H1 a solid choice, as it is wireless and you can check the levels right in the palm of your hands as you record and even hear playback on the device.
The only thing that might slow you down, is that the audio will be captured directly onto the device, which means that you will need to sync up your audio to video afterward.
Tip : Before you start your interview, hit record on video and audio and then clap on camera, causing the audio to spike and giving you a video reference. This will give you a clear mark for syncing up, the sound of the clap and your hands coming together on camera.
7. Best Microphone for Action and Fitness
Rode VMPR VideoMic Pro R with Rycote Lyre Shockmount - $214.90
If you’re a YouTuber who films a lot of action shots or fitness videos, where you, your camera and your microphone are in motion, then I recommend the Rode VMPR VideoMic Pro R with Rycote Lyre Shockmount.
The Rode VMRP VideoMic Pro is a shotgun microphone that can focus on your subject in front of the camera with a low self-noise. This is excellent when you’re filming action shots, because you can always direct your mic at what you want to record knowing you won’t capture too much from other angles.
The Rycote Lyre shock mount eliminates any external audio that can be caused by movements to the microphone and camera. The shock mount is made of an elastic solution, so it’s incredibly durable.
Tip : For a greater range, the Rode VMRP Video Mic Pro can be mounted onto a boom pole, should the subject need to move around within the shot or if the camera needs to move away from the subject.
8. Best Waterproof Microphone
Sennheiser MKE 2 elements - Action Mic for the GoPro HERO4 - $200
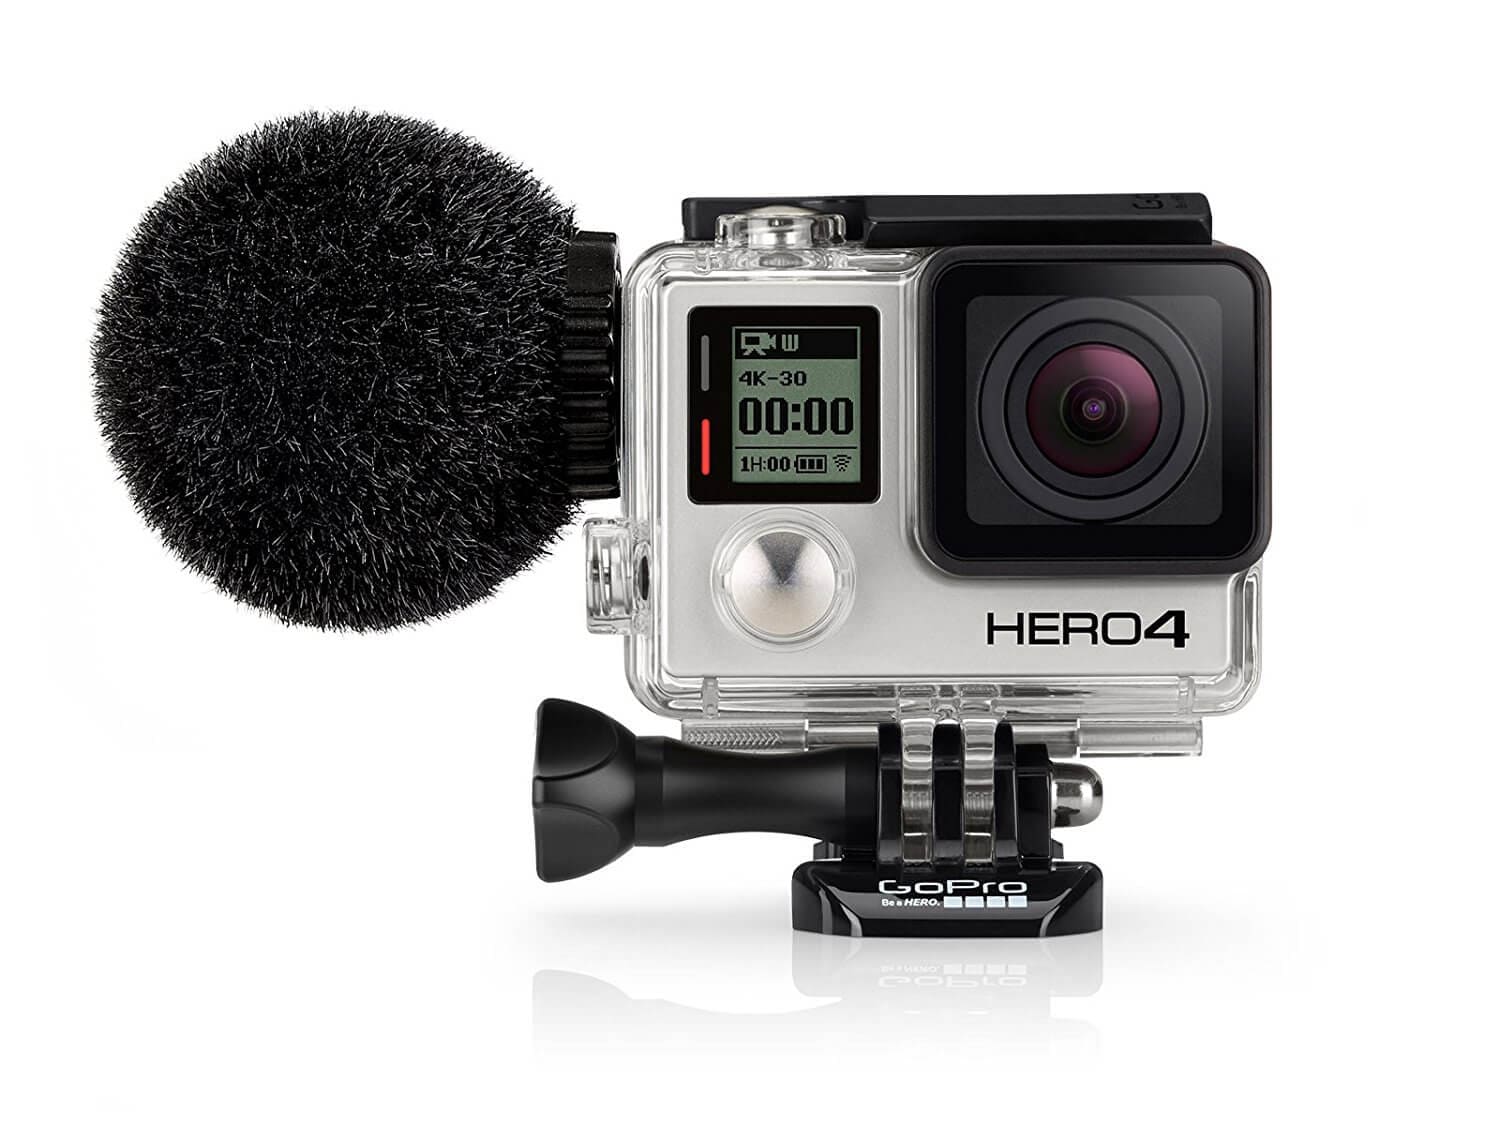
In or around water, nothing can ruin a day of shooting faster than getting your equipment wet. If you’re using GoPro Hero4 for shooting all your intense water shots, you would be familiar with the awful audio you capture when the camera is inside the waterproof casing.
Lucky for you, Sennheiser has developed a waterproof microphone, the MKE 2 elements. This little furry ball that connects to your GoPro Hero4 can withstand up to 1 meter of water. Because underwater sound is captured differently (via a hydrophone ), the Sennheiser MKE 2 elements can’t actually record audio underwater, however, it’ll be ready to keep recording quality audio once it resurfaces.
Tip: Double check to make sure that the mic cable is not blocking the seal of the waterproof case of the camera before launching it into the water.
Different situations call for different equipment. This is the true for tradespeople, golfers, and YouTubers. If you want to get the best audio, it’s more than simply buying the most expensive one, you’ll also need to find the microphone most suited for that situation.
I hope this post helped you improve your audio quality. If you are having challenges finding a good microphone for a particular scenario, let us know in the comments below!
Part 3: 10 Tips for Recording YouTube Audio [Video Tutorial]
After picking up the best microphone based on your need, you can record your audio now. But wait, here are 10 tips for using the microphones to record better audio for your YouTube video. In case that you are in a hurry, we have summarized the following tips for a quick look.
- Silence everything you don’t want your mic to record.
- Put your mobile phone in airplane mode.
- Minimize echo.
- Block wind from reaching your mic.
- Upgrade your mic.
- Adjust your levels.
- Start with a sound cue if you’re planning to do some syncing in post.
- Get close to the sound.
- ADR.
- Record Ambient Sound.
 Download Mac Version ](https://tools.techidaily.com/wondershare/filmora/download/ )
Part 4: How to Sync your Audio in Filmora
Both the LAV Mics and the R-05 will create separate audio clips which you will need to sync up with your video when you are finished recording.
Note: when you start recording, clap two or three times. This will create distinct and visible audio spikes for you to look for when you sync the audio with video.
1. Import Video and Audio Files
Once you have finished recording and have opened up Filmora Video Editor , import your video and drag and drop it into your timeline. The audio recorded with the built in camera mic is already lined with your video clip and your audio and video will both automatically share the video track.
Now import the audio from your external microphone and drag and drop it to your audio track. The audio track is initially hidden, but it will appear when you pull an audio file into the timeline.
Download Mac Version ](https://tools.techidaily.com/wondershare/filmora/download/ )
2.Detach Default Audio from Video
Since you have recorded a separate audio file, you should detach the original audio recorded with the built-in camera mic from the video. To do this, just right click the video clip in the timeline and select Audio Detach from the drop down menu.

3.Align Spikes in Video Audio and Recorded Audio
Find the spikes that represent your clapping in both audio tracks. Then, adjust your external audio so its clapping patterns are in line with those in your camera’s audio track. You can magnify your timeline for a better control.
Once your external audio is synced to your camera’s audio it will also be synced to your video. You no longer need your camera’s audio and can delete it.
Watch the video below to check more features about Filmora.

Richard Bennett
Richard Bennett is a writer and a lover of all things video.
Follow @Richard Bennett
Richard Bennett
Mar 27, 2024• Proven solutions
If you want your viewers to be glued to their screens then quality audio is just as important as quality video for your YouTube channel. People will watch your vlog because they want to hear what you are saying. It can be tempting to use the audio your camera records rather than buy a separate microphone. Unfortunately, the microphones built into most cameras will only record mediocre audio. In this case, we have researched and found out the following best microphones for YouTube videos based on its price and performance. Besides, we will also highlight the best microphones for different recording scenarios. Whether you’re making gaming videos or recording yourself singing, or filming inside or outside, you will get to know which one is best for your situation. Let’s check out now.
- Best Microphones for YouTube Videos
- Best Microphones for Different Types of YouTube Creators
- Tips for Recording YouTube Audio
- How to Sync your Audio in Filmora
Part 1: Best Microphones for YouTube Videos [Best for All]
Here are examples of some of the best external microphones for YouTube:
1. Blue Snowball USB Mic - $60
The Snowball is especially good for vlogging from your webcam because it is easy to hook up to your computer using a USB port. It will record your audio simultaneously while you are using your webcam. The biggest drawback of the Snowball is that it needs to be close to you while your record. This combined with its larger size means that it will probably need to be in your shot.
2. RØDE Video Shotgun Mic - $140
The Shotgun attaches to your DSLR camera and is great for capturing specific sounds, like dialogue, without a lot of background noise. To work well it needs to be pointing at the person who is speaking, and it should be fairly close to them as well. This means that the camera cannot be too far back from you while you vlog.
3. Audio-Technica AT875R Line + Gradient Condenser Microphone - $240
This microphone is similar to the ones you think of being mounted on boom poles on professional sets, and it can easily be mounted onto a pole and used the same way. This gradient condenser mic is good at picking up sound at a distance, and at only picking up sound coming from directly in front of it. If you are working alone then you can set this mic up on a stand so it is pointing at you, or if you have a friend to help you you can ask them to hold it on a boom pole.
4. Sony LAV Wireless Mic System - $600
A LAV Mic, also called a lavalier or lapel mic, is a small microphone which can be clipped onto clothing. Wearing a LAV Mic while you vlog will allow you to move around freely and still capture great audio, rather than being stuck in range of a stationary mic. There are both wired and wireless options available in LAV Mics.
5. Roland R-05 WAVE/MP3 Recorder - $200
The R-05 is a pocket recorder that captures flawless audio. Its small size means you can hide it in your pocket and it will not show up in your video. Also, since it does not need to hook up to your camera or computer you will have freedom of movement.
Part 2: Best Microphones for All Types of YouTube Creators
If you have to invest in a new piece of equipment for your YouTube channel, consider upgrading your microphones. Your viewers can forgive your grainy video footage, poor lighting, and unsteady camera handling, but if your audio sounds like you’re speaking across the road on a busy highway, all your hard work will be wasted, because nobody will want to watch it.
But the thing about microphones is that they are not all created equal. Depending on the type of videos you’re filming and the environment where you’re recording, the capabilities of the microphone will differ.
1. Best Microphone for Live Streamers and Gamers
Blue Yeti USB - $150
As a live streamer, gamer, or vlogger such as beauty or lifestyle, you’ll want a balance of easy setup and high-quality audio. The Blue Yeti USB delivers on that.
It’s the closest budget microphone to a professional studio mic on the market, and it feels that way when you hold its solid metal frame for the first time. Connecting directly to your computer via USB, the Blue Yeti comes with a 6-feet long USB cable. Out of the box, it sits upon a sturdy stand, which can be removed and the mic can be threaded a shock mount.
The Blue Yeti can pick up audio in four different polar patterns: cardioid, bidirectional, omnidirectional, and stereo. This makes it incredibly versatile, but if you are streaming, I recommend keeping it on cardioid.
Tip: In cardioid mode, speak into the front of the mic, not the top of it.
2. Best Microphones for Outdoor Locations
Rode VideoMic Pro Compact VMP Shotgun Microphone - $268
When you are filming outside, you are dealing with audio from all different directions: distant traffic, a gust of wind, the neighbor’s kids, etc.
That’s why a shotgun mic is better than an omnidirectional one for outdoor situations. Shotgun microphones, such as the Rode VideoMic Pro, picks up audio only in the direction it’s pointing in. You can aim it at your subject and it will give you clear audio without a lot of background noises.
The Rode VideoMic Pro comes with a mount that attaches on top of your camera, if you are filming outdoors. So if you are holding the camera and vlogging, then the audio will be great. However, if you want to take advantage of the space, and set the camera further away, you should attach the mic on a boom or a stand to get the best audio.
Tip: With Rode VideoMic Pro, and any mic you use to shoot outdoors, always do a sound check to make sure the quality is up to standard. Ten seconds of your subject talking at the level they will be speaking in will be enough to judge the sound quality.
3. Best Microphone for Music (Vocals)
Audio-Technica AT2035 - $163
If you are a serious musician on YouTube, then you will need a serious microphone like the Audio-Technica AT2035. This microphone connects via an XLR cable and requires phantom power, so you will need to invest in an audio interface, if you don’t already have one.
Nevertheless, this microphone does a fantastic job isolating the source of sound and eliminating background noise. Even if you’re recording in your bedroom, and not a professional studio, you’ll still get high quality vocals from this microphone.
Tip : Position yourself 8-12 inches away from the mic when singing. This allows your voice to sound more natural (too close and it’ll sound bassy) and it prevents the audio volume from fluctuating too dramatically as you move around or sing loudly one part and quietly at another.
4. Best Microphone for Voice Over
Rode NTK Tube Condenser Microphone - $529
The Rode NTK Tube is arguably one of the best microphone for its price. You can spend a thousand dollars and get a professional studio microphone, but you can’t do much better than the Rode NTK.
If you’re recording out of a studio environment, whether it’s a professional, semi-professional, or a closet with soft padded walls, the Rode NTK will give warmth and richness to every word you speak, while still offering crispness. Allow it to warm up for a few minutes before you start recording, and you’ll have awesome audio for your voice over.
This mic is great for YouTubers who are creating video essays, ADR, animated videos, or other videos that require top quality narrations.
Tip: Make sure you have a mic stand that you can raise to your standing height. Standing while recording voice over allows you diaphragm to open up, which will improve the quality of your voice.
5. Best Microphone for Big Echoey Space
Sennheiser MD 421 II Cardioid Dynamic Mic - $449
Commonly used to record isolated percussions or brass instruments, the Sennheiser MD 421 II is also wonderful if you need to record vocals in a large room. As a versatile dynamic mic, it doesn’t allow background noises or reverberations to bleed into the source vocal.
The Sennheiser MD 421 II has a rugged design as it’s built for live situations, such as concerts. This is a great microphone to have in your arsenal, should you end up recording in a large venue such as a conference or an arena.
If you are a YouTuber who makes a lot of video in warehouses, workshops, or rehearsal halls, then you should consider investing in a Sennheiser MD 421 II to get the most out of these acoustically complicated locations.
Tip : Sometimes audio in a loud, big environment can’t be saved by the best microphone. If that’s the case, film the source of the background noise. Get b-roll of people walking around, machinery operating, or whatever challenging sound you are dealing with in the large space. Cutting to these noise makers will give the audience a reference for the background noise, which helps conceal it.
6. Best Handheld Microphone for Interviews
Zoom ZH1 H1 Handy Portable Digital Recorder - $68.99
This unidirectional microphone delivers clear and crisp audio. Compact, portable, and lightweight, the Zoom ZH1 H1 is a terrific choice for YouTubers who are looking for a handheld option for a microphone.
As a YouTuber, you may not have a crew to help you wrangle cable or a team member to help you monitor your audio levels, that is what makes Zoom ZH1 H1 a solid choice, as it is wireless and you can check the levels right in the palm of your hands as you record and even hear playback on the device.
The only thing that might slow you down, is that the audio will be captured directly onto the device, which means that you will need to sync up your audio to video afterward.
Tip : Before you start your interview, hit record on video and audio and then clap on camera, causing the audio to spike and giving you a video reference. This will give you a clear mark for syncing up, the sound of the clap and your hands coming together on camera.
7. Best Microphone for Action and Fitness
Rode VMPR VideoMic Pro R with Rycote Lyre Shockmount - $214.90
If you’re a YouTuber who films a lot of action shots or fitness videos, where you, your camera and your microphone are in motion, then I recommend the Rode VMPR VideoMic Pro R with Rycote Lyre Shockmount.
The Rode VMRP VideoMic Pro is a shotgun microphone that can focus on your subject in front of the camera with a low self-noise. This is excellent when you’re filming action shots, because you can always direct your mic at what you want to record knowing you won’t capture too much from other angles.
The Rycote Lyre shock mount eliminates any external audio that can be caused by movements to the microphone and camera. The shock mount is made of an elastic solution, so it’s incredibly durable.
Tip : For a greater range, the Rode VMRP Video Mic Pro can be mounted onto a boom pole, should the subject need to move around within the shot or if the camera needs to move away from the subject.
8. Best Waterproof Microphone
Sennheiser MKE 2 elements - Action Mic for the GoPro HERO4 - $200
In or around water, nothing can ruin a day of shooting faster than getting your equipment wet. If you’re using GoPro Hero4 for shooting all your intense water shots, you would be familiar with the awful audio you capture when the camera is inside the waterproof casing.
Lucky for you, Sennheiser has developed a waterproof microphone, the MKE 2 elements. This little furry ball that connects to your GoPro Hero4 can withstand up to 1 meter of water. Because underwater sound is captured differently (via a hydrophone ), the Sennheiser MKE 2 elements can’t actually record audio underwater, however, it’ll be ready to keep recording quality audio once it resurfaces.
Tip: Double check to make sure that the mic cable is not blocking the seal of the waterproof case of the camera before launching it into the water.
Different situations call for different equipment. This is the true for tradespeople, golfers, and YouTubers. If you want to get the best audio, it’s more than simply buying the most expensive one, you’ll also need to find the microphone most suited for that situation.
I hope this post helped you improve your audio quality. If you are having challenges finding a good microphone for a particular scenario, let us know in the comments below!
Part 3: 10 Tips for Recording YouTube Audio [Video Tutorial]
After picking up the best microphone based on your need, you can record your audio now. But wait, here are 10 tips for using the microphones to record better audio for your YouTube video. In case that you are in a hurry, we have summarized the following tips for a quick look.
- Silence everything you don’t want your mic to record.
- Put your mobile phone in airplane mode.
- Minimize echo.
- Block wind from reaching your mic.
- Upgrade your mic.
- Adjust your levels.
- Start with a sound cue if you’re planning to do some syncing in post.
- Get close to the sound.
- ADR.
- Record Ambient Sound.
Download Mac Version ](https://tools.techidaily.com/wondershare/filmora/download/ )
Part 4: How to Sync your Audio in Filmora
Both the LAV Mics and the R-05 will create separate audio clips which you will need to sync up with your video when you are finished recording.
Note: when you start recording, clap two or three times. This will create distinct and visible audio spikes for you to look for when you sync the audio with video.
1. Import Video and Audio Files
Once you have finished recording and have opened up Filmora Video Editor , import your video and drag and drop it into your timeline. The audio recorded with the built in camera mic is already lined with your video clip and your audio and video will both automatically share the video track.
Now import the audio from your external microphone and drag and drop it to your audio track. The audio track is initially hidden, but it will appear when you pull an audio file into the timeline.
Download Mac Version ](https://tools.techidaily.com/wondershare/filmora/download/ )
2.Detach Default Audio from Video
Since you have recorded a separate audio file, you should detach the original audio recorded with the built-in camera mic from the video. To do this, just right click the video clip in the timeline and select Audio Detach from the drop down menu.
3.Align Spikes in Video Audio and Recorded Audio
Find the spikes that represent your clapping in both audio tracks. Then, adjust your external audio so its clapping patterns are in line with those in your camera’s audio track. You can magnify your timeline for a better control.
Once your external audio is synced to your camera’s audio it will also be synced to your video. You no longer need your camera’s audio and can delete it.
Watch the video below to check more features about Filmora.
Richard Bennett
Richard Bennett is a writer and a lover of all things video.
Follow @Richard Bennett
YouTube Live Excellence: A Comprehensive Tutorial
The Ultimate Guide to YouTube Live Streaming
Richard Bennett
Mar 27, 2024• Proven solutions
Live streaming on YouTube is a great way to get more engagement from your audience, even if you do not have a huge following. As long as you have some reliable subscribers leaving comments on your videos you should be able to schedule a live stream and know it will have an audience. People feel a personal connection with their favorite vloggers so if you give your subscribers a chance to interact with you in real time they will probably plan to join in. The key to a good live streaming is to respond to comments and questions from people who are watching. Besides watching the live chat of your video you can create a hashtag for your stream and monitor it on twitter.
Table of Contents
- Why Livestream?
- Type of Content to Livestream
- What You Need to Livestream On YouTube
- 4 Ways to Setup Your Livestream On YouTube
- 8 Tips to Improve Your Livestream on YouTube
- How to Grow As A Livestreamer on YouTube
Why Livestream?
You have grown your audience, and now you want to take your channel to the next level and diversify your content.
Whether you are vlogging, gaming, or running tutorials on YouTube, there is potential to host a live broadcast. It’s not limited to any genre, you simply need to create content that people are interested in watching.
Before we get started into the How, let’s start with a few reasons Why you should be live streaming your content.
Connect and engage with your audience
When a viewer leaves a comment during a livestream you will be able to see it right away and respond. Having an instantaneous conversation with a viewer while they are watching your video will encourage more engagement and establish a ber relationship with your viewers — and you will know that these viewers are not bots.
Increase watch time and session watch time on your channel
If you are making YouTube videos on average 10 minutes long, and the viewer only watches half of it, that’s only 5 minutes of watch time, which is fine… But if you are live streaming for 45 minutes, and you are able to hold the viewer’s attention, you can surpass what your regular videos can do.
Make videos faster
As a YouTuber, you are always striving to be more efficient. Live streaming allows you to do that as you can set up and go. The content you end up creating during the duration of your livestream can then also be condensed into a highlight reel or a recap.
With a bit of planning before you go live, you can create a week’s worth of content in one go, instead of having multiple schedules for livestream content and your standard publishing videos.
Type of Content to Livestream
Live streaming has a lot of value, but what type of content should you be streaming?
Here are a few popular ideas for content that will attract viewers to your livestream:
Q&A session
Unboxing
Game or challenge
Sneak preview or review
Live events (just make sure the Internet can support it)
A demo or a tutorial
A live commentary or (if you are a gamer) Let’s Play video
What You Need to Livestream On YouTube
A Plan or Outline
It’s good to know what your livestream is going to be about before you start. Is there a key message you want to hit, an action you want your viewers to take, or a structure you want to follow.
Just because it’s live, doesn’t mean it all has to be improvised. If you go in without a plan, you might end up feeling flustered or getting stressed out. Allow for spontaneous comments or events to take you off your initial plan, but always return to your outline so you know how to wrap up your livestream when you have to.
Stable Internet Connection
You cannot conduct a quality livestream, if your Internet is bad. When evaluating your internet connection for live streaming on YouTube, look at the Upload speed. Depending on the quality of your video, these are the minimum upload speed rates your Internet will need to perform:
480p = 1.5 mbps
720p = 3 mbps
1080 = 5 mbps
In addition, be aware of external causes that may be slowing down your internet such as someone else using it, a poorly performing router, or a damaged cable.
Camera
If you have a smartphone or a laptop with a webcam built in, that is the best camera for you to get started live streaming. It’s good to have a milestone and work towards a more advanced camera, but until then, don’t feel discouraged because you don’t have expensive gear. If you have a smartphone, a laptop, or a basic webcam, that’s perfectly fine.
Microphone
You don’t need a great microphone for live streaming, you only need a good one. If you do want to spend several hundred to a thousand dollars for a professional studio microphone, nobody will stop you, but know this, a mic that is easy to use is as important as the audio quality as you develop a consistent live streaming schedule.
Streaming Software (For Higher Quality Streams)
Once upon a time, to livestream on YouTube, you needed additional software to capture content from desktop, camera, microphone, etc, called encoding software — but not anymore.
Those encoding software, such as OBS , Wirecast , and VMix , are required if you are producing content that requires a high frame rate such as gaming, but not mandatory if you are simply vlogging or running a tutorial.
If you are using Chrome, you canstream live on YouTube without using an encoder .
A Capture Card (For Higher Quality Streams)
You will need a capture card when you are capturing footage from a different PC or console. If you are a gamer and you are using one PC to stream and one PC to play your game, then you should consider getting a capture card.
4 Ways to Setup Your Livestream On YouTube
There are 4 main ways you can start live streaming on YouTube. The one that works best for you depends on the content you are going to be streaming.
1. Camera/Go Live (Chrome Browser)
By accessing www.youtube.com/webcam on the Google Chrome browser, you can start streaming immediately through your connected webcam. This way is best for a simple Q&A or letting your viewers know your thoughts in a timely situation. This method does not require an encoder.
There are 3 ways to access livestream this way:
1. Click here to connect to your YouTube channel
2. You can access it from the top menu on YouTube

3. You can access it by clicking Camera under the Live Streaming tab in your Creator Studio
2. Google Hangouts On Air (Quick)
Another way to livestream without an encoding software is by using the Google Hangouts On Air feature.
This is great if you want the feel of your livestream to be similar to a board meeting, where you can invite people, split screen, and share screen to illustrate your point.
Here’s how you can access this Google Hangouts On Air:
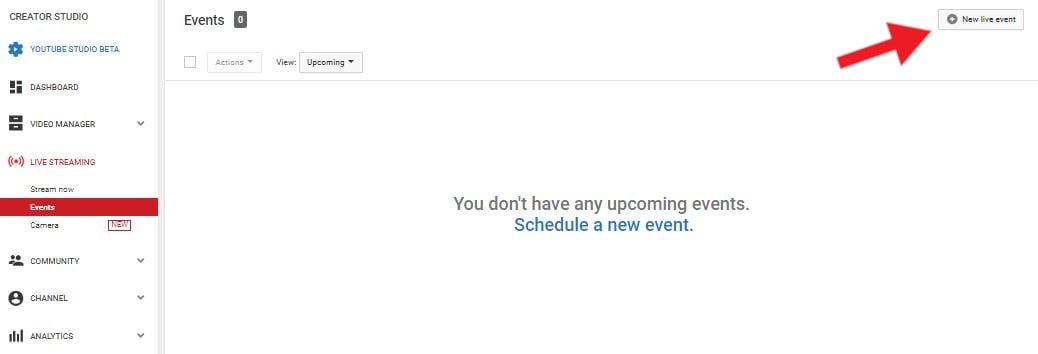
Step 1: Go to Events under the Live Streaming tab in your Creator Studio
Step 2: Click New Live Event button on the top right corner
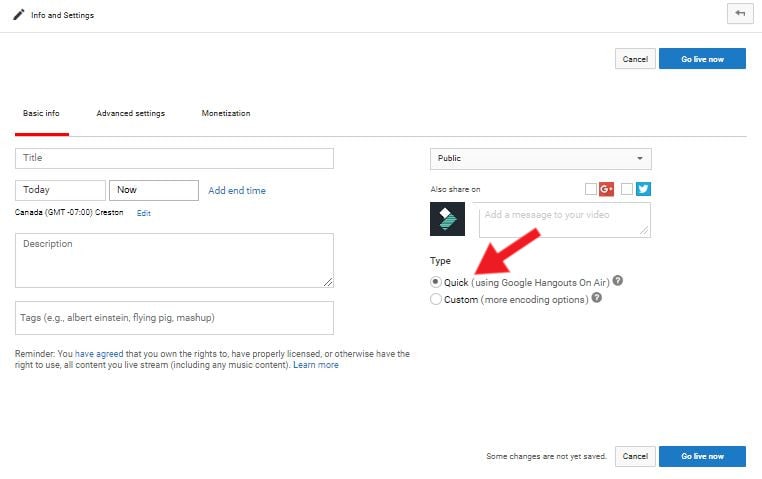
Step 3: Enter the event’s Info and Setting page. Fill out the details of your Livestream, and under Type, select Quick (using Google Hangouts On Air).
Step 4: You can schedule your livestream or Go Live immediately by clicking one of the blue buttons on the left-hand side.
3. Mobile
Live streaming via your mobile device gives you a lot more freedom to maneuver. You can walk around and give your viewers a tour — but remember to stay within the WiFi or LTE range. That means you still won’t be able to livestream well inside an elevator.
Here’s how you can livestream on mobile:
Step 1: Access the YouTube app and make sure you are signed in to the account you want to livestream from.
Step 2: At the top, click on the camera icon
Step 3: Click on Go Live
Pro Tip: When live streaming, always hold your smartphone horizontally. This allows your video to be oriented as a landscape, instead of a portrait.
4. Custom Encoder
The fourth way of live streaming on YouTube is with encoding software. This is the recommended method if video quality is essential, such as gaming videos.
Step 1: Download and install an encoding software. In this example, we’ll be using OBS .
Step 2: Open OBS
Step 3: Go to YouTube Creator Studio and enter the Stream Now page
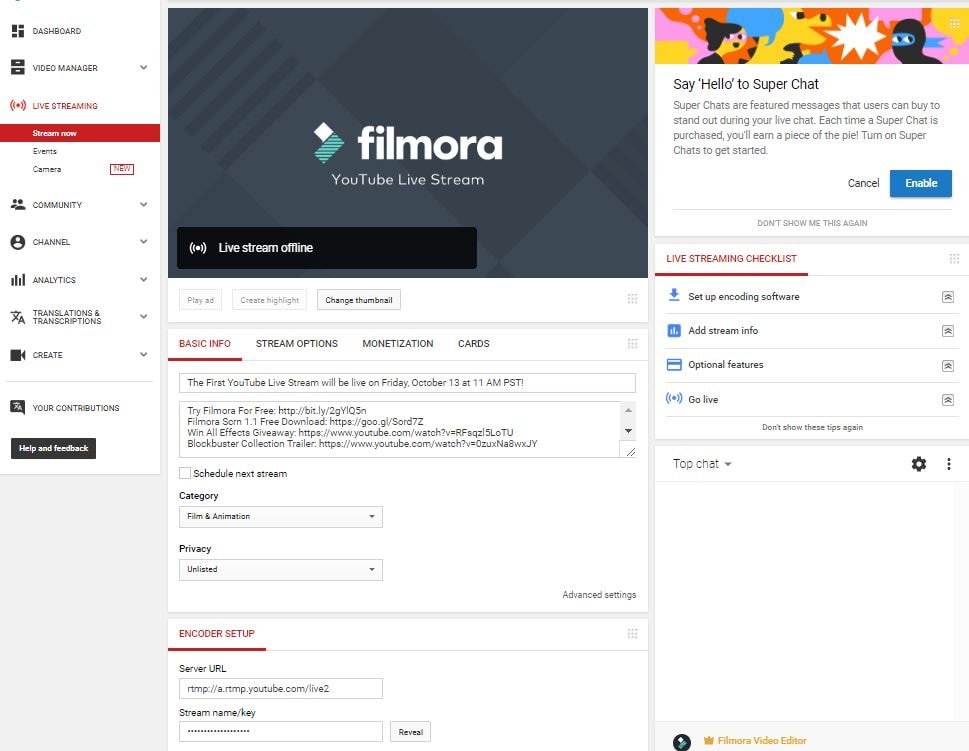
Step 4: Under Encoder Setup, copy Stream name/key (Warning: DO NOT share this key with anyone)
Step 5: Return to OBS and enter the Setting menu on the lower right-hand side of the application
Step 6: Click into the Stream tab
a) Under Stream Type, select Streaming Services
b) Under Service, select YouTube/YouTube Gaming
c) Under Server, select Primary YouTube ingest server
d) In Stream Key box, paste the Stream Key you copied from YouTube
e) Click Apply and then OK
Step 7: Plug in your webcam
Step 8: In the main OBS dashboard, under the Sources menu, click the + icon and add Video Capture Device. You should now see visuals from your Webcam.
Step 9: Select the Resolution you want for your video and click OK
Step 10: Return to your YouTube Streaming Page and fill out the details of your livestream
Step 11: Go back to OBS and click Start Streaming
Step 12: See on YouTube Streaming Page at the top that you are Live. You are officially streaming. Once You are finished streaming, return to OBS and click Stop Streaming to end the stream.
8 Tips to Improve Your Livestream on YouTube
Do Speed Test
Before you start your livestream, do a speed test of your Internet. Check out from here.
Have Good Lighting
Be aware of your surroundings when you are about to livestream. You don’t need the top-notch lighting kit, you can simply sit beside a window and allow natural lights to illuminate your stream.
Shoot A Live Test (Unlisted)
Have a technical rehearsal by doing a livestream test, then rewatching it, and evaluating the quality of the audio and visual.
You don’t have to worry about your audience logging in and seeing your test if you set the Privacy of the stream to Unlisted.
Look at the Lens, Not the Screen
If you are streaming with the selfie camera on your smartphone or using your camera’s viewfinder to make sure you are in the frame, remember that you need to be looking at the lens — not the image of yourself.
Eye contact is important in building trust, and if you are looking at yourself, it will appear as if you are looking past your viewers instead of at them.
Show It To Your Viewers
Whatever you are talking about, if you can, show it to your viewers. YouTube is a visual medium, and that means your viewers can become disinterested if there’s nothing visual holding their attention.
In the beginning, you probably won’t have a multi-camera setup, so you cannot cut away from your livestream. However, you can share the screen and you can bring physical objects into a frame.
If you are talking about your dog, show her on camera. If you’re presenting something with a lot of steps, create a Powerpoint slideshow.
Consider what visuals or props you can add to your livestream to enhance your performance.
Find A Way to Make it Evergreen
Evergreen content refers to content that is relevant for a great length of time. Talking about an event isn’t evergreen, because the event will soon pass and become old news. However, giving some tips for how to plan an event would be evergreen content.
Since your livestream will be saved on YouTube and your viewers can replay and watch it. They’re more likely to enjoy it if the content is relevant and interesting.
It Doesn’t Have to Be Long
A livestream doesn’t need to be 40 minutes long. It only needs to be long enough for you to get your story across — and if you want to answer some questions and engage with your audience. As soon as your story is over, even if it’s only 5 minutes, that’s okay. Don’t stress about the length of your stream, it’s not an endurance competition.
Allow Yourself to Make Mistakes
Another thing you shouldn’t worry about at all is making mistakes. When you are doing livestreams pretend you are engaging with someone in real life. In real life, you aren’t able to edit out your mistakes, whether it’s a word mispronounced or coffee spilling. Roll with it and laugh it off.
How to Grow As A Livestreamer on YouTube
Let People Know When You Are Streaming
Give people enough time to schedule it in, don’t spring it on them in the last minute. Share it on social media, your website, and any other means.
Create a Streaming Link 2 Days Before
Share your livestream link via social media to remind everyone to tune in when you go live. Looking for your link? It should look something like this: <www.youtube.com/user/\[channelname\]/live>
Reach Out To the Communities Most Interested
If you are going to be live streaming about a specific topic, such as photography, you should reach out to those who are interested in the topic. Highlight what aspect of photography you are going to be streaming and attract new viewers to your content.
Be Aware of Time Difference
If you have an international audience, find time to livestream where you can get the optimal amount of viewers.
You can find the location of your main demographic in your YouTube analytics .
Create a Channel Trailer to Promote Livestream
Make a video and host it as your channel trailer, that way anyone who lands on your YouTube page will see the promo for your livestream.
Promote Through Feature Content and Channel
YouTube has a feature that enables you to use your existing content to promote your upcoming livestream.
Here’s how to set it up:
Key Takeaways
- Live streaming will help you make more videos, engage with your audience, and grow your channel.
- You don’t need expensive equipment to livestream on YouTube, you only need a webcam and a microphone.
- YouTube has made live streaming as easy as a few clicks, no additional software needed unless you are gaming.
- Always do a test run of your livestream to ensure the internet, audio, and visual are all working properly.
- Create content and reach out to communities to promote your livestream.
Have you encountered any obstacles when setting up your livestream on YouTube? Let us know in the comments below, we are happy to help!
Richard Bennett
Richard Bennett is a writer and a lover of all things video.
Follow @Richard Bennett
Richard Bennett
Mar 27, 2024• Proven solutions
Live streaming on YouTube is a great way to get more engagement from your audience, even if you do not have a huge following. As long as you have some reliable subscribers leaving comments on your videos you should be able to schedule a live stream and know it will have an audience. People feel a personal connection with their favorite vloggers so if you give your subscribers a chance to interact with you in real time they will probably plan to join in. The key to a good live streaming is to respond to comments and questions from people who are watching. Besides watching the live chat of your video you can create a hashtag for your stream and monitor it on twitter.
Table of Contents
- Why Livestream?
- Type of Content to Livestream
- What You Need to Livestream On YouTube
- 4 Ways to Setup Your Livestream On YouTube
- 8 Tips to Improve Your Livestream on YouTube
- How to Grow As A Livestreamer on YouTube
Why Livestream?
You have grown your audience, and now you want to take your channel to the next level and diversify your content.
Whether you are vlogging, gaming, or running tutorials on YouTube, there is potential to host a live broadcast. It’s not limited to any genre, you simply need to create content that people are interested in watching.
Before we get started into the How, let’s start with a few reasons Why you should be live streaming your content.
Connect and engage with your audience
When a viewer leaves a comment during a livestream you will be able to see it right away and respond. Having an instantaneous conversation with a viewer while they are watching your video will encourage more engagement and establish a ber relationship with your viewers — and you will know that these viewers are not bots.
Increase watch time and session watch time on your channel
If you are making YouTube videos on average 10 minutes long, and the viewer only watches half of it, that’s only 5 minutes of watch time, which is fine… But if you are live streaming for 45 minutes, and you are able to hold the viewer’s attention, you can surpass what your regular videos can do.
Make videos faster
As a YouTuber, you are always striving to be more efficient. Live streaming allows you to do that as you can set up and go. The content you end up creating during the duration of your livestream can then also be condensed into a highlight reel or a recap.
With a bit of planning before you go live, you can create a week’s worth of content in one go, instead of having multiple schedules for livestream content and your standard publishing videos.
Type of Content to Livestream
Live streaming has a lot of value, but what type of content should you be streaming?
Here are a few popular ideas for content that will attract viewers to your livestream:
Q&A session
Unboxing
Game or challenge
Sneak preview or review
Live events (just make sure the Internet can support it)
A demo or a tutorial
A live commentary or (if you are a gamer) Let’s Play video
What You Need to Livestream On YouTube
A Plan or Outline
It’s good to know what your livestream is going to be about before you start. Is there a key message you want to hit, an action you want your viewers to take, or a structure you want to follow.
Just because it’s live, doesn’t mean it all has to be improvised. If you go in without a plan, you might end up feeling flustered or getting stressed out. Allow for spontaneous comments or events to take you off your initial plan, but always return to your outline so you know how to wrap up your livestream when you have to.
Stable Internet Connection
You cannot conduct a quality livestream, if your Internet is bad. When evaluating your internet connection for live streaming on YouTube, look at the Upload speed. Depending on the quality of your video, these are the minimum upload speed rates your Internet will need to perform:
480p = 1.5 mbps
720p = 3 mbps
1080 = 5 mbps
In addition, be aware of external causes that may be slowing down your internet such as someone else using it, a poorly performing router, or a damaged cable.
Camera
If you have a smartphone or a laptop with a webcam built in, that is the best camera for you to get started live streaming. It’s good to have a milestone and work towards a more advanced camera, but until then, don’t feel discouraged because you don’t have expensive gear. If you have a smartphone, a laptop, or a basic webcam, that’s perfectly fine.
Microphone
You don’t need a great microphone for live streaming, you only need a good one. If you do want to spend several hundred to a thousand dollars for a professional studio microphone, nobody will stop you, but know this, a mic that is easy to use is as important as the audio quality as you develop a consistent live streaming schedule.
Streaming Software (For Higher Quality Streams)
Once upon a time, to livestream on YouTube, you needed additional software to capture content from desktop, camera, microphone, etc, called encoding software — but not anymore.
Those encoding software, such as OBS , Wirecast , and VMix , are required if you are producing content that requires a high frame rate such as gaming, but not mandatory if you are simply vlogging or running a tutorial.
If you are using Chrome, you canstream live on YouTube without using an encoder .
A Capture Card (For Higher Quality Streams)
You will need a capture card when you are capturing footage from a different PC or console. If you are a gamer and you are using one PC to stream and one PC to play your game, then you should consider getting a capture card.
4 Ways to Setup Your Livestream On YouTube
There are 4 main ways you can start live streaming on YouTube. The one that works best for you depends on the content you are going to be streaming.
1. Camera/Go Live (Chrome Browser)
By accessing www.youtube.com/webcam on the Google Chrome browser, you can start streaming immediately through your connected webcam. This way is best for a simple Q&A or letting your viewers know your thoughts in a timely situation. This method does not require an encoder.
There are 3 ways to access livestream this way:
1. Click here to connect to your YouTube channel
2. You can access it from the top menu on YouTube
3. You can access it by clicking Camera under the Live Streaming tab in your Creator Studio
2. Google Hangouts On Air (Quick)
Another way to livestream without an encoding software is by using the Google Hangouts On Air feature.
This is great if you want the feel of your livestream to be similar to a board meeting, where you can invite people, split screen, and share screen to illustrate your point.
Here’s how you can access this Google Hangouts On Air:
Step 1: Go to Events under the Live Streaming tab in your Creator Studio
Step 2: Click New Live Event button on the top right corner
Step 3: Enter the event’s Info and Setting page. Fill out the details of your Livestream, and under Type, select Quick (using Google Hangouts On Air).
Step 4: You can schedule your livestream or Go Live immediately by clicking one of the blue buttons on the left-hand side.
3. Mobile
Live streaming via your mobile device gives you a lot more freedom to maneuver. You can walk around and give your viewers a tour — but remember to stay within the WiFi or LTE range. That means you still won’t be able to livestream well inside an elevator.
Here’s how you can livestream on mobile:
Step 1: Access the YouTube app and make sure you are signed in to the account you want to livestream from.
Step 2: At the top, click on the camera icon
Step 3: Click on Go Live
Pro Tip: When live streaming, always hold your smartphone horizontally. This allows your video to be oriented as a landscape, instead of a portrait.
4. Custom Encoder
The fourth way of live streaming on YouTube is with encoding software. This is the recommended method if video quality is essential, such as gaming videos.
Step 1: Download and install an encoding software. In this example, we’ll be using OBS .
Step 2: Open OBS
Step 3: Go to YouTube Creator Studio and enter the Stream Now page
Step 4: Under Encoder Setup, copy Stream name/key (Warning: DO NOT share this key with anyone)
Step 5: Return to OBS and enter the Setting menu on the lower right-hand side of the application
Step 6: Click into the Stream tab
a) Under Stream Type, select Streaming Services
b) Under Service, select YouTube/YouTube Gaming
c) Under Server, select Primary YouTube ingest server
d) In Stream Key box, paste the Stream Key you copied from YouTube
e) Click Apply and then OK
Step 7: Plug in your webcam
Step 8: In the main OBS dashboard, under the Sources menu, click the + icon and add Video Capture Device. You should now see visuals from your Webcam.
Step 9: Select the Resolution you want for your video and click OK
Step 10: Return to your YouTube Streaming Page and fill out the details of your livestream
Step 11: Go back to OBS and click Start Streaming
Step 12: See on YouTube Streaming Page at the top that you are Live. You are officially streaming. Once You are finished streaming, return to OBS and click Stop Streaming to end the stream.
8 Tips to Improve Your Livestream on YouTube
Do Speed Test
Before you start your livestream, do a speed test of your Internet. Check out from here.
Have Good Lighting
Be aware of your surroundings when you are about to livestream. You don’t need the top-notch lighting kit, you can simply sit beside a window and allow natural lights to illuminate your stream.
Shoot A Live Test (Unlisted)
Have a technical rehearsal by doing a livestream test, then rewatching it, and evaluating the quality of the audio and visual.
You don’t have to worry about your audience logging in and seeing your test if you set the Privacy of the stream to Unlisted.
Look at the Lens, Not the Screen
If you are streaming with the selfie camera on your smartphone or using your camera’s viewfinder to make sure you are in the frame, remember that you need to be looking at the lens — not the image of yourself.
Eye contact is important in building trust, and if you are looking at yourself, it will appear as if you are looking past your viewers instead of at them.
Show It To Your Viewers
Whatever you are talking about, if you can, show it to your viewers. YouTube is a visual medium, and that means your viewers can become disinterested if there’s nothing visual holding their attention.
In the beginning, you probably won’t have a multi-camera setup, so you cannot cut away from your livestream. However, you can share the screen and you can bring physical objects into a frame.
If you are talking about your dog, show her on camera. If you’re presenting something with a lot of steps, create a Powerpoint slideshow.
Consider what visuals or props you can add to your livestream to enhance your performance.
Find A Way to Make it Evergreen
Evergreen content refers to content that is relevant for a great length of time. Talking about an event isn’t evergreen, because the event will soon pass and become old news. However, giving some tips for how to plan an event would be evergreen content.
Since your livestream will be saved on YouTube and your viewers can replay and watch it. They’re more likely to enjoy it if the content is relevant and interesting.
It Doesn’t Have to Be Long
A livestream doesn’t need to be 40 minutes long. It only needs to be long enough for you to get your story across — and if you want to answer some questions and engage with your audience. As soon as your story is over, even if it’s only 5 minutes, that’s okay. Don’t stress about the length of your stream, it’s not an endurance competition.
Allow Yourself to Make Mistakes
Another thing you shouldn’t worry about at all is making mistakes. When you are doing livestreams pretend you are engaging with someone in real life. In real life, you aren’t able to edit out your mistakes, whether it’s a word mispronounced or coffee spilling. Roll with it and laugh it off.
How to Grow As A Livestreamer on YouTube
Let People Know When You Are Streaming
Give people enough time to schedule it in, don’t spring it on them in the last minute. Share it on social media, your website, and any other means.
Create a Streaming Link 2 Days Before
Share your livestream link via social media to remind everyone to tune in when you go live. Looking for your link? It should look something like this: <www.youtube.com/user/\[channelname\]/live>
Reach Out To the Communities Most Interested
If you are going to be live streaming about a specific topic, such as photography, you should reach out to those who are interested in the topic. Highlight what aspect of photography you are going to be streaming and attract new viewers to your content.
Be Aware of Time Difference
If you have an international audience, find time to livestream where you can get the optimal amount of viewers.
You can find the location of your main demographic in your YouTube analytics .
Create a Channel Trailer to Promote Livestream
Make a video and host it as your channel trailer, that way anyone who lands on your YouTube page will see the promo for your livestream.
Promote Through Feature Content and Channel
YouTube has a feature that enables you to use your existing content to promote your upcoming livestream.
Here’s how to set it up:
Key Takeaways
- Live streaming will help you make more videos, engage with your audience, and grow your channel.
- You don’t need expensive equipment to livestream on YouTube, you only need a webcam and a microphone.
- YouTube has made live streaming as easy as a few clicks, no additional software needed unless you are gaming.
- Always do a test run of your livestream to ensure the internet, audio, and visual are all working properly.
- Create content and reach out to communities to promote your livestream.
Have you encountered any obstacles when setting up your livestream on YouTube? Let us know in the comments below, we are happy to help!
Richard Bennett
Richard Bennett is a writer and a lover of all things video.
Follow @Richard Bennett
Also read:
- 2024 Approved Direct Download of YouTube Videos
- [New] Essential Free Tools Convert YouTube Audio to MP3 on iPhone
- Convert With Ease The Top 10 Best Tools for Flv to YouTubes
- In 2024, Accelerated Fame – The Speed of YouTube’s Most-Watched Video Milestones
- Earning the Big Bucks as a YouTube Star
- Construct the Ultimate Experience in Unveiling Videos for 2024
- Eradicating Grayscale Issues with YouTube Video
- Discover 5 Exceptional Non-YouTube Video Platforms Today for 2024
- [Updated] Elevate Your Day Discovering Youtube's Prime Anime Sources
- Behind the Numbers Deciphering How YouTube Measures Popularity for 2024
- Essential Gear Picking the Very Best Among Top 9 Free Logomakers
- Maximizing Reach YouTube's Template Advantage Explained
- 2024 Approved Discover 5 Exceptional Non-YouTube Video Platforms Today
- [New] Crafting Your YouTube Legacy A Deep Dive Into Creator Studio Mastery
- Navigating to Your Own Custom-Arranged Music Library on Youtube
- [Updated] Elevate Your Sound Experience Subscribe to 20 YouTube Sounds
- [New] Directly Posting Your Videos From iDevice to YouTube
- Bridging Platforms Uploading From Twitch to YouTube
- Ultimate Recording Gear for Social Media Stars
- [New] Efficient Processes for Uploading Videos From iOS Gadgets
- Unveiling the 15 Most Enthralling Online Anime Spots
- [Updated] 9 YouTube Video Extraction Tools for Android Reviewed
- 2024 Approved Cultivating Commitment Gentle Subscription Strategies
- [Updated] Creating Impressive Video Tracks with a Newbie Mac User
- Earning Potential in Beauty Blogging
- In 2024, Cross-Platform Title Framework YTB to Other Apps
- Seamless Content Transfer From YouTubers to FB Friends
- [New] Boost Your Reach The Quintessential Five Tactics for YouTube Success
- From Novice to Vlogger Your Guide to Creating a YouTube Chanel
- Decoding Dimensions The Key to Perfect Aspect Ratios in Video
- In 2024, Dynamic Website Content Incorporating YouTube Playlists
- In 2024, Decoding the Functionality of YouTube's Media Hub
- [New] 2024 Approved Epic Escapades in Playtime Paradise
- [New] 2024 Approved Perfecting Your Teammates' Backdrops in Teams Calls
- [New] In 2024, Ultimate Playlist for Bike Enthusiasts
- Does Honor Magic V2 Have Find My Friends? | Dr.fone
- Solutions for Common Final Cut Pro X Crash Problems for 2024
- How To Transfer WhatsApp From iPhone 8 Plus to other iPhone 11 devices? | Dr.fone
- [New] Epic Gaming Recorded An Analysis
- Asus Data Recovery – recover lost data from Asus ROG Phone 7
- [Updated] 2024 Approved Trending Reads BookTok’s Hot List of Must-Have Titles
- Effortless HD-Ready Turning Your FB Videos Into MP4 Instantly for 2024
- [Updated] In 2024, Game On Top 10 Gaming Personalities on TikTok
- 3 Solutions to Hard Reset Samsung Galaxy M14 5G Phone Using PC | Dr.fone
- Updated 2024 Approved Reveal the Details How to Play Videos in Slow Motion with VLC Media Player
- How To Bypass the Required Apple Store Verification For Apple iPhone 6s | Dr.fone
- [New] In 2024, Optimizing Engagement in the New Facebook Algorithms Era
- Updated Tips for Lowering the Bit Rate of Multimedia Content
- [Updated] Elite Audio Capture Top 9 Mic Recorders Showcase for 2024
- [Updated] In 2024, Peeling Back the Layers 10 Realities About Instagram Reels
- New 2024 Approved From Screen to Video How to Record Your Desktop with Filmora Scrn
- [Updated] Mastering Personal Branding Essential Strategies for Facebook Bio Crafting
- In 2024, Full Guide on Mirroring Your Vivo X Flip to Your PC/Mac | Dr.fone
- Resolve Your Apple iPhone 15 Plus Keeps Asking for Outlook Password | Dr.fone
- A Deep Dive Into Competitive AR Stickers Outside Google for 2024
- How To Pause Life360 Location Sharing For Sony Xperia 1 V | Dr.fone
- [New] Mastering Status Update in Discord Chat
- How does the stardust trade cost In pokemon go On Apple iPhone 14? | Dr.fone
- [New] Avoid the Void Strategies for Non-Black Screens in OBS Recordings for 2024
- Fiverr Cover Content Proportions
- In 2024, PassFab Apple iPhone 6 Plus Backup Unlocker Top 4 Alternatives
- Title: Ideal Recording Gear for Vloggers
- Author: Brian
- Created at : 2024-05-25 11:58:11
- Updated at : 2024-05-26 11:58:11
- Link: https://youtube-video-recordings.techidaily.com/ideal-recording-gear-for-vloggers/
- License: This work is licensed under CC BY-NC-SA 4.0.
