
:max_bytes(150000):strip_icc()/spider-man-e662e5dd29ce40cda75a11d0593604f4.jpg)
How to Transcribe a YouTube Video for FREE
Turning YouTube Sounds Into Text: An In-Depth, No-Cost Course
How to Transcribe a YouTube Video for FREE

Richard Bennett
Mar 27, 2024• Proven solutions
If you want to transcribe your videos to make the dialogs and speeches available in text format, you can use YouTube Transcribe feature that the streaming site offers for free. In this article, I’ll share with you a couple of methods to transcribe a YouTube video for free.
- Part 1: Transcribe YouTube Video Automatically for Free [2 Ways]
- Part 2: Transcribe YouTube Video to Text Online with Third-Party Service
- Part 3: Benefits of Transcribing YouTube Videos
- Part 4: YouTube Video Transcription FAQs
Part 1: How to Transcribe YouTube Video Automatically for Free [2 Ways]
Besides the basic video editing features on the YouTube platform, you can now quickly transcribe YouTube videos to the text as well. The good thing is, you can either use the automatic transcription feature that YouTube offers, or upload it manually while adjusting the timing as you go further.
Below are the two methods to transcribe your YouTube videos for free:
Method 1: Use the Automated Transcription Service on YouTube
As the name suggests, YouTube automatic transcription service works automatically. This means you don’t even have to click the ‘Transcribe’ button anymore to transcribe a YouTube video, and the website takes care of it on its own. All you need to do is, choose English as the language of the video when setting up subtitles. You can follow the instructions given below to do so:
Step 1 Upload a Video
Sign in to your YouTube account, click your profile picture from the top-right corner, and click YouTube Studio from the menu. Next, click CREATE from the upper-right corner, click Upload videos from the menu, and drag and drop a video from your computer to the Upload videos box that appears next.

Step 2 Select Transcription Language
On the Details page of the next box that appears, scroll down and click MORE OPTIONS, and select English in the Video language drop-down list under the Language, subtitles, and closed captions (CC) section.

Step 3 Publish the Video
Follow the on-screen instructions from this point to publish the video, and wait while YouTube automatically transcribes and adds the close captions to it.
Note: Depending on the duration of the clip, the time YouTube would take to transcribe may vary.
After YouTube has transcribed the video, you can download the transcription file in your preferred format. The instructions are given below explain how you can do so:
- Get to the Subtitles Window
While on the YouTube Studio page, click Subtitles from the left pane to go to the Channel subtitles page. And then click the video you want to modify.
- Get to Classic Studio
In the video subtitle page of the target video, hover mouse on the Published Automatic status under the Subtitles column, click the Options icon (with three vertical dots) that appears, and click Edit on Classic Studio.

- Download Transcription File
Click and open the Actions drop-down list from the top-left corner of the left pane, click your preferred transcription format including .vtt, .srt and .sbv from the list, and save the file on your local hard disk.

Method 2: Get YouTube Transcription when Watching
In addition, if you are watching any other video, you can make YouTube transcribe that for you as well. You can follow the instructions given below to get the YouTube video to text transcription:
Step 1: Play the Video
Go to the video on YouTube and start playing it. Make sure NOT to get to full-screen mode as doing so would hide the option to transcribe the clip.
Step 2: Enable Transcription
Click the More icon (with three horizontal dots) from under the bottom-right corner of the video player, and click Open transcript to see the video transcription in the Transcript pane that appears in the right.
Step 3: Manage Timestamps
Click the Options icon (with three vertical dots) from the top-right corner of the Transcript pane, and click Toggle timestamp to enable or disable the timestamps in the video transcription.
Limitations of Using YouTube Transcribe
Although YouTube’s automatic transcription is a decent feature that saves you a lot of time, since Google uses machine learning algorithms to convert the speech to text, the level of accuracy may vary depending on the accent of the speaker, and the clarity of the audio the video has. Also, even sometime you may not be satisfied with the end-results.
Alternatively, you can use Kapwing to transcribe a YouTube video and download the transcription file with the below step-by-step instructions:
Step 1: Add YouTube Video
Copy the URL of YouTube video you want to transcribe, go to https://www.kapwing.com/subtitles , paste the URL in the Paste a URL field, wait while Kapwing fetches the content of the video, and opens the Add subtitles to Video page.
Step 2: Transcribe the Video
Click Auto-generate from the right window, and follow the on-screen instructions to transcribe YouTube video to text.

Step 3: Download the Transcription File
Click Download SRT from the left pane, and follow the instructions from there to download the transcription file in *.srt format.

Pros
- Kapwing is free to use
- The auto-transcription process is quick and less tedious
- Kapwing also allows manual transcription and uploading of an existing *.srt file
Cons
- The auto-transcribed text might lack accuracy as the task is done by the speech-to-text tools that work in the background
You can follow the step-by-step instructions to transcribe a YouTube video and download the transcription file using Kapwing:
Step 1: Add YouTube Video
Copy the URL of YouTube video you want to transcribe, go to https://www.kapwing.com/subtitles , paste the URL in the Paste a URL field, wait while Kapwing fetches the content of the video, and opens the Add subtitles to Video page.
Step 2: Transcribe the Video
Click Auto-generate from the right window, and follow the on-screen instructions to transcribe YouTube video to text.
Step 3: Download the Transcription File
Click Download SRT from the left pane, and follow the instructions from there to download the transcription file in *.srt format.
Pros
- Kapwing is free to use
- The auto-transcription process is quick and less tedious
- Kapwing also allows manual transcription and uploading of an existing *.srt file
Cons
- The auto-transcribed text might lack accuracy as the task is done by the speech-to-text tools that work in the background
Part 3: Benefits of Transcribing YouTube Videos
You may need video transcriptions for several reasons, such as analyzing the summary of the entire speech in the video, extracting a single phrase or quote that was spoken in the clip, or making the video helpful even for those suffering from hearing impairment. When you transcribe a YouTube video, the transcript can be useful in many ways. Some of the most common benefits of transcribing a video include:
- Search Engine Optimization
When you add subtitles, the text can appear in Google search results when someone types a similar phrase in the search box. This helps get more views to your videos, thus giving your channel popularity, and you, monetary gains in the long run.
- Accent
If the speaker in the video is from a different region and is using an accent that you are not much comfortable with, you can turn on the subtitles and read the dialogs along with the video.
- Repurposing on Blogs
If you own a blog that you have embedded your video to, the transcription could be used to add text to it so the target audience can get a fair idea of what the video is all about. This is useful because many people prefer reading over watching.
YouTube Video Transcription FAQs
1. How to Transcribe YouTube Video to Text
Usually the transcription files have *.srt extension that are globally accepted and supported by almost all media players. However, there might be instances when you want to have the subtitles in plain text.
That said, to convert an SRT file to TXT, you can:
- Right-click the SRT file
- Go to Rename
- Replace srt with txt and press Enter
- Click OK on the confirmation box that appears next to convert SRT to TXT
After this, you can simply double-click the file, and read and modify the transcribed content as needed.
2. How to Edit and Upload Edited Transcript to YouTube
If you made any modifications to the transcript that was automatically generated by YouTube or any other third-party transcription tool, you can follow the steps given below to upload the new file to the YouTube video:
- Go to YouTube Studio and then to the Channel subtitles page as explained earlier
- Expand the Languages column of the target video
- Click the Options icon that appears under the Subtitles column when you hover mouse on to it
- Click Edit on Classic Studio
- On the next page, click Edit from the top-right corner

- Click to open the Actions drop-down list from the upper-left corner
- Click Upload a file
- Follow the on-screen instructions from there to upload the modified transcription file
- Click Save Changes from the top-right corner of the page when done
Conclusion
If you are looking for a quick and easy way of adding subtitles to your videos, letting YouTube transcribe for you could be a good approach. However, because these auto-generated transcriptions are created by machine learning algorithms, their accuracy cannot be counted on. Therefore, the best way to get the job done accurately is, let YouTube auto-transcribe your video, download the transcription file, make the necessary changes to it, and then upload the file back to the video.
Richard Bennett
Richard Bennett is a writer and a lover of all things video.
Follow @Richard Bennett
Richard Bennett
Mar 27, 2024• Proven solutions
If you want to transcribe your videos to make the dialogs and speeches available in text format, you can use YouTube Transcribe feature that the streaming site offers for free. In this article, I’ll share with you a couple of methods to transcribe a YouTube video for free.
- Part 1: Transcribe YouTube Video Automatically for Free [2 Ways]
- Part 2: Transcribe YouTube Video to Text Online with Third-Party Service
- Part 3: Benefits of Transcribing YouTube Videos
- Part 4: YouTube Video Transcription FAQs
Part 1: How to Transcribe YouTube Video Automatically for Free [2 Ways]
Besides the basic video editing features on the YouTube platform, you can now quickly transcribe YouTube videos to the text as well. The good thing is, you can either use the automatic transcription feature that YouTube offers, or upload it manually while adjusting the timing as you go further.
Below are the two methods to transcribe your YouTube videos for free:
Method 1: Use the Automated Transcription Service on YouTube
As the name suggests, YouTube automatic transcription service works automatically. This means you don’t even have to click the ‘Transcribe’ button anymore to transcribe a YouTube video, and the website takes care of it on its own. All you need to do is, choose English as the language of the video when setting up subtitles. You can follow the instructions given below to do so:
Step 1 Upload a Video
Sign in to your YouTube account, click your profile picture from the top-right corner, and click YouTube Studio from the menu. Next, click CREATE from the upper-right corner, click Upload videos from the menu, and drag and drop a video from your computer to the Upload videos box that appears next.
Step 2 Select Transcription Language
On the Details page of the next box that appears, scroll down and click MORE OPTIONS, and select English in the Video language drop-down list under the Language, subtitles, and closed captions (CC) section.
Step 3 Publish the Video
Follow the on-screen instructions from this point to publish the video, and wait while YouTube automatically transcribes and adds the close captions to it.
Note: Depending on the duration of the clip, the time YouTube would take to transcribe may vary.
After YouTube has transcribed the video, you can download the transcription file in your preferred format. The instructions are given below explain how you can do so:
- Get to the Subtitles Window
While on the YouTube Studio page, click Subtitles from the left pane to go to the Channel subtitles page. And then click the video you want to modify.
- Get to Classic Studio
In the video subtitle page of the target video, hover mouse on the Published Automatic status under the Subtitles column, click the Options icon (with three vertical dots) that appears, and click Edit on Classic Studio.
- Download Transcription File
Click and open the Actions drop-down list from the top-left corner of the left pane, click your preferred transcription format including .vtt, .srt and .sbv from the list, and save the file on your local hard disk.
Method 2: Get YouTube Transcription when Watching
In addition, if you are watching any other video, you can make YouTube transcribe that for you as well. You can follow the instructions given below to get the YouTube video to text transcription:
Step 1: Play the Video
Go to the video on YouTube and start playing it. Make sure NOT to get to full-screen mode as doing so would hide the option to transcribe the clip.
Step 2: Enable Transcription
Click the More icon (with three horizontal dots) from under the bottom-right corner of the video player, and click Open transcript to see the video transcription in the Transcript pane that appears in the right.
Step 3: Manage Timestamps
Click the Options icon (with three vertical dots) from the top-right corner of the Transcript pane, and click Toggle timestamp to enable or disable the timestamps in the video transcription.
Limitations of Using YouTube Transcribe
Although YouTube’s automatic transcription is a decent feature that saves you a lot of time, since Google uses machine learning algorithms to convert the speech to text, the level of accuracy may vary depending on the accent of the speaker, and the clarity of the audio the video has. Also, even sometime you may not be satisfied with the end-results.
Alternatively, you can use Kapwing to transcribe a YouTube video and download the transcription file with the below step-by-step instructions:
Step 1: Add YouTube Video
Copy the URL of YouTube video you want to transcribe, go to https://www.kapwing.com/subtitles , paste the URL in the Paste a URL field, wait while Kapwing fetches the content of the video, and opens the Add subtitles to Video page.
Step 2: Transcribe the Video
Click Auto-generate from the right window, and follow the on-screen instructions to transcribe YouTube video to text.
Step 3: Download the Transcription File
Click Download SRT from the left pane, and follow the instructions from there to download the transcription file in *.srt format.
Pros
- Kapwing is free to use
- The auto-transcription process is quick and less tedious
- Kapwing also allows manual transcription and uploading of an existing *.srt file
Cons
- The auto-transcribed text might lack accuracy as the task is done by the speech-to-text tools that work in the background
You can follow the step-by-step instructions to transcribe a YouTube video and download the transcription file using Kapwing:
Step 1: Add YouTube Video
Copy the URL of YouTube video you want to transcribe, go to https://www.kapwing.com/subtitles , paste the URL in the Paste a URL field, wait while Kapwing fetches the content of the video, and opens the Add subtitles to Video page.
Step 2: Transcribe the Video
Click Auto-generate from the right window, and follow the on-screen instructions to transcribe YouTube video to text.
Step 3: Download the Transcription File
Click Download SRT from the left pane, and follow the instructions from there to download the transcription file in *.srt format.
Pros
- Kapwing is free to use
- The auto-transcription process is quick and less tedious
- Kapwing also allows manual transcription and uploading of an existing *.srt file
Cons
- The auto-transcribed text might lack accuracy as the task is done by the speech-to-text tools that work in the background
Part 3: Benefits of Transcribing YouTube Videos
You may need video transcriptions for several reasons, such as analyzing the summary of the entire speech in the video, extracting a single phrase or quote that was spoken in the clip, or making the video helpful even for those suffering from hearing impairment. When you transcribe a YouTube video, the transcript can be useful in many ways. Some of the most common benefits of transcribing a video include:
- Search Engine Optimization
When you add subtitles, the text can appear in Google search results when someone types a similar phrase in the search box. This helps get more views to your videos, thus giving your channel popularity, and you, monetary gains in the long run.
- Accent
If the speaker in the video is from a different region and is using an accent that you are not much comfortable with, you can turn on the subtitles and read the dialogs along with the video.
- Repurposing on Blogs
If you own a blog that you have embedded your video to, the transcription could be used to add text to it so the target audience can get a fair idea of what the video is all about. This is useful because many people prefer reading over watching.
YouTube Video Transcription FAQs
1. How to Transcribe YouTube Video to Text
Usually the transcription files have *.srt extension that are globally accepted and supported by almost all media players. However, there might be instances when you want to have the subtitles in plain text.
That said, to convert an SRT file to TXT, you can:
- Right-click the SRT file
- Go to Rename
- Replace srt with txt and press Enter
- Click OK on the confirmation box that appears next to convert SRT to TXT
After this, you can simply double-click the file, and read and modify the transcribed content as needed.
2. How to Edit and Upload Edited Transcript to YouTube
If you made any modifications to the transcript that was automatically generated by YouTube or any other third-party transcription tool, you can follow the steps given below to upload the new file to the YouTube video:
- Go to YouTube Studio and then to the Channel subtitles page as explained earlier
- Expand the Languages column of the target video
- Click the Options icon that appears under the Subtitles column when you hover mouse on to it
- Click Edit on Classic Studio
- On the next page, click Edit from the top-right corner
- Click to open the Actions drop-down list from the upper-left corner
- Click Upload a file
- Follow the on-screen instructions from there to upload the modified transcription file
- Click Save Changes from the top-right corner of the page when done
Conclusion
If you are looking for a quick and easy way of adding subtitles to your videos, letting YouTube transcribe for you could be a good approach. However, because these auto-generated transcriptions are created by machine learning algorithms, their accuracy cannot be counted on. Therefore, the best way to get the job done accurately is, let YouTube auto-transcribe your video, download the transcription file, make the necessary changes to it, and then upload the file back to the video.
Richard Bennett
Richard Bennett is a writer and a lover of all things video.
Follow @Richard Bennett
Top Picks: 7 Best Live Streaming Apps to Upgrade Your YouTube Presence (iOS/Android)
FREE 7 Best Apps to Go Live on YouTube from iPhone or Android
Richard Bennett
Mar 27, 2024• Proven solutions


1. Emoze: (Android /iOS )
This most awaited Go Live application is now available for Android as well as iOS platform. It assists users in direct live streaming to YouTube channel via portable devices. The one click type installation facility allows users to get connected to heir channel, video, followers and viewers within seconds.
Key Features:
- Emoze offers unlimited broadcast time for live content.
- It supports HD live transmissions.
- Users can enjoy customized video effects.
- It is possible to switch between horizontal and vertical video mode during broadcast.
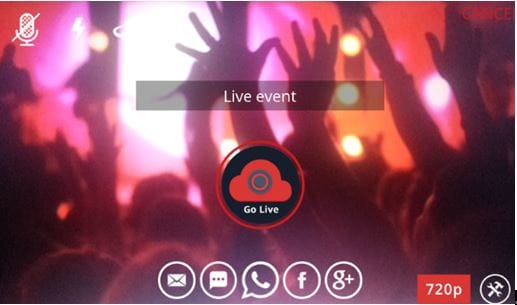
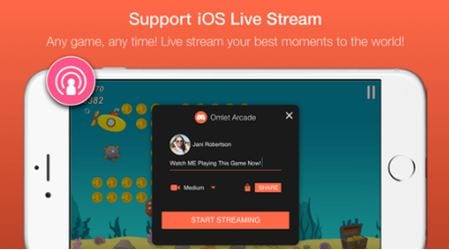
2. Omlet Arcade: (Android /iOS )
Omlet Arcade is well known for its most convenient collection of tools that can assist mobile gamers, the exclusive and highly interactive chat room and easy to share and upload facilities. Users love its intuitive functionality that makes content sharing on social media platforms like YouTube, Facebook and Twitch etc. much easier.
Key Features:
- It offers in game chat feature where users can spend unlimited time. You can prefer to connect via region chat, group chat and SMS options.
- Omlet Arcade hosts an active forum where gamers can easily explore information about all new stuff.
- One can enjoy easy recording, fast uploading of videos and it is also possible to develop personal community files for your favorite games.
3. YouTube App: (Android /iOS )
It is time to enjoy lots of interesting things on single platform on the go; this YouTube application allow users to stay connected to most popular music videos, entertainment, game hot spots and news etc. It is possible to subscribe to different channels and share impressive content with friends via YouTube.
Key Features:
- Users will be able to browse their personalized recommendations on Home tab.
- The subscription tab assists users to get connected to their favorite channel with ease.
- One can express his thoughts via shares and comments.
- It is possible to develop customized videos using its top quality filters and music editing tools. Everything can be managed directly on YouTube platform.
4. YouTube Gaming: (Android /iOS )
YouTube Gamming application help users to stay connected with their favorite players, games and culture. It features live streams and videos with interactive chats, let’s play option, reviews, trailers and speed runs etc.
Key Features:
- With YouTube gaming application, you will be able to place live streams as well as videos at same place.
- You can enjoy chatting while live streaming your content.
- It is possible to browse specially designed pages for all games, channels as well as publishers.
- YouTube Gaming platform is currently serving the biggest community with more than 100 million active users.
5. Live Now: (iOS )
Live Now application is well recognized for its easy to use interface and simple sign up process. The basic widgets are designed pretty fine with collection of templates; beginners will find it much easier to explore all hot new features of Live Now.
Key Features:
- Users can easily define any number of phrases for quick access in form of tags.
- It offers numbers of integrations to end users along with SugarCRM, Salesforce and Highrise etc.
- You will find awesome mobile support from service professionals and your dream to work in team for development of interesting projects may end here with Live Now.

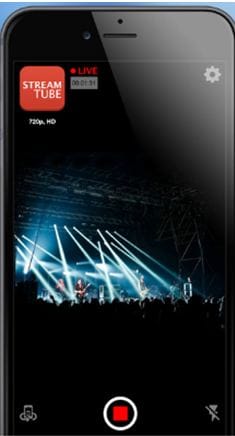
6. Stream Tube: (iOS )
Stream Tube application comes with so many advanced features that can assist users in easy live streaming. It can support HD as well as SD content whereas stream quality can be adjusted as per need. The donation system, ability to surf safari while live streaming and change YouTube server as per need, are some of its latest features.
Key Features:
- Users can enjoy editing with advanced filters, logos and manual as well as auto focus abilities.
- It offers landscape and portrait streaming abilities.
- Users can capture stills while live streaming their content.
- You will love to use its Zoomx15 feature.
- The one tap start type functionality is highly useful.
7. CameraFi Live: (Android )
CameraFi Live app is designed for Android devices only and it makes direct connection with Facebook and YouTube for fast sharing abilities. CameraFi Live can be used with smart phone camera as well as can be connected to a USB camera unit. The interactive user platform assists in fast responses.
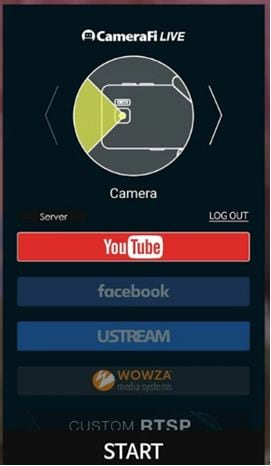
Key Features:
- It is possible to broadcast amazing videos without any restriction over time using CameraFi Live.
- This application is well known for its professional video quality that leads to much higher performance when connected to DSLR and camcorders.
- Users will love to enjoy its ability to broadcast games with much impressive content quality
- Some of the best and most advanced features added to CameraFi Live are live poll voting, 360 degree live streaming with VR camera, picture in picture ability, advanced text and image overlays, video filters and many more.
![]()

Filmora - Best YouTube Video Recorder and Editor
- Record YouTube videos on your computer with audio and webcam.
- Edit videos quickly with a wide range of gaming effects.
- Rich video tempaltes and resources for videos.
- Export to MP4, MOV, MKV, GIF and multiple formats.
For Win 7 or later (64-bit)
For macOS 10.12 or later
 Secure Download
Richard Bennett
Richard Bennett is a writer and a lover of all things video.
Follow @Richard Bennett
Richard Bennett
Mar 27, 2024• Proven solutions
1. Emoze: (Android /iOS )
This most awaited Go Live application is now available for Android as well as iOS platform. It assists users in direct live streaming to YouTube channel via portable devices. The one click type installation facility allows users to get connected to heir channel, video, followers and viewers within seconds.
Key Features:
- Emoze offers unlimited broadcast time for live content.
- It supports HD live transmissions.
- Users can enjoy customized video effects.
- It is possible to switch between horizontal and vertical video mode during broadcast.
2. Omlet Arcade: (Android /iOS )
Omlet Arcade is well known for its most convenient collection of tools that can assist mobile gamers, the exclusive and highly interactive chat room and easy to share and upload facilities. Users love its intuitive functionality that makes content sharing on social media platforms like YouTube, Facebook and Twitch etc. much easier.
Key Features:
- It offers in game chat feature where users can spend unlimited time. You can prefer to connect via region chat, group chat and SMS options.
- Omlet Arcade hosts an active forum where gamers can easily explore information about all new stuff.
- One can enjoy easy recording, fast uploading of videos and it is also possible to develop personal community files for your favorite games.
3. YouTube App: (Android /iOS )
It is time to enjoy lots of interesting things on single platform on the go; this YouTube application allow users to stay connected to most popular music videos, entertainment, game hot spots and news etc. It is possible to subscribe to different channels and share impressive content with friends via YouTube.
Key Features:
- Users will be able to browse their personalized recommendations on Home tab.
- The subscription tab assists users to get connected to their favorite channel with ease.
- One can express his thoughts via shares and comments.
- It is possible to develop customized videos using its top quality filters and music editing tools. Everything can be managed directly on YouTube platform.
4. YouTube Gaming: (Android /iOS )
YouTube Gamming application help users to stay connected with their favorite players, games and culture. It features live streams and videos with interactive chats, let’s play option, reviews, trailers and speed runs etc.
Key Features:
- With YouTube gaming application, you will be able to place live streams as well as videos at same place.
- You can enjoy chatting while live streaming your content.
- It is possible to browse specially designed pages for all games, channels as well as publishers.
- YouTube Gaming platform is currently serving the biggest community with more than 100 million active users.
5. Live Now: (iOS )
Live Now application is well recognized for its easy to use interface and simple sign up process. The basic widgets are designed pretty fine with collection of templates; beginners will find it much easier to explore all hot new features of Live Now.
Key Features:
- Users can easily define any number of phrases for quick access in form of tags.
- It offers numbers of integrations to end users along with SugarCRM, Salesforce and Highrise etc.
- You will find awesome mobile support from service professionals and your dream to work in team for development of interesting projects may end here with Live Now.
6. Stream Tube: (iOS )
Stream Tube application comes with so many advanced features that can assist users in easy live streaming. It can support HD as well as SD content whereas stream quality can be adjusted as per need. The donation system, ability to surf safari while live streaming and change YouTube server as per need, are some of its latest features.
Key Features:
- Users can enjoy editing with advanced filters, logos and manual as well as auto focus abilities.
- It offers landscape and portrait streaming abilities.
- Users can capture stills while live streaming their content.
- You will love to use its Zoomx15 feature.
- The one tap start type functionality is highly useful.
7. CameraFi Live: (Android )
CameraFi Live app is designed for Android devices only and it makes direct connection with Facebook and YouTube for fast sharing abilities. CameraFi Live can be used with smart phone camera as well as can be connected to a USB camera unit. The interactive user platform assists in fast responses.
Key Features:
- It is possible to broadcast amazing videos without any restriction over time using CameraFi Live.
- This application is well known for its professional video quality that leads to much higher performance when connected to DSLR and camcorders.
- Users will love to enjoy its ability to broadcast games with much impressive content quality
- Some of the best and most advanced features added to CameraFi Live are live poll voting, 360 degree live streaming with VR camera, picture in picture ability, advanced text and image overlays, video filters and many more.
![]()
Filmora - Best YouTube Video Recorder and Editor
- Record YouTube videos on your computer with audio and webcam.
- Edit videos quickly with a wide range of gaming effects.
- Rich video tempaltes and resources for videos.
- Export to MP4, MOV, MKV, GIF and multiple formats.
For Win 7 or later (64-bit)
For macOS 10.12 or later
Secure Download
Richard Bennett
Richard Bennett is a writer and a lover of all things video.
Follow @Richard Bennett
Also read:
- Joining the Elite Your Roadmap to 2024 YTP Benefits
- In 2024, Craft Your Content Cross-Pollination with YouTube+TikTok
- [New] Elevate Every Story Prime Video Editor Apps for Android
- The Shorter Path Cutting Video Duration on YouTube
- [Updated] Building Brands Together A Guide to Selecting YouTube Teams
- Beauty Breakdown Mastering Makeup and Hauls Online
- Globe’s Biggest Video Content Mogul
- Identifying High-Growth YouTube Channels for Personal Development
- Designing News Outro Sequences
- In 2024, Does Instant Subscription Strategy Improve User Engagement?
- Incredible Trend Trackers Monitor Highest YouTube Spots
- Enhancing Visual Content Turning Youtube Clips Into Animated GIFs
- 2024 Approved Chart a Course for Success Top 5 Effective Video Marketing Strategies on YouTube
- In 2024, Cut to Perfection Editing Video Duration on YouTube
- Does Subforsub Securely Boost Your YouTube Fanbase Growth for 2024
- The Essential Guide to Aspect Ratio Standards on YT
- Effortless Tutorial for Top-Notch YT Video Thumbnails
- 10 Best YouTube Music Reaction Videos 2023
- 2024 Approved Deciphering the Wealth of Mr. Beast
- [New] Essential Tips for Successful YouTube Broadcasts
- In 2024, Addressing Missing Image Display in YouTubes Shorts
- In 2024, Correct YT Monetization Checklist – Maximize Your Earnings
- Our Quick & Complete OBS Youtube Streaming Path for Newbies
- Fostering Resilience in the Face of Cyber Haters
- Quash Unwanted YouTube Suggested Videos
- Filmmaker Tips YouTube Trailers Using Filmora
- Fuse Melodies Into Your Youtube Digital Realm
- 2024 Approved Creating Captivating Life-Enriching Video Content
- In 2024, Building Audience Organically Tactics That Deliver Views
- Expanding Digital Presence Stream to YouTube + Additional Platforms
- Capture Every Angle – How to Create Dynamic, Viewpoint-Driven Reaction Vids for YouTube Success for 2024
- The Uncharted Territory of YouTube's Unlisted Content
- In 2024, Building Your ASMR Empire Key Concepts and Best Practices
- Acquiring Free Music YouTube Video Edition
- 2024 Approved Elevating Video Reach The Role of Smart Backlinking Techniques
- [New] 8 Premium Complimentary Streaming Media Processors
- Grow Your Channelnode Through Joint Videography Endeavors
- How to Remove Black Bars From Existing YouTube Videos?
- [Updated] Designing with Dirt Incorporating Natural Elements Into Urban Areas
- Maximize Traffic with These Must-Use FreeFire Tags for Videos
- Captivating Charm Top Magicians & Their Video Cuts for 2024
- 2024 Approved A Visual Voyage Through Youtube's 2017 Data Deluge
- [Updated] Digital Dynamos 8 YouTube Channels Surging Forward
- Spotlight on YouTube’s Most Visionary and Creative Ad Creators
- Captivating Videos Start Here These 7 Royalty-Free Audios
- 2024 Approved Explore These 5 Pinnacle Platforms for Efficient MP3 File Tagging
- 2024 Approved Unveiling the Subtleties of Whistle Auditory Signatures
- In 2024, How to Transfer Contacts from Oppo Reno 8T to Other Android Devices Using Bluetooth? | Dr.fone
- [New] Saving Every Moment on Mac with Screen Recording Tutorial
- A Swift Guide to Faster, More Engaging TikToks
- [New] Leveraging Hashtags & Collaborations for 1K Insta Following for 2024
- Watermarking Masters The Leading Tools Reviewed
- How to Lock Apps on Tecno Spark 10C to Protect Your Individual Information
- Zippy Zeal in Zoom-Outs Adding Text Movement on Stories
- In 2024, How to Bypass FRP on Itel A05s?
- Title: How to Transcribe a YouTube Video for FREE
- Author: Brian
- Created at : 2024-05-25 11:57:52
- Updated at : 2024-05-26 11:57:52
- Link: https://youtube-video-recordings.techidaily.com/how-to-transcribe-a-youtube-video-for-free/
- License: This work is licensed under CC BY-NC-SA 4.0.
