
:max_bytes(150000):strip_icc()/GettyImages-1205659474-6b8ccc23dc3f4139aa3d8ab6893d1f44.jpg)
"High-End Audio for YouTube's Best Gamers"
High-End Audio for YouTube’s Best Gamers
Top 5 Gaming Headsets for YouTube in 2024

Richard Bennett
Feb 20, 2024• Proven solutions
Need a gaming headset? The number of gamers is growing every day, and that means more and more people are looking for content from experienced gamers on YouTube and Twitch. To produce great YouTube gaming videos, you’ll need a lot of gaming knowledge and a few pieces of high-quality equipment, including a good headset. Without a headset, it might be hard to keep track of in-game audio cues while entertaining your audience.
Most hardware manufacturers are actively targeting the gaming market, releasing specialized headset models for 2024. Here is a quick overview of the five best candidates for the title of the best gaming headset for 2024:
2. Audio Technica ATH-ADG1 Open Air High Fidelity Headset
3. Logitec Surround Sound Gaming Headset G430
4. Razer Kraken 7.1 Chroma Gaming Headset
5. HyperX Cloud II Gaming Headset
1. Razer Man O’ War 7.1
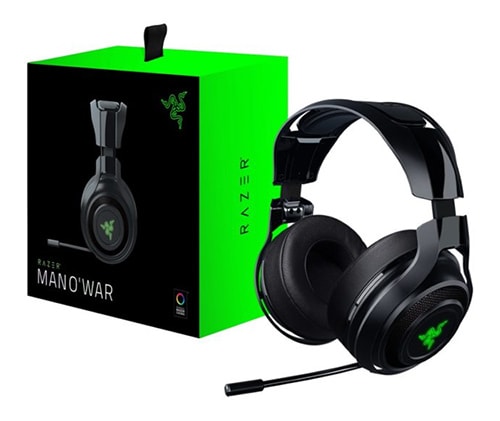
Price: $222.48
Compatible with: PC, Mac (with USB), PlayStation, Xbox
This wireless headset has an impressive surround sound engine that allows for an immersive gaming experience and convincing positional audio. The headset features a modern ergonomic design with earcups that fit very tightly and completely seal off the outside world. Razer Man O’War looks bulky, but it weighs just over 330 grams and uses an analog 3.5 mm connector.
The microphone boom extends from the left ear cup and can be easily adjusted or retracted. Most importantly, microphone controls are very sophisticated allowing for in-game switching between channels without disruption. When used for talking, the microphone will ensure absolute clarity, which comes handy for those who broadcast their games on YouTube.
Pros:
- Wireless setup for maximum freedom
- Minimizes ambient noise with cushion-like ear cups
- Lightweight and comfortable to wear
- Fully retractable, high-quality MEMS microphone
- Long-lasting batteries – up to 14 hours
Cons:
- Occasional loss of connectivity
- Slightly expensive for a plastic build
2. Audio Technica ATH-ADG1 Open Air High Fidelity Headset
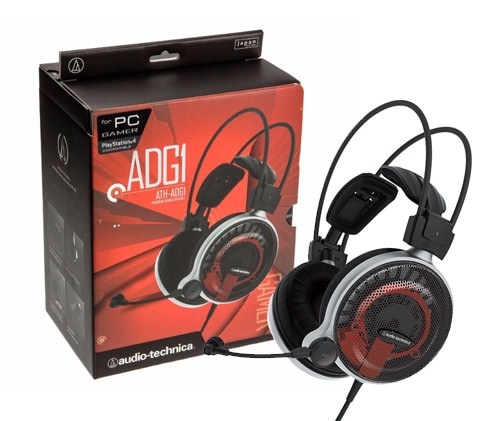
Price: $299
Compatible with: PC, PS4, iPad, iPhone, Xbox (with adapter)
For a gaming headset, this model boasts a really impressive audio quality. This characteristic is a huge strength, especially when coupled with its broad compatibility and innovative design. The structure of this headset is unique, with an open-air setup that allows for the circulation of air under the set, which is useful during long gaming sessions. This comes at a price since the isolation against ambient noise is less than perfect and the feeling might be a bit awkward until you get used to it.
As for the microphone, it is permanently attached to the left side of the headset with a flexible stem, so it can be easily adjusted to the desired position. This implies that ATH-ADG1 was made specifically for those who need to communicate while receiving the high-quality audio feed, such as gaming streamers.
Pros:
- Extremely light and uniquely built for comfort
- Top-notch audio quality above its class
- Innovative, self-adjusting frame
- Comfortable ear cups
Cons:
- Analog headset, so the quality depends on the connected device
- Specialized product with a narrow range of applications
- Fragile build that can easily be damaged
- Very expensive
3. Logitec Surround Sound Gaming Headset G430
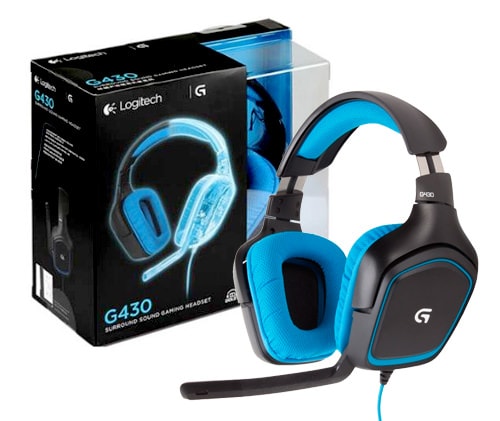
Price: $79.99
Compatible with: PC, PS4
Logitec is well known for producing high-quality peripherals, and this model lives up to that standard despite its affordable price. Its most touted feature is the surround sound system, which is not common in this price range. This allows for very realistic in-game audio, particularly because the headset has an excellent bass channel. In addition to solid audio performance, the Logitec gaming headset is characterized by low weight rotating ear cups with a protective cloth and vibrant coloring.
A standard 3.5 mm connector is used for the microphone, which is conveniently positioned and capable of clearly capturing speech while blocking out other sounds. Unfortunately, the microphone can’t be easily manipulated and doesn’t offer the option to be muted automatically, although a manual switch is available to turn it off. For a budget gaming headset, that’s a fair compromise.
Pros:
- Realistic, immersive sound
- Smart design optimized to decrease weight
- The Durable cloth covering the ear cups
- Surround effect on a cheap gaming headset
- Excellent price-to-quality ratio
Cons:
- Lack of programmable commands
- Poor protection against ambient noise
- Less than impressive visually
4. Razer Kraken 7.1 Chroma Gaming Headset
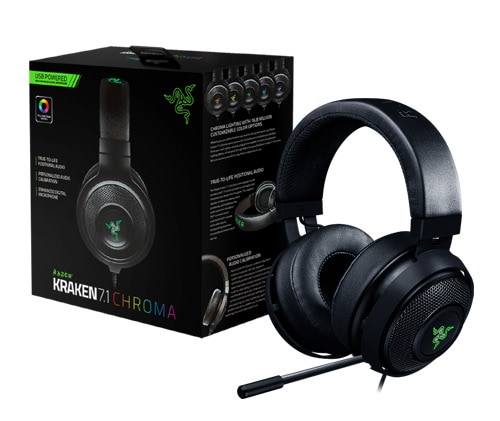
Price: $96.77
Compatible with : PC, PS4
If you are looking for the best gaming headset with a microphone, this is a very b candidate. It is pretty affordable compared to the other Razer headset on this list (the Man O’ War), but it is equally robust when it comes to performance, including high-quality surround audio. This is a rather large headset with thick ear cups decorated with a glowing logo of the brand, but its size is not a problem since Kraken is very comfortable even when worn continually for hours.
Kraken’s fully retractable and flexible microphone can be hidden under the left cup when not in use, giving this model a bit of versatility. It picks up your voice even when it’s bent sideways, so YouTube professionals won’t have to worry about the exact positioning while engaged in a fierce battle. It’s also possible to use a toggle switch to mute the microphone quickly.
Pros:
- Excellent audio for its price range
- Surround audio contributes to the more complete gaming experience
- Completely isolates any ambient sounds
- Flexible mic that can be moved out of the way
- Access to Synapse 2.0 software
Cons:
- USB only, no 3.5 mm jacks
- Lack of preset settings for gaming
- A sensitive microphone that sometimes picks up unwanted sounds
5. HyperX Cloud II Gaming Headset
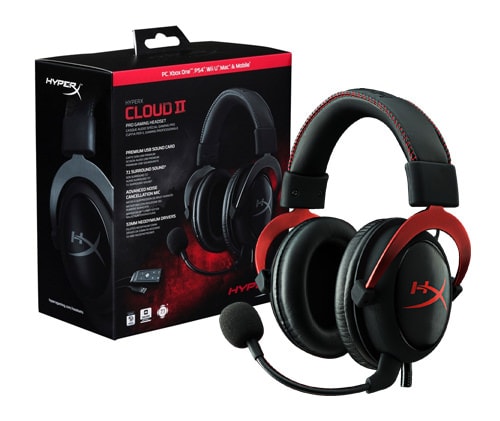
Price: $99.88
Compatible with: PC, Mac, Xbox, PS4, Mobile
Well designed, packed with advanced features and moderately priced, this gaming headset offers a lot of value to the YouTube crowd. It comes with optional surround audio that can be plugged in via sound card, or disconnected when this effect is not needed. The headset was originally designed to work perfectly on the Xbox, but it retains compatibility with most desktops, laptops, and consoles.
The detachable microphone is very solid and particularly effective in filtering noise and eliminating echo. It can be easily moved into any position or removed altogether when the headset is used for any purpose other than game streaming.
Pros:
- b and elegant aluminum frame
- Advanced audio control box
- Virtual 7.1 surround audio
- Interchangeable ear pads
- Premium look and feel at an affordable price
Cons:
- Inconveniently positioned mute switch
- Relatively short cord limiting movement
Best Video Editing Software for Gamers- Wondershare Filmora9
No doubt gamers would need a lot of effects and overlays to edit a live stream video to show the best effects on the game screen. High bass music syncing with the scene is very important for a game video. The sky is the limit to add effects and background to the game videos with Wondershare Filmora9 as it’s the best video editor for professionals and newcomers who are interested in gaming and pursuing a YouTube channel. Filmora9 provides you with a green screen, PIP, scene detection, play video in reverse, add voice over, royalty-free music, overlays, and transitions that you can use to make a gaming video like a pro.


Richard Bennett
Richard Bennett is a writer and a lover of all things video.
Follow @Richard Bennett
Richard Bennett
Feb 20, 2024• Proven solutions
Need a gaming headset? The number of gamers is growing every day, and that means more and more people are looking for content from experienced gamers on YouTube and Twitch. To produce great YouTube gaming videos, you’ll need a lot of gaming knowledge and a few pieces of high-quality equipment, including a good headset. Without a headset, it might be hard to keep track of in-game audio cues while entertaining your audience.
Most hardware manufacturers are actively targeting the gaming market, releasing specialized headset models for 2024. Here is a quick overview of the five best candidates for the title of the best gaming headset for 2024:
2. Audio Technica ATH-ADG1 Open Air High Fidelity Headset
3. Logitec Surround Sound Gaming Headset G430
4. Razer Kraken 7.1 Chroma Gaming Headset
5. HyperX Cloud II Gaming Headset
1. Razer Man O’ War 7.1
Price: $222.48
Compatible with: PC, Mac (with USB), PlayStation, Xbox
This wireless headset has an impressive surround sound engine that allows for an immersive gaming experience and convincing positional audio. The headset features a modern ergonomic design with earcups that fit very tightly and completely seal off the outside world. Razer Man O’War looks bulky, but it weighs just over 330 grams and uses an analog 3.5 mm connector.
The microphone boom extends from the left ear cup and can be easily adjusted or retracted. Most importantly, microphone controls are very sophisticated allowing for in-game switching between channels without disruption. When used for talking, the microphone will ensure absolute clarity, which comes handy for those who broadcast their games on YouTube.
Pros:
- Wireless setup for maximum freedom
- Minimizes ambient noise with cushion-like ear cups
- Lightweight and comfortable to wear
- Fully retractable, high-quality MEMS microphone
- Long-lasting batteries – up to 14 hours
Cons:
- Occasional loss of connectivity
- Slightly expensive for a plastic build
2. Audio Technica ATH-ADG1 Open Air High Fidelity Headset
Price: $299
Compatible with: PC, PS4, iPad, iPhone, Xbox (with adapter)
For a gaming headset, this model boasts a really impressive audio quality. This characteristic is a huge strength, especially when coupled with its broad compatibility and innovative design. The structure of this headset is unique, with an open-air setup that allows for the circulation of air under the set, which is useful during long gaming sessions. This comes at a price since the isolation against ambient noise is less than perfect and the feeling might be a bit awkward until you get used to it.
As for the microphone, it is permanently attached to the left side of the headset with a flexible stem, so it can be easily adjusted to the desired position. This implies that ATH-ADG1 was made specifically for those who need to communicate while receiving the high-quality audio feed, such as gaming streamers.
Pros:
- Extremely light and uniquely built for comfort
- Top-notch audio quality above its class
- Innovative, self-adjusting frame
- Comfortable ear cups
Cons:
- Analog headset, so the quality depends on the connected device
- Specialized product with a narrow range of applications
- Fragile build that can easily be damaged
- Very expensive
3. Logitec Surround Sound Gaming Headset G430
Price: $79.99
Compatible with: PC, PS4
Logitec is well known for producing high-quality peripherals, and this model lives up to that standard despite its affordable price. Its most touted feature is the surround sound system, which is not common in this price range. This allows for very realistic in-game audio, particularly because the headset has an excellent bass channel. In addition to solid audio performance, the Logitec gaming headset is characterized by low weight rotating ear cups with a protective cloth and vibrant coloring.
A standard 3.5 mm connector is used for the microphone, which is conveniently positioned and capable of clearly capturing speech while blocking out other sounds. Unfortunately, the microphone can’t be easily manipulated and doesn’t offer the option to be muted automatically, although a manual switch is available to turn it off. For a budget gaming headset, that’s a fair compromise.
Pros:
- Realistic, immersive sound
- Smart design optimized to decrease weight
- The Durable cloth covering the ear cups
- Surround effect on a cheap gaming headset
- Excellent price-to-quality ratio
Cons:
- Lack of programmable commands
- Poor protection against ambient noise
- Less than impressive visually
4. Razer Kraken 7.1 Chroma Gaming Headset
Price: $96.77
Compatible with : PC, PS4
If you are looking for the best gaming headset with a microphone, this is a very b candidate. It is pretty affordable compared to the other Razer headset on this list (the Man O’ War), but it is equally robust when it comes to performance, including high-quality surround audio. This is a rather large headset with thick ear cups decorated with a glowing logo of the brand, but its size is not a problem since Kraken is very comfortable even when worn continually for hours.
Kraken’s fully retractable and flexible microphone can be hidden under the left cup when not in use, giving this model a bit of versatility. It picks up your voice even when it’s bent sideways, so YouTube professionals won’t have to worry about the exact positioning while engaged in a fierce battle. It’s also possible to use a toggle switch to mute the microphone quickly.
Pros:
- Excellent audio for its price range
- Surround audio contributes to the more complete gaming experience
- Completely isolates any ambient sounds
- Flexible mic that can be moved out of the way
- Access to Synapse 2.0 software
Cons:
- USB only, no 3.5 mm jacks
- Lack of preset settings for gaming
- A sensitive microphone that sometimes picks up unwanted sounds
5. HyperX Cloud II Gaming Headset
Price: $99.88
Compatible with: PC, Mac, Xbox, PS4, Mobile
Well designed, packed with advanced features and moderately priced, this gaming headset offers a lot of value to the YouTube crowd. It comes with optional surround audio that can be plugged in via sound card, or disconnected when this effect is not needed. The headset was originally designed to work perfectly on the Xbox, but it retains compatibility with most desktops, laptops, and consoles.
The detachable microphone is very solid and particularly effective in filtering noise and eliminating echo. It can be easily moved into any position or removed altogether when the headset is used for any purpose other than game streaming.
Pros:
- b and elegant aluminum frame
- Advanced audio control box
- Virtual 7.1 surround audio
- Interchangeable ear pads
- Premium look and feel at an affordable price
Cons:
- Inconveniently positioned mute switch
- Relatively short cord limiting movement
Best Video Editing Software for Gamers- Wondershare Filmora9
No doubt gamers would need a lot of effects and overlays to edit a live stream video to show the best effects on the game screen. High bass music syncing with the scene is very important for a game video. The sky is the limit to add effects and background to the game videos with Wondershare Filmora9 as it’s the best video editor for professionals and newcomers who are interested in gaming and pursuing a YouTube channel. Filmora9 provides you with a green screen, PIP, scene detection, play video in reverse, add voice over, royalty-free music, overlays, and transitions that you can use to make a gaming video like a pro.
Richard Bennett
Richard Bennett is a writer and a lover of all things video.
Follow @Richard Bennett
The Charisma of Jittery Text: 2 Methods Unleashed
How to Create Animated Bouncing Text

Liza Brown
Mar 27, 2024• Proven solutions
Earlier, you learned how to have a bounce text effect in Adobe After Effects . However, because AE is a complex application and has a steep learning curve, this section explains the two alternative ways to get the same effect on your existing video footage.
Method 1: How to Create Bouncing Text in Filmora Video Editor?
When talking about Wondershare Filmora , the application is populated with several presets for texts and titles, animations, effects, filters, and much more.
These pre-built templates not only make your task easier, they also save your decent amount of time that you would spend while working with After Effects or any other similar app that requires you to build things from scratch.
You can follow the instructions given below to add animated bounce text to any of your video footages with Filmora:
Step 1: Add a Footage to Timeline
Launch Wondershare Filmora on your Windows or Mac PC. By default, the aspect ratio of the project is set to 16:9. Click anywhere inside the Media window at the upper-left section, and select and import footage you want to add bounce text to.
Step 2: Insert Text and Add Bounce Effect
Click Titles from the standard toolbar at the top, and click and drag your preferred title template from the Library to the timeline. In case you don’t want any specific animation or style on the title, you can use the default title.
In the timeline, double-click the title you just added, use the upper-left section to edit the text, go to the Animation tab from the left pane, scroll down the list, and double-click the Up Down 1 or Up Down 2 preset to apply the bounce effect to the credits. Click OK to save the changes and to get back to the main window.

Step 3: Add Shake Filters
Go to Effects from the standard toolbar, expand the Filters category from the left pane, and click Shake. From the Library window, click and drag your preferred shake filter to the timeline. Here, I will choose Mild.

You can customize the default effect by double-clicking the shake filter in the timeline, using the sliders in the upper-left area of the interface to make necessary adjustments, and then clicking OK to save the changes and to get back to the previous interface.

Step 4: Export the Final Output
Click EXPORT from the top of the interface, go to the Local tab in the Export box, choose your preferred output format from the list in the left, make required customizations from the right pane, and click EXPORT from the bottom-right corner to export the video.

Now, you can add the bouncing text video and the background video to the timeline, and then place the bouncing text video above the background video track.
Double click the text track, go to the Chroma Key effect, select the Color Picker tool, and click anywhere in the Preview window to get things right. Finally, export the entire project to your preferred output format as explained in Step 4.
As explained before, Wondeshare Filmora makes the entire process of creating and adding bounce text effect pretty simple. With all the pre-build templates, and the versatility of the options that can be used to customize those presets, you can come up with the effects that are usually obtained when you start generating them from the scratch.
Method 2: Generate Animated Bouncing Texts Online
If you don’t want any heavy and resource-intensive app on your PC merely for some special text effects, you can try any of the online solutions instead. The benefit of using any such web app is that all the processing is done on site’s server, and it is only a web browser and an Internet connection that you need to have at your side.
Some most trusted websites to generate bounce text are listed below:
1. ENGFTO
Website: https://engfto.com/index/create%5Fanimated%5Fbouncing%5Ftext/0-26

You can follow the instructions given below to use Engfto to generate bouncing text for your footages:
Step 1: Get to the Animated Bouncing Text Page
Launch your favorite web browser, and go to the link given above to get to the Engfto’s animated bouncing text page.
Step 2: Customize Text and Preferences
Modify the values in the fields under the SIZE AREA and TEXT sections to customize the text area, the text itself, its size, and font. Next, adjust the values in the fields under the EFFECT PARAMETERS section to get the required bounce effect. Also, use the fields under the BACKGROUND section to either change the background color, or pick a background image from your PC.
Step 3: Obtain the Animated Text
Click the SAVE GIF ANIMATION button from the lower section of the page to download the animated text to your PC.
2. Loading.io
The instructions given below explain how to use Loading.io to get animated bounce text effect for your footages:
Step 1: Get to the Loading.io Webpage
Launch your favorite web browser and go to https://loading.io/animation/text/ .
Step 2: Customize the Text and Choose Animation Effect

Use the options available on the webpage to type your text, and change its font, color, background, transparency level etc. Select Bounce (or any of its variants) from the Animation drop-down list, and adjust the speed using the Speed slider.
Step 3: Obtain the Text
Click your preferred option from next to the Download As section to download the animated text to your PC.
Note: Regardless of the web solution you choose to generate and obtain animated bounce text, you will still need a post-production tool to add the downloaded text to your footage.
Conclusion
Generating bounce text effect is much simpler when you use Wondershare Filmora or any of the online solutions as explained in Method 2. While the former gives you more flexibility when it comes to customizations, the latter doesn’t require any app to be installed on your PC. In addition, many times the web apps offer their services for free, and therefore they are preferred by the novice users who are not much into post-production processes.
Liza Brown
Liza Brown is a writer and a lover of all things video.
Follow @Liza Brown
Liza Brown
Mar 27, 2024• Proven solutions
Earlier, you learned how to have a bounce text effect in Adobe After Effects . However, because AE is a complex application and has a steep learning curve, this section explains the two alternative ways to get the same effect on your existing video footage.
Method 1: How to Create Bouncing Text in Filmora Video Editor?
When talking about Wondershare Filmora , the application is populated with several presets for texts and titles, animations, effects, filters, and much more.
These pre-built templates not only make your task easier, they also save your decent amount of time that you would spend while working with After Effects or any other similar app that requires you to build things from scratch.
You can follow the instructions given below to add animated bounce text to any of your video footages with Filmora:
Step 1: Add a Footage to Timeline
Launch Wondershare Filmora on your Windows or Mac PC. By default, the aspect ratio of the project is set to 16:9. Click anywhere inside the Media window at the upper-left section, and select and import footage you want to add bounce text to.
Step 2: Insert Text and Add Bounce Effect
Click Titles from the standard toolbar at the top, and click and drag your preferred title template from the Library to the timeline. In case you don’t want any specific animation or style on the title, you can use the default title.
In the timeline, double-click the title you just added, use the upper-left section to edit the text, go to the Animation tab from the left pane, scroll down the list, and double-click the Up Down 1 or Up Down 2 preset to apply the bounce effect to the credits. Click OK to save the changes and to get back to the main window.
Step 3: Add Shake Filters
Go to Effects from the standard toolbar, expand the Filters category from the left pane, and click Shake. From the Library window, click and drag your preferred shake filter to the timeline. Here, I will choose Mild.
You can customize the default effect by double-clicking the shake filter in the timeline, using the sliders in the upper-left area of the interface to make necessary adjustments, and then clicking OK to save the changes and to get back to the previous interface.
Step 4: Export the Final Output
Click EXPORT from the top of the interface, go to the Local tab in the Export box, choose your preferred output format from the list in the left, make required customizations from the right pane, and click EXPORT from the bottom-right corner to export the video.
Now, you can add the bouncing text video and the background video to the timeline, and then place the bouncing text video above the background video track.
Double click the text track, go to the Chroma Key effect, select the Color Picker tool, and click anywhere in the Preview window to get things right. Finally, export the entire project to your preferred output format as explained in Step 4.
As explained before, Wondeshare Filmora makes the entire process of creating and adding bounce text effect pretty simple. With all the pre-build templates, and the versatility of the options that can be used to customize those presets, you can come up with the effects that are usually obtained when you start generating them from the scratch.
Method 2: Generate Animated Bouncing Texts Online
If you don’t want any heavy and resource-intensive app on your PC merely for some special text effects, you can try any of the online solutions instead. The benefit of using any such web app is that all the processing is done on site’s server, and it is only a web browser and an Internet connection that you need to have at your side.
Some most trusted websites to generate bounce text are listed below:
1. ENGFTO
Website: https://engfto.com/index/create%5Fanimated%5Fbouncing%5Ftext/0-26
You can follow the instructions given below to use Engfto to generate bouncing text for your footages:
Step 1: Get to the Animated Bouncing Text Page
Launch your favorite web browser, and go to the link given above to get to the Engfto’s animated bouncing text page.
Step 2: Customize Text and Preferences
Modify the values in the fields under the SIZE AREA and TEXT sections to customize the text area, the text itself, its size, and font. Next, adjust the values in the fields under the EFFECT PARAMETERS section to get the required bounce effect. Also, use the fields under the BACKGROUND section to either change the background color, or pick a background image from your PC.
Step 3: Obtain the Animated Text
Click the SAVE GIF ANIMATION button from the lower section of the page to download the animated text to your PC.
2. Loading.io
The instructions given below explain how to use Loading.io to get animated bounce text effect for your footages:
Step 1: Get to the Loading.io Webpage
Launch your favorite web browser and go to https://loading.io/animation/text/ .
Step 2: Customize the Text and Choose Animation Effect
Use the options available on the webpage to type your text, and change its font, color, background, transparency level etc. Select Bounce (or any of its variants) from the Animation drop-down list, and adjust the speed using the Speed slider.
Step 3: Obtain the Text
Click your preferred option from next to the Download As section to download the animated text to your PC.
Note: Regardless of the web solution you choose to generate and obtain animated bounce text, you will still need a post-production tool to add the downloaded text to your footage.
Conclusion
Generating bounce text effect is much simpler when you use Wondershare Filmora or any of the online solutions as explained in Method 2. While the former gives you more flexibility when it comes to customizations, the latter doesn’t require any app to be installed on your PC. In addition, many times the web apps offer their services for free, and therefore they are preferred by the novice users who are not much into post-production processes.
Liza Brown
Liza Brown is a writer and a lover of all things video.
Follow @Liza Brown
Also read:
- Charting the Course From Scale to Submillions in Youtube
- Best 10 Volume Magnifiers for Windows/MacOS for 2024
- 2024 Approved Advanced Presentation Techniques YouTube in Slides
- [Updated] Brief but Impactful Which Social Platform Leads for Short Video Content?
- Top Best Video Editor with Music For PC Users
- 2024 Approved Curating Best Audio Relaxation Tools (ASMR)
- Decoding the Payment Structure on YouTube
- Becoming a YouTube Guru Essential Production Know-How
- No More Distractions - Expert Guide to Removing YouTube Ads
- Final Thoughts on YouTubing - Best Makers, Tips, and Templates
- [Updated] Channel Finale 101 Insider Tricks for Successful Outros
- In 2024, Effortless iMovie Music Enhancement Using YouTube Songs
- Optimal Tripod Setup for Smooth, Professional Videography
- Social Media Live Platforms FACEbook Vs. YOUTube Live & Twitter Periscope
- [New] Cutting-Edge Editing A Roadmap for High-Quality YouTube Sounds
- [Updated] Determining View Count's Direct Effect on Creator Revenue
- Blueprint Strategies for Authentic Life Enrichment Videos
- Best 5 YouTube Tag Generators & Tips to Tag Videos Properly
- [New] Channel Choices Youtube vs TikTok Battle
- [Updated] Charting Your Financial Course The 3-Step Methodology for Estimating YouTube Income
- [Updated] Control YouTube Audio Mobile/Desktop Approach
- [Updated] Elevate Your Video Productions 15 Top-Tier Free Music Websites
- Elevate Your Content Game Tactics for Optimal YouTube Featured Channels
- 2024 Approved Deep Dive Into the Rise of Online Performing Artists
- In 2024, Best Free Video Editing Programs You Should Know
- In 2024, Charting Success Top 15 Investment Educational Videos
- 2024 Approved Amplifying Your Content Free Techniques to Boost YouTube Views
- Top 10 Online Yoga Classrooms Enhancing Physical Strength
- [New] Aesthetic Ambitions Launching a YouTube Channel for Makeup Maven
- Optimal Video-Sharing Experience Decide Between TikTok & YouTubes' Shorts
- Constructing a Custom YouTube Subscription URL for 2024
- Top 10 Yoga YouTube Channels to Follow - Keep Fit
- 2024 Approved Building Direct URLs for YouTube Channel Subscribers
- In 2024, Are Annual Payments for YouTube Premium Better Than Monthly?
- 2024 Approved Conquer Zero Viewers 10 Essential Tips for Video Popularity
- 2024 Approved Ensuring Profit Tracking on Your Channel
- 2024 Approved Boosting Video Management Creating an Effective YouTube Watch Later List
- [New] Audio Recording 101 From YouTube Playback To Files
- 2024 Approved Dissecting Video Ranking Algorithms on YouTube
- [New] Demystifying YouTube Shorts for Total Beginners
- In 2024, How to Mirror Itel A70 to Mac? | Dr.fone
- [New] ZD Soft Screen Recorder Key Features and Review for 2024
- 2024 Approved Brand Expression Made Simple Affordable Personalized Logo Templates (Free)
- In 2024, Craft Superior Canon Chrono Series
- [Updated] How to Get Free Animated Emojis on Discord [With/Without Nitro] for 2024
- Terrarium's Topography Selecting Prime Maps
- New 2024 Approved Efficient, Cost-Effective Steps to Convert Voices to Text Comprehensive Guide
- [Updated] Quick Route to Your Latest FB Video Viewings for 2024
- Complete Fixes To Solve Apple iPhone 13 Pro Max Randomly Asking for Apple ID Password | Dr.fone
- Facebook Launching Your First Phenomenal Giving Post
- In 2024, How to use Snapchat Location Spoofer to Protect Your Privacy On Xiaomi Redmi 12? | Dr.fone
- [Updated] Understanding IGTV Shutdown
- List of Pokémon Go Joysticks On Apple iPhone 13 Pro Max | Dr.fone
- [Updated] 2024 Approved Unrivaled 7 Best Virtual Meetings Security-Centric Ranking
- 2024 Approved Essential Software for Recording Educational Experiences
- In 2024, How to Watch Hulu Outside US On Poco X6 | Dr.fone
- Innovating Content Tips for Facebook Slide Show Makers
- Updated 2024 Approved Top 15 Adobe Premiere Plugins Free Download
- Title: "High-End Audio for YouTube's Best Gamers"
- Author: Brian
- Created at : 2024-05-25 11:56:15
- Updated at : 2024-05-26 11:56:15
- Link: https://youtube-video-recordings.techidaily.com/high-end-audio-for-youtubes-best-gamers/
- License: This work is licensed under CC BY-NC-SA 4.0.
