
:max_bytes(150000):strip_icc()/is-verizon-down-or-is-it-just-you-5069423-437db7b54e7c4a758e5f445dfa5edaea.jpg)
Green Up Your CTA Strategy with Tools
Green Up Your CTA Strategy with Tools
Create High-Quality Video - Wondershare Filmora
An easy and powerful YouTube video editor
Numerous video and audio effects to choose from
Detailed tutorials provided by the official channel
Advances in filmmaking have brought many concepts into reality. And the green screen is one common practice. Green screen technology is a technique where you use two images or video streams to composite them together. You can use any background images, either foreground or behind the actors. For YouTube, you can use green screen subscribe to facilitate video Call To Action. A green screen easily produces impossible scenes and expands filming ideas. Everything done at the Studio is also the best way to protect actors from hazardous environments.
More so, the best trick is to allow actors to appear together on the screen even when the scenes were captured separately. And did you know that subscribe green screen makes it easy to add YouTube Call To Action and direct viewers on what to do?

Methods to add a subscribe button to your video
Viewers are not likely to subscribe to any channel if they are not guided. One best method is to engage a subscribe button to your video and draw the attention of as many as possible.
1 Use Subscribe Green Screen
Put your green screen to work by subscribing to it. Follow these steps to produce eye-catching videos, with a call to action closing point.
Step 1. Set screen
You need to create a background at the Studio – and that’s the green screen. Keenly hand it on a frame before you start filming. Also, note that no wrinkles or fold-ups are visible.

Step 2. Adjust lighting
Lighting is important to facilitate high-resolution video output quality. Put appropriate lighting settings to avoid directional shadows and get the best results.
Step 3. Set up the subject
Give ample space between the subject and the green screen for an effective outcome. If they are too close, there will be a reflection of the green screen on the subject. It isn’t professional as it will be hard when it comes to matching to a different background.

Step 4. Start filming
Begin to film your video and ensure you take various shots for comparison. It is good to film at different angles to see what works best.
Step 5. Polish the rough cut
Tune all the footage to perfect video clips. It will save your efforts when keying out green screen footage. Remove the unwanted parts by trimming. You can also do other edits like merge and split where necessary.
Step 6. Key out the footage and edit the green screen
Your footage is now ready, and you are now free to edit the green screen. It is better to engage reliable editing software to remove the green traces in the shot.
Step 7. Paste the new background
Any background concept can now fit in. Add your desired background video or image in a new layer below the subject. You can continue to make other necessary adjustments like sharpness and hue for reality.
Step 8. Add Call To Action
Finally, tell your viewers to subscribe to your YouTube channel while watching the video. You can also introduce your other channels that aren’t yet known or those that have not reached 1,000 subscribers.
2 Using YouTube Studio
You can also enable the green screen to subscribe via the YouTube Studio. It is a YouTube application that provides you with the tools you need to create a successful YouTube channel. You can manage your videos, respond to comments and even add adverts to your content for pay. Here are the steps to add subscribe button.
Step 1. First, go directly to “studio.youtube.com” or click on your profile picture on the YouTube page to launch YT Studio.

Step 2. Click on the “Menu” option and choose the “Settings”> “Channel” option.

Step 3. Then select the “Choose” image and select which subscribe button image you wish to use as your branding watermark. You can easily get one on the Google images section.
Step 4. Next, choose the display time for the branding watermark. It could be a custom start time if you want the branding watermark to start showing at a specific time. You can also choose “End or video” for it to appear at the last 10 to 15 seconds of your video. Likewise, the branding watermark can show throughout the video if you choose the “Entire video” option.
Step 5. Finally, save the changes. Voila! Viewers can subscribe to your channel easily, with a single click of a button.
3 Using Subscribe Effects
You can also use the subscribers’ effects to add a Call To Action. Remember, your main aim is to increase the audience to your channel. And in most cases, viewers forget to subscribe even though they love your video. Perhaps they don’t understand the importance it holds to your channel. You can do this using a reliable video editor software – Filmora.
Filmora is a sophisticated tool that is easy to use and export your videos to your computer and upload them to YouTube. It has over 300 effects for YouTubers and comprises exclusive overlays for any scene. Follow these steps to add the subscribe button with subscribe effects.
Key Features of Filmora
- Edit and export your videos at up to 4K resolution
- Supports GIF animation, which you can use for CTA
- It has an advanced text editor
- Easily remove background noise for a polished video sound
- It has an audio equalizer functionality for audio uniformity
- It has the video stabilization functionality
For Win 7 or later (64-bit)
For macOS 10.12 or later
Step 1. Launch Filmora
Open Filmora on your computer, then navigate to the upper left corner of the screen. Click on the “Sample Colors” and select the “Green color.” Next, drag it to video track into the timeline. Then adjust the duration of your video track to your preference.

Step 2. Design the subscribe GIF animation
Use a different color shade to design the subscribe GIF animation. Take “Red” in this case as it smartly blends with the green color that we choose earlier. Drag the red color above the green background.

Step 3. Adjust the red box
Make the added color red button look like a subscribe button. Then place it at any point you want it to appear in front of the background.
Step 4. Add the subscribe text
Write a text into the button. Filmora offers you various styles of text to choose from. You can select the text style you want to use, then drag and drop it into the timeline.

Step 5. Edit title with “Subscribe”
Edit your text with the word “Subscribe,” then place it under the red rectangle and hit the “OK” button.
Step 6. Animate the “Subscribe” button
Double click on the “Red” button. Just go to the “Animate” tab and click on the “Customize” option. Next, click on the “Add” button.

Step 7. Animate text as well
Go to the “Text” option in the timeline and click on “Advanced” text editor. Then go to the “Animation” tab and select the animation you wish to use. Here, you can adjust your text’s start and ending time when you want it to start fading.
Step 8. Export GIF
Your Subscribe GIF is now ready to be exported to your video. Hit the “Export” button and select which format to export it in.

Extra Tip: Ways to Include Calls to Action on videos
Know how to include CTA in your video marketing strategy to boost your subscribers.
- Include Annotations
Annotations are eye-catching and a quick reminder for viewers. You have a variety to choose from, like bubbles, shoutouts, etc. They are used to remind you to subscribe to the channel, view another video, or comment after watching it. - Edit CTAs in your video
It lets the viewer know what to do next before the video ends. The likely reminder is to subscribe to the channel. They could also be reminded to watch the next video or leave a comment. - YouTube Ad Overlays also work
However, ad overlay is for content creators with Google AdWords enabled on their YT channel. Adding an Ad Overlay will link you to any part of the web. Do you want to know the best part? No cost at all! You only need to pay for the views you buy during your video promotion.
Conclusion
● The best strategy to get viewers to subscribe to your YouTube channel is to engage a Call To Action. A bigger number of subscribers guarantees more watch time and the possible growth of your channel. Subscribe green screen even makes it perfect as far as video creation is concerned. You can get different video background ideas and make every scene look authentic. You can engage a third-party tool like Filmora. It will effortlessly add a green screen subscribe in a few steps. Likewise, you can add annotations and other text styles to enhance your look.
Advances in filmmaking have brought many concepts into reality. And the green screen is one common practice. Green screen technology is a technique where you use two images or video streams to composite them together. You can use any background images, either foreground or behind the actors. For YouTube, you can use green screen subscribe to facilitate video Call To Action. A green screen easily produces impossible scenes and expands filming ideas. Everything done at the Studio is also the best way to protect actors from hazardous environments.
More so, the best trick is to allow actors to appear together on the screen even when the scenes were captured separately. And did you know that subscribe green screen makes it easy to add YouTube Call To Action and direct viewers on what to do?
Methods to add a subscribe button to your video
Viewers are not likely to subscribe to any channel if they are not guided. One best method is to engage a subscribe button to your video and draw the attention of as many as possible.
1 Use Subscribe Green Screen
Put your green screen to work by subscribing to it. Follow these steps to produce eye-catching videos, with a call to action closing point.
Step 1. Set screen
You need to create a background at the Studio – and that’s the green screen. Keenly hand it on a frame before you start filming. Also, note that no wrinkles or fold-ups are visible.
Step 2. Adjust lighting
Lighting is important to facilitate high-resolution video output quality. Put appropriate lighting settings to avoid directional shadows and get the best results.
Step 3. Set up the subject
Give ample space between the subject and the green screen for an effective outcome. If they are too close, there will be a reflection of the green screen on the subject. It isn’t professional as it will be hard when it comes to matching to a different background.
Step 4. Start filming
Begin to film your video and ensure you take various shots for comparison. It is good to film at different angles to see what works best.
Step 5. Polish the rough cut
Tune all the footage to perfect video clips. It will save your efforts when keying out green screen footage. Remove the unwanted parts by trimming. You can also do other edits like merge and split where necessary.
Step 6. Key out the footage and edit the green screen
Your footage is now ready, and you are now free to edit the green screen. It is better to engage reliable editing software to remove the green traces in the shot.
Step 7. Paste the new background
Any background concept can now fit in. Add your desired background video or image in a new layer below the subject. You can continue to make other necessary adjustments like sharpness and hue for reality.
Step 8. Add Call To Action
Finally, tell your viewers to subscribe to your YouTube channel while watching the video. You can also introduce your other channels that aren’t yet known or those that have not reached 1,000 subscribers.
2 Using YouTube Studio
You can also enable the green screen to subscribe via the YouTube Studio. It is a YouTube application that provides you with the tools you need to create a successful YouTube channel. You can manage your videos, respond to comments and even add adverts to your content for pay. Here are the steps to add subscribe button.
Step 1. First, go directly to “studio.youtube.com” or click on your profile picture on the YouTube page to launch YT Studio.
Step 2. Click on the “Menu” option and choose the “Settings”> “Channel” option.
Step 3. Then select the “Choose” image and select which subscribe button image you wish to use as your branding watermark. You can easily get one on the Google images section.
Step 4. Next, choose the display time for the branding watermark. It could be a custom start time if you want the branding watermark to start showing at a specific time. You can also choose “End or video” for it to appear at the last 10 to 15 seconds of your video. Likewise, the branding watermark can show throughout the video if you choose the “Entire video” option.
Step 5. Finally, save the changes. Voila! Viewers can subscribe to your channel easily, with a single click of a button.
3 Using Subscribe Effects
You can also use the subscribers’ effects to add a Call To Action. Remember, your main aim is to increase the audience to your channel. And in most cases, viewers forget to subscribe even though they love your video. Perhaps they don’t understand the importance it holds to your channel. You can do this using a reliable video editor software – Filmora.
Filmora is a sophisticated tool that is easy to use and export your videos to your computer and upload them to YouTube. It has over 300 effects for YouTubers and comprises exclusive overlays for any scene. Follow these steps to add the subscribe button with subscribe effects.
Key Features of Filmora
- Edit and export your videos at up to 4K resolution
- Supports GIF animation, which you can use for CTA
- It has an advanced text editor
- Easily remove background noise for a polished video sound
- It has an audio equalizer functionality for audio uniformity
- It has the video stabilization functionality
For Win 7 or later (64-bit)
For macOS 10.12 or later
Step 1. Launch Filmora
Open Filmora on your computer, then navigate to the upper left corner of the screen. Click on the “Sample Colors” and select the “Green color.” Next, drag it to video track into the timeline. Then adjust the duration of your video track to your preference.
Step 2. Design the subscribe GIF animation
Use a different color shade to design the subscribe GIF animation. Take “Red” in this case as it smartly blends with the green color that we choose earlier. Drag the red color above the green background.
Step 3. Adjust the red box
Make the added color red button look like a subscribe button. Then place it at any point you want it to appear in front of the background.
Step 4. Add the subscribe text
Write a text into the button. Filmora offers you various styles of text to choose from. You can select the text style you want to use, then drag and drop it into the timeline.
Step 5. Edit title with “Subscribe”
Edit your text with the word “Subscribe,” then place it under the red rectangle and hit the “OK” button.
Step 6. Animate the “Subscribe” button
Double click on the “Red” button. Just go to the “Animate” tab and click on the “Customize” option. Next, click on the “Add” button.
Step 7. Animate text as well
Go to the “Text” option in the timeline and click on “Advanced” text editor. Then go to the “Animation” tab and select the animation you wish to use. Here, you can adjust your text’s start and ending time when you want it to start fading.
Step 8. Export GIF
Your Subscribe GIF is now ready to be exported to your video. Hit the “Export” button and select which format to export it in.
Extra Tip: Ways to Include Calls to Action on videos
Know how to include CTA in your video marketing strategy to boost your subscribers.
- Include Annotations
Annotations are eye-catching and a quick reminder for viewers. You have a variety to choose from, like bubbles, shoutouts, etc. They are used to remind you to subscribe to the channel, view another video, or comment after watching it. - Edit CTAs in your video
It lets the viewer know what to do next before the video ends. The likely reminder is to subscribe to the channel. They could also be reminded to watch the next video or leave a comment. - YouTube Ad Overlays also work
However, ad overlay is for content creators with Google AdWords enabled on their YT channel. Adding an Ad Overlay will link you to any part of the web. Do you want to know the best part? No cost at all! You only need to pay for the views you buy during your video promotion.
Conclusion
● The best strategy to get viewers to subscribe to your YouTube channel is to engage a Call To Action. A bigger number of subscribers guarantees more watch time and the possible growth of your channel. Subscribe green screen even makes it perfect as far as video creation is concerned. You can get different video background ideas and make every scene look authentic. You can engage a third-party tool like Filmora. It will effortlessly add a green screen subscribe in a few steps. Likewise, you can add annotations and other text styles to enhance your look.
Shielding Your Media: What Does Unlisted Mean in YouTube?
Complete Guide: What Does Unlisted Mean on YouTube

Richard Bennett
Mar 27, 2024• Proven solutions
Whether personal or professional purposes, YouTube is a great platform for sharing videos but, there are times, when you don’t wish to share it with each and everyone across the globe. The YouTube unlisted meaning is a video which can be viewed only by the users having the link to it. At the back of your mind, you may be wondering how safe an unlisted video is. Let’s learn in detail what does unlisted mean on YouTube.
- Part 1: What is Unlisted Video on YouTube
- Part 2: How to Make YouTube Videos Unlisted
- Part 3: How to Share Unlisted Video
Wondershare Filmora video editor is one of the most widely used video editing software for YouTubers, it makes the video editing simplified with the pre-programmed effects and templates. You can download the free trial version to check.


Part 1: What Does Unlisted Video Mean on YouTube
The YouTube unlisted meaning is that your video will neither come up in the search results nor on your channel. Only the users who have the link to the video can view it. The link can be shared with anyone and everyone, even with the users who do not have a YouTube account. Many people don’t know the difference between private and unlisted YouTube videos . In order to understand what does unlisted mean on YouTube in a detailed way, let’s dive deeper into it and know the difference between public videos, unlisted videos, and private videos.
1. What is Unlisted YouTube Video
Between private and public, you can find the unlisted videos. What does unlisted mean on YouTube? An unlisted video does not appear in the search results, suggestions or video tab. If you unlist a new video, your subscribers won’t receive any notification informing about it. You can share an unlisted video with the people you wish to share and the users having a link to the video can see it. It can also be viewed by the friend of friends if they share the link with their friends.
The unlisted videos are treated like public videos by YouTube. This means that you cannot use the copyright audio or video and it will be reviewed by the YouTube team if other users flag it as inappropriate content within a timeframe of 24-hours .
What Unlisted YouTube Videos Can Do
The unlisted videos can be shared with family and friends. If you are conducting a webinar and wish to share the video with only the registered users, an unlisted video can be used. You may also use the unlisted video for giving access to the people who embedded it while cleaning the YouTube page. For getting feedback from closed groups for market research or to share online resume link for job applications, the unlisted videos can be of great help.
Takeaway: Unlisted videos are a great way to share personal videos with just your family and friends, or to get feedback from people you trust on videos before you decide whether to make them public.
2. What is Private YouTube Video
The videos that do not appear in the recommendations, search options in YouTube or in your tab are the private videos. When you select the private setting for a video, the subscribers don’t get a notification. The private videos can be seen only by the uploader and the mentioned Google accounts. It is not available for friends of friends which mean if you share a private video with a friend, only that person can see it. If your friend shares it with someone, it won’t be visible to others. If anyone wishes to view a private video, the person has to request permission to view to the uploader.

What Private Youtube Videos Can Do
By using private YouTube videos, the internal company information can be kept confidential, the family videos can be shared safely with the people you wish to, and also store your personal data without worrying about being hacked by the strangers. By choosing the private setting, you may upload and schedule the date and time when a video can be made public on YouTube. It helps in saving storage space on your phone.
Takeaway: A private YouTube video is only available to YouTube users that you invite to view it.
3. What are Public Youtube Videos
The Public setting in the YouTube video is a default setting which allows everyone to see the video you post. When you want your video to appear in the search engine results and want more and more viewers and traffic on your video, you can keep the Public default setting on.
What Public YouTube Videos Can Do
Do you wish to grow your brand awareness? Select the Public default setting as it is the best way to do it. You may use the Public setting in any of these situations below:
- Having a video sharing business like explainer videos, product reviews, commercials, etc. with customers or prospective viewers
- Targeting at earning money through YouTube videos
- Looking forward to the growing personal brand by a YouTuber
- Looking for more and more subscribers on YouTube
But, you must remember that once you post the video, it will be available for everyone throughout the world on YouTube. Even if you decide to change the settings or delete the video, later on, you will be subjected to judgment, professionally and personally. While posting a video with Public setting, you must have an answer to questions like-
- Shall the senior or your boss see this video?
- Can your job prospect hamper with this video?
- Does the video contain harassing or offensive content?
- Can your friends ridicule you after seeing the video content?
If all the questions are answered in YES… then it is better to think hard and long before uploading the video content with Public setting on YouTube. You may upload the content with unlisted or private settings.
Takeaway: If you make a video public, anyone will be able to find and watch it. When uploading a video using default settings through YouTube, it will always default to being a public video.
Below is a brief comparison table about the differences among YouTube Unlisted, Private and Public video settings.
| Feature | Unlisted | Private | Public |
|---|---|---|---|
| Can I share video URL to friends? | Yes | No | Yes |
| Can I add video to YouTube channel? | Yes | No | Yes |
| Can I shows up video in YouTube platform? | No | No | Yes |
| Can I post video on my channel? | No | No | Yes |
| Can I leave a comment? | Yes | No | Yes |
| Can I see it in landing page? | Yes | No | Yes |
| Do People need an account to watch it? | No | No | Yes |
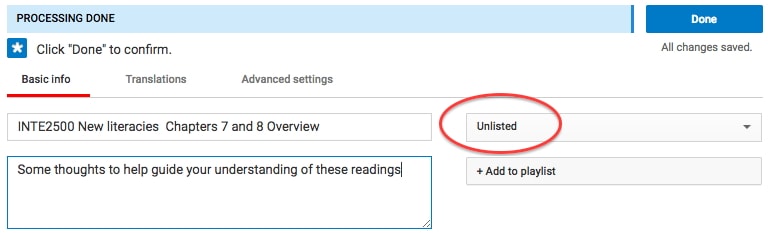
Part 2: How to Make an Unlisted YouTube Video
Follow the below-mentioned steps to make an unlisted YouTube video -
- Log in to your YouTube channel
- In the top right corner, click the add video button
- Find the drop-down menu and choose Upload Video
- Select the setting by clicking on Public and a drop-down menu appears to unlisted
- Search the instruction select files to upload your video
- When you start uploading your video, a message box appears, Click Public on the right side corner and select unlisted from the drop-down menu
- Once you have selected unlisted, click Done in the top right corner and your video is published
Part 3: How to Share Your Unlisted Video
If you wish to share the unlisted video , just share the published video link with anyone you wish to share. A Google account is not required to see the video. So, if the person you shared the link with is not logged in to his Google account, still the video can be viewed. The people who have the link to your video can also share and re-share the link in a number of ways. It can be shared on the social media or just forwarded amongst their friends. But, if you don’t want your friends to re-share it, change the settings to Private.
You can see a message showing “this video is unlisted” on YouTube when you want to share someone else’s unlisted video on social platforms. Think before you consider sharing an unlisted video.
Conclusion
Now, that you clearly know what does unlisted mean on YouTube, consider the option while uploading a video. It helps in retaining the privacy of your video.
Richard Bennett
Richard Bennett is a writer and a lover of all things video.
Follow @Richard Bennett
Richard Bennett
Mar 27, 2024• Proven solutions
Whether personal or professional purposes, YouTube is a great platform for sharing videos but, there are times, when you don’t wish to share it with each and everyone across the globe. The YouTube unlisted meaning is a video which can be viewed only by the users having the link to it. At the back of your mind, you may be wondering how safe an unlisted video is. Let’s learn in detail what does unlisted mean on YouTube.
- Part 1: What is Unlisted Video on YouTube
- Part 2: How to Make YouTube Videos Unlisted
- Part 3: How to Share Unlisted Video
Wondershare Filmora video editor is one of the most widely used video editing software for YouTubers, it makes the video editing simplified with the pre-programmed effects and templates. You can download the free trial version to check.
Part 1: What Does Unlisted Video Mean on YouTube
The YouTube unlisted meaning is that your video will neither come up in the search results nor on your channel. Only the users who have the link to the video can view it. The link can be shared with anyone and everyone, even with the users who do not have a YouTube account. Many people don’t know the difference between private and unlisted YouTube videos . In order to understand what does unlisted mean on YouTube in a detailed way, let’s dive deeper into it and know the difference between public videos, unlisted videos, and private videos.
1. What is Unlisted YouTube Video
Between private and public, you can find the unlisted videos. What does unlisted mean on YouTube? An unlisted video does not appear in the search results, suggestions or video tab. If you unlist a new video, your subscribers won’t receive any notification informing about it. You can share an unlisted video with the people you wish to share and the users having a link to the video can see it. It can also be viewed by the friend of friends if they share the link with their friends.
The unlisted videos are treated like public videos by YouTube. This means that you cannot use the copyright audio or video and it will be reviewed by the YouTube team if other users flag it as inappropriate content within a timeframe of 24-hours .
What Unlisted YouTube Videos Can Do
The unlisted videos can be shared with family and friends. If you are conducting a webinar and wish to share the video with only the registered users, an unlisted video can be used. You may also use the unlisted video for giving access to the people who embedded it while cleaning the YouTube page. For getting feedback from closed groups for market research or to share online resume link for job applications, the unlisted videos can be of great help.
Takeaway: Unlisted videos are a great way to share personal videos with just your family and friends, or to get feedback from people you trust on videos before you decide whether to make them public.
2. What is Private YouTube Video
The videos that do not appear in the recommendations, search options in YouTube or in your tab are the private videos. When you select the private setting for a video, the subscribers don’t get a notification. The private videos can be seen only by the uploader and the mentioned Google accounts. It is not available for friends of friends which mean if you share a private video with a friend, only that person can see it. If your friend shares it with someone, it won’t be visible to others. If anyone wishes to view a private video, the person has to request permission to view to the uploader.
What Private Youtube Videos Can Do
By using private YouTube videos, the internal company information can be kept confidential, the family videos can be shared safely with the people you wish to, and also store your personal data without worrying about being hacked by the strangers. By choosing the private setting, you may upload and schedule the date and time when a video can be made public on YouTube. It helps in saving storage space on your phone.
Takeaway: A private YouTube video is only available to YouTube users that you invite to view it.
3. What are Public Youtube Videos
The Public setting in the YouTube video is a default setting which allows everyone to see the video you post. When you want your video to appear in the search engine results and want more and more viewers and traffic on your video, you can keep the Public default setting on.
What Public YouTube Videos Can Do
Do you wish to grow your brand awareness? Select the Public default setting as it is the best way to do it. You may use the Public setting in any of these situations below:
- Having a video sharing business like explainer videos, product reviews, commercials, etc. with customers or prospective viewers
- Targeting at earning money through YouTube videos
- Looking forward to the growing personal brand by a YouTuber
- Looking for more and more subscribers on YouTube
But, you must remember that once you post the video, it will be available for everyone throughout the world on YouTube. Even if you decide to change the settings or delete the video, later on, you will be subjected to judgment, professionally and personally. While posting a video with Public setting, you must have an answer to questions like-
- Shall the senior or your boss see this video?
- Can your job prospect hamper with this video?
- Does the video contain harassing or offensive content?
- Can your friends ridicule you after seeing the video content?
If all the questions are answered in YES… then it is better to think hard and long before uploading the video content with Public setting on YouTube. You may upload the content with unlisted or private settings.
Takeaway: If you make a video public, anyone will be able to find and watch it. When uploading a video using default settings through YouTube, it will always default to being a public video.
Below is a brief comparison table about the differences among YouTube Unlisted, Private and Public video settings.
| Feature | Unlisted | Private | Public |
|---|---|---|---|
| Can I share video URL to friends? | Yes | No | Yes |
| Can I add video to YouTube channel? | Yes | No | Yes |
| Can I shows up video in YouTube platform? | No | No | Yes |
| Can I post video on my channel? | No | No | Yes |
| Can I leave a comment? | Yes | No | Yes |
| Can I see it in landing page? | Yes | No | Yes |
| Do People need an account to watch it? | No | No | Yes |
Part 2: How to Make an Unlisted YouTube Video
Follow the below-mentioned steps to make an unlisted YouTube video -
- Log in to your YouTube channel
- In the top right corner, click the add video button
- Find the drop-down menu and choose Upload Video
- Select the setting by clicking on Public and a drop-down menu appears to unlisted
- Search the instruction select files to upload your video
- When you start uploading your video, a message box appears, Click Public on the right side corner and select unlisted from the drop-down menu
- Once you have selected unlisted, click Done in the top right corner and your video is published
Part 3: How to Share Your Unlisted Video
If you wish to share the unlisted video , just share the published video link with anyone you wish to share. A Google account is not required to see the video. So, if the person you shared the link with is not logged in to his Google account, still the video can be viewed. The people who have the link to your video can also share and re-share the link in a number of ways. It can be shared on the social media or just forwarded amongst their friends. But, if you don’t want your friends to re-share it, change the settings to Private.
You can see a message showing “this video is unlisted” on YouTube when you want to share someone else’s unlisted video on social platforms. Think before you consider sharing an unlisted video.
Conclusion
Now, that you clearly know what does unlisted mean on YouTube, consider the option while uploading a video. It helps in retaining the privacy of your video.
Richard Bennett
Richard Bennett is a writer and a lover of all things video.
Follow @Richard Bennett
Also read:
- 15 Steps Towards Perfecting Your Educational Video Content for YouTube
- In 2024, Top 10 YouTube Video Trimmers Online
- Boosted Audio-Visual Experience Choose AV1 on YouTube for 2024
- 2024 Approved Comparing YouTube Policies with Creative Commons
- Excellence Exchange Global Creators
- Maximizing YouTube Shorts Income Strategies
- [New] Elevate Your Channel's Popularity with 12 Key Growth Techniques
- Behind the Scenes What Does an 'Unlisted' Video Mean?
- [Updated] Deciphering How T-Series Earns via Youtube
- [Updated] Cutting-Edge Gear for Aspiring YouTube Stars
- [New] Command the YouTube Stage Mastering Visibility Through Tactics
- [Updated] Chuckle Collective Top 15 Hilarious YouTubers for Boredom Beaters
- Navigating the Platform Apple Devices and YouTube Uploads
- [New] Compact Video Summary Key Insights Unveiled
- [New] 10 YouTube Havens for Entrepreneurs & Business Gurus
- Classic Cinema Revisited Step-by-Step Video Guide for 2024
- Streamline Your Music Habits with These 15 High-Quality, Free YouTube Extractors
- Premium 7 Cameras Boosting Vlogging Creativity & Viewership
- [Updated] Culinary Comrades YouTube's Best Food Blogs
- Unique Coverage Awaits Crafting Your Own Custom YouTube Shorts Images
- Audio Amplified Today's Hits Backdropping YT Shorts
- [New] Download Custom MCB Banner Packs
- 2024 Approved Best 8 Linux Platforms for Video Mastery
- A Comprehensively Reviewed List of YouTube Video Extractor Apps (Android)
- From Raw Footage to YouTube A Step-by-Step Process Unveiled
- YouTube Advertising Crafting a Winning Campaign
- [New] Channel Choices Youtube vs TikTok Battle
- Economical Entrance to YouTube Ecosystem Affiliate Assistance for Small Sets
- [Updated] Easy-Peasy YouTube Tutorials Making Content That Works for All
- [New] Essential 20 YouTube Playlists Bringing You the Beat
- Mastering YouTube Video Composition Techniques
- 2024 Approved Beat Drops in Seconds A Beginner’s Guide to Music Videos
- Thriving Online A Strategy Guide for Building YouTube Links
- Streamlining Discovery The Key to Effective Video Titling
- Enhance Branding The Ultimate Guide to Custom URLs for YouTube for 2024
- [Updated] Best Tools for Transforming Your Spotify Mixes Into YouTube Channels
- Future of Virtual Game Viewership Income
- 2024 Approved Decoding the Revised YouTube Earnings Criteria
- Explore 10 Premium YouTube-to-WebM Converter Tools
- In 2024, Boosting Bank Balance Effective Tactics for Mobile Video Money-Making
- Exclusive List of the Top 10 Digital Recording Apps
- In 2024, Become a Short-Form Video Star with These 10 Proven Methods
- [Updated] Decoding Revenue From A Million Watches on YouTube
- In 2024, Boost Your YouTube Output - Rapid Video Rendering and Transfer
- Income Comparison Exercise Monetizing Videos on DailyMovement & YouTube
- Navigate the Melody Maze Crafting a Personalized YouTube Playlist
- Top 5 Gaming Headsets for YouTube
- [New] Channel Titans The Current List of Top Subscribers
- The Ultimate Guide to YouTube Keywords for Peak Performance
- In 2024, Access High-Quality YouTube Images Without Paying a Dime
- [New] Crafting the Perfect Voice and Vision for Docs
- Is pgsharp legal when you are playing pokemon On Xiaomi Redmi A2? | Dr.fone
- How to Lock Apps on Samsung Galaxy A34 5G to Protect Your Individual Information
- [Updated] A Step-by-Step Guide to Updating Photos and Videos on Instagram for 2024
- [Updated] Instagram Integrity at Stake with Artificial Approvals
- Mastering Earnings via Sponsored YouTube Videos
- 6 Proven Ways to Unlock Itel S23 Phone When You Forget the Password
- Three methods to recover lost data on Vivo V27e
- [Updated] Beyond 3D A Comparative Guide to Metaverse and Omniverse Realities
- [New] In 2024, Immediate Flagging of Insta De-Following Events
- [New] Superior Schedulers for Success Our Recommendation List
- In 2024, Fix Apple iPhone 15 Pro Stuck on Data Transfer Verified Solution! | Dr.fone
- In 2024, 4 Most-Known Ways to Find Someone on Tinder For Vivo S18 Pro by Name | Dr.fone
- [New] In 2024, Elevate Online Engagement Unlocking the Potential of VoiceMod on Discord
- new 2024 Approved Unlocking Global Audiences Top Video Language Converters
- [Updated] Best High-Quality Discord Music Bots | Updated for 2024
- [New] Streamlining Media Transfer Twitter Content on Snapchat for 2024
- [Updated] In 2024, Integrating YouTube Into Your Social Media Strategy - Facebook
- [Updated] In 2024, Restoring Your TikTok Profile Visibility
- Hidden ScreenShotters Concealed Photography on the Snapchat App for 2024
- [New] In 2024, Navigating the Technicalities Recording & Saving Your Role-Play Experieninas on Apple Devices
- Complete guide for recovering photos files on Oppo .
- [Updated] Download Twitter GIF 3 Ways to Download GIFs From Twitter on Your PC for 2024
- Three Solutions to Hard Reset Realme V30? | Dr.fone
- In 2024, 10 Most Innovative No-Cost Digital Audio Trimmer Tools
- New 2024 Approved Whats the Best Green Screen App for Mac? Weve Got the Answer
- In 2024, 20 Leading No-Cost Digital Editing Platforms
- [New] Beyond ShareX In-Depth Comparisons for 2024
- [Updated] 2024 Approved Dispelling Illusions Yourself, Not An Impostor on FB
- Updated Unlocking Profound Sound A Guide to Deepening Your Vocal Presence via Filmora for 2024
- How Does Gain Staging Impact the Overall Fidelity of Recorded Tracks, In 2024
- In 2024, How To Unlock Vivo S18 Phone Without Password?
- In 2024, A Step-by-Step Guide on Using ADB and Fastboot to Remove FRP Lock on your ZTE Nubia Z60 Ultra
- How to recover deleted photos on Realme Narzo N53
- How To Unlock Realme 12 Pro 5G Phone Without Password?
- How to Intercept Text Messages on Samsung Galaxy A14 5G | Dr.fone
- Top 10 Best Spy Watches For your Vivo V27e | Dr.fone
- [New] In 2024, Capturing Gaming Sessions Pick Between OBS or ShadowPlay
- How to Track Realme 12 Pro 5G by Phone Number | Dr.fone
- Title: Green Up Your CTA Strategy with Tools
- Author: Brian
- Created at : 2024-05-25 11:55:36
- Updated at : 2024-05-26 11:55:36
- Link: https://youtube-video-recordings.techidaily.com/green-up-your-cta-strategy-with-tools/
- License: This work is licensed under CC BY-NC-SA 4.0.
