"From Boring to Buzzing Three Tactics for YouTube Reaction Mastery"
From Boring to Buzzing: Three Tactics for YouTube Reaction Mastery
How to Make a YouTube Reaction Video?

Richard Bennett
Mar 27, 2024• Proven solutions
Sharing ideas and opinions on virtually any topic you can think of with millions of people around the world is arguably one of the greatest benefits YouTube gives to content creators. Even so, building your channel exclusively around reaction videos may prove to be difficult, but this doesn’t mean that you can’t use this type of video to comment on what other YouTubers are saying.
The process of making a YouTube reaction video is not overly technical, although you will have to decide which video editing technique you are going to use to make a reaction video. That is why in this article we are going to take a look at different ways to make a YouTube reaction video.
- Method 1: Making Reaction Videos with PIP feature in Filmora
- Method 2: Create YouTube Reaction Video with Split Screen Templates
- Method 3: Make A Reaction Video for YouTube with AI Portrait
How to Make a Reaction Video for Your YouTube Channel? [3 Ways]
Using the footage without the consent of the copyright owner is punishable by the law, which means that you can only include the footage in a reaction video if you have the owner’s consent. Consequently, the selection of videos you can comment on is going to be limited, since it is entirely up to the creator of the video if they are going to give you permission to use their footage in your reaction video.
You can use the following video editing techniques, once you have access to the video you would like to comment on.
Method 1: Making a reaction video with the Picture-in-Picture feature in Filmora
Video editing software, like Filmora , can also be used to create YouTube reaction videos, but you must have all the footage you would like to include in that video before you can start putting it together.
The first step is to create a new project in Filmora and then import the media assets into the editor. Besides video clips, you can also add music, pictures, or create opening titles and end credits for your reaction video.


Place the video you’re reacting to on a video track on the timeline and then add the video of your reaction to the timeline that is directly above the one to which you added the first video clip. Click on the top video in the preview window and use the handles that are positioned around the edges of the video to adjust its size.
If you would like to change the on-screen position of the overlay clip, you should simply click on it and drag it to the new location within the preview window.

Filmora offers more than sixty motion effects, hundreds of transitions, and visual effects that can make your reaction video more visually appealing to the audience.

Moreover, Filmora video editing software offers a variety of blending modes, and it lets you control the opacity of the overlay video so that you can make it more transparent. Whether or not you are going to use these options depends on the footage you’re working with and the demands of a particular project.
Pros of using the Picture in Picture feature to make reaction videos in Filmora: You can place and adjust the videos with more customizable options. Get more tips about Making a PIP video in Filmora .
Method 2: Create several reaction windows with the Split Screen feature
Besides the Picture-in-Picture option, Filmora also enables you to play two or more videos simultaneously with Split Screen templates. Drag and drop the template you want to use in your reaction video to the timeline and click on the Enable Split Screen Animation tick box if you want to use the template without animations.

Afterward, you should drag the video clips from the Media tab and drop them onto the section of the preview window where you want them to be located. Keep in mind that you cannot add more than six videos to a split-screen template.

All videos you add to a split-screen template can be edited, and you just have to click on them if you want to adjust their sizes, enhance colors, mute their audio tracks or add a new audio file to the template.
Check the details about How to make a split-screen video step by step.
Pros of using Split-screen template to make reaction video in Filmora: various templates for creating stylish video side by side easily.
Method 3: Create A YouTube Reaction Video with AI Portrait
With the human segmentation effect in AI Portrait, you can now blend the reaction video in a more natural way. The human segmentation effect will isolate people from the background, you can use any background in the video.
Note: You can use this feature after version after V 10.5 for Windows, and V 10.4 for Mac. Click the button below to get the latest version of Filmora on your desktop.
Step 1: Import the videos to the media library, and then drag the background video to the first video track, and the reaction video to the track above.

Step 2: Go to the Effects tab at the top, and click the AI Portrait category, and then you will see many effects such as Human Segmentation, Human Pixelate, Human Noise, and lighting flash. Here, drag and drop the Human segmentation effect to the reaction video.

Step 3: Select the reaction video in the timeline, and then adjust its size and position by dragging it on the preview window. See, the reaction video is fine blended with the background video.

Step 4: That’s the basic editing of making a reaction video. You can also add the neon or flashing effect to the video. If everything goes well, click Export and save the video.

You can find out more details about using the AI Portrait effect to make a reaction video .
How to Avoid Copyright Infringements While Making a YouTube Reaction Video
All videos you can find on YouTube are protected by intellectual property regulations, and you can’t use them without the copyright owner’s permission. The only way to avoid being absolutely sure that your reaction video isn’t violating the law is to contact the video creator and ask for permission to use their intellectual property. However, most YouTubers are reluctant to let others download and edit their videos unless they already have a large fan base.
In case you’re granted permission to comment on a video, you have nothing to worry about. However, if you don’t get the permission you’re all the money the reaction video generates will go to the copyright owner or you will be forced to delete the video from your channel. There are still a few things you can do, even if you don’t get permission to use the video you would like to comment on.
Muting the video’s audio or altering its pitch will make it more difficult for YouTube’s bots to detect copyright infringement, although this method may not always work. In addition, you can play a video for up to thirty seconds, then comment on that segment, and then play another segment of that video.
There is no way of saying whether any of these editing tricks are going to help you avoid a copyright claim, and you should only use them if you have no other option.
Conclusion
Anyone can master the technical aspects of making a reaction video, but the topics you react to need to be related to the general topic your channel covers. What’s more, the idea of your reaction video has to be relevant for your audience if you want to attract their attention. Which video editing techniques are you using to make a YouTube reaction video?
Download Mac Version ](https://tools.techidaily.com/wondershare/filmora/download/ )
Richard Bennett
Richard Bennett is a writer and a lover of all things video.
Follow @Richard Bennett
Richard Bennett
Mar 27, 2024• Proven solutions
Sharing ideas and opinions on virtually any topic you can think of with millions of people around the world is arguably one of the greatest benefits YouTube gives to content creators. Even so, building your channel exclusively around reaction videos may prove to be difficult, but this doesn’t mean that you can’t use this type of video to comment on what other YouTubers are saying.
The process of making a YouTube reaction video is not overly technical, although you will have to decide which video editing technique you are going to use to make a reaction video. That is why in this article we are going to take a look at different ways to make a YouTube reaction video.
- Method 1: Making Reaction Videos with PIP feature in Filmora
- Method 2: Create YouTube Reaction Video with Split Screen Templates
- Method 3: Make A Reaction Video for YouTube with AI Portrait
How to Make a Reaction Video for Your YouTube Channel? [3 Ways]
Using the footage without the consent of the copyright owner is punishable by the law, which means that you can only include the footage in a reaction video if you have the owner’s consent. Consequently, the selection of videos you can comment on is going to be limited, since it is entirely up to the creator of the video if they are going to give you permission to use their footage in your reaction video.
You can use the following video editing techniques, once you have access to the video you would like to comment on.
Method 1: Making a reaction video with the Picture-in-Picture feature in Filmora
Video editing software, like Filmora , can also be used to create YouTube reaction videos, but you must have all the footage you would like to include in that video before you can start putting it together.
The first step is to create a new project in Filmora and then import the media assets into the editor. Besides video clips, you can also add music, pictures, or create opening titles and end credits for your reaction video.
Place the video you’re reacting to on a video track on the timeline and then add the video of your reaction to the timeline that is directly above the one to which you added the first video clip. Click on the top video in the preview window and use the handles that are positioned around the edges of the video to adjust its size.
If you would like to change the on-screen position of the overlay clip, you should simply click on it and drag it to the new location within the preview window.
Filmora offers more than sixty motion effects, hundreds of transitions, and visual effects that can make your reaction video more visually appealing to the audience.
Moreover, Filmora video editing software offers a variety of blending modes, and it lets you control the opacity of the overlay video so that you can make it more transparent. Whether or not you are going to use these options depends on the footage you’re working with and the demands of a particular project.
Pros of using the Picture in Picture feature to make reaction videos in Filmora: You can place and adjust the videos with more customizable options. Get more tips about Making a PIP video in Filmora .
Method 2: Create several reaction windows with the Split Screen feature
Besides the Picture-in-Picture option, Filmora also enables you to play two or more videos simultaneously with Split Screen templates. Drag and drop the template you want to use in your reaction video to the timeline and click on the Enable Split Screen Animation tick box if you want to use the template without animations.
Afterward, you should drag the video clips from the Media tab and drop them onto the section of the preview window where you want them to be located. Keep in mind that you cannot add more than six videos to a split-screen template.
All videos you add to a split-screen template can be edited, and you just have to click on them if you want to adjust their sizes, enhance colors, mute their audio tracks or add a new audio file to the template.
Check the details about How to make a split-screen video step by step.
Pros of using Split-screen template to make reaction video in Filmora: various templates for creating stylish video side by side easily.
Method 3: Create A YouTube Reaction Video with AI Portrait
With the human segmentation effect in AI Portrait, you can now blend the reaction video in a more natural way. The human segmentation effect will isolate people from the background, you can use any background in the video.
Note: You can use this feature after version after V 10.5 for Windows, and V 10.4 for Mac. Click the button below to get the latest version of Filmora on your desktop.
Step 1: Import the videos to the media library, and then drag the background video to the first video track, and the reaction video to the track above.
Step 2: Go to the Effects tab at the top, and click the AI Portrait category, and then you will see many effects such as Human Segmentation, Human Pixelate, Human Noise, and lighting flash. Here, drag and drop the Human segmentation effect to the reaction video.
Step 3: Select the reaction video in the timeline, and then adjust its size and position by dragging it on the preview window. See, the reaction video is fine blended with the background video.
Step 4: That’s the basic editing of making a reaction video. You can also add the neon or flashing effect to the video. If everything goes well, click Export and save the video.
You can find out more details about using the AI Portrait effect to make a reaction video .
How to Avoid Copyright Infringements While Making a YouTube Reaction Video
All videos you can find on YouTube are protected by intellectual property regulations, and you can’t use them without the copyright owner’s permission. The only way to avoid being absolutely sure that your reaction video isn’t violating the law is to contact the video creator and ask for permission to use their intellectual property. However, most YouTubers are reluctant to let others download and edit their videos unless they already have a large fan base.
In case you’re granted permission to comment on a video, you have nothing to worry about. However, if you don’t get the permission you’re all the money the reaction video generates will go to the copyright owner or you will be forced to delete the video from your channel. There are still a few things you can do, even if you don’t get permission to use the video you would like to comment on.
Muting the video’s audio or altering its pitch will make it more difficult for YouTube’s bots to detect copyright infringement, although this method may not always work. In addition, you can play a video for up to thirty seconds, then comment on that segment, and then play another segment of that video.
There is no way of saying whether any of these editing tricks are going to help you avoid a copyright claim, and you should only use them if you have no other option.
Conclusion
Anyone can master the technical aspects of making a reaction video, but the topics you react to need to be related to the general topic your channel covers. What’s more, the idea of your reaction video has to be relevant for your audience if you want to attract their attention. Which video editing techniques are you using to make a YouTube reaction video?
Download Mac Version ](https://tools.techidaily.com/wondershare/filmora/download/ )
Richard Bennett
Richard Bennett is a writer and a lover of all things video.
Follow @Richard Bennett
Techniques for Emptying YouTube’s Keep Queue
The YouTube Watch Later playlist is a great way to save videos and view them later. But if you don’t keep on top of it, your Watch Later list can quickly become unmanageable and cluttered with content that you no longer want to watch afterward.
If you are wondering how, you can declutter the playlist, we’ve got you covered. To help you with the task, we’ve compiled a comprehensive step-by-step guide. In this article, we will show you how to clear Watch Later on YouTube with just a few clicks.
So, without beating around the bush, let’s get started with our tutorial!
How To Delete YouTube Watch Later Playlist
If your YouTube Watch Later playlist is filled with videos you’ll never watch again, or you are not interested in that specific content type, you can quickly delete these videos at any time.
Here’s the step-by-step process on how to clear Watch Later on YouTube Web and App:
How To Delete YouTube Watch Later Playlist On Web?
You can delete the YouTube Watch Later Playlist on your desktop in the following ways:
From YouTube Homepage
To clear the YouTube Watch Later Playlist from the YouTube Homepage, do the following steps:
Step1 First, open a browser on your PC and visit the YouTube homepage. Sign into your account if needed and click the “Library” option located at the left-hand side menu panel.

Step2 Croll down and click the “See All” option under the Watch Later header. Click the Three Dots below the Watch Later playlist details on the next page.
Step3 From the drop-down menu, click “Remove Watch Videos.” This will instantly remove all the videos you’ve watched but are still in the playlist.
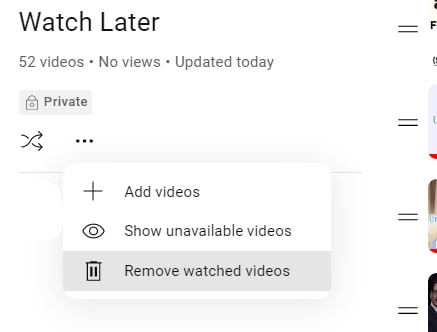
Step4 Finally, to remove the unwatched videos, hover over a video and click the Three Dots. Select the “Remove from Watch Later” option to delete the video. You can repeat this process to remove all the content from the playlist until it is decluttered at the point of your satisfaction.

Using A Script
Since the above process can be tiring, you can use a script to remove all the videos at once from the Watch Later playlist in the following way:
Step1 In the first step, launch the Google Chrome browser on your system and head to the YouTube website**.** Next, select the “Library” option in the left pane and click “Watch Later” from the menu.
Step2 Now, hit the “Ctrl + Shift + J” keys on Windows or the “Command + Option+ J” buttons on Mac to launch the developer mode and open the console window.

Step3 Copy and paste the following lines of the script at the end of the line under the Console tab where the cursor is blinking.
setInterval(function () { document.querySelector(‘#primary button[aria-label=”Action menu”]‘).click(); var things = document.evaluate( ‘//span[contains(text(),”Remove from”)]‘, document, null, XPathResult.ORDERED_NODE_SNAPSHOT_TYPE, null ); for (var i = 0; i < things.snapshotLength; i++) { things.snapshotItem(i).click(); } }, 1000);
Step4 In the last step, hit the “Enter” key to clear the Watch Later Playlist on YouTube. However, the process may take some time, depending on the number of videos in your playlist.
Although a bit tech-savvy, the script execution method is the most effective way to delete all Watch Later videos at once.
You can also replace the number at the end of the script with a lower entry to delete videos according to your preference. Also, choosing a lesser number can speed up the video deletion process from YouTube Watch Later list by a great deal.
![]()
Note: It is important to note that experimenting with scripts is only for some. The script above has been confirmed to work, but others still need to be thoroughly checked and could potentially damage your computer. To prevent this from happening, only look for scripts from reliable sources instead of those posted by random people in various forums.
How To Delete YouTube Watch Later Playlist On YouTube App?
If you are using YouTube on an Android or iOS device, it is possible to clear the Watch Later Playlist by doing the steps below:
Step1 In the first step, swipe up on the Homescreen of your Android device or swipe right on your iOS device to launch App Drawer, and tap “YouTube” to launch the app.
Step2 Now, tap the “Library” option in the bottom-right corner of the screen and tap “Watch Later.”
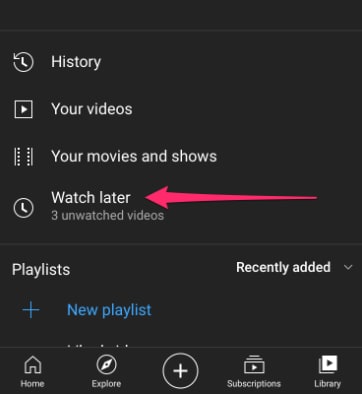
Step3 Next, tap the three dots (vertical ellipses) icon on the top-right side of the screen and choose the “Remove Watched Videos” option to delete them from the playlist.
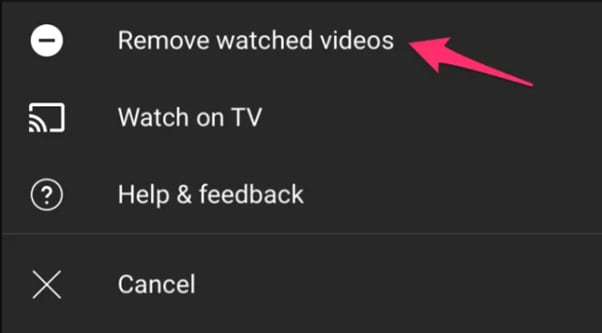
Step4 If there are still unwatched videos in the playlist, select a video and tap the three dots next to it. Now, tap the “Remove from Watch Later” option. Repeat the process to remove all the unwatched videos to clear the playlist.
Is there an Alternative Way to Download YouTube Videos without Using Software?
Now that you’ve learned how you can clear the Watch Later playlist on YouTube, you might be looking for a way to download your favorite videos on your PC for later watch without using any software. If so,click here to find out 13 proven ways to get this done.
Free Download For Win 7 or later(64-bit)
Free Download For macOS 10.14 or later
Bonus Video Tutorial: From a User to a Creator, How To Edit YouTube Videos Like a Pro
Hopefully, you have found the most appropriate solution to clear your YouTube Watcher Later playlist. However, while you are a YouTube user, how can you transfer your character from a user to a creator? In this video era, why not participate in the creation party and be one of them?
If you have any interests, you can watch the video we specially prepared for you. This video will show you how to use a user-friendly video editor, Filmora , to create your own YouTube videos!
Conclusion
In this article, we’ve discussed how to clear your YouTube watch later playlist from both the YouTube web from the homepage and using the script in the browser’s developer mode. We’ve also provided a step-by-step process for deleting the Watch Later playlist on the YouTube mobile app.
This guide was informative enough to answer most of your queries, and after reading it, you can now unclutter your YouTube Watch Later without any issues.
How To Delete YouTube Watch Later Playlist On YouTube App?
If you are using YouTube on an Android or iOS device, it is possible to clear the Watch Later Playlist by doing the steps below:
Step1 In the first step, swipe up on the Homescreen of your Android device or swipe right on your iOS device to launch App Drawer, and tap “YouTube” to launch the app.
Step2 Now, tap the “Library” option in the bottom-right corner of the screen and tap “Watch Later.”
Step3 Next, tap the three dots (vertical ellipses) icon on the top-right side of the screen and choose the “Remove Watched Videos” option to delete them from the playlist.
Step4 If there are still unwatched videos in the playlist, select a video and tap the three dots next to it. Now, tap the “Remove from Watch Later” option. Repeat the process to remove all the unwatched videos to clear the playlist.
Is there an Alternative Way to Download YouTube Videos without Using Software?
Now that you’ve learned how you can clear the Watch Later playlist on YouTube, you might be looking for a way to download your favorite videos on your PC for later watch without using any software. If so,click here to find out 13 proven ways to get this done.
Free Download For Win 7 or later(64-bit)
Free Download For macOS 10.14 or later
Bonus Video Tutorial: From a User to a Creator, How To Edit YouTube Videos Like a Pro
Hopefully, you have found the most appropriate solution to clear your YouTube Watcher Later playlist. However, while you are a YouTube user, how can you transfer your character from a user to a creator? In this video era, why not participate in the creation party and be one of them?
If you have any interests, you can watch the video we specially prepared for you. This video will show you how to use a user-friendly video editor, Filmora , to create your own YouTube videos!
Conclusion
In this article, we’ve discussed how to clear your YouTube watch later playlist from both the YouTube web from the homepage and using the script in the browser’s developer mode. We’ve also provided a step-by-step process for deleting the Watch Later playlist on the YouTube mobile app.
This guide was informative enough to answer most of your queries, and after reading it, you can now unclutter your YouTube Watch Later without any issues.
Also read:
- [New] Clearing Process for YouTube's Pending Video List
- [New] Overcome Blurred Images The Best Online Enhancers Listed for 2024
- [Updated] 14- YouTube AdSense Earnings How Much Does AdSense Pay per 1,000 Views
- 2024 Approved Efficient Deletion Techniques for Online Discussions
- 2024 Approved Exquisite Background Melodies for Edits
- ChatGPT in Finance: Exploring 5 Key Drawbacks for Cryptocurrency Market Prediction
- How to Fix the Apple iPhone SE (2020) GPS not Working Issue | Dr.fone
- How to share/fake gps on Uber for Samsung Galaxy A15 4G | Dr.fone
- iCloud Separation How To Disconnect Apple iPhone SE (2022) and iPad
- In 2024, Beyond YouTube Elite Video Sharing Hubs Revealed
- In 2024, Customizing YouTube Viewing Policies for Your Content
- In 2024, Easy Tutorial for Activating iCloud on Apple iPhone X Safe and Legal
- Mastering Minor Glitches in Audio Devices
- Title: From Boring to Buzzing Three Tactics for YouTube Reaction Mastery
- Author: Brian
- Created at : 2024-11-23 16:57:56
- Updated at : 2024-11-24 16:17:53
- Link: https://youtube-video-recordings.techidaily.com/from-boring-to-buzzing-three-tactics-for-youtube-reaction-mastery/
- License: This work is licensed under CC BY-NC-SA 4.0.