
:max_bytes(150000):strip_icc():format(webp)/GettyImages-642981042-5a903651a18d9e0037d31742.jpg)
"Free Frame Perfection on YouTube - Your Ultimate Guidebook"
Free Frame Perfection on YouTube - Your Ultimate Guidebook
How to Go Frame by Frame on YouTube Video? [5 Methods]

Richard Bennett
Mar 27, 2024• Proven solutions
It’s always a handy process to be able to move the frame one by one if you binge-watch YouTube videos. Be it as complex as time-lapse or as simple as makeup tutorial, viewing YouTube video frame-by-frame is never an underestimated process.
To be able to achieve this, you ought to master the methods to move frame-by-frame using a frame by a frame video editor or frame by the frame video player.
But this might make you wonder which one would be best for you?
Then here are some methods to move a video frame-by-frame that may come handy for you.
Option 1: Frame-By-Frame Editing and Watching Video Offline
If you are looking for how to edit frame by frame on YouTube or how to go frame by frame on YouTube then you may use a variety of offline applications.
Below are the 2 highlighting benefits of making use of offline video editors instead of online ones:
- You are not required to have a fast and smooth internet connection once the targeted video has been downloaded and will have full liberty to edit or video vide while staying offline.
- You are granted with the full editing facilities whilst staying offline. You can trim, cut or do any video alterations using offline video editors.
If you don’t know how to download a YouTube video easily and quickly, check this guide on How to Download YouTube Videos without Any Software .
Beneath are some of the efficient offline video editors you can work with for editing and viewing videos of YouTube frame by frame.
How to Go Frame by Frame in YouTube Video Using Filmora
Filmora is a great video editor designed for those who are interested in video editing but lack professional experience. It’s very easy to use. Filmora is free to download. You can choose version that is compatible with your operating system.
Compatibility: Windows and Mac


Step 1: Tap on “New Project”.
Step 2: In “project settings” select the desired ratio rate.
Step 3: You can import files by clicking the “import” tab or drag-drop the desired file to this tool.

Step 4: Drag the file to the timeline.
Step 5: You can separate frames from video by hovering the mouse over the first desired frame and complete it by hovering mouse all the way to the end of the frame.
Step 6: Perform editing operations.
Step 7: Save the file by clicking “export” by selecting the desired format under the “format” option and set parameters in “advanced settings” or directly upload the final product to YouTube.

How to Move Frame by Frame in YouTube Video Using Movie Maker
Compatibility: windows
This video editing tool gives you enough option to perform basic editing. With its timeline option, one can edit the videos frame-by-frame which can be performed as guided below:
Step 1: The first step is to download the desired YouTube video.
Step 2: Import that video to movie maker.
Step 3: You have the facility to skip the video frame-by-frame and can also edit it by selecting a specific portion from the timeline.
Step 4: Tap on “edit” beneath video tools after selecting the targeted portion.
Step 5: You will have numerous editing options like transition, add texts, split, music, etc. for each of the frames one by one.
You may also like: YouTube to WAV File: 4 Best Free Convert Solutions >>
How to Advance Frame by Frame in YouTube Video Using iMovie
Compatibility: Mac
This is a free editing tool with a bundle of editing features. The steps are given below:
Step 1: Click “file”, then “new project” followed by “create” option
Step 2: Click “Import” to import video
Step 3: Tap on “edit” followed by the “play head” option to segregate the desired portion of the video to edit.
Step 4: Now apply editing features on the portion of the video given in this tool
Step 5: Press “share” and “export” option once done with editing.
Option 2: Frame-By-Frame Advancement Using YouTube Player
Why even bother ourselves to get a third-party program for the purpose of moving a video frame-by-frame when the YouTube player provides you the same facility within itself. Following are the steps to guide you about how to skip frame by frame on YouTube by using YouTube frame by frame hotkey:
Step 1: Make the video pause.
Step 2: To answer the query regarding how to go frame by frame on YouTube editor, you can make use of 2 keys on the keyboard which are basically used as a shortcut process for the sake of forwarding video frame-by-frame.
You can press “<” in order to skip a frame backward or you could either use a comma as well for the same purpose. For moving the frame forwards, you need to press “>” key or a full stop key will serve you with the same operation.
This is how to move frame by frame on YouTube.

Option 3: Go Frame-By-Frame In YouTube Video Using Online Application
If your work requires intricate analysis of the video where you have to view the view very closely then you may make use of an online external application for this purpose.
The following are the steps to show you how to advance frame by frame on YouTube using this online tool.
Step 1: Into the URL bar of the browser, paste the link www.watchframebyframe.com there where you will be redirected to the online tool which has quite an easy interface with several controls provided built-in.
Step 2: Tap on “Enter Video URL” box and paste the copied URL of a targeted YouTube video
Step 3: The video will get loaded after hitting enter. At the bottom, buttons are given to control accordingly for skipping the frame forwards and backward respectively.
Step 4: You can also personalize the frame skipping setting with the option given beside the forwards and backward button where you can customize fps (frame per second) setting and also adjust the number of frames to be skipped upon clicking forwards and backward button.
An application granting such diverse options gives precise accuracy level which would help make the learning process easier and accurate.

Where Will Need to Go Frame by Frame on YouTube?
- Viewing time-lapse:
Capturing minor details in a video having time-lapse is such a complicated task. It often becomes harder even after slowing the video down. Therefore, a frame-by-frame view is the perfect yet only way out to this problem.
- Viewing how-to video:
The main purpose of a learning video is to get the sound and thorough details of the process and hence can be made not only possible but easier through frame-by-frame scrolling.
- Video sharing or editing:
Clean editing or cropping from a particular position is an intricate process and becomes easier to pause at the desired moment by frame-by-frame forwarding.
- Learning tutorial
Learning needs an in-depth and clear delivery of the content which is made easier by the feature of frame-by-frame skipping of the video.
YouTube studio is the basement for YouTubers to upload and track their videos. To some newbies, they might don’t know how to use the YouTube Manager. If you happen to be one of them, check this article to get: Everything You Need to Know about YouTube Video Manager >>
Conclusion
The precise control over separate frames as well as set of frames, diverse OS support, and liberty to use a variety of editing features make Wondershare Filmora stand out among all other tools. But depending upon the suitability with respect to one’s available resources, any of the above tool will help you watch and edit YouTube video frame by frame.
Richard Bennett
Richard Bennett is a writer and a lover of all things video.
Follow @Richard Bennett
Richard Bennett
Mar 27, 2024• Proven solutions
It’s always a handy process to be able to move the frame one by one if you binge-watch YouTube videos. Be it as complex as time-lapse or as simple as makeup tutorial, viewing YouTube video frame-by-frame is never an underestimated process.
To be able to achieve this, you ought to master the methods to move frame-by-frame using a frame by a frame video editor or frame by the frame video player.
But this might make you wonder which one would be best for you?
Then here are some methods to move a video frame-by-frame that may come handy for you.
Option 1: Frame-By-Frame Editing and Watching Video Offline
If you are looking for how to edit frame by frame on YouTube or how to go frame by frame on YouTube then you may use a variety of offline applications.
Below are the 2 highlighting benefits of making use of offline video editors instead of online ones:
- You are not required to have a fast and smooth internet connection once the targeted video has been downloaded and will have full liberty to edit or video vide while staying offline.
- You are granted with the full editing facilities whilst staying offline. You can trim, cut or do any video alterations using offline video editors.
If you don’t know how to download a YouTube video easily and quickly, check this guide on How to Download YouTube Videos without Any Software .
Beneath are some of the efficient offline video editors you can work with for editing and viewing videos of YouTube frame by frame.
How to Go Frame by Frame in YouTube Video Using Filmora
Filmora is a great video editor designed for those who are interested in video editing but lack professional experience. It’s very easy to use. Filmora is free to download. You can choose version that is compatible with your operating system.
Compatibility: Windows and Mac
Step 1: Tap on “New Project”.
Step 2: In “project settings” select the desired ratio rate.
Step 3: You can import files by clicking the “import” tab or drag-drop the desired file to this tool.
Step 4: Drag the file to the timeline.
Step 5: You can separate frames from video by hovering the mouse over the first desired frame and complete it by hovering mouse all the way to the end of the frame.
Step 6: Perform editing operations.
Step 7: Save the file by clicking “export” by selecting the desired format under the “format” option and set parameters in “advanced settings” or directly upload the final product to YouTube.
How to Move Frame by Frame in YouTube Video Using Movie Maker
Compatibility: windows
This video editing tool gives you enough option to perform basic editing. With its timeline option, one can edit the videos frame-by-frame which can be performed as guided below:
Step 1: The first step is to download the desired YouTube video.
Step 2: Import that video to movie maker.
Step 3: You have the facility to skip the video frame-by-frame and can also edit it by selecting a specific portion from the timeline.
Step 4: Tap on “edit” beneath video tools after selecting the targeted portion.
Step 5: You will have numerous editing options like transition, add texts, split, music, etc. for each of the frames one by one.
You may also like: YouTube to WAV File: 4 Best Free Convert Solutions >>
How to Advance Frame by Frame in YouTube Video Using iMovie
Compatibility: Mac
This is a free editing tool with a bundle of editing features. The steps are given below:
Step 1: Click “file”, then “new project” followed by “create” option
Step 2: Click “Import” to import video
Step 3: Tap on “edit” followed by the “play head” option to segregate the desired portion of the video to edit.
Step 4: Now apply editing features on the portion of the video given in this tool
Step 5: Press “share” and “export” option once done with editing.
Option 2: Frame-By-Frame Advancement Using YouTube Player
Why even bother ourselves to get a third-party program for the purpose of moving a video frame-by-frame when the YouTube player provides you the same facility within itself. Following are the steps to guide you about how to skip frame by frame on YouTube by using YouTube frame by frame hotkey:
Step 1: Make the video pause.
Step 2: To answer the query regarding how to go frame by frame on YouTube editor, you can make use of 2 keys on the keyboard which are basically used as a shortcut process for the sake of forwarding video frame-by-frame.
You can press “<” in order to skip a frame backward or you could either use a comma as well for the same purpose. For moving the frame forwards, you need to press “>” key or a full stop key will serve you with the same operation.
This is how to move frame by frame on YouTube.
Option 3: Go Frame-By-Frame In YouTube Video Using Online Application
If your work requires intricate analysis of the video where you have to view the view very closely then you may make use of an online external application for this purpose.
The following are the steps to show you how to advance frame by frame on YouTube using this online tool.
Step 1: Into the URL bar of the browser, paste the link www.watchframebyframe.com there where you will be redirected to the online tool which has quite an easy interface with several controls provided built-in.
Step 2: Tap on “Enter Video URL” box and paste the copied URL of a targeted YouTube video
Step 3: The video will get loaded after hitting enter. At the bottom, buttons are given to control accordingly for skipping the frame forwards and backward respectively.
Step 4: You can also personalize the frame skipping setting with the option given beside the forwards and backward button where you can customize fps (frame per second) setting and also adjust the number of frames to be skipped upon clicking forwards and backward button.
An application granting such diverse options gives precise accuracy level which would help make the learning process easier and accurate.
Where Will Need to Go Frame by Frame on YouTube?
- Viewing time-lapse:
Capturing minor details in a video having time-lapse is such a complicated task. It often becomes harder even after slowing the video down. Therefore, a frame-by-frame view is the perfect yet only way out to this problem.
- Viewing how-to video:
The main purpose of a learning video is to get the sound and thorough details of the process and hence can be made not only possible but easier through frame-by-frame scrolling.
- Video sharing or editing:
Clean editing or cropping from a particular position is an intricate process and becomes easier to pause at the desired moment by frame-by-frame forwarding.
- Learning tutorial
Learning needs an in-depth and clear delivery of the content which is made easier by the feature of frame-by-frame skipping of the video.
YouTube studio is the basement for YouTubers to upload and track their videos. To some newbies, they might don’t know how to use the YouTube Manager. If you happen to be one of them, check this article to get: Everything You Need to Know about YouTube Video Manager >>
Conclusion
The precise control over separate frames as well as set of frames, diverse OS support, and liberty to use a variety of editing features make Wondershare Filmora stand out among all other tools. But depending upon the suitability with respect to one’s available resources, any of the above tool will help you watch and edit YouTube video frame by frame.
Richard Bennett
Richard Bennett is a writer and a lover of all things video.
Follow @Richard Bennett
Navigating Numbers: A Comprehensive Triad Strategy for Monitoring Your YouTube Profitability
There have been lots of user queries similar to the one above about how to check YouTube income lately. Honestly, YouTube has made it easy for users to track their revenue analytics on the platform, thus making it easy for creators to track how much they make and other revenue data.
So, if you don’t know how to check YouTube income, don’t worry, this article will teach you the simple steps to check your YouTube. Plus, you’ll find out how your YouTube earnings are calculated. Just stick with us.
Part 1: Follow the steps below to check your YouTube earnings
The process of checking YouTube income is pretty straightforward. So, regardless of what device you’re using to check, we’ve briefly explained the step-by-step instructions to carry out your YouTube income check within a few clicks.
Check on a computer
To check YouTube income on your PC or Mac, you just have to do the following;
Step1 Open the browser app on your computer and sign in to your YouTube Studio .
Step2 Click Analytics from the left side of the screen.

Step3 On the Analytics screen, select Revenue from the top side of the screen to check your YouTube income.
There, you’ll find your YouTube income and other necessary data that you might need.
Check on a Mobile Device
The process of checking YouTube income on an Android or iOS device is also straightforward, and you can use either the YouTube app or the YouTube Studio app to perform the operation. The steps below explain the procedure;
YouTube App
Step1 Make sure you have the latest version of the YouTube app on your phone. If not, you can install it from Google Play Store or App Store.

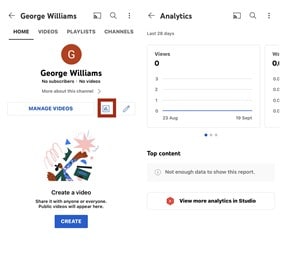
Step2 Log in to your YouTube account and tap on the Profile icon at the top side. Then, select Your Channel.

Step3 Tap the Analytics icon from the middle menu. Your YouTube channel income and other data will be displayed on your phone screen.
YouTube Studio App
Step1 Launch the YouTube Studio app on your Android or iPhone.
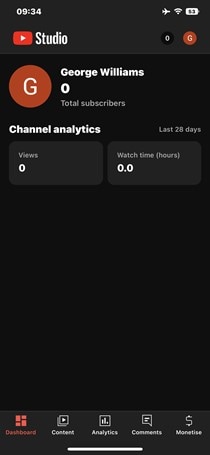
Step2 Tap Analytics from the bottom menu and select Revenue from the top of the screen.

The information that you’ll find in the YouTube revenue analytics includes the following;
- RPM (Revenue Per Mile); This is the metric that displays how much a creator has earned per 1000 video views.
- Playback-based CPM; This shows the average gross revenue per 1000 playbacks where an AD or more is displayed.
- Monthly Estimated Revenue; This report shows how much a YouTuber has earned from his/her channel in the last six months.
- Revenue Sources: Just as the name suggests, this shows you the data of how much is earned from each revenue source used on your YouTube channel.
- Transaction Revenue; The transaction revenue metric is a breakdown of how much a creator has earned from membership and merch.
- Top Earnings; It shows the data of the video with the highest estimated revenue.
- Ad Type; This displays the percentage of revenue earned from the different types of ads.
Part 2: How your YouTube earnings are calculated
Having known how to check YouTube income, if you’re still wondering how your earnings are calculated, here, we’ve discussed all the necessary information you need to know about how YouTube earnings are calculated.
YouTube earnings are calculated based on different factors. From CPC to CPM, estimated gross earnings per view, and more. Keep reading to find out more about how these factors affect your YouTube earnings;
CPM (Cost Per Mile): CPM is the amount an advertiser pays for every one thousand views of their ads. This means if an advertiser is paying you $10CPM, you’ll earn $10 on every 1000 views of their ads.
CPC (Cost Per Click): Most people think CPC is the same as CPM, but no they are not. Cost Per Click is the amount an advertiser pays for every viewer that clicks on their ads. If an advertiser is willing to pay $10, then you’ll earn $10 on every ad click.
Estimated Gross Earning Per Subscriber: You’ll notice whenever you watch a YouTube video, the creator always emphasizes you click the Subscribe button to get a notification on every new video he/she uploads. Well, they do this because the more subscribers they get, the more likely their videos appear in search results.
Also, if you have a huge Subscriber base, your videos tend to get more views, thereby increasing ad views, ad clicks, and your earnings.
All the factors explained above will determine how your YouTube earnings are calculated. However, keep in mind that you’ll receive only 55% of the total dollar advertisers pays while YouTube keeps the remaining 45%. If you get an average of $5 from an advertiser on every 1000 ad view, you’ll earn $5 x 55% which is approximately $2.75.
You can also calculate your YouTube channel total earnings by using the YouTube calculator .

Part 3: How do you increase your YouTube earnings?
1. Post quality videos
If your video is of low quality, then viewers might not find it interesting. For this reason, it’s important you post quality videos, and you need the Wondershare Filmora software for such an operation.
Filmora is one of the best video editing software that is trusted by millions of users globally because of its high efficiency. It supports lots of advanced tools that anyone can utilize to edit and spice up their videos. From adding transitions to applying effects, and more. It even offers a high-quality built-in preset that users can utilize for free to give their video the best quality they can ever think of.
Free Download For Win 7 or later(64-bit)
Free Download For macOS 10.14 or later
Step1 Install Filmora software on your computer.
Step2 Use the Import button to upload the video you created for your YouTube channel. You can also drag-n-drop it to the interface of the software.
Step3 Drag-n-drop the video you uploaded to the Timeline.

Step4 To remove unwanted background from your video, click Effects from the top side of the screen. Select AI Portrait from the left side of the screen and select a preferred AI Portrait effect that you’ll like to use in the video.

Step5 Next, drag-n-dop the chosen AI Portrait effect to the timeline. After that, adjust the AI Portrait effect from the timeline. You can also add multiple effects by dragging and dropping them to the timeline.
Step6 Double-click the AI Portrait effect from the Timeline. From the pop-up that appears, adjust the settings according to your requirements.

Step7 You can add Subscribe watermark by clicking the >> icon at the top of the screen, then select Element.

Choose the ‘Social Media Show Element 07’ Effects. Drag-n-drop the selected effect to the Timeline.

Step8 Preview the edited video. If you’re satisfied with the output, click the Export button at the top bar and choose Burn DVD from the drop-down list.

Step9 Enter file name in the box next to Label. Then, navigate to Folder Path and choose where you want the file to be saved. Afterward, click Export to Finish.

2. Upload videos regularly
Starting a YouTube channel can be quite hard from start, but make it a priority to upload at least two quality videos every week. Yes, the more quality videos you post, the more you attract the viewer to like your videos, and the higher your chances of getting new subscribers, thereby increasing your YouTube earnings.
3. Promote your Videos
Promoting your YouTube videos is a great way to increase your YouTube earnings. Once you post a new video on YouTube, you can share it to your other social media profiles or websites to increase views and attract new folks to watch the video. The more views you get the more money you’ll make.
Part 4: Hot FAQs on YouTube channel earnings check
Let’s take a look at some frequently asked questions from users like you.
1. Is monetizing on YouTube different from Google AdSense?
YouTube monetization involves making money from videos you upload on your YouTube channel. And Google AdSense is a means of monetizing your YouTube channel.
2. Why should you consider monetizing on YouTube creator?
Monetizing YouTube as a creator is a great way to earn passive income just by uploading videos. Research shows that an average YouTuber has the potential of earning $10,000 in revenue per year.
3. Which category is best for YouTube earnings?
The average CPM you earn from videos you upload on YouTube all depends on the niche of your video. The following are the best 5 categories best for YouTube earnings in 2022;
Make Money Online - $13.52
Social Media Marketing - $12.41
Finance & Investing - $12.25
Educational Videos - $9.89
Photography & Film Making - $7.31
Final Words
Checking YouTube income is not a big deal. This article has covered every necessary detail you need to know about checking your YouTube income on a PC or mobile phone. Also, if you don’t understand how YouTube earnings are calculated, we touched on that, and don’t hesitate to employ the tips discussed to increase your YouTube earnings.
Free Download For Win 7 or later(64-bit)
Free Download For macOS 10.14 or later
Part 1: Follow the steps below to check your YouTube earnings
The process of checking YouTube income is pretty straightforward. So, regardless of what device you’re using to check, we’ve briefly explained the step-by-step instructions to carry out your YouTube income check within a few clicks.
Check on a computer
To check YouTube income on your PC or Mac, you just have to do the following;
Step1 Open the browser app on your computer and sign in to your YouTube Studio .
Step2 Click Analytics from the left side of the screen.
Step3 On the Analytics screen, select Revenue from the top side of the screen to check your YouTube income.
There, you’ll find your YouTube income and other necessary data that you might need.
Check on a Mobile Device
The process of checking YouTube income on an Android or iOS device is also straightforward, and you can use either the YouTube app or the YouTube Studio app to perform the operation. The steps below explain the procedure;
YouTube App
Step1 Make sure you have the latest version of the YouTube app on your phone. If not, you can install it from Google Play Store or App Store.
Step2 Log in to your YouTube account and tap on the Profile icon at the top side. Then, select Your Channel.
Step3 Tap the Analytics icon from the middle menu. Your YouTube channel income and other data will be displayed on your phone screen.
YouTube Studio App
Step1 Launch the YouTube Studio app on your Android or iPhone.
Step2 Tap Analytics from the bottom menu and select Revenue from the top of the screen.
The information that you’ll find in the YouTube revenue analytics includes the following;
- RPM (Revenue Per Mile); This is the metric that displays how much a creator has earned per 1000 video views.
- Playback-based CPM; This shows the average gross revenue per 1000 playbacks where an AD or more is displayed.
- Monthly Estimated Revenue; This report shows how much a YouTuber has earned from his/her channel in the last six months.
- Revenue Sources: Just as the name suggests, this shows you the data of how much is earned from each revenue source used on your YouTube channel.
- Transaction Revenue; The transaction revenue metric is a breakdown of how much a creator has earned from membership and merch.
- Top Earnings; It shows the data of the video with the highest estimated revenue.
- Ad Type; This displays the percentage of revenue earned from the different types of ads.
Part 2: How your YouTube earnings are calculated
Having known how to check YouTube income, if you’re still wondering how your earnings are calculated, here, we’ve discussed all the necessary information you need to know about how YouTube earnings are calculated.
YouTube earnings are calculated based on different factors. From CPC to CPM, estimated gross earnings per view, and more. Keep reading to find out more about how these factors affect your YouTube earnings;
CPM (Cost Per Mile): CPM is the amount an advertiser pays for every one thousand views of their ads. This means if an advertiser is paying you $10CPM, you’ll earn $10 on every 1000 views of their ads.
CPC (Cost Per Click): Most people think CPC is the same as CPM, but no they are not. Cost Per Click is the amount an advertiser pays for every viewer that clicks on their ads. If an advertiser is willing to pay $10, then you’ll earn $10 on every ad click.
Estimated Gross Earning Per Subscriber: You’ll notice whenever you watch a YouTube video, the creator always emphasizes you click the Subscribe button to get a notification on every new video he/she uploads. Well, they do this because the more subscribers they get, the more likely their videos appear in search results.
Also, if you have a huge Subscriber base, your videos tend to get more views, thereby increasing ad views, ad clicks, and your earnings.
All the factors explained above will determine how your YouTube earnings are calculated. However, keep in mind that you’ll receive only 55% of the total dollar advertisers pays while YouTube keeps the remaining 45%. If you get an average of $5 from an advertiser on every 1000 ad view, you’ll earn $5 x 55% which is approximately $2.75.
You can also calculate your YouTube channel total earnings by using the YouTube calculator .
Part 3: How do you increase your YouTube earnings?
1. Post quality videos
If your video is of low quality, then viewers might not find it interesting. For this reason, it’s important you post quality videos, and you need the Wondershare Filmora software for such an operation.
Filmora is one of the best video editing software that is trusted by millions of users globally because of its high efficiency. It supports lots of advanced tools that anyone can utilize to edit and spice up their videos. From adding transitions to applying effects, and more. It even offers a high-quality built-in preset that users can utilize for free to give their video the best quality they can ever think of.
Free Download For Win 7 or later(64-bit)
Free Download For macOS 10.14 or later
Step1 Install Filmora software on your computer.
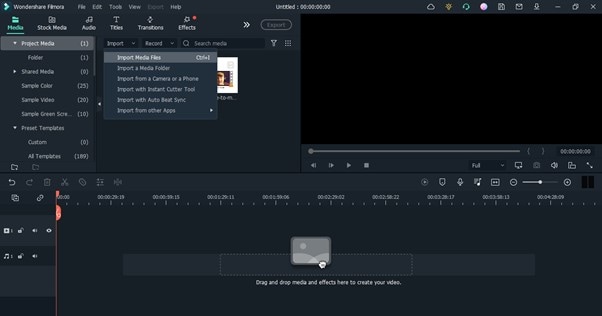
Step2 Use the Import button to upload the video you created for your YouTube channel. You can also drag-n-drop it to the interface of the software.
Step3 Drag-n-drop the video you uploaded to the Timeline.
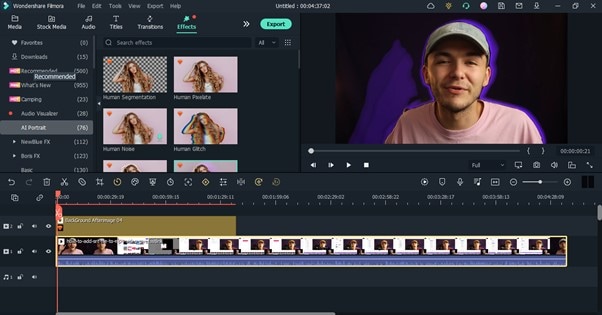
Step4 To remove unwanted background from your video, click Effects from the top side of the screen. Select AI Portrait from the left side of the screen and select a preferred AI Portrait effect that you’ll like to use in the video.
Step5 Next, drag-n-dop the chosen AI Portrait effect to the timeline. After that, adjust the AI Portrait effect from the timeline. You can also add multiple effects by dragging and dropping them to the timeline.
Step6 Double-click the AI Portrait effect from the Timeline. From the pop-up that appears, adjust the settings according to your requirements.
Step7 You can add Subscribe watermark by clicking the >> icon at the top of the screen, then select Element.
Choose the ‘Social Media Show Element 07’ Effects. Drag-n-drop the selected effect to the Timeline.
Step8 Preview the edited video. If you’re satisfied with the output, click the Export button at the top bar and choose Burn DVD from the drop-down list.
Step9 Enter file name in the box next to Label. Then, navigate to Folder Path and choose where you want the file to be saved. Afterward, click Export to Finish.
2. Upload videos regularly
Starting a YouTube channel can be quite hard from start, but make it a priority to upload at least two quality videos every week. Yes, the more quality videos you post, the more you attract the viewer to like your videos, and the higher your chances of getting new subscribers, thereby increasing your YouTube earnings.
3. Promote your Videos
Promoting your YouTube videos is a great way to increase your YouTube earnings. Once you post a new video on YouTube, you can share it to your other social media profiles or websites to increase views and attract new folks to watch the video. The more views you get the more money you’ll make.
Part 4: Hot FAQs on YouTube channel earnings check
Let’s take a look at some frequently asked questions from users like you.
1. Is monetizing on YouTube different from Google AdSense?
YouTube monetization involves making money from videos you upload on your YouTube channel. And Google AdSense is a means of monetizing your YouTube channel.
2. Why should you consider monetizing on YouTube creator?
Monetizing YouTube as a creator is a great way to earn passive income just by uploading videos. Research shows that an average YouTuber has the potential of earning $10,000 in revenue per year.
3. Which category is best for YouTube earnings?
The average CPM you earn from videos you upload on YouTube all depends on the niche of your video. The following are the best 5 categories best for YouTube earnings in 2022;
Make Money Online - $13.52
Social Media Marketing - $12.41
Finance & Investing - $12.25
Educational Videos - $9.89
Photography & Film Making - $7.31
Final Words
Checking YouTube income is not a big deal. This article has covered every necessary detail you need to know about checking your YouTube income on a PC or mobile phone. Also, if you don’t understand how YouTube earnings are calculated, we touched on that, and don’t hesitate to employ the tips discussed to increase your YouTube earnings.
Free Download For Win 7 or later(64-bit)
Free Download For macOS 10.14 or later
Also read:
- In 2024, Boost Visibility with a Bespoke YouTube Channel URL
- Brevity in Action Shortening YouTube Video Content
- Unlocking Video Content Potential Integrating Interactive Features in Youtube Cards
- Maximize Reach The Top Ten Keywords Discovery Platforms for YouTubers
- Prime Screen Recording Tech for YouTube Broadcasts
- Seamless Conversion of Video Content to Dynamic GIF Formats
- Boost Online Presence Innovative YouTube Channel Names for 2024
- Crafting Success Leading Business Channels for Professionals
- 2024 Approved Achieve Viewer Engagement and Brand Growth – Here's How to Do It on YouTube
- Track Talkative YouTube Threads
- Comprehensive Guide to Downloading Standardized YouTube Images
- In 2024, Audience’ Market Leaders in YouTube's Short Clips Downloads
- Perfecting Projects A Deep Dive Into YouTube Studio Editor
- [Updated] A Step-by-Step Youtube Traffic & Revenue Assessment Guide
- [Updated] Bring Your Spotify Mixes Online 5 Top Playlist Conversion Apps for YouTube
- [New] Eternal Banishment of YouTube's Quick Clips
- Channel Cash Flow Management for YouTubers for 2024
- [New] A Treasure Trove of 9 Complete Holiday Flicks, Free Streaming
- Reasons for Oppo Reno 8T Stuck on Startup Screen and Ways To Fix Them | Dr.fone
- [Updated] Master the Game with Standout TikTok Profile Frames
- New 2024 Approved Make Your Instagram Feed Pop with Stop Motion Videos Tips and Tricks
- New Professional Audio Editing Software Is a Powerful Tool for Us to Make an Amazing Video. In This Article, You Will Learn the 8 Best Professional Audio Editing Software. Check This Article to Find More for 2024
- Exploring Social Boundaries Sign Up for a Facebook Profile for 2024
- Top 10 Hindi Video Translators with Step-by-Step Guidance
- In 2024, How To Extract GIF Content Seamlessly on Various Devices
- How To Bypass iCloud By Checkra1n Even On iPhone 7 Plus If Youve Tried Everything
- 2024 Approved The Ultimate Checklist for Zoom Recording
- New The Art of Infusing Audio Harmonies with Visual Narratives at Zero Expense
- How to Transfer Data from Infinix Smart 8 Pro to Samsung Phone | Dr.fone
- New In 2024, Unleash Your Creativity Top-Rated Video Collage Apps for iPhone and iPad
- [Updated] 2024 Approved The Ultimate Guide to Creating Slow-Motion Content in TikTok
- In 2024, A Step-by-Step Guide to Finding Your Apple ID On Your iPhone 13 Pro Max
- How To Upgrade or Downgrade iPhone 13 Without Losing Anything? | Dr.fone
- [New] 2024 Approved Expert Advice for Android & iPhone Users to Save TikTok
- Updated In 2024, How to Use Twixtor Effect to Create Super Slow-Motion Video?
- [Updated] Freely Collect TikTok Masterpieces - No Marks Included for 2024
- Title: "Free Frame Perfection on YouTube - Your Ultimate Guidebook"
- Author: Brian
- Created at : 2024-05-25 11:53:36
- Updated at : 2024-05-26 11:53:36
- Link: https://youtube-video-recordings.techidaily.com/free-frame-perfection-on-youtube-your-ultimate-guidebook/
- License: This work is licensed under CC BY-NC-SA 4.0.
