
:max_bytes(150000):strip_icc()/unnamed1-9c9badc69b6246a986855f6f923185d8.jpg)
Forging Strategic Alliances on YouTube Through FameBit Wisdom
Forging Strategic Alliances on YouTube Through FameBit Wisdom
How to Find YouTube Sponsorships by Using FameBit

Richard Bennett
Oct 26, 2023• Proven solutions
FameBit is one of the leading influencer marketing platforms.
Creators use FameBit to earn money by creating branded content. Businesses use FameBit to find the perfect video creators – or ‘digital influencers’ – to help with their marketing campaigns.
Until your channel is huge it is difficult to make a significant amount of money through ad revenue on YouTube. Creating branded content is one way in which YouTubers with small or mid-sized channels can generate income.
Finding sponsorships and negotiating with brands can be tricky. So can integrating products and brand messages in your videos without making your audience feel like you have ‘sold out’. This guide will help.
You must have at least 5,000 subscribers to join FameBit.

How Much Money Can You Make
How much money you can make on FameBit will depend on the deals you can negotiate with brands, and those deals will depend on how many subscribers you have and how many views you usually receive .
When calculating your fee, FameBit suggests thinking of it in terms of ‘cost per view’ (CPV). Most creators on FameBit charge between $0.05 and $0.10 per view. If you charge $0.05 per view and you get an average of 10,000 views per video then you would charge a brand $500 for your services.
How much you should charge per view depends on your genre and the nature of your audience. If you often mention products you like in videos and your subscribers have come to trust your recommendations, then it makes sense for you to charge more per view than a creator whose audience will be less receptive to product placement.
For example, if you do makeup tutorials then viewers will be used to hearing about your favorites. This makes your 10 000 views more valuable than 10 000 views on a ranting vlog channel whose subscribers are not tuning in to hear about products.
How to Make Money With FameBit
Finding Sponsorships
Brands post details about their upcoming campaigns, and the types of creators they are interested in working with, on FameBit.
While you are browsing through the available campaigns, think of the types of brands you would be excited to work with as well as which ones make sense for your channel.
If you host a lifestyle vlog about staying healthy, for example, and there is an opportunity to work with a brand that sells a type of healthy snack then it is your responsibility to look into the company and the product before you sign on to work with them. Is the snack healthy, and do you enjoy it?
Ideally, you will want to find brands that share your values and which are selling products you feel good about recommending to your subscribers.
Once you find a few campaigns you are interested in creating videos for, it’s time to write your proposals and negotiate with your potential sponsors.
Negotiating with Sponsors
When you want to be part of a campaign a brand has posted, you send them a proposal.
Be creative and detailed in the proposals you write. The best brands will value you for our ideas and creativity, and this will give you an edge over creators who put less effort into their pitches. You also want to be detailed because you do not want to risk having a disagreement with the brand based on them misunderstanding what you were going to do.
Sometimes brands will have very specific things they want you to do or say in the video you make for them. It is your job to find ways of doing and saying these things that still feel natural within the context of your videos. On YouTube, even when you are representing a brand, you need to be authentically you.
If you feel like the things a brand wants from you will make your video come across as a tacky commercial and offend your loyal subscribers, and you cannot see a creative way around this, bring it up before you agree to work with them. Explain what you think should happen instead. If they are not willing to compromise, do not agree to work with them. Find a more reasonable brand to partner with.
If you offend your subscribers and they stop watching you then your channel will become less valuable to other potential sponsors. In the long run, there is no upside to agreeing to do a video that makes no sense for your channel.
Remember that even brands that like your ideas and get excited about your proposals will not be able to work with you if you do not meet their requirements in terms of subscribers and average views. There are a lot of campaigns on FameBit which are open to small or mid-sized channels, but there will always be minimum requirements. It makes no sense for a brand to pay you to make a video nobody will see, even if it is an amazing video. Sad, but true.
How to Avoid Alienating Your Audience
Some of your subscribers will resent any branded content you create and there is no way around that. These subscribers will be in the minority – most people understand that accepting sponsorship from brands helps their favorite YouTubers continue making great videos – but it is unavoidable that there will be a few.
Most of your subscribers will not be bothered by the idea of you partnering with a brand, so long as you go about it in the right way.
Firstly; be honest about your sponsorship. Do not pretend to be giving an objective opinion on a product when the company who makes it is paying you. Your viewers will know and they will be offended.
Secondly; incorporate the brand’s message or product into your videos in ways that feel natural. Do not stray too far from your usual video style. Ultimately every video you make, even branded content, is for your viewers. Make the kind of video they expect from you and mention the product or service you have agreed to in a place where it makes sense/is on topic.
You want the branding in your videos to be subtle, but you never want to hide that it is there.
So long as you are honest and the more commercial elements of your video are not distracting, the vast majority of your subscribers – the ones you have built a real relationship with – will not mind.
Custom Videos with Awesome Video Editor


Richard Bennett
Richard Bennett is a writer and a lover of all things video.
Follow @Richard Bennett
Richard Bennett
Oct 26, 2023• Proven solutions
FameBit is one of the leading influencer marketing platforms.
Creators use FameBit to earn money by creating branded content. Businesses use FameBit to find the perfect video creators – or ‘digital influencers’ – to help with their marketing campaigns.
Until your channel is huge it is difficult to make a significant amount of money through ad revenue on YouTube. Creating branded content is one way in which YouTubers with small or mid-sized channels can generate income.
Finding sponsorships and negotiating with brands can be tricky. So can integrating products and brand messages in your videos without making your audience feel like you have ‘sold out’. This guide will help.
You must have at least 5,000 subscribers to join FameBit.
How Much Money Can You Make
How much money you can make on FameBit will depend on the deals you can negotiate with brands, and those deals will depend on how many subscribers you have and how many views you usually receive .
When calculating your fee, FameBit suggests thinking of it in terms of ‘cost per view’ (CPV). Most creators on FameBit charge between $0.05 and $0.10 per view. If you charge $0.05 per view and you get an average of 10,000 views per video then you would charge a brand $500 for your services.
How much you should charge per view depends on your genre and the nature of your audience. If you often mention products you like in videos and your subscribers have come to trust your recommendations, then it makes sense for you to charge more per view than a creator whose audience will be less receptive to product placement.
For example, if you do makeup tutorials then viewers will be used to hearing about your favorites. This makes your 10 000 views more valuable than 10 000 views on a ranting vlog channel whose subscribers are not tuning in to hear about products.
How to Make Money With FameBit
Finding Sponsorships
Brands post details about their upcoming campaigns, and the types of creators they are interested in working with, on FameBit.
While you are browsing through the available campaigns, think of the types of brands you would be excited to work with as well as which ones make sense for your channel.
If you host a lifestyle vlog about staying healthy, for example, and there is an opportunity to work with a brand that sells a type of healthy snack then it is your responsibility to look into the company and the product before you sign on to work with them. Is the snack healthy, and do you enjoy it?
Ideally, you will want to find brands that share your values and which are selling products you feel good about recommending to your subscribers.
Once you find a few campaigns you are interested in creating videos for, it’s time to write your proposals and negotiate with your potential sponsors.
Negotiating with Sponsors
When you want to be part of a campaign a brand has posted, you send them a proposal.
Be creative and detailed in the proposals you write. The best brands will value you for our ideas and creativity, and this will give you an edge over creators who put less effort into their pitches. You also want to be detailed because you do not want to risk having a disagreement with the brand based on them misunderstanding what you were going to do.
Sometimes brands will have very specific things they want you to do or say in the video you make for them. It is your job to find ways of doing and saying these things that still feel natural within the context of your videos. On YouTube, even when you are representing a brand, you need to be authentically you.
If you feel like the things a brand wants from you will make your video come across as a tacky commercial and offend your loyal subscribers, and you cannot see a creative way around this, bring it up before you agree to work with them. Explain what you think should happen instead. If they are not willing to compromise, do not agree to work with them. Find a more reasonable brand to partner with.
If you offend your subscribers and they stop watching you then your channel will become less valuable to other potential sponsors. In the long run, there is no upside to agreeing to do a video that makes no sense for your channel.
Remember that even brands that like your ideas and get excited about your proposals will not be able to work with you if you do not meet their requirements in terms of subscribers and average views. There are a lot of campaigns on FameBit which are open to small or mid-sized channels, but there will always be minimum requirements. It makes no sense for a brand to pay you to make a video nobody will see, even if it is an amazing video. Sad, but true.
How to Avoid Alienating Your Audience
Some of your subscribers will resent any branded content you create and there is no way around that. These subscribers will be in the minority – most people understand that accepting sponsorship from brands helps their favorite YouTubers continue making great videos – but it is unavoidable that there will be a few.
Most of your subscribers will not be bothered by the idea of you partnering with a brand, so long as you go about it in the right way.
Firstly; be honest about your sponsorship. Do not pretend to be giving an objective opinion on a product when the company who makes it is paying you. Your viewers will know and they will be offended.
Secondly; incorporate the brand’s message or product into your videos in ways that feel natural. Do not stray too far from your usual video style. Ultimately every video you make, even branded content, is for your viewers. Make the kind of video they expect from you and mention the product or service you have agreed to in a place where it makes sense/is on topic.
You want the branding in your videos to be subtle, but you never want to hide that it is there.
So long as you are honest and the more commercial elements of your video are not distracting, the vast majority of your subscribers – the ones you have built a real relationship with – will not mind.
Custom Videos with Awesome Video Editor
Richard Bennett
Richard Bennett is a writer and a lover of all things video.
Follow @Richard Bennett
Snappy and Simple: Steps for Posting Short Videos Online
How to Upload Shorts Video on YouTube? [2024]
Richard Bennett
Mar 27, 2024• Proven solutions
Quite recently, YouTube launched Shorts to compete with Tik Tok. At the time of this writing, the users in India have access to the fully functional version of the app. Although YouTube Shorts is available for both Android and iOS platforms, its functions are limited as the application is still in its Beta phase for the remaining part of the globe.
With that said, the following sections explain the step-by-step process on how to upload a short video on YouTube Shorts both from your smartphone and a PC.
Part 1: How to Upload Short Video on YouTube from PC?
The fact is, if you are using a computer to upload short videos to YouTube, the process is identical to publishing your other, regular footage. However, there are a few guidelines that your clips must comply with so that the streaming platform could specifically identify them as YouTube Shorts. These norms include:
- Your videos must not be more than 60 seconds long in duration
- They must be shot in portrait orientation, ideally in the 9:16 aspect ratio
- The title or the description must contain ‘#Shorts’ (without quotes) in it
Once you have a video recorded using the first two guidelines from the above list, you can use the instructions given below to upload the media on YouTube:
Step 1: Select a Short Video to Upload
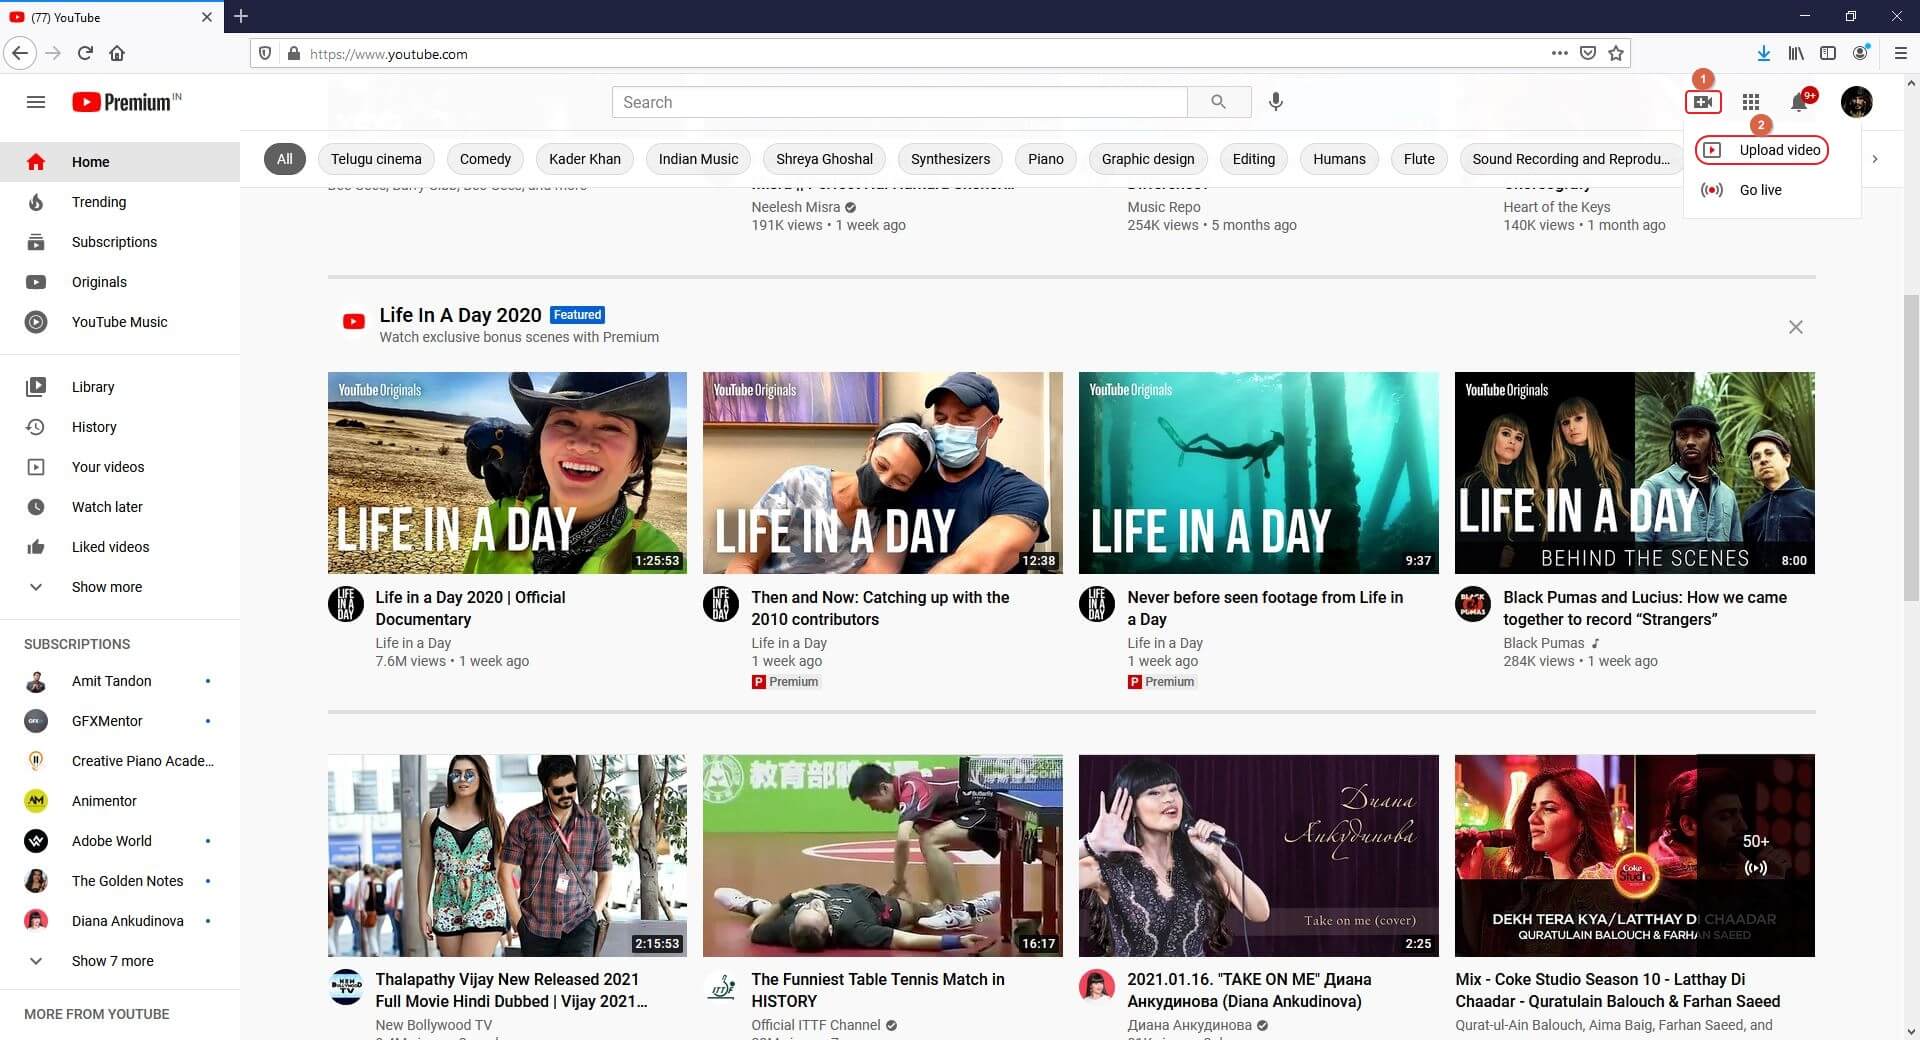
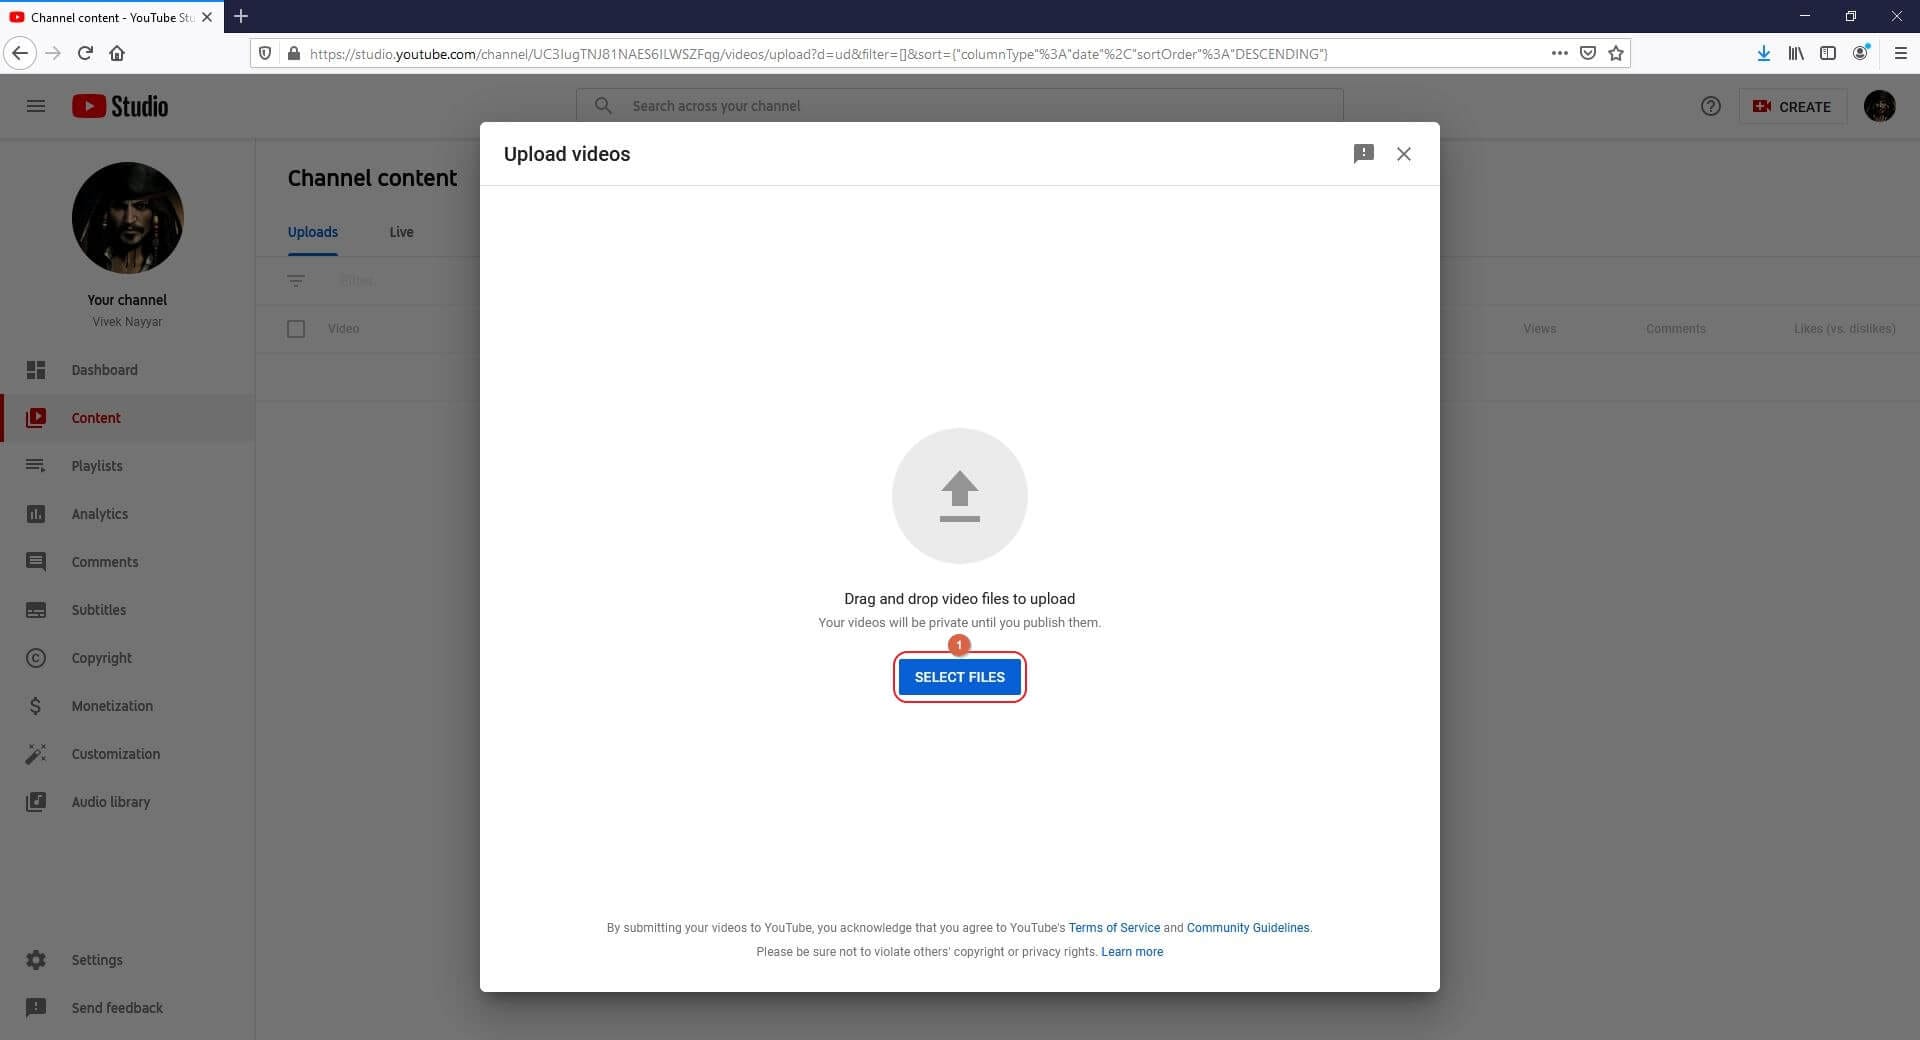
Launch your favorite web browser on your PC, go to YouTube, make sure to sign in to your YouTube account, click the Create (Camera) icon from the top-right corner of the web page, click SELECT FILES on the Upload videos window, and locate, select, and upload a short video from your PC to the portal.
Step 2: Mark the Video as Short
On the Details window that appears, add #Shorts in the Title or Description field, optionally pick a thumbnail from the suggested images present under the Thumbnail section (or upload a custom picture from your PC), select your preferred radio button from under the Audience section, make the other necessary changes if need be, and click NEXT. When the Video elements window comes up, choose your preferred options and elements, click NEXT.

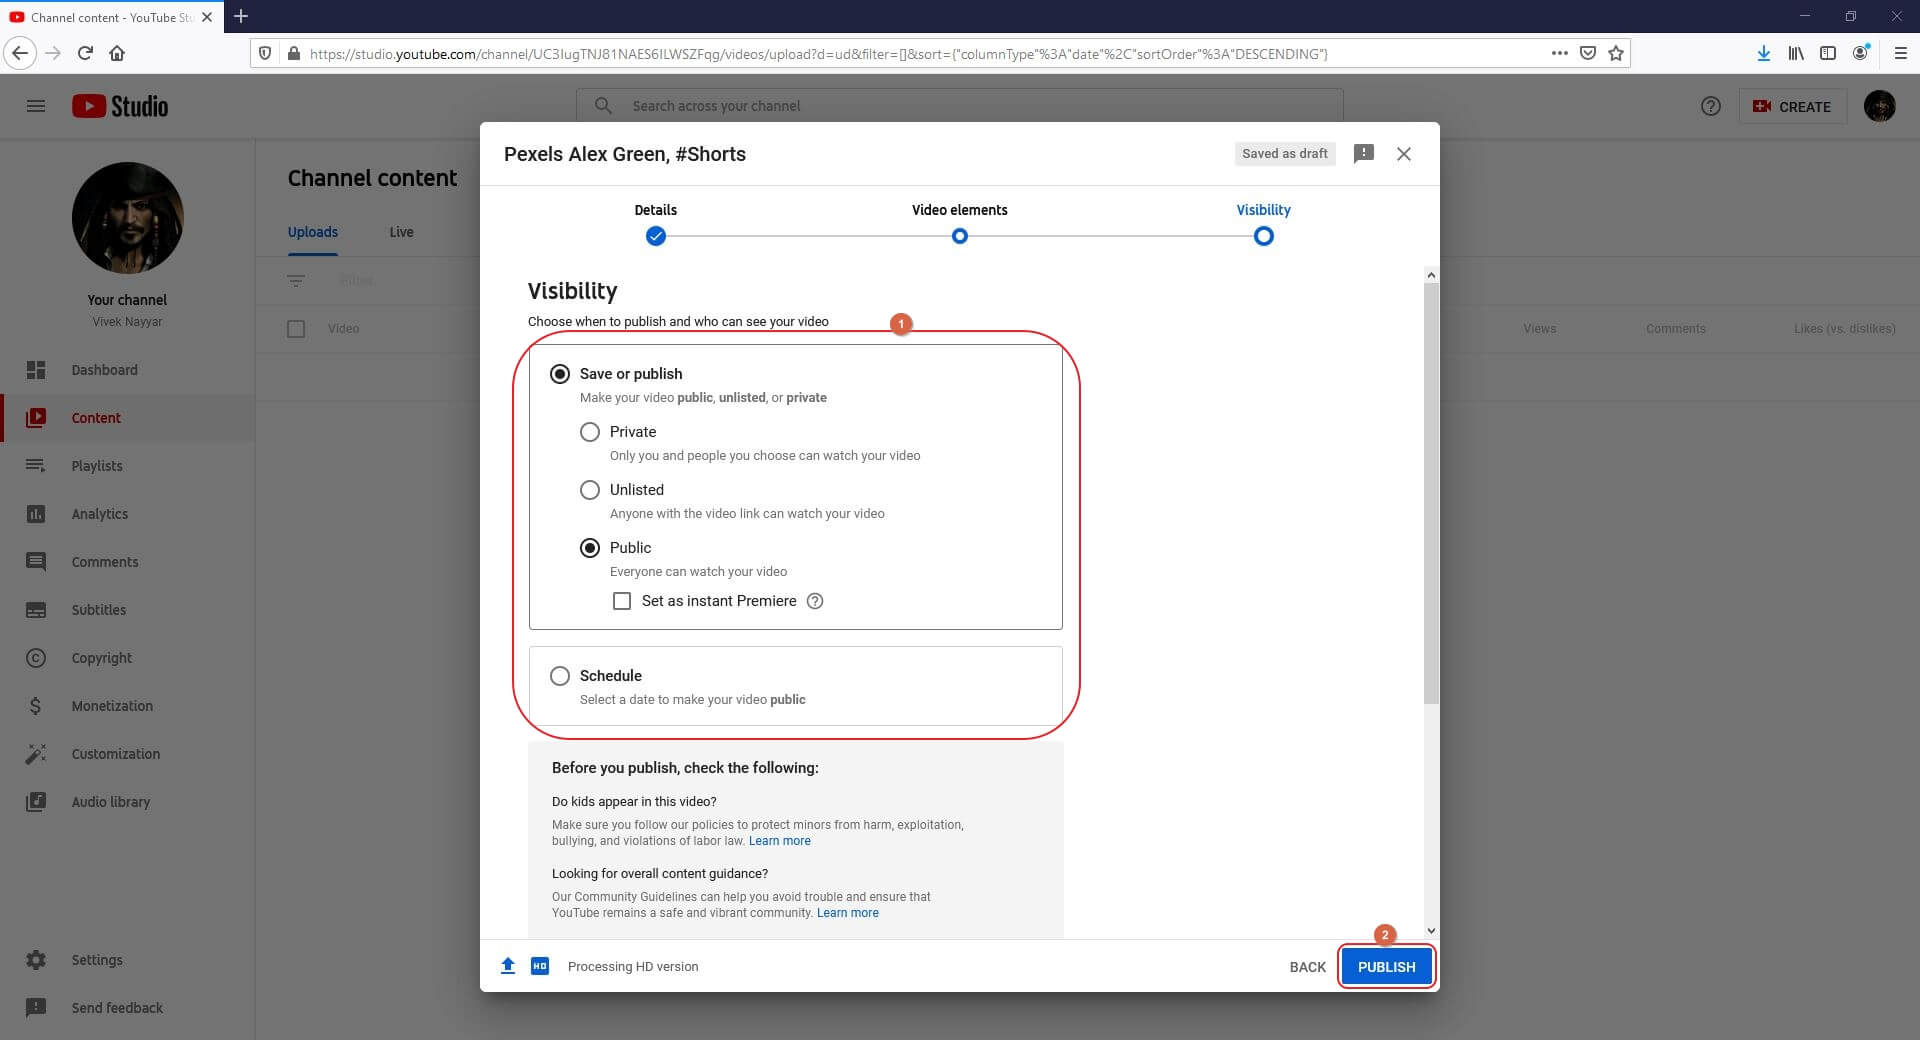
Step 3: Publish the Short Video
On the Visibility window, choose your preferred radio button from under the Save or publish section or select Schedule to set a different time when the short video should be published automatically. Finally, click SAVE to publish the clip as a short video on YouTube from your computer.
To sum up, uploading YouTube Shorts video from desktop has nothing different from uploading regular YouTube video besides the requirements listed at the beginning of this article. If you prefer to edit videos for YouTube Shortson a computer, I recommend you to try our video editor Filmora , which is an ideal solution for YouTubers. Download the free trial version below and get started.
For Win 7 or later (64-bit)
 Secure Download
For macOS 10.12 or later
Secure Download
Part 2: How to Upload Short Video on YouTube Mobile App?
The process of uploading YouTube Shorts from the mobile app is fairly simple compared to the method used on a computer. While using the app, you can either upload an existing video or shoot a new one from within the program itself then and there, add music and text, and upload it right away. Both these methods are explained below in detail:
Note: The guidelines for creating and uploading short videos to YouTube remain the same, regardless of the platform or device you use.
Method 1: Upload an Existing Short Video
Note: Make sure to have the target video on the smartphone and that you have downloaded, installed, and signed in to the YouTube app before proceeding.
Step 1: Select a Video to Upload

On your Android or iOS smartphone, launch the YouTube app, tap the + (Create) icon from the bottom, tap Create a Short from the Create box that pops up from the bottom, tap Upload from the bottom-right corner of the next screen, and select and upload a short, 60 seconds video recorded in portrait orientation from your device’s storage to the app.
Step 2: Add Details
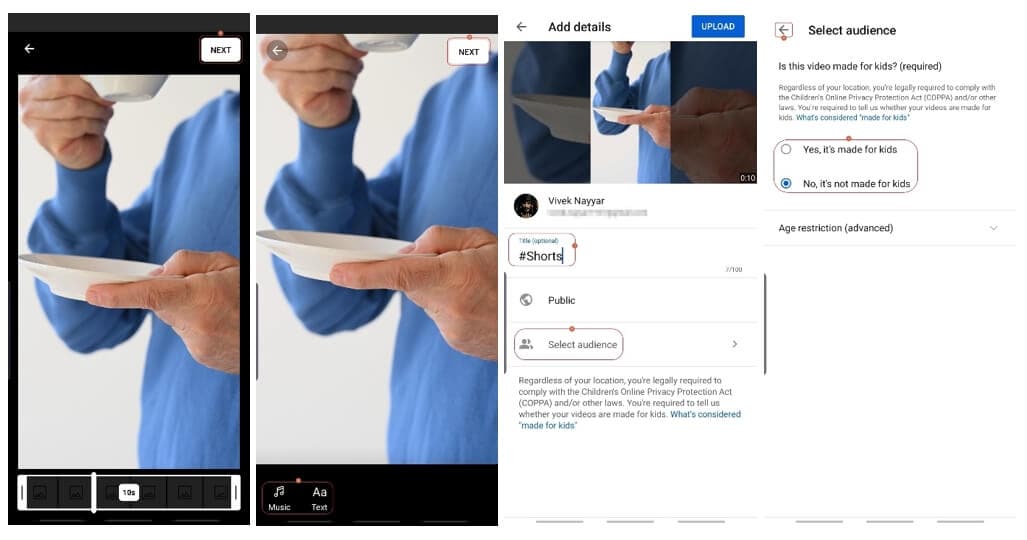
On the next screen, tap NEXT, user the Music and Text icons at the bottom-left corner to add a background music and caption to the video respectively, and tap NEXT from the top-right corner. On the next screen, enter a name for the video in the Title field along with the #Shorts tag, and tap Select audience to choose your preferred audience.
Step 3: Upload the Video
Finally tap UPLOAD from the top-right corner to upload the short video on YouTube.
Method 2: Record a Short Video and Upload
Step 1: Record Shorts Video
Previously, I have introduced how to record and upload YouTube Shorts videos , so I will keep the content concise here.
Please note you will not see the Create a Short option if you are outsides of India.

In the YouTube app, tap the + (Add) button and select Create a Short. Please note you will not see the Create a Short option if you are outsides of India.
Next, use the Speed and Timer icons to set the speed of the video and the countdown timer duration before the app starts recording the video when you press the Record button respectively.
Now tap the Record button from the bottom to start recording a video and stop to stop the recording. Make sure to shoot the footage in the portrait mode (ideally in the 9:16 aspect ratio). Tap NEXT from the bottom-right corner to proceed to the next step.
Step 2: Add Text and Music to the Short Video
On the next window, use the Music and Text buttons from the bottom-left corner to add a background music and caption to the video, and tap NEXT from the top-right corner.
Step 3: Upload and Post the Short Video
On the Add details window, enter a name for the video along with the #Shorts tag in the Create a title field, tap Select audience to select the target audience, and tap UPLOAD from the top-right corner to upload the short video on YouTube.
Conclusion
Learning the process of how to post short videos on YouTube is fairly simple as long as you have the video recorded in the portrait orientation, it is up to 60 seconds long, and contains the ‘#Shorts’ tag (without quotes) in the title or description. The good thing is, if you don’t have access to the YouTube app on your smartphone, the method for how to upload short video on YouTube explained in the first section can be followed while using your desktop computer.
Richard Bennett
Richard Bennett is a writer and a lover of all things video.
Follow @Richard Bennett
Richard Bennett
Mar 27, 2024• Proven solutions
Quite recently, YouTube launched Shorts to compete with Tik Tok. At the time of this writing, the users in India have access to the fully functional version of the app. Although YouTube Shorts is available for both Android and iOS platforms, its functions are limited as the application is still in its Beta phase for the remaining part of the globe.
With that said, the following sections explain the step-by-step process on how to upload a short video on YouTube Shorts both from your smartphone and a PC.
Part 1: How to Upload Short Video on YouTube from PC?
The fact is, if you are using a computer to upload short videos to YouTube, the process is identical to publishing your other, regular footage. However, there are a few guidelines that your clips must comply with so that the streaming platform could specifically identify them as YouTube Shorts. These norms include:
- Your videos must not be more than 60 seconds long in duration
- They must be shot in portrait orientation, ideally in the 9:16 aspect ratio
- The title or the description must contain ‘#Shorts’ (without quotes) in it
Once you have a video recorded using the first two guidelines from the above list, you can use the instructions given below to upload the media on YouTube:
Step 1: Select a Short Video to Upload
Launch your favorite web browser on your PC, go to YouTube, make sure to sign in to your YouTube account, click the Create (Camera) icon from the top-right corner of the web page, click SELECT FILES on the Upload videos window, and locate, select, and upload a short video from your PC to the portal.
Step 2: Mark the Video as Short
On the Details window that appears, add #Shorts in the Title or Description field, optionally pick a thumbnail from the suggested images present under the Thumbnail section (or upload a custom picture from your PC), select your preferred radio button from under the Audience section, make the other necessary changes if need be, and click NEXT. When the Video elements window comes up, choose your preferred options and elements, click NEXT.
Step 3: Publish the Short Video
On the Visibility window, choose your preferred radio button from under the Save or publish section or select Schedule to set a different time when the short video should be published automatically. Finally, click SAVE to publish the clip as a short video on YouTube from your computer.
To sum up, uploading YouTube Shorts video from desktop has nothing different from uploading regular YouTube video besides the requirements listed at the beginning of this article. If you prefer to edit videos for YouTube Shortson a computer, I recommend you to try our video editor Filmora , which is an ideal solution for YouTubers. Download the free trial version below and get started.
For Win 7 or later (64-bit)
Secure Download
For macOS 10.12 or later
Secure Download
Part 2: How to Upload Short Video on YouTube Mobile App?
The process of uploading YouTube Shorts from the mobile app is fairly simple compared to the method used on a computer. While using the app, you can either upload an existing video or shoot a new one from within the program itself then and there, add music and text, and upload it right away. Both these methods are explained below in detail:
Note: The guidelines for creating and uploading short videos to YouTube remain the same, regardless of the platform or device you use.
Method 1: Upload an Existing Short Video
Note: Make sure to have the target video on the smartphone and that you have downloaded, installed, and signed in to the YouTube app before proceeding.
Step 1: Select a Video to Upload
On your Android or iOS smartphone, launch the YouTube app, tap the + (Create) icon from the bottom, tap Create a Short from the Create box that pops up from the bottom, tap Upload from the bottom-right corner of the next screen, and select and upload a short, 60 seconds video recorded in portrait orientation from your device’s storage to the app.
Step 2: Add Details
On the next screen, tap NEXT, user the Music and Text icons at the bottom-left corner to add a background music and caption to the video respectively, and tap NEXT from the top-right corner. On the next screen, enter a name for the video in the Title field along with the #Shorts tag, and tap Select audience to choose your preferred audience.
Step 3: Upload the Video
Finally tap UPLOAD from the top-right corner to upload the short video on YouTube.
Method 2: Record a Short Video and Upload
Step 1: Record Shorts Video
Previously, I have introduced how to record and upload YouTube Shorts videos , so I will keep the content concise here.
Please note you will not see the Create a Short option if you are outsides of India.
In the YouTube app, tap the + (Add) button and select Create a Short. Please note you will not see the Create a Short option if you are outsides of India.
Next, use the Speed and Timer icons to set the speed of the video and the countdown timer duration before the app starts recording the video when you press the Record button respectively.
Now tap the Record button from the bottom to start recording a video and stop to stop the recording. Make sure to shoot the footage in the portrait mode (ideally in the 9:16 aspect ratio). Tap NEXT from the bottom-right corner to proceed to the next step.
Step 2: Add Text and Music to the Short Video
On the next window, use the Music and Text buttons from the bottom-left corner to add a background music and caption to the video, and tap NEXT from the top-right corner.
Step 3: Upload and Post the Short Video
On the Add details window, enter a name for the video along with the #Shorts tag in the Create a title field, tap Select audience to select the target audience, and tap UPLOAD from the top-right corner to upload the short video on YouTube.
Conclusion
Learning the process of how to post short videos on YouTube is fairly simple as long as you have the video recorded in the portrait orientation, it is up to 60 seconds long, and contains the ‘#Shorts’ tag (without quotes) in the title or description. The good thing is, if you don’t have access to the YouTube app on your smartphone, the method for how to upload short video on YouTube explained in the first section can be followed while using your desktop computer.
Richard Bennett
Richard Bennett is a writer and a lover of all things video.
Follow @Richard Bennett
Also read:
- [New] Crafting Engaging YouTube Video Layouts
- In 2024, Discovering All in YouTube Shorts Guide
- In 2024, Choreographing Climactic Crescendos
- In 2024, Essential Thumbnail Strategies for Amplifying Viewership on YouTube
- In 2024, Creating a Singular Stream From Diverse YouTube Videos
- Cutting-Edge Gadgets for Elite Gamers
- 2024 Approved Charting the Differences in YouTube's Ownership and CC Models
- Social Media Savviness Promoting Your Haul Videos Effectively
- 2024 Approved Educational History Vlogs - The Ultimate List
- Create Professional Valorant Thumbnails in No Time
- Stand Out on YouTube with These 20 Top Font Choices
- Compile of the Most Beautiful Wedding Videos - Youtube & Vimeo Edition
- Flavor Leaders Must-Watch Culinary YouTube Stars
- [New] Embrace Serenity The 10 Best Online Yoga Masters Today
- 2024 Approved Capture Your Best Side Tips for Effective Talking-Head Shots
- [Updated] Channel-Building Through Characters and Plot Twists
- [Updated] Command the YouTube Stage Mastering Visibility Through Tactics
- Crafting Captivating Video Narratives for YouTube Success
- The Price Tag of a Million-Viewed YouTube Video
- Prime Channel List 10 YouTube Sources for Analysis
- Reverse the Norm Creative Methods for Backward Youtube Watching
- Optimal Screen Recorder Selection for YouTube Professionals
- Easy and Inexpensive Techniques for YouTube Cards for 2024
- [Updated] Download All YouTube Images for Free
- Streamline Your Channels Customized End Screen Templates
- 2024 Approved Eliminate Your Streaming Darkness on YouTube
- Syncing YouTube Optimizing Screen Viewing for Live TV Audiences
- In 2024, 3 Easy YouTube Audio Extraction Methods Free & Secure
- [Updated] Content Makers' Compensation Breakdown for YouTube Shorts
- Overcoming Non-Displayed Thumbnails YouTube Shorts Guide
- Dissecting & Defeating Dreadful Greenscreen A Mac Editor's Directive for 2024
- [New] Cultivating Connection, Not Compulsion in Subscriptions
- Mastering YouTube Shorts Templates A Complete Guide
- [Updated] Crafting Perfect YouTube Thumbnails on macOS
- [Updated] Breaking Down the Secrets of Impactful ASMR Video Creation
- Adjust Privacy Settings for Secure Online Viewing for 2024
- 2024 Approved A Closer Look at Earnings Comparing Dailymotion and YouTube Revenues
- Engage Viewers with Powerful Channel-Building Stories
- Internet Idols Index 10 Most Subscribed Global Creators
- Optimize YouTube for Superior Image Quality Using AV1
- Enhancing YouTube Thumbnails Neon Borders - Top 3 Methods for 2024
- [Updated] Beyond the Buffering A Ranked List of Top 27 Video Streamers Excluding YouTube
- Prime Vocal Changer Tools for Digital Personalities
- Frame It Right Essential Composition Rules for YouTube Filmmaking
- The Snapshot Solution Effortless iPhone/iPad Video Production
- [New] End-Screen Design Made Easy with Our Templates & Tutorials
- 2024 Approved Building a YouTube Subscription Direct Link
- Enhance Video Production - 7 Best Free Sounds for Editors for 2024
- [New] Essential Tips for YouTube Edits with Sony Vegas
- How to Transfer Text Messages from Realme 12+ 5G to New Phone | Dr.fone
- [Updated] 2023'S Premier Alternatives to Samsung's Gear 360 Cam
- 2024 Approved How to Zoom Webcam on PC
- [New] In 2024, Follower Fallout on Instagram How to Spot It
- Unlock Apple iPhone 14 With Forgotten Passcode Different Methods You Can Try
- 5 Ways to Restart Honor Play 7T Without Power Button | Dr.fone
- How To Simulate GPS Movement With Location Spoofer On Itel S23? | Dr.fone
- In 2024, Expert Review Top 5 Webcams for Ultimate Visual & Auditory Experience
- New In 2024, 4 Solutions to Add White Border to Video on Mobile and Desktop
- [Updated] In 2024, Expert Hashtag Analyzers for Social Media Giants (FB/Tweet/IG)
- New In 2024, Leading the Way The Best 8 Chromebook Audio Workstations for Music Creation
- New Mastering Your Music on a Chromebook The Top 8 DAWs that Will Elevate Your Sound (Updated List, 2023)
- New 2024 Approved Top Reasons to Check Out This Mp3 Converter Windows Guide
- [New] The Ephemeral Era of FB Video
- Proven Strategies Excelling at Facetrack Video Capture for 2024
- [Updated] Achieve Success in Twitch Top 5 Livestream Strategies
- [Updated] Pro-Rated Cameras for Windows 11 - The Top Lineup Reviewed for 2024
- [Updated] The Streaming Showdown OBS vs Twitch
- In 2024, What Is a SIM Network Unlock PIN? Get Your Vivo T2x 5G Phone Network-Ready
- New In 2024, Essential Video Editing Tools for Newbies
- 2024 Approved Prime Screen Recording Tools for No-Ad Android
- How to Change Lock Screen Wallpaper on Vivo V29 Pro
- In 2024, How to Watch Hulu Outside US On Vivo T2 5G | Dr.fone
- Top SRT Enhancements Maximizing Performance on Both Platforms
- Unova Stone Pokémon Go Evolution List and How Catch Them For Tecno Spark Go (2024) | Dr.fone
- 2024 Approved Install Lumafusion on Your Mac or Find a Suitable Replacement
- New The Fast Track to Voice Reduction in Audacity
- In 2024, How to Get and Use Pokemon Go Promo Codes On Vivo G2 | Dr.fone
- In 2024, How to get the dragon scale and evolution-enabled pokemon On Sony Xperia 10 V? | Dr.fone
- [New] 2024 Approved RhythmRipper Software Overview & Testing
- Fix Unfortunately Settings Has Stopped on Xiaomi Redmi K70 Pro Quickly | Dr.fone
- Updated In 2024, Discover the Best Digital Stores for Authentic Wildlife Audio
- [Updated] Crafting Gentle Volume Declines in Premiere Pro Videos
- 5 Best Photo Video Maker With Music You Should Know for 2024
- How to Perform Hard Reset on Oppo Reno 10 Pro+ 5G? | Dr.fone
- Bypass Activation Lock From iPhone 15 Pro Max - 4 Easy Ways
- Easy Guide to Oppo K11x FRP Bypass With Best Methods
- iPhone Is Disabled? Here Is The Way To Unlock Disabled Apple iPhone XS | Dr.fone
- [Updated] 2024 Approved Critical Steps in Logging Live YouTube Videos
- Title: Forging Strategic Alliances on YouTube Through FameBit Wisdom
- Author: Brian
- Created at : 2024-05-25 11:53:23
- Updated at : 2024-05-26 11:53:23
- Link: https://youtube-video-recordings.techidaily.com/forging-strategic-alliances-on-youtube-through-famebit-wisdom/
- License: This work is licensed under CC BY-NC-SA 4.0.
