
:max_bytes(150000):strip_icc()/ipad-wont-turn-on-4103788-A-v1-5b4e32aa46e0fb00375f59da.jpg)
"Flip the Script Unique Approaches to Retracing YT Content"
Flip the Script: Unique Approaches to Retracing YT Content
How to Reverse YouTube Video in Creative Ways

Richard Bennett
Mar 27, 2024• Proven solutions
It could be a film or a reversed meme, a boomerang video on Instagram, or a rewind effect in a playback action. The reversing results make the clip compelling and creative. At present, many video creators find YouTube as a suitable platform for such rewind effects as it has millions of diverse genre video clips. Although the mechanism behind such an act can be quite confusing, it is no more if you get to know how to reverse YouTube videos at ease. Yes, video reversers are created and developed for such a purpose, and you can read below to understand how to play YouTube videos backward.
- Part 1: How to Reverse YouTube Video in the Quickest Way?
- Part 2: Reverse YouTube Videos More Creatively
How to Reverse YouTube Video in the Quickest Way?
Let’s take a look at some online tools that can play YouTube videos backward.
2. Kapwing
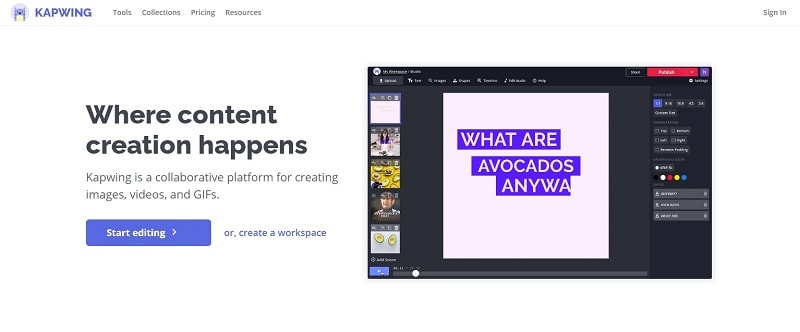
Kapwing is an online video reverser shared stage where you can create images, videos, and GIFs to share on social media. It suits to be perfect for any content that performs varied tasks with video editor tools like trimmer, resizes, studio, subtitles, and audio addition. Kapwing is an all-in-one workspace asset that is a single secure place to place over your backup safely facilitated with cross-device capability. To whatever field of interest you might belong to from a school student, professional, media, or a design team, Kapwing is the right platform ease-to-use.
3. Clideo
Like Kapwing, Clideo is an online video reverser tool that does multiple tasking like video converter, file converter, audio joiner, video maker, and a slideshow maker. We have taken up Clideo in our list as it follows a simple interface and comes up with useful tools of the loop, stops motion, and meme required in the present video creation industry. Supporting all video formats like MPG, MOV, and VOB, Clideo is a fast editor with a high-level of data protection. Developed by Softo Ltd., Clideo has got more than 4.1M users and had made up 25M videos.
Now, let’s take a simple guide to reverse a YouTube video quickly with Clideo.
Step 1: Enter the link, https://clideo.com/reverse-video on your desired web browser like Chrome or Firefox.
Now add the files from your desktop or your smartphone from the “Choose File” option or the drop-down choose your convenient option like Dropbox, Google Drive, or YouTube URL to reverse the video.
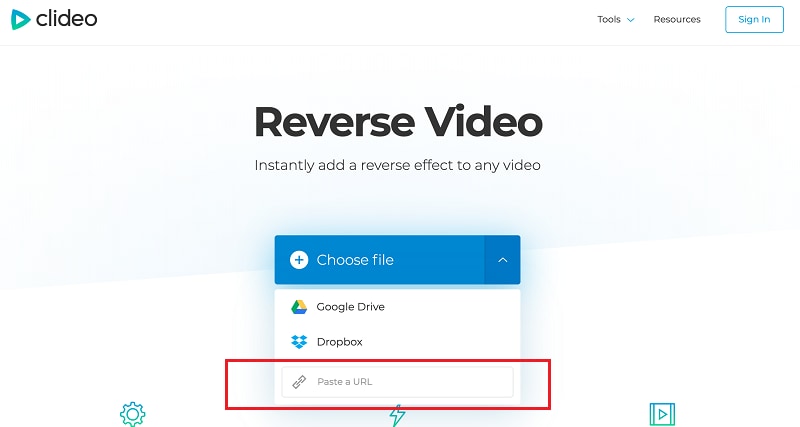
Source: clideo.com
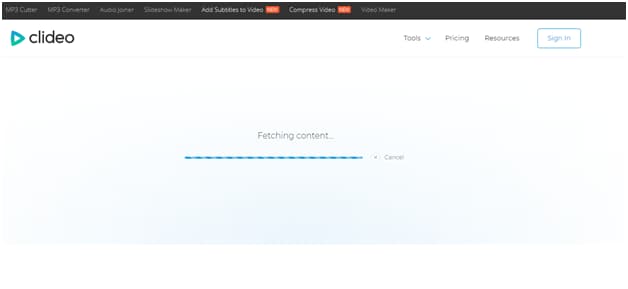
Step 2: Paste the YouTube link on the search box, and the video will process.
Step 3: The YouTube video will now start to play from backward where you can reverse the speed by changing the levels from 0.5X to 2X.
You can make a preview by playing or pausing the timeline of the YouTube video.
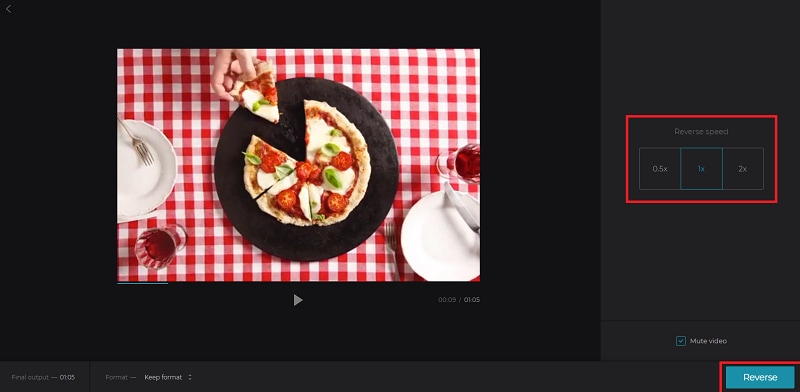
Once satisfied, hit the “Reverse” button on the right corner of the screen.
Step 4: Before downloading the revered Youtube video, you can play it once, and upon satisfaction, tap the “Download” button else you can go on with the “Back to edit” option.
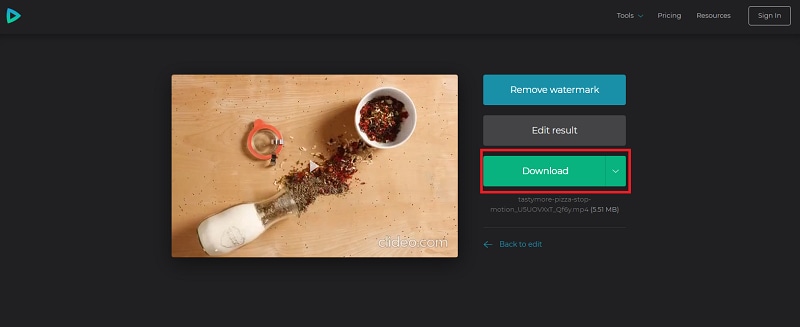
You can quickly reverse a YouTube video with Clideo in just three steps, along with a watermark removal facility.
Reverse YouTube Videos More Creatively
Want to embed more creativity in your YouTube video before reversing them? Get to know some of the YouTube video downloaders from this session.
Keepvid
Keepvid is an online video downloader that converts a video directly to MP4 & MP3. It allows you to download videos from 100+ sites, including YouTube, Facebook, Twitter, Vevo, Reddit, and BBC, irrespective of their video metadata. With Keepvid, you can listen to YouTube videos offline, save YouTube videos directly to MP3, download YouTube playlists everywhere, and anytime with the web-based lite-weight app.
YTD Video downloader
YTD video downloader has been in the market for years as a popular video downloader & converter. It is free to download software, allowing you to download video, audio, and playlist that could play offline. YTD video downloaded has gathered more than 200M users globally, supporting overall popular sites like Bing, Vimeo, TikTok, Yahoo, and Metacafe. With YTD, you can download the unlimited playlist and HD videos of 1080P at ultra-fast speed.
Want to reverse your YouTube video creatively and stunningly?
Wondershare Filmora is all you need, a complete pack of video/editing toolkit developed for the inspired that helps discover storytelling. It is a platform where you can create without limits, give life to your videos, craft fun in every clip, go beyond boundaries with endless possibilities, and make your epic story or adventure outstanding in the crowd. Filmora has a free version that allows you to access all the beautiful features like video reverse, ripple edit, trim, rotate, flip, zoom, edit, and audio ducking.
3.1How to Reverse Videos in Filmora?
Now that you have come to know about Filmora Wondershare, the best video reverser from the list, let’s directly jump over to a manual on how to reverse a YouTube video at ease.
Note: Before starting up, download and install the free version of Filmora on the device from https://filmora.wondershare.com/ .


Step 1: Open Filmora and click the “File” menu. Choose “New Project” from the drop-down.
Step 2: To import the YouTube video to the workplace, choose the “Import Media” option from the file menu.
From the drop-down, you can import files or folders at your convenience.
Step 3: Once the video is loaded on the media library, right-click on the track timeline and select the “Speed and Duration” option.
Tick the “Reverse Speed” checkbox and then hit the “OK” button.
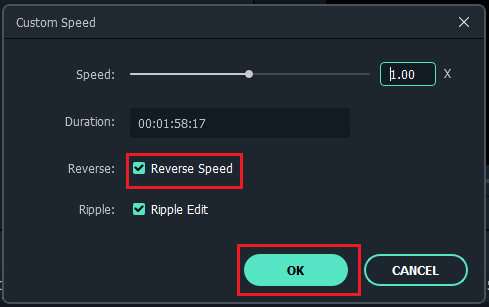
Step 4: Doing so will play the YouTube video backward, and you can see the progress on the preview window.
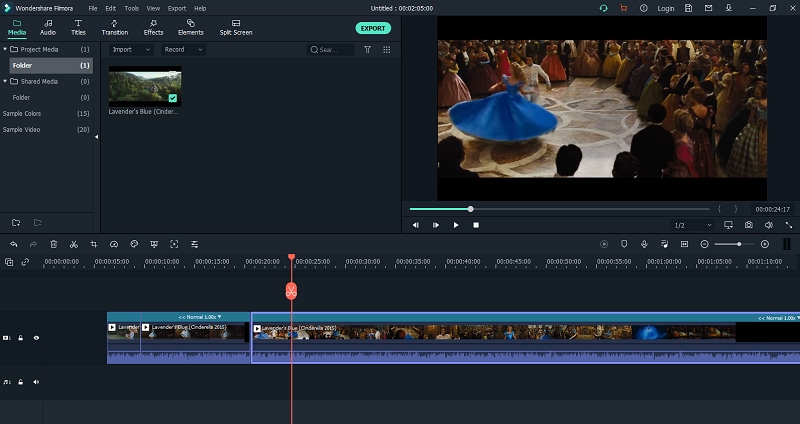
Step 5: You can perfect your creation with filters or effects offered with Filmora.
Once done, click the “Export” option that will allow you to save the file in your destined format and export it.
You can upload the reversed YouTube video directly to your YouTube account or other social media apps with Filmora.
3.2Tips for Customizing the Reversing Videos
1. Add filters & effects: Adding filters and effects like Mosaic and Amaro can uplift your reversed video and make them attractive. Filmora has 200+ filters, utilities, overlays, and LUT.
2. Render/Perfect the audio: Audio is the backbone of the video that provokes and makes the creation sound perfect and outstanding. 76 in-built audio tracks included in Filmora consisting of tender, sentimental, folk, rock, and young categories.
3. Transform your video with transitions: While various ordinary videos crowd the Internet, make yours unique by transforming them with 3D effects and a slideshow. Filmora comes with 233 transitions like 3D, warp, dissolve & ripple slideshow, lifestyle, and still a lot more.
4. Perform video editing tricks: While trim, cut & merge, crop & flip, resize, delete, and watermark are pre-defined and traditional editing tools, why don’t you try something new like creating freeze frames, accessing sample colors, and zoom in/out timeline where Filmora has a toolkit more than what you expect.
Conclusion
Thanks to the technology behind video reversers like Clideo and Kapwing that does a great job of reversing the YouTube video online quickly. The alternatives YTD downloader and Keepvid also facilitates downloading your favorite videos from 100+ video streaming sites. However, if you aspire to become a creative & professional video creator expert in the field, Filmora from Wondershare stands as the best choice for all. Lastly, also note the tips discussed, and use Filmora today for a brighter career tomorrow.
Richard Bennett
Richard Bennett is a writer and a lover of all things video.
Follow @Richard Bennett
Richard Bennett
Mar 27, 2024• Proven solutions
It could be a film or a reversed meme, a boomerang video on Instagram, or a rewind effect in a playback action. The reversing results make the clip compelling and creative. At present, many video creators find YouTube as a suitable platform for such rewind effects as it has millions of diverse genre video clips. Although the mechanism behind such an act can be quite confusing, it is no more if you get to know how to reverse YouTube videos at ease. Yes, video reversers are created and developed for such a purpose, and you can read below to understand how to play YouTube videos backward.
- Part 1: How to Reverse YouTube Video in the Quickest Way?
- Part 2: Reverse YouTube Videos More Creatively
How to Reverse YouTube Video in the Quickest Way?
Let’s take a look at some online tools that can play YouTube videos backward.
2. Kapwing
Kapwing is an online video reverser shared stage where you can create images, videos, and GIFs to share on social media. It suits to be perfect for any content that performs varied tasks with video editor tools like trimmer, resizes, studio, subtitles, and audio addition. Kapwing is an all-in-one workspace asset that is a single secure place to place over your backup safely facilitated with cross-device capability. To whatever field of interest you might belong to from a school student, professional, media, or a design team, Kapwing is the right platform ease-to-use.
3. Clideo
Like Kapwing, Clideo is an online video reverser tool that does multiple tasking like video converter, file converter, audio joiner, video maker, and a slideshow maker. We have taken up Clideo in our list as it follows a simple interface and comes up with useful tools of the loop, stops motion, and meme required in the present video creation industry. Supporting all video formats like MPG, MOV, and VOB, Clideo is a fast editor with a high-level of data protection. Developed by Softo Ltd., Clideo has got more than 4.1M users and had made up 25M videos.
Now, let’s take a simple guide to reverse a YouTube video quickly with Clideo.
Step 1: Enter the link, https://clideo.com/reverse-video on your desired web browser like Chrome or Firefox.
Now add the files from your desktop or your smartphone from the “Choose File” option or the drop-down choose your convenient option like Dropbox, Google Drive, or YouTube URL to reverse the video.
Source: clideo.com
Step 2: Paste the YouTube link on the search box, and the video will process.
Step 3: The YouTube video will now start to play from backward where you can reverse the speed by changing the levels from 0.5X to 2X.
You can make a preview by playing or pausing the timeline of the YouTube video.
Once satisfied, hit the “Reverse” button on the right corner of the screen.
Step 4: Before downloading the revered Youtube video, you can play it once, and upon satisfaction, tap the “Download” button else you can go on with the “Back to edit” option.
You can quickly reverse a YouTube video with Clideo in just three steps, along with a watermark removal facility.
Reverse YouTube Videos More Creatively
Want to embed more creativity in your YouTube video before reversing them? Get to know some of the YouTube video downloaders from this session.
Keepvid
Keepvid is an online video downloader that converts a video directly to MP4 & MP3. It allows you to download videos from 100+ sites, including YouTube, Facebook, Twitter, Vevo, Reddit, and BBC, irrespective of their video metadata. With Keepvid, you can listen to YouTube videos offline, save YouTube videos directly to MP3, download YouTube playlists everywhere, and anytime with the web-based lite-weight app.
YTD Video downloader
YTD video downloader has been in the market for years as a popular video downloader & converter. It is free to download software, allowing you to download video, audio, and playlist that could play offline. YTD video downloaded has gathered more than 200M users globally, supporting overall popular sites like Bing, Vimeo, TikTok, Yahoo, and Metacafe. With YTD, you can download the unlimited playlist and HD videos of 1080P at ultra-fast speed.
Want to reverse your YouTube video creatively and stunningly?
Wondershare Filmora is all you need, a complete pack of video/editing toolkit developed for the inspired that helps discover storytelling. It is a platform where you can create without limits, give life to your videos, craft fun in every clip, go beyond boundaries with endless possibilities, and make your epic story or adventure outstanding in the crowd. Filmora has a free version that allows you to access all the beautiful features like video reverse, ripple edit, trim, rotate, flip, zoom, edit, and audio ducking.
3.1How to Reverse Videos in Filmora?
Now that you have come to know about Filmora Wondershare, the best video reverser from the list, let’s directly jump over to a manual on how to reverse a YouTube video at ease.
Note: Before starting up, download and install the free version of Filmora on the device from https://filmora.wondershare.com/ .
Step 1: Open Filmora and click the “File” menu. Choose “New Project” from the drop-down.
Step 2: To import the YouTube video to the workplace, choose the “Import Media” option from the file menu.
From the drop-down, you can import files or folders at your convenience.
Step 3: Once the video is loaded on the media library, right-click on the track timeline and select the “Speed and Duration” option.
Tick the “Reverse Speed” checkbox and then hit the “OK” button.
Step 4: Doing so will play the YouTube video backward, and you can see the progress on the preview window.
Step 5: You can perfect your creation with filters or effects offered with Filmora.
Once done, click the “Export” option that will allow you to save the file in your destined format and export it.
You can upload the reversed YouTube video directly to your YouTube account or other social media apps with Filmora.
3.2Tips for Customizing the Reversing Videos
1. Add filters & effects: Adding filters and effects like Mosaic and Amaro can uplift your reversed video and make them attractive. Filmora has 200+ filters, utilities, overlays, and LUT.
2. Render/Perfect the audio: Audio is the backbone of the video that provokes and makes the creation sound perfect and outstanding. 76 in-built audio tracks included in Filmora consisting of tender, sentimental, folk, rock, and young categories.
3. Transform your video with transitions: While various ordinary videos crowd the Internet, make yours unique by transforming them with 3D effects and a slideshow. Filmora comes with 233 transitions like 3D, warp, dissolve & ripple slideshow, lifestyle, and still a lot more.
4. Perform video editing tricks: While trim, cut & merge, crop & flip, resize, delete, and watermark are pre-defined and traditional editing tools, why don’t you try something new like creating freeze frames, accessing sample colors, and zoom in/out timeline where Filmora has a toolkit more than what you expect.
Conclusion
Thanks to the technology behind video reversers like Clideo and Kapwing that does a great job of reversing the YouTube video online quickly. The alternatives YTD downloader and Keepvid also facilitates downloading your favorite videos from 100+ video streaming sites. However, if you aspire to become a creative & professional video creator expert in the field, Filmora from Wondershare stands as the best choice for all. Lastly, also note the tips discussed, and use Filmora today for a brighter career tomorrow.
Richard Bennett
Richard Bennett is a writer and a lover of all things video.
Follow @Richard Bennett
Perfect Timing for On-Screen Dialogue in Your YouTube Productions
How to Add Text to YouTube Video Before or After Uploading
Richard Bennett
Mar 27, 2024• Proven solutions
A great way to emphasize something you say in your vlog is to have your words appear next to you as you say them . Adding text to YouTube videos can look really professional. You might put a title at the beginning of your video, use bullet points to help people keep track of your monologue, or to highlight an important point by writing it on your screen. When you use text in your videos there are a few things you need to keep in mind. In this article, I will share with you 2 ways to add text/subtitles/captions to YouTube videos, whether you need to add text to the video during editing and upload it to YouTube later, or you have uploaded the video to YouTube already and want to add some captions and subtitles to complement it.
- Part 1: Add text to video before uploading YouTube
- Part 2: Add Text to YouTube video after uploading
- Part 3: Top 3 YouTube Video Text Tips
How to Add Text to YouTube Video Before Uploading
Before uploading the video to YouTube, it is recommended to add text to the video first. You can add simple texts and captions to videos with the free video editing software. To add more text effects to the video, you can use Filmora, Sony Vegas Movie Studio and Adobe Premiere CC based on your video editing skills and needs. These software programs are great video editors, which can help you input text easily.
1. Use Filmora to Add text to Videos
There are plenty of Text effects built in Filmora, you can apply motions and animation to texts, titles, subtitles, end credits and openers as well. Each title preset will present different effects. You can add multiple text boxes and place the text to any position in need. Besides writing texts to video, you can select the target font, size and color and customize the text effect in detail as well. To add text to a video in Filmora is easy, just follow the steps below:

- Open up Filmora and drag a clip into your timeline. Then, go to Text/Credit.
- Find a style that you like and drag it into your timeline where you want your text to appear. Make sure your text is selected in your timeline and click the Advanced Text Editing icon, which looks like a pen and paper.
- Insert your own words and drag your text to where you want it on the screen. Adjust the size by dragging the blue squares which surround your text.
- To change the color of your text, go into the Customize menu. You will find it near the top left of your screen. While you are in Customize there will be a section called Fill. This is where you select the color of your text. You can even change the fill type to ‘gradient fill’ and have your text transition between two colors.
- All of Filmora’s text options are animated – they fade, move around the screen, or perform some other type of action as they appear and disappear. To change the animation of your text select Animation next to Customize. A selection of different animations will appear. Double click on the one you want to apply to your text.
Download Mac Version ](https://tools.techidaily.com/wondershare/filmora/download/ )
Check the detailed steps of how to add text to video in Filmora.
2. Use Windows Movie Maker
As a simple video editing software, Windows Movie Maker also allows you to add text to videos. It provides 3 different options for you to add Title, Caption and Credits to the YouTube videos. You can follow the steps below to add text to the video in WMM.

- To start, launch the Windows Movie Maker.
- After, select import video to insert the video that you want to add text with.
- Select edit movie then click make credits or titles.
- Then add the text that you want to include.
For the step by step tutorial of adding text to YouTube video, check How to Add Text to Video with Windows Movie Maker . Besides adding text to video, you can use Windows Movie Maker to edit YouTube video further. Learn How to trim, cut, combine, split video and add transitions and upload video to YouTube in Windows Movie Maker?
3. Use Sony Vegas Movie Studio
Adding text to YouTube videos in Sony Vegas is not so complicated if you are new to this software. You can adjust the color, size, font and duration of the text effect and add fade in and fade out effects. Follow the steps below to add texts to video in Vegas:

- Launch Sony Vegas Movie Studio.
- Click the View Menu then select Media Generators.
- Choose the generator that you want to use.
- After, drag the generator you have chosen on the timeline.
- Then, the video event FX dialogue box will appear.
- Enter the text that you want and modify it by changing the font, size and style.
4. Use Adobe Premiere CC
For professionals who are looking for a professional way to adding text to video and also have a sufficient budget, Adobe Premiere CC is always recommended. You can check the video and the steps below to add text to video in Premiere:
- Click open or create a project.
- Click the file menu then choose new and title.
- After, the text window will appear then utilize the text tool to add text.
- You can also edit your text using the commands that are provided in the Title Menu.
- Save the text that you have made by clicking the file menu then choose Save As.
How to Add Text to video in YouTube after uploading
Sometimes, we have uploaded a video to YouTube and then want to add subtitles/cc to the video later. The good news is that YouTube is not only a site for videos but is also the place where you can edit your videos in an instant. As you have read, adding text and captions to the uploaded YouTube videos is just a breeze.
Of course, you can only add and edit texts and captions to the video under your YouTube account. Here are the steps on how you can add text to your videos with YouTube Video Editor after the video is uploaded.
- Go to youtube.com then sign in to your account. After sign in your YouTube account, click your avatar and select Creator Studio to enter the creator studio interface.
- Click the Video Manager tab and in Videos section you will see all your videos uploaded to YouTube. Select the video that you want to add captions to and then select Subtitles/CC after clicking Edit button.
- Add Captions/Subtitles

While YouTube may have already created the subtitles automatically for your video with its speech recognition technology. If it does, you will see something like Published: English (Automatic) to the right of your video. If the automatically generated subtitles is not correct, you can edit it to improve the accuracy. Select the line that needs modification to make the edits.
If there is no auto-subtitles, you can choose from 3 ways to add subtitles and closed captions to the video: Upload a file, Transcribe and auto-sync and create new subtitles or CC.

Upload a file: upload a text transcript or timed subtitles file.
Transcribe and auto-sync: Type or paste in a full transcript of the video and subtitle timings will be set automatically.
Create new subtitles or CC: Create subtitles and closed captions by typing them in as you watch the video.
If you already have a caption file which contains both text and time codes, just click Upload a file and upload the text to the video.
- Once everything is okay, you can change the name of the video and you can do it in the box beside Project.
Cons of Using YouTube Video Editor
When you make use of this editor, you cannot shorten the clips for music. Moreover, since it is an online editor, you need to refresh the page in order to do the changes. Aside from YouTube Video Editor, you can use Adobe Premier Pro, MAGIX Vegas Pro, OpenShot and Avidemux.
From 20th September 2017 users will no longer be able to use the complementary editing suite. Check the best YouTube video editor alternatives from this complete guide to find out more YouTube video editor alternatives if you want to add text to video with more features and customization.
Top 3 Tips for Adding Text to YouTube Videos
1. Leave Room
If you know you are going to add text to your video then make sure you leave room for it in your frame. Consider standing off to one side instead of directly in front of your camera. You do not want to have to choose between not using text, making your text really small, or placing it over your face.
While planning out your frame and leaving room for your text, consider what color you are going to make the words and whether it will stand out and look good against your background.
2. Bigger is Better
People should be able to read your text without putting in any extra effort, such as straining their eyes to make out small words. If it takes effort to read your text then a lot of people will just ignore it. Your text should be big enough that somebody watching your video on their smartphone screen – where everything is shrunk down – can read it easily.
It is easier to make your text larger when you stick to titles, keywords, and short sentences.
3. Do Not Overuse
Text is a great tool for making something stand out. However, if you try to use text to emphasize too much of what you say it will lose its effect. Text does not stand out anymore once viewers get too used to seeing it. Too much text can even get annoying and cause people to click away from your videos.
Try to use text to emphasize only the most important things you say.
Richard Bennett
Richard Bennett is a writer and a lover of all things video.
Follow @Richard Bennett
Richard Bennett
Mar 27, 2024• Proven solutions
A great way to emphasize something you say in your vlog is to have your words appear next to you as you say them . Adding text to YouTube videos can look really professional. You might put a title at the beginning of your video, use bullet points to help people keep track of your monologue, or to highlight an important point by writing it on your screen. When you use text in your videos there are a few things you need to keep in mind. In this article, I will share with you 2 ways to add text/subtitles/captions to YouTube videos, whether you need to add text to the video during editing and upload it to YouTube later, or you have uploaded the video to YouTube already and want to add some captions and subtitles to complement it.
- Part 1: Add text to video before uploading YouTube
- Part 2: Add Text to YouTube video after uploading
- Part 3: Top 3 YouTube Video Text Tips
How to Add Text to YouTube Video Before Uploading
Before uploading the video to YouTube, it is recommended to add text to the video first. You can add simple texts and captions to videos with the free video editing software. To add more text effects to the video, you can use Filmora, Sony Vegas Movie Studio and Adobe Premiere CC based on your video editing skills and needs. These software programs are great video editors, which can help you input text easily.
1. Use Filmora to Add text to Videos
There are plenty of Text effects built in Filmora, you can apply motions and animation to texts, titles, subtitles, end credits and openers as well. Each title preset will present different effects. You can add multiple text boxes and place the text to any position in need. Besides writing texts to video, you can select the target font, size and color and customize the text effect in detail as well. To add text to a video in Filmora is easy, just follow the steps below:
- Open up Filmora and drag a clip into your timeline. Then, go to Text/Credit.
- Find a style that you like and drag it into your timeline where you want your text to appear. Make sure your text is selected in your timeline and click the Advanced Text Editing icon, which looks like a pen and paper.
- Insert your own words and drag your text to where you want it on the screen. Adjust the size by dragging the blue squares which surround your text.
- To change the color of your text, go into the Customize menu. You will find it near the top left of your screen. While you are in Customize there will be a section called Fill. This is where you select the color of your text. You can even change the fill type to ‘gradient fill’ and have your text transition between two colors.
- All of Filmora’s text options are animated – they fade, move around the screen, or perform some other type of action as they appear and disappear. To change the animation of your text select Animation next to Customize. A selection of different animations will appear. Double click on the one you want to apply to your text.
Download Mac Version ](https://tools.techidaily.com/wondershare/filmora/download/ )
Check the detailed steps of how to add text to video in Filmora.
2. Use Windows Movie Maker
As a simple video editing software, Windows Movie Maker also allows you to add text to videos. It provides 3 different options for you to add Title, Caption and Credits to the YouTube videos. You can follow the steps below to add text to the video in WMM.
- To start, launch the Windows Movie Maker.
- After, select import video to insert the video that you want to add text with.
- Select edit movie then click make credits or titles.
- Then add the text that you want to include.
For the step by step tutorial of adding text to YouTube video, check How to Add Text to Video with Windows Movie Maker . Besides adding text to video, you can use Windows Movie Maker to edit YouTube video further. Learn How to trim, cut, combine, split video and add transitions and upload video to YouTube in Windows Movie Maker?
3. Use Sony Vegas Movie Studio
Adding text to YouTube videos in Sony Vegas is not so complicated if you are new to this software. You can adjust the color, size, font and duration of the text effect and add fade in and fade out effects. Follow the steps below to add texts to video in Vegas:
- Launch Sony Vegas Movie Studio.
- Click the View Menu then select Media Generators.
- Choose the generator that you want to use.
- After, drag the generator you have chosen on the timeline.
- Then, the video event FX dialogue box will appear.
- Enter the text that you want and modify it by changing the font, size and style.
4. Use Adobe Premiere CC
For professionals who are looking for a professional way to adding text to video and also have a sufficient budget, Adobe Premiere CC is always recommended. You can check the video and the steps below to add text to video in Premiere:
- Click open or create a project.
- Click the file menu then choose new and title.
- After, the text window will appear then utilize the text tool to add text.
- You can also edit your text using the commands that are provided in the Title Menu.
- Save the text that you have made by clicking the file menu then choose Save As.
How to Add Text to video in YouTube after uploading
Sometimes, we have uploaded a video to YouTube and then want to add subtitles/cc to the video later. The good news is that YouTube is not only a site for videos but is also the place where you can edit your videos in an instant. As you have read, adding text and captions to the uploaded YouTube videos is just a breeze.
Of course, you can only add and edit texts and captions to the video under your YouTube account. Here are the steps on how you can add text to your videos with YouTube Video Editor after the video is uploaded.
- Go to youtube.com then sign in to your account. After sign in your YouTube account, click your avatar and select Creator Studio to enter the creator studio interface.
- Click the Video Manager tab and in Videos section you will see all your videos uploaded to YouTube. Select the video that you want to add captions to and then select Subtitles/CC after clicking Edit button.
- Add Captions/Subtitles
While YouTube may have already created the subtitles automatically for your video with its speech recognition technology. If it does, you will see something like Published: English (Automatic) to the right of your video. If the automatically generated subtitles is not correct, you can edit it to improve the accuracy. Select the line that needs modification to make the edits.
If there is no auto-subtitles, you can choose from 3 ways to add subtitles and closed captions to the video: Upload a file, Transcribe and auto-sync and create new subtitles or CC.
Upload a file: upload a text transcript or timed subtitles file.
Transcribe and auto-sync: Type or paste in a full transcript of the video and subtitle timings will be set automatically.
Create new subtitles or CC: Create subtitles and closed captions by typing them in as you watch the video.
If you already have a caption file which contains both text and time codes, just click Upload a file and upload the text to the video.
- Once everything is okay, you can change the name of the video and you can do it in the box beside Project.
Cons of Using YouTube Video Editor
When you make use of this editor, you cannot shorten the clips for music. Moreover, since it is an online editor, you need to refresh the page in order to do the changes. Aside from YouTube Video Editor, you can use Adobe Premier Pro, MAGIX Vegas Pro, OpenShot and Avidemux.
From 20th September 2017 users will no longer be able to use the complementary editing suite. Check the best YouTube video editor alternatives from this complete guide to find out more YouTube video editor alternatives if you want to add text to video with more features and customization.
Top 3 Tips for Adding Text to YouTube Videos
1. Leave Room
If you know you are going to add text to your video then make sure you leave room for it in your frame. Consider standing off to one side instead of directly in front of your camera. You do not want to have to choose between not using text, making your text really small, or placing it over your face.
While planning out your frame and leaving room for your text, consider what color you are going to make the words and whether it will stand out and look good against your background.
2. Bigger is Better
People should be able to read your text without putting in any extra effort, such as straining their eyes to make out small words. If it takes effort to read your text then a lot of people will just ignore it. Your text should be big enough that somebody watching your video on their smartphone screen – where everything is shrunk down – can read it easily.
It is easier to make your text larger when you stick to titles, keywords, and short sentences.
3. Do Not Overuse
Text is a great tool for making something stand out. However, if you try to use text to emphasize too much of what you say it will lose its effect. Text does not stand out anymore once viewers get too used to seeing it. Too much text can even get annoying and cause people to click away from your videos.
Try to use text to emphasize only the most important things you say.
Richard Bennett
Richard Bennett is a writer and a lover of all things video.
Follow @Richard Bennett
Also read:
- Best Online Stock Market Channels Reviewed
- 10 Highest Performing Business YouTube Platforms Explained
- The Ultimate 12 Portable Camera Reviews For Dynamic Vlogging
- Perfecting iPhone/iPad Screenshots A YouTube Guide
- [Updated] Behind the Screen A Strategic Approach for Secret YouTube Videos
- [Updated] Boost Your TV Experience Automatic Loops of YouTube Videos
- 8 Best Youtube Video Promotion Services (Real)
- Probing Into YouTube Discussions
- [Updated] Avoiding YouTube Copyright Claims Understanding the Rules
- In 2024, City Planning for Climate Action A Comprehensive Guide
- [Updated] Boosting Bank Balance Crafting Commercial Video Content
- Crafting Impactful Try-On Hauls for Maximum Views
- Unveiling the Swift-Growing YouTube Sources for Inspiration
- Natural Vs. Artificial Balancing Your Set's Illumination
- YouTube Playlist Reordering Simplified
- 2024 Approved Channeling Changes Transition to YouTube's Updated Membership Model
- In 2024, Mastering Mobile Development Top 15 Android Virtual Machines
- Easy Methods for Saving YouTube Videos
- Change Location on Yik Yak For your Apple iPhone 15 Pro Max to Enjoy More Fun | Dr.fone
- Masterful Modulation How to Switch Up Your Character's Speech in Free Fire
- New 2024 Approved Stop Looking for Filmora Coupon Code on Reddit - Weve Got It Here
- In 2024, Reset iTunes Backup Password Of Apple iPhone XS Prevention & Solution | Dr.fone
- 2024 Approved Best Sound Mixer for Windows 10
- Conquering Cinematic Recording A Guide to Windows/macOS/iOS
- In 2024, iPogo will be the new iSpoofer On Nokia G310? | Dr.fone
- Achieve Full-Screen Display in Social Media Videos for 2024
- Top Apps and Online Tools To Track Samsung Galaxy F14 5G Phone With/Without IMEI Number
- How to Electronically Sign a JPG Using DigiSigner
- Title: "Flip the Script Unique Approaches to Retracing YT Content"
- Author: Brian
- Created at : 2024-05-25 11:53:17
- Updated at : 2024-05-26 11:53:17
- Link: https://youtube-video-recordings.techidaily.com/flip-the-script-unique-approaches-to-retracing-yt-content/
- License: This work is licensed under CC BY-NC-SA 4.0.
