
:max_bytes(150000):strip_icc()/Greentechhomeconcept-182b5c8902524865b7461097333c9046.jpg)
"Find Your Perfect Match Top 8 Mirrorless Cameras For Live Streams"
Find Your Perfect Match: Top 8 Mirrorless Cameras For Live Streams
8 Best Mirrorless Cameras Vloggers Should Know

Richard Bennett
Nov 01, 2022• Proven solutions
Mirrorless cameras are great for vloggers wanting a powerful camera without the weight and size of a DSLR camera. As mirrorless cameras are becoming better with all the advancements in camera technology, more and more DSLR camera vloggers are switching over to vlogging with a mirrorless camera. Below is our list and review of the eight best mirrorless cameras for vlogging.
WHAT TO LOOK FOR IN A VLOGGING CAMERA
1. Fully articulated screen (flip screen)
2. Good continual autofocus while recording video
3. Good focus priority through face recognition
4. Touch to focus
5. Good low-light performance
6. external mic jack, hot/cold shoe bracket
7. optical image stabilization
8. good battery life
Check out my full list of 10 Things To Look For In A Vlogging Camera to understand the importance of these camera features.
THE 8 BEST MIRRORLESS CAMERAS FOR VLOGGING (2018)
| Camera | Release Date | Sensor Size | Flip Screen | Mic Port | Price | |
|---|---|---|---|---|---|---|
| CanonEOSM50 | 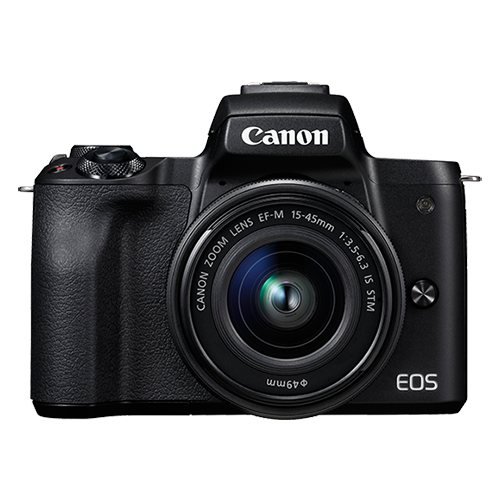 |
February2018 | APS-C(22.3 x 14.9 mm) | Fully Articulated | Yes | $- |
| PanasonicLumixDC-GH5S | 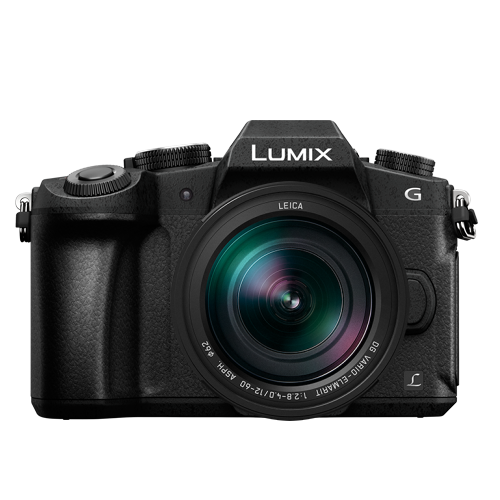 |
January2018 | Four Thirds(19.2 x 13 mm) | Fully Articulated | Yes | $$$ |
| SonyAlphaa7R III | 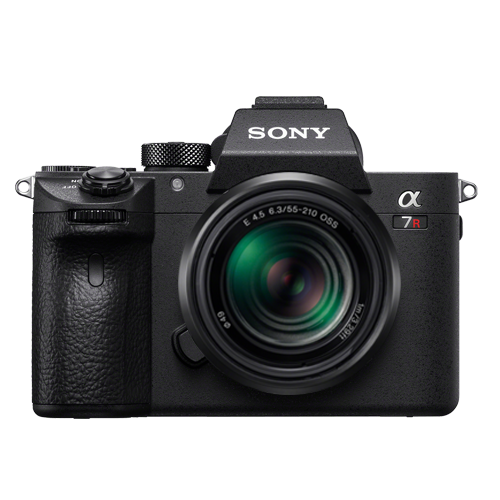 |
October2017 | Full Frame(35.9 x 24 mm) | Tilting | Yes | $$$ |
| CanonEOSM100 | 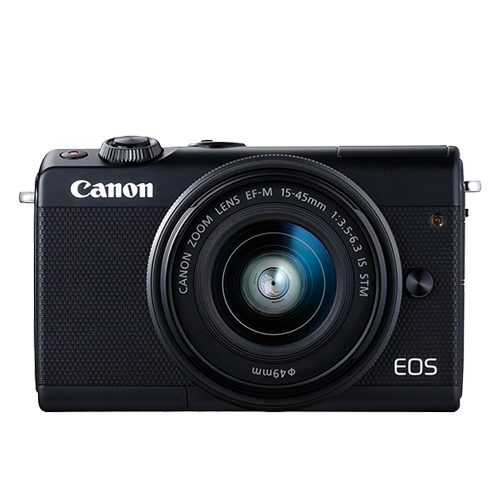 |
August2017 | APS-C(22.3 x 14.9 mm) | Flip Up | No | $ |
| CanonEOSM6 | 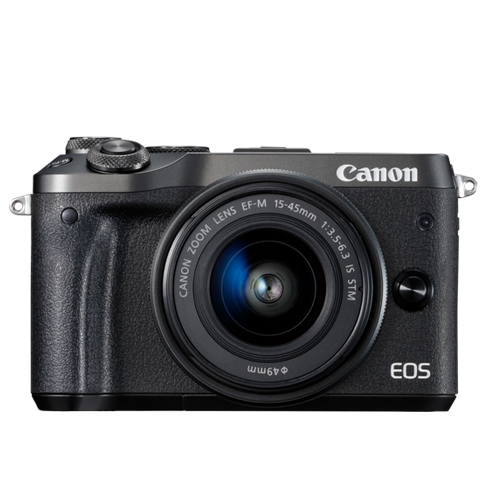 |
February2017 | APS-C(22.3 x 14.9 mm) | Flip Up | Yes | $- |
| SonyAlphaa6500 | 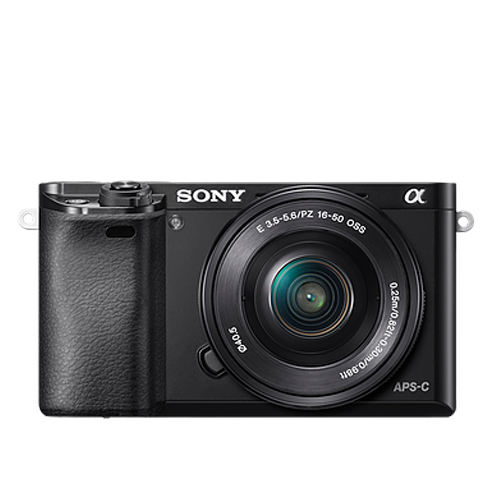 |
October2016 | APS-C(23.5 x 15.6 mm) | Tilting | Yes | $$- |
| PanasonicLumixDMC-G85 | 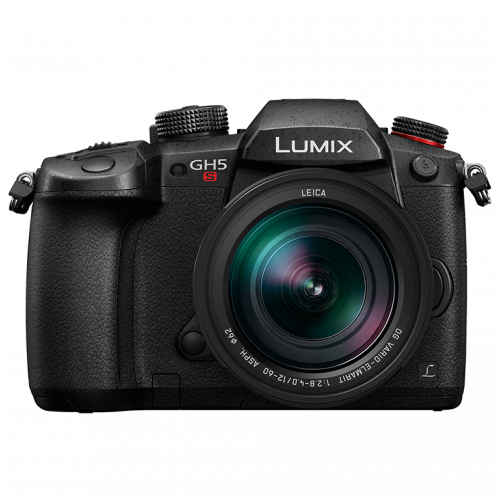 |
September2016 | Four Thirds(17.3 x 13 mm) | Fully Articulated | Yes | $- |
| PanasonicLumixDMC-G7 | 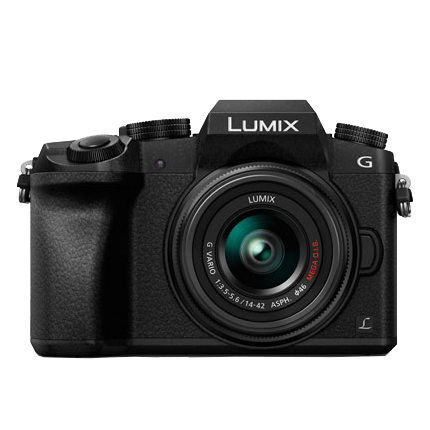 |
May2015 | Four Thirds(17.3 x 13 mm) | Fully Articulated | Yes | $ |
|
Best daily mirrorless camera for vlogging: Canon EOS M50 The Canon EOS M50 is Canon’s first mirrorless camera that comes equipped with both a fully-articulated screen and an external microphone jack. It came out only a few months ago and is already considered one of the best mirrorless cameras for vlogging. The M50 is also the only camera on our list that you can buy at a prosumer’s budget that shoots 4K video. Yes, the Sony a7R III and Panasonic GH5S also shoot 4K video, but they are much more expensive. With Canon’s new DIGIC 8 Image Processor, the camera’s dual-pixel autofocusing system will perform even better. PROS - Can shoot UHD 4K videos at 23.98 fps - Has a 2.36m-dot OLED electronic viewfinder CONS - No image stabilization - Battery life could be longer |
|---|---|
|
Best entry-level mirrorless camera for vlogging: Canon EOS M100 The Canon EOS M100 is a small, but powerful mirrorless camera for vlogging. This camera can shoot full HD 1080p videos at 60 fps. It cannot shoot 4K video, unfortunately. It uses its DIGIC 7 Image Processor and dual-pixel autofocusing system to ensure that your vlogs are always in focus. The M100 provides great ISO sensitivity options - it can reach up to ISO 25600. With its built-in Wi-Fi with NFC, you can transfer your media seamlessly to a computer. PROS - Affordable - Great connectivity options CONS - Lacks advanced video recording features - No viewfinder |
|
Best mid-range mirrorless camera for vlogging: Canon EOS M50 The Canon EOS M50 wins this category as well in our books. It is the only camera on our list that shoots 4K video that is priced much lower than the Sony a7R III and the Panasonic GH7S. In case you missed it, check out my review on the Canon EOS M50. |
|
Best professional mirrorless camera for vlogging: Panasonic Lumix DC-GH5S Originally, Panasonic had released it’s GH5 as a hybrid camera that handles both photography and videography well. In response to hearing customers’ interest in a more video-focused camera, Panasonic came up with the GH5S. In our list of the top mirrorless cameras, the Panasonic GH5S and the Sony a7R III are the two professional mirrorless cameras that can record 4K video. Between the two, though, the GH5S wins as the best professional mirrorless camera for vlogging because it sports a fully-articulated screen. Its micro four-thirds sensor is smaller than the a7R III’s full-frame sensor. Even with a smaller sensor, though, the GH5S is made to still autofocus well in low lighting conditions. Another amazing feature is its ability to record 240 fps slow-motion video at full HD 1080p. PROS - ISO sensitivity goes up to 204800 - High video bit rates CONS - Expensive - The camera body weighs about 1.5 lbs |
Want to compare even more cameras? Check out…
12 Best Vlogging Cameras (2018)
Top 11 Cheap Vlogging Cameras (2018)
7 Best DSLR Cameras For Vlogging (2018)
12 Best Vlogging Cameras With A Flip Screen (2018)
Richard Bennett
Richard Bennett is a writer and a lover of all things video.
Follow @Richard Bennett
Richard Bennett
Nov 01, 2022• Proven solutions
Mirrorless cameras are great for vloggers wanting a powerful camera without the weight and size of a DSLR camera. As mirrorless cameras are becoming better with all the advancements in camera technology, more and more DSLR camera vloggers are switching over to vlogging with a mirrorless camera. Below is our list and review of the eight best mirrorless cameras for vlogging.
WHAT TO LOOK FOR IN A VLOGGING CAMERA
1. Fully articulated screen (flip screen)
2. Good continual autofocus while recording video
3. Good focus priority through face recognition
4. Touch to focus
5. Good low-light performance
6. external mic jack, hot/cold shoe bracket
7. optical image stabilization
8. good battery life
Check out my full list of 10 Things To Look For In A Vlogging Camera to understand the importance of these camera features.
THE 8 BEST MIRRORLESS CAMERAS FOR VLOGGING (2018)
| Camera | Release Date | Sensor Size | Flip Screen | Mic Port | Price | |
|---|---|---|---|---|---|---|
| CanonEOSM50 | |
February2018 | APS-C(22.3 x 14.9 mm) | Fully Articulated | Yes | $- |
| PanasonicLumixDC-GH5S | |
January2018 | Four Thirds(19.2 x 13 mm) | Fully Articulated | Yes | $$$ |
| SonyAlphaa7R III | |
October2017 | Full Frame(35.9 x 24 mm) | Tilting | Yes | $$$ |
| CanonEOSM100 | |
August2017 | APS-C(22.3 x 14.9 mm) | Flip Up | No | $ |
| CanonEOSM6 | |
February2017 | APS-C(22.3 x 14.9 mm) | Flip Up | Yes | $- |
| SonyAlphaa6500 | |
October2016 | APS-C(23.5 x 15.6 mm) | Tilting | Yes | $$- |
| PanasonicLumixDMC-G85 | |
September2016 | Four Thirds(17.3 x 13 mm) | Fully Articulated | Yes | $- |
| PanasonicLumixDMC-G7 | |
May2015 | Four Thirds(17.3 x 13 mm) | Fully Articulated | Yes | $ |
|
Best daily mirrorless camera for vlogging: Canon EOS M50 The Canon EOS M50 is Canon’s first mirrorless camera that comes equipped with both a fully-articulated screen and an external microphone jack. It came out only a few months ago and is already considered one of the best mirrorless cameras for vlogging. The M50 is also the only camera on our list that you can buy at a prosumer’s budget that shoots 4K video. Yes, the Sony a7R III and Panasonic GH5S also shoot 4K video, but they are much more expensive. With Canon’s new DIGIC 8 Image Processor, the camera’s dual-pixel autofocusing system will perform even better. PROS - Can shoot UHD 4K videos at 23.98 fps - Has a 2.36m-dot OLED electronic viewfinder CONS - No image stabilization - Battery life could be longer |
|---|---|
|
Best entry-level mirrorless camera for vlogging: Canon EOS M100 The Canon EOS M100 is a small, but powerful mirrorless camera for vlogging. This camera can shoot full HD 1080p videos at 60 fps. It cannot shoot 4K video, unfortunately. It uses its DIGIC 7 Image Processor and dual-pixel autofocusing system to ensure that your vlogs are always in focus. The M100 provides great ISO sensitivity options - it can reach up to ISO 25600. With its built-in Wi-Fi with NFC, you can transfer your media seamlessly to a computer. PROS - Affordable - Great connectivity options CONS - Lacks advanced video recording features - No viewfinder |
|
Best mid-range mirrorless camera for vlogging: Canon EOS M50 The Canon EOS M50 wins this category as well in our books. It is the only camera on our list that shoots 4K video that is priced much lower than the Sony a7R III and the Panasonic GH7S. In case you missed it, check out my review on the Canon EOS M50. |
|
Best professional mirrorless camera for vlogging: Panasonic Lumix DC-GH5S Originally, Panasonic had released it’s GH5 as a hybrid camera that handles both photography and videography well. In response to hearing customers’ interest in a more video-focused camera, Panasonic came up with the GH5S. In our list of the top mirrorless cameras, the Panasonic GH5S and the Sony a7R III are the two professional mirrorless cameras that can record 4K video. Between the two, though, the GH5S wins as the best professional mirrorless camera for vlogging because it sports a fully-articulated screen. Its micro four-thirds sensor is smaller than the a7R III’s full-frame sensor. Even with a smaller sensor, though, the GH5S is made to still autofocus well in low lighting conditions. Another amazing feature is its ability to record 240 fps slow-motion video at full HD 1080p. PROS - ISO sensitivity goes up to 204800 - High video bit rates CONS - Expensive - The camera body weighs about 1.5 lbs |
Want to compare even more cameras? Check out…
12 Best Vlogging Cameras (2018)
Top 11 Cheap Vlogging Cameras (2018)
7 Best DSLR Cameras For Vlogging (2018)
12 Best Vlogging Cameras With A Flip Screen (2018)
Richard Bennett
Richard Bennett is a writer and a lover of all things video.
Follow @Richard Bennett
BriefClip Artist
In today’s world where businesses are going digital, it is very important to think of how you are going to get your products in front of many customers as possible without having to spend a fortune. That’s where YouTube Clip Maker comes in. It is an effective way for making YouTube videos that you can use for your business advertisements.
If you are a budding YouTuber or just looking at starting to make YouTube videos, you should consider among your editing tools a YouTube Clip Maker. It is an application that has all the tools necessary for you to edit videos in a fast and convenient way and enables you to upload the completed videos to YouTube. It is a simple tool with a friendly-to-use interface for editing videos, it should be a must-have for all users.
Part 1. Best YouTube Clip Maker Filmora
Filmora is a feature-rich audio and video editor that helps beginners with the editing of their audio and video files. The designers did their job with the armature editors in mind. It gives them a simple and easy-to-use layout that makes the work less complicated. Filmora has a built-in feature that lets you record your music and voice and also trim, merge, and cut a split your mp3 files.
Besides all the wonderful features, Filmora lets you make adjustments to speed, pitch, and volume, this makes you improve the clarity of your audio file. The app can be used to customize ringtones and specialized sound effects for your presentation.

For Win 7 or later (64-bit)
For macOS 10.12 or later
Steps on How to Use Filmora
This is an app that is best suited to those starting in video editing and requires the use of an easy-to-use app that can as well deliver quality work. Filmora is an application that was made with the armature editors in mind and is one they should consider while looking for a program to work with. It features some of the essential tools one would require and it is easy to learn how to navigate through it.
Installation Steps
- Click the icon in the center of the Media Library to add files directly.
- Go File > Import Media > Import Media Files.
- Drag and drop to the ‘media library’ directly.
When importing a media file and Filmora asks you to create a proxy file to speed up the editing process. Select “Yes” to have a fast video editing experience.
You can also import video clips using your Touch Bar controls if your computer has Touch Bar.
Record a media file
Apart from the videos shot by your digital devices, you can also directly import media files by recording video from your webcam, screen recording your computer, and a voice-over recording.
Computer screen recording:
Click the “Record” option, and choose “Record PC Screen” to get the built-in Wondershare Screen Recorder. Hit the red button to get started. To finish recording click on F9
Record videos from webcam:
Also, click the “Record” option, and choose “Record from Webcam”. In the recording pop-up window, select the red button, it will start the recording process and is also the button to choose when you want to stop recording. You will then select OK to save the recorded video clip.
Record voice-over:
Choose “Record a voiceover” on the Record menu. It would be better to connect a microphone to your Mac for a better result. Hit the Record button, and it leaves you 3 seconds to get ready.
All media files recorded are automatically saved in the “Media Library”, in case of further editing, you can drag them to the timeline.
Part 2. How to Make YouTube Clip Online
The application lets you trim your YouTube videos without having to have an account. It provides you with a quick way to either cut the beginning or end of a YouTube video. YouTube Trimmer will let you trim the video in a couple of seconds with just a few clicks. To use the app, you just need to copy and paste the earl and you are on your way to editing. You don’t have to be worried about downloading or installing the application for you to use it.
Steps on How to Use YouTube Trimmer
Step 1:
Import
Copy the YouTube link that you want to work on and paste it into the field indicated on the application.
Step 2:
Trim and Edit
You can drag the video at the edges to trim it. You can also move the playhead with your mouse and manually make cuts by clicking on the cut button.
Step 3:
Export
Once you are done editing and happy with the outcome, select the Export button to start rendering the video. Here you can choose to publish it on YouTube or save it for other uses.
Part 3. YouTube Clip Maker for Android and iPhone
KineMaster
It is a simple-to-use application that lets you create professional-quality videos in very short minutes. It enables you to edit pre-made videos or lets you make fresh ones by combining your video with several visual and sound effects. After you are done with the editing, you can save your video or share it out there.
Steps on How to Use Kinemater
Step 1:Create
It lets you import videos, audio, and images from your device. After which you can cut, rearrange, and transition between your images and videos using the KineMaster’s video layering support. This is highly dependent on your computer’s hardware capabilities.
Step 2:Edit
Adjust your video’s appearance parameters by blending color modes, adding light and sound effects, overlaying graphics, and text, or rather directly drawing on the video by using the handwriting layers.
Step 3:Share
You can export your project up to 4k and 60fps. The app saves directly to your camera’s roll besides letting you share to social media.
Part 4: Related FAQs
**How to Make a Clip from a YouTube Video ?
First, sign in to YouTube and start playing a video. Under the video click on the Clip, this will create a clip box after which you will select the part of the video that you want to clip. Give the clip a title then click share after which you will be prompted to choose an option for sharing.
**How to Clip Parts of a YouTube Video ?
Start by sign-in and opening YouTube then proceed by watching a video. If clips are available, you will see a clips icon in the bar at the bottom of the video. Click on the clip icon and select that part of the video you are interested in, give the clip a title, and select Share Clip. Choose whether you want to share the clip or save it for later use.
**What YouTubers Use to Get Clips ?
YouTubers use several video editors for their work. Some of the most popular editors are iMovie, Final Cut Pro X, and Premier Pro CC. These YouTube editing apps vary in technicalities of use and features whereby you will find that some are easy to use and have varying features. Some of the editors are free while others require payments for one to use.
Also read:
- [Updated] Best 7 LIVE Streaming Apps to Amplify Your YouTube Presence on iPhone and Android
- [Updated] ASMR App Selection Guide for Phones
- In 2024, Cutting Edge Creativity Choosing High-Quality Camera Lenses
- [New] 10 Superior YouTube Mp3 Extractors
- [Updated] Beginner's Blueprint for YouTube Income Growth
- [New] Crafting Perfect Ad Videos on YouTube Without Expense
- Essential Tips for Spectacular Product Releases for 2024
- [Updated] Efficient Ad Elimination Select 7 Android AdBlockers
- Streaming Superstars The Leading Subscriber Crew
- [Updated] Best Camera for Videos Mirrorless Vs. DSLR Showdown
- Explore Unrestricted Stock Content in Key 4 Video Channels
- [Updated] 3 Creative Ways to Enhance YouTube Videos with Neon Edges
- YouTube Streams Optimal WebM Converters Ranked!
- How to Safely Extract YouTube Audio A Study of 3 Techniques
- In 2024, A Compre Written in Code Deciphering YouTube Backlink Building Techniques
- 2024 Approved Best Bites Outside the Box New Film Favorites
- 2024 Approved Creating a Prime Business Channel Top Picks & Simple Steps
- Epicurean Escapades Crafting Kitchen Films for 2024
- [Updated] Enhance Your Profile with Free Imagery
- 2024 Approved Cutting-Edge Content Sharing Your Guide to YouTube+TikTok Linkup
- [New] Captivating Your Audience YouTube Intro Excellence with iMovie
- [New] Cutting Edge Creativity - Top 10 Online Trimmer Apps Reviewed
- [New] Capturing Emotion Ensuring Authenticity in Your YouTube Videos
- Mining Meaningful Conversations on YouTube
- YouTube's Secret to Success A Compre FFive Essential Keyword Tools
- [Updated] Choreographing Climactic Crescendos
- A Trailblazer’s Guide YouTube Studio Location Unveiled for 2024
- Integrative Design Embedding YouTube in Slides
- Thumbnail Triumphs A Smartphone Guide to Engaging YouTube Videos
- [Updated] Becoming a Master at the Art of Engaging Thumbnails
- Digital Domain Decision Which Platform for Your Videos for 2024
- 2024 Approved Elevating Video Experience Best YouTube-to-AVI Companions
- [Updated] Evaluate Subforsub’s Impact on Safe YouTube Subscriber Increase
- Deciphering YouTube Conversations
- Streamlined Sharing The Best Shortened Link Apps for Youtubers
- Unveiling the Best Youtube Channel Titles A Must-Have Guide for Vloggers (Limit to 156 Characters)
- Essential Resources for Crafting Eye-Catching YouTube Ends for 2024
- Leading Edge 16 YouTube Intros That Skyrocket Views
- In 2024, Best YouTube to MP3 Converters Free Download [Online/Win/Mac]
- Discovering Featured Social Media Exchange for 2024
- [Updated] Earth's Richest Digital Content Wizard
- Comprehensive Guide to Crafting Engaging YouTube Outros for 2024
- 2024 Approved Blissful Days The Very Best of YouTube Anime Channels
- Adding a Digital Clock to Your YouTube Video Playback
- Cloaking in Content An Introduction to Video Smoothing
- Top 4 SIM Location Trackers To Easily Find Your Lost Vivo Y100A Device
- How to Resolve Motorola Moto G14 Screen Not Working | Dr.fone
- Recording Games Like a Pro Discover the Best of Windows 11 Methods
- Essential Tweets Choosing the Right Converter
- Updated In 2024, Best Ideas on Using Green Screen with Filmora
- Quick Tips Efficiently Capturing Moments with Snap Features in Meet
- [Updated] Send Smiles Wide Step-by-Step for Sharing Gifs on Snapchat
- [New] TaringaID Profile Image Details Pixel Count, Codec, Time Span
- In 2024, Understanding Pexels.com A Resource for High-Quality, Creative Commons Images
- Updated In 2024, Cutting Edge Audio Editing with Sony Vegas Pro – Complete Guide
- What You Want To Know About Two-Factor Authentication for iCloud On your iPhone 11 Pro Max
- [New] WebCam Wizardry Crafting Ultimate Gamer Footage for 2024
- In 2024, How To Check if Your Vivo Y17s Is Unlocked
- Why Is My Honor Magic 5 Lite Offline? Troubleshooting Guide | Dr.fone
- [New] The Ultimate Collection Top 6 Apps to Capture on Mac for 2024
- How to Stop Google Chrome from Tracking Your Location On Realme Narzo 60x 5G? | Dr.fone
- 2024 Approved Top 5 Sources for Legal Comedy Soundtracks Online
- New In 2024, No Watermark, No Problem 7 Video Merger Solutions
- How to unlock a disable iPhone SE (2022) without itunes
- Masterclass Syncing Your Social Media with URLs for 2024
- In 2024, How to Bypass FRP on Tecno Spark Go (2024)?
- In 2024, Choosing GoPro Wisely A Comparative Examination
- How To Transfer Data From iPhone 13 To Other iPhone 12 Pro devices? | Dr.fone
- Updated How Different YouTube Aspect Ratio Affect Video Style for 2024
- [Updated] In 2024, Best 5-Minute Timelapse Video Maker #Top
- New Some Top Methods to Create AI Slow Motion Videos for 2024
- Updated 2024 Approved The Artisans Audit Scrutinizing Expert-Level Tools for Sonic Craftsmanship
- Updated Color Harmony in PowerDirector Tips and Tricks for a Polished Look for 2024
- Updated In 2024, Rise and Shine Wondershare Filmora Easter Sale Brings You Unbeatable Offers
- [New] Transform Your Footage Techniques for Exceptional Instagram Videos
- New In 2024, Sounds of the Game Discovering Cricket Ambient Noises
- [Updated] UnveilingEaseInUsingYourWebCamForRecord for 2024
- 2024 Approved Analyzing the Impact of Burst on Live-Action Shoots
- In 2024, For People Wanting to Mock GPS on Itel P55T Devices | Dr.fone
- [Updated] Crafting the Best Tunes on Discord With Advanced Audiophile Bots for 2024
- How to Bypass Google FRP Lock on Itel A05s Devices
- Title: "Find Your Perfect Match Top 8 Mirrorless Cameras For Live Streams"
- Author: Brian
- Created at : 2024-05-25 11:52:53
- Updated at : 2024-05-26 11:52:53
- Link: https://youtube-video-recordings.techidaily.com/find-your-perfect-match-top-8-mirrorless-cameras-for-live-streams/
- License: This work is licensed under CC BY-NC-SA 4.0.
