
:max_bytes(150000):strip_icc():format(webp)/Apple-Watch-Ultra-2-23e8ec3e4ee04c6e98c9d654a35f59ec.jpg)
Explore 8 Mirrorless Cameras That Make Great Video Content
Explore 8 Mirrorless Cameras That Make Great Video Content
8 Best Mirrorless Cameras Vloggers Should Know

Richard Bennett
Nov 01, 2022• Proven solutions
Mirrorless cameras are great for vloggers wanting a powerful camera without the weight and size of a DSLR camera. As mirrorless cameras are becoming better with all the advancements in camera technology, more and more DSLR camera vloggers are switching over to vlogging with a mirrorless camera. Below is our list and review of the eight best mirrorless cameras for vlogging.
WHAT TO LOOK FOR IN A VLOGGING CAMERA
1. Fully articulated screen (flip screen)
2. Good continual autofocus while recording video
3. Good focus priority through face recognition
4. Touch to focus
5. Good low-light performance
6. external mic jack, hot/cold shoe bracket
7. optical image stabilization
8. good battery life
Check out my full list of 10 Things To Look For In A Vlogging Camera to understand the importance of these camera features.
THE 8 BEST MIRRORLESS CAMERAS FOR VLOGGING (2018)
| Camera | Release Date | Sensor Size | Flip Screen | Mic Port | Price | |
|---|---|---|---|---|---|---|
| CanonEOSM50 | 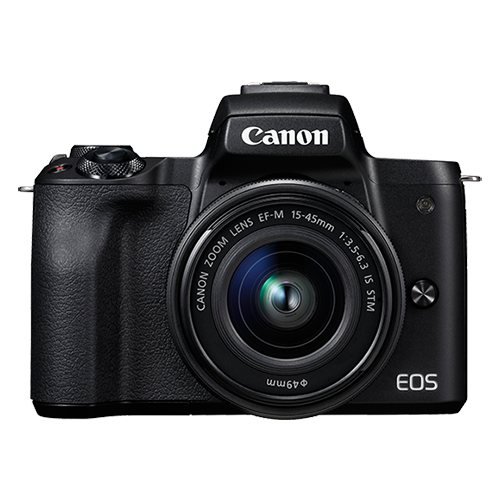 |
February2018 | APS-C(22.3 x 14.9 mm) | Fully Articulated | Yes | $- |
| PanasonicLumixDC-GH5S | 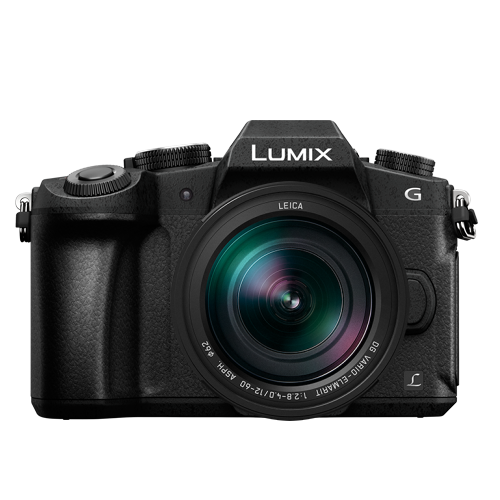 |
January2018 | Four Thirds(19.2 x 13 mm) | Fully Articulated | Yes | $$$ |
| SonyAlphaa7R III |  |
October2017 | Full Frame(35.9 x 24 mm) | Tilting | Yes | $$$ |
| CanonEOSM100 | 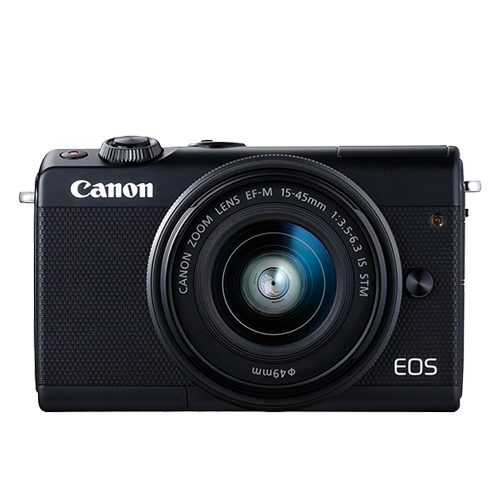 |
August2017 | APS-C(22.3 x 14.9 mm) | Flip Up | No | $ |
| CanonEOSM6 | 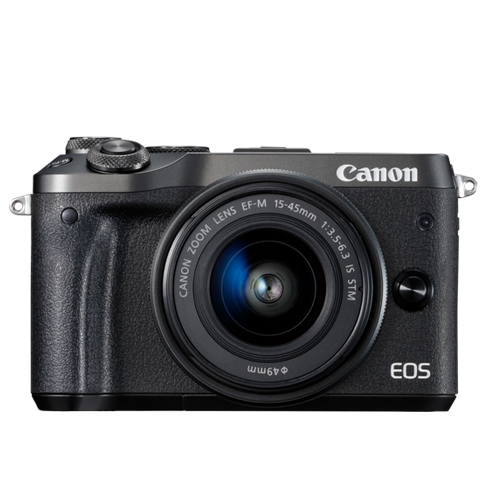 |
February2017 | APS-C(22.3 x 14.9 mm) | Flip Up | Yes | $- |
| SonyAlphaa6500 | 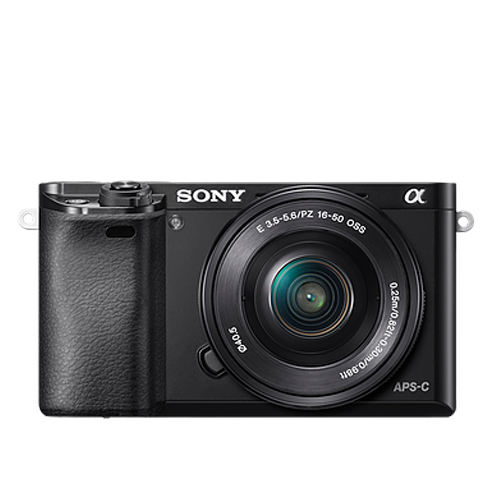 |
October2016 | APS-C(23.5 x 15.6 mm) | Tilting | Yes | $$- |
| PanasonicLumixDMC-G85 | 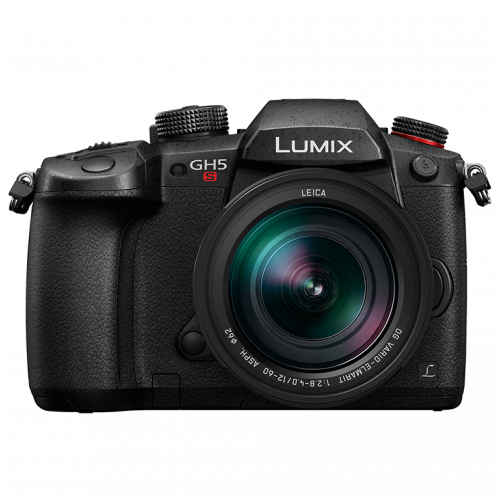 |
September2016 | Four Thirds(17.3 x 13 mm) | Fully Articulated | Yes | $- |
| PanasonicLumixDMC-G7 | 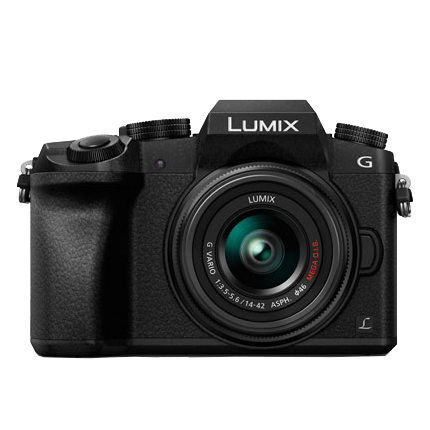 |
May2015 | Four Thirds(17.3 x 13 mm) | Fully Articulated | Yes | $ |
|
Best daily mirrorless camera for vlogging: Canon EOS M50 The Canon EOS M50 is Canon’s first mirrorless camera that comes equipped with both a fully-articulated screen and an external microphone jack. It came out only a few months ago and is already considered one of the best mirrorless cameras for vlogging. The M50 is also the only camera on our list that you can buy at a prosumer’s budget that shoots 4K video. Yes, the Sony a7R III and Panasonic GH5S also shoot 4K video, but they are much more expensive. With Canon’s new DIGIC 8 Image Processor, the camera’s dual-pixel autofocusing system will perform even better. PROS - Can shoot UHD 4K videos at 23.98 fps - Has a 2.36m-dot OLED electronic viewfinder CONS - No image stabilization - Battery life could be longer |
|---|---|
|
Best entry-level mirrorless camera for vlogging: Canon EOS M100 The Canon EOS M100 is a small, but powerful mirrorless camera for vlogging. This camera can shoot full HD 1080p videos at 60 fps. It cannot shoot 4K video, unfortunately. It uses its DIGIC 7 Image Processor and dual-pixel autofocusing system to ensure that your vlogs are always in focus. The M100 provides great ISO sensitivity options - it can reach up to ISO 25600. With its built-in Wi-Fi with NFC, you can transfer your media seamlessly to a computer. PROS - Affordable - Great connectivity options CONS - Lacks advanced video recording features - No viewfinder |
|
Best mid-range mirrorless camera for vlogging: Canon EOS M50 The Canon EOS M50 wins this category as well in our books. It is the only camera on our list that shoots 4K video that is priced much lower than the Sony a7R III and the Panasonic GH7S. In case you missed it, check out my review on the Canon EOS M50. |
|
Best professional mirrorless camera for vlogging: Panasonic Lumix DC-GH5S Originally, Panasonic had released it’s GH5 as a hybrid camera that handles both photography and videography well. In response to hearing customers’ interest in a more video-focused camera, Panasonic came up with the GH5S. In our list of the top mirrorless cameras, the Panasonic GH5S and the Sony a7R III are the two professional mirrorless cameras that can record 4K video. Between the two, though, the GH5S wins as the best professional mirrorless camera for vlogging because it sports a fully-articulated screen. Its micro four-thirds sensor is smaller than the a7R III’s full-frame sensor. Even with a smaller sensor, though, the GH5S is made to still autofocus well in low lighting conditions. Another amazing feature is its ability to record 240 fps slow-motion video at full HD 1080p. PROS - ISO sensitivity goes up to 204800 - High video bit rates CONS - Expensive - The camera body weighs about 1.5 lbs |
Want to compare even more cameras? Check out…
12 Best Vlogging Cameras (2018)
Top 11 Cheap Vlogging Cameras (2018)
7 Best DSLR Cameras For Vlogging (2018)
12 Best Vlogging Cameras With A Flip Screen (2018)
Richard Bennett
Richard Bennett is a writer and a lover of all things video.
Follow @Richard Bennett
Richard Bennett
Nov 01, 2022• Proven solutions
Mirrorless cameras are great for vloggers wanting a powerful camera without the weight and size of a DSLR camera. As mirrorless cameras are becoming better with all the advancements in camera technology, more and more DSLR camera vloggers are switching over to vlogging with a mirrorless camera. Below is our list and review of the eight best mirrorless cameras for vlogging.
WHAT TO LOOK FOR IN A VLOGGING CAMERA
1. Fully articulated screen (flip screen)
2. Good continual autofocus while recording video
3. Good focus priority through face recognition
4. Touch to focus
5. Good low-light performance
6. external mic jack, hot/cold shoe bracket
7. optical image stabilization
8. good battery life
Check out my full list of 10 Things To Look For In A Vlogging Camera to understand the importance of these camera features.
THE 8 BEST MIRRORLESS CAMERAS FOR VLOGGING (2018)
| Camera | Release Date | Sensor Size | Flip Screen | Mic Port | Price | |
|---|---|---|---|---|---|---|
| CanonEOSM50 | |
February2018 | APS-C(22.3 x 14.9 mm) | Fully Articulated | Yes | $- |
| PanasonicLumixDC-GH5S | |
January2018 | Four Thirds(19.2 x 13 mm) | Fully Articulated | Yes | $$$ |
| SonyAlphaa7R III | |
October2017 | Full Frame(35.9 x 24 mm) | Tilting | Yes | $$$ |
| CanonEOSM100 | |
August2017 | APS-C(22.3 x 14.9 mm) | Flip Up | No | $ |
| CanonEOSM6 | |
February2017 | APS-C(22.3 x 14.9 mm) | Flip Up | Yes | $- |
| SonyAlphaa6500 | |
October2016 | APS-C(23.5 x 15.6 mm) | Tilting | Yes | $$- |
| PanasonicLumixDMC-G85 | |
September2016 | Four Thirds(17.3 x 13 mm) | Fully Articulated | Yes | $- |
| PanasonicLumixDMC-G7 | |
May2015 | Four Thirds(17.3 x 13 mm) | Fully Articulated | Yes | $ |
|
Best daily mirrorless camera for vlogging: Canon EOS M50 The Canon EOS M50 is Canon’s first mirrorless camera that comes equipped with both a fully-articulated screen and an external microphone jack. It came out only a few months ago and is already considered one of the best mirrorless cameras for vlogging. The M50 is also the only camera on our list that you can buy at a prosumer’s budget that shoots 4K video. Yes, the Sony a7R III and Panasonic GH5S also shoot 4K video, but they are much more expensive. With Canon’s new DIGIC 8 Image Processor, the camera’s dual-pixel autofocusing system will perform even better. PROS - Can shoot UHD 4K videos at 23.98 fps - Has a 2.36m-dot OLED electronic viewfinder CONS - No image stabilization - Battery life could be longer |
|---|---|
|
Best entry-level mirrorless camera for vlogging: Canon EOS M100 The Canon EOS M100 is a small, but powerful mirrorless camera for vlogging. This camera can shoot full HD 1080p videos at 60 fps. It cannot shoot 4K video, unfortunately. It uses its DIGIC 7 Image Processor and dual-pixel autofocusing system to ensure that your vlogs are always in focus. The M100 provides great ISO sensitivity options - it can reach up to ISO 25600. With its built-in Wi-Fi with NFC, you can transfer your media seamlessly to a computer. PROS - Affordable - Great connectivity options CONS - Lacks advanced video recording features - No viewfinder |
|
Best mid-range mirrorless camera for vlogging: Canon EOS M50 The Canon EOS M50 wins this category as well in our books. It is the only camera on our list that shoots 4K video that is priced much lower than the Sony a7R III and the Panasonic GH7S. In case you missed it, check out my review on the Canon EOS M50. |
|
Best professional mirrorless camera for vlogging: Panasonic Lumix DC-GH5S Originally, Panasonic had released it’s GH5 as a hybrid camera that handles both photography and videography well. In response to hearing customers’ interest in a more video-focused camera, Panasonic came up with the GH5S. In our list of the top mirrorless cameras, the Panasonic GH5S and the Sony a7R III are the two professional mirrorless cameras that can record 4K video. Between the two, though, the GH5S wins as the best professional mirrorless camera for vlogging because it sports a fully-articulated screen. Its micro four-thirds sensor is smaller than the a7R III’s full-frame sensor. Even with a smaller sensor, though, the GH5S is made to still autofocus well in low lighting conditions. Another amazing feature is its ability to record 240 fps slow-motion video at full HD 1080p. PROS - ISO sensitivity goes up to 204800 - High video bit rates CONS - Expensive - The camera body weighs about 1.5 lbs |
Want to compare even more cameras? Check out…
12 Best Vlogging Cameras (2018)
Top 11 Cheap Vlogging Cameras (2018)
7 Best DSLR Cameras For Vlogging (2018)
12 Best Vlogging Cameras With A Flip Screen (2018)
Richard Bennett
Richard Bennett is a writer and a lover of all things video.
Follow @Richard Bennett
Triple Your Online Impact with Dual-Stream Youtube & Twitch
Youtube Video Maker - Wondershare Filmora
Provide abundant video effects - A creative video editor
Powerful color correction and grading
Detailed tutorials provided by the official channel
As the world has progressed, a great deal has changed, and it has transformed into a digital hub. People have started to use different platforms to entertain themselves, watch their favorite content online, gaming, music, sports, or any other form of entertainment.
Cross-platform streaming is a concept people have started to follow especially when it comes to gaming. The audience has a wide variety of choices when it comes to viewing live content online.
YouTube and Twitch are two major platforms streamers use to publish their content online for their targeted audience. They need to stream their content on YouTube and Twitch simultaneously as it engages a wider range of audiences worldwide, and newer streamers can benefit from it.
In this article
Part 1: How Can You Stream on Twitch and YouTube at the Same Time?
Part 2: How to Multi-stream using Streamlabs Prime
Part 3: Bonus Tips | Enlarge your Live Stream Performance!
Part 1: How Can You Stream on Twitch and YouTube at the Same Time?
To stream simultaneously on multiple platforms, a certain program or application is required to provide you with the required tools to enable you to broadcast your content. Several programs provide the option to stream to multiple websites at the same time e.g., Restream, Streamlabs Prime, and MelonApp.
Restream
Restream.io is a service that provides you with the option to broadcast your content to more than 30 different platforms including Twitch and YouTube. When you log in, you can choose the channels you wish to broadcast on and restream will issue a unique key for you.

After you have selected your desired selection, go to your broadcasting software, and choose Restream.io as your preferred service and insert your unique key provided by Restream.
Restream will let you use their services for free provided you use it with their watermark. It is recommended for newer users but if you wish to remove the watermark and go ad-free you will have to upgrade your plan.
Below is a step-by-step guide to help you stream using Restream.io
Step 1: Sign up or log in
The first step is to sign up on Restream. It will require you to choose a unique username, password and enter a valid email address.
Step 2: Choose your desired Platforms
From the list of different platforms, choose the ones you wish to stream to and add your channels by authorizing with the required credentials. Restream has an option of more than 30 platforms including YouTube, Twitch, Facebook, Twitter, and LinkedIn.

Step 3: Choose your subscription plan
Choose your desired plan that caters to your needs. Keep in mind that Restream is 100% free but free accounts do not come with recording or storage and will show a Restream watermark.

You can remove this watermark by upgrading your subscription plan to a Professional one from the dashboard.
Step 4: Choose the final streaming platforms
Connect all your channels so you can stream from a single platform. Click the platform icon and connect your preferred accounts with Restream.
Step 5: Tweak the settings according to your preference
Set up for streaming preferences and settings along with your streaming software. You can broadcast directly from your browser, multiple members from different locations, from your mobile phone, or even your GoPro. More available streaming features can be found on the Restream Help Center.

Restream also offers a wide range of services including the option to stream pre-recorded videos on Twitch at a preselected time and date. However, there is a caveat that you will not be able to multi-stream after you get an affiliate status on your Twitch channel.
Part 2: How to Multi-stream using Streamlabs Prime
Streamlabs Prime is the premium version of Streamlabs. It provides you with a range of 40+ apps that can also improve the quality of your streams and allow you to multi-stream. It is one of the best streaming software in the game currently.
Many content creators use Streamlabs to simultaneously run their streams on YouTube along with Twitch to grasp a wider range of audiences and get more views. One of the best things about Streamlabs is that you can connect to the broadcast services directly from the program without entering any stream key.
Streamlabs has included the option to Multi Stream on different platforms within its OBS client. Below are the steps required to set you up for streaming on YouTube and Twitch at the same time.
Step 1: Open the settings of your desired client
Click on the gear icon to open the settings on the bottom left of the client, click on the Stream tab where you will see the three main platforms for streaming.
Step 2: Add your preferred platforms
Add YouTube and Twitch by pressing the connect button; you can also add other services as well with the Add Destination feature.

Your stream will automatically be broadcast to all selected platforms when you go live. Although, you will be required to use the premium service of Streamlabs to ensure you can Multistream to different platforms at the same time.

Melon is a web-based service that lets you live-stream onto different platforms at the same time such as YouTube, Twitch, Facebook, and LinkedIn in just a matter of a few clicks. No downloads are required and there are umpteen options of customizations to personalize your feed according to your preference.
You can earn through donations from your live stream and are provided with the best customer support 24/7. Everything is hosted on a cloud-based setup and you can stream and record in 1080p.
Below are the steps to guide you on how to stream using the MelonApp.
Step 1: Login or Sign up
Login or Signup with your credentials into Melon and allow the required permissions i.e., microphone and camera.

Step 2: Choose your subscription plan
Choose your premium plan to avail of multi-streaming along with high-quality broadcasting, unlimited streaming, and tons of customization.

Step 3: Choose your desired platforms
Choose and connect the platforms you want to stream to from the Settings in the top right corner. If you have to reselect, simply click x, and reconnect to a different service.
Step 4: Finalize your preferences
Click on ‘Go Live’ and select the platforms for the current stream you wish to broadcast. Selected platforms will be highlighted.

Step 5: Go live
In the end, click next, put in the title of your stream and its description and you are all set to broadcast your content.
Part 3: Bonus Tips | Enlarge your Live Stream Performance
Now that you know how to stream on Twitch and YouTube, here are some tips to improve your live streams!
Tip # 1: Enhance Your Content
You can enhance your content in multiple ways to grasp a wider audience and get your message all around the globe.
Tip # 2: Introduce Graphics and Transitions
You can use interesting gifs, screens, intros, and outros for your streams. Announcing your streams beforehand can also help build up hype and make people anticipate your feed.
Tip # 3: Work More on Post Production
People stream different content on these streaming platforms including gaming, podcasts, educational and entertainment videos. Editing your content to near perfection is one of the most major aspects of a successful broadcast.
Tip # 4: Use Editing Tools to Make Your Videos Interesting
You can use different editing tools such as Wondershare Filmora which is a great video editing software that allows you to edit, trim, cut, add sounds and apply tons of effects to your content no matter what type or genre it is.
Tip # 5: Add Certain Effects to Appear Professional
You can also introduce motion tracking, keyframing, and use other powerful features, and that too for free using Wondershare Filmora. However, if you wish to go a step further you can always opt for their premium version and transcend into a world of endless options and opportunities to edit and enhance your content.
Tip # 6: Promote Your Content Using Social Media
Multi-streaming helps build up a wider community of fans as it is targeting different sets of people and you can also earn from your streams using advertisements and introducing click-on banners for brand endorsements.
Some platforms also let you promote and manage your merchandise, so it is always a good opportunity for these streaming clients and platforms.
Conclusion
Now you can also monetize your streams and broadcast on different platforms such as YouTube and Twitch at the same time. This will boost your reach and views in a very positive way. You can also tweak your content by editing it and inserting sound effects, gifs, and much more to make it more interesting and catchier.
And by multi-streaming on YouTube and Twitch, you will have a greater chance of being found by gaming sponsors and your growth will not be tied just to a single platform. You can also promote your streams on other social media platforms and your handles as well.
Pre-recorded videos are also a great way to present your content with perfection without any chances of being prone to any potential online mishaps.
As the world has progressed, a great deal has changed, and it has transformed into a digital hub. People have started to use different platforms to entertain themselves, watch their favorite content online, gaming, music, sports, or any other form of entertainment.
Cross-platform streaming is a concept people have started to follow especially when it comes to gaming. The audience has a wide variety of choices when it comes to viewing live content online.
YouTube and Twitch are two major platforms streamers use to publish their content online for their targeted audience. They need to stream their content on YouTube and Twitch simultaneously as it engages a wider range of audiences worldwide, and newer streamers can benefit from it.
In this article
Part 1: How Can You Stream on Twitch and YouTube at the Same Time?
Part 2: How to Multi-stream using Streamlabs Prime
Part 3: Bonus Tips | Enlarge your Live Stream Performance!
Part 1: How Can You Stream on Twitch and YouTube at the Same Time?
To stream simultaneously on multiple platforms, a certain program or application is required to provide you with the required tools to enable you to broadcast your content. Several programs provide the option to stream to multiple websites at the same time e.g., Restream, Streamlabs Prime, and MelonApp.
Restream
Restream.io is a service that provides you with the option to broadcast your content to more than 30 different platforms including Twitch and YouTube. When you log in, you can choose the channels you wish to broadcast on and restream will issue a unique key for you.
After you have selected your desired selection, go to your broadcasting software, and choose Restream.io as your preferred service and insert your unique key provided by Restream.
Restream will let you use their services for free provided you use it with their watermark. It is recommended for newer users but if you wish to remove the watermark and go ad-free you will have to upgrade your plan.
Below is a step-by-step guide to help you stream using Restream.io
Step 1: Sign up or log in
The first step is to sign up on Restream. It will require you to choose a unique username, password and enter a valid email address.
Step 2: Choose your desired Platforms
From the list of different platforms, choose the ones you wish to stream to and add your channels by authorizing with the required credentials. Restream has an option of more than 30 platforms including YouTube, Twitch, Facebook, Twitter, and LinkedIn.
Step 3: Choose your subscription plan
Choose your desired plan that caters to your needs. Keep in mind that Restream is 100% free but free accounts do not come with recording or storage and will show a Restream watermark.
You can remove this watermark by upgrading your subscription plan to a Professional one from the dashboard.
Step 4: Choose the final streaming platforms
Connect all your channels so you can stream from a single platform. Click the platform icon and connect your preferred accounts with Restream.
Step 5: Tweak the settings according to your preference
Set up for streaming preferences and settings along with your streaming software. You can broadcast directly from your browser, multiple members from different locations, from your mobile phone, or even your GoPro. More available streaming features can be found on the Restream Help Center.
Restream also offers a wide range of services including the option to stream pre-recorded videos on Twitch at a preselected time and date. However, there is a caveat that you will not be able to multi-stream after you get an affiliate status on your Twitch channel.
Part 2: How to Multi-stream using Streamlabs Prime
Streamlabs Prime is the premium version of Streamlabs. It provides you with a range of 40+ apps that can also improve the quality of your streams and allow you to multi-stream. It is one of the best streaming software in the game currently.
Many content creators use Streamlabs to simultaneously run their streams on YouTube along with Twitch to grasp a wider range of audiences and get more views. One of the best things about Streamlabs is that you can connect to the broadcast services directly from the program without entering any stream key.
Streamlabs has included the option to Multi Stream on different platforms within its OBS client. Below are the steps required to set you up for streaming on YouTube and Twitch at the same time.
Step 1: Open the settings of your desired client
Click on the gear icon to open the settings on the bottom left of the client, click on the Stream tab where you will see the three main platforms for streaming.
Step 2: Add your preferred platforms
Add YouTube and Twitch by pressing the connect button; you can also add other services as well with the Add Destination feature.
Your stream will automatically be broadcast to all selected platforms when you go live. Although, you will be required to use the premium service of Streamlabs to ensure you can Multistream to different platforms at the same time.
Melon is a web-based service that lets you live-stream onto different platforms at the same time such as YouTube, Twitch, Facebook, and LinkedIn in just a matter of a few clicks. No downloads are required and there are umpteen options of customizations to personalize your feed according to your preference.
You can earn through donations from your live stream and are provided with the best customer support 24/7. Everything is hosted on a cloud-based setup and you can stream and record in 1080p.
Below are the steps to guide you on how to stream using the MelonApp.
Step 1: Login or Sign up
Login or Signup with your credentials into Melon and allow the required permissions i.e., microphone and camera.
Step 2: Choose your subscription plan
Choose your premium plan to avail of multi-streaming along with high-quality broadcasting, unlimited streaming, and tons of customization.
Step 3: Choose your desired platforms
Choose and connect the platforms you want to stream to from the Settings in the top right corner. If you have to reselect, simply click x, and reconnect to a different service.
Step 4: Finalize your preferences
Click on ‘Go Live’ and select the platforms for the current stream you wish to broadcast. Selected platforms will be highlighted.
Step 5: Go live
In the end, click next, put in the title of your stream and its description and you are all set to broadcast your content.
Part 3: Bonus Tips | Enlarge your Live Stream Performance
Now that you know how to stream on Twitch and YouTube, here are some tips to improve your live streams!
Tip # 1: Enhance Your Content
You can enhance your content in multiple ways to grasp a wider audience and get your message all around the globe.
Tip # 2: Introduce Graphics and Transitions
You can use interesting gifs, screens, intros, and outros for your streams. Announcing your streams beforehand can also help build up hype and make people anticipate your feed.
Tip # 3: Work More on Post Production
People stream different content on these streaming platforms including gaming, podcasts, educational and entertainment videos. Editing your content to near perfection is one of the most major aspects of a successful broadcast.
Tip # 4: Use Editing Tools to Make Your Videos Interesting
You can use different editing tools such as Wondershare Filmora which is a great video editing software that allows you to edit, trim, cut, add sounds and apply tons of effects to your content no matter what type or genre it is.
Tip # 5: Add Certain Effects to Appear Professional
You can also introduce motion tracking, keyframing, and use other powerful features, and that too for free using Wondershare Filmora. However, if you wish to go a step further you can always opt for their premium version and transcend into a world of endless options and opportunities to edit and enhance your content.
Tip # 6: Promote Your Content Using Social Media
Multi-streaming helps build up a wider community of fans as it is targeting different sets of people and you can also earn from your streams using advertisements and introducing click-on banners for brand endorsements.
Some platforms also let you promote and manage your merchandise, so it is always a good opportunity for these streaming clients and platforms.
Conclusion
Now you can also monetize your streams and broadcast on different platforms such as YouTube and Twitch at the same time. This will boost your reach and views in a very positive way. You can also tweak your content by editing it and inserting sound effects, gifs, and much more to make it more interesting and catchier.
And by multi-streaming on YouTube and Twitch, you will have a greater chance of being found by gaming sponsors and your growth will not be tied just to a single platform. You can also promote your streams on other social media platforms and your handles as well.
Pre-recorded videos are also a great way to present your content with perfection without any chances of being prone to any potential online mishaps.
Also read:
- In 2024, Comedic Craftsmanship The Best Short Video Ideas to Entertain Viewers
- How YouTube's Shorts Fund Aims to Revolutionize Content Creation
- Unlocking YouTube Simplified Methods for CC and Subtitle Integration
- Best Practices for Inserting Text on YouTube Videos Effectively
- Efficient Solutions for YouTube Short Snags
- Achieve Perfect YouTube Broadcasts with Superior Webcams for 2024
- [New] Essential ASMR Channel Discoveries
- Viral Visionaries Hashes that Transform Short Videos Into Hits
- [Updated] Best Stream Tech Innovative Hardware & Software Guide for Youtubers
- 2024 Approved Capture Your Best Side Tips for Effective Talking-Head Shots
- Decoding YouTube's Clandestine Content with Orderliness
- [Updated] Deciphering YouTube Monetization Success Codes
- Ranking the Real Heavies YouTube Video Watch Hours Top 10
- 2024 Approved Creating Profit on YouTube The Ultimate List of Top Business Channels
- 10 User-Friendly Free Tools to Create Professional Video Thumbnails
- 2024 Approved Design Guide YouTube Banners & Thumbnail Creation
- 2024 Approved Dive Into Digital Green Magic Top 4 YouTube Sources for No-Cost Background Workshops
- Download YouTube's Best Moments Without Full Streaming for 2024
- Upgrade Video Previews with Bright Neon Edging
- [Updated] Essential Tips for Crafting YouTube Image Marketing
- [New] Becoming a Confident Content Creator YouTube's Top Tips
- In 2024, Charting Success with YouTube Income Streams
- 2024 Approved 10 Top Zero-Charge Web Tools to Craft Videos
- Screen Saga A Thousand Stories, One Channel at a Time
- Elite Media Maestro Picture Perfect with Pitches for 2024
- [Updated] Digital Dominance Top YouTube Watch Count Chronicles
- 2024 Approved Digital Wealth Creation Through Video Networking
- Digital Video Conquerors' Ultimate Toolkit List
- [New] Crafting Motivational Life Vlogs for Fan Engagement
- [Updated] 8 Best Free Video Editing Software for YouTube
- 2024 Approved Elevate Engagement Crafting Effective YouTube Shorts
- [New] Break Free From YouTube with These Best 27 Video Streamers
- 2024 Approved A Peek Into the Heart of YouTube's Video Operations
- In 2024, Elevate Creations - Get FREE High-Quality Templates Today
- In 2024, Top 10 VR Videos on YouTube to Have Immersive Experience
- [New] Editing Made Easy YouTube Edition—Top 10 Tips for Newbies
- Ace Your Videos Essential Editors for YouTube for 2024
- [New] Deciphering the Code Understanding What 'Unlisted' On YouTube Means
- Virtual Voyage YouTube's Premier 10-VR Video Experience
- New 2024 Approved The Ultimate List of Free iMovie Alternatives for Online Video Editing
- In 2024, A New Era of Photo Display Best Frame Makers
- [New] 10 Excellent Open-Source Screen Capture Programs for 2024
- 2024 Approved Alternative High-Quality Gaming Video Recording Solutions
- Quick Fixes for Why Is My Xiaomi 13T Pro Black and White | Dr.fone
- Become a SnapBoom Expert in Minutes
- In 2024, 10 Free Location Spoofers to Fake GPS Location on your Itel S23+ | Dr.fone
- [Updated] 2024 Approved TwitVid Mastery Your Go-To Resource for Video Downloads
- Preparation to Beat Giovani in Pokemon Go For Vivo Y200e 5G | Dr.fone
- Recover Lost Photos during Transfer from iPhone 6s to PC or Mac | Stellar
- [New] 2024 Approved Unlocking TV Potential with Social Media's Facebook Live Streams
- 2024 Approved How to Share Videos on Facebook?
- New In 2024, Audio Separation Strategies Isolating Sound From Video Clips
- 2024 Approved 10+ Best Free Online Video Trimmers to Edit Videos Quickly
- [Updated] Avoiding Simulated Reality Ills Strategies and Tips
- Broadcast Success Master the Art of Monitor Sharing on FB
- New Create Unforgettable Intros 7 Leading Movie Intro Software
- The Art of Colors Selecting the Crème De La Créme Monitors
- Protecting Your Privacy How To Remove Apple ID From Apple iPhone 14
- In 2024, Step-by-Step Tutorial How To Bypass Xiaomi Redmi 12 5G FRP
- How to Repair a Damaged video file of Xiaomi Redmi Note 13 5G using Video Repair Utility on Mac?
- In 2024, Deciphering ShareX Comparisons & Replacements
- How to Use Phone Clone to Migrate Your Infinix Smart 7 Data? | Dr.fone
- How to Change/Fake Your Honor X9a Location on Viber | Dr.fone
- [New] 2024 Approved Instagram Craftsmanship Incorporating Descriptive Texts
- New How to Remove Audio From MKV-2023 Update
- New 2024 Approved Top AI Video Makers to Create Captivating Videos with Pictures
- Optimal Insta Video Sizes - 2023 Guide for 2024
- In 2024, From Zero to Hero Establishing a New Social Media Presence (Facebook)
- [New] Crafting Visual Stories for Successful FB Covers
- Title: Explore 8 Mirrorless Cameras That Make Great Video Content
- Author: Brian
- Created at : 2024-05-25 11:51:44
- Updated at : 2024-05-26 11:51:44
- Link: https://youtube-video-recordings.techidaily.com/explore-8-mirrorless-cameras-that-make-great-video-content/
- License: This work is licensed under CC BY-NC-SA 4.0.
