
:max_bytes(150000):strip_icc()/ecotech_robothands_gettyimages-1179633351_koya79_cropped_1745_v3-c9e218ef95494c239b2edfb8294fe2a1.jpg)
Essential 12 Flipscreen Cam Titles for Optimal Vlogging
Essential 12 Flipscreen Cam Titles for Optimal Vlogging
12 Best Vlogging Cameras with a Flip Screen

Richard Bennett
Nov 01, 2022• Proven solutions
A flip screen is a very important feature on a camera for vloggers. With a flip screen, you can preview whether or not your shot is composed the way you want it to be, all in real-time. Below is our top list and review of the twelve best vlogging cameras with a flip screen.
WHAT TO LOOK FOR IN A VLOGGING CAMERA
1. Fully articulated screen (flip screen)
2. Good continual autofocus while recording video
3. Good focus priority through face recognition
4. Touch to focus
5. Good low-light performance
6. external mic jack, hot/cold shoe bracket
7. optical image stabilization
8. good battery life
Check out my full list of 10 Things To Look For In A Vlogging Camera to understand the importance of these camera features.
THE 12 BEST VLOGGING CAMERAS WITH A FLIP SCREEN (2018)
| Camera | Release Date | Camera Type | Flip Screen Type | Mic Port | Price | |
|---|---|---|---|---|---|---|
| CanonEOSM50 | 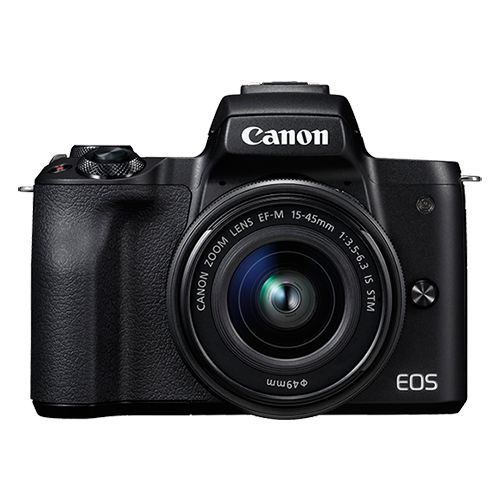 |
February2018 | Mirrorless | Fully Articulated | Yes | $- |
| PanasonicLumixDC-GH5S | 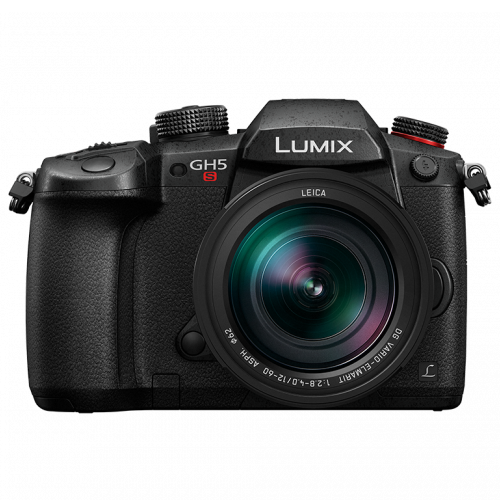 |
January2018 | Mirrorless | Fully Articulated | Yes | $$$ |
| CanonEOSM100 | 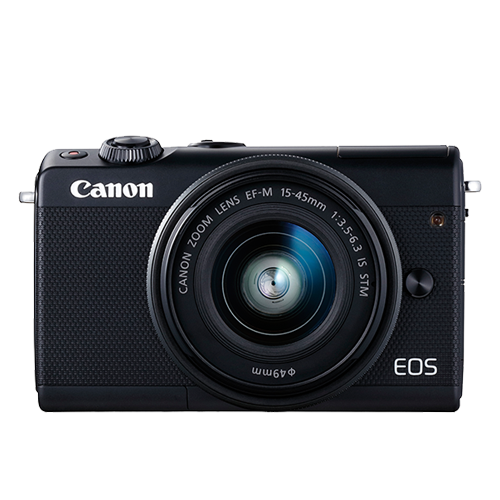 |
August2017 | Mirrorless | Flip Up | No | $ |
| CanonEOS6D Mark II | 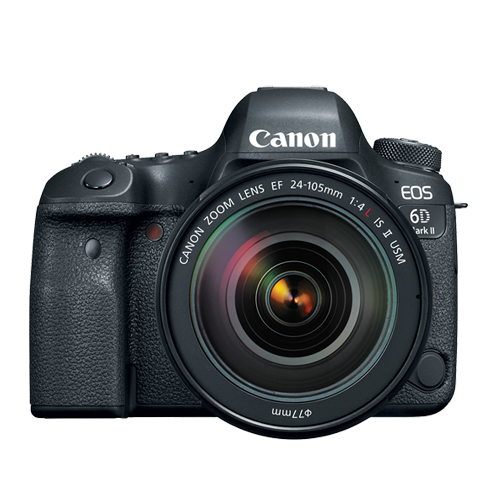 |
June2017 | Mid-size SLR | Fully Articulated | Yes | $$ |
| CanonEOS RebelSL2 |  |
June2017 | Compact SLR | Fully Articulated | Yes | $ |
| CanonEOS RebelT7i | 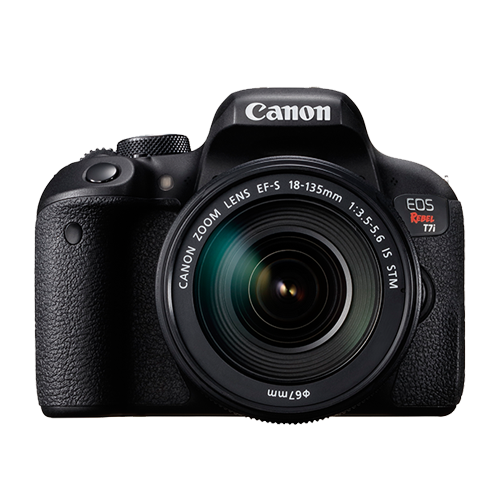 |
February2017 | Mid-size SLR | Fully Articulated | Yes | $- |
| CanonEOSM6 | 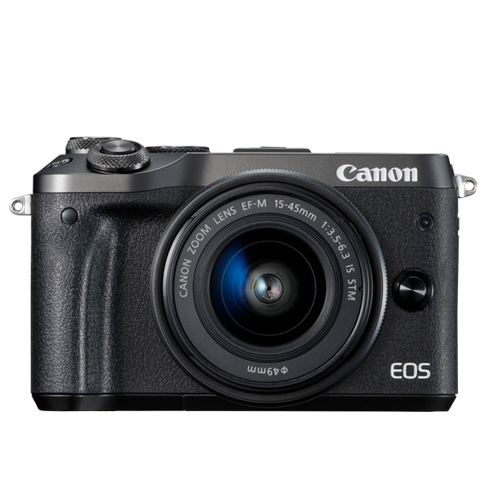 |
February2017 | Mirrorless | Flip Up | Yes | $ |
| NikonD5600 | 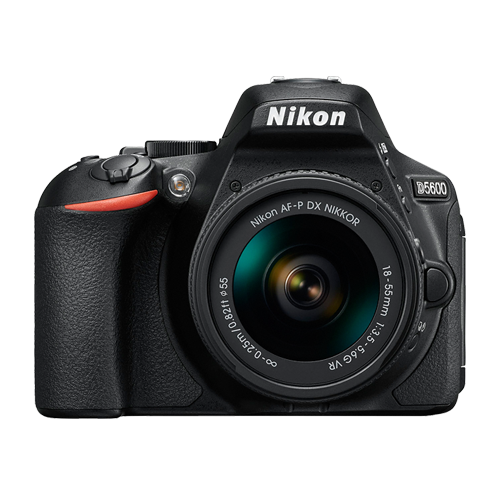 |
November2016 | Compact SLR | Fully Articulated | Yes | $- |
| SonyCyber-Shot DSCRX 100 V | 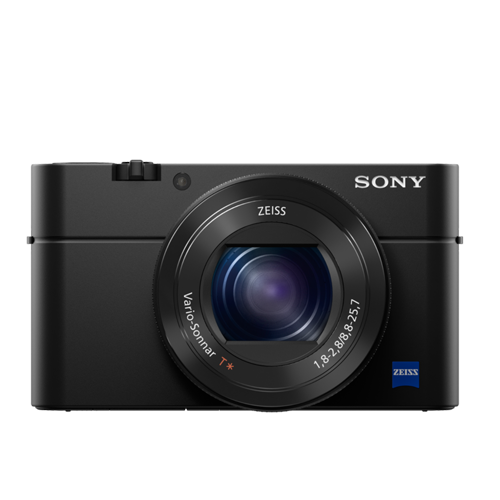 |
October2016 | Compact | Flip Up | No | $- |
| PanasonicLumixDMC-G85 | 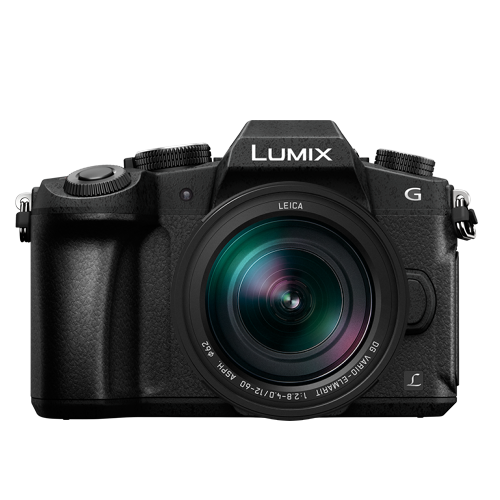 |
September2016 | Mirrorless | Flip Up | Yes | $- |
| CanonEOS80D | 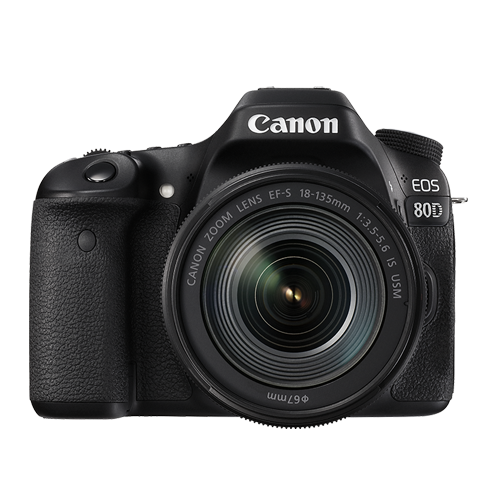 |
February2016 | Mid-size SLR | Fully Articulated | Yes | $$ |
| CanonPowerShotG7 X Mark II | 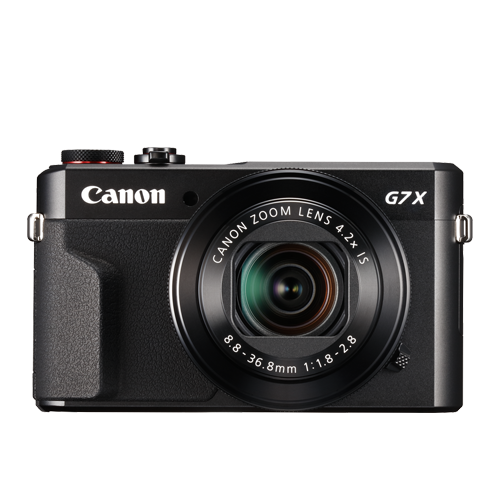 |
February2016 | Compact | Flip Up | No | $ |
|
Best daily vlogging camera with a flip screen: Sony Cyber-Shot DSC-RX 100 V If you want to use a compact camera with a flip screen, Sony’s Cyber-shot DSC-RX 100 V is an exceptional daily vlogging camera. This camera’s 20.1 MP Exmor RS BSI CMOS sensor with a maximum of 12800 in ISO sensitivity, can record footage in UHD 4K at 30 or 24 fps. The lens on this camera, a non-interchangeable Carl Zeiss Vario Sonnar T lens, performs well even under low-light conditions. With its fast hybrid AF system with 315 phase-detection points and an anti-motion blur mode, you can expect your shots to be accurately focused. The Sony RX 100 V packs so much power into such a small, portable camera, making it a great daily vlogging device. PROS - Light and easy to carry around - Produces high-res videos CONS - Short battery life - Lacking a touchscreen |
|---|---|
|
Best cheap vlogging camera with a flip screen: Canon EOS M100 The Canon EOS M100 is another great small vlogging camera with a flip screen. This mirrorless camera shoots up to full HD 1080p videos at 60 fps. Its 24.2 MP APS-C CMOS sensor and DIGIC 7 image processor will accurately lock the right focus and produce videos with rich detail. The camera’s ISO sensitivity goes as high as ISO 25600. Even in difficult light conditions, this camera will be able to capture a scene. You can control and navigate through the difficult functions of this camera using its 3-inch touchscreen LCD. This camera has a flip screen that flips upward so that you can see yourself while you vlog. With built-in Wi-Fi and NFC, you can also transfer your videos seamlessly to a computer without any cables. If you don’t want to spend a fortune but still want to produce videos with great picture quality, the Canon EOS M100 is the best entry-level camera for daily vlogging that’s currently on the market. PROS - Affordable - Great connectivity options CONS - Lacks advanced video recording features - No viewfinder |
|
Best entry-level mirrorless camera with a flip screen for vlogging: Canon EOS M100 The Canon EOS M100 is the best entry-level mirrorless camera with a flip screen for vlogging. In case you missed it, check out my review on the Canon EOS M100. |
|
Best mid-range mirrorless camera with a flip screen for vlogging: Canon EOS M50 The Canon EOS M50 is already regarded as one of the best mirrorless cameras for vlogging though it has only been on the market for just a few months. This mirrorless camera comes with the newer DIGIC 8 Image Processor that find a focus for your footage even better than the last generation’s image processor. You can crank up the ISO sensitivity to ISO 51200 with the Canon EOS M50. The Canon EOS M50 can shoot UHD 4K videos at 23.98 fps. You can also capture 720p slow-motion videos at 120 fps. PROS - Has an external microphone port - Has a 2.36m-dot OLED electronic viewfinder CONS - No image stabilization - Battery life could be longer |
|
Best professional mirrorless camera with a flip screen for vlogging: Panasonic Lumix DC-GH5S When Panasonic made its Lumix DC-GH5, it was a hybrid camera that performed equally well in both photo and video. In response to customers’ interest in a video-focused camera, Panasonic released the GH5S. This camera is equipped with a micro four-thirds sensor and can shoot UHD 4K and DCI videos at 60 fps, up to 150 Mbps. If you want to capture slow-motion footage, you can shoot full HD 1080p videos at 240 fps as well. With its 10.28MP multi-aspect ratio MOS sensor, you’ll be able to produce high-quality videos even under very challenging lighting conditions. In a fraction of a second, this camera can also automatically grab focus during your video with its advanced depth-from-focus technology. It is also equipped with a microphone jack so that you can record better audio while shooting with this camera. The GH5S has a fully articulated touchscreen so that you can compose your shot from any angle. PROS - ISO sensitivity goes up to 204800 - High video bit rates CONS - Expensive - The camera body weighs about 1.5 lbs |
|
Best entry-level DSLR camera with a flip screen for vlogging: Canon EOS SL2 If you’re looking for a low priced entry-level vlogging camera with a flip screen, the Canon EOS Rebel SL2 is the best option. You can precisely and quickly grab focus during video recording with its 9-point AF system and dual pixel CMOS AF technology. The camera powers these functions with its DIGIC 7 image processor. You can shoot up to full HD 1080p videos at 60 fps with its 24.2 MP APS-C CMOS sensor and crank the ISO up to ISO 51200 in case you need to shoot under low light conditions. If you want better audio for your vlogs, you can connect an external microphone to the SL2’s microphone jack. PROS - Microphone jack - Wi-Fi connectivity CONS - No 4K video support - Optical image stabilizer could be better |
|
Best mid-range DSLR camera with a flip screen for vlogging: Canon EOS 80D The 80D is the best camera to go with if you’re looking for a mid-range DLSR vlogging camera with a flip screen. It is equipped with a 24.2 MP APS-C CMOS sensor, comes with the DIGIC 6 image processor, and shoots up to full HD 1080p videos at 60 fps. For low lighting conditions, you can set the camera’s ISO to as high as ISO 25600. The 80D is great for autofocusing during video recording as it comes with a 45-point all cross phase detection autofocus system and a dual pixel CMOS AF system. PROS - Feature-rich - Continuous AF feature performs beautifully while recording high-res videos CONS - Just one SD card slot - PC sync connection features could be better |
|
Best professional DSLR camera with a flip screen for vlogging: Canon 6D Mark II The 6D Mark II is currently (at the time of writing this review) the only full-frame DSLR camera that comes with both a fully-articulated screen and a microphone jack. It is equipped with a 26.2 MP full-frame CMOS sensor, comes with the DIGIC 7 image processor, and shoots up to full HD 1080p videos at 60 fps. The 6D is also equipped with the same 45-point all cross-phase detection and dual pixel CMOS autofocusing system as the 80D. If you’re wanting to vlog with a full-frame camera, the 6D Mark II is the best option. PROS - ISO sensitivity goes up to 102400 - Amazing touchscreen controls CONS - No 4K video recording option - No USB 3.0 |
Want to compare even more cameras? Check out…
12 Best Vlogging Cameras (2018)
Top 11 Cheap Vlogging Cameras (2018)
7 Best DSLR Cameras For Vlogging (2018)
8 Best Mirrorless Cameras For Vlogging (2018)
Richard Bennett
Richard Bennett is a writer and a lover of all things video.
Follow @Richard Bennett
Richard Bennett
Nov 01, 2022• Proven solutions
A flip screen is a very important feature on a camera for vloggers. With a flip screen, you can preview whether or not your shot is composed the way you want it to be, all in real-time. Below is our top list and review of the twelve best vlogging cameras with a flip screen.
WHAT TO LOOK FOR IN A VLOGGING CAMERA
1. Fully articulated screen (flip screen)
2. Good continual autofocus while recording video
3. Good focus priority through face recognition
4. Touch to focus
5. Good low-light performance
6. external mic jack, hot/cold shoe bracket
7. optical image stabilization
8. good battery life
Check out my full list of 10 Things To Look For In A Vlogging Camera to understand the importance of these camera features.
THE 12 BEST VLOGGING CAMERAS WITH A FLIP SCREEN (2018)
| Camera | Release Date | Camera Type | Flip Screen Type | Mic Port | Price | |
|---|---|---|---|---|---|---|
| CanonEOSM50 | |
February2018 | Mirrorless | Fully Articulated | Yes | $- |
| PanasonicLumixDC-GH5S | |
January2018 | Mirrorless | Fully Articulated | Yes | $$$ |
| CanonEOSM100 | |
August2017 | Mirrorless | Flip Up | No | $ |
| CanonEOS6D Mark II | |
June2017 | Mid-size SLR | Fully Articulated | Yes | $$ |
| CanonEOS RebelSL2 | |
June2017 | Compact SLR | Fully Articulated | Yes | $ |
| CanonEOS RebelT7i | |
February2017 | Mid-size SLR | Fully Articulated | Yes | $- |
| CanonEOSM6 | |
February2017 | Mirrorless | Flip Up | Yes | $ |
| NikonD5600 | |
November2016 | Compact SLR | Fully Articulated | Yes | $- |
| SonyCyber-Shot DSCRX 100 V | |
October2016 | Compact | Flip Up | No | $- |
| PanasonicLumixDMC-G85 | |
September2016 | Mirrorless | Flip Up | Yes | $- |
| CanonEOS80D | |
February2016 | Mid-size SLR | Fully Articulated | Yes | $$ |
| CanonPowerShotG7 X Mark II | |
February2016 | Compact | Flip Up | No | $ |
|
Best daily vlogging camera with a flip screen: Sony Cyber-Shot DSC-RX 100 V If you want to use a compact camera with a flip screen, Sony’s Cyber-shot DSC-RX 100 V is an exceptional daily vlogging camera. This camera’s 20.1 MP Exmor RS BSI CMOS sensor with a maximum of 12800 in ISO sensitivity, can record footage in UHD 4K at 30 or 24 fps. The lens on this camera, a non-interchangeable Carl Zeiss Vario Sonnar T lens, performs well even under low-light conditions. With its fast hybrid AF system with 315 phase-detection points and an anti-motion blur mode, you can expect your shots to be accurately focused. The Sony RX 100 V packs so much power into such a small, portable camera, making it a great daily vlogging device. PROS - Light and easy to carry around - Produces high-res videos CONS - Short battery life - Lacking a touchscreen |
|---|---|
|
Best cheap vlogging camera with a flip screen: Canon EOS M100 The Canon EOS M100 is another great small vlogging camera with a flip screen. This mirrorless camera shoots up to full HD 1080p videos at 60 fps. Its 24.2 MP APS-C CMOS sensor and DIGIC 7 image processor will accurately lock the right focus and produce videos with rich detail. The camera’s ISO sensitivity goes as high as ISO 25600. Even in difficult light conditions, this camera will be able to capture a scene. You can control and navigate through the difficult functions of this camera using its 3-inch touchscreen LCD. This camera has a flip screen that flips upward so that you can see yourself while you vlog. With built-in Wi-Fi and NFC, you can also transfer your videos seamlessly to a computer without any cables. If you don’t want to spend a fortune but still want to produce videos with great picture quality, the Canon EOS M100 is the best entry-level camera for daily vlogging that’s currently on the market. PROS - Affordable - Great connectivity options CONS - Lacks advanced video recording features - No viewfinder |
|
Best entry-level mirrorless camera with a flip screen for vlogging: Canon EOS M100 The Canon EOS M100 is the best entry-level mirrorless camera with a flip screen for vlogging. In case you missed it, check out my review on the Canon EOS M100. |
|
Best mid-range mirrorless camera with a flip screen for vlogging: Canon EOS M50 The Canon EOS M50 is already regarded as one of the best mirrorless cameras for vlogging though it has only been on the market for just a few months. This mirrorless camera comes with the newer DIGIC 8 Image Processor that find a focus for your footage even better than the last generation’s image processor. You can crank up the ISO sensitivity to ISO 51200 with the Canon EOS M50. The Canon EOS M50 can shoot UHD 4K videos at 23.98 fps. You can also capture 720p slow-motion videos at 120 fps. PROS - Has an external microphone port - Has a 2.36m-dot OLED electronic viewfinder CONS - No image stabilization - Battery life could be longer |
|
Best professional mirrorless camera with a flip screen for vlogging: Panasonic Lumix DC-GH5S When Panasonic made its Lumix DC-GH5, it was a hybrid camera that performed equally well in both photo and video. In response to customers’ interest in a video-focused camera, Panasonic released the GH5S. This camera is equipped with a micro four-thirds sensor and can shoot UHD 4K and DCI videos at 60 fps, up to 150 Mbps. If you want to capture slow-motion footage, you can shoot full HD 1080p videos at 240 fps as well. With its 10.28MP multi-aspect ratio MOS sensor, you’ll be able to produce high-quality videos even under very challenging lighting conditions. In a fraction of a second, this camera can also automatically grab focus during your video with its advanced depth-from-focus technology. It is also equipped with a microphone jack so that you can record better audio while shooting with this camera. The GH5S has a fully articulated touchscreen so that you can compose your shot from any angle. PROS - ISO sensitivity goes up to 204800 - High video bit rates CONS - Expensive - The camera body weighs about 1.5 lbs |
|
Best entry-level DSLR camera with a flip screen for vlogging: Canon EOS SL2 If you’re looking for a low priced entry-level vlogging camera with a flip screen, the Canon EOS Rebel SL2 is the best option. You can precisely and quickly grab focus during video recording with its 9-point AF system and dual pixel CMOS AF technology. The camera powers these functions with its DIGIC 7 image processor. You can shoot up to full HD 1080p videos at 60 fps with its 24.2 MP APS-C CMOS sensor and crank the ISO up to ISO 51200 in case you need to shoot under low light conditions. If you want better audio for your vlogs, you can connect an external microphone to the SL2’s microphone jack. PROS - Microphone jack - Wi-Fi connectivity CONS - No 4K video support - Optical image stabilizer could be better |
|
Best mid-range DSLR camera with a flip screen for vlogging: Canon EOS 80D The 80D is the best camera to go with if you’re looking for a mid-range DLSR vlogging camera with a flip screen. It is equipped with a 24.2 MP APS-C CMOS sensor, comes with the DIGIC 6 image processor, and shoots up to full HD 1080p videos at 60 fps. For low lighting conditions, you can set the camera’s ISO to as high as ISO 25600. The 80D is great for autofocusing during video recording as it comes with a 45-point all cross phase detection autofocus system and a dual pixel CMOS AF system. PROS - Feature-rich - Continuous AF feature performs beautifully while recording high-res videos CONS - Just one SD card slot - PC sync connection features could be better |
|
Best professional DSLR camera with a flip screen for vlogging: Canon 6D Mark II The 6D Mark II is currently (at the time of writing this review) the only full-frame DSLR camera that comes with both a fully-articulated screen and a microphone jack. It is equipped with a 26.2 MP full-frame CMOS sensor, comes with the DIGIC 7 image processor, and shoots up to full HD 1080p videos at 60 fps. The 6D is also equipped with the same 45-point all cross-phase detection and dual pixel CMOS autofocusing system as the 80D. If you’re wanting to vlog with a full-frame camera, the 6D Mark II is the best option. PROS - ISO sensitivity goes up to 102400 - Amazing touchscreen controls CONS - No 4K video recording option - No USB 3.0 |
Want to compare even more cameras? Check out…
12 Best Vlogging Cameras (2018)
Top 11 Cheap Vlogging Cameras (2018)
7 Best DSLR Cameras For Vlogging (2018)
8 Best Mirrorless Cameras For Vlogging (2018)
Richard Bennett
Richard Bennett is a writer and a lover of all things video.
Follow @Richard Bennett
YouTube Money Mastery: From Clicks to Checkbook Balance
How To Get Paid on YouTube - From AdSense to your Bank Account
Richard Bennett
Oct 26, 2023• Proven solutions
YouTube is more than a video sharing social network; here’s how to get paid on YouTube. Having an active YouTube channel with decent monthly views can earn you income through advertising. If your channel is set up properly, Google can place ads over your YouTube videos and you can earn money based on how many people see or click on (depends on the ad) those ads while watching your videos.
- The Requirements for YouTube Monetization
- How to Enable Monetization for Your YouTube Channel
- Linking Your Bank Account to Your AdSense Account
- Receiving Payments
Many vloggers receive direct bank deposits of their ad-based revenues every month. In this article, we’ll show you how to monetize your YouTube Channel and how to receive payments to your bank account.
Making Your YouTube Videos Better with Filmora
If you want to earn more money with YouTube videos, your video should be stand out. To achieve that, you should use a powerful video editing software as well. Here, I recommend Wondershare Filmora video editor . As one of the most widely used video editing software among YouTubers, Filmora provides lots of templates and effects which allows you to edit faster and better.


Part 1: The Requirements for YouTube Monetization
Meeting the minimum requirement for YouTube monetization is probably the hardest part of this whole process. About a month ago, you had to have 10,000 lifetime views on your YouTube channel to qualify for monetization. However, earlier this year, Google changed their eligibility requirements and made them even tougher.
As of February 20, 2018, YouTube channels need to have accumulated 4000 hours of ‘watch time’ over the past 12 months and no less than 1000 subscribers to qualify for monetization. If you do not meet these requirements you cannot join the YouTube Partner Program and monetize your YouTube channel.
So, the first step to successful monetization on YouTube is to actually grow your channel. You need to create videos that will attract viewers and engage your audience. You also need to get people to subscribe because this is really what will grow your YouTube channel over time.
Part 2: How To Enable Monetization for Your YouTube Channel
Here’s the step-by-step process for monetizing your YouTube Channel, for those who are qualified.
- Log in to your YouTube account.
- Find your account icon in the top right corner. Click it to find the ‘Creator Studio’ button.
- Click the ‘Creator Studio’ button.
- Click the ‘Channel’ option in the left side menu.
- You’ll see a drop-down menu under ‘Channel’. Click on ‘Status and Features’. This is actually the first option on the menu. It should open by default once you click the ‘Channel’ button.
- Look through the ‘Status and Features’ page and click the ‘Enable’ button beside monetization.

- Clicking the ‘Enable’ button should lead you to another page where the guidelines for monetization are explained. Take the time to read through the guidelines and understand the dos and don’ts of YouTube monetization.
- Once you’ve looked through the guidelines, click the ‘Enable my account’ button to proceed. This will lead you to a page where you’ll be prompted to join the YouTube Partner Program.
- Read through the YouTube Partner Program terms, check the appropriate boxes, and click the ‘accept’ button.
- You’ll be prompted to link an AdSense account.
- Connect an existing AdSense account if you have one or create a new one.
- Once you’re done linking an AdSense account, you’ll be redirected to YouTube. There, select the type of ads you want to run under ‘Monetization Preferences’.
- Click the submit button and wait to find out if your account is approved for monetization.
According to YouTube, it can take up to a week for a decision to be reached on your application.
YouTube will not review your monetization application until you’ve met their eligibility criteria. Even then, your application may be declined if your videos do not follow the community guidelines (i.e. channels which simply repost content from other channels will not be monetized).
Not all videos can be monetized. While there are legal ways to create videos consisting of imagery and footage belonging to others, be aware that such videos are not always eligible for monetization. YouTube will only monetize videos that you own. So, posting videos which do not belong to you or which include copyrighted content can cause your monetization application to be declined.
Part 3: Linking Your Bank Account To Your AdSense Account
AdSense offers a variety of payment options including mailed checks and Western Union transfers. However, these options may not be available to you depending on where you’re based. AdSense does make payments through electronic wire transfer (EFT – Electronic funds transfer) to virtually every country in the world, and this is the preferred payment option for most people.
To have your earnings deposited directly into your account through EFT, you’ll need to link your bank account to your AdSense account.
Here’s a step-by-step guide for linking your bank account to your AdSense account.
- Log in to AdSense via: www.google.com/adsense/start
- Click the ‘Settings’ button in the left panel menu
- Under ‘Settings’, click ‘Payments’.
- On the ‘Payments’ page, click ‘Manage payment options’.
- Click ‘Add payment method’.
- Next, you’ll be prompted to add your bank account details. In general, you will be asked to provide the following:
- Name on the account / account holder’s name
- Bank account number
- Bank name
- Bank SWIFT code
- Depending on where you are based, additional information may be required.
- Ensure that the name on your AdSense account matches the name on the bank account you provide. To edit your AdSense name, click the ‘Manage settings’ button also on the Payments page.
Part 4: Receiving Payments
To get paid by AdSense, you need to reach the $100 threshold. You may wish to set a higher threshold but as a rule, earnings below the $100 will not be processed for payment (you will still receive the money, it will just keep adding up until it gets to $100 and then you’ll be paid).
Also, bear in mind that AdSense follows a monthly payment cycle. This means that a month’s earnings (assuming they meet the threshold requirement) will be paid next month. Usually, direct deposit payments will be processed between the 21st and 26th of every month. That said, it can take up to 10 days for electronic wire payments to be received.
In addition to reaching the payment threshold, be sure that you have no payment hold on your AdSense account. A payment hold can cause your earnings to be withheld even if it has reached the payment threshold.
To avoid a payment hold, be sure to provide the necessary tax information, verify your identity and your address, make sure the bank account linked to your AdSense is verified, and make sure you have not violated any of YouTube’s guidelines and community rules.
Conclusion
Depending on your vlogging skills and the nature of your content (some types of videos get more attention than others), it can take a while for you to be eligible for monetization. And even when you’ve successfully monetized your channel, getting enough views to reach the payment threshold can be tough.
Don’t let this discourage you from working towards earning income from your YouTube channel. Just focus on creating a YouTube channel people will want to watch. That’s how to get paid on YouTube - be sticking with your channel long enough for it to grow.
Richard Bennett
Richard Bennett is a writer and a lover of all things video.
Follow @Richard Bennett
Richard Bennett
Oct 26, 2023• Proven solutions
YouTube is more than a video sharing social network; here’s how to get paid on YouTube. Having an active YouTube channel with decent monthly views can earn you income through advertising. If your channel is set up properly, Google can place ads over your YouTube videos and you can earn money based on how many people see or click on (depends on the ad) those ads while watching your videos.
- The Requirements for YouTube Monetization
- How to Enable Monetization for Your YouTube Channel
- Linking Your Bank Account to Your AdSense Account
- Receiving Payments
Many vloggers receive direct bank deposits of their ad-based revenues every month. In this article, we’ll show you how to monetize your YouTube Channel and how to receive payments to your bank account.
Making Your YouTube Videos Better with Filmora
If you want to earn more money with YouTube videos, your video should be stand out. To achieve that, you should use a powerful video editing software as well. Here, I recommend Wondershare Filmora video editor . As one of the most widely used video editing software among YouTubers, Filmora provides lots of templates and effects which allows you to edit faster and better.
Part 1: The Requirements for YouTube Monetization
Meeting the minimum requirement for YouTube monetization is probably the hardest part of this whole process. About a month ago, you had to have 10,000 lifetime views on your YouTube channel to qualify for monetization. However, earlier this year, Google changed their eligibility requirements and made them even tougher.
As of February 20, 2018, YouTube channels need to have accumulated 4000 hours of ‘watch time’ over the past 12 months and no less than 1000 subscribers to qualify for monetization. If you do not meet these requirements you cannot join the YouTube Partner Program and monetize your YouTube channel.
So, the first step to successful monetization on YouTube is to actually grow your channel. You need to create videos that will attract viewers and engage your audience. You also need to get people to subscribe because this is really what will grow your YouTube channel over time.
Part 2: How To Enable Monetization for Your YouTube Channel
Here’s the step-by-step process for monetizing your YouTube Channel, for those who are qualified.
- Log in to your YouTube account.
- Find your account icon in the top right corner. Click it to find the ‘Creator Studio’ button.
- Click the ‘Creator Studio’ button.
- Click the ‘Channel’ option in the left side menu.
- You’ll see a drop-down menu under ‘Channel’. Click on ‘Status and Features’. This is actually the first option on the menu. It should open by default once you click the ‘Channel’ button.
- Look through the ‘Status and Features’ page and click the ‘Enable’ button beside monetization.
- Clicking the ‘Enable’ button should lead you to another page where the guidelines for monetization are explained. Take the time to read through the guidelines and understand the dos and don’ts of YouTube monetization.
- Once you’ve looked through the guidelines, click the ‘Enable my account’ button to proceed. This will lead you to a page where you’ll be prompted to join the YouTube Partner Program.
- Read through the YouTube Partner Program terms, check the appropriate boxes, and click the ‘accept’ button.
- You’ll be prompted to link an AdSense account.
- Connect an existing AdSense account if you have one or create a new one.
- Once you’re done linking an AdSense account, you’ll be redirected to YouTube. There, select the type of ads you want to run under ‘Monetization Preferences’.
- Click the submit button and wait to find out if your account is approved for monetization.
According to YouTube, it can take up to a week for a decision to be reached on your application.
YouTube will not review your monetization application until you’ve met their eligibility criteria. Even then, your application may be declined if your videos do not follow the community guidelines (i.e. channels which simply repost content from other channels will not be monetized).
Not all videos can be monetized. While there are legal ways to create videos consisting of imagery and footage belonging to others, be aware that such videos are not always eligible for monetization. YouTube will only monetize videos that you own. So, posting videos which do not belong to you or which include copyrighted content can cause your monetization application to be declined.
Part 3: Linking Your Bank Account To Your AdSense Account
AdSense offers a variety of payment options including mailed checks and Western Union transfers. However, these options may not be available to you depending on where you’re based. AdSense does make payments through electronic wire transfer (EFT – Electronic funds transfer) to virtually every country in the world, and this is the preferred payment option for most people.
To have your earnings deposited directly into your account through EFT, you’ll need to link your bank account to your AdSense account.
Here’s a step-by-step guide for linking your bank account to your AdSense account.
- Log in to AdSense via: www.google.com/adsense/start
- Click the ‘Settings’ button in the left panel menu
- Under ‘Settings’, click ‘Payments’.
- On the ‘Payments’ page, click ‘Manage payment options’.
- Click ‘Add payment method’.
- Next, you’ll be prompted to add your bank account details. In general, you will be asked to provide the following:
- Name on the account / account holder’s name
- Bank account number
- Bank name
- Bank SWIFT code
- Depending on where you are based, additional information may be required.
- Ensure that the name on your AdSense account matches the name on the bank account you provide. To edit your AdSense name, click the ‘Manage settings’ button also on the Payments page.
Part 4: Receiving Payments
To get paid by AdSense, you need to reach the $100 threshold. You may wish to set a higher threshold but as a rule, earnings below the $100 will not be processed for payment (you will still receive the money, it will just keep adding up until it gets to $100 and then you’ll be paid).
Also, bear in mind that AdSense follows a monthly payment cycle. This means that a month’s earnings (assuming they meet the threshold requirement) will be paid next month. Usually, direct deposit payments will be processed between the 21st and 26th of every month. That said, it can take up to 10 days for electronic wire payments to be received.
In addition to reaching the payment threshold, be sure that you have no payment hold on your AdSense account. A payment hold can cause your earnings to be withheld even if it has reached the payment threshold.
To avoid a payment hold, be sure to provide the necessary tax information, verify your identity and your address, make sure the bank account linked to your AdSense is verified, and make sure you have not violated any of YouTube’s guidelines and community rules.
Conclusion
Depending on your vlogging skills and the nature of your content (some types of videos get more attention than others), it can take a while for you to be eligible for monetization. And even when you’ve successfully monetized your channel, getting enough views to reach the payment threshold can be tough.
Don’t let this discourage you from working towards earning income from your YouTube channel. Just focus on creating a YouTube channel people will want to watch. That’s how to get paid on YouTube - be sticking with your channel long enough for it to grow.
Richard Bennett
Richard Bennett is a writer and a lover of all things video.
Follow @Richard Bennett
Also read:
- Champion Top Titles Best Free Video Caption Grabs for 2024
- Clearing Your Browser's Watched Videos
- Synchronize Your Surfing Master Multi-Video YouTube Use
- Social Media Shifts Yearly Data Visualization Guide
- Masterclass on Minimizing Video Footage in YouTube
- Streamer's Guide Validating Your Channel's Income
- Audible Savings The Essential Guide to Using These 24 No-Cost Splitters on YouTube for 2024
- [New] 24 Hour Heavyweights Top 10 Most Watched on YT
- In 2024, Digital Artisans' Exclusive Summit
- Free YouTube Outro Kings 6 TOP Suggestions!
- In 2024, Escalate Your Content Reach Leveraging Synergistic YouTube Outros
- Detailed Procedures for Elevating YouTube Clips Through WM Maker for 2024
- Elevate Your Content with These 10 Reaction Wonders
- [New] Creative Channel Titling Techniques for Growth
- [Updated] Dynamic Website Content Incorporating YouTube Playlists
- In 2024, Charting the Course Establishing a Powerful Gaming Channel
- 2024 Approved Discovering Success Through the Most Effective 15 YouTube Themes
- [Updated] Deciphering YouTube's Shorts Funding Mechanism
- In 2024, 30 Must-Have YouTube Intros Tools for Beginners, All Free
- 2024 Approved A Fresh Take on Frigidity Crafting Inviting Backdrops
- In 2024, Deciding on the Best Videography Camera Type DSLR or Mirrorless?
- Elevate Your Video Productions 15 Top-Tier Free Music Websites
- In 2024, Effective Guide to Cast Apple iPhone 12 to MacBook without Hindrance | Dr.fone
- New Windows Video Editing Apps The Best iMovie Substitutes for 2024
- 11 Ways to Fix it When My Infinix Note 30 Pro Wont Charge | Dr.fone
- 5 Awesome Voice Changer for Google Meet
- In 2024, Auditory Storytelling at a High Level
- How to Remove Apple ID from iPhone 13 mini without Password?
- How Infinix Hot 40i Mirror Screen to PC? | Dr.fone
- [Updated] Free Meeting Tools Ranked - Your Ultimate Video Call Companion for 2024
- [Updated] 2024 Approved Crafting Visual Stories with Snapchat Photo Edits
- Exploring Windows 11 Essential Upgrades
- Title: Essential 12 Flipscreen Cam Titles for Optimal Vlogging
- Author: Brian
- Created at : 2024-05-25 11:49:20
- Updated at : 2024-05-26 11:49:20
- Link: https://youtube-video-recordings.techidaily.com/essential-12-flipscreen-cam-titles-for-optimal-vlogging/
- License: This work is licensed under CC BY-NC-SA 4.0.
