
:max_bytes(150000):strip_icc()/snow-tracks-of-senior-couple-walking-to-trees-and-mountain-range--sattelbergalm--tyrol--austria-592233383-c47ecd50c6ee406687da83916a3f2ff1.jpg)
"Ensure Flawless Playback How to Set YouTube Video Size Right for 2024"
Ensure Flawless Playback: How to Set YouTube Video Size Right
YouTube Video Dimensions/Size: Guide for Upload Settings

Richard Bennett
Mar 27, 2024• Proven solutions
Every social media offers a distinct range of dimensions and settings for their publication. So does YouTube.
It’s acutely important to be aware of your setting choices and choosing the right video, thumbnail and screen dimensions of a YouTube video to elevate the user experience.
Merely watching the videos on YouTube is much easier but being able to upload a video there using the right size matters a lot more than one thinks of.
But how can one master it all by himself? Here we are to guide you all along the way! So sit back and relax and enjoy your first-rated content!
You will Learn :
- The right YouTube video size for you
- Important guidelines for YouTube Video dimensions
- What’s the best YouTube video size for you?
- What is the right aspect ratio for YouTube videos
- The correct video image and YouTube screen size
- FAQs about Youtube upload settings
- Basic terminologies that you should know
The Best Video Editor for Successful YouTubers - Wondershare Filmora
As a easy-to-use video editor, Filmora is really perfect for successful YouTubers. Filmora not only allows you to cut, crop, rotate, reverse videos, but also offers your advanced features like PIP, Green Screen, or audio mixing. What’s more, you can find lots of effects for Fashion, gaming, education, tutorial, sports, etc.
Check below video to know more and download now to have a try for free.


The right YouTube video size for you
| Resolution | Equivalent Name | Quality |
|---|---|---|
| 3840×2160 | 2160p | 4K |
| 2560×1440 | 1440p | 2K |
| 1920×1080 | 1080p | Highest YouTube HD video resolution |
| 1280×720 | 720p | Least YouTube HD video resolution |
| 854×480 | 480p | Standard definition |
| 640×360 | 360p | Conventional website resolution |
| 426×240 | 240p | Least YouTube video size available |
Important guidelines for YouTube Video dimensions
| Maximum acceptable size of a YouTube video | 426 x 420p |
|---|---|
| Minimum acceptable size of a YouTube video | 3840 x 2160p |
| The right aspect ratio of a YouTube video | 16:9 |
| Maximum size of a YouTube file | 128GB |
| The maximum length of a YouTube video | 12 hours |
| Compatible YouTube video formats | avi mov mp4 (best video format for YouTube) 3GPP webM flv mpeg mpegps wmv |
In order to grasp all of the aforementioned configurations thoroughly, a pictorial depiction is a must. So here it is to give you a vivid vision.
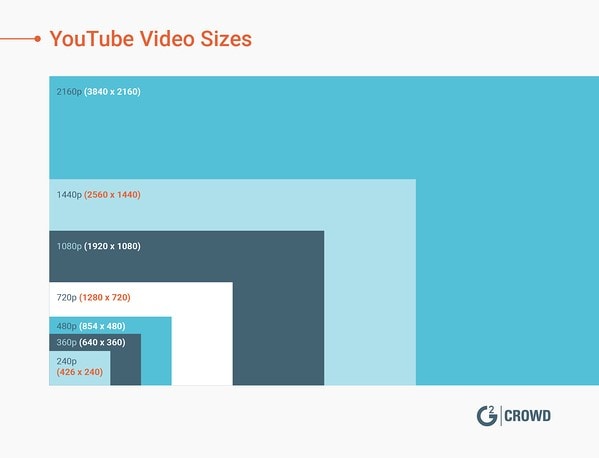
Image from learn.g2
What’s the best YouTube video size for you?
It is recommended by professionals to use the YouTube video dimensions 1080p, or 1920 x 1080.
These ones are the ideal because it will not only facilitate the video with a professional and elite look but also consumes relatively much less data. Moreover, if you use a phone for recording your videos then using the quality higher than the ones mentioned above will cost you with ample memory.
If you are a newbie to the world of YouTube and want to up the device’s storage game then 720p would still do wonders.
What is the video aspect ratio?
This term refers to the proportion of your video. In other words, the video aspect ratio can be defined as the width or breadth (of an image or screen) with respect to its height. Such a ratio can be expressed or represented in the form of “width x height.
That means an aspect ratio of 4x3 refers to an image that is 4 unit wide and 3 units high. Similarly, it can also be expressed with a colon in between the units such as 4:3 or 16:9.
The aspect ratio of a video merely refers to the relationship among the width and height respectively and not the actual physical size of the image.
The most common aspect ratios used in the video are depicted below for sound understanding:
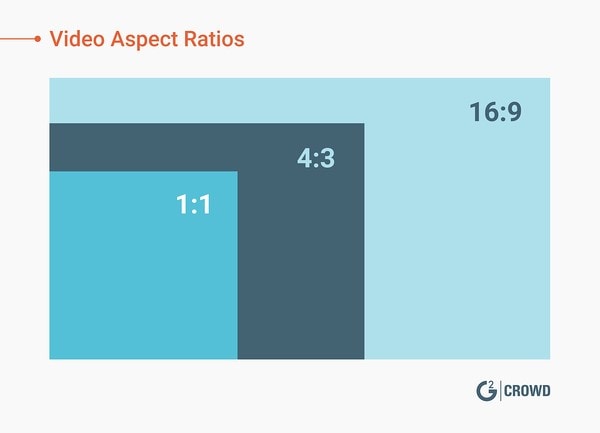
Image from learn.g2
The aspect ratio is the proportion of your video. This image displays the three most common aspect ratios.
Aspect ratio refers to the ratio of height and width although dimensions refer to two separate measurements of height and width rather than a ratio with “pixel” as its unit.
Standard aspect ratios
Below are the most common aspect ratios used for the video. There may be certain amendments to the ones mentioned below but the following formats are used mostly by the film and video makers.
Let’s review the quick breakdown of the available aspect ratio options that you can opt accordingly:
| Aspect ratio | Application |
|---|---|
| 1:1 or 1x1 | This aspect ratio will mostly be seen in the Instagram video. This 1:1 ratio gives a video a perfect square shape. |
| 4:3 or 4x3 | This aspect ratio was mostly seen few ages ago in almost the amidst 20th century on the TV. This was used to be a standard television format back then. So if you are a 90’s kid or an adult then you must be familiar with this format while watching your favorite old schooled sitcoms! |
| 16:9 or 16x9 | The format was enhanced to 16:9 aspect ratio for more HD quality and better viewing experience. This format is widely being used in televisions, theatres, DVD or high definition professional videos. |
| 21:9 or 21x9 | For more than merely an HD video quality and astonishing user experience, the formats have been upgraded to 21:9 aspect ratio. This is dominantly being used in the cinema for movie theatre releases. |
The right aspect ratio for YouTube videos
YouTube recommends using an aspect ratio of 16:9 according to the video player that YouTube uses. You are also given an option to upload your videos vertically but this will amend the aspect ratio respectively.
When you upload a video with an aspect ratio other than the one mention formerly then YouTube will automatically place the black bars on the sides. This is done to display the best quality video with the right resolution otherwise it will be displayed as distorted or cropped.
A vertical ratio with may be 4:3 video aspect ratio will be displayed like the image given below:

Image from learn.g2
The correct video image and YouTube screen size
Videos are undoubtedly the most important asset of YouTube but we cannot ignore the significance of the optimal images there! Using the right channel images will enhance the user experience and will ultimately level up your game!
The appealing and attractive cover photos, banners, thumbnails, channel icons possess equal importance as the video itself.
So don’t forget to tune your images! Just grab a cup of coffee and see how your views increase exponentially by this simple yet most important change!
Just skim through the checklist given below and you will be ready to nail it!
1. Perfect size for your YouTube profile photo
The profile photo of YouTube, often called a YouTube channel icon, is preferably a facial picture when is run by an individual and a respective logo if run by a brand or a business.
The suggested YouTube screen size of your YouTube profile picture or channel icon is 800 x800 pixels.
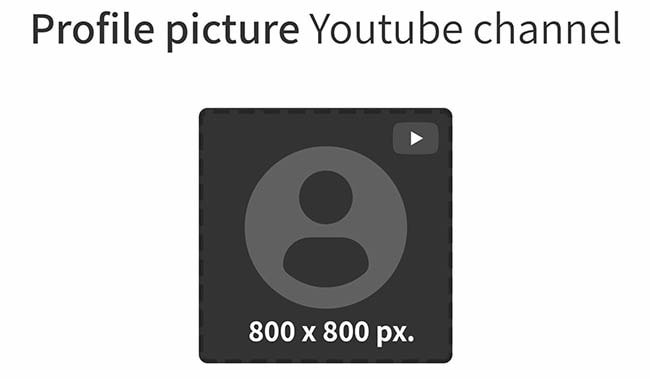
Image from metricool
2. Perfect size for your YouTube thumbnail photo
What is YouTube thumbnail?
A thumbnail photo is the picture of one of the frames of your video that you select to let the viewers see the quick glace or snapshot of your video while they browse YouTube.
You can choose any of the snapshots, technically known as a thumbnail, right after uploading your video on your channel. Either you can let YouTube choose any thumbnail or you choose your own.
Why is it important?
Choosing the appropriate thumbnail is one of the most important factors you cannot neglect. In order to gain views the most on your videos, a wise selection of a perfect YouTube video thumbnail dimensions will attract the viewers. Hence this will can uplift your views to a drastic extent.
A quick tip for the perfect YouTube thumbnail
Take a look at the popular you tubers and see what strategies they use when uploading their thumbnails. Usually, the video content is not as appealing as the thumbnail itself. That’s what you need to understand! Just see by yourself how large text and striking images will do wonders!
YouTube video thumbnail dimension for a perfect thumbnail image
The preferred YouTube screen size of your thumbnail image is 1280 x 720 pixels.
Similar to the YouTube video, the aspect ratio of your thumbnail is 16:9.
For even more clear understanding, look into this illustration:
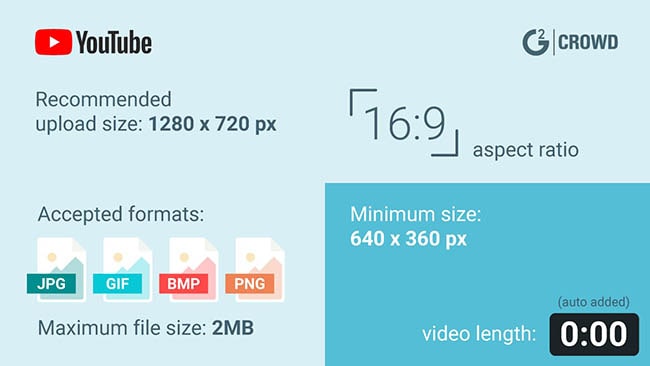
Image from learn.g2
3. Perfect size for your YouTube banner
YouTube offers two main areas for image display of your channel. One is an icon image while other is what YouTube calls “Channel Art”. This is the same as Facebook’s cover photo. People often call it “YouTube banner”. It is a header image displayed at the top of your channel.

For each kind of display (mobile, desktop, and TV), channel art (or banner) dimension changes accordingly.
Either your cover photo or your YouTube banner is displayed at the top of the channel so it’s highly significant to consider what you are depicting about your channel through these images.
Hence, this being said or realized, selecting the appropriate banner resolution should be among your topmost priorities.
The recommended banner dimensions of a YouTube video as suggested by YouTube are 2560 x 1440 pixels. But the dimensions may slightly vary with the variation in the devices being used by the users.
| Displays | Banner image Dimensions |
|---|---|
| Video display | 2560 x 1440 pixels |
| Desktop display | 2560 x 423 pixels |
| Tablet display | 1855 x 423 pixels |
| Television | 2560 x 1440 pixels |
For a thorough understanding, refer to the image below:
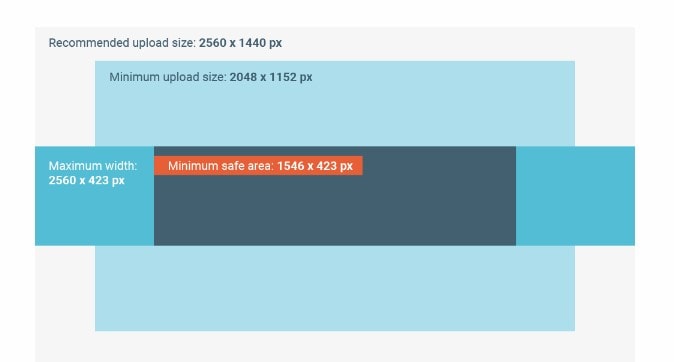
Image from learn.g2
The right cover photo size on TV
The image displayed when accessing YouTube from TV will appear and be uploaded full or maximized. So a wise image size must be opted. So the accurate resolution would be 2560 x 1440 pixels which will cover the entire background of your channel.
The right cover photo size on desktop displays
The image size may vary to some extent as per the browser you are accessing with or the desktop itself. But generally, the suggested cover photo size for desktop displays is 2560 x 423 pixels.
The right cover photo size on Tablet displays
As per the recommendation for uploading the image while specifically considering the table display is 1855 x 423 pixels. This will cover the area appropriately.
FAQs about Youtube upload settings

What is the maximum YouTube upload limit of size?
The allowed maximum video file size for uploading is 128GB at present.
What is the maximum YouTube upload limit of length?
The allowed maximum video length today for uploading is 12 hours.
How the default upload setting is reset on YouTube?
Step 1: Sign In to your YouTube account using a browser.
Step 2: By clicking your profile icon on the top right corner of the pane, you’ll see the YouTube Studio option. Click on it.
Step 3: Go on settings option where a pop-up window will appear.
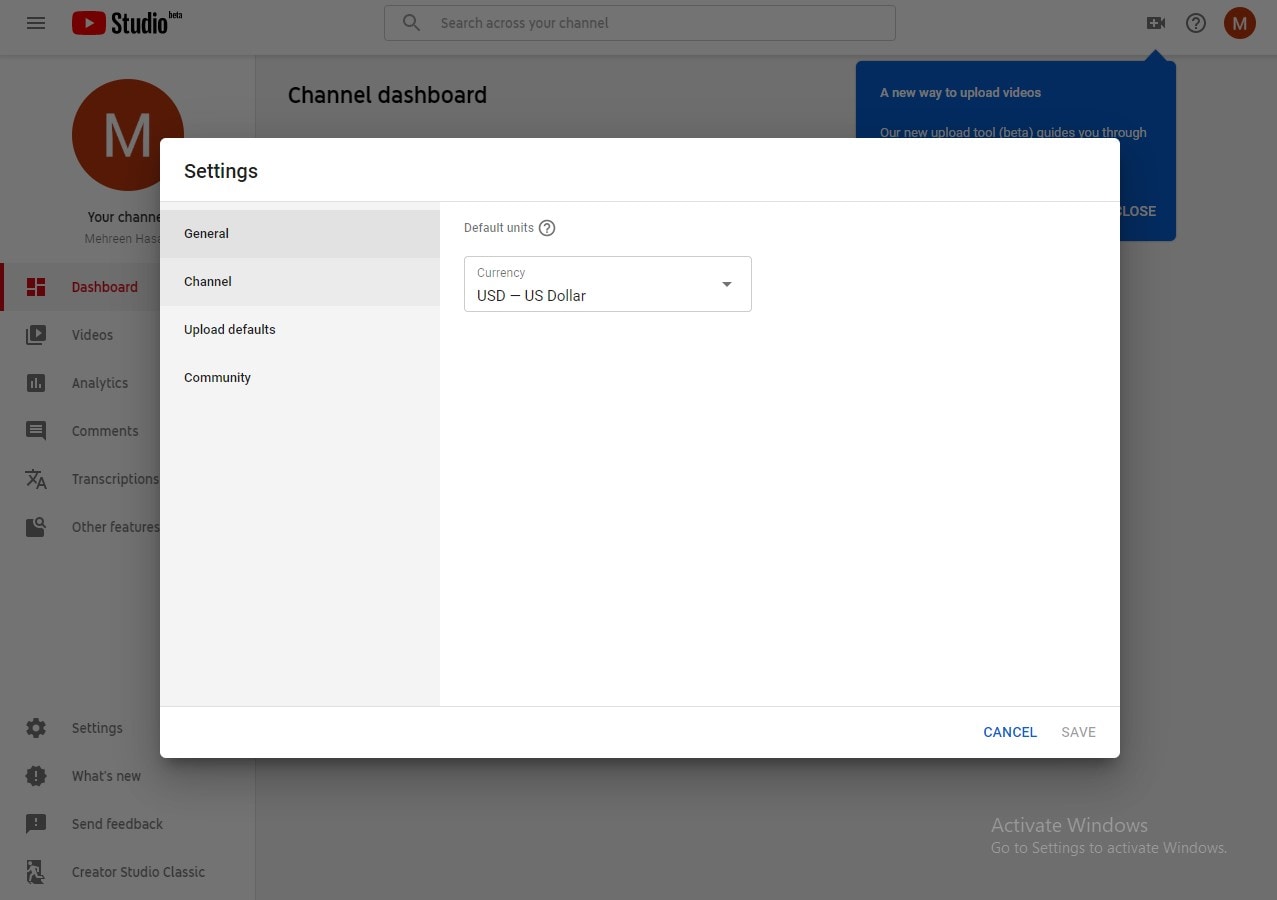
Step 4: Look for upload defaults and change the configurations on 2 tabs.
Step 5: Click on save button.
How is YouTube video uploaded using the mobile application?
Step 1: Sign in to your YouTube channel using your mobile phone.
Step 2: Tap on the video camera icon to upload a video. Grant access to your photo gallery and camera is asked by the app while uploading for the first time.
Step 3: You may “Go Live” or simply drag an already made video file to upload.
Step 4: Click “Next”.
Step 5: Enter the video name, select visibility level and then click upload.
How is YouTube video uploaded using a web browser?
Step 1: Sign in to your YouTube account in a web browser.
Step 2: Click on the video icon appearing on the top of the pane.
Step 3: Click on upload video in the drop-down.
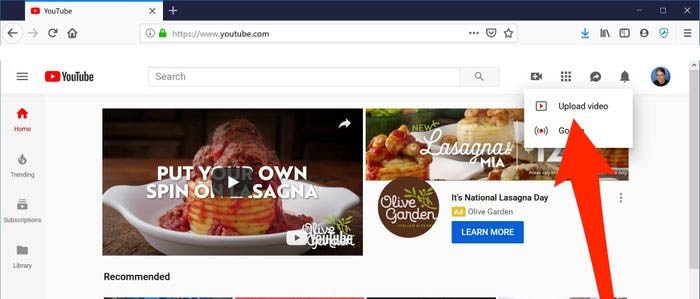
Step 4: You will be redirected to the video upload page. Click “public” under “Select files to upload” option and choose visibility level (public, private or scheduled).
Step 5: Click on a large arrow for video file selection or simply drag the file onto the page.
Step 6: You may enter miscellaneous information related to the video while the video is being uploaded.
Step 7: Click on publish and you are done!
Read More to Get : Best Video Websites Like YouTube >>
Basic terminologies that you should know
Video Format
A file format is a way that is standard for the storage of information in the encoded form within the computer file. It entails how exactly the bits are used while encoding the information in a digital storage medium.
So, a video file format is basically a type of file format in order to store the digital data of a video in the computer system. Mostly, video is often stored using the lossy compression in order to reduce the file size.
Frame Rate
“Frame rate” essentially entails the frequency (rate) at which the simultaneous images display on the screen. These images or called “frames”. Frame rate is expressed in “frames per second or FPS”. The unit or term is applicable for film, cameras, motion capture, video, and computer graphics. This is also known as “frame frequency”, expressed in the unit “hertz”
Resolution
Resolution is a measure to entail the clarity and sharpness of an image and most often used as a metric to judge the quality of cameras, monitors, printers, etc.
It basically refers to the number of different pixels in each dimension which can be viewed in any display device.
File Size
File size refers to the space that a file occupies in a storage medium, like hard drive or USB. The measure of file sizes can be expressed in bytes (B), kilobytes (KB), megabytes (MB), gigabytes (GB), terabytes (TB), and so on.
As shown in the picture below, the files listed in the Windows Explorer assorted as per the file with the largest size first. The file with the name “family-safety.jpg” occupies the largest size of 47 KB and the smallest one with 32 KB size.
Codec
Codec is a device or maybe a computer program that is used to encode or decode a stream of digital data or signal. A codec is a short form of “coder-decoder”.
The basic function of a coder is to encode the stream of data or signal for storage or transmission, usually in an encrypted form.
While, a decoder decodes the encoded (possibly encrypted) data, which is merely a reverse process of a coder. The application of codec are in streaming media, videoconferencing, and video editing applications.
Aspect ratio:
This term refers to the proportion of your video. In other words, the video aspect ratio can be defined as the width or breadth (of an image or screen) with respect to its height. Such a ratio can be expressed or represented in the form of “width x height.
That means an aspect ratio of 4x3 refers to an image that is 4 units wide and 3 units high. Similarly, it can also be expressed with a colon in between the units such as 4:3 or 16:9.
Need a YouTube support?
If you need any support, guidance or may face any queries related to anything regarding your YouTube channel, here’s the link of YouTube support .
Final Verdict
Hopefully, with this detailed guide, you are now ready to make a wise decision regarding customizing your videos and channel as per viewers likeliness. So get ready to see your channel grow drastically!
Richard Bennett
Richard Bennett is a writer and a lover of all things video.
Follow @Richard Bennett
Richard Bennett
Mar 27, 2024• Proven solutions
Every social media offers a distinct range of dimensions and settings for their publication. So does YouTube.
It’s acutely important to be aware of your setting choices and choosing the right video, thumbnail and screen dimensions of a YouTube video to elevate the user experience.
Merely watching the videos on YouTube is much easier but being able to upload a video there using the right size matters a lot more than one thinks of.
But how can one master it all by himself? Here we are to guide you all along the way! So sit back and relax and enjoy your first-rated content!
You will Learn :
- The right YouTube video size for you
- Important guidelines for YouTube Video dimensions
- What’s the best YouTube video size for you?
- What is the right aspect ratio for YouTube videos
- The correct video image and YouTube screen size
- FAQs about Youtube upload settings
- Basic terminologies that you should know
The Best Video Editor for Successful YouTubers - Wondershare Filmora
As a easy-to-use video editor, Filmora is really perfect for successful YouTubers. Filmora not only allows you to cut, crop, rotate, reverse videos, but also offers your advanced features like PIP, Green Screen, or audio mixing. What’s more, you can find lots of effects for Fashion, gaming, education, tutorial, sports, etc.
Check below video to know more and download now to have a try for free.
The right YouTube video size for you
| Resolution | Equivalent Name | Quality |
|---|---|---|
| 3840×2160 | 2160p | 4K |
| 2560×1440 | 1440p | 2K |
| 1920×1080 | 1080p | Highest YouTube HD video resolution |
| 1280×720 | 720p | Least YouTube HD video resolution |
| 854×480 | 480p | Standard definition |
| 640×360 | 360p | Conventional website resolution |
| 426×240 | 240p | Least YouTube video size available |
Important guidelines for YouTube Video dimensions
| Maximum acceptable size of a YouTube video | 426 x 420p |
|---|---|
| Minimum acceptable size of a YouTube video | 3840 x 2160p |
| The right aspect ratio of a YouTube video | 16:9 |
| Maximum size of a YouTube file | 128GB |
| The maximum length of a YouTube video | 12 hours |
| Compatible YouTube video formats | avi mov mp4 (best video format for YouTube) 3GPP webM flv mpeg mpegps wmv |
In order to grasp all of the aforementioned configurations thoroughly, a pictorial depiction is a must. So here it is to give you a vivid vision.
Image from learn.g2
What’s the best YouTube video size for you?
It is recommended by professionals to use the YouTube video dimensions 1080p, or 1920 x 1080.
These ones are the ideal because it will not only facilitate the video with a professional and elite look but also consumes relatively much less data. Moreover, if you use a phone for recording your videos then using the quality higher than the ones mentioned above will cost you with ample memory.
If you are a newbie to the world of YouTube and want to up the device’s storage game then 720p would still do wonders.
What is the video aspect ratio?
This term refers to the proportion of your video. In other words, the video aspect ratio can be defined as the width or breadth (of an image or screen) with respect to its height. Such a ratio can be expressed or represented in the form of “width x height.
That means an aspect ratio of 4x3 refers to an image that is 4 unit wide and 3 units high. Similarly, it can also be expressed with a colon in between the units such as 4:3 or 16:9.
The aspect ratio of a video merely refers to the relationship among the width and height respectively and not the actual physical size of the image.
The most common aspect ratios used in the video are depicted below for sound understanding:
Image from learn.g2
The aspect ratio is the proportion of your video. This image displays the three most common aspect ratios.
Aspect ratio refers to the ratio of height and width although dimensions refer to two separate measurements of height and width rather than a ratio with “pixel” as its unit.
Standard aspect ratios
Below are the most common aspect ratios used for the video. There may be certain amendments to the ones mentioned below but the following formats are used mostly by the film and video makers.
Let’s review the quick breakdown of the available aspect ratio options that you can opt accordingly:
| Aspect ratio | Application |
|---|---|
| 1:1 or 1x1 | This aspect ratio will mostly be seen in the Instagram video. This 1:1 ratio gives a video a perfect square shape. |
| 4:3 or 4x3 | This aspect ratio was mostly seen few ages ago in almost the amidst 20th century on the TV. This was used to be a standard television format back then. So if you are a 90’s kid or an adult then you must be familiar with this format while watching your favorite old schooled sitcoms! |
| 16:9 or 16x9 | The format was enhanced to 16:9 aspect ratio for more HD quality and better viewing experience. This format is widely being used in televisions, theatres, DVD or high definition professional videos. |
| 21:9 or 21x9 | For more than merely an HD video quality and astonishing user experience, the formats have been upgraded to 21:9 aspect ratio. This is dominantly being used in the cinema for movie theatre releases. |
The right aspect ratio for YouTube videos
YouTube recommends using an aspect ratio of 16:9 according to the video player that YouTube uses. You are also given an option to upload your videos vertically but this will amend the aspect ratio respectively.
When you upload a video with an aspect ratio other than the one mention formerly then YouTube will automatically place the black bars on the sides. This is done to display the best quality video with the right resolution otherwise it will be displayed as distorted or cropped.
A vertical ratio with may be 4:3 video aspect ratio will be displayed like the image given below:
Image from learn.g2
The correct video image and YouTube screen size
Videos are undoubtedly the most important asset of YouTube but we cannot ignore the significance of the optimal images there! Using the right channel images will enhance the user experience and will ultimately level up your game!
The appealing and attractive cover photos, banners, thumbnails, channel icons possess equal importance as the video itself.
So don’t forget to tune your images! Just grab a cup of coffee and see how your views increase exponentially by this simple yet most important change!
Just skim through the checklist given below and you will be ready to nail it!
1. Perfect size for your YouTube profile photo
The profile photo of YouTube, often called a YouTube channel icon, is preferably a facial picture when is run by an individual and a respective logo if run by a brand or a business.
The suggested YouTube screen size of your YouTube profile picture or channel icon is 800 x800 pixels.
Image from metricool
2. Perfect size for your YouTube thumbnail photo
What is YouTube thumbnail?
A thumbnail photo is the picture of one of the frames of your video that you select to let the viewers see the quick glace or snapshot of your video while they browse YouTube.
You can choose any of the snapshots, technically known as a thumbnail, right after uploading your video on your channel. Either you can let YouTube choose any thumbnail or you choose your own.
Why is it important?
Choosing the appropriate thumbnail is one of the most important factors you cannot neglect. In order to gain views the most on your videos, a wise selection of a perfect YouTube video thumbnail dimensions will attract the viewers. Hence this will can uplift your views to a drastic extent.
A quick tip for the perfect YouTube thumbnail
Take a look at the popular you tubers and see what strategies they use when uploading their thumbnails. Usually, the video content is not as appealing as the thumbnail itself. That’s what you need to understand! Just see by yourself how large text and striking images will do wonders!
YouTube video thumbnail dimension for a perfect thumbnail image
The preferred YouTube screen size of your thumbnail image is 1280 x 720 pixels.
Similar to the YouTube video, the aspect ratio of your thumbnail is 16:9.
For even more clear understanding, look into this illustration:
Image from learn.g2
3. Perfect size for your YouTube banner
YouTube offers two main areas for image display of your channel. One is an icon image while other is what YouTube calls “Channel Art”. This is the same as Facebook’s cover photo. People often call it “YouTube banner”. It is a header image displayed at the top of your channel.
For each kind of display (mobile, desktop, and TV), channel art (or banner) dimension changes accordingly.
Either your cover photo or your YouTube banner is displayed at the top of the channel so it’s highly significant to consider what you are depicting about your channel through these images.
Hence, this being said or realized, selecting the appropriate banner resolution should be among your topmost priorities.
The recommended banner dimensions of a YouTube video as suggested by YouTube are 2560 x 1440 pixels. But the dimensions may slightly vary with the variation in the devices being used by the users.
| Displays | Banner image Dimensions |
|---|---|
| Video display | 2560 x 1440 pixels |
| Desktop display | 2560 x 423 pixels |
| Tablet display | 1855 x 423 pixels |
| Television | 2560 x 1440 pixels |
For a thorough understanding, refer to the image below:
Image from learn.g2
The right cover photo size on TV
The image displayed when accessing YouTube from TV will appear and be uploaded full or maximized. So a wise image size must be opted. So the accurate resolution would be 2560 x 1440 pixels which will cover the entire background of your channel.
The right cover photo size on desktop displays
The image size may vary to some extent as per the browser you are accessing with or the desktop itself. But generally, the suggested cover photo size for desktop displays is 2560 x 423 pixels.
The right cover photo size on Tablet displays
As per the recommendation for uploading the image while specifically considering the table display is 1855 x 423 pixels. This will cover the area appropriately.
FAQs about Youtube upload settings
What is the maximum YouTube upload limit of size?
The allowed maximum video file size for uploading is 128GB at present.
What is the maximum YouTube upload limit of length?
The allowed maximum video length today for uploading is 12 hours.
How the default upload setting is reset on YouTube?
Step 1: Sign In to your YouTube account using a browser.
Step 2: By clicking your profile icon on the top right corner of the pane, you’ll see the YouTube Studio option. Click on it.
Step 3: Go on settings option where a pop-up window will appear.
Step 4: Look for upload defaults and change the configurations on 2 tabs.
Step 5: Click on save button.
How is YouTube video uploaded using the mobile application?
Step 1: Sign in to your YouTube channel using your mobile phone.
Step 2: Tap on the video camera icon to upload a video. Grant access to your photo gallery and camera is asked by the app while uploading for the first time.
Step 3: You may “Go Live” or simply drag an already made video file to upload.
Step 4: Click “Next”.
Step 5: Enter the video name, select visibility level and then click upload.
How is YouTube video uploaded using a web browser?
Step 1: Sign in to your YouTube account in a web browser.
Step 2: Click on the video icon appearing on the top of the pane.
Step 3: Click on upload video in the drop-down.
Step 4: You will be redirected to the video upload page. Click “public” under “Select files to upload” option and choose visibility level (public, private or scheduled).
Step 5: Click on a large arrow for video file selection or simply drag the file onto the page.
Step 6: You may enter miscellaneous information related to the video while the video is being uploaded.
Step 7: Click on publish and you are done!
Read More to Get : Best Video Websites Like YouTube >>
Basic terminologies that you should know
Video Format
A file format is a way that is standard for the storage of information in the encoded form within the computer file. It entails how exactly the bits are used while encoding the information in a digital storage medium.
So, a video file format is basically a type of file format in order to store the digital data of a video in the computer system. Mostly, video is often stored using the lossy compression in order to reduce the file size.
Frame Rate
“Frame rate” essentially entails the frequency (rate) at which the simultaneous images display on the screen. These images or called “frames”. Frame rate is expressed in “frames per second or FPS”. The unit or term is applicable for film, cameras, motion capture, video, and computer graphics. This is also known as “frame frequency”, expressed in the unit “hertz”
Resolution
Resolution is a measure to entail the clarity and sharpness of an image and most often used as a metric to judge the quality of cameras, monitors, printers, etc.
It basically refers to the number of different pixels in each dimension which can be viewed in any display device.
File Size
File size refers to the space that a file occupies in a storage medium, like hard drive or USB. The measure of file sizes can be expressed in bytes (B), kilobytes (KB), megabytes (MB), gigabytes (GB), terabytes (TB), and so on.
As shown in the picture below, the files listed in the Windows Explorer assorted as per the file with the largest size first. The file with the name “family-safety.jpg” occupies the largest size of 47 KB and the smallest one with 32 KB size.
Codec
Codec is a device or maybe a computer program that is used to encode or decode a stream of digital data or signal. A codec is a short form of “coder-decoder”.
The basic function of a coder is to encode the stream of data or signal for storage or transmission, usually in an encrypted form.
While, a decoder decodes the encoded (possibly encrypted) data, which is merely a reverse process of a coder. The application of codec are in streaming media, videoconferencing, and video editing applications.
Aspect ratio:
This term refers to the proportion of your video. In other words, the video aspect ratio can be defined as the width or breadth (of an image or screen) with respect to its height. Such a ratio can be expressed or represented in the form of “width x height.
That means an aspect ratio of 4x3 refers to an image that is 4 units wide and 3 units high. Similarly, it can also be expressed with a colon in between the units such as 4:3 or 16:9.
Need a YouTube support?
If you need any support, guidance or may face any queries related to anything regarding your YouTube channel, here’s the link of YouTube support .
Final Verdict
Hopefully, with this detailed guide, you are now ready to make a wise decision regarding customizing your videos and channel as per viewers likeliness. So get ready to see your channel grow drastically!
Richard Bennett
Richard Bennett is a writer and a lover of all things video.
Follow @Richard Bennett
Add YouTube Melodies in iMovie Without Hurdles
How to Add Music to iMovie from YouTube?

Marion Dubois
Nov 07, 2023• Proven solutions
Adding background music to videos makes the video more unique and interesting to see. iMovie is a professional video editing tool that lets you pimp your videos the way you want it with your desired music and other sound effects. With the introduction of background music, your video would become unique and stand out.
Though it is not easy to find the right music for your background music, YouTube is a good place to search for good sounds. That’s why in this article, we’ll see how to add music to iMovie from YouTube.
- Is It Possible to Add Music to iMovie from YouTube?
- Add YouTube Music to iMovie from iPhone & Mac [All-In-One Platform]
- How to Add Music to iMovie from YouTube on iPhone?
- How to Put Music from YouTube to iMovie on Mac?
Part 1. Is It Possible to Add Music to iMovie from YouTube?
iMovie is a tool developed by Apple for video editing designed to help users create unique, fun videos quickly. This outstanding video editor works only on Apple devices which includes macOS, iOS, and iPadOS. It embodies excellent tools for a media organization, color grading, soundtracks, and green-screen effects for your videos. To crown it all, it supports a few media formats.
If your media source is unavailable on your device, it could be since iMovie doesn’t support the format, or it may be under the protection of Digital Rights Management.
Now, even though you’ve downloaded the songs from YouTube to listen to them offline, you are allowed to stream them within the music player only and not apply them to other media forms.
So, if you want to add YouTube music to iMovie, you must remove the DRM restrictions first before converting the YouTube song to a format supported by iMovie. A professional YouTube music downloader can help you with all of this.
Part 2. Add YouTube Music to iMovie from iPhone & Mac
Here is an all-in-one method that to add a YouTube song to iMovie whether through iPhone or Mac. First, record the YouTube music, then add extracted audio files to iMovie.
Step 1: First download and install Filmora Video Editor from the button below and use the built-in ‘Screen Recorder‘ tool to record the YouTube video/music that you want to rip the audio from.
For Win 7 or later (64-bit)
 Secure Download
For macOS 10.14 or later
Secure Download


Step 2: Import the recorded video to Filmora, right click on the video track and select ‘Detach Audio‘ to seperate the audio track and the video track. Select the audio track and click the ‘Export‘ button to save ripped audio files.
Step 3: And now, you can use the extracted YouTube audio files to iMovie for forther editing. Plus, Filmora Video Editor provides with a music library, where you can choose background music or sound effect for your project according to your needs. It is also an expert in creating videos, worth to have a try!
Tips You May Not Want to Miss
Filmora is the best iMovie alternative on the market, which provides the best methods, tools, and techniques to add music to videos, video cutting easily, joining, inversion, and editing. It allows you to easily make movies, edit audio, apply effects and share your new movies on YouTube, Vimeo, DVD, TV, iPhone, iPad, iPod, etc.
Therefore, if you are using Filmora, adding music to videos is just a piece of cake. Just select the audio clip in the timeline, click the “Video and Audio Effects” button, and go to the “Audio Effects” option. Now you can freely choose any audio effect.
For Win 7 or later (64-bit)
Secure Download
For macOS 10.14 or later
Secure Download
Part 3. How to Add Music to iMovie from YouTube on iPhone?
In this part, let us read the most straightforward tutorial on how to add music from YouTube to iMovie on iPhone.
First Download Music from YouTube on iPhone
Downloading YouTube videos on your iPhone is confusing since Apple provides the apps available in the App store. If you jailbreak your phone, there are various other options, but here’s the simplest way if you don’t want to go that route.
Step 1: Download the app Documents by Readdle.
Step 2: Select the compass icon and go to https://www.videosolo.com/online-video-downloader/

Step 3: Paste a YouTube video link in the text box and select “Download”. After some seconds, the video will decode and produce a list of different output quality and format options.
Step 4: Hit the “Download” on the preferred output option.
Step 5: Enter a name and download location for the video.
Step 6: Hit the Downloads tab in the bottom navigation bar to view your downloaded videos within the Documents app.
Step 7: Go back to the Documents app home screen to save your downloaded video and open your Downloads folder.
Step 8: Look for the video you wish to edit and tap the three dots icon on it.
Step 9: Hit the Share button and then Save Video.
Step 10: You can search the downloaded YouTube videos in the Photos app.
Add Downloaded Music to iMovie
Step 1: Launch iMovie and Create a Project
Open the iMovie app and pick the “+” icon to create a project. Then, select a movie file from the media to which you want to add the music and add it to the created project.
Step2: Create Movie
Immediately the movie is added to the project, click on the “Create Movie”, enhance the quality of your video using any of iMovie’s many themes, and add the correct ambiance. Click on the icon like a gear and toggle “Theme Music”. Now you have to choose the theme you desire for your video.
Step 3: Select My Music
Now, it’s time to add audio of your choice, and if you don’t want to select from your existing collection, tap on the “+” icon below on the left side of your screen. Next, choose “Audio” and then select “My Music”.
Step 4: Select Audio from Playlist
Select from the playlist, artist, individual songs, or select from the albums you already have on your device and click on the “+” icon to add to your video. It is important to note that you cannot add multiple songs at once. Just add and adjust the sound as desired.
Finally, after the song has been added to the video successfully, export it to your gallery using the “Export” button and save it on your phone.

Filmora Video Editor
Best iMovie Alternative - Filmora Video Editor
Filmora Video Editor is an expert in creating and editing videos, it offers a ChatGPT plug-in and AI tools to enhance your creative vision. Make your idea into reality.
Try It Free Try It Free Try It Free Learn More >
Part 4. How to Add Music to iMovie from YouTube on Mac?
It is elementary to use YouTube songs in iMovie on Mac. You can easily drag the YouTube music file into your project from the Finder and the desktop. The YouTube music added into the project timeline behaves differently depending on the place you added them.
Download Music from YouTube on Mac
Various programs and tools can assist you in downloading YouTube videos on a Mac.
A straightforward way is to use the inbuilt screen capture tool of macOS. Hit the Command + Shift + 5 tabs to bring up the screen recording options.
You can either record an entire screen or choose a window and alter the options to add audio from your Mac’s internal microphone.

The ideal tool or app for downloading YouTube videos on Mac in high-tech quality is a 4K Video Downloader.
It’s free for a max of 30 downloads per day, or you can upgrade to one of its premium plans. The software can also download videos in around 8K quality and various other high-tech formats. And 4K Video Downloader can also grab whole playlists of YouTube.
Here’s how to use it:
Step 1: Launch the 4K Video Downloader and open the program.
Step 2: Find a YouTube video and copy the link.
Step 3: Hit the Paste Link button in the menu.
Step 4: Select the Download button after choosing from the list of quality and format options.
Step 5: Download the video and then click the three-dot icon, so you can play.
How to Add Music to iMovie
Step 1: Add YouTube Music to the Clip
To add a YouTube music file to a particular video clip, drag the YouTube music file under the video clip so that a bar appears. Next, release the button when you see the green “Add” symbol to set the music as a background song in your iMovie project.
To add a YouTube music file to the iMovie project: drag and drop the YouTube music file to your project, release the mouse button once you see the green color. Add a symbol to add a YouTube song to the iMovie project as background music.
Step 2: Add YouTube Music File to the iMovie Project
Just drag and drop the YouTube video file to your project. Then, release the button once you see the green “Add” sign to add background music from the YouTube file to your project.
Conclusion
So, guys, now, can you add music from YouTube to iMovie? I’m pretty sure you have a positive answer as you saw how to add music to iMovie from YouTube using a simple step method. Moreover, have fun and create magic with your discovery of Filmora Video Editor , as it allows you to explore its numerous features to make a movie.
For Win 7 or later (64-bit)
Secure Download
For macOS 10.14 or later
Secure Download
Marion Dubois
Marion Dubois is a writer and a lover of all things video.
Follow @Marion Dubois
Marion Dubois
Nov 07, 2023• Proven solutions
Adding background music to videos makes the video more unique and interesting to see. iMovie is a professional video editing tool that lets you pimp your videos the way you want it with your desired music and other sound effects. With the introduction of background music, your video would become unique and stand out.
Though it is not easy to find the right music for your background music, YouTube is a good place to search for good sounds. That’s why in this article, we’ll see how to add music to iMovie from YouTube.
- Is It Possible to Add Music to iMovie from YouTube?
- Add YouTube Music to iMovie from iPhone & Mac [All-In-One Platform]
- How to Add Music to iMovie from YouTube on iPhone?
- How to Put Music from YouTube to iMovie on Mac?
Part 1. Is It Possible to Add Music to iMovie from YouTube?
iMovie is a tool developed by Apple for video editing designed to help users create unique, fun videos quickly. This outstanding video editor works only on Apple devices which includes macOS, iOS, and iPadOS. It embodies excellent tools for a media organization, color grading, soundtracks, and green-screen effects for your videos. To crown it all, it supports a few media formats.
If your media source is unavailable on your device, it could be since iMovie doesn’t support the format, or it may be under the protection of Digital Rights Management.
Now, even though you’ve downloaded the songs from YouTube to listen to them offline, you are allowed to stream them within the music player only and not apply them to other media forms.
So, if you want to add YouTube music to iMovie, you must remove the DRM restrictions first before converting the YouTube song to a format supported by iMovie. A professional YouTube music downloader can help you with all of this.
Part 2. Add YouTube Music to iMovie from iPhone & Mac
Here is an all-in-one method that to add a YouTube song to iMovie whether through iPhone or Mac. First, record the YouTube music, then add extracted audio files to iMovie.
Step 1: First download and install Filmora Video Editor from the button below and use the built-in ‘Screen Recorder‘ tool to record the YouTube video/music that you want to rip the audio from.
For Win 7 or later (64-bit)
Secure Download
For macOS 10.14 or later
Secure Download
Step 2: Import the recorded video to Filmora, right click on the video track and select ‘Detach Audio‘ to seperate the audio track and the video track. Select the audio track and click the ‘Export‘ button to save ripped audio files.
Step 3: And now, you can use the extracted YouTube audio files to iMovie for forther editing. Plus, Filmora Video Editor provides with a music library, where you can choose background music or sound effect for your project according to your needs. It is also an expert in creating videos, worth to have a try!
Tips You May Not Want to Miss
Filmora is the best iMovie alternative on the market, which provides the best methods, tools, and techniques to add music to videos, video cutting easily, joining, inversion, and editing. It allows you to easily make movies, edit audio, apply effects and share your new movies on YouTube, Vimeo, DVD, TV, iPhone, iPad, iPod, etc.
Therefore, if you are using Filmora, adding music to videos is just a piece of cake. Just select the audio clip in the timeline, click the “Video and Audio Effects” button, and go to the “Audio Effects” option. Now you can freely choose any audio effect.
For Win 7 or later (64-bit)
Secure Download
For macOS 10.14 or later
Secure Download
Part 3. How to Add Music to iMovie from YouTube on iPhone?
In this part, let us read the most straightforward tutorial on how to add music from YouTube to iMovie on iPhone.
First Download Music from YouTube on iPhone
Downloading YouTube videos on your iPhone is confusing since Apple provides the apps available in the App store. If you jailbreak your phone, there are various other options, but here’s the simplest way if you don’t want to go that route.
Step 1: Download the app Documents by Readdle.
Step 2: Select the compass icon and go to https://www.videosolo.com/online-video-downloader/
Step 3: Paste a YouTube video link in the text box and select “Download”. After some seconds, the video will decode and produce a list of different output quality and format options.
Step 4: Hit the “Download” on the preferred output option.
Step 5: Enter a name and download location for the video.
Step 6: Hit the Downloads tab in the bottom navigation bar to view your downloaded videos within the Documents app.
Step 7: Go back to the Documents app home screen to save your downloaded video and open your Downloads folder.
Step 8: Look for the video you wish to edit and tap the three dots icon on it.
Step 9: Hit the Share button and then Save Video.
Step 10: You can search the downloaded YouTube videos in the Photos app.
Add Downloaded Music to iMovie
Step 1: Launch iMovie and Create a Project
Open the iMovie app and pick the “+” icon to create a project. Then, select a movie file from the media to which you want to add the music and add it to the created project.
Step2: Create Movie
Immediately the movie is added to the project, click on the “Create Movie”, enhance the quality of your video using any of iMovie’s many themes, and add the correct ambiance. Click on the icon like a gear and toggle “Theme Music”. Now you have to choose the theme you desire for your video.
Step 3: Select My Music
Now, it’s time to add audio of your choice, and if you don’t want to select from your existing collection, tap on the “+” icon below on the left side of your screen. Next, choose “Audio” and then select “My Music”.
Step 4: Select Audio from Playlist
Select from the playlist, artist, individual songs, or select from the albums you already have on your device and click on the “+” icon to add to your video. It is important to note that you cannot add multiple songs at once. Just add and adjust the sound as desired.
Finally, after the song has been added to the video successfully, export it to your gallery using the “Export” button and save it on your phone.
Filmora Video Editor
Best iMovie Alternative - Filmora Video Editor
Filmora Video Editor is an expert in creating and editing videos, it offers a ChatGPT plug-in and AI tools to enhance your creative vision. Make your idea into reality.
Try It Free Try It Free Try It Free Learn More >
Part 4. How to Add Music to iMovie from YouTube on Mac?
It is elementary to use YouTube songs in iMovie on Mac. You can easily drag the YouTube music file into your project from the Finder and the desktop. The YouTube music added into the project timeline behaves differently depending on the place you added them.
Download Music from YouTube on Mac
Various programs and tools can assist you in downloading YouTube videos on a Mac.
A straightforward way is to use the inbuilt screen capture tool of macOS. Hit the Command + Shift + 5 tabs to bring up the screen recording options.
You can either record an entire screen or choose a window and alter the options to add audio from your Mac’s internal microphone.
The ideal tool or app for downloading YouTube videos on Mac in high-tech quality is a 4K Video Downloader.
It’s free for a max of 30 downloads per day, or you can upgrade to one of its premium plans. The software can also download videos in around 8K quality and various other high-tech formats. And 4K Video Downloader can also grab whole playlists of YouTube.
Here’s how to use it:
Step 1: Launch the 4K Video Downloader and open the program.
Step 2: Find a YouTube video and copy the link.
Step 3: Hit the Paste Link button in the menu.
Step 4: Select the Download button after choosing from the list of quality and format options.
Step 5: Download the video and then click the three-dot icon, so you can play.
How to Add Music to iMovie
Step 1: Add YouTube Music to the Clip
To add a YouTube music file to a particular video clip, drag the YouTube music file under the video clip so that a bar appears. Next, release the button when you see the green “Add” symbol to set the music as a background song in your iMovie project.
To add a YouTube music file to the iMovie project: drag and drop the YouTube music file to your project, release the mouse button once you see the green color. Add a symbol to add a YouTube song to the iMovie project as background music.
Step 2: Add YouTube Music File to the iMovie Project
Just drag and drop the YouTube video file to your project. Then, release the button once you see the green “Add” sign to add background music from the YouTube file to your project.
Conclusion
So, guys, now, can you add music from YouTube to iMovie? I’m pretty sure you have a positive answer as you saw how to add music to iMovie from YouTube using a simple step method. Moreover, have fun and create magic with your discovery of Filmora Video Editor , as it allows you to explore its numerous features to make a movie.
For Win 7 or later (64-bit)
Secure Download
For macOS 10.14 or later
Secure Download
Marion Dubois
Marion Dubois is a writer and a lover of all things video.
Follow @Marion Dubois
Also read:
- 2024 Approved DIY Sports Highlights A Comprehensive Guide
- A Complete Guide to Upload Longer Videos on YouTube for 2024
- Corrected Non-Existence of Shorts on Feeds
- Adobe Premiere Power Enhancing Your YouTube Presence
- Top 10 Student-Friendly History YT Series
- Beyond YouTube 3 Pioneering Online Video Platforms
- 2024 Approved Boost Your Chances Strategic Keywords for YouTubers
- Eliminate Your Streaming Darkness on YouTube for 2024
- The Ultimate Format Selection – Elevating Your YouTube Content
- Premium Editing Tools Unveiled YouTube Edition
- Top 10 Affordable, Accessible Tools to Transform Videos
- Unleash Video Potential - Leading YouTube SEO Tools
- 2024 Approved Essential Free MCB Theme Templates
- In 2024, A Treasure Trove of 9 Complete Holiday Flicks, Free Streaming
- [Updated] Elite Equipment Showcasing Gameplay Innovations
- [New] Direct Download of YouTube Videos
- The Art of Viral Videos No Budget Necessary
- 2024 Approved Amplify Engagement Increase YouTube Viewers
- In 2024, Clear YouTube Watch Later Playlist - [Step-by-Step]
- Discovering Your Customized YouTube Playlist
- In 2024, Brighten Up Your Videos Implementing Neons on Thumbnails
- Ranking 10 Must-See History YouTube Channels for Learners
- [New] Digital Dynamos 8 YouTube Channels Surging Forward
- 2024 Approved Commanding the Screen Top 10 Women Gamers YT
- 2024 Approved Elevating Your Video Content YouTube to IGTV Transition
- 2024 Approved Crafting Compelling FreeFire Vids with Strategy Guide
- 2024 Approved Creating Captivating YouTube Openers - Two Ways
- Elevating Your Earning Game with YouTube Monetization Strategies
- [New] 5 Inspirational Winter Bgs to Heat Your Videos
- [Updated] Enhance Viewership with Advanced YouTube Video Tracker Tools
- Optimize Your Auditory Experience Convert and Share Via YouTube
- Diving Into the World of Youtubers Starting Your Channel, Earning Cash
- Boost Views and Engagement Top-Rated Online Keyword Generators
- Coordinating Multiple Channels on One Screen
- In 2024, Distracted Boyfriend Meme Generator
- Updated 2024 Approved Best Claymation Shows That Make Your Memories Unforgettable
- [New] 2024 Approved Serenity in Strings The Top 20 Calming Country Songs (TikTok)
- What Is a SIM Network Unlock PIN? Get Your Vivo Phone Network-Ready
- In 2024, How Can Asus ROG Phone 7Mirror Share to PC? | Dr.fone
- How to Fix My Apple iPhone 13 Pro Location Is Wrong | Dr.fone
- TikTok Trends Navigating Copyright Laws for Your Videos for 2024
- [Updated] Videographer's Arena Rivalry
- [New] The Photographer's Pathway Transitioning From Camera to Computer Screen for 2024
- [New] 2024 Approved Grab Speech File & Review
- Free Video Stabilization Software to Enhance Your Videos for 2024
- [Updated] Mastering Video Success on Facebook Platforms for 2024
- In 2024, Seamless TikTok Video Download Experience, No Watermarks
- [Updated] Mastering the Art of Inverted Lookups on Instagram Posts for 2024
- [New] Scheduling Success A Step-by-Step Approach to Google Meets for 2024
- Slow It Down Techniques to Improve Your Slow Motion Photography Skills for Instagram for 2024
- Top 5 Budget-Friendly Windows Screen Recorders – 2023 Edition
- [Updated] Dominating Instagram's Social Scene 5 Proven Tips & Success Stories for 2024
- New 2024 Approved Tips for GIF to Animated PNG You Should Know
- [New] The Boomerang Edge Captivating Your Instagram Audience
- Title: "Ensure Flawless Playback How to Set YouTube Video Size Right for 2024"
- Author: Brian
- Created at : 2024-05-25 11:48:51
- Updated at : 2024-05-26 11:48:51
- Link: https://youtube-video-recordings.techidaily.com/ensure-flawless-playback-how-to-set-youtube-video-size-right-for-2024/
- License: This work is licensed under CC BY-NC-SA 4.0.
