
:max_bytes(150000):strip_icc()/GettyImages-827891530-5bbe624446e0fb0026c95aad.jpg)
"Enliven YouTube Images A Burst of Neon Flair for 2024"
Enliven YouTube Images: A Burst of Neon Flair
Your YouTube video, or any other clip published on any forum, gets a larger number of hits if it has an attractive thumbnail. And, the fact is, a thumbnail becomes 10x more attractive when the main character that the image has have a neon border around it.
With that said, in the following sections, you will learn a couple of methods on how to add a YouTube thumbnail border around the main characters and/or objects that are significant to the clip.
In this article
01 Add Glowing Neon Border to YouTube Thumbnail with Filmora
02 Add a Glowing Neon Border in YouTube Thumbnail with Canva
03 Outline a Person in a YouTube Thumbnail with Photoshop
Part 1: How to Add Neon Border to YouTube Thumbnail for Free with Filmora
Being one of the most versatile and intuitive post-production tools available in the market today, Wondershare Filmora X allows you to add a neon border to a YouTube thumbnail quite conveniently. You can learn how to get this done on Windows or Mac by following the steps given below.
For Win 7 or later (64-bit)
For macOS 10.12 or later
Step 1: Define Project Settings and Add Image to the Timeline
Launch Wondershare Filmora X on your PC (a MacBook Pro M1 is used here), ensure that the project aspect ratio is set to 16:9 (Widescreen) on the splash screen, and click New Project. On the main interface, click the Preview quality and display settings icon from the upper-right area of the Timeline, click Change Project Aspect Ratio, click to select 1280 x 720 (HD) from the Resolution menu of the Project Settings box, and click OK to save the custom project settings.

Then select My Media from the menu bar if not already selected, click Project Media from the navigation pane, and click Import from the Media box to select and import the image of the main character or object that you want to use in the thumbnail.

Now, drag the image from the Media box to the Timeline at the bottom.

Step 2: Clear Image Background, Add Border, and Add Custom Background
Go to Effects from the menu bar, click to select the Default tab and then AI Portrait from the navigation pane, and click and drag the Human Segmentation preset from the right box, and place it over the image track in the Timeline.

Double-click the image layer, scroll down the upper-left box to the Video Effects section, and use the Edge Thickness and Edge Feather sliders to adjust the character’s edges to make them as realistic as possible. Click OK when done.

Next, click and drag the Human Border preset over the image track in the Timeline, and follow the same procedure to customize the border. This will give the character a neon border effect.

Now, use the method explained earlier to import a custom image for the background, and drag and place it under the previous track in the Timeline.

If you are running the latest version of Filmora, you will find there are some neon light effects available under AI Portrait as well.

Step 3: Add Titles to Thumbnail
Go to Titles from the menu bar, click to select the Default tab and then Lower 3rds from the navigation pane, and click and drag your preferred lower-third preset from the right window to a separate layer in the Timeline. Double-click the lower-third layer, and use the available options in the upper-left window to change the text, its color, etc., and drag the textbox to place it to your preferred position on the image as well. Click OK to save the changes.
Next, click to select Titles from the navigation pane, and drag your preferred title from the right window to the upper-most track in the Timeline. Now use the method explained earlier to edit the text, its color, position, etc. to make it look professional.

For more tips and tricks for creating YouTube thumbnail, you can check this You Tube thumbnail creating guide.
Step 4: Get the Neon Border Thumbnail
Click the Snapshot (Camera) icon from the upper-right area of the Timeline, go to My Media from the menu bar, right-click the thumbnail of the screenshot you captured, and click Reveal in Finder (on Mac) or Reveal in Explorer (on Windows) to get to the folder the YouTube thumbnail border is saved in.

Part 2: How to Add a Glowing Neon Border in Your YouTube Thumbnail with Canva
Canva is another intuitive editing program that works on the web interface rather than having you download and install an app on your PC. You can add a neon border for YouTube thumbnails using Canva by following the instructions given below:
Step 1: Define Project Settings and Add a Background
After signing in to your Canva account, click Create a design from the top-right corner of the page, click Custom size from the bottom, define 1280 and 720 in the Width and Height fields on the box that appears respectively, and click Create new design.

Now, click to select Background from the navigation bar on the left (if the Background tool is not visible, click More and then choose Background from the expanded list), and click to select a background from the images available in the center pane.

Step 2: Upload an Image and Add Effects
Click Uploads from the navigation bar, click the More icon from the right of the Upload media button present at the top of the center pane, choose your preferred method to upload the image (with the transparent background) that you want to use, upload the image, and drag it from the center pane to the Canvas.
Note: You can use any of the tools available online to remove the background from your image for free.

To add a YouTube thumbnail border, make sure that the image that you added to the Canvas is selected, click the Duplicate icon from the upper-right area, and use the scaling handles of the copy of the image to increase its size a bit. Reposition the image back to its original location as well.
Then, click Edit image from the upper-left corner of the Canvas, click Duotone from the Edit image pane at the center, if need be, click See all, choose your preferred duotone effect to apply on the image, choose your preferred highlight and shadow colors from the box that appears next, and click Back from the top of the pane.

Next, click See all next to the Adjust section from the center pane, and drag the Blur slider to the right to increase the blur effect on the image.

Step 3: Position the Layers
While keeping the duplicate image selected, click the Position button from the upper-right area of the Canvas, and click Background to send the second image behind the first one to get the neon border effect for the photo.

Part 3: How to Outline a Person in a YouTube Thumbnail with Photoshop
Because YouTube thumbnails are nothing but static images, creating YouTube thumbnail border with Adobe Photoshop is comparatively easier. The process of doing this is given below:
Step 1: Define Document Preferences and Import an Image
Launch Adobe Photoshop on your PC, click Create new, and on the New Document customization box, define the width and height values to 1280 and 720 pixels respectively. Select Transparent from the Background Contents menu as well if not already selected. Click Create from the bottom to create a new Photoshop document with the specified document settings. Next, open the folder that contains the source image, drag the photo to Photoshop, and press Enter to place the photo.

Step 2: Remove Background from the Image
Make sure that the image layer is selected in the Layers panel on the right, go to Select from the menu bar at the top, and click Subject. From the bottom of the Layers panel, click the Add a mask icon to get rid of the background, leaving only the human on the Canvas.

Step 3: Add a Custom Background and an Outline Around the Subject
Use the method explained earlier to import a background image of your choice to Photoshop. Drag the background image layer to the bottom in the Layers panel. Double-click the masked layer, click to select Stroke from the left pane of the Layer Style box, and use the options available on the right to manage the size, color, position, etc. of the stroke that has been added around the human subject. Click OK when done, and then export the image normally to use it as a YouTube thumbnail border.

Summary
It is important to know that the default resolution of a YouTube thumbnail is 1280 x 720 pixels that is usually written and referred to as 720p. While adding a YouTube thumbnail border, it is also imperative to have a good sense of color combination and fonts. Furthermore, a decent tool like Wondershare Filmora X must be used to add an appealing neon border around the main subject in the thumbnail image easily and quickly.
02 Add a Glowing Neon Border in YouTube Thumbnail with Canva
03 Outline a Person in a YouTube Thumbnail with Photoshop
Part 1: How to Add Neon Border to YouTube Thumbnail for Free with Filmora
Being one of the most versatile and intuitive post-production tools available in the market today, Wondershare Filmora X allows you to add a neon border to a YouTube thumbnail quite conveniently. You can learn how to get this done on Windows or Mac by following the steps given below.
For Win 7 or later (64-bit)
For macOS 10.12 or later
Step 1: Define Project Settings and Add Image to the Timeline
Launch Wondershare Filmora X on your PC (a MacBook Pro M1 is used here), ensure that the project aspect ratio is set to 16:9 (Widescreen) on the splash screen, and click New Project. On the main interface, click the Preview quality and display settings icon from the upper-right area of the Timeline, click Change Project Aspect Ratio, click to select 1280 x 720 (HD) from the Resolution menu of the Project Settings box, and click OK to save the custom project settings.
Then select My Media from the menu bar if not already selected, click Project Media from the navigation pane, and click Import from the Media box to select and import the image of the main character or object that you want to use in the thumbnail.
Now, drag the image from the Media box to the Timeline at the bottom.
Step 2: Clear Image Background, Add Border, and Add Custom Background
Go to Effects from the menu bar, click to select the Default tab and then AI Portrait from the navigation pane, and click and drag the Human Segmentation preset from the right box, and place it over the image track in the Timeline.
Double-click the image layer, scroll down the upper-left box to the Video Effects section, and use the Edge Thickness and Edge Feather sliders to adjust the character’s edges to make them as realistic as possible. Click OK when done.
Next, click and drag the Human Border preset over the image track in the Timeline, and follow the same procedure to customize the border. This will give the character a neon border effect.
Now, use the method explained earlier to import a custom image for the background, and drag and place it under the previous track in the Timeline.
If you are running the latest version of Filmora, you will find there are some neon light effects available under AI Portrait as well.
Step 3: Add Titles to Thumbnail
Go to Titles from the menu bar, click to select the Default tab and then Lower 3rds from the navigation pane, and click and drag your preferred lower-third preset from the right window to a separate layer in the Timeline. Double-click the lower-third layer, and use the available options in the upper-left window to change the text, its color, etc., and drag the textbox to place it to your preferred position on the image as well. Click OK to save the changes.
Next, click to select Titles from the navigation pane, and drag your preferred title from the right window to the upper-most track in the Timeline. Now use the method explained earlier to edit the text, its color, position, etc. to make it look professional.
For more tips and tricks for creating YouTube thumbnail, you can check this You Tube thumbnail creating guide.
Step 4: Get the Neon Border Thumbnail
Click the Snapshot (Camera) icon from the upper-right area of the Timeline, go to My Media from the menu bar, right-click the thumbnail of the screenshot you captured, and click Reveal in Finder (on Mac) or Reveal in Explorer (on Windows) to get to the folder the YouTube thumbnail border is saved in.
Part 2: How to Add a Glowing Neon Border in Your YouTube Thumbnail with Canva
Canva is another intuitive editing program that works on the web interface rather than having you download and install an app on your PC. You can add a neon border for YouTube thumbnails using Canva by following the instructions given below:
Step 1: Define Project Settings and Add a Background
After signing in to your Canva account, click Create a design from the top-right corner of the page, click Custom size from the bottom, define 1280 and 720 in the Width and Height fields on the box that appears respectively, and click Create new design.
Now, click to select Background from the navigation bar on the left (if the Background tool is not visible, click More and then choose Background from the expanded list), and click to select a background from the images available in the center pane.
Step 2: Upload an Image and Add Effects
Click Uploads from the navigation bar, click the More icon from the right of the Upload media button present at the top of the center pane, choose your preferred method to upload the image (with the transparent background) that you want to use, upload the image, and drag it from the center pane to the Canvas.
Note: You can use any of the tools available online to remove the background from your image for free.
To add a YouTube thumbnail border, make sure that the image that you added to the Canvas is selected, click the Duplicate icon from the upper-right area, and use the scaling handles of the copy of the image to increase its size a bit. Reposition the image back to its original location as well.
Then, click Edit image from the upper-left corner of the Canvas, click Duotone from the Edit image pane at the center, if need be, click See all, choose your preferred duotone effect to apply on the image, choose your preferred highlight and shadow colors from the box that appears next, and click Back from the top of the pane.
Next, click See all next to the Adjust section from the center pane, and drag the Blur slider to the right to increase the blur effect on the image.
Step 3: Position the Layers
While keeping the duplicate image selected, click the Position button from the upper-right area of the Canvas, and click Background to send the second image behind the first one to get the neon border effect for the photo.
Part 3: How to Outline a Person in a YouTube Thumbnail with Photoshop
Because YouTube thumbnails are nothing but static images, creating YouTube thumbnail border with Adobe Photoshop is comparatively easier. The process of doing this is given below:
Step 1: Define Document Preferences and Import an Image
Launch Adobe Photoshop on your PC, click Create new, and on the New Document customization box, define the width and height values to 1280 and 720 pixels respectively. Select Transparent from the Background Contents menu as well if not already selected. Click Create from the bottom to create a new Photoshop document with the specified document settings. Next, open the folder that contains the source image, drag the photo to Photoshop, and press Enter to place the photo.
Step 2: Remove Background from the Image
Make sure that the image layer is selected in the Layers panel on the right, go to Select from the menu bar at the top, and click Subject. From the bottom of the Layers panel, click the Add a mask icon to get rid of the background, leaving only the human on the Canvas.
Step 3: Add a Custom Background and an Outline Around the Subject
Use the method explained earlier to import a background image of your choice to Photoshop. Drag the background image layer to the bottom in the Layers panel. Double-click the masked layer, click to select Stroke from the left pane of the Layer Style box, and use the options available on the right to manage the size, color, position, etc. of the stroke that has been added around the human subject. Click OK when done, and then export the image normally to use it as a YouTube thumbnail border.
Summary
It is important to know that the default resolution of a YouTube thumbnail is 1280 x 720 pixels that is usually written and referred to as 720p. While adding a YouTube thumbnail border, it is also imperative to have a good sense of color combination and fonts. Furthermore, a decent tool like Wondershare Filmora X must be used to add an appealing neon border around the main subject in the thumbnail image easily and quickly.
Top 5 Video & Picture Capturing Tools for Smartphones
Best Camera Apps to Shoot and Record Videos on iPhone and Andriod Phones

Richard Bennett
Oct 26, 2023• Proven solutions
Smartphone cameras, especially the newest models, are capable of recording great videos. Depending on what kind of videos you make, you might not actually need a separate camera.
The majority of phone cameras record in full HD now, and some can even manage 4K. Where things get tricky is shooting in less than ideal conditions, i.e low light. You cannot make the same adjustments and customizations to your settings with a smartphone camera as you can with a DSLR.
You don’t have the same level of control.
But don’t worry – there are 5 camera apps that will allow you to record videos and get even more creative with how you use your phone’s camera.
- Part 1: Bonus Tip-Make Your Own Video with Wondershare Filmora
- Part 2: Best 5 Camera Apps to Record Videos on iPhone and Android
Part 1: Bonus Tip-Make Your Own Video with Wondershare Filmora
Wondershare Filmora is an amazing video editor for both professional staff and beginners. Its intuitive interface, fast timeline rendering, advanced color tuning, and surprising video effects, etc will make your video stand out! Just download it and edit your smartphone videos with Wondershare Filmora!


Part 2: Best 5 Camera Apps to Record Videos on iPhone and Android
Let’s dive!
1. Open Camera – Free, Android Only

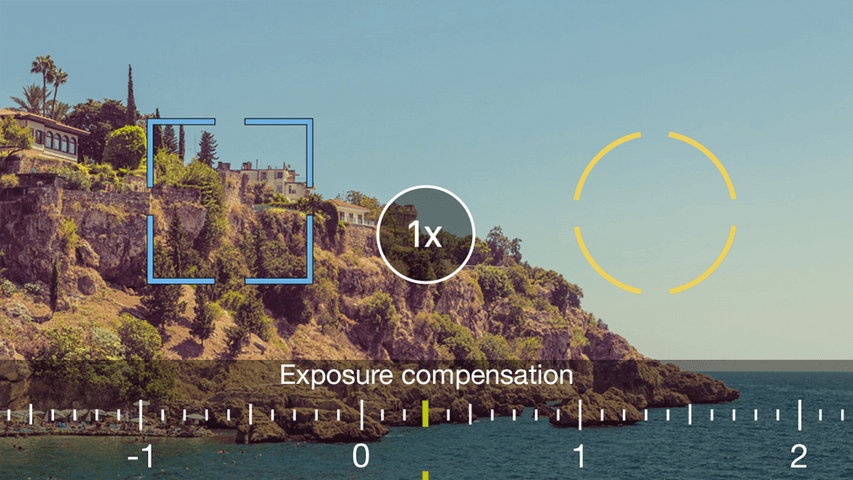
This camera app gives you control over your exposure, flash, focus, ISO, shutter speed, torch, and white balance. How much control you have is up to you. If managing all these things manually is a hassle for you, you can use its automatic or semi-manual modes instead of manual mode.
This is a great camera app to record time-lapses. It is simplistic compared to some of the other apps on this list, but it is also extremely easy to use.
2. ProShot - $4, iOS or Android
ProShot lets you adjust your frame rate, which is important if you want to shoot slow motion or time-lapse videos. You can also adjust your brightness while filming. One of the most useful features of this camera app is that it provides a real-time audio level meter, so you won’t be surprised by a poor sound recording when you watch your videos back.
3. ProCamera - $5, iOS Only
This is one of the most frequently recommended camera apps for iPhones. It makes it easy for you to adjust your focus, iOS, and exposure. You can also play with different filters and effects right in the app. One of the only downsides of this app is that some of its most useful features, like Lowlight Plus, are in-app purchases.
4. Sun Seeker - $10, iOS or Android

A lot of the time when you’re shooting with your phone, you’re shooting outside. When you’re shooting outside, the most important thing you need to keep track of is the sun. Sun Seeker is the perfect app for figuring out where the sun will be in the sky at any given time, which will tell you the best time to go out and make your video.
For more information on making videos with natural light, check out Indoor Natural Lighting Tips .
Besides just keeping track of the sun, Sun Seeker provides an augmented reality view of its path and how it will affect specific locations.
5. FiLMiC Pro - $10, iOS or Android
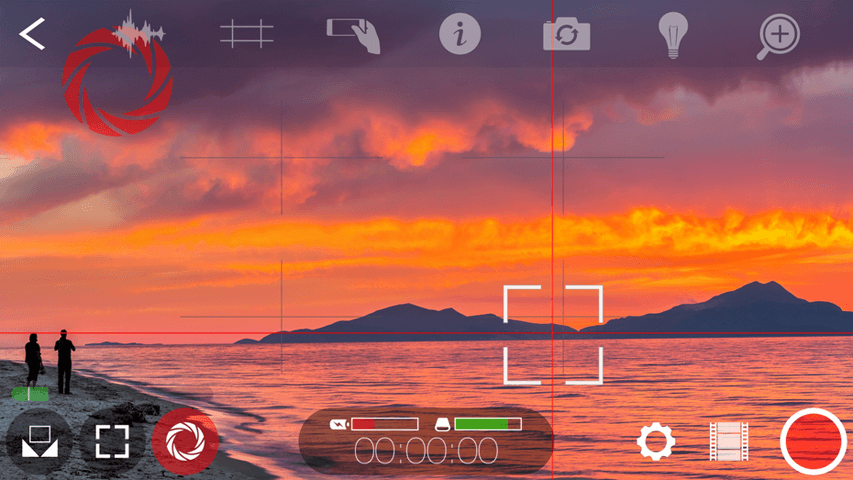
This is probably the best all-purpose camera app available. It gives you exactly the same kind of control over your smartphone camera as you would have over a DSLR. You can manually adjust your focus, exposure, ISO, shutter speed, tint, and color temperature. There are even voice processing audio filters, so you can capture better audio while you’re shooting and have less to fix in post.
Final Words
Because mobile cameras already perform so well, it can be easy to think to have more to adjust would only make things more complicated. However, there are occasions where you need to be able to make these adjustments. Are the videos you take inside at night at a lower quality than the ones you record during the day, for example? If you could set a higher ISO, you would be able to fix that.
Another example: just the other day, there was a question here about shooting green screen videos on a mobile device. One of our community members, Vivekpanwar, was having an issue with motion blur. Motion blur isn’t always distracting in normal videos, but it becomes a huge issue when you apply a Chroma key effect. The best way to avoid motion blur is to set a high shutter speed, which you can do if you download a quality camera app.
Richard Bennett
Richard Bennett is a writer and a lover of all things video.
Follow @Richard Bennett
Richard Bennett
Oct 26, 2023• Proven solutions
Smartphone cameras, especially the newest models, are capable of recording great videos. Depending on what kind of videos you make, you might not actually need a separate camera.
The majority of phone cameras record in full HD now, and some can even manage 4K. Where things get tricky is shooting in less than ideal conditions, i.e low light. You cannot make the same adjustments and customizations to your settings with a smartphone camera as you can with a DSLR.
You don’t have the same level of control.
But don’t worry – there are 5 camera apps that will allow you to record videos and get even more creative with how you use your phone’s camera.
- Part 1: Bonus Tip-Make Your Own Video with Wondershare Filmora
- Part 2: Best 5 Camera Apps to Record Videos on iPhone and Android
Part 1: Bonus Tip-Make Your Own Video with Wondershare Filmora
Wondershare Filmora is an amazing video editor for both professional staff and beginners. Its intuitive interface, fast timeline rendering, advanced color tuning, and surprising video effects, etc will make your video stand out! Just download it and edit your smartphone videos with Wondershare Filmora!
Part 2: Best 5 Camera Apps to Record Videos on iPhone and Android
Let’s dive!
1. Open Camera – Free, Android Only
This camera app gives you control over your exposure, flash, focus, ISO, shutter speed, torch, and white balance. How much control you have is up to you. If managing all these things manually is a hassle for you, you can use its automatic or semi-manual modes instead of manual mode.
This is a great camera app to record time-lapses. It is simplistic compared to some of the other apps on this list, but it is also extremely easy to use.
2. ProShot - $4, iOS or Android
ProShot lets you adjust your frame rate, which is important if you want to shoot slow motion or time-lapse videos. You can also adjust your brightness while filming. One of the most useful features of this camera app is that it provides a real-time audio level meter, so you won’t be surprised by a poor sound recording when you watch your videos back.
3. ProCamera - $5, iOS Only
This is one of the most frequently recommended camera apps for iPhones. It makes it easy for you to adjust your focus, iOS, and exposure. You can also play with different filters and effects right in the app. One of the only downsides of this app is that some of its most useful features, like Lowlight Plus, are in-app purchases.
4. Sun Seeker - $10, iOS or Android
A lot of the time when you’re shooting with your phone, you’re shooting outside. When you’re shooting outside, the most important thing you need to keep track of is the sun. Sun Seeker is the perfect app for figuring out where the sun will be in the sky at any given time, which will tell you the best time to go out and make your video.
For more information on making videos with natural light, check out Indoor Natural Lighting Tips .
Besides just keeping track of the sun, Sun Seeker provides an augmented reality view of its path and how it will affect specific locations.
5. FiLMiC Pro - $10, iOS or Android
This is probably the best all-purpose camera app available. It gives you exactly the same kind of control over your smartphone camera as you would have over a DSLR. You can manually adjust your focus, exposure, ISO, shutter speed, tint, and color temperature. There are even voice processing audio filters, so you can capture better audio while you’re shooting and have less to fix in post.
Final Words
Because mobile cameras already perform so well, it can be easy to think to have more to adjust would only make things more complicated. However, there are occasions where you need to be able to make these adjustments. Are the videos you take inside at night at a lower quality than the ones you record during the day, for example? If you could set a higher ISO, you would be able to fix that.
Another example: just the other day, there was a question here about shooting green screen videos on a mobile device. One of our community members, Vivekpanwar, was having an issue with motion blur. Motion blur isn’t always distracting in normal videos, but it becomes a huge issue when you apply a Chroma key effect. The best way to avoid motion blur is to set a high shutter speed, which you can do if you download a quality camera app.
Richard Bennett
Richard Bennett is a writer and a lover of all things video.
Follow @Richard Bennett
Also read:
- In 2024, Chasing Profit on Platforms YouTube Partner Application Steps
- 2024 Approved Cross-Media Content Flow From YouTube to Thirty+ Others
- [Updated] Efficiently Shifting Videos YouTube to Dailymotion Strategy
- [Updated] Avoiding Common Pitfalls in YouTube Sponsorships, According to FameBit
- Achieve Professional-Level YouTube Transcription Without Spending for 2024
- [New] Dissecting the Best YouTube Music Troupes
- Exploring 8 Superior YouTube-to-AVI Software
- In 2024, 5-Second Stories Explained Well
- Best Practices Choosing YouTube's Most Popular Video Formats for 2024
- 2024 Approved Digital Detective Finding and Watching YT Archives
- 2024 Approved An Intro to Discovering YouTube Studio Content Creator's Dreamland
- How to Use YouTube Cards and Annotations?
- 2024 Approved Elevated Engagement Awards on Video Realms
- Mastering YouTube Promotion 26 Effective Techniques
- Achieve Perfect YouTube Broadcasts with Superior Webcams for 2024
- Essential GIF Tool Guide Tips From the Experts for 2024
- Culinary Crescendo High-Impact Food Network Monikers for 2024
- [Updated] Endless Entertainment Loop YouTube Content on TV
- YouTube Lighting Essentials - #17 Tops Reviewed
- [New] Best Practices in YouTube Thumbnail Sizes and Ratios
- Top Techniques for Crafting Engaging YouTube Shorts Templates
- The Complete Rundown of Essential YouTube Video Downloading Apps (Android)
- Rejuvenate Your Visuals Neon Outlines Included
- [Updated] Curated Collection Best Free Footage Websites Ranked
- [Updated] Building Sustainable Cities Innovation in Environmental Design
- In 2024, Entrepreneur' Writes Top YouTube Sites for Business Success
- How Do You Transform Into a Digital Entertainer (Vtuber)?
- In 2024, Download YouTube Tunes with These 10+ No-Cost Audio Crackers
- From Zero to Hero Your First Time Streaming to Youtube
- Monetizing Videos on YouTube Strategies Success
- Unveiling the Best 5 Tools for YouTube Video URL Shortening
- Mastering Your YouTube Pinpointing a Specialized Audience
- Increasing YouTube Shorts Views Effective Tactics
- Guidelines for Authoritative Life Lesson Videos
- Retro Editing Magic Cutting Classical Cinematography
- Boost Engagement - Top 8 YouTube Video Trackers Unveiled
- [Updated] 9 Ultimate Free Online Editors for Content Creators
- Earning in a World Dominated by YouTubers for 2024
- Elite Yoga Routines YouTube's Leading Fitness Sites for 2024
- 2024 Approved Crafting Captivating Haul Vlogs for Online Fame
- 8 Mistakes People Should Avoid as a New YouTuber
- 2024 Approved Educator Elite Selective Learning YT Channels
- In 2024, Resolve Your Apple iPhone 12 Keeps Asking for Outlook Password
- Unravel the Mystery of Tempo Control in Instagram Stories
- In 2024, Planning to Use a Pokemon Go Joystick on Huawei P60? | Dr.fone
- Identify missing hardware drivers with Windows Device Manager in Windows 7
- [New] The Ultimate Guide to Selecting Frame Rate for HD Recording for 2024
- Instantaneous Installation Laugh with iFunny Memes Easily
- [New] 2024 Approved AudioArchive Compiler Download, Playback & Test
- [Updated] Google Chats Mastery Key Elements, #4 Ways for 2024
- [Updated] 2024 Approved Fade In Fade Out Videos in 4 Easy Ways
- [New] How to Get More Views and Likes on Tik Tok
- [Updated] 2024 Approved Standing Out on TikTok Masterful PFP Techniques and Concepts
- Top 10 Best Free Invitation Video Makers Online
- [Updated] Ornate Asian Dwellings for Your Next Build-Off for 2024
- How To Remove or Bypass Knox Enrollment Service On Infinix Note 30 5G
- Title: "Enliven YouTube Images A Burst of Neon Flair for 2024"
- Author: Brian
- Created at : 2024-05-25 11:48:45
- Updated at : 2024-05-26 11:48:45
- Link: https://youtube-video-recordings.techidaily.com/enliven-youtube-images-a-burst-of-neon-flair-for-2024/
- License: This work is licensed under CC BY-NC-SA 4.0.
