
:max_bytes(150000):strip_icc():format(webp)/GettyImages-585151372-a659baf0c7b441b9b7e7896716b12784.jpg)
"Enhancing User Experience Strategic Placement of Alerts on YouTube Content for 2024"
Enhancing User Experience: Strategic Placement of Alerts on YouTube Content
How to Add YouTube Annotations and Cards?

Richard Bennett
Mar 27, 2024• Proven solutions
Update: YouTube has replaced annotation with end screen. You can find the latest informaiton about YouTube screen and YouTube cards here.
YouTube Cards and Annotations are very useful if you want to encourage your viewrs to take an action, like Subscribe, go to another video or associated website, etc. Today, we’re going to show you the differences between cards and annotations, and how to add them in YouTube videos.
Do you want to make your YouTube video more attractive? Wondershare Filmora is a such video editing software designed for YouTube creator. It not only allows you cut, trim, crop, zoom, reverse, rotate the video clips, but also makes the advanced features like green screen, PIP, tilt-shift and mosaic easy like a piece of cake. With Wondershare Filmora, you can ignite your YouTube videos with over 300 effects like Fashion, Beauty, Block Buster, Travel, etc.
 Download Mac Version ](https://tools.techidaily.com/wondershare/filmora/download/ )
The main difference between annotation and cards is their outlook. Cards are more graphical whereas annotations are text based. The cards slide in once you click the small “i” button on the video where as the annotation is there based on the timings set by the user. Moreover the main differences between the two are:
1. YouTube Cards are small and unobtrusive, unless a viewer chooses to click on them, which is why they are the better option when you are trying to get views on other videos. Irritating a few people with a big annotation might be worth it if you also draw other people’s attention to your cause or website, but it is not a good way to endear yourself to people you are trying to get views and subscriptions from. When a card is clicked a thumbnail will appear with a link to your additional content. YouTube Cards are often better than annotations for adding links to your videos because they look much tidier. Also, unlike annotations, cards will be visible to people watching your videos on their mobile devices.
2. You cannot use Cards just to insert notes into your videos, though, and you cannot adjust their size like you can with annotations. So, if you do need a link to be large and extremely noticeable, annotations might still be your best option. Cards and annotations can even be used in combination sometimes.
How to add YouTube Cards
YouTube Cards are similar to annotations but more interactive. They allow the owner of the video to add images and other links. A small box appears, clicking on which will activate the cards.
- Click on the “Video Manager” tab

- Click “Edit” tab under the video screen shot you want to add the card on
- Click on the “Cards” tab

- On the right panel click on “Add Card” drop down menu and select the type of card you want to add
- Click on the create button which will open the corresponding video
- Once you finish the subsequent information required click create card
- Select the timeline for the playhead to appear which leads to the card slide

- Apply changes and exit
How to add YouTube annotations
YouTube Annotation is addition of a text layer, link or hotspots over your video. They add interactive boxes which link to other websites or videos (any link you want).
- Click on the video manager tab
- Click edit tab under the video screen shot you want to add the annotation on
- Click on the “End screen & Annotation” tab

- On the right panel click on “+ Add Element” and select the kind of annotation you want to add
- Adjust the position of Annotation, you can drag the rectangle to locate it at any position of the video, move the slide to set the start and end time of the annotation

- Apply changes
The types of YouTube annotations:
1. Speech Bubbles
Speech Bubbles: look like the dialogue box in a comic strip. There is a tail which you can adjust so it looks like one of the people in your video is saying what is written in the annotation. Speech bubbles are great for adding in funny comments.
2. Notes
Notes: come in a limited selection of colors and can be adjusted to take up a maximum of 30% of your player screen. Sometimes you need a huge annotation to get an important point across, but using huge note annotations too often – especially near the beginnings of your videos – will annoy viewers. If you need a large note annotation make sure to place it later in your video, when a viewer will already be invested in what they are watching and less likely to click away.
3. Titles
Titles: are large pieces of text that go either at the beginning of your video or in-between different topics within your video. YouTube’s titles are not very nice to look at, but they are a decent option if you do not have access to video editing software.
4. Spotlights
Spotlights: have a subtle border and are completely clear inside. Your text only appears when a user hovers over the spotlight. Spotlights are great for turning elements within your video into links.
5. Labels
Labels: are completely transparent, like spotlights, but the user does not have to hover over them for your text to be visible.
6. Pauses
Pauses: are no longer available to add to your videos, although Pause Annotations added before they were removed still work. Pause Annotations used to stop your video for a set period of time when your annotation appeared.
If somebody watches your video and gets to the end then that means they enjoyed it and will probably be open to checking out more of your content. Rather than hoping that your other videos show up in the ‘Suggested Videos’ YouTube will show after yours has finished playing you should always include an outro, or ending card, after your video to recommend your own work. Annotations are used in a lot of successful YouTuber’s ending cards.
One form this takes is small Note annotations in the bottom corners of the screen, one linking to your previous video and one to the next. Sometimes your viewers might not necessarily get the most enjoyment out of your videos by watching them in order, though. Sometimes you want to link viewers to the videos that are most related to the one they just watched.
The best outros also include a subscribe button, which can be created using annotations. These annotations work best when combined with a verbal call to action. Make sure your outro lasts long enough for people to make the decision to subscribe or click another video.
No matter what kind of annotations you are using, you should never use more than two of them at a time anywhere except for your outro. You should also never place annotations at the very top of your screen, or in the middle at the bottom. If your video is embedding on a separate website then the player will cover annotations at the top of the screen, and ads might cover annotations placed in the bottom-middle of the screen. Keep in mind when using annotations that they will not be visible to users watching your videos on mobile devices. If mobile traffic is very important to you then consider using YouTube Cards.
Richard Bennett
Richard Bennett is a writer and a lover of all things video.
Follow @Richard Bennett
Richard Bennett
Mar 27, 2024• Proven solutions
Update: YouTube has replaced annotation with end screen. You can find the latest informaiton about YouTube screen and YouTube cards here.
YouTube Cards and Annotations are very useful if you want to encourage your viewrs to take an action, like Subscribe, go to another video or associated website, etc. Today, we’re going to show you the differences between cards and annotations, and how to add them in YouTube videos.
Do you want to make your YouTube video more attractive? Wondershare Filmora is a such video editing software designed for YouTube creator. It not only allows you cut, trim, crop, zoom, reverse, rotate the video clips, but also makes the advanced features like green screen, PIP, tilt-shift and mosaic easy like a piece of cake. With Wondershare Filmora, you can ignite your YouTube videos with over 300 effects like Fashion, Beauty, Block Buster, Travel, etc.
Download Mac Version ](https://tools.techidaily.com/wondershare/filmora/download/ )
The main difference between annotation and cards is their outlook. Cards are more graphical whereas annotations are text based. The cards slide in once you click the small “i” button on the video where as the annotation is there based on the timings set by the user. Moreover the main differences between the two are:
1. YouTube Cards are small and unobtrusive, unless a viewer chooses to click on them, which is why they are the better option when you are trying to get views on other videos. Irritating a few people with a big annotation might be worth it if you also draw other people’s attention to your cause or website, but it is not a good way to endear yourself to people you are trying to get views and subscriptions from. When a card is clicked a thumbnail will appear with a link to your additional content. YouTube Cards are often better than annotations for adding links to your videos because they look much tidier. Also, unlike annotations, cards will be visible to people watching your videos on their mobile devices.
2. You cannot use Cards just to insert notes into your videos, though, and you cannot adjust their size like you can with annotations. So, if you do need a link to be large and extremely noticeable, annotations might still be your best option. Cards and annotations can even be used in combination sometimes.
How to add YouTube Cards
YouTube Cards are similar to annotations but more interactive. They allow the owner of the video to add images and other links. A small box appears, clicking on which will activate the cards.
- Click on the “Video Manager” tab
- Click “Edit” tab under the video screen shot you want to add the card on
- Click on the “Cards” tab
- On the right panel click on “Add Card” drop down menu and select the type of card you want to add
- Click on the create button which will open the corresponding video
- Once you finish the subsequent information required click create card
- Select the timeline for the playhead to appear which leads to the card slide
- Apply changes and exit
How to add YouTube annotations
YouTube Annotation is addition of a text layer, link or hotspots over your video. They add interactive boxes which link to other websites or videos (any link you want).
- Click on the video manager tab
- Click edit tab under the video screen shot you want to add the annotation on
- Click on the “End screen & Annotation” tab
- On the right panel click on “+ Add Element” and select the kind of annotation you want to add
- Adjust the position of Annotation, you can drag the rectangle to locate it at any position of the video, move the slide to set the start and end time of the annotation
- Apply changes
The types of YouTube annotations:
1. Speech Bubbles
Speech Bubbles: look like the dialogue box in a comic strip. There is a tail which you can adjust so it looks like one of the people in your video is saying what is written in the annotation. Speech bubbles are great for adding in funny comments.
2. Notes
Notes: come in a limited selection of colors and can be adjusted to take up a maximum of 30% of your player screen. Sometimes you need a huge annotation to get an important point across, but using huge note annotations too often – especially near the beginnings of your videos – will annoy viewers. If you need a large note annotation make sure to place it later in your video, when a viewer will already be invested in what they are watching and less likely to click away.
3. Titles
Titles: are large pieces of text that go either at the beginning of your video or in-between different topics within your video. YouTube’s titles are not very nice to look at, but they are a decent option if you do not have access to video editing software.
4. Spotlights
Spotlights: have a subtle border and are completely clear inside. Your text only appears when a user hovers over the spotlight. Spotlights are great for turning elements within your video into links.
5. Labels
Labels: are completely transparent, like spotlights, but the user does not have to hover over them for your text to be visible.
6. Pauses
Pauses: are no longer available to add to your videos, although Pause Annotations added before they were removed still work. Pause Annotations used to stop your video for a set period of time when your annotation appeared.
If somebody watches your video and gets to the end then that means they enjoyed it and will probably be open to checking out more of your content. Rather than hoping that your other videos show up in the ‘Suggested Videos’ YouTube will show after yours has finished playing you should always include an outro, or ending card, after your video to recommend your own work. Annotations are used in a lot of successful YouTuber’s ending cards.
One form this takes is small Note annotations in the bottom corners of the screen, one linking to your previous video and one to the next. Sometimes your viewers might not necessarily get the most enjoyment out of your videos by watching them in order, though. Sometimes you want to link viewers to the videos that are most related to the one they just watched.
The best outros also include a subscribe button, which can be created using annotations. These annotations work best when combined with a verbal call to action. Make sure your outro lasts long enough for people to make the decision to subscribe or click another video.
No matter what kind of annotations you are using, you should never use more than two of them at a time anywhere except for your outro. You should also never place annotations at the very top of your screen, or in the middle at the bottom. If your video is embedding on a separate website then the player will cover annotations at the top of the screen, and ads might cover annotations placed in the bottom-middle of the screen. Keep in mind when using annotations that they will not be visible to users watching your videos on mobile devices. If mobile traffic is very important to you then consider using YouTube Cards.
Richard Bennett
Richard Bennett is a writer and a lover of all things video.
Follow @Richard Bennett
Achieve Uninterrupted YouTube Experience Across OS Platforms
How to Block YouTube Ads on Chrome/Firefox/Android/iPhone
Richard Bennett
Mar 27, 2024• Proven solutions
YouTube is unquestionably the world’s most popular video-sharing platform with a massive 2 billion active monthly users. With such a large audience, advertisers are pouring a lot of funds into Google’s video platform that makes up a big portion of the company’s advertising revenue. Unfortunately, according to the BI Intelligence Digital Trust Survey , YouTube serves up the most annoying ads with 43 percent of the respondents considering YouTube ads most irksome.
Every now and then you’ll get annoyed with the obtrusive ads and ask how to block YouTube ads. Getting away with the un-skippable and plagued 30-second ads during the playback or the onscreen pop-up ads that come suddenly on the playing screen will make your life miserable when watching a show or practicing a dance move. To help you escape the forced ads on YouTube we’ll go through the YouTube ad blocking techniques available. You will learn:
- Part 1: How to block YouTube ads on the computer (Chrome & Firefox)
- Part 2: How to block YouTube ads on the mobile phone (Android & iPhone)
Here is the video guide to help you block Youtube ads on the computer and mobile phone

Part 1: How to block YouTube ads on the computer (Chrome & Firefox)
In case you care about and want to support content creators on YouTube, you can buy the YouTube Premium which will also give you access to exclusive shows and will eliminate ads from your YouTube life.
However, as most of us won’t like the idea of paying for a free service, there are possible solutions of how to block YouTube ads in Chrome or Firefox. You will need to install a third-party browser extension proficient in blocking the annoying YouTube ads in Google Chrome or Mozilla Firefox.
1.Google Chrome
Chrome allows you to have extensions to enhance the browser features and interact more with the content presented to you. These third-party extensions or sometimes called Add-ons can help prevent the irritating YouTube ads to show up on the site. To install them, follow the steps.
- 1. Open Google Chrome browser and go to Menu.
- 2. In the Menu look for “More Tools” and in there tap the “Extensions”.
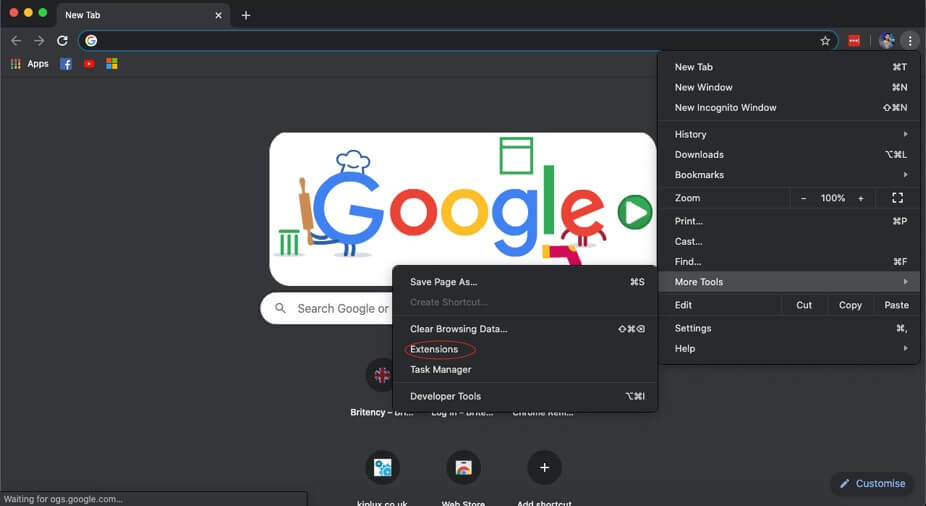
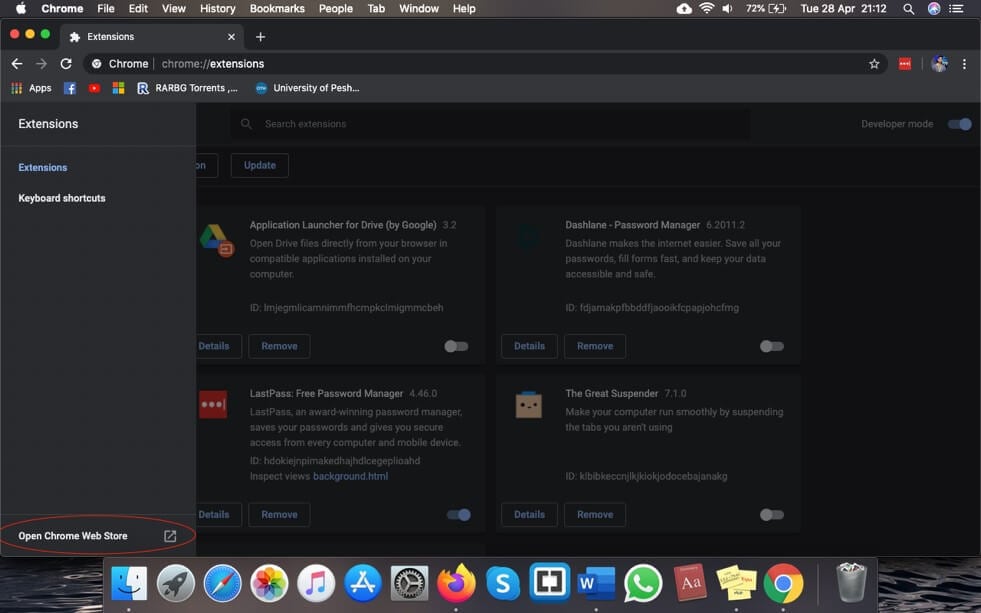
- 3. In the Extensions tap the “Main menu” at the left-hand side. It will show the menu here open the Chrome Web Store. Or you can simply open Chrome Web Store
- 4. You will need to sign in with your Google account if you’re not already signed in.
- 5. In the search box type “ad blocker YouTube” and tap enter. You’ll see a list of ad blockers available for chrome.
- 6. You will adblocker’s specifically for YouTube ads. Select whichever you like and it will block the YouTube ads on Chrome.

2.Mozilla Firefox
You can also install third-party extensions to block YouTube ads from popping up in the middle of the playback. To install the extensions, follow the steps.
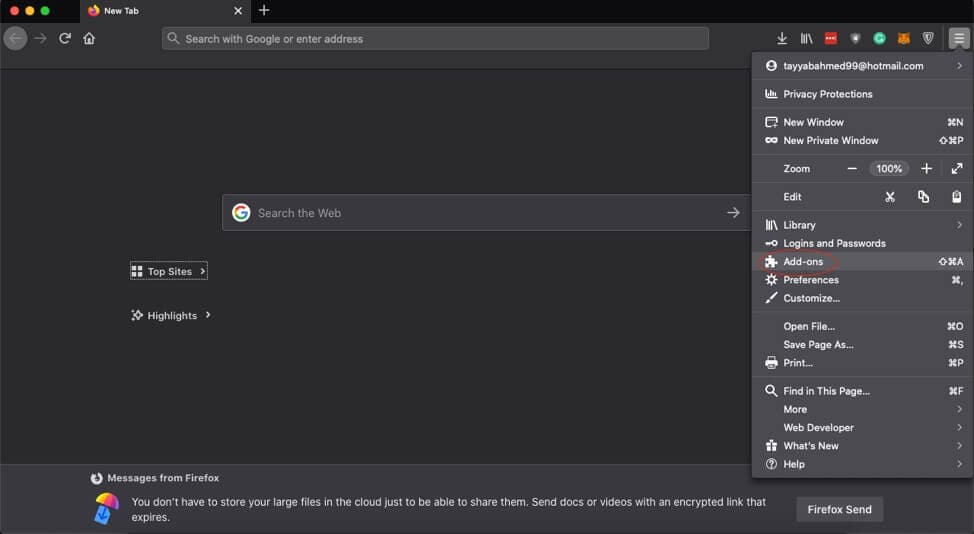
- 1. Tap the Hamburger Menu on Firefox at the top-right corner and select Add-ons.
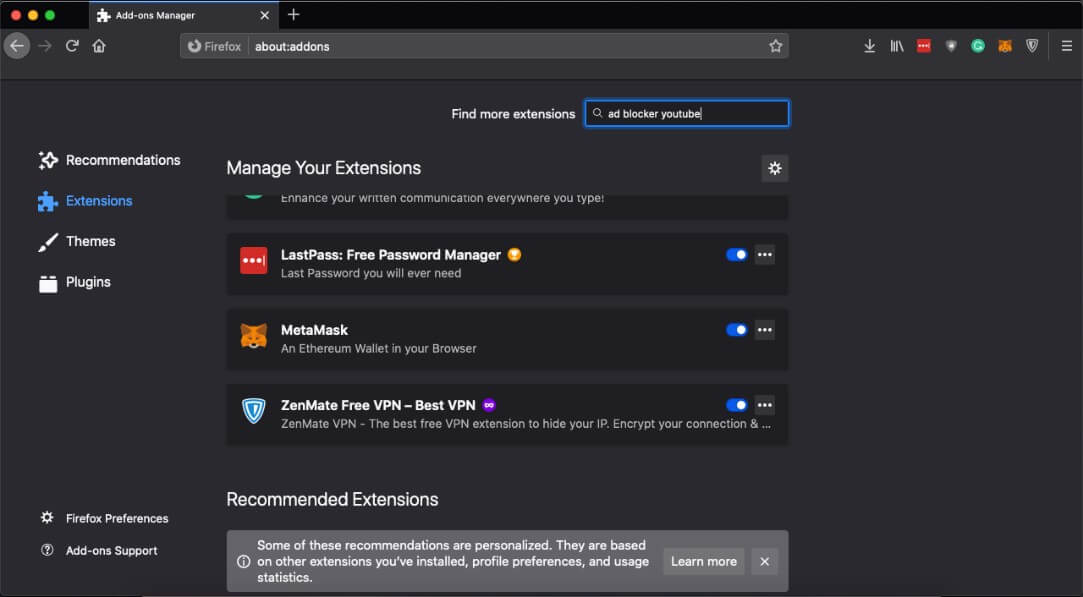
- 2. In the search bar “Find more extensions” type “ad blocker YouTube” and press enter.
- 3. Select an appropriate ad blocker and it will protect you from the irritating ads.
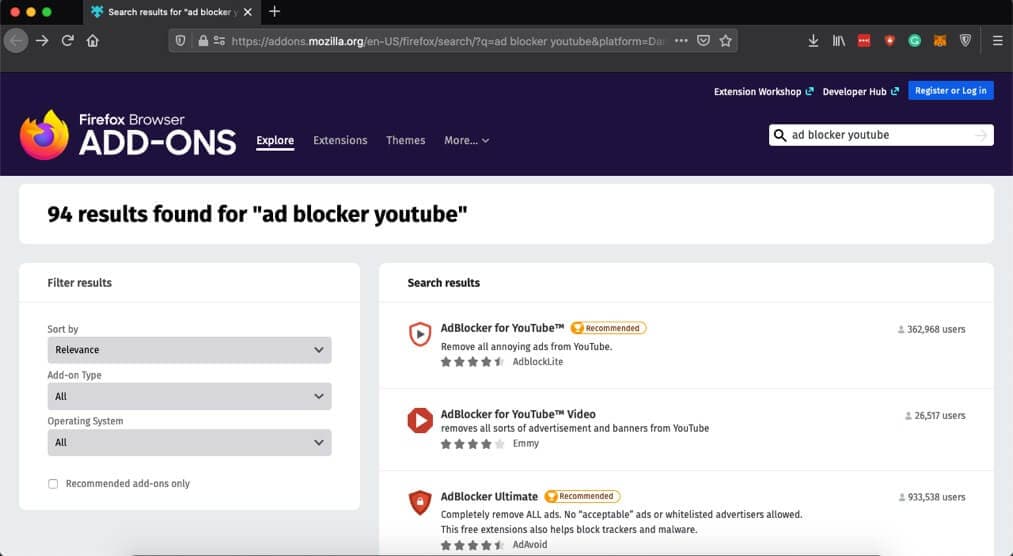
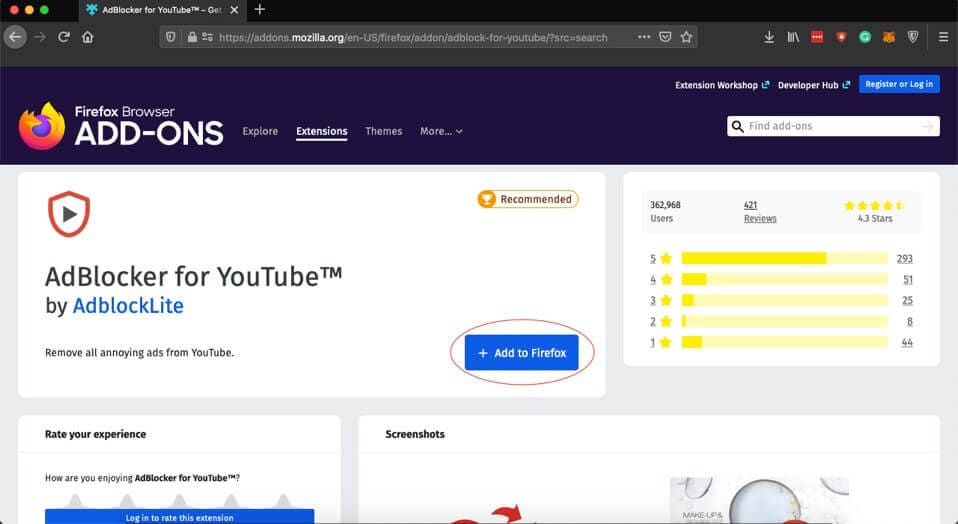
- 4. Tap the “Add to Firefox” to download the extension.
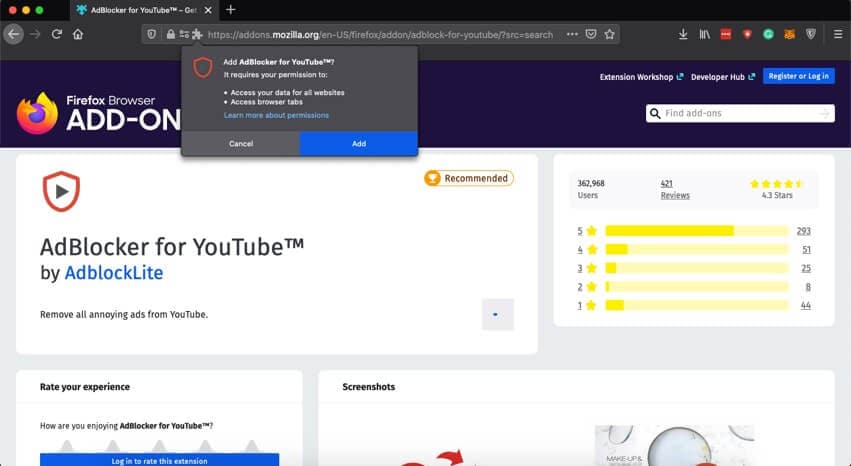
- 5. It will ask for permission, press “Add” again to grant the permissions.
Part 2: How to block YouTube ads on the mobile phone (Android & iPhone)
Ads can cause inconvenience and make YouTube watching a sour experience. To protect yourself from the constant nagging ads on mobile platforms both Android and iPhone you can utilize the numerous ad-blocking apps for Android and iOS. Though the simplest method of blocking the ads and watch YouTube content without ads is to use the Adblock Browser available both for both devices at Google Play Store and Apple Store. This technique won’t require you to root your Android phone or jailbreak the iPhone for watching ad-free YouTube videos.
1.Android
Android is pretty flexible and allows you to add many feature-rich third-party apps. Though there might be other options available to get rid of the irksome YouTube ads, the easiest and single app solution to remove ads is downloading an Adblock browser app that will act as your default browser when you try to want to watch YouTube videos. The steps to set up your Android to block YouTube ads are down here.
- 1. Click Here to install Adblock Browser on your Android device.
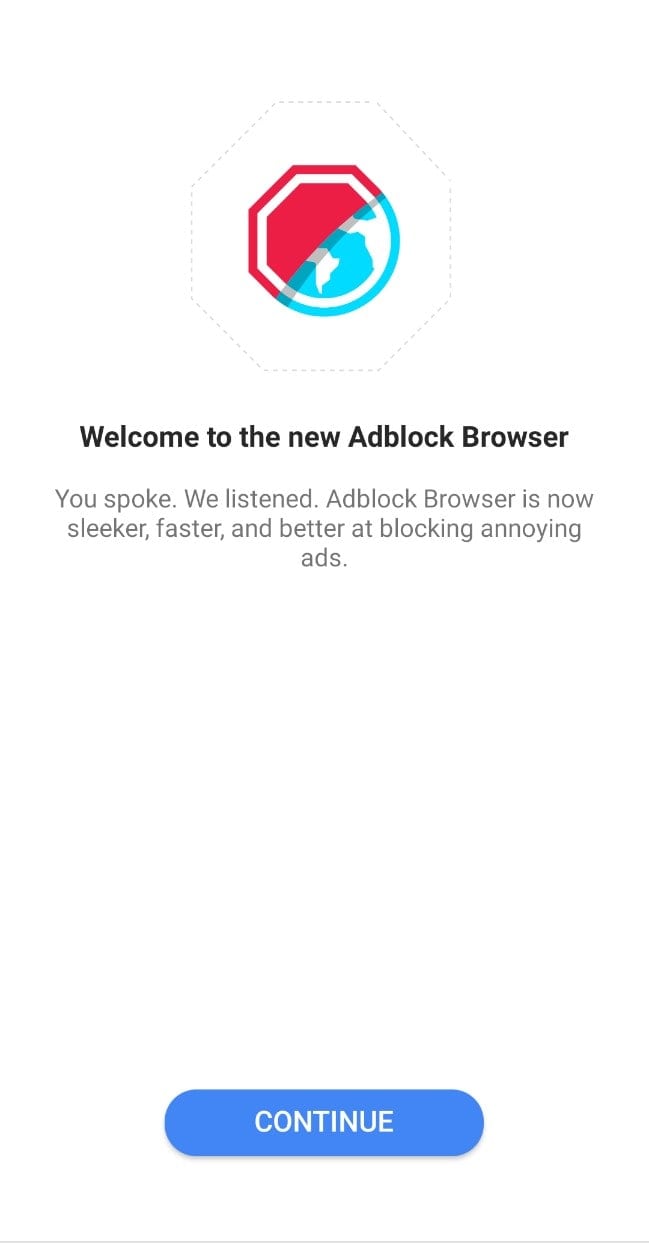
- 2. It is a full-fledged browser and can act as your primary browser for YouTube playback.

- 3. After installing the Adblock Browser your Android device may still try to play videos in the YouTube app.
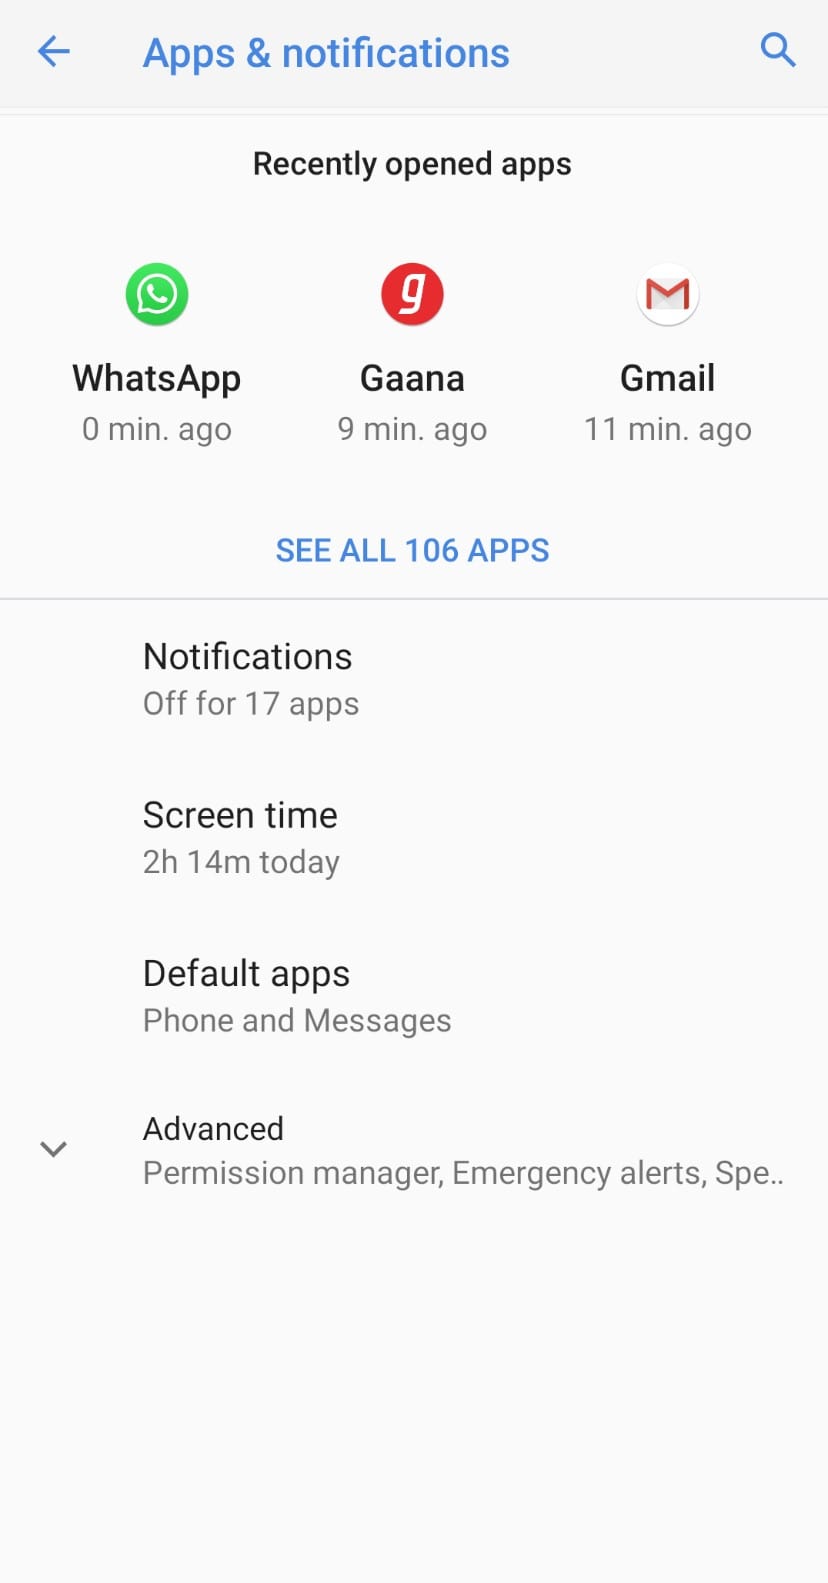
- 4. To current that, open the “Settings” on your Android and go to “Apps & notifications” and press See all. In the apps find YouTube, tap in to see app info.
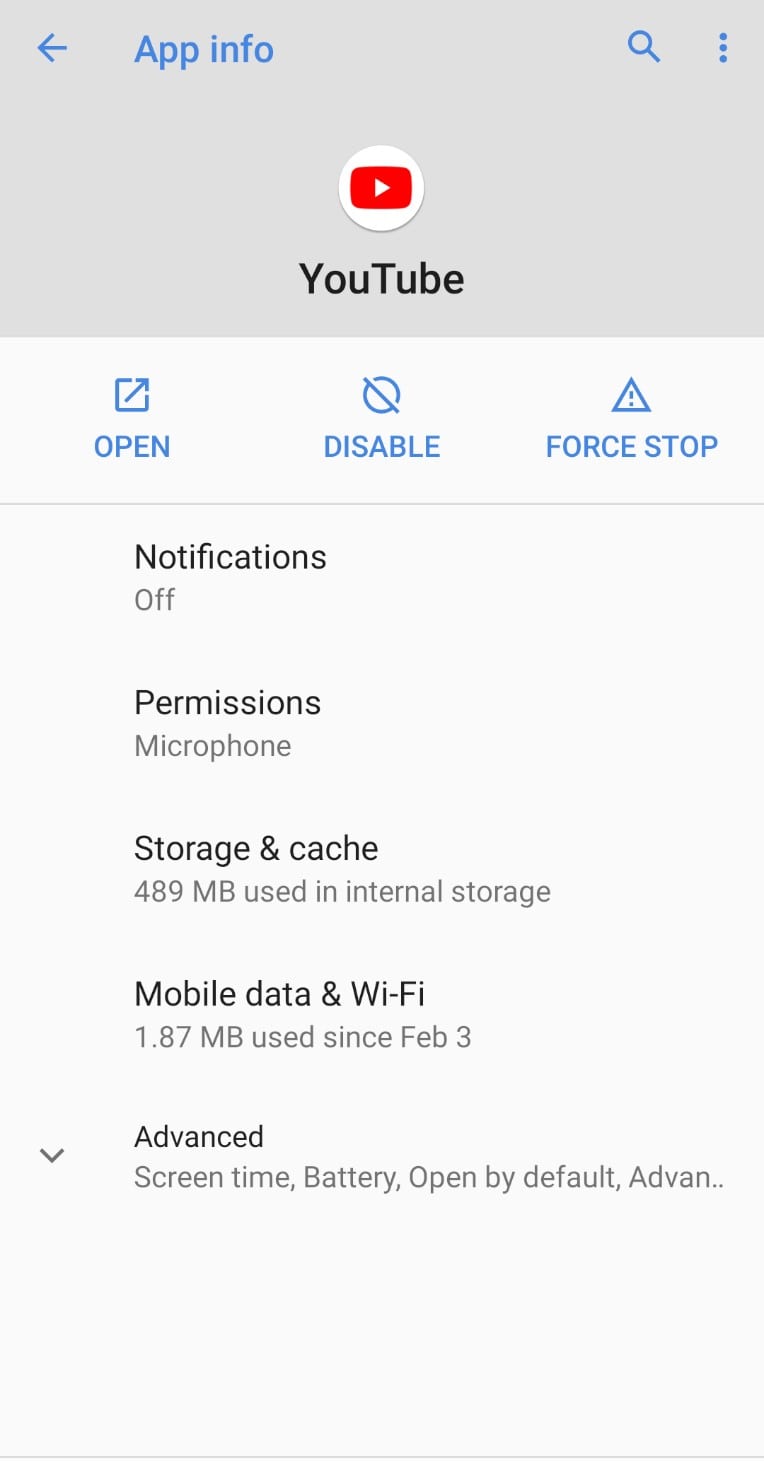
- 5. In the App info screen click “Storage & cache”.
- 6. Tap on “Clear storage”. This will clear all the cache and data of the app from the operating system.
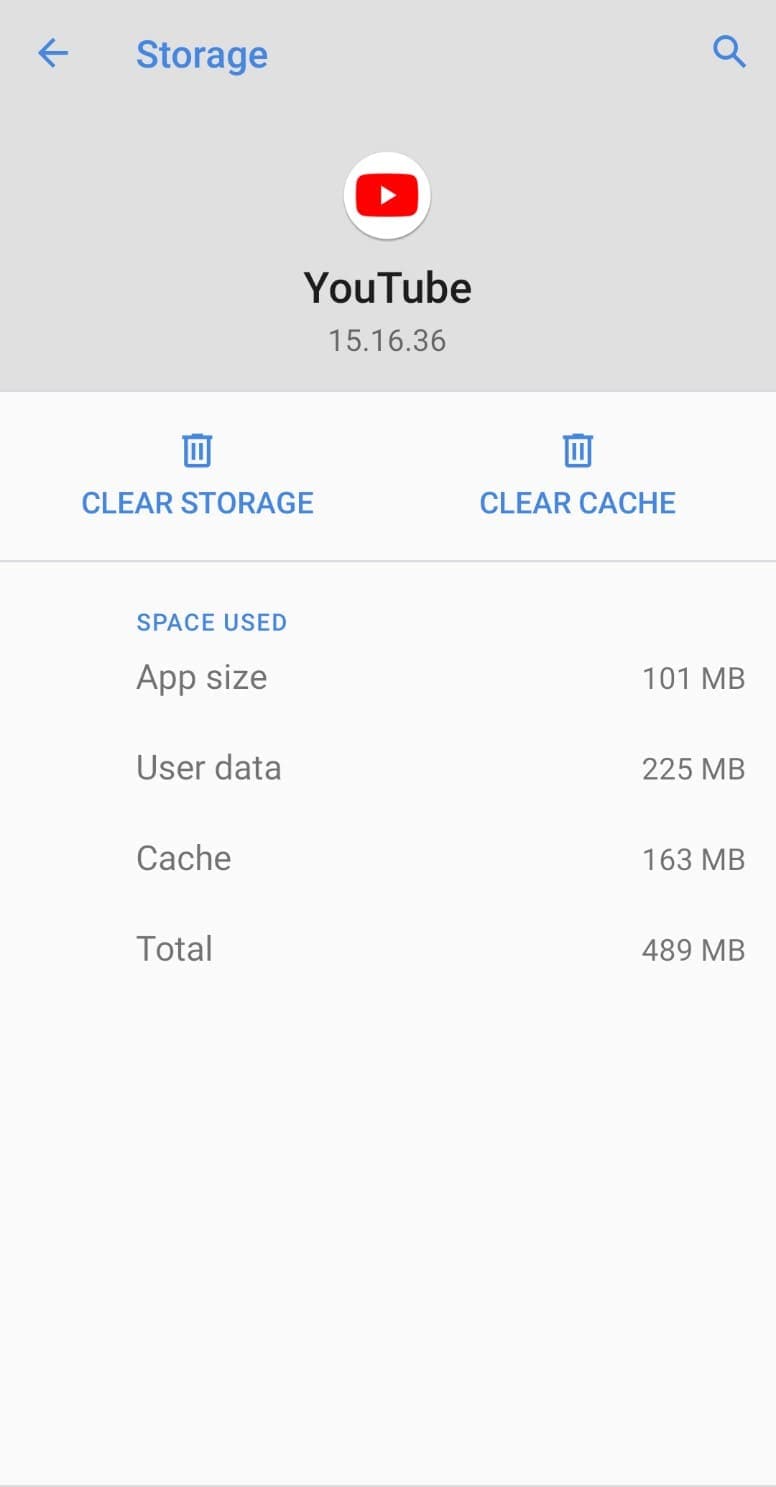
- 7. Now your YouTube videos will be played in the Adblock Browser.
2.iPhone
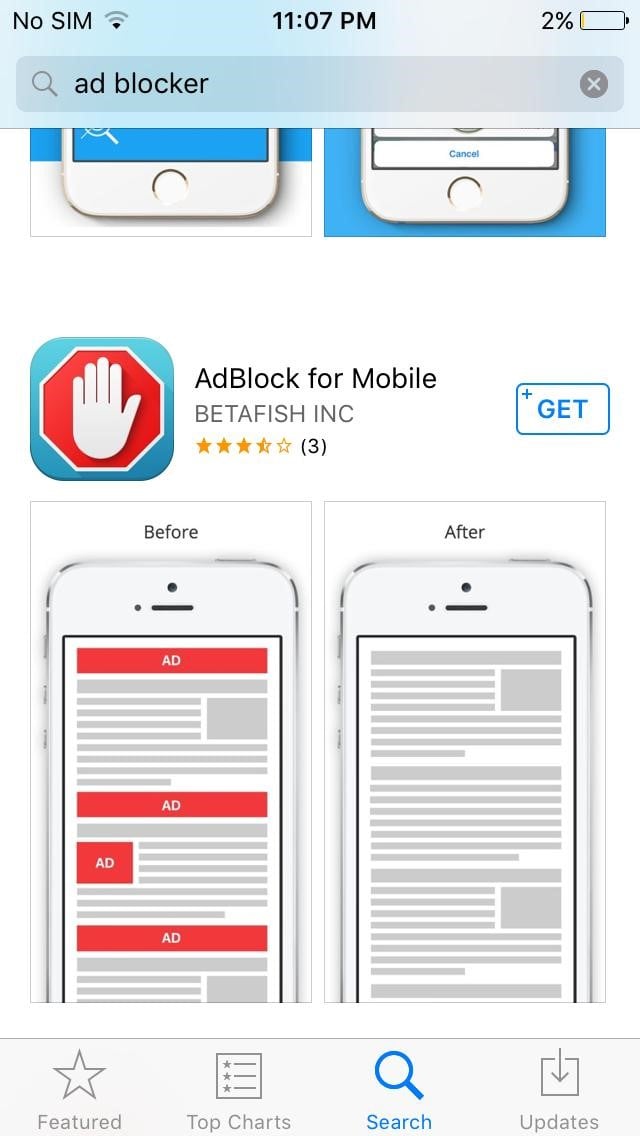
On iOS, you can keep using the default iOS browser and still be able to block YouTube ads in the Safari browser app. You can add third-party ad blocker apps to disable YouTube ads on your iPhone and link it as the Content Blocker in the Safari settings. To activate the ad blocking feature, follow the steps.
- 1. Open Apple Store and download any ad blocker app you like.
- 2. Now come to the iPhone device Settings and go to Safari.
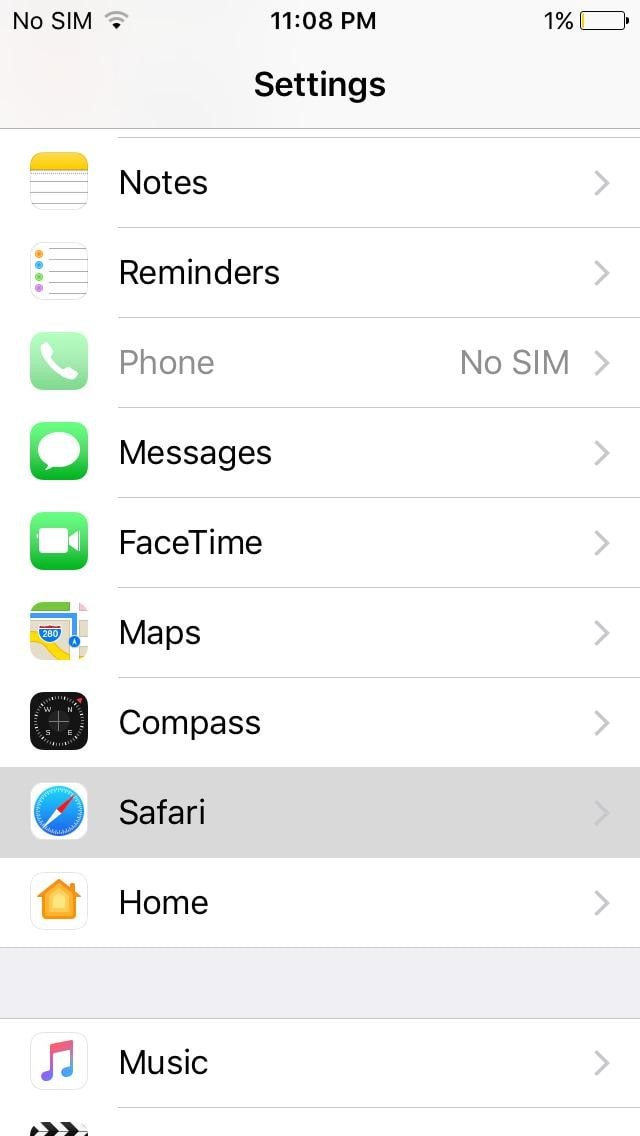
- 3. In the Safari settings, you will find a “Block Pop-ups” toggle button, activate it.
- 4. Right below the toggle button, you’ll see the “Content Blockers” tap to configure it.
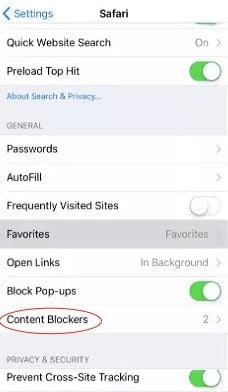
- 5. The ad blocker app you just downloaded will be displaying under Allow these content blockers, enable it with the toggle button.
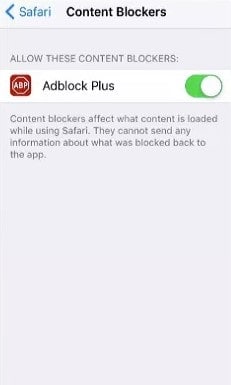
- 6. Now your Safari browser will block all YouTube ads during playback.
Conclusion
Ads can be annoying and time-wasting if you are being forced to watch them every other minute. YouTube is as addictive as its active userbase depict and during that addiction, anyone will not accept an interruption. To do away with the disruptive adds and block YouTube ads on any of your devices from PC to Mac, or mobile devices you need to have an adblocker application that will disable YouTube ads and make your video viewing experience smooth and relishing.
Richard Bennett
Richard Bennett is a writer and a lover of all things video.
Follow @Richard Bennett
Richard Bennett
Mar 27, 2024• Proven solutions
YouTube is unquestionably the world’s most popular video-sharing platform with a massive 2 billion active monthly users. With such a large audience, advertisers are pouring a lot of funds into Google’s video platform that makes up a big portion of the company’s advertising revenue. Unfortunately, according to the BI Intelligence Digital Trust Survey , YouTube serves up the most annoying ads with 43 percent of the respondents considering YouTube ads most irksome.
Every now and then you’ll get annoyed with the obtrusive ads and ask how to block YouTube ads. Getting away with the un-skippable and plagued 30-second ads during the playback or the onscreen pop-up ads that come suddenly on the playing screen will make your life miserable when watching a show or practicing a dance move. To help you escape the forced ads on YouTube we’ll go through the YouTube ad blocking techniques available. You will learn:
- Part 1: How to block YouTube ads on the computer (Chrome & Firefox)
- Part 2: How to block YouTube ads on the mobile phone (Android & iPhone)
Here is the video guide to help you block Youtube ads on the computer and mobile phone
Part 1: How to block YouTube ads on the computer (Chrome & Firefox)
In case you care about and want to support content creators on YouTube, you can buy the YouTube Premium which will also give you access to exclusive shows and will eliminate ads from your YouTube life.
However, as most of us won’t like the idea of paying for a free service, there are possible solutions of how to block YouTube ads in Chrome or Firefox. You will need to install a third-party browser extension proficient in blocking the annoying YouTube ads in Google Chrome or Mozilla Firefox.
1.Google Chrome
Chrome allows you to have extensions to enhance the browser features and interact more with the content presented to you. These third-party extensions or sometimes called Add-ons can help prevent the irritating YouTube ads to show up on the site. To install them, follow the steps.
- 1. Open Google Chrome browser and go to Menu.
- 2. In the Menu look for “More Tools” and in there tap the “Extensions”.
- 3. In the Extensions tap the “Main menu” at the left-hand side. It will show the menu here open the Chrome Web Store. Or you can simply open Chrome Web Store
- 4. You will need to sign in with your Google account if you’re not already signed in.
- 5. In the search box type “ad blocker YouTube” and tap enter. You’ll see a list of ad blockers available for chrome.
- 6. You will adblocker’s specifically for YouTube ads. Select whichever you like and it will block the YouTube ads on Chrome.
2.Mozilla Firefox
You can also install third-party extensions to block YouTube ads from popping up in the middle of the playback. To install the extensions, follow the steps.
- 1. Tap the Hamburger Menu on Firefox at the top-right corner and select Add-ons.
- 2. In the search bar “Find more extensions” type “ad blocker YouTube” and press enter.
- 3. Select an appropriate ad blocker and it will protect you from the irritating ads.
- 4. Tap the “Add to Firefox” to download the extension.
- 5. It will ask for permission, press “Add” again to grant the permissions.
Part 2: How to block YouTube ads on the mobile phone (Android & iPhone)
Ads can cause inconvenience and make YouTube watching a sour experience. To protect yourself from the constant nagging ads on mobile platforms both Android and iPhone you can utilize the numerous ad-blocking apps for Android and iOS. Though the simplest method of blocking the ads and watch YouTube content without ads is to use the Adblock Browser available both for both devices at Google Play Store and Apple Store. This technique won’t require you to root your Android phone or jailbreak the iPhone for watching ad-free YouTube videos.
1.Android
Android is pretty flexible and allows you to add many feature-rich third-party apps. Though there might be other options available to get rid of the irksome YouTube ads, the easiest and single app solution to remove ads is downloading an Adblock browser app that will act as your default browser when you try to want to watch YouTube videos. The steps to set up your Android to block YouTube ads are down here.
- 1. Click Here to install Adblock Browser on your Android device.
- 2. It is a full-fledged browser and can act as your primary browser for YouTube playback.
- 3. After installing the Adblock Browser your Android device may still try to play videos in the YouTube app.
- 4. To current that, open the “Settings” on your Android and go to “Apps & notifications” and press See all. In the apps find YouTube, tap in to see app info.
- 5. In the App info screen click “Storage & cache”.
- 6. Tap on “Clear storage”. This will clear all the cache and data of the app from the operating system.
- 7. Now your YouTube videos will be played in the Adblock Browser.
2.iPhone
On iOS, you can keep using the default iOS browser and still be able to block YouTube ads in the Safari browser app. You can add third-party ad blocker apps to disable YouTube ads on your iPhone and link it as the Content Blocker in the Safari settings. To activate the ad blocking feature, follow the steps.
- 1. Open Apple Store and download any ad blocker app you like.
- 2. Now come to the iPhone device Settings and go to Safari.
- 3. In the Safari settings, you will find a “Block Pop-ups” toggle button, activate it.
- 4. Right below the toggle button, you’ll see the “Content Blockers” tap to configure it.
- 5. The ad blocker app you just downloaded will be displaying under Allow these content blockers, enable it with the toggle button.
- 6. Now your Safari browser will block all YouTube ads during playback.
Conclusion
Ads can be annoying and time-wasting if you are being forced to watch them every other minute. YouTube is as addictive as its active userbase depict and during that addiction, anyone will not accept an interruption. To do away with the disruptive adds and block YouTube ads on any of your devices from PC to Mac, or mobile devices you need to have an adblocker application that will disable YouTube ads and make your video viewing experience smooth and relishing.
Richard Bennett
Richard Bennett is a writer and a lover of all things video.
Follow @Richard Bennett
Also read:
- 5 Critical Equipment Items to Start Your Channel Right
- Critical ASMR Series to Experience for 2024
- Craft Channels with Flair Unveiling 10 Innovative Design Platforms
- 2024 Approved Content Creation Conundrums Understanding the Differences Between IGTV and YouTube
- Multitask Mastery in Media Co-Watching Channels with Ease
- Insider Guide Decoding YouTube Live Image Codes
- [New] Enthralling Escapade YouTube Editors Magic Spectacle
- In 2024, Elite 7 Cameras Elevating Interactive Learning Vlogs & Tutorials
- Who Are the World's Most Popular YouTube Channels?
- 2024 Approved Connect With Creators Unravel Your YouTube Subscriber Type with 6 Exciting Questionnaires
- In 2024, Behind the Sequence Celebrating YouTube's Top Cosmetics Artists
- Tackling YouTube's Dark View Troubleshooting Steps
- 2024 Approved Crafting Cross-Social Media Content Strategy with YouTube & FB
- Unveiling the Leading YouTube Stations for Daily Headlines
- Cross-Platform Creative Dimensioning Techniques for 2024
- 2024 Approved Cutting-Edge Tips for Low-Cost YouTube Sessions
- Essential YouTube SEO Techniques for Enhanced Video Rankings
- [Updated] In 2024, Reigniting the Social Sphere How to Amplify Instagram Activity
- Top 10 Password Cracking Tools For Vivo T2 Pro 5G
- [Updated] 2024 Approved Optimizing Your FB Video Ads 20 Best Tips for Success
- How to Unlock iPhone 12 Without Passcode?
- Vida App Review Cutting-Edge Video Editing at Your Fingertips
- 7 Solutions to Fix Chrome Crashes or Wont Open on OnePlus Nord N30 5G | Dr.fone
- [Updated] 2024 Approved Transform Your IGTV Videos with Top 10 Video Editors
- New 2024 Approved Unleash Your Game Top Gaming Intro Makers
- How to Sign .odt file Online with DigiSigner
- Want to Uninstall Google Play Service from Motorola Moto G73 5G? Here is How | Dr.fone
- 2024 Approved Tutorial Guide to Animate Pictures in Canva
- [New] 2024 Approved Social Media Synergy Merging Instagram & Facebook Feeds
- [Updated] In 2024, The Modern Creator’s Ultimate TikTok Toolkit
- In 2024, How To Quickly Craft Perfect Subtitles and Captions for Facebook Video Feeds
- How To Recover iPhone 13 mini Data From iCloud? | Dr.fone
- In 2024, How To Use Special Features - Virtual Location On Realme V30? | Dr.fone
- Title: "Enhancing User Experience Strategic Placement of Alerts on YouTube Content for 2024"
- Author: Brian
- Created at : 2024-05-25 11:48:15
- Updated at : 2024-05-26 11:48:15
- Link: https://youtube-video-recordings.techidaily.com/enhancing-user-experience-strategic-placement-of-alerts-on-youtube-content-for-2024/
- License: This work is licensed under CC BY-NC-SA 4.0.
