
:max_bytes(150000):strip_icc()/christin-hume-309877-unsplash-5be72fd246e0fb005186530a.jpg)
"Elite Edits The Best Video Editors Ranked"
Elite Edits: The Best Video Editors Ranked
The Best Video Editors for YouTube

Richard Bennett
Oct 26, 2023• Proven solutions
Check out our most updated post on this topic: Top 10 Video Editors for YouTube in 2018.
Part 1: Filmora

Filmora ’s intuitive interface was designed to make video editing a fast and simple process. The less effort you have to put into the technical side of editing, the more energy you can devote to being creative.
In the main screen of Filmora, you are never more than a couple clicks away from any basic, advanced, or creative feature you want to use. The built-in music library, a wide selection of text and title options, filters, overlays, animated elements, and split-screen options can all be accessed from a clearly labeled toolbar above the timeline.
Besides fun things like filters, Filmora also has powerful tools like advanced color grading and an audio equalizer. Either of these features can be accessed in two clicks from the main editing screen. With your audio or video clip selected, simply click the editing icon and then either Advanced (for expanded color editing options) or Customize (for the audio equalizer).
Even features like picture-in-picture (PIP) and green screen are easy to use in Filmora. The PIP tracks are right under the main video track in your timeline. Although there is only one when you start a project, you can have up to ten. These PIP tracks can be used to layer photos and videos over top of each other. One of the most popular uses for the PIP track is facecam videos. After you drag your facecam footage into the PIP track, you can easily shrink it and move it to the corner of your main video.
The green screen has its own designated icon on the main toolbar. Simply select a clip or image in one of your PIP tracks and click it to access the feature.
Filmora is always adding new features to make editing even easier for online video creators. A few of the other tools included in Filmora are speed control, text customization, tilt-shift, ripple delete, and an audio mixer.


Part 2: Video Editing Software Comparisons
Here is a ‘top 4’ list of other popular video editors. The list will discuss their best features and how they measure up to Filmora.
Section 1: PC Video Editors
Here are two of the most popular editing programs for Windows computers:
Windows Movie Maker

Image source: intowindows
PC users can download Windows Movie Maker for free, which has made it a popular choice among video creators that are just starting out. Movie Maker has different timeline tracks for things like videos and music, and it is very easy to trim or cut up all of your media clips. The ability to sharpen some of your blurrier images, speed control, and a simple title generator, and some basic transitions are some of the program’s more noteworthy features.
Movie Maker does not come close to matching Filmora’s range of features, but it is easy to use. It could be a good option for video creators who have no room in their budget for paid software. Videos made in Movie Maker will be simple, but that is all some people need.
Vegas Movie Studio
Vegas Movie Studio, which used to be Sony Vegas, is a big step up from Movie Maker. While editing your clips, you can adjust their brightness, contrast, and color balance. On the audio side of things, Vegas has a great audio restoration tool you can use to get rid of unwanted background noises.
Although it does not have filters, overlays, and animated elements like Filmora, Vegas does have some very modern-looking titles and transition effects.
The biggest advantage that Filmora has over Vegas is that it is a lot easier to use. Vegas has some great features, but accessing and using them is not something you can just jump into doing. Filmora is so intuitive that most users can just open it up and start applying effects.
Vegas is very reasonably priced at $49.95 USD, but it is only $10 more for the ease and effect variety of Filmora.
Section 2: Mac Video Editors
Here are two of the most popular video editors for the Mac OS:
iMovie
iMovie comes free with Mac computers, and it is a huge step up from Windows Movie Maker. It has some really nice audio editing tools, like an equalizer and the ability to set fade in and fade out times (which Filmora also has). When you are editing video clips, iMovie provides you with a stabilization tool, speed controls, and even some filters and overlays. There are text and title options available as well, although they are very basic.
The main difference between Filmora and iMovie is variety. Filmora has a huge range of titles in different styles; iMovie has everyday fonts with all the traditional credit/title animations. iMovie has close to the same amount of features as Filmora, but there is always less variety in those features, and they tend to feel dated.
The main difference between iMovie and every other editor on this list is the layout. The timeline is located in the top left portion of the screen, not stretched across the bottom, and the clips/sounds do not sit in different tracks. The iMovie interface is not actually very complicated, but it will be an adjustment for anybody used to a more traditional editing experience.
Final Cut Pro X
Final Cut Pro is Apple’s attempt at a professional-grade editing program. It is much more advanced than iMovie and offers 64-bit architecture and background rendering. Background rendering means that your imported clips are prepared for playback before you actually move them into your timeline, making the editing process a lot faster.
Final Cut Pro also boasts a huge selection of editing tools.
Like iMovie, Final Cut Pro does not use a traditional timeline. This will make it easier to learn for users upgrading from iMovie, but potentially more difficult for users coming from any other program. Final Cut Pro would be competition for Adobe Premiere if it were available on anything except the latest Mac OS.
Final Cut Pro X costs $300, making it a significant investment.
Section 3: Online Video Editors
WeVideo
WeVideo is a fairly simple cloud-based video editor. Its most useful feature is that it gives your team the ability to edit collaboratively. Multiple editors can upload footage and create their own edits of the project.
WeVideo has all of the most basic editing features – the abilities to trim clips, add transitions, and give your project a soundtrack. Other than the potential for collaboration, though, it has nothing that free programs like iMovie, and even Windows Movie Maker, do not have.
There are a few different pricing options for WeVideo. You can use it for free, but your storage space and the number of features you have access to will be very limited. Your videos will also be watermarked. Also, both the free and $19 packages limit your video resolution to 720p. You will need to pay at least $39 for 1080p, and it will cost you $69 to get rid of all the storage limits.
If you are going to pay $69 for video editing software, you are much better off using Filmora.
Section 4: The Pro-Choice
Adobe Premiere
Adobe Premiere is a professional editing software. In terms of functionality, it has every program on this list, including Filmora, beat. It has very powerful video and audio editing tools, and the program can be customized to suit the needs of particular projects.
Because it is designed for professionals and veteran editors, Premiere is far from a simple program. If you have not edited a video before, or are used to a simpler program, it will take you a long time to become good at using Premiere (it might be a good idea to find an online course).
It does have a few features designed to save time, such as an automatic audio syncing tool and the ability to apply changes you have made to one clip across multiple other clips. The Premiere is probably the best program for professional video editors, but Filmora’s ease of use gives it an edge with amateur video creators.
Conclusion
Filmora is the best video editing software for YouTubers and other online video creators. Windows Movie Maker and iMovie are decent basic programs for creators on a budget, and Premiere is an excellent program for professionals, but if your goal is to create awesome videos for YouTube, then Filmora is the best tool for the job.
If you want to find a video editing solution that empowers your imagination and creativity yet takes less effort, please try this robust and user-friendly video editing software Wondershare Filmora. It provides special effects, stock photo & video, sound library, etc., which will definitely enhance your productivity and helps to make money by making videos much accessible.
Richard Bennett
Richard Bennett is a writer and a lover of all things video.
Follow @Richard Bennett
Richard Bennett
Oct 26, 2023• Proven solutions
Check out our most updated post on this topic: Top 10 Video Editors for YouTube in 2018.
Part 1: Filmora
Filmora ’s intuitive interface was designed to make video editing a fast and simple process. The less effort you have to put into the technical side of editing, the more energy you can devote to being creative.
In the main screen of Filmora, you are never more than a couple clicks away from any basic, advanced, or creative feature you want to use. The built-in music library, a wide selection of text and title options, filters, overlays, animated elements, and split-screen options can all be accessed from a clearly labeled toolbar above the timeline.
Besides fun things like filters, Filmora also has powerful tools like advanced color grading and an audio equalizer. Either of these features can be accessed in two clicks from the main editing screen. With your audio or video clip selected, simply click the editing icon and then either Advanced (for expanded color editing options) or Customize (for the audio equalizer).
Even features like picture-in-picture (PIP) and green screen are easy to use in Filmora. The PIP tracks are right under the main video track in your timeline. Although there is only one when you start a project, you can have up to ten. These PIP tracks can be used to layer photos and videos over top of each other. One of the most popular uses for the PIP track is facecam videos. After you drag your facecam footage into the PIP track, you can easily shrink it and move it to the corner of your main video.
The green screen has its own designated icon on the main toolbar. Simply select a clip or image in one of your PIP tracks and click it to access the feature.
Filmora is always adding new features to make editing even easier for online video creators. A few of the other tools included in Filmora are speed control, text customization, tilt-shift, ripple delete, and an audio mixer.
Part 2: Video Editing Software Comparisons
Here is a ‘top 4’ list of other popular video editors. The list will discuss their best features and how they measure up to Filmora.
Section 1: PC Video Editors
Here are two of the most popular editing programs for Windows computers:
Windows Movie Maker
Image source: intowindows
PC users can download Windows Movie Maker for free, which has made it a popular choice among video creators that are just starting out. Movie Maker has different timeline tracks for things like videos and music, and it is very easy to trim or cut up all of your media clips. The ability to sharpen some of your blurrier images, speed control, and a simple title generator, and some basic transitions are some of the program’s more noteworthy features.
Movie Maker does not come close to matching Filmora’s range of features, but it is easy to use. It could be a good option for video creators who have no room in their budget for paid software. Videos made in Movie Maker will be simple, but that is all some people need.
Vegas Movie Studio
Vegas Movie Studio, which used to be Sony Vegas, is a big step up from Movie Maker. While editing your clips, you can adjust their brightness, contrast, and color balance. On the audio side of things, Vegas has a great audio restoration tool you can use to get rid of unwanted background noises.
Although it does not have filters, overlays, and animated elements like Filmora, Vegas does have some very modern-looking titles and transition effects.
The biggest advantage that Filmora has over Vegas is that it is a lot easier to use. Vegas has some great features, but accessing and using them is not something you can just jump into doing. Filmora is so intuitive that most users can just open it up and start applying effects.
Vegas is very reasonably priced at $49.95 USD, but it is only $10 more for the ease and effect variety of Filmora.
Section 2: Mac Video Editors
Here are two of the most popular video editors for the Mac OS:
iMovie
iMovie comes free with Mac computers, and it is a huge step up from Windows Movie Maker. It has some really nice audio editing tools, like an equalizer and the ability to set fade in and fade out times (which Filmora also has). When you are editing video clips, iMovie provides you with a stabilization tool, speed controls, and even some filters and overlays. There are text and title options available as well, although they are very basic.
The main difference between Filmora and iMovie is variety. Filmora has a huge range of titles in different styles; iMovie has everyday fonts with all the traditional credit/title animations. iMovie has close to the same amount of features as Filmora, but there is always less variety in those features, and they tend to feel dated.
The main difference between iMovie and every other editor on this list is the layout. The timeline is located in the top left portion of the screen, not stretched across the bottom, and the clips/sounds do not sit in different tracks. The iMovie interface is not actually very complicated, but it will be an adjustment for anybody used to a more traditional editing experience.
Final Cut Pro X
Final Cut Pro is Apple’s attempt at a professional-grade editing program. It is much more advanced than iMovie and offers 64-bit architecture and background rendering. Background rendering means that your imported clips are prepared for playback before you actually move them into your timeline, making the editing process a lot faster.
Final Cut Pro also boasts a huge selection of editing tools.
Like iMovie, Final Cut Pro does not use a traditional timeline. This will make it easier to learn for users upgrading from iMovie, but potentially more difficult for users coming from any other program. Final Cut Pro would be competition for Adobe Premiere if it were available on anything except the latest Mac OS.
Final Cut Pro X costs $300, making it a significant investment.
Section 3: Online Video Editors
WeVideo
WeVideo is a fairly simple cloud-based video editor. Its most useful feature is that it gives your team the ability to edit collaboratively. Multiple editors can upload footage and create their own edits of the project.
WeVideo has all of the most basic editing features – the abilities to trim clips, add transitions, and give your project a soundtrack. Other than the potential for collaboration, though, it has nothing that free programs like iMovie, and even Windows Movie Maker, do not have.
There are a few different pricing options for WeVideo. You can use it for free, but your storage space and the number of features you have access to will be very limited. Your videos will also be watermarked. Also, both the free and $19 packages limit your video resolution to 720p. You will need to pay at least $39 for 1080p, and it will cost you $69 to get rid of all the storage limits.
If you are going to pay $69 for video editing software, you are much better off using Filmora.
Section 4: The Pro-Choice
Adobe Premiere
Adobe Premiere is a professional editing software. In terms of functionality, it has every program on this list, including Filmora, beat. It has very powerful video and audio editing tools, and the program can be customized to suit the needs of particular projects.
Because it is designed for professionals and veteran editors, Premiere is far from a simple program. If you have not edited a video before, or are used to a simpler program, it will take you a long time to become good at using Premiere (it might be a good idea to find an online course).
It does have a few features designed to save time, such as an automatic audio syncing tool and the ability to apply changes you have made to one clip across multiple other clips. The Premiere is probably the best program for professional video editors, but Filmora’s ease of use gives it an edge with amateur video creators.
Conclusion
Filmora is the best video editing software for YouTubers and other online video creators. Windows Movie Maker and iMovie are decent basic programs for creators on a budget, and Premiere is an excellent program for professionals, but if your goal is to create awesome videos for YouTube, then Filmora is the best tool for the job.
If you want to find a video editing solution that empowers your imagination and creativity yet takes less effort, please try this robust and user-friendly video editing software Wondershare Filmora. It provides special effects, stock photo & video, sound library, etc., which will definitely enhance your productivity and helps to make money by making videos much accessible.
Richard Bennett
Richard Bennett is a writer and a lover of all things video.
Follow @Richard Bennett
Express Yourself: Incorporating Emojis Into YT Feedback
How to Add Emojis on YouTube Comments
Richard Bennett
Mar 27, 2024• Proven solutions
Emojis are a great way to make your videos and comments stand out from the rest. You may also be able to catch the attention of millennials and improve your YouTube and Google ranking. Beginners can use emojis as a great strategy to improve YouTube SEO performance and get ahead of others. Experts suggest using emojis wisely; that is not to overload or spam whole titles or comments with smileys!
Here are some great ways to add YouTube comments emojis:
Part 1: How to Type Emojis in a YouTube Comment on Windows
Here are several ways to type emojis in YouTube comments. Follow the instructions below to write YouTube comments with emojis:
1. Adding Emojis to YouTube Videos on Windows with Keyboard
If you are using Windows 10, then you can use the keyboard shortcut to open the emoji icons. Press Windows + ; (semi-colon) or Windows + . (period) to open the emoji keyboard. And you will see the emojis.
Currently, there are 6 types of emojis you can add on Windows, including smiley faces and animals, people, celebrities and objects, foods and plants, transportation and places, and symbols.
You can then click the emoji that you’d like to add to the YouTube video directly.
2. Copy and Paste Emojis from Websites
One of the easiest ways to add emojis to YouTube comments is to copy-paste them from an emoji database. You can right-click on the emoji and then select “copy.”
Now, go to your YouTube comment and right-click again. Scroll down and click on “paste” to use the emoji.
Here are some of the best websites to download emojis that you may need. In these websites, you can get a range of smileys and icons to use for your YouTube comments. You can start with smiley faces that help you express many emotions. Then you can get emojis of objects like cars, mountains, drinks, fruits, bells, guitars, and more.
The list is just endless, and you will never face any shortage of emojis.
Part 2: How to Add Emojis to YouTube Comments on Mac?
Mac users enjoy a wide selection of emojis without any hassles and can easily add emojis to comments they type on YouTube. Just follow the steps below to add emoji to YouTube comments.
You can select any emoji from the emoji resources website and ctrl-click your mouse to copy it. Now, navigate to your YouTube comment and ctrl-click your mouse. Click on “paste” to add the smiley to your comments.
If you want to use your keyboard, select the emoji and press “Command” and “C.” Now, press “Command” and “V” to paste the emoji in your YouTube comment.
Your emoji is now added to your YouTube comments.
You can also use your Mac’s inbuilt emojis in your YouTube comments. Start typing your YouTube comment and then use your keyboard shortcut Command + Control + Space to access the emoji list.
You can now double-click on any emoji to include it in your comment. The free emoji lists are full of smileys, animal faces, everyday objects and things, sports emojis, vehicles, and more. and more. You will find an emoji to suit every comment you type on YouTube.
If your Mac has a Touch Bar, then you can tap the smile face and then tap an emoji to add to YouTube video comments.
YouTuber Javier Mercedes has made a quick tutorial and introduced many more ways to typing emojis on Mac. Check it below and find the best way based on your preferences.
Part 3: How to Add Emoji to YouTube Comments with TubeBuddy?
TubeBuddy is a suite of tools for YouTubers to grow their success. You can access a range of tools, including YouTube comments emojis to improve your visual appeal. It is a free browser extension that you can add to Chrome, Opera, Firefox, and more.
TubeBuddy provides a large collection of emojis and smileys for you to use in your YouTube comments. Additionally, you don’t need to copy-paste anything. The plugin lets you insert emojis from a list with a click. Here are the steps to add emojis to YouTube comments using TubeBuddy:
Step 1: Install TubeBuddy
Visit the TubeBuddy website and install the plugin for your browser. TubeBuddy is available on both Chrome, FireFox, Opera, and Edge, as well as iOS and Android devices.
Step 2: Sign in to YouTube
Sign in to your YouTube account to allow TubeBuddy access to your comments. You will find the TubeBuddy icon beside the YouTube search bar on your browser.
Step 3: Add Emojis at Commenting
A window with a list of emojis will appear on YouTube as you type your comments. You can select any emoji and add it to your comments.
Types of Emojis in TubeBuddy
TubeBuddy is home to a large collection of emojis. You won’t find many emojis anywhere else on the internet. All emojis are grouped under categories like smileys, places, food and drinks, buildings, and more.
You can quickly select a category and then add emoji to YouTube comments. The tool also adds new emojis daily.
Bonus: How to Add Emojis to YouTube Video Title and Description?
You can add cool emojis to your video titles and descriptions for more innovation. People will also be more likely to choose your video as they pop-out on the search results or playlists.
Here is how you can add emojis to YouTube video titles and descriptions:
You can access any list of YouTube comments emojis and select the one you like. Then use your mouse to copy the emoji and paste it into your YouTube titles and description. Or press “Ctrl” + “C” for Windows and “Command” + “C” for Mac to copy your emoji.
Now go to your title or description and press “Ctrl” + “V” for Windows and “Command” + “V” for Mac to paste the emoji.
FAQs about YouTube Video Comments
- Are Emojis Harmful to Use for YouTube?
We all have heard rumors of using emojis in YouTube video titles or comments may damage views or reputation. However, it’s not true, and emojis have no negative consequences on YouTube.
Rather, you can attract more viewers and even improve YouTube SEO by using emojis. Google also allows emojis in search results, and data shows they rank better. You can use emojis for YouTube with complete peace of mind.
In my opinion, there will be no harmful effects on your views, subscribers, or credibility. Instead, you may be able to appeal to a younger crowd and get more clicks.
- Will adding Emojis Impact YouTube SEO?
Many people don’t use emojis in their YouTube videos, fearing a negative impact. But all the rumors out there are just rumors without any truth. YouTube doesn’t penalize you in any way if you use emojis in comments, titles, or descriptions. You will not experience any penal actions by including emojis on YouTube.
Google is also friendly with emojis, and many websites use them to stand apart from the crowd. Using emojis on YouTube can be an excellent way to improve your SEO performance. Your videos will also have a chance to show up on Google results and YouTube. Emojis also help your videos look innovative to draw in more views.
Final Thoughts
Using emojis in YouTube comments is a great way to boost the popularity of your videos. You can also use emojis in your video titles and descriptions to appear more innovative. Additionally, emojis can improve your YouTube SEO performance and even help you rank on Google search results.
Copy-pasting emojis is a simple way to use them, but you can also go for other methods. TubeBuddy is a great choice if you want to eliminate the whole copy-paste scenario and include more types of emojis in your comments directly.
Richard Bennett
Richard Bennett is a writer and a lover of all things video.
Follow @Richard Bennett
Richard Bennett
Mar 27, 2024• Proven solutions
Emojis are a great way to make your videos and comments stand out from the rest. You may also be able to catch the attention of millennials and improve your YouTube and Google ranking. Beginners can use emojis as a great strategy to improve YouTube SEO performance and get ahead of others. Experts suggest using emojis wisely; that is not to overload or spam whole titles or comments with smileys!
Here are some great ways to add YouTube comments emojis:
Part 1: How to Type Emojis in a YouTube Comment on Windows
Here are several ways to type emojis in YouTube comments. Follow the instructions below to write YouTube comments with emojis:
1. Adding Emojis to YouTube Videos on Windows with Keyboard
If you are using Windows 10, then you can use the keyboard shortcut to open the emoji icons. Press Windows + ; (semi-colon) or Windows + . (period) to open the emoji keyboard. And you will see the emojis.
Currently, there are 6 types of emojis you can add on Windows, including smiley faces and animals, people, celebrities and objects, foods and plants, transportation and places, and symbols.
You can then click the emoji that you’d like to add to the YouTube video directly.
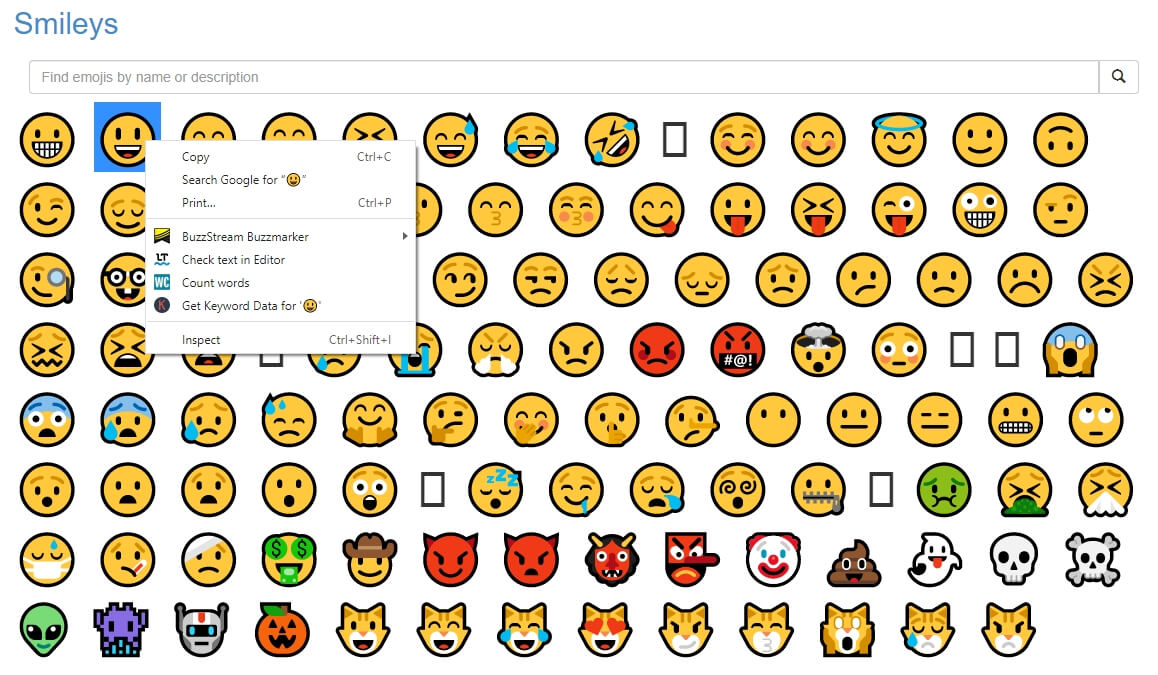
2. Copy and Paste Emojis from Websites
One of the easiest ways to add emojis to YouTube comments is to copy-paste them from an emoji database. You can right-click on the emoji and then select “copy.”
Now, go to your YouTube comment and right-click again. Scroll down and click on “paste” to use the emoji.
Here are some of the best websites to download emojis that you may need. In these websites, you can get a range of smileys and icons to use for your YouTube comments. You can start with smiley faces that help you express many emotions. Then you can get emojis of objects like cars, mountains, drinks, fruits, bells, guitars, and more.
The list is just endless, and you will never face any shortage of emojis.
Part 2: How to Add Emojis to YouTube Comments on Mac?
Mac users enjoy a wide selection of emojis without any hassles and can easily add emojis to comments they type on YouTube. Just follow the steps below to add emoji to YouTube comments.
You can select any emoji from the emoji resources website and ctrl-click your mouse to copy it. Now, navigate to your YouTube comment and ctrl-click your mouse. Click on “paste” to add the smiley to your comments.
If you want to use your keyboard, select the emoji and press “Command” and “C.” Now, press “Command” and “V” to paste the emoji in your YouTube comment.
Your emoji is now added to your YouTube comments.
You can also use your Mac’s inbuilt emojis in your YouTube comments. Start typing your YouTube comment and then use your keyboard shortcut Command + Control + Space to access the emoji list.
You can now double-click on any emoji to include it in your comment. The free emoji lists are full of smileys, animal faces, everyday objects and things, sports emojis, vehicles, and more. and more. You will find an emoji to suit every comment you type on YouTube.
If your Mac has a Touch Bar, then you can tap the smile face and then tap an emoji to add to YouTube video comments.
YouTuber Javier Mercedes has made a quick tutorial and introduced many more ways to typing emojis on Mac. Check it below and find the best way based on your preferences.
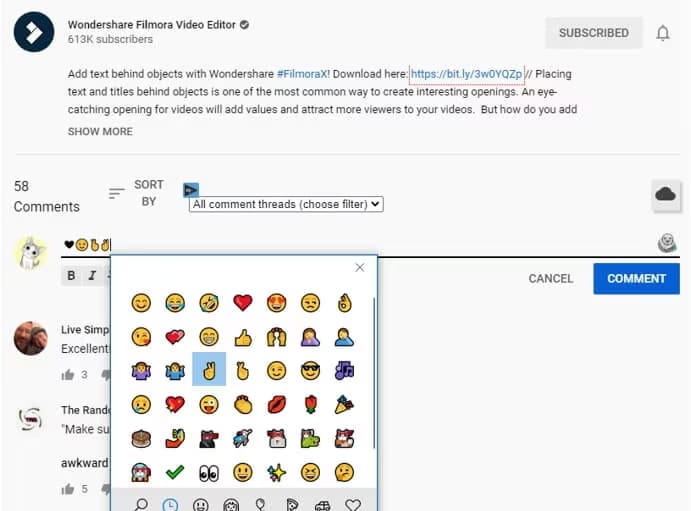
Part 3: How to Add Emoji to YouTube Comments with TubeBuddy?
TubeBuddy is a suite of tools for YouTubers to grow their success. You can access a range of tools, including YouTube comments emojis to improve your visual appeal. It is a free browser extension that you can add to Chrome, Opera, Firefox, and more.
TubeBuddy provides a large collection of emojis and smileys for you to use in your YouTube comments. Additionally, you don’t need to copy-paste anything. The plugin lets you insert emojis from a list with a click. Here are the steps to add emojis to YouTube comments using TubeBuddy:
Step 1: Install TubeBuddy
Visit the TubeBuddy website and install the plugin for your browser. TubeBuddy is available on both Chrome, FireFox, Opera, and Edge, as well as iOS and Android devices.
Step 2: Sign in to YouTube
Sign in to your YouTube account to allow TubeBuddy access to your comments. You will find the TubeBuddy icon beside the YouTube search bar on your browser.
Step 3: Add Emojis at Commenting
A window with a list of emojis will appear on YouTube as you type your comments. You can select any emoji and add it to your comments.
Types of Emojis in TubeBuddy
TubeBuddy is home to a large collection of emojis. You won’t find many emojis anywhere else on the internet. All emojis are grouped under categories like smileys, places, food and drinks, buildings, and more.
You can quickly select a category and then add emoji to YouTube comments. The tool also adds new emojis daily.
Bonus: How to Add Emojis to YouTube Video Title and Description?
You can add cool emojis to your video titles and descriptions for more innovation. People will also be more likely to choose your video as they pop-out on the search results or playlists.
Here is how you can add emojis to YouTube video titles and descriptions:
You can access any list of YouTube comments emojis and select the one you like. Then use your mouse to copy the emoji and paste it into your YouTube titles and description. Or press “Ctrl” + “C” for Windows and “Command” + “C” for Mac to copy your emoji.
Now go to your title or description and press “Ctrl” + “V” for Windows and “Command” + “V” for Mac to paste the emoji.
FAQs about YouTube Video Comments
- Are Emojis Harmful to Use for YouTube?
We all have heard rumors of using emojis in YouTube video titles or comments may damage views or reputation. However, it’s not true, and emojis have no negative consequences on YouTube.
Rather, you can attract more viewers and even improve YouTube SEO by using emojis. Google also allows emojis in search results, and data shows they rank better. You can use emojis for YouTube with complete peace of mind.
In my opinion, there will be no harmful effects on your views, subscribers, or credibility. Instead, you may be able to appeal to a younger crowd and get more clicks.
- Will adding Emojis Impact YouTube SEO?
Many people don’t use emojis in their YouTube videos, fearing a negative impact. But all the rumors out there are just rumors without any truth. YouTube doesn’t penalize you in any way if you use emojis in comments, titles, or descriptions. You will not experience any penal actions by including emojis on YouTube.
Google is also friendly with emojis, and many websites use them to stand apart from the crowd. Using emojis on YouTube can be an excellent way to improve your SEO performance. Your videos will also have a chance to show up on Google results and YouTube. Emojis also help your videos look innovative to draw in more views.
Final Thoughts
Using emojis in YouTube comments is a great way to boost the popularity of your videos. You can also use emojis in your video titles and descriptions to appear more innovative. Additionally, emojis can improve your YouTube SEO performance and even help you rank on Google search results.
Copy-pasting emojis is a simple way to use them, but you can also go for other methods. TubeBuddy is a great choice if you want to eliminate the whole copy-paste scenario and include more types of emojis in your comments directly.
Richard Bennett
Richard Bennett is a writer and a lover of all things video.
Follow @Richard Bennett
Also read:
- 2024 Approved Direct YouTube Tunes to MP3s Online & Offline Options
- Cutting-Edge Tips Designing Immersive Educational Videos for Online Learning
- Jumpstart Your YouTube Channel Growth with Key Editing Skills From Sony Vegas
- Grow Your Channelnode Through Joint Videography Endeavors
- In 2024, Decoding YouTube Stats Efficiency with Social Blade's Advanced Analysis
- [New] Content Creation Evolution Studio Vs. Innovative Beta
- A Step-by-Step Guide to Your Profit Share in YouTube Shorts
- Essential Video Concepts Fueling Creativity in YouTube Channels for 2024
- The Ultimate How-To for Clearer YouTube Footage
- Enjoy Your Content – YouTube Shorts Are Shown Again
- 2024 Approved Audience Wow Factor The Best Camera Lenses for YouTube Stars
- Breakthrough Vids The Titans of 100 Million YouTube Views for 2024
- 24-Hour Scoreboard Top Ten Viewership Heavyweights on YT for 2024
- Crafting Effective Ads A Cost-Free Guide to YouTube Videos for 2024
- [New] Easy Guide Turning Your Favorite YouTube Videos Into Animated GIFs
- In 2024, Determinants of YouTube Video Prominence and Success
- [Updated] Circulating Content The Art of Playlist Sharing
- Converting YouTube Audio Securely Master 3 Proven Techniques
- Turning Traffic Into Cash Calculating the Essential Youtube Number
- 2024 Approved Banish Odd Greens in Your YouTube Videos Using Mac Techniques
- 2024 Approved Addressed Discrepancy in Shorts Showcase
- Plunge Into the Magic 9 Premium Full-Length Christmas Movies for Free
- Trim, Transform, and Triumph Advanced Techniques in Youtube Edits
- Enhance Visibility YouTube Thumbnails Made Simple
- [New] Easily Download Specific YouTube Sections
- Perfectly Positioned Cards YouTube Embedding Techniques
- Kids Earning Big The Success Story of Young Ryan Kaji
- Seamless Playback Tips & Tricks for Infinite Youtube Views
- Unlocking YouTube Success Top 10 Keyword Research Utilities Listed
- [Updated] A Beginner’s Guide to Interpreting Youtube Analytics Scores
- Future of Virtual Game Viewership Income
- Unveiling False Numbers The Risks of Manipulated YouTube Viewership
- Watch History Wizards Top Video Achievements Soaring Past 100 Million in '24
- [New] Earnings Escalation via YouTube Channel Initiatives
- How to Extract YouTube Content Easily
- Rhythm's Riches The Ultimate DJ Templates Collection
- 2024 Approved 8 Mistakes People Should Avoid as a New YouTuber
- 2024 Approved Blocking Unwanted Youtube Channels PC & Mobile Edition
- Essential 8 Tools Linux-Based Edits Software for 2024
- Ace Your Videos Essential Editors for YouTube for 2024
- How to Locate Your YouTube Fanbase
- In 2024, Download YouTube Tunes with These 10+ No-Cost Audio Crackers
- Step-By-Step Strategy for YouTube Shorts to MP4 Conversion
- Customize Your YouTube Watch Experience (Speed Settings) for 2024
- In 2024, Elite Content Makers Top Paid Online Stars
- [New] A Closer Look at YouTube’s ‘Unlisted’ Content Category
- Astonishing Visuals on Thumbnails
- Spectacular Editor Platform Exquisite PC Cutting and Tunes
- In 2024, Enhance Your Presence Best Free Tools for Intriguing Openings
- Streamline Your Channels Customized End Screen Templates
- Why Your WhatsApp Location is Not Updating and How to Fix On Nokia C12 Plus | Dr.fone
- All Must-Knows to Use Fake GPS GO Location Spoofer On Poco X5 Pro | Dr.fone
- [New] IPhone Screen Capture Simplified Guide for 2024
- Seamless MacOS Sierra Integration Techniques
- Updated What Is an AI Editor?
- [New] Prime Zero-Cost Switch Mimicry Apps
- Complete Review & Guide to Techeligible FRP Bypass and More For Huawei
- [New] 2024 Approved Downloading and Archiving Facebook GIFs A Unified Approach
- New Multiple Ways How To Remove iCloud Activation Lock From your Apple iPhone 8
- In 2024, How To Remove Phone Number From Your Apple ID on Your Apple iPhone 15 Plus?
- [New] In 2024, Reconstructing Your TikTok Identity Step-by-Step Renaming Manual
- In 2024, Fake the Location to Get Around the MLB Blackouts on Itel P55+ | Dr.fone
- New From Chorus to Silence Proven Tactics for Singularizing Lyrics Within Harmonized Audios for 2024
- Tips for Snagging Quality Streams on Facebook
- New In 2024, Top 10 Mac Video Tag Editors for Effortless Organization
- Google Play Services Wont Update? 12 Fixes are Here on Honor X50 GT | Dr.fone
- 4 Easy Ways for Your Motorola G54 5G Hard Reset | Dr.fone
- Updated 2024 Approved Best Gaming Intro Creators for Windows and Mac Free and Paid Options
- In 2024, Navigating the Tech for Distance Casting
- Unlocking Made Easy The Best 10 Apps for Unlocking Your Samsung Galaxy A25 5G Device
- Fixing Foneazy MockGo Not Working On Apple iPhone 12 | Dr.fone
- New In 2024, A Vacation Slideshow Is a Great Way to Relive the Vacation Memories and Also Share Them with Your Loved Ones. If You Are Looking for Ways to Create a Slideshow in Just a Few Minutes, We Will Help You with the Best Tool
- 2024 Approved Capturing Life in High Definition The Nikon 1J5 Review
- 3 Methods to Mirror Realme GT Neo 5 SE to Roku | Dr.fone
- [New] Top-Class AI Mates for Online Squares
- 2024 Approved Gastronomic Gurus Who's Dining on Virality?
- Title: "Elite Edits The Best Video Editors Ranked"
- Author: Brian
- Created at : 2024-05-25 11:46:25
- Updated at : 2024-05-26 11:46:25
- Link: https://youtube-video-recordings.techidaily.com/elite-edits-the-best-video-editors-ranked/
- License: This work is licensed under CC BY-NC-SA 4.0.
