
:max_bytes(150000):strip_icc()/discoveryplusturnoffautoplay-9d9f20c89c724e83b9b5f5bbaddc03d8.jpg)
Elevating Your Earning Game with YouTube Monetization Strategies
Elevating Your Earning Game with YouTube Monetization Strategies
YouTube is a widely beloved platform that appeals to individuals of all age groups. If you understand how to harness its potential, YouTube can become a source of income. Generating income from YouTube videos becomes simple through YouTube video monetization. If you’re keen on monetizing your YouTube account, this article is your guide. You can turn it into a part-time gig or a full-time profession, potentially earning a solid income.
To earn well, your content must align with what viewers truly desire. Read this article to learn about how you can monetize YouTube videos, its rules, and requirements.
YouTube Monetization Helper Create the conditions for effective YouTube monetization with Wondershare Filmora!
Free Download Free Download Learn More

Part 1. How to Get Monetized on YouTube: Rules and Requirements
How to Monetize YouTube Channel
Begin making money from your YouTube videos through the YouTube Partner Program. You can create earnings from your YouTube channel by connecting it to your Google account. Monetize your website using Google AdSense.
Google AdSense generates substantial website revenue. If viewers interact with the ads in your videos, you earn money. Adding AdSense to your YouTube channel makes your videos monetizable.
Some videos cannot be monetized, however. Content must meet specific requirements to qualify for YouTube’s program. Criteria include content quality, community guidelines, and copyright compliance. Your YouTube channel can generate income once your videos meet these standards.
Monetizing YouTube Videos: What Are The Requirements?
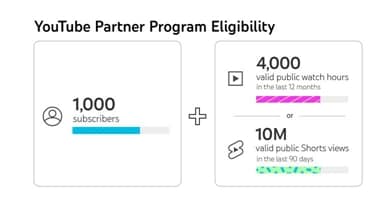
You can monetize your YouTube videos by joining the YouTube Partner Program. Everyone can create a YouTube account, but YPP requires certain requirements. Every time you create content, you must consider these requirements.
Prior to applying for the program, your channel must first accomplish the following:
- One thousand subscribers
- A total of 4,000 watch hours in the past year
Building your audience and creating great content will help you meet these requirements. Joining the YPP, and making sure your YouTube channel complies with YouTube’s rules and policies, is the more complicated aspect.
Those advertising on YouTube want to avoid being linked to low-quality content. Therefore, YouTube Partner Program members are encouraged to create unique, valuable videos.
When you upload content to YouTube, you’ll need to keep these things in mind. Those who plan on monetizing their videos should thoroughly read these documents. You also need to set up a Google AdSense account, which tracks and pays for your YouTube ads.

Part 2. 10 Proven Ways to Monetize Your YouTube Channel
10 Methods to Monetize YouTube Videos
You can monetize your YouTube videos in 10 different ways, including:
- Google Adsense
- Paid Sponsorship
- YouTube Premium
- Memberships
- Merchandise
- Invest in crowd-funding
- Stickers, chats, and thanks
- YouTube Shorts
- YouTube Brandconnect
- YouTube Shopping
1. Google AdSense
YouTube channel monetization is the most popular method. By adding AdSense to your videos, you can generate revenue from the ads displayed. You must adhere to our advertiser-friendly guidelines when creating your videos. The monetization of all videos may not be possible, therefore. YouTube and AdSense work seamlessly together. With no technical knowledge required, your monetization strategy can be set up and managed easily.

2. Paid Sponsorships
Sponsorship involves paying a content creator to use, demonstrate, or test a brand’s product in a video. Both the creator and the brand benefit from sponsorships provided by brands.
The rewards of sponsorship can be immense, but sponsorships are hard to come by. You can pitch relevant brands to partner with your influential channel if your channel has a large following.

3. YouTube Premium
Joining the YouTube Partner Program qualifies you for YouTube Premium. In addition, it can increase your earnings. YouTube Premium members get paid when they watch your content as a creator. The number of Premium members has now surpassed 20 million. It is possible that this may occur quite frequently. YouTube Premium will automatically pay you if someone watches your content.

4. Memberships
Creating membership tiers on your channel allows you to offer different perks to different levels of subscription. Using memberships has the main benefit of providing a more steady income stream. Ad revenue is a more traditional method of monetization. This feature is enabled by channels with at least 1,000 subscribers, and the creator sets fees.

5. Merchandise
You can sell merchandise on YouTube videos with over 10,000 subscribers using a merch shelf. By selling branded merchandise to your YouTube fans, you can generate additional revenue.
It’s especially useful for YouTube creators without their own website who want to sell merchandise. Currently, there are over 45 platforms or retailers worldwide that support merch, so growing your brand is easy.
6. Invest in crowd-funding
It’s not just for startups anymore; you can use crowdfunding to fund content creation on YouTube as well. You can find people to support your work through third-party applications like Patreon in exchange for perks. You can now place sponsor buttons on your YouTube videos, which allows you to crowdfund. With this, you can offer rewards in exchange for monthly funding like with Patreon.
7. Stickers, chats, and thanks
During live streams and premieres, creators can engage their fans with Super Chat and Super Stickers. In the live chat, fans can purchase Super Chats to display their message prominently. A Super Sticker is an animated image displayed during a live chat session. The Super Thanks feature enables creators to earn income from their videos. Additional appreciation may be expressed by those who wish to do so
8. YouTube Shorts
Using the YouTube app, short, vertical videos can be uploaded straight to YouTube using a smartphone. In the same way as Instagram Stories are uploaded to the social media site. The length of YouTube shorts is limited to 60 seconds. In 2021 and 2022, a $100 million fund will be distributed for YouTube Shorts. With this initial stage, YouTube Shorts began to monetize in May 2021. A YouTube Short will only be compensated if it meets the fund’s criteria.

9. YouTube BrandConnect
Brands and YouTube creators can work together on content campaigns through YouTube BrandConnect. In terms of product recommendations, audiences trust creators. It is also possible to partner with YouTube channels through BrandConnect
10. YouTube Shopping
YouTube shopping gives you the chance to promote your own products or those of other brands. It is possible to connect your store (such as Shopify) to YouTube. Add your products to videos, shorts, live streams, etc., as well as tag other brands’ products.
Part 3. Wondershare Filmora: A Video Editing Software to Help Edit YouTube Videos
Wondershare Filmora is your creative ally when it comes to enhancing and editing YouTube videos. Video editing software like Filmora allows you to produce visually engaging and captivating content. Creating the conditions for effective YouTube monetization.
Filmora is cross-platform compatible. Making it accessible for all creators, so you can work on your videos wherever you are. With Filmora, you can enhance your video content no matter what platform you’re using.
Edit YouTube videos with Filmora’s features
Using Filmora’s features, you can give your videos a professional edge.
Free Download For Win 7 or later(64-bit)
Free Download For macOS 10.14 or later
Adjustment Layer
Take the Adjustment Layer feature, for instance, which allows you to add general effects to multiple video clips simultaneously, saving you time and effort. This feature can make your video content more engaging, ultimately attracting a larger audience.
Split Screen
You can create eye-catching split-screen videos with Filmora’s Split Screen Video Editor. Simply click a button to create split-screen videos using premade templates. Enhancing the visual appeal and dynamic of your videos for easy monetization on YouTube.
Motion Tracking
Motion Tracking is another exciting feature that Filmora brings to the table. It enables you to track the movement of objects within your videos and pin graphics and media files to follow the motion magically. This not only adds a touch of professionalism to your videos but also keeps your audience engaged.
Video Effects
Filmora offers a treasure trove of creative possibilities with its Video Effects, including transitions, filters, titles, and motion elements that you won’t find elsewhere. These exclusive features will help you infuse your videos with creativity and style.
Mask and Blend
And let’s not forget the Mask and Blend feature, which allows you to create unique video effects by masking and blending video clips. With only a few clicks, you can create distinct video effects that will set your content apart.
Wondershare Filmora empowers you to take your YouTube videos to the next level. making them more visually appealing, engaging, and ultimately better suited for monetization.
Try Filmora out Free! Click here!
Free Download For Win 7 or later(64-bit)
Free Download For macOS 10.14 or later
Conclusion
For those aspiring to turn their passion into a source of income, YouTube is a treasure trove of opportunities. This comprehensive 2024 guide has shed light on the path to monetizing your YouTube channel. With Google AdSense, paid sponsorships, and YouTube Premium, you’ve learned the ropes of the YouTube Partner Program.
With Wondershare Filmora‘s user-friendly tools, your videos will stand out on a professional level. As a result, your YouTube dreams will become a reality in 2024 with dedication and these insights.
Free Download Free Download Learn More
Part 1. How to Get Monetized on YouTube: Rules and Requirements
How to Monetize YouTube Channel
Begin making money from your YouTube videos through the YouTube Partner Program. You can create earnings from your YouTube channel by connecting it to your Google account. Monetize your website using Google AdSense.
Google AdSense generates substantial website revenue. If viewers interact with the ads in your videos, you earn money. Adding AdSense to your YouTube channel makes your videos monetizable.
Some videos cannot be monetized, however. Content must meet specific requirements to qualify for YouTube’s program. Criteria include content quality, community guidelines, and copyright compliance. Your YouTube channel can generate income once your videos meet these standards.
Monetizing YouTube Videos: What Are The Requirements?
You can monetize your YouTube videos by joining the YouTube Partner Program. Everyone can create a YouTube account, but YPP requires certain requirements. Every time you create content, you must consider these requirements.
Prior to applying for the program, your channel must first accomplish the following:
- One thousand subscribers
- A total of 4,000 watch hours in the past year
Building your audience and creating great content will help you meet these requirements. Joining the YPP, and making sure your YouTube channel complies with YouTube’s rules and policies, is the more complicated aspect.
Those advertising on YouTube want to avoid being linked to low-quality content. Therefore, YouTube Partner Program members are encouraged to create unique, valuable videos.
When you upload content to YouTube, you’ll need to keep these things in mind. Those who plan on monetizing their videos should thoroughly read these documents. You also need to set up a Google AdSense account, which tracks and pays for your YouTube ads.
Part 2. 10 Proven Ways to Monetize Your YouTube Channel
10 Methods to Monetize YouTube Videos
You can monetize your YouTube videos in 10 different ways, including:
- Google Adsense
- Paid Sponsorship
- YouTube Premium
- Memberships
- Merchandise
- Invest in crowd-funding
- Stickers, chats, and thanks
- YouTube Shorts
- YouTube Brandconnect
- YouTube Shopping
1. Google AdSense
YouTube channel monetization is the most popular method. By adding AdSense to your videos, you can generate revenue from the ads displayed. You must adhere to our advertiser-friendly guidelines when creating your videos. The monetization of all videos may not be possible, therefore. YouTube and AdSense work seamlessly together. With no technical knowledge required, your monetization strategy can be set up and managed easily.
2. Paid Sponsorships
Sponsorship involves paying a content creator to use, demonstrate, or test a brand’s product in a video. Both the creator and the brand benefit from sponsorships provided by brands.
The rewards of sponsorship can be immense, but sponsorships are hard to come by. You can pitch relevant brands to partner with your influential channel if your channel has a large following.
3. YouTube Premium
Joining the YouTube Partner Program qualifies you for YouTube Premium. In addition, it can increase your earnings. YouTube Premium members get paid when they watch your content as a creator. The number of Premium members has now surpassed 20 million. It is possible that this may occur quite frequently. YouTube Premium will automatically pay you if someone watches your content.
4. Memberships
Creating membership tiers on your channel allows you to offer different perks to different levels of subscription. Using memberships has the main benefit of providing a more steady income stream. Ad revenue is a more traditional method of monetization. This feature is enabled by channels with at least 1,000 subscribers, and the creator sets fees.
5. Merchandise
You can sell merchandise on YouTube videos with over 10,000 subscribers using a merch shelf. By selling branded merchandise to your YouTube fans, you can generate additional revenue.
It’s especially useful for YouTube creators without their own website who want to sell merchandise. Currently, there are over 45 platforms or retailers worldwide that support merch, so growing your brand is easy.
6. Invest in crowd-funding
It’s not just for startups anymore; you can use crowdfunding to fund content creation on YouTube as well. You can find people to support your work through third-party applications like Patreon in exchange for perks. You can now place sponsor buttons on your YouTube videos, which allows you to crowdfund. With this, you can offer rewards in exchange for monthly funding like with Patreon.
7. Stickers, chats, and thanks
During live streams and premieres, creators can engage their fans with Super Chat and Super Stickers. In the live chat, fans can purchase Super Chats to display their message prominently. A Super Sticker is an animated image displayed during a live chat session. The Super Thanks feature enables creators to earn income from their videos. Additional appreciation may be expressed by those who wish to do so
8. YouTube Shorts
Using the YouTube app, short, vertical videos can be uploaded straight to YouTube using a smartphone. In the same way as Instagram Stories are uploaded to the social media site. The length of YouTube shorts is limited to 60 seconds. In 2021 and 2022, a $100 million fund will be distributed for YouTube Shorts. With this initial stage, YouTube Shorts began to monetize in May 2021. A YouTube Short will only be compensated if it meets the fund’s criteria.
9. YouTube BrandConnect
Brands and YouTube creators can work together on content campaigns through YouTube BrandConnect. In terms of product recommendations, audiences trust creators. It is also possible to partner with YouTube channels through BrandConnect
10. YouTube Shopping
YouTube shopping gives you the chance to promote your own products or those of other brands. It is possible to connect your store (such as Shopify) to YouTube. Add your products to videos, shorts, live streams, etc., as well as tag other brands’ products.
Part 3. Wondershare Filmora: A Video Editing Software to Help Edit YouTube Videos
Wondershare Filmora is your creative ally when it comes to enhancing and editing YouTube videos. Video editing software like Filmora allows you to produce visually engaging and captivating content. Creating the conditions for effective YouTube monetization.
Filmora is cross-platform compatible. Making it accessible for all creators, so you can work on your videos wherever you are. With Filmora, you can enhance your video content no matter what platform you’re using.
Edit YouTube videos with Filmora’s features
Using Filmora’s features, you can give your videos a professional edge.
Free Download For Win 7 or later(64-bit)
Free Download For macOS 10.14 or later
Adjustment Layer
Take the Adjustment Layer feature, for instance, which allows you to add general effects to multiple video clips simultaneously, saving you time and effort. This feature can make your video content more engaging, ultimately attracting a larger audience.
Split Screen
You can create eye-catching split-screen videos with Filmora’s Split Screen Video Editor. Simply click a button to create split-screen videos using premade templates. Enhancing the visual appeal and dynamic of your videos for easy monetization on YouTube.
Motion Tracking
Motion Tracking is another exciting feature that Filmora brings to the table. It enables you to track the movement of objects within your videos and pin graphics and media files to follow the motion magically. This not only adds a touch of professionalism to your videos but also keeps your audience engaged.
Video Effects
Filmora offers a treasure trove of creative possibilities with its Video Effects, including transitions, filters, titles, and motion elements that you won’t find elsewhere. These exclusive features will help you infuse your videos with creativity and style.
Mask and Blend
And let’s not forget the Mask and Blend feature, which allows you to create unique video effects by masking and blending video clips. With only a few clicks, you can create distinct video effects that will set your content apart.
Wondershare Filmora empowers you to take your YouTube videos to the next level. making them more visually appealing, engaging, and ultimately better suited for monetization.
Try Filmora out Free! Click here!
Free Download For Win 7 or later(64-bit)
Free Download For macOS 10.14 or later
Conclusion
For those aspiring to turn their passion into a source of income, YouTube is a treasure trove of opportunities. This comprehensive 2024 guide has shed light on the path to monetizing your YouTube channel. With Google AdSense, paid sponsorships, and YouTube Premium, you’ve learned the ropes of the YouTube Partner Program.
With Wondershare Filmora‘s user-friendly tools, your videos will stand out on a professional level. As a result, your YouTube dreams will become a reality in 2024 with dedication and these insights.
Mouthwatering Movies: A Cook’s Guide
How to Make a Cooking Video in Steps - an Ultimate Guide

Richard Bennett
Mar 27, 2024• Proven solutions
Cooking and food-oriented videos are among the most outreaching and popular categories of content to publish online, notably, on YouTube, Facebook, or Instagram. So if you are a cooking aficionado, you have excellent potential to gain positive attention and a loyal audience. But to create engaging videos, you’d need a lot more than excellent culinary skills. This article aims to enlighten aspiring food and recipe vloggers about the essentials of video making straight out of the oven, to create enriched content that’s professional, neat, and viral-worthy.
- Part 1: What to Prepare Before Making a Recipe Video?
- Part 2: Make a Cooking Video with Filmora: a Step-by-Step Guide
- Part 3: Tips to Make Your Cooking Videos Stand Out
- Part 4: How to Promote Your Cooking Channel on YouTube?
What to Prepare Before Making a Recipe Video
While you would know best about the prep work needed for the recipes, the prep work for making a video starts with a plan. What goes into the plan?
Brainstorm this equation - Main Content + Duration + Light + Sound + Camera + Camera Angle, Shots & Transition.
The main content is how you picture the finished video. Ask yourself - Do you want an intro gig? Are you going to talk in the video or show only hands and the cooking with a piece of background music? How do you wish to present the ingredients? Would there be additional tips? At what platform are you going to publish your content? How long should be your clippings? Consider all these questions to chalk out a basic framework of your video
The camera is a pivotal element. Whether it is a smartphone or a hi-fidelity digital camera, it is worthwhile to familiarise the best positions and light orientations and the capacity of the device to produce the best quality picture.
How is your sound going to be like? If you are going to talk in the video, it is recommended that you use a microphone. Or else, you can also use background sound. But to mix sound with the video, you’d need an excellent sound editing tool.
Finally, comes the editing and finishing part. Eventually, you’ll need purposive video-editing software to help you work out the video transitions, sound, and visual effects.Choose a toolkit that is easy to learn and that you can get comfortable with so that the job of video editing doesn’t take the focus away from the main task of cooking.

Now, once you have all the essential ingredients to create your video, start practicing. Remember that it is the most natural thing for the first videos to appear amateurish or inept. And that is part of the plan. Don’t be disheartened and keep going.
Make a Cooking Video with Filmora: a Step-by-Step Guide
As one of the easiest-to-use video editing tools, the full-featured Filmora is the right choice considering it can fit most of your needs. Moreover, you’d be delighted to know that the software also has a series of features and functions and even tutorial videos dedicated to cooking videos.


Step 1: Filming the Video
Whether you are going to present a traditional cook-with-me style video or feature the contemporary “jump-cut” style focusing on speedy short videos, you need to prepare all the equipment and ingredients to suit the frame by frame shots. Consider spills, drops, overcooking, etc. as part of the process, so keep adequate substitutes to continue with your project unwaveringly. If you are using a phone, keep it fully charged up. And have a plan beforehand about what you should do when you get an urgent call while shooting. Also, consider doing a site investigation of the shooting spot for any fragile items, pointy corners, slippery areas, curious pets, etc. to avoid trips and falls in the middle of the filming, especially when working with a cameraman who’s following your movement. If you are using a tripod, and floor-standing lights, remember to secure the equipment with plenty of adhesive tapes, lest they bump into an expensive trip or fall.
Step 2: mport Your Video In Filmora
You need to sync the device that you used to film the video with the computer that has Filmora installed. It may be a phone or a camcorder. Once the devices are synced, you should launch the Filmora software and go the “Media” button at the top right toolbar. There you will find the “Import” button. You will get a pop-up message asking you to choose the type of device. Select the right one, and your video will be imported in the Filmora interface.
Step 3: Edit Video Pace: Time-Lapse, Jump Cut, Slow Motion
To create crisp, fast-paced videos, you don’t have to gobble up the content eyeing at the duration. Think smart when you have the resources of a tool like Filmora. Here are the three best features that help you create fast-paced yet well-defined recipes.
Time-Lapse: The time-lapse feature allows you to adjust the speed of the video from slow-motion to 10x faster. To use this, double click on a specific clip in your imported video and open the custom speed settings. Use the adjusting meter beside speed to make your clip as fast or slow as you want. You may use the same feature to introduce the slow-motion effects in certain areas of the video.
Now, when you are using either the fast-forward or slow-motion effects, it is best to have stable video footage with consistent lighting and a static background. There are also the options of Reverse Speed that can play the clip backward, as in flash-back. The Ripple edit feature allows you to cut short a long clip seamlessly.
Jump Cut: The Jump Cut is about snipping unwanted areas in the clip. It may sound like the Ripple edit mentioned above, but the ripple edit is more functional for cutting short a continuous video so that the viewer won’t realize the snip. For the Jump Cut, it doesn’t have to be a constant clip. You can get to the next frame or scene with an abracadabra move.
To use Jump Cut, place the cursor over the starting of the clip that you want to cut, and right-click on it and select “Split” (the “scissors” feature on the toolbar does the same thing). To make this look neat, preview the portion of the clip once again and delete the cuts between two clips with the same right-click.
Step 4: Understanding Transitions on Filmora
Transitions make your video more interactive and help you segregate the video from frame-to-frame with effects like dissolve, fade, flash, etc. there are numerous transition options available within the Filmora suit.
The best way to do this drag and drop the clips on the timeline is to trim parts of the clip to shorten it. Once you have all the clips in place, go to the “Transitions” options at the top toolbar to apply it on the end or start of each clip.
Step 5: Audio, Playback & Sound Edits
There are plenty of options that you can remove background noise, add voiceover, add music, and detach audio from video. Refer to the Audios section from your toolbar.
Step 6: Save to Drive/ Emport/ Publish
Once you are satisfied with your content, then go to Export. Choose the format of the video, MOV, MP4, MPG, etc. and whether you wish to publish directly or save to drive.
Tips to Make Your Cooking Videos Stand Out
- Lighting is your best friend. Invest in some quality spotlights or use the best of daylight.
- Mind your video duration. Short and Simple videos get the most views, but your content should not look incomplete. It is not a fact that long and elaborate videos do not get a place on the table; it is all about the relevance of your content. So don’t stop till you get enough.
- If you appear in the video, keep yourself always look good.
- Keep your video titles relevant and prominent, so that people looking for it can readily find it.
- Have a scrumptious custom thumbnail.
How to Promote Your Cooking Channel on YouTube
- Create an inventory before publishing videos. YouTube vlogging is valued for consistency. If you have a list of 10, 15, 20 videos, then you can have enough time in hand to film your next videos.
- Have a consistent style to create brand recognition. Do you think branding is not for Vlogs? Well, I suppose you might be wrong. Branding is for anyone who uses it.
- Share the link of your YouTube videos on other platforms like Twitter and Facebook.
- Encourage your viewers to comment on the video.
- Explore the different YouTube SEO strategies and use the accurate keywords in your video descriptions with hashtags.
With prior planning and practicing, you are bent on developing more confident moves and camera angles. Once you have that, follow this step by step guide to gain speed and prowess and also enjoy the whole adventure.
Richard Bennett
Richard Bennett is a writer and a lover of all things video.
Follow @Richard Bennett
Richard Bennett
Mar 27, 2024• Proven solutions
Cooking and food-oriented videos are among the most outreaching and popular categories of content to publish online, notably, on YouTube, Facebook, or Instagram. So if you are a cooking aficionado, you have excellent potential to gain positive attention and a loyal audience. But to create engaging videos, you’d need a lot more than excellent culinary skills. This article aims to enlighten aspiring food and recipe vloggers about the essentials of video making straight out of the oven, to create enriched content that’s professional, neat, and viral-worthy.
- Part 1: What to Prepare Before Making a Recipe Video?
- Part 2: Make a Cooking Video with Filmora: a Step-by-Step Guide
- Part 3: Tips to Make Your Cooking Videos Stand Out
- Part 4: How to Promote Your Cooking Channel on YouTube?
What to Prepare Before Making a Recipe Video
While you would know best about the prep work needed for the recipes, the prep work for making a video starts with a plan. What goes into the plan?
Brainstorm this equation - Main Content + Duration + Light + Sound + Camera + Camera Angle, Shots & Transition.
The main content is how you picture the finished video. Ask yourself - Do you want an intro gig? Are you going to talk in the video or show only hands and the cooking with a piece of background music? How do you wish to present the ingredients? Would there be additional tips? At what platform are you going to publish your content? How long should be your clippings? Consider all these questions to chalk out a basic framework of your video
The camera is a pivotal element. Whether it is a smartphone or a hi-fidelity digital camera, it is worthwhile to familiarise the best positions and light orientations and the capacity of the device to produce the best quality picture.
How is your sound going to be like? If you are going to talk in the video, it is recommended that you use a microphone. Or else, you can also use background sound. But to mix sound with the video, you’d need an excellent sound editing tool.
Finally, comes the editing and finishing part. Eventually, you’ll need purposive video-editing software to help you work out the video transitions, sound, and visual effects.Choose a toolkit that is easy to learn and that you can get comfortable with so that the job of video editing doesn’t take the focus away from the main task of cooking.
Now, once you have all the essential ingredients to create your video, start practicing. Remember that it is the most natural thing for the first videos to appear amateurish or inept. And that is part of the plan. Don’t be disheartened and keep going.
Make a Cooking Video with Filmora: a Step-by-Step Guide
As one of the easiest-to-use video editing tools, the full-featured Filmora is the right choice considering it can fit most of your needs. Moreover, you’d be delighted to know that the software also has a series of features and functions and even tutorial videos dedicated to cooking videos.
Step 1: Filming the Video
Whether you are going to present a traditional cook-with-me style video or feature the contemporary “jump-cut” style focusing on speedy short videos, you need to prepare all the equipment and ingredients to suit the frame by frame shots. Consider spills, drops, overcooking, etc. as part of the process, so keep adequate substitutes to continue with your project unwaveringly. If you are using a phone, keep it fully charged up. And have a plan beforehand about what you should do when you get an urgent call while shooting. Also, consider doing a site investigation of the shooting spot for any fragile items, pointy corners, slippery areas, curious pets, etc. to avoid trips and falls in the middle of the filming, especially when working with a cameraman who’s following your movement. If you are using a tripod, and floor-standing lights, remember to secure the equipment with plenty of adhesive tapes, lest they bump into an expensive trip or fall.
Step 2: mport Your Video In Filmora
You need to sync the device that you used to film the video with the computer that has Filmora installed. It may be a phone or a camcorder. Once the devices are synced, you should launch the Filmora software and go the “Media” button at the top right toolbar. There you will find the “Import” button. You will get a pop-up message asking you to choose the type of device. Select the right one, and your video will be imported in the Filmora interface.
Step 3: Edit Video Pace: Time-Lapse, Jump Cut, Slow Motion
To create crisp, fast-paced videos, you don’t have to gobble up the content eyeing at the duration. Think smart when you have the resources of a tool like Filmora. Here are the three best features that help you create fast-paced yet well-defined recipes.
Time-Lapse: The time-lapse feature allows you to adjust the speed of the video from slow-motion to 10x faster. To use this, double click on a specific clip in your imported video and open the custom speed settings. Use the adjusting meter beside speed to make your clip as fast or slow as you want. You may use the same feature to introduce the slow-motion effects in certain areas of the video.
Now, when you are using either the fast-forward or slow-motion effects, it is best to have stable video footage with consistent lighting and a static background. There are also the options of Reverse Speed that can play the clip backward, as in flash-back. The Ripple edit feature allows you to cut short a long clip seamlessly.
Jump Cut: The Jump Cut is about snipping unwanted areas in the clip. It may sound like the Ripple edit mentioned above, but the ripple edit is more functional for cutting short a continuous video so that the viewer won’t realize the snip. For the Jump Cut, it doesn’t have to be a constant clip. You can get to the next frame or scene with an abracadabra move.
To use Jump Cut, place the cursor over the starting of the clip that you want to cut, and right-click on it and select “Split” (the “scissors” feature on the toolbar does the same thing). To make this look neat, preview the portion of the clip once again and delete the cuts between two clips with the same right-click.
Step 4: Understanding Transitions on Filmora
Transitions make your video more interactive and help you segregate the video from frame-to-frame with effects like dissolve, fade, flash, etc. there are numerous transition options available within the Filmora suit.
The best way to do this drag and drop the clips on the timeline is to trim parts of the clip to shorten it. Once you have all the clips in place, go to the “Transitions” options at the top toolbar to apply it on the end or start of each clip.
Step 5: Audio, Playback & Sound Edits
There are plenty of options that you can remove background noise, add voiceover, add music, and detach audio from video. Refer to the Audios section from your toolbar.
Step 6: Save to Drive/ Emport/ Publish
Once you are satisfied with your content, then go to Export. Choose the format of the video, MOV, MP4, MPG, etc. and whether you wish to publish directly or save to drive.
Tips to Make Your Cooking Videos Stand Out
- Lighting is your best friend. Invest in some quality spotlights or use the best of daylight.
- Mind your video duration. Short and Simple videos get the most views, but your content should not look incomplete. It is not a fact that long and elaborate videos do not get a place on the table; it is all about the relevance of your content. So don’t stop till you get enough.
- If you appear in the video, keep yourself always look good.
- Keep your video titles relevant and prominent, so that people looking for it can readily find it.
- Have a scrumptious custom thumbnail.
How to Promote Your Cooking Channel on YouTube
- Create an inventory before publishing videos. YouTube vlogging is valued for consistency. If you have a list of 10, 15, 20 videos, then you can have enough time in hand to film your next videos.
- Have a consistent style to create brand recognition. Do you think branding is not for Vlogs? Well, I suppose you might be wrong. Branding is for anyone who uses it.
- Share the link of your YouTube videos on other platforms like Twitter and Facebook.
- Encourage your viewers to comment on the video.
- Explore the different YouTube SEO strategies and use the accurate keywords in your video descriptions with hashtags.
With prior planning and practicing, you are bent on developing more confident moves and camera angles. Once you have that, follow this step by step guide to gain speed and prowess and also enjoy the whole adventure.
Richard Bennett
Richard Bennett is a writer and a lover of all things video.
Follow @Richard Bennett
Also read:
- Channel Exploration Guide The Best Historical YouTube Selections for Students for 2024
- [Updated] Boost Video Appeal with These 20 Best Thumbnail Fonts
- [Updated] Cooking Chronicles Video Production Insights
- 2024 Approved Dive Into the Deep End - Your Guide to the Best Free Movies on YouTube
- In 2024, Digital Riches Unleashed Measuring Your Success on YouTube's Platform
- The Executive Mind How Neuroscience Can Inform Better Management Strategies
- The Ultimate List of Engaging History Content on YouTube
- In 2024, Breaking the Norm Eye-Catching Talents Amongst Female YouTube Stars
- In 2024, Buy Subscribers Wisely, Watch Your Numbers Soar
- Say No to Latency Turn On AV1 in YouTube Settings
- In 2024, Designing Memorable Try-On Videos for Online Audiences
- Daily Dharma The Best Yoga Channels for Self-Growth for 2024
- In 2024, Clearing Your Browser's Watched Videos
- A Vlogger's Dream Exploring the Best 12 Video Capture Devices
- In 2024, Essential Rules for a Positive YouTube Experience
- [Updated] 2024'S Lightning-Fast Video Growth Reaching 100 Million Quickly
- Efficiently Broadcasting Your Videos as Shorts via Computers & Mobile
- [New] Discover the Secrets to YouTube's Rankings with Keywords
- [Updated] Effortless Music Playlist Creation for YouTube, Anywhere (Web/Mobile)
- Navigating Legal Pathways for Gaining a Million YouTube Views
- Deciding the Optimal Social Media Platform TikTok Vs. YouTube Shorts
- 10 Top Must-Have Gear Items for YouTubers for 2024
- Sync Your Device Pace YouTube Audio Control Guide
- 2024 Approved Edu-Stream 100 Cutting-Edge Learning YT
- [New] Elevate Your Video Game with These 5 YouTube Thumbnail Builders
- [Updated] Does Immediate Subscribing Affect Content Recommendations?
- Step Up Your Content Quality with These 8 Mirrorless Cams
- Unlocking Success The Quintessential YouTube Video Strategies
- In 2024, Boost Engagement Innovative Templates for Your Video Closings
- [Updated] Beating the Blues of Overly Green A Mac Video Editor's Handbook
- In-Depth Analysis Top 9 Freeware Logo Designers Unveiled
- Enhancing Exposure Do Buy Views Accelerate Channel Growth?
- [New] Earnings Insights for Video Content Surpassing 1 Million Views
- 2024 Approved Craft a Powerhouse Channel with Studio Expertise
- [New] 2024'S Streaming Surge Gamers and Money Flow
- Virtual Voyage YouTube's Premier 10-VR Video Experience
- Premium 7 Cameras Boosting Vlogging Creativity & Viewership
- In 2024, Collaborate for Success Video Strategies
- Cutting-Edge Guide to YouTube Audio Editing for 2024
- Optimal Video Balance Top Stabilizer Brands
- YouTube's Go-To Lighting Kit - #17 Picks Reviewed
- Tips to Perfectly Integrate Jump Cuts Into Videos
- Rejuvenate Your Visuals Neon Outlines Included
- Sync Your Views IPhone's Looping Feature
- Ensemble Dynamics Crafting Collaborative Content for Musicians for 2024
- New Cut Editing Time in Half 40 Final Cut Pro X Keyboard Shortcuts for 2024
- [New] Top 12 Self-Contained Screen Recording Tools
- Top 10 Fingerprint Lock Apps to Lock Your Samsung Galaxy M34 5G Phone
- New In 2024, FCP in the Spotlight 10 Renowned Movies Made with Final Cut Pro
- 2024 Approved The Availability of the Slow-Motion Feature on the iPhone Is Often Debated. This Article Will Guide You on How to Slow Down a Video on iPhone
- Pokémon Go Cooldown Chart On Honor Magic 5 Pro | Dr.fone
- 4 Methods to Turn off Life 360 On Xiaomi Redmi 13C 5G without Anyone Knowing | Dr.fone
- In 2024, Easy Steps on How To Create a New Apple ID Account On iPhone XS Max
- Identify missing your hardware drivers with Windows Device Manager on Windows 11 & 10 & 7
- [New] 2024 Approved Exclusive Mac HD Scribing + Auditory Logging Solution
- New Add Text Animation to A Video Online
- [Updated] 2024 Approved Reliving Real-Time Recollections
- In 2024, How to Fake Snapchat Location without Jailbreak On Vivo Y56 5G | Dr.fone
- [Updated] In 2024, Learn to Record Exceptional Videos in Minutes on TikTok
- Explore the Potential of Slow-Motion Video for Different Industries. Read This Guide and Choose the Best Slow-Motion Camera App to Create Stunning Videos for 2024
- [New] In 2024, Webcam Wizardry for Creative Minds
- 2024 Approved Swipe Past Watermarks IPhones and TikTok Videos Downloads
- In 2024, Highest-Rated Video Call Software (Not Zoom) for PCs & Phones
- In 2024, 7 Top Explainer Video Makers You May Like
- Updated Windows-Compatible Options Sony Vegas Alternatives Revealed
- How to Reset Oppo A1x 5G without Losing Data | Dr.fone
- Complete Tutorial for Tecno Spark Go (2024) Hard Reset | Dr.fone
- [Updated] 2024 Approved The Ultimate Guide to Adaptive IGTV Video Dimensions
- In 2024, How Can I Catch the Regional Pokémon without Traveling On Oppo A1x 5G | Dr.fone
- [Updated] Uninterrupted Song Livestreaming on HuyaTV
- How to restore wiped videos on Honor Magic Vs 2
- Creating Skype Chats for PC & Mac Users for 2024
- The Ultimate Guide to Audio Detachment in Videos - Discovering the Most Used Software
- How Do You Get Sun Stone Evolutions in Pokémon For Nokia C02? | Dr.fone
- How to Get and Use Pokemon Go Promo Codes On Samsung Galaxy A14 5G | Dr.fone
- Explore the Future of Broadcasting with These Non-OBS Applications
- In 2024, How Can You Transfer Files From Samsung Galaxy S23+ To iPhone 15/14/13? | Dr.fone
- Top 10 AI Subtitle Translators for Content Creators
- Astronomy Enthusiasts' Top Website Picklist
- Title: Elevating Your Earning Game with YouTube Monetization Strategies
- Author: Brian
- Created at : 2024-05-25 11:45:52
- Updated at : 2024-05-26 11:45:52
- Link: https://youtube-video-recordings.techidaily.com/elevating-your-earning-game-with-youtube-monetization-strategies/
- License: This work is licensed under CC BY-NC-SA 4.0.
