
"Elevating Your Content's Presence Perfecting YouTube Thumbnails Size for 2024"
Elevating Your Content’s Presence: Perfecting YouTube Thumbnails Size
Best YouTube Thumbnail Size You Should Know[The Ultimate Guide]

Richard Bennett
Mar 27, 2024• Proven solutions
Around 300 hours of video is uploaded to Youtube in every single minute. Then content creators need to be more innovative and creative than others in the market. A thumbnail is worth a thousand words that show its real meaning in the case where every month YouTube records a whopping 2 billion active users. To create an impressive and tempting thumbnail, you should set a perfect youtube thumbnail size first.
So you may be wondering what the best youtube thumbnail size is, and how to create a attractive thumbnail for your YouTube videos? Don’t worry I’ll explain everything here. You will learn:
- Part 1: The Ultimate Guide of YouTube Thumbnail Size
- Part 2: Upload and Change a Custom YouTube Thumbnail to Your Video
- Part 3: Q&A– About Creating YouTube Thumbnails
Part 1: The Ultimate Guide of Youtube Thumbnail Size
Every content creator needs to select the right youtube thumbnail size for any given video.
1. What’s the Best YouTube Thumbnail Size(Dimensions)?
According to the YouTube guidelines , the best-suited youtube thumbnail size is 1280x720 pixels with a minimum pixel width of 640 pixels. Also, the custom thumbnail image must be as large as possible as it will be utilized as a preview image in the embedded player.
2. What Are the Compatible Formats for YouTube Thumbnail Image?
The recommended thumbnail image formats are .JPG, .PNG, .GIF, .BMP
3. What’s the Maximum YouTube Thumbnail Size?
The maximum YouTube thumbnail size must be below 2MB. Keeping the limit in mind design your thumbnail image as high-resolution as possible. This will ensure your custom thumbnail doesn’t get rejected by YouTube.
4. What’s the Recommended Aspect Ratio of YouTube Thumbnail?
Usually, the 16:9 ratio is deemed an ideal choice for any YouTube video aiming high view volume. As it is most widely used in YouTube players and previews.
Part 2: Upload and Change a Custom YouTube Thumbnail
With a verified account, you can upload custom thumbnail on new videos as well as change the thumbnail of uploaded videos.
1. For New Video
YouTube makes it very simple and easy for any content creator to publish custom YouTube thumbnail on their video while uploading the video onto the platform. Here’s the method to do so:
- Upload your desired video to YouTube in the Upload section.

- When your upload to the YouTube is completed a section will appear at the down portion of the browser screen showing Video Thumbnails. Here YouTube automatically creates some thumbnail images from your uploaded video and shows them here. These are the screenshots from your video, and you can select any one of them to be your thumbnail.

- You will be able to see a button right next to the image – Custom thumbnail. Click on the button and you can upload a set of images of your choice as the thumbnail of your video.
- Once done you can see the custom image just uploaded as the thumbnail of your video.

- If you want to update the image or change it with another one you can just click on the same image in the video thumbnail section and swap it with any other image.

2. For Already Uploaded Video
To change the thumbnail on an already uploaded video you need to follow these steps:
- Sign in to YouTube Studio associated with your YouTube channel.
- From the menu go to Videos and then select the video you want to upload a custom thumbnail to via its title or thumbnail

- Now in the thumbnail section if you already haven’t uploaded a custom thumbnail, click Custom thumbnail.
- Select your intended thumbnail file and click Save.

Part 3: Q&A– About YouTube Thumbnail Images
You may want to know:
- Question 1: How do I make my youtube thumbnail less than 2mb?
- Question 2: How can I create an attractive youtube thumbnail?
1. How do I make my youtube thumbnail less than 2mb?
YouTube will not allow you to upload a custom thumbnail image if it is bigger than the 2MB limit. So, you need to make sure the file size is below the limit to be able to successfully upload a custom thumbnail. To reduce the image size you can follow the steps below:
- 1. Open Microsoft Paint and open the thumbnail image that is above 2MB size
- 2. Now go to the File menu and click Save as then select JPEG picture
- 3. Select the location you want the file to be saved to
- 4. The thumbnail picture will be reduced to Kilobytes only while maintaining the image quality
2. How can I create an attractive youtube thumbnail?
Utilizing online platforms and software tools to make your thumbnail image informative and attractive can potentially increase your views and traffic. You can use any advanced tools like Wondershare Filmora, Wondershare PixStudio, or Canva to create an aspiring and luring image that will get more views on YouTube just because of the thumbnail image. Here we will show you how to do it with Wondershare Filmora, Wondershare PixStudio and Canva:
1. Try Wondershare Filmora>>
Wondershare Filmora is an outstanding tool if you want to make a perfect thumbnail image. Consider and optimize your thumbnail for mobile devices to offer the best experience to your users on every possible device. Make it stand out as the thumbnail can be the very first thing that might attract a viewer.
Let’s see how you can create your thumbnail using Wondershare Filmora:


2. Try Wondershare PixStudio>>
Wondershare PixStudio provides you massive pre-designed templates which help you to create attractive YouTube Thumbnail. Let’s see the video below and see how you can design your YouTube Thumbnail easily.
3. Try Canva>>
With Canva you can make a distinct and stand-out YouTube thumbnail image. Canva hosts a number of readymade designs that you can use to design and customize it for your use.
Note:
To download the image without the watermark you’ll need to sign-up for a premium account on the Canva.
To sum up
YouTube thumbnail plays an important part for the audience’s first impression on your video. And it is of essential essence as it can attract more viewers to your content. So you should get the right youtube thumbnail size before you start customing your thumbnail. We’ve gone through all the detailed requirements of youtube thumbnail size and how to make the best thumbnail by using the best software solutions. Please leave your comments below if any suggestions. We’d love to hear them!
Richard Bennett
Richard Bennett is a writer and a lover of all things video.
Follow @Richard Bennett
Richard Bennett
Mar 27, 2024• Proven solutions
Around 300 hours of video is uploaded to Youtube in every single minute. Then content creators need to be more innovative and creative than others in the market. A thumbnail is worth a thousand words that show its real meaning in the case where every month YouTube records a whopping 2 billion active users. To create an impressive and tempting thumbnail, you should set a perfect youtube thumbnail size first.
So you may be wondering what the best youtube thumbnail size is, and how to create a attractive thumbnail for your YouTube videos? Don’t worry I’ll explain everything here. You will learn:
- Part 1: The Ultimate Guide of YouTube Thumbnail Size
- Part 2: Upload and Change a Custom YouTube Thumbnail to Your Video
- Part 3: Q&A– About Creating YouTube Thumbnails
Part 1: The Ultimate Guide of Youtube Thumbnail Size
Every content creator needs to select the right youtube thumbnail size for any given video.
1. What’s the Best YouTube Thumbnail Size(Dimensions)?
According to the YouTube guidelines , the best-suited youtube thumbnail size is 1280x720 pixels with a minimum pixel width of 640 pixels. Also, the custom thumbnail image must be as large as possible as it will be utilized as a preview image in the embedded player.
2. What Are the Compatible Formats for YouTube Thumbnail Image?
The recommended thumbnail image formats are .JPG, .PNG, .GIF, .BMP
3. What’s the Maximum YouTube Thumbnail Size?
The maximum YouTube thumbnail size must be below 2MB. Keeping the limit in mind design your thumbnail image as high-resolution as possible. This will ensure your custom thumbnail doesn’t get rejected by YouTube.
4. What’s the Recommended Aspect Ratio of YouTube Thumbnail?
Usually, the 16:9 ratio is deemed an ideal choice for any YouTube video aiming high view volume. As it is most widely used in YouTube players and previews.
Part 2: Upload and Change a Custom YouTube Thumbnail
With a verified account, you can upload custom thumbnail on new videos as well as change the thumbnail of uploaded videos.
1. For New Video
YouTube makes it very simple and easy for any content creator to publish custom YouTube thumbnail on their video while uploading the video onto the platform. Here’s the method to do so:
- Upload your desired video to YouTube in the Upload section.
- When your upload to the YouTube is completed a section will appear at the down portion of the browser screen showing Video Thumbnails. Here YouTube automatically creates some thumbnail images from your uploaded video and shows them here. These are the screenshots from your video, and you can select any one of them to be your thumbnail.
- You will be able to see a button right next to the image – Custom thumbnail. Click on the button and you can upload a set of images of your choice as the thumbnail of your video.
- Once done you can see the custom image just uploaded as the thumbnail of your video.
- If you want to update the image or change it with another one you can just click on the same image in the video thumbnail section and swap it with any other image.
2. For Already Uploaded Video
To change the thumbnail on an already uploaded video you need to follow these steps:
- Sign in to YouTube Studio associated with your YouTube channel.
- From the menu go to Videos and then select the video you want to upload a custom thumbnail to via its title or thumbnail
- Now in the thumbnail section if you already haven’t uploaded a custom thumbnail, click Custom thumbnail.
- Select your intended thumbnail file and click Save.
Part 3: Q&A– About YouTube Thumbnail Images
You may want to know:
- Question 1: How do I make my youtube thumbnail less than 2mb?
- Question 2: How can I create an attractive youtube thumbnail?
1. How do I make my youtube thumbnail less than 2mb?
YouTube will not allow you to upload a custom thumbnail image if it is bigger than the 2MB limit. So, you need to make sure the file size is below the limit to be able to successfully upload a custom thumbnail. To reduce the image size you can follow the steps below:
- 1. Open Microsoft Paint and open the thumbnail image that is above 2MB size
- 2. Now go to the File menu and click Save as then select JPEG picture
- 3. Select the location you want the file to be saved to
- 4. The thumbnail picture will be reduced to Kilobytes only while maintaining the image quality
2. How can I create an attractive youtube thumbnail?
Utilizing online platforms and software tools to make your thumbnail image informative and attractive can potentially increase your views and traffic. You can use any advanced tools like Wondershare Filmora, Wondershare PixStudio, or Canva to create an aspiring and luring image that will get more views on YouTube just because of the thumbnail image. Here we will show you how to do it with Wondershare Filmora, Wondershare PixStudio and Canva:
1. Try Wondershare Filmora>>
Wondershare Filmora is an outstanding tool if you want to make a perfect thumbnail image. Consider and optimize your thumbnail for mobile devices to offer the best experience to your users on every possible device. Make it stand out as the thumbnail can be the very first thing that might attract a viewer.
Let’s see how you can create your thumbnail using Wondershare Filmora:
2. Try Wondershare PixStudio>>
Wondershare PixStudio provides you massive pre-designed templates which help you to create attractive YouTube Thumbnail. Let’s see the video below and see how you can design your YouTube Thumbnail easily.
3. Try Canva>>
With Canva you can make a distinct and stand-out YouTube thumbnail image. Canva hosts a number of readymade designs that you can use to design and customize it for your use.
Note:
To download the image without the watermark you’ll need to sign-up for a premium account on the Canva.
To sum up
YouTube thumbnail plays an important part for the audience’s first impression on your video. And it is of essential essence as it can attract more viewers to your content. So you should get the right youtube thumbnail size before you start customing your thumbnail. We’ve gone through all the detailed requirements of youtube thumbnail size and how to make the best thumbnail by using the best software solutions. Please leave your comments below if any suggestions. We’d love to hear them!
Richard Bennett
Richard Bennett is a writer and a lover of all things video.
Follow @Richard Bennett
Pioneering Online Video: Secrets for YouTube’s Spherical Livestreaming Techniques
How to live streaming 360 video to youtube
Richard Bennett
Mar 27, 2024• Proven solutions
- Part1.Stream 360 to Youtube via Ricoh Theta S and OBS on PC
- Part2.Live Stream from Allie 360 Camera to YouTube on Mobile
1. Stream 360 to Youtube via Ricoh Theta S and OBS on PC
Step 1: First of all you need to get ready with your Ricoh Theta S 360 camera unit.
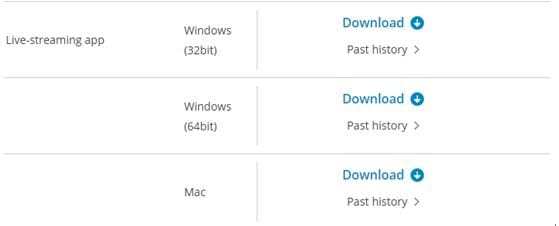
Step 2: Now visit the official website of Theta 360 in order to download your dedicated live streaming application.
Step 3: Get your application and install it on your Mac or PC as per need.
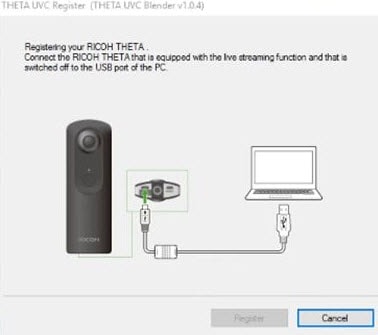
Step 4: It is time to plug in to your Ricoh Theta S 360 camera using your PC.
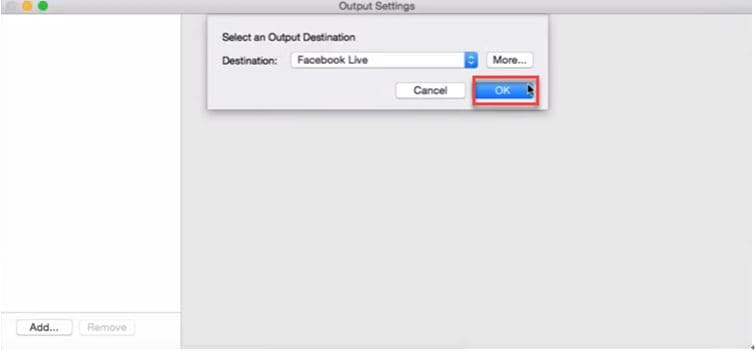
Step 5: Now select your device ‘Ricoh Theta S’ and then hit Okay.
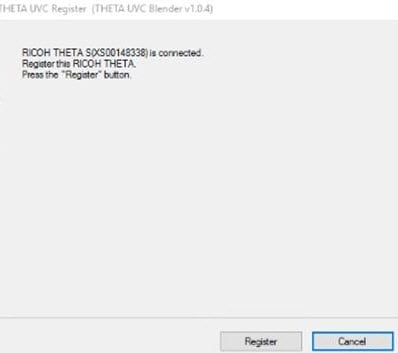
Step 6: You will find option to register to application with your respective device. Select and hit register.
Step 7: As soon as your registration process is complete then un-plug your USB cable.
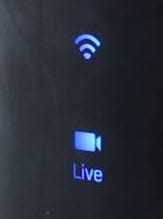
Step 8: It is time to turn the Ricoh Theta device to Live Mode; you simple need to press the top power and lower video button simultaneously to directly switch to the live mode.
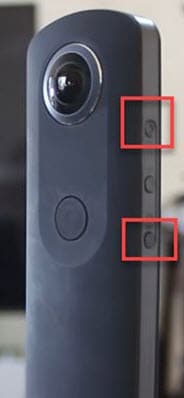
Step 9: Once your device enters into Live Stream mode then a Led will start blinking on your device that represents your device is live at this moment.
Step 10: Now you need to plug in the USB cable again with your computer.
Step 11: Visit the official site of OBS and download your software; install it on your system.
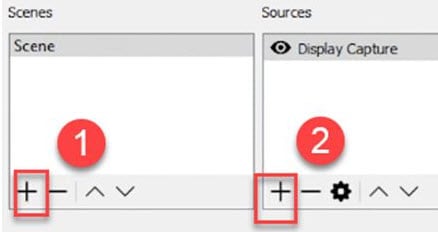
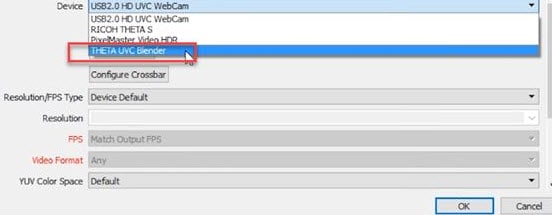
Step 12: Go to create scene option and then switch to create sources.
Step 13: Select video capture device as your source from drop down menu.
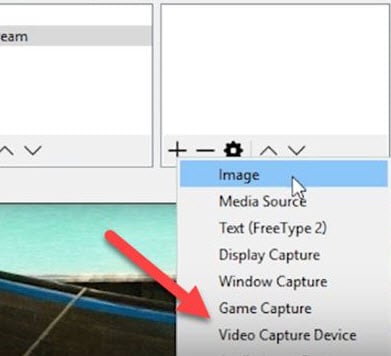
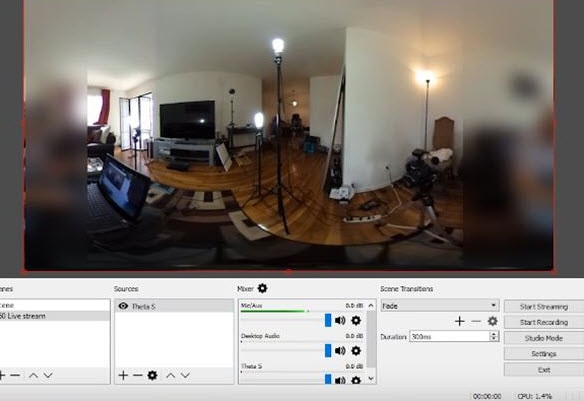
Step 14: Now from available list select Theta UVC as your active video capture source.
Step 15: You need to adjust screen as per your requirements.
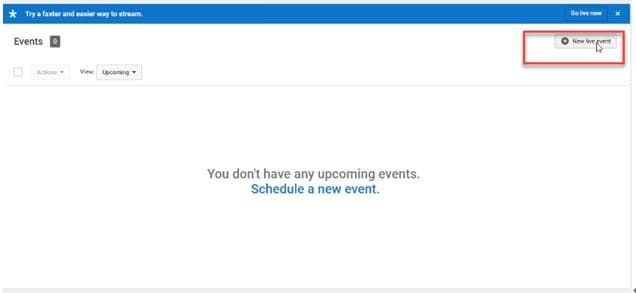
Step 16: Now move to YouTube and then hit New Live Events option.
Step 17: Complete the basic information.
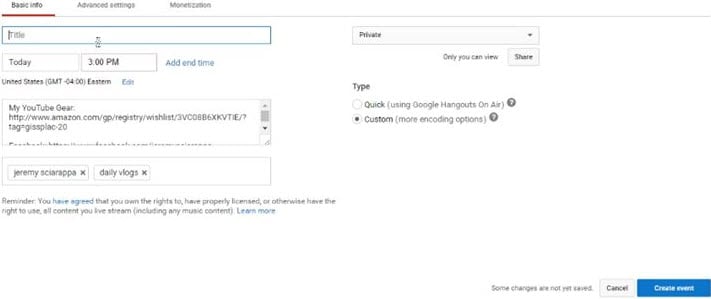
Step 18: You need to move to advanced settings now; select 360 live stream option and then create event.
Step 19: Now complete the ingesting settings and finally select create new stream option.

Step 20: As soon as your event is created then you will be able to find your stream name on screen, copy it and simply paste it on OBS window.
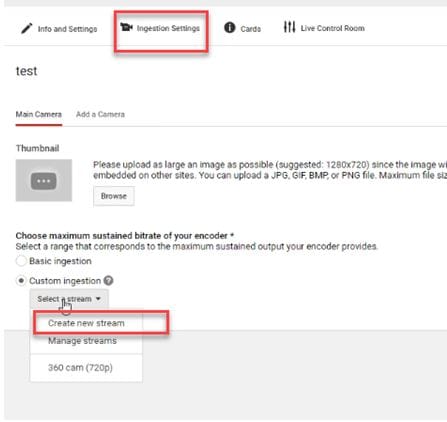
Step 21: It is time to return to OBS settings and then you need to paste that copied name on stream key option.
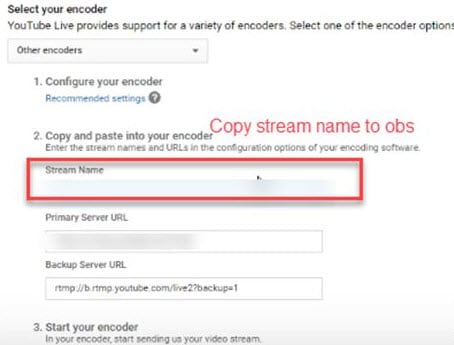
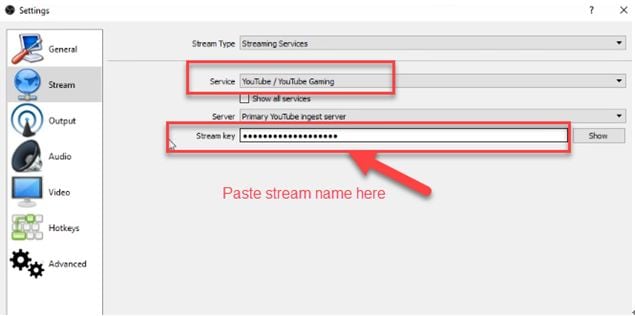
Step 22: Once all above settings are complete then click start stream option from your OBS window and you will soon be able to find your 360 live on YouTube.
2.Live Stream from Allie 360 Camera to YouTube on Mobile
Step 1: Get ready with your Allie 360 camera unit.
Step 2: Visit YouTube and then hit the option to create your live event.
Step 3: It is time to download your Allie Application and then get it installed on your device.
- Prefer to use this link if you are working on iOS: https://itunes.apple.com/app/allie-home/id1063986074
- Android users need to visit: https://play.google.com/store/apps/details?id=com.icrealtime.allie
Step 4: As soon as you have downloaded your app then simply turn on the Bluetooth, Wi-Fi and air plane mode on your device.
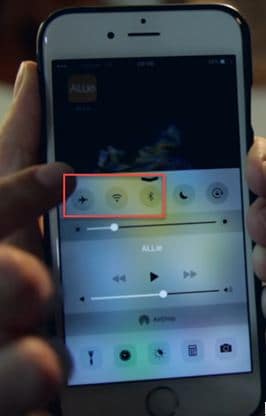
Step 5: Simply open your Allie application and then connect your camera.

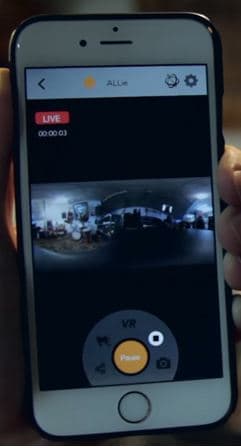
Step 6: Now users need to hit stream icon on screen.
![]()
Step 7: You will be asked to fill the necessary information about your video. It is also possible to make adjustments regarding video quality. Once you are done with all required settings then hit Submit option.

Step 8: Soon your video will become live; note that you can also share your live video via SNS platform with other viewers.
Richard Bennett
Richard Bennett is a writer and a lover of all things video.
Follow @Richard Bennett
Richard Bennett
Mar 27, 2024• Proven solutions
- Part1.Stream 360 to Youtube via Ricoh Theta S and OBS on PC
- Part2.Live Stream from Allie 360 Camera to YouTube on Mobile
1. Stream 360 to Youtube via Ricoh Theta S and OBS on PC
Step 1: First of all you need to get ready with your Ricoh Theta S 360 camera unit.
Step 2: Now visit the official website of Theta 360 in order to download your dedicated live streaming application.
Step 3: Get your application and install it on your Mac or PC as per need.
Step 4: It is time to plug in to your Ricoh Theta S 360 camera using your PC.
Step 5: Now select your device ‘Ricoh Theta S’ and then hit Okay.
Step 6: You will find option to register to application with your respective device. Select and hit register.
Step 7: As soon as your registration process is complete then un-plug your USB cable.
Step 8: It is time to turn the Ricoh Theta device to Live Mode; you simple need to press the top power and lower video button simultaneously to directly switch to the live mode.
Step 9: Once your device enters into Live Stream mode then a Led will start blinking on your device that represents your device is live at this moment.
Step 10: Now you need to plug in the USB cable again with your computer.
Step 11: Visit the official site of OBS and download your software; install it on your system.
Step 12: Go to create scene option and then switch to create sources.
Step 13: Select video capture device as your source from drop down menu.
Step 14: Now from available list select Theta UVC as your active video capture source.
Step 15: You need to adjust screen as per your requirements.
Step 16: Now move to YouTube and then hit New Live Events option.
Step 17: Complete the basic information.
Step 18: You need to move to advanced settings now; select 360 live stream option and then create event.
Step 19: Now complete the ingesting settings and finally select create new stream option.
Step 20: As soon as your event is created then you will be able to find your stream name on screen, copy it and simply paste it on OBS window.
Step 21: It is time to return to OBS settings and then you need to paste that copied name on stream key option.
Step 22: Once all above settings are complete then click start stream option from your OBS window and you will soon be able to find your 360 live on YouTube.
2.Live Stream from Allie 360 Camera to YouTube on Mobile
Step 1: Get ready with your Allie 360 camera unit.
Step 2: Visit YouTube and then hit the option to create your live event.
Step 3: It is time to download your Allie Application and then get it installed on your device.
- Prefer to use this link if you are working on iOS: https://itunes.apple.com/app/allie-home/id1063986074
- Android users need to visit: https://play.google.com/store/apps/details?id=com.icrealtime.allie
Step 4: As soon as you have downloaded your app then simply turn on the Bluetooth, Wi-Fi and air plane mode on your device.
Step 5: Simply open your Allie application and then connect your camera.
Step 6: Now users need to hit stream icon on screen.
![]()
Step 7: You will be asked to fill the necessary information about your video. It is also possible to make adjustments regarding video quality. Once you are done with all required settings then hit Submit option.
Step 8: Soon your video will become live; note that you can also share your live video via SNS platform with other viewers.
Richard Bennett
Richard Bennett is a writer and a lover of all things video.
Follow @Richard Bennett
Also read:
- [New] In 2024, Top 10 TikTok Campaigns and How to Make a Successful Campaign
- 1. Effortless Conversion: Transforming FLV Files Into High-Quality MP3s at Zero Cost
- 2024 Approved Get Creative Streamline Your Movies with One Clicks on Windows 10
- Best New Releases: Top 12 High-Definition Hindi Films From 2016-17 Available for Free
- Download the Best Video Grabber Apps Compatible with Windows 11, Available at No Cost!
- Effortless Video Saving Techniques: Mastering the Art of Downloading Tweets
- In 2024, Surge Your Viewer Numbers A Comprehensive Guide to YouTube Growth
- Inside Look: Free, Powerful Photo Editing with PhotoScape Software Breakdown
- Music FM復活へ:最新版無料音楽アプリインストールガイド
- New In 2024, The Ultimate List Top Gaming Sites for Free Game Downloads
- Top America's Got Talent Performances - Free Video Streaming & Downloads
- Top Ultra HD Films Downloaded Safely and Quickly: A Comprehensive Guide
- Unleashing Potential: The Future of Conversational AI
- Windows 系統即時备份与恢复技术师服务 - AOMEI 备份工程师
- Title: Elevating Your Content's Presence Perfecting YouTube Thumbnails Size for 2024
- Author: Brian
- Created at : 2024-12-01 06:01:40
- Updated at : 2024-12-02 19:33:28
- Link: https://youtube-video-recordings.techidaily.com/elevating-your-contents-presence-perfecting-youtube-thumbnails-size-for-2024/
- License: This work is licensed under CC BY-NC-SA 4.0.