
:max_bytes(150000):strip_icc():format(webp)/how-to-fix-it-when-reddit-apps-arent-working-f4c8fe50a9ff4c90a28e6a056b427208.jpg)
Elevating Live Play with Professional Gear Lists
Elevating Live Play with Professional Gear Lists
YouTube Equipment for Gaming Channels - Best Gaming Gears

Richard Bennett
Mar 27, 2024• Proven solutions
You love gaming, you have a lot of know-how to pass on, and you have a magnetic personality: you are ready to become a great YouTube gaming commentator. All you need is gaming gear. We have already listed some of the best YouTube video shooting equipment lists for starting recording videos, here we will run through some of the best YouTube equipment for gaming channels, sorted into categories for game recording, audio, and video (facecam).
YouTube Equipment You Should Have for Gaming Channels [Gaming Gears]
1. Game Recording [Capture Card & Game Recording Software]

Game recording software, or hardware, is what you will use to capture your in-game footage. The worst thing you can do is try to point a camera at the screen of your computer or television; recording your screen directly is a must. What kind of game capture gear you need will depend on what kind of game you are playing.
For recording games on your computer screen, you may only need software, and there are a few quality game recording software out there for free. One popular option among YouTube gamers is called OBS , or ‘Open Broadcaster Software’. OBS is free to download from Obsproject.com. The thing that makes it great for gamers is it can be used for live streaming to YouTube, or other sharing sites like Twitch.tv (which has a focus on gaming videos).
For those who want to record the gameplay with ease and edit the recorded gameplay footage with the same tool, we recommend you to try Filmora , which is a 2-in-1 gameplay recording software and video editor on both Windows and Mac.
The advantages of using Filmora to record YouTube Gameplay video:
- Record 4K gameplay and high-space game
- Record gameplay and webcam at the same time
- Mark the important moment with the Marker feature when playing the game
- Basic video editing tools provide trimming, cutting, and merging features as well as annotation effects


If you are going to be making videos more related to consol games then you may need to invest in a Capture device. One of the best is the Elgato Game Capture HD60 featured above. It captures video directly onto either your Mac or PC, while a lot of the other top capture devices only work with a PC. It can record in 1080p with 60fps, and you can even live stream. The Elgato HD60 is compatible with PS4, Xbox One, Xbox 360, and the Wii U.
2. Audio Recording Devices
Your audio recording is extremely important. The thing that will set you apart from other people posting gaming commentary is your personality, and that will only come across if your videos have clear audio. It does not do you much good to be hilarious in a fuzzy commentary track.
A lot of YouTube gamers, especially gamers who are just starting to make videos, go with the Zalman ZM-Mic1 which can be used in combination with headphones. The Zalman might pick up background sounds, like mouse clicks, which is not ideal. However, it will give you significantly better audio than recording directly from your computer, and at under $10 it will not be a purchase you regret. The Zalman is a great starter-mic, especially if you download the free audio editing program Audacity and use it to clean up the little imperfections in your recording. Audacity can be downloaded at Audacityteam.org.
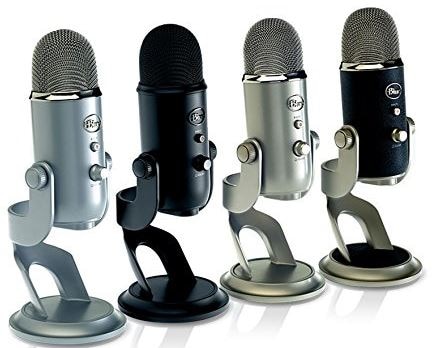
If you are looking for more control over your recording then you should consider the Blue Yeti Mic, which is featured above. This standalone mic is also used by a lot of vloggers and YouTube gamers. It has volume control and even a mute button. It plugs right into the USB drive of your computer using a ten-foot cable, which means you can take it pretty far from your computer. The Blue Yeti USB mic costs about $130.
Check our best list of audio recording devices: Best Microphones for YouTubers
3. Video Recording Devices

If you are going to add a facecam into your videos then it should be high quality, but it does not need to be a top-of-the-line 4K recording. Rather than buying a $1000 DSLR for reaction shots, you should go with a reliable webcam. Before you make a decision about what kind of webcam to get consider how often you will be using your facecam. Not all gaming videos need one. If you play a lot of survival horror games then your reactions will be a key element in your videos, but if you are not playing games that will cause you to have amusing reactions then a facecam will not really add anything to a viewer’s experience.
You may also like: how to use DSLR as a webcam
If your facecam is going to be an important element in your channel then you should expect to spend around $100 on your webcam. The above image is the Logitech C920, which is one of the best at this price point. It performs well in low light, has a good auto-focus feature, and the quality of its video recordings is quite high.
If you are only going to use a facecam occasionally then consider the Genius WideCam F100, which can be found online for around $30. Its 1080p HD recordings are not as smooth as they should be, but it performs very well at 720p and that is all you should need.
Check more options for the Best webcams for YouTuber
Conclusion
Once you have these gaming recording devices, you can now go to record a gameplay and upload it to YouTube. Before you move on, do check these 10 tips for shooting professional YouTube videos . In case you need to trim and edit the recorded gameplay video and present the most exciting moments, you can use some of the best video editing software for YouTube . Here, we recommend you try the Filmora video editor to achieve your goal.
Why choose Filmora to edit recorded YouTube gameplay videos?
- Intuitive interface for saving time
- Trim Video and Audio Quickly
- Record commentary and voiceover with ease or add royalty-free music sound from the Music Library
- 300+ stylish video effects built-in and more in Filmora Effect Store
- Upload to YouTube directly
In case you didn’t know Filmora before, here is a video tutorial for beginners about Filmora video editor, check and download it to edit your YouTube today.
Richard Bennett
Richard Bennett is a writer and a lover of all things video.
Follow @Richard Bennett
Richard Bennett
Mar 27, 2024• Proven solutions
You love gaming, you have a lot of know-how to pass on, and you have a magnetic personality: you are ready to become a great YouTube gaming commentator. All you need is gaming gear. We have already listed some of the best YouTube video shooting equipment lists for starting recording videos, here we will run through some of the best YouTube equipment for gaming channels, sorted into categories for game recording, audio, and video (facecam).
YouTube Equipment You Should Have for Gaming Channels [Gaming Gears]
1. Game Recording [Capture Card & Game Recording Software]
Game recording software, or hardware, is what you will use to capture your in-game footage. The worst thing you can do is try to point a camera at the screen of your computer or television; recording your screen directly is a must. What kind of game capture gear you need will depend on what kind of game you are playing.
For recording games on your computer screen, you may only need software, and there are a few quality game recording software out there for free. One popular option among YouTube gamers is called OBS , or ‘Open Broadcaster Software’. OBS is free to download from Obsproject.com. The thing that makes it great for gamers is it can be used for live streaming to YouTube, or other sharing sites like Twitch.tv (which has a focus on gaming videos).
For those who want to record the gameplay with ease and edit the recorded gameplay footage with the same tool, we recommend you to try Filmora , which is a 2-in-1 gameplay recording software and video editor on both Windows and Mac.
The advantages of using Filmora to record YouTube Gameplay video:
- Record 4K gameplay and high-space game
- Record gameplay and webcam at the same time
- Mark the important moment with the Marker feature when playing the game
- Basic video editing tools provide trimming, cutting, and merging features as well as annotation effects
If you are going to be making videos more related to consol games then you may need to invest in a Capture device. One of the best is the Elgato Game Capture HD60 featured above. It captures video directly onto either your Mac or PC, while a lot of the other top capture devices only work with a PC. It can record in 1080p with 60fps, and you can even live stream. The Elgato HD60 is compatible with PS4, Xbox One, Xbox 360, and the Wii U.
2. Audio Recording Devices
Your audio recording is extremely important. The thing that will set you apart from other people posting gaming commentary is your personality, and that will only come across if your videos have clear audio. It does not do you much good to be hilarious in a fuzzy commentary track.
A lot of YouTube gamers, especially gamers who are just starting to make videos, go with the Zalman ZM-Mic1 which can be used in combination with headphones. The Zalman might pick up background sounds, like mouse clicks, which is not ideal. However, it will give you significantly better audio than recording directly from your computer, and at under $10 it will not be a purchase you regret. The Zalman is a great starter-mic, especially if you download the free audio editing program Audacity and use it to clean up the little imperfections in your recording. Audacity can be downloaded at Audacityteam.org.
If you are looking for more control over your recording then you should consider the Blue Yeti Mic, which is featured above. This standalone mic is also used by a lot of vloggers and YouTube gamers. It has volume control and even a mute button. It plugs right into the USB drive of your computer using a ten-foot cable, which means you can take it pretty far from your computer. The Blue Yeti USB mic costs about $130.
Check our best list of audio recording devices: Best Microphones for YouTubers
3. Video Recording Devices
If you are going to add a facecam into your videos then it should be high quality, but it does not need to be a top-of-the-line 4K recording. Rather than buying a $1000 DSLR for reaction shots, you should go with a reliable webcam. Before you make a decision about what kind of webcam to get consider how often you will be using your facecam. Not all gaming videos need one. If you play a lot of survival horror games then your reactions will be a key element in your videos, but if you are not playing games that will cause you to have amusing reactions then a facecam will not really add anything to a viewer’s experience.
You may also like: how to use DSLR as a webcam
If your facecam is going to be an important element in your channel then you should expect to spend around $100 on your webcam. The above image is the Logitech C920, which is one of the best at this price point. It performs well in low light, has a good auto-focus feature, and the quality of its video recordings is quite high.
If you are only going to use a facecam occasionally then consider the Genius WideCam F100, which can be found online for around $30. Its 1080p HD recordings are not as smooth as they should be, but it performs very well at 720p and that is all you should need.
Check more options for the Best webcams for YouTuber
Conclusion
Once you have these gaming recording devices, you can now go to record a gameplay and upload it to YouTube. Before you move on, do check these 10 tips for shooting professional YouTube videos . In case you need to trim and edit the recorded gameplay video and present the most exciting moments, you can use some of the best video editing software for YouTube . Here, we recommend you try the Filmora video editor to achieve your goal.
Why choose Filmora to edit recorded YouTube gameplay videos?
- Intuitive interface for saving time
- Trim Video and Audio Quickly
- Record commentary and voiceover with ease or add royalty-free music sound from the Music Library
- 300+ stylish video effects built-in and more in Filmora Effect Store
- Upload to YouTube directly
In case you didn’t know Filmora before, here is a video tutorial for beginners about Filmora video editor, check and download it to edit your YouTube today.
Richard Bennett
Richard Bennett is a writer and a lover of all things video.
Follow @Richard Bennett
The Filmmaker’s Blueprint: Making YouTube Splitscreen Magic
How to Make a Creative Split-screen Video for YouTube?

Liza Brown
Oct 26, 2023• Proven solutions
If we talk about post-production techniques and visual effects, then Split Screen has to be one of the smartest picks. After all, it lets us narrate our story via two (or more) screens and gives our audience a superior viewing experience. Though, a lot of users find it hard to implement the split-screen effect on YouTube videos. Here, I will let you know how to come up with all kinds of YouTube split-screen videos by using a professional video editor.
Part 1: The Diverse Applications of Split-screen Videos
Before we discuss how to work on YouTube split-screen videos, let’s quickly consider some major applications of this video effect.
One of the most popular applications of split-screen videos is for comparing two or more instances or perspectives in the same frame. For example, you might wish to depict the lifestyle of two people from different parts of the world or simply compare the effect of various seasons in a single video.

Videos are the best visual storytelling tools and just like any story, they can also have different perspectives. Ideally, the split-screen effect would be one of the best ways to show your audience all kinds of perspectives that can take place in your story.
One of the best examples was depicted in the movie “500 Days of Summer” in which we got several Expectations vs. Reality shots. These split-screen shots depicted the two major perspectives of the story in a single frame.

Have you ever wondered how filmmakers create a clone of a person in movies? To do that, we make the protagonist record both the scenes in front of the same background. Later, we implement a split-screen effect in which both the clips are combined in such a way that it makes the audience believe as if the scene has both, the character and their clone placed flawlessly.

Watch Video! Use Split-Screen for Your YouTube Videos
Part 2: How to Make Creative YouTube Split-screen Videos with Wondershare Filmora ?
If you want to come up with professional YouTube split-screen videos, then consider using a resourceful tool like Wondershare Filmora. Recently, the company has launched Wondershare Filmora for Mac V10.2 with an upgraded set of newly-added split-screen templates . Therefore, you can simply use the wide range of split-screen templates in Filmora and drag-and-drop your videos to implement the effect.
- Wondershare Filmora has recently added an extensive range of split-screen templates that you can instantly use and customize to meet your requirements.
- Apart from YouTube split-screen templates, you can also find options for other social platforms such as Instagram, Facebook, TikTok, etc.
- Without undergoing any technical hassle, you can just drag and drop your videos to the split-screen template and further make the needed changes.
- There are also dedicated options to edit the split-screen video, apply color correction, and even implement different stunning animated effects.
- Besides that, you can use Filmora to access numerous other editing options like motion tracking, keyframing, audio ducking, auto reframing, action cam editing, and more.
Creating or editing YouTube split-screen videos in Wondershare Filmora is extremely easy and can be done in the following way:
Step 1: Import the Videos You Want to Edit to Wondershare Filmora
Before you edit your YouTube split-screen video, you need to import clips to the application. To do this, just launch Wondershare Filmora on your system and click on the “Import” button to load your videos. You can also go to its Menu > File > Import Media to do the same.

Step 2: Select the Split-screen Template and Add Your Videos
Great! Once you have loaded the interface of Filmora, you can locate a “Split Screen” section from the top. Just click on it to browse a wide range of split-screen video templates for YouTube to include two, three, or more clips. You can just double-click any template to get its preview and drag-and-drop it to the timeline to start working on it.

If you want, you can take the playhead and drag the pointer to adjust the length of the split-screen template on the timeline. To add your clips, just double-click on the split-screen template and click on the drop icon from the preview window. Now, click on the source clip to add it to the template and adjust its position to get the desired effects.

Step 3: Edit Your YouTube Split-screen Video
Following the same drill, you can include multiple clips to the YouTube split-screen template. You can further go to its editing features and explore the “Video” tab to scale, reposition, or rotate your clips. There are also options to add borders in the split-screen effect to separate the clips distinctively in the video.

Apart from that, you can also go to the “Color” section to access various color correction features. From here, you can adjust the brightness, temperature, saturation, tint, and other effects in the video.

If you want to make your YouTube split-screen video more appealing, then go to the “Motion” feature. Here, you can easily implement any existing animated template for transitions and other effects.

Besides that, you can also click on the edit icon from the bottom panel of the Preview section to edit your videos separately.

Step 4: Export the YouTube Split-screen Video
That’s it! Once you are done editing the split-screen video, you can export it from Filmora and save it on your Mac. Just click on the Export option and select a location to save the YouTube split-screen video. There are also additional features to save the video in different formats, video resolutions, and frame rates here that you can explore.

There you go! After following this guide, you would be able to come up with all kinds of YouTube split-screen videos on your Mac. Ideally, with the help of a resourceful tool like Wondershare Filmora, working on a split-screen video is an effortless task. Since the tool has numerous split-screen templates for YouTube, you can just select any template, and customize it to create a stunning YouTube split-screen video in minutes.
Liza Brown
Liza Brown is a writer and a lover of all things video.
Follow @Liza Brown
Liza Brown
Oct 26, 2023• Proven solutions
If we talk about post-production techniques and visual effects, then Split Screen has to be one of the smartest picks. After all, it lets us narrate our story via two (or more) screens and gives our audience a superior viewing experience. Though, a lot of users find it hard to implement the split-screen effect on YouTube videos. Here, I will let you know how to come up with all kinds of YouTube split-screen videos by using a professional video editor.
Part 1: The Diverse Applications of Split-screen Videos
Before we discuss how to work on YouTube split-screen videos, let’s quickly consider some major applications of this video effect.
One of the most popular applications of split-screen videos is for comparing two or more instances or perspectives in the same frame. For example, you might wish to depict the lifestyle of two people from different parts of the world or simply compare the effect of various seasons in a single video.
Videos are the best visual storytelling tools and just like any story, they can also have different perspectives. Ideally, the split-screen effect would be one of the best ways to show your audience all kinds of perspectives that can take place in your story.
One of the best examples was depicted in the movie “500 Days of Summer” in which we got several Expectations vs. Reality shots. These split-screen shots depicted the two major perspectives of the story in a single frame.
Have you ever wondered how filmmakers create a clone of a person in movies? To do that, we make the protagonist record both the scenes in front of the same background. Later, we implement a split-screen effect in which both the clips are combined in such a way that it makes the audience believe as if the scene has both, the character and their clone placed flawlessly.
Watch Video! Use Split-Screen for Your YouTube Videos
Part 2: How to Make Creative YouTube Split-screen Videos with Wondershare Filmora ?
If you want to come up with professional YouTube split-screen videos, then consider using a resourceful tool like Wondershare Filmora. Recently, the company has launched Wondershare Filmora for Mac V10.2 with an upgraded set of newly-added split-screen templates . Therefore, you can simply use the wide range of split-screen templates in Filmora and drag-and-drop your videos to implement the effect.
- Wondershare Filmora has recently added an extensive range of split-screen templates that you can instantly use and customize to meet your requirements.
- Apart from YouTube split-screen templates, you can also find options for other social platforms such as Instagram, Facebook, TikTok, etc.
- Without undergoing any technical hassle, you can just drag and drop your videos to the split-screen template and further make the needed changes.
- There are also dedicated options to edit the split-screen video, apply color correction, and even implement different stunning animated effects.
- Besides that, you can use Filmora to access numerous other editing options like motion tracking, keyframing, audio ducking, auto reframing, action cam editing, and more.
Creating or editing YouTube split-screen videos in Wondershare Filmora is extremely easy and can be done in the following way:
Step 1: Import the Videos You Want to Edit to Wondershare Filmora
Before you edit your YouTube split-screen video, you need to import clips to the application. To do this, just launch Wondershare Filmora on your system and click on the “Import” button to load your videos. You can also go to its Menu > File > Import Media to do the same.
Step 2: Select the Split-screen Template and Add Your Videos
Great! Once you have loaded the interface of Filmora, you can locate a “Split Screen” section from the top. Just click on it to browse a wide range of split-screen video templates for YouTube to include two, three, or more clips. You can just double-click any template to get its preview and drag-and-drop it to the timeline to start working on it.
If you want, you can take the playhead and drag the pointer to adjust the length of the split-screen template on the timeline. To add your clips, just double-click on the split-screen template and click on the drop icon from the preview window. Now, click on the source clip to add it to the template and adjust its position to get the desired effects.
Step 3: Edit Your YouTube Split-screen Video
Following the same drill, you can include multiple clips to the YouTube split-screen template. You can further go to its editing features and explore the “Video” tab to scale, reposition, or rotate your clips. There are also options to add borders in the split-screen effect to separate the clips distinctively in the video.
Apart from that, you can also go to the “Color” section to access various color correction features. From here, you can adjust the brightness, temperature, saturation, tint, and other effects in the video.
If you want to make your YouTube split-screen video more appealing, then go to the “Motion” feature. Here, you can easily implement any existing animated template for transitions and other effects.
Besides that, you can also click on the edit icon from the bottom panel of the Preview section to edit your videos separately.
Step 4: Export the YouTube Split-screen Video
That’s it! Once you are done editing the split-screen video, you can export it from Filmora and save it on your Mac. Just click on the Export option and select a location to save the YouTube split-screen video. There are also additional features to save the video in different formats, video resolutions, and frame rates here that you can explore.
There you go! After following this guide, you would be able to come up with all kinds of YouTube split-screen videos on your Mac. Ideally, with the help of a resourceful tool like Wondershare Filmora, working on a split-screen video is an effortless task. Since the tool has numerous split-screen templates for YouTube, you can just select any template, and customize it to create a stunning YouTube split-screen video in minutes.
Liza Brown
Liza Brown is a writer and a lover of all things video.
Follow @Liza Brown
Also read:
- The Ultimate Intro Video Guide for iPhone and Android Users
- In 2024, Channel Branding 101 Brainstorm Techniques
- Unlock Your Video Soundtrack 4 Cost-Effective WAV Extractors
- 2024 Approved Borrow Without Cost Images From Leading YouTubers' Archives
- Ultimate Recording Gear for Social Media Stars
- Achieve the Perfect Look YouTube's Guide to Video Aspect Ratios for 2024
- In 2024, Audio Perfection Achieved Expert Tips Without a Microphone
- Getting Your Foot in the Channel's Door Must-Haves
- Crafting Channel Graphics Icons, Banners & Thumbnails
- The Key to Connecting Your YouTube Channel with a Facebook Page
- Charting Earnings From YouTube AdSense What You Can Expect per 1,000 Views
- In 2024, Chart Your Course Navigating the Waters of YouTube Subscription Surges
- [New] Efficient Processes for Uploading Videos From iOS Gadgets
- [Updated] Daytime Delights The Most Inspiring Anime Streaming Channels
- Elevate Thumbnail Imagery Fantasy Landscapes & Effects Guide for 2024
- What Is Haul Video and How to Make a Catchy Try on Haul Video
- In 2024, Crafting a Continuous Youtube Video Stream From Separate Files
- [Updated] Defeat Bot Intruders, Elevate Video Engagement
- Ace Your Viewing Experience Onboarding AV1 in YouTube for 2024
- Acquire No-Cost Sounds for Videos & Podcasts
- 2024 Approved How To Stream Your Favorite Games Online
- How to Come up With the Best Pokemon Team On Lava Blaze Curve 5G? | Dr.fone
- [New] How Instagram Algorithm Update Will Affect You
- Updated Clearer Screen, Cleaner Sound Techniques for Dampening Background Audio in Digital Videos
- Updated In 2024, Revolutionize Your Videos Best Quality Improvement Tools
- How to Stream Apple iPhone XS Video to Computer? | Dr.fone
- Your Complete Guide To Reset Nubia Red Magic 9 Pro+ | Dr.fone
- 2024 Approved Crafting Cinematic Stories in Extended Seconds A Guide to Creating Spectacularly Long Lasting Video From Still Images Online
- [Updated] In 2024, Uncover the Best 6 Screen Recording Software on Mac
- New One-Stop Video Editor Shop Best Solutions for Windows, Mac, Mobile, and Linux for 2024
- New 2024 Approved What We Learned The Ultimate OGG Converter Guide
- How to Transfer Music from Infinix Zero 5G 2023 Turbo to iPod | Dr.fone
- Discovering Easy Music Arrangement in Magix Maker
- How to Easily Hard reset my Oppo K11x | Dr.fone
- Title: Elevating Live Play with Professional Gear Lists
- Author: Brian
- Created at : 2024-05-25 11:45:34
- Updated at : 2024-05-26 11:45:34
- Link: https://youtube-video-recordings.techidaily.com/elevating-live-play-with-professional-gear-lists/
- License: This work is licensed under CC BY-NC-SA 4.0.
