
:max_bytes(150000):strip_icc()/phoneinairplanemode-4cf424c7f7cf4366853c8100d57275cc.jpeg)
"Elevate Your Video's Discoverability - Mastering Tags for 2024"
Elevate Your Video’s Discoverability - Mastering Tags
Create High-Quality Video - Wondershare Filmora
An easy and powerful YouTube video editor
Numerous video and audio effects to choose from
Detailed tutorials provided by the official channel
Tagging your content online greatly impacts how viewers will react to your post. However, it doesn’t end at adding tags; you need to know more. Be savvy to put the tags strategically depending on your topic’s trending. So, why add a tag to YouTube videos? You want to gain enough clicks, yes, right? And that’s what hashtags do. They are online content features that will push the number of clicks to an unimaginable level.
Your content will gain more views and go viral within a short time. After all, that’s what we purpose for when posting videos. No one wants to put effort into editing videos and posting then don’t get a considerable number of views or clicks. But also, know that the ball is at your court. There are no go-zone areas when it comes to dealing with YouTube tags. Check this article on what to do for more views.
In this article
02 How will YouTube tag affect your video performance?
03 Things to consider before you start adding a tag.
04 How to add a tag to YouTube video
What is a YouTube tag?
A tag is a word used to describe a video or image. It is generally added to video titles and descriptions or used independently. They make YouTubers easily discover other posts with similar tags. YouTube tags are vital as they help the YouTube algorithm fully understand the videos you post. It’s by this that those who are interested in your video get hooked to them.
For tags to work ideally, you need to include your brand-specific tags before adding similar tags. YouTube auto-suggest is another gem in this scenario. Just see what YouTube suggests when you type while searching other similar topics. For great results, place the most important keywords and tags first, as these will act as the face of your video.
How will YouTube tag affect your video performance?
It is YouTube tags that help viewers to find videos they are searching for on YouTube. Besides, this is how it works: An audience will type keywords into YouTube’s search bar. Then videos with the same tag and keywords will appear in the search results. If not correctly done, the YouTube tag could affect your video performance and lead to such outcomes.
1. No adequate audience engagement
Your main focus should be audience engagement. You are trying to drive the attention of many YouTube users as possible. A small mistake, and you lose track. It is wise to know the best approach to use your tags. Improper YouTube tagging will not drive enough audience to your channel. You, therefore, won’t get adequate audience engagement.
2. Your video won’t go viral
Anything selling should strive to reach thousands and probably millions of viewers. Perhaps you have put in several days and months of work on a single video, only for it to be viewed by a few fellows. You will feel like a waste of time when you put so much effort, yet your videos don’t go viral. It means there will be fewer people looking out for your content.
3. Limited chances of your video ranking high
If you don’t do YouTube tagging the right way, then the chances are that your video won’t rank high. Everyone feels better when they get a pat on the back for a well-done job. But what happens if there is no traffic to your video? You probably lose the urge to continue doing more videos. Just play right, so you are not demoralized whenever you post your videos.
Things to consider before you start adding a tag
If used properly, YouTube tags are a great way for your video and business to perform well. You’ll attract the audience and probably get a flux of customers. And the tricks are just at your fingertips. You only need to give the best approach possible to all the steps of your YouTube tagging. Here are some tips to help you out.
1) Use keyword variations
Try to use variations of keywords to increase the chances of your video ranking high. The audience will use several phrases to lead them to the right YouTube video. More so, they’ll even change the order of keywords for best results. It would be best to strive to appear in as many searches as possible. The best option is to use the “YouTube” tag generator to gather as many relevant tags as possible. It will pop you more ideas and let you identify the most important core terms that you can build on.
2) Research competitors
This trick works well for you before you add a tag to a YouTube video. Check out what your competitors are up to and what tags they use. While you check at what competitors do, also mind the trending tags. You don’t want to be left behind in the quick-paced technological advances. But ensure your searches are related to your content. Any misleading tags will plunge you into more drawbacks. Checking out on the latest trends will help you generate more ideas for useful keywords that make your videos rank better.
3) Conduct keyword research
Research is a vital point to start from. By this, you’ll find other keyword possibilities for your video. Don’t just think of keywords out of the blue but ensure that the audience searches what you use. It is better to check out the generic relationship between YouTube tags and your video content. Find keywords that will directly link to what your video is all about. You can also find out what has worked for those in your industry to know the best approach to give.
4) Write a keyword-optimized title and description
Ensure that the texts associated with your video are keyword-optimized. Your audience will majorly rely on the video title and description. The description should emphasize more on what the title is. Consider that first, and then find the kinds of tags that would correlate with both your title and description. Besides, it is the best way for your audience to quickly find your videos as the keywords will directly link them.
5) Don’t go overboard
Even though there are no limits on words for YouTube tags, don’t use so many words; it may turn away your audience. Instead, focus on adding relevant tags but don’t stuff in keywords. Going overboard may automatically take you off the topic and mislead your audience.
How to add a tag to a YouTube video
Adding the right YouTube tag will increase the chances of YouTubers finding and watching your video. Here are the steps how to add a tag to a YouTube video.
Step 1. First, log in to your YouTube account and hit the “Camera” icon. It is located at the top-right corner of your screen.
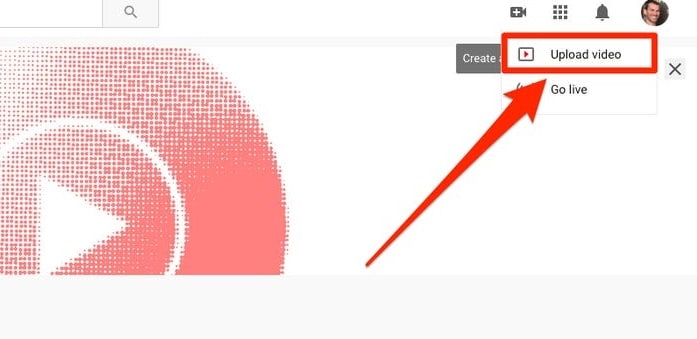
Step 2. Check the drop-down menu and choose the “Upload Video” option.
Step 3. Select from your videos which one to upload. Then click on the “Edit” tab to add relevant information like keywords, descriptions, etc.
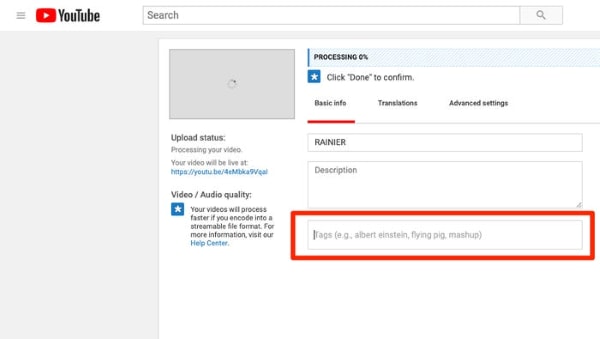
Step 4. Give your video a name and description. Ensure the description correlates to the title of your video.
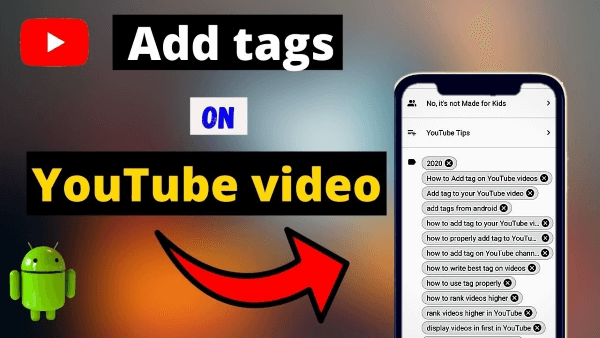
Step 5. Add relevant tags, separating them with commas. You can use from five to fifteen tags. YouTube may ignore your tags if they are more than 15.
Step 6. Click on the “Save” tab to complete the upload.

Make Your Video Better with Filmora
You may know how to add a tag to a YouTube video, but you might not know how to come up with a compelling piece of video. Filmora works in simple steps to produce a quality video that makes heads turn around. Its powerful editing tools enable you to add several effects for better viewing. It has over 800 stunning effects to enhance your videos with. The export feature also lets you upload your videos to YouTube in any format just with a click of a button.
Key Features
- Edit and export your videos at a high resolution of up to 4K
- Easily remove any background noise from the video
- Make unique clips by slowing them down or increasing speed up to ten times
- It supports GIF files among other output formats
- Easily flip your clips and play them backward.
For Win 7 or later (64-bit)
For macOS 10.12 or later
Conclusion
● YouTube tags play a vital role for you and your potential customers. YouTube’s algorithm uses your tags to match them to similar search queries. When properly utilized, tags can bring an over flux of customers to your video. You have to know how to add a tag to a YouTube video for better results. Remember that YouTube tags can also drive away customers if not properly utilized. We have covered the effects and the best approach when settling on YouTube tags.
● Nonetheless, ensure your videos are top-notch before you tag them around. The best video editor – Filmora – works to produce high-end videos. Try it and gain additional traffic to your video.
Tagging your content online greatly impacts how viewers will react to your post. However, it doesn’t end at adding tags; you need to know more. Be savvy to put the tags strategically depending on your topic’s trending. So, why add a tag to YouTube videos? You want to gain enough clicks, yes, right? And that’s what hashtags do. They are online content features that will push the number of clicks to an unimaginable level.
Your content will gain more views and go viral within a short time. After all, that’s what we purpose for when posting videos. No one wants to put effort into editing videos and posting then don’t get a considerable number of views or clicks. But also, know that the ball is at your court. There are no go-zone areas when it comes to dealing with YouTube tags. Check this article on what to do for more views.
In this article
02 How will YouTube tag affect your video performance?
03 Things to consider before you start adding a tag.
04 How to add a tag to YouTube video
What is a YouTube tag?
A tag is a word used to describe a video or image. It is generally added to video titles and descriptions or used independently. They make YouTubers easily discover other posts with similar tags. YouTube tags are vital as they help the YouTube algorithm fully understand the videos you post. It’s by this that those who are interested in your video get hooked to them.
For tags to work ideally, you need to include your brand-specific tags before adding similar tags. YouTube auto-suggest is another gem in this scenario. Just see what YouTube suggests when you type while searching other similar topics. For great results, place the most important keywords and tags first, as these will act as the face of your video.
How will YouTube tag affect your video performance?
It is YouTube tags that help viewers to find videos they are searching for on YouTube. Besides, this is how it works: An audience will type keywords into YouTube’s search bar. Then videos with the same tag and keywords will appear in the search results. If not correctly done, the YouTube tag could affect your video performance and lead to such outcomes.
1. No adequate audience engagement
Your main focus should be audience engagement. You are trying to drive the attention of many YouTube users as possible. A small mistake, and you lose track. It is wise to know the best approach to use your tags. Improper YouTube tagging will not drive enough audience to your channel. You, therefore, won’t get adequate audience engagement.
2. Your video won’t go viral
Anything selling should strive to reach thousands and probably millions of viewers. Perhaps you have put in several days and months of work on a single video, only for it to be viewed by a few fellows. You will feel like a waste of time when you put so much effort, yet your videos don’t go viral. It means there will be fewer people looking out for your content.
3. Limited chances of your video ranking high
If you don’t do YouTube tagging the right way, then the chances are that your video won’t rank high. Everyone feels better when they get a pat on the back for a well-done job. But what happens if there is no traffic to your video? You probably lose the urge to continue doing more videos. Just play right, so you are not demoralized whenever you post your videos.
Things to consider before you start adding a tag
If used properly, YouTube tags are a great way for your video and business to perform well. You’ll attract the audience and probably get a flux of customers. And the tricks are just at your fingertips. You only need to give the best approach possible to all the steps of your YouTube tagging. Here are some tips to help you out.
1) Use keyword variations
Try to use variations of keywords to increase the chances of your video ranking high. The audience will use several phrases to lead them to the right YouTube video. More so, they’ll even change the order of keywords for best results. It would be best to strive to appear in as many searches as possible. The best option is to use the “YouTube” tag generator to gather as many relevant tags as possible. It will pop you more ideas and let you identify the most important core terms that you can build on.
2) Research competitors
This trick works well for you before you add a tag to a YouTube video. Check out what your competitors are up to and what tags they use. While you check at what competitors do, also mind the trending tags. You don’t want to be left behind in the quick-paced technological advances. But ensure your searches are related to your content. Any misleading tags will plunge you into more drawbacks. Checking out on the latest trends will help you generate more ideas for useful keywords that make your videos rank better.
3) Conduct keyword research
Research is a vital point to start from. By this, you’ll find other keyword possibilities for your video. Don’t just think of keywords out of the blue but ensure that the audience searches what you use. It is better to check out the generic relationship between YouTube tags and your video content. Find keywords that will directly link to what your video is all about. You can also find out what has worked for those in your industry to know the best approach to give.
4) Write a keyword-optimized title and description
Ensure that the texts associated with your video are keyword-optimized. Your audience will majorly rely on the video title and description. The description should emphasize more on what the title is. Consider that first, and then find the kinds of tags that would correlate with both your title and description. Besides, it is the best way for your audience to quickly find your videos as the keywords will directly link them.
5) Don’t go overboard
Even though there are no limits on words for YouTube tags, don’t use so many words; it may turn away your audience. Instead, focus on adding relevant tags but don’t stuff in keywords. Going overboard may automatically take you off the topic and mislead your audience.
How to add a tag to a YouTube video
Adding the right YouTube tag will increase the chances of YouTubers finding and watching your video. Here are the steps how to add a tag to a YouTube video.
Step 1. First, log in to your YouTube account and hit the “Camera” icon. It is located at the top-right corner of your screen.
Step 2. Check the drop-down menu and choose the “Upload Video” option.
Step 3. Select from your videos which one to upload. Then click on the “Edit” tab to add relevant information like keywords, descriptions, etc.
Step 4. Give your video a name and description. Ensure the description correlates to the title of your video.
Step 5. Add relevant tags, separating them with commas. You can use from five to fifteen tags. YouTube may ignore your tags if they are more than 15.
Step 6. Click on the “Save” tab to complete the upload.
Make Your Video Better with Filmora
You may know how to add a tag to a YouTube video, but you might not know how to come up with a compelling piece of video. Filmora works in simple steps to produce a quality video that makes heads turn around. Its powerful editing tools enable you to add several effects for better viewing. It has over 800 stunning effects to enhance your videos with. The export feature also lets you upload your videos to YouTube in any format just with a click of a button.
Key Features
- Edit and export your videos at a high resolution of up to 4K
- Easily remove any background noise from the video
- Make unique clips by slowing them down or increasing speed up to ten times
- It supports GIF files among other output formats
- Easily flip your clips and play them backward.
For Win 7 or later (64-bit)
For macOS 10.12 or later
Conclusion
● YouTube tags play a vital role for you and your potential customers. YouTube’s algorithm uses your tags to match them to similar search queries. When properly utilized, tags can bring an over flux of customers to your video. You have to know how to add a tag to a YouTube video for better results. Remember that YouTube tags can also drive away customers if not properly utilized. We have covered the effects and the best approach when settling on YouTube tags.
● Nonetheless, ensure your videos are top-notch before you tag them around. The best video editor – Filmora – works to produce high-end videos. Try it and gain additional traffic to your video.
Top Picks: The Best 10 Recorders for Podcasting
Best 10 Screen Recorders for YouTube

Richard Bennett
Mar 27, 2024• Proven solutions
If you are interested in making tutorial videos by capturing videos from your computer screen then following details will definitely help you. It is possible to share wonderful details with screen recorder tools that are discussed below in this article:
Looking for Screen recorders for your smartphone? Kindly check this screen recorder Apps for iPhone>>
![]()

The All-in-One Screen Recorder & Video Editor
- Record desktop screen, voiceover, and webcam simultaneously
- Edit recorded clips quickly with a wide range of professional tools
- Built-in plentiful templates and effects
- Export to MP4, MOV, MKV, GIF and multiple formats
For Win 7 or later (64-bit)
For macOS 10.12 or later
 Secure Download
Top 10 Screen Recorders for YouTube video creators
Note: We resolutely oppose all forms of copyright-infringing downloads. This tutorial is only for downloading YouTube videos/audio materials from your own channel.
For Windows
1. Wondershare Filmora
Wondershare Filmora is an easy-to-use while light screen recorder for PC and Mac. It allows you to record desktop screen by customizing areas you like, and you can record popular games at up to 120fps without lagging. What’s more, Filmora also offers you a built-in video editing tool that allows you to add annotations, personalize cursor effects, and crop, trim, cut your recorded footage as you like.


Price:
Free trial/$49.99 per year/$79.99 for perpetual
2.Cam Studio:
It is an open-source screen recorder for YouTube that can be learned within few minutes and results in higher quality video outcomes. Offers a small file size along with the facility to convert from AVI to SWF.
Pros:
It allows users to add captions to videos and possesses a built-in help file.
Cons:
The website suffers from few bugs.
Price:
It is 100% free for use.
3.iSpring Free Cam:
Users are likely to get built in type video/audio editor with this screen recorder that has intuitive interface with professional screencasts.
Pros:
High Quality resolution with no time limits and it also records user’s voice along with computer sounds.
Cons:
Do not allow webcam type recording and output file format use to be WMV only.
Price:
Free tool for screen recording needs.
4.ShareX:
ShareX is a well-known open source type ad free tool that comes with numerous customization features. It is targeted for professional video developers who need advanced editing options.
Pros:
Custom colour effects with watermarks where you can easily import existing photos, music or videos from your device.
Cons:
It does not possess video editor, webcam recording feature and is little complicated to use for beginners.
Price:
Can be used for free.
5.MadCap Mimic:
Here is a highly advanced multimedia tool with interactive simulation options. Users can access this screen recorder for YouTube with three different modes as like full motion, automatic and manual.
Pros:
Automatically saved content for future needs, wide variety of video effects, fast technical support and results in highly interactive content.
Cons:
Occasional bugs are reported and users can access free trial only for 30 days.
Price:
For full year version you need to pay $144 whereas life time access can be obtained by paying only $428.
For Mac
1.Camtasia 2:
This is a comprehensive tool for your screen recording needs where you can also connect external devices for input. Users will be able to enjoy smooth editing features with its studio like platform, layered timeline and fast mixing.
Pros:
It is fully interactive screen recorder that can be used as an interactive mobile application. This tool is supported by Windows, Android and iPhone devices.
Cons:
Aimed for professional users only.
Price:
Although free trial is available for few days but actual featured version can be accessed after payment of $99.
2.ScreenFlow:
Here is a popular paid offering for all professionals who are interested to create interactive educational videos. There are unlimited powerful features with easy to use interface and one can import input from externally connected devices as like iPad, iPod and iPhones etc.
Pros:
High class motion control features with attractive zooming facility so that you can manage videos from all views.
Cons:
Difficult to use for beginners due to advanced design tools.
Price:
Screen Flow packages are available on payment of $99 and more.
3.Snapz Pro X:
Snapz Pro X offers various tutorials along with training videos so that users can avail resizable video creation options with a straightforward type interface. The live preview feature allows users to generate customized videos with easy corrections. Snapz Pro X is commonly used by professionals for learning and training related video creations as it offers lesser mistakes.
Pros:
It offers live preview, selective region capture facility and high end pixel perfection services.
Cons:
Free or trial version comes with unwanted watermarks.
Price:
Cheaper option as compared to above two tools as it can be accessed by paying only $69.
4.Screencast-o-Matic:
You will be glad to know about this online screen recorder for YouTube that can be accessed by anyone with installation of a specially designed launcher. The screen recording length can go up to 15 minutes and resolution quality offered goes up to 720p. The free version can be accessed by anyone but if you need advanced features then you have to spend some money.
Pros:
Offers real time editing as well as recording for video shooting; users need not to download this tool on their personal device rather it can be accessed online with ease.
Cons:
Video quality is little poor as compared to other tools.
Price:
The free version is available with limited features whereas fully featured tool is accessible with a payment of $15/ year.
5.QuickTime:
It is one of the latest screen recorder tool for all Mac users that can grab audio from microphone but not compatible with system audio. If you need to use a video creator tool without spending even a single penny then QuickTime software is best option for you.
Pros:
It is available for free and can be used by beginners as well as professionals easily. QuickTime is compatible with almost all versions of Mac devices.
Cons:
It is a restricted solution for screen recording with limited tools and features. QuickTime is not preferred for game recording videos due to low-resolution outputs.
Price:
Available for free.
Richard Bennett
Richard Bennett is a writer and a lover of all things video.
Follow @Richard Bennett
Richard Bennett
Mar 27, 2024• Proven solutions
If you are interested in making tutorial videos by capturing videos from your computer screen then following details will definitely help you. It is possible to share wonderful details with screen recorder tools that are discussed below in this article:
Looking for Screen recorders for your smartphone? Kindly check this screen recorder Apps for iPhone>>
![]()
The All-in-One Screen Recorder & Video Editor
- Record desktop screen, voiceover, and webcam simultaneously
- Edit recorded clips quickly with a wide range of professional tools
- Built-in plentiful templates and effects
- Export to MP4, MOV, MKV, GIF and multiple formats
For Win 7 or later (64-bit)
For macOS 10.12 or later
Secure Download
Top 10 Screen Recorders for YouTube video creators
Note: We resolutely oppose all forms of copyright-infringing downloads. This tutorial is only for downloading YouTube videos/audio materials from your own channel.
For Windows
1. Wondershare Filmora
Wondershare Filmora is an easy-to-use while light screen recorder for PC and Mac. It allows you to record desktop screen by customizing areas you like, and you can record popular games at up to 120fps without lagging. What’s more, Filmora also offers you a built-in video editing tool that allows you to add annotations, personalize cursor effects, and crop, trim, cut your recorded footage as you like.
Price:
Free trial/$49.99 per year/$79.99 for perpetual
2.Cam Studio:
It is an open-source screen recorder for YouTube that can be learned within few minutes and results in higher quality video outcomes. Offers a small file size along with the facility to convert from AVI to SWF.
Pros:
It allows users to add captions to videos and possesses a built-in help file.
Cons:
The website suffers from few bugs.
Price:
It is 100% free for use.
3.iSpring Free Cam:
Users are likely to get built in type video/audio editor with this screen recorder that has intuitive interface with professional screencasts.
Pros:
High Quality resolution with no time limits and it also records user’s voice along with computer sounds.
Cons:
Do not allow webcam type recording and output file format use to be WMV only.
Price:
Free tool for screen recording needs.
4.ShareX:
ShareX is a well-known open source type ad free tool that comes with numerous customization features. It is targeted for professional video developers who need advanced editing options.
Pros:
Custom colour effects with watermarks where you can easily import existing photos, music or videos from your device.
Cons:
It does not possess video editor, webcam recording feature and is little complicated to use for beginners.
Price:
Can be used for free.
5.MadCap Mimic:
Here is a highly advanced multimedia tool with interactive simulation options. Users can access this screen recorder for YouTube with three different modes as like full motion, automatic and manual.
Pros:
Automatically saved content for future needs, wide variety of video effects, fast technical support and results in highly interactive content.
Cons:
Occasional bugs are reported and users can access free trial only for 30 days.
Price:
For full year version you need to pay $144 whereas life time access can be obtained by paying only $428.
For Mac
1.Camtasia 2:
This is a comprehensive tool for your screen recording needs where you can also connect external devices for input. Users will be able to enjoy smooth editing features with its studio like platform, layered timeline and fast mixing.
Pros:
It is fully interactive screen recorder that can be used as an interactive mobile application. This tool is supported by Windows, Android and iPhone devices.
Cons:
Aimed for professional users only.
Price:
Although free trial is available for few days but actual featured version can be accessed after payment of $99.
2.ScreenFlow:
Here is a popular paid offering for all professionals who are interested to create interactive educational videos. There are unlimited powerful features with easy to use interface and one can import input from externally connected devices as like iPad, iPod and iPhones etc.
Pros:
High class motion control features with attractive zooming facility so that you can manage videos from all views.
Cons:
Difficult to use for beginners due to advanced design tools.
Price:
Screen Flow packages are available on payment of $99 and more.
3.Snapz Pro X:
Snapz Pro X offers various tutorials along with training videos so that users can avail resizable video creation options with a straightforward type interface. The live preview feature allows users to generate customized videos with easy corrections. Snapz Pro X is commonly used by professionals for learning and training related video creations as it offers lesser mistakes.
Pros:
It offers live preview, selective region capture facility and high end pixel perfection services.
Cons:
Free or trial version comes with unwanted watermarks.
Price:
Cheaper option as compared to above two tools as it can be accessed by paying only $69.
4.Screencast-o-Matic:
You will be glad to know about this online screen recorder for YouTube that can be accessed by anyone with installation of a specially designed launcher. The screen recording length can go up to 15 minutes and resolution quality offered goes up to 720p. The free version can be accessed by anyone but if you need advanced features then you have to spend some money.
Pros:
Offers real time editing as well as recording for video shooting; users need not to download this tool on their personal device rather it can be accessed online with ease.
Cons:
Video quality is little poor as compared to other tools.
Price:
The free version is available with limited features whereas fully featured tool is accessible with a payment of $15/ year.
5.QuickTime:
It is one of the latest screen recorder tool for all Mac users that can grab audio from microphone but not compatible with system audio. If you need to use a video creator tool without spending even a single penny then QuickTime software is best option for you.
Pros:
It is available for free and can be used by beginners as well as professionals easily. QuickTime is compatible with almost all versions of Mac devices.
Cons:
It is a restricted solution for screen recording with limited tools and features. QuickTime is not preferred for game recording videos due to low-resolution outputs.
Price:
Available for free.
Richard Bennett
Richard Bennett is a writer and a lover of all things video.
Follow @Richard Bennett
Also read:
- Ryan Kaji’s Riches The Tale of YouTube's Youngest Mogul
- 2024 Approved Affiliate Advancements How Small Channels Thrive Financially
- The Ins and Outs of Earning From YouTube
- Productivity in Duality Employment & Video Creation
- In 2024, Accelerate Video Processing for YouTube Uploads
- Unlock Mastery The Beginner's Guide to Editing Excellence
- Imitation Ingenuity Generating Parodies of Films
- [New] Dream Makers The Online Marvel Experience
- [Updated] Cut Through the Noise with These Top 10 YT Short Standout Strategies
- Making Every Minute Count YouTube Length Reduction Techniques
- Best Recording Equipment For Creating YouTube Masterpieces
- Enhancing Viewer Engagement with Smart End Screen Techniques for 2024
- Simple Path Your Guide to Convert YouTube Audio on Mac
- Dive Deep Into YouTube Shorts Essentials
- [New] Ensuring Visual Presentation YouTube Shorts Thumbnails Fix
- [Updated] A Comprehensible Breakdown for YouTube Annotation and Card Implementation
- Dynamic Descriptor Constructor
- Unlock YouTube's Earnings in CP2024 Guide
- [New] Crafting Engaging YouTube Video Layouts
- Digital Dominion #1 to #10 Most Watched YouTube Videos in a Day
- 2024 Approved Creating A Quick Video Subscribe Link on YouTube
- [Updated] Creating Custom Subscribe URLs for Online Content
- Influencing Audiences with Short-Form Videos
- [Updated] Countering Harshness Maintaining Poise Online
- [Updated] Choosing Channels TikTok vs YouTube Shorts Insights
- Freeze Non-Picked YouTube Video Suggestions
- Breakthrough Strategies for YouTube Short Problem-Solving
- Boosting Your YouTube Presence Key Tips for Popularity
- Hasty Thumbnail Crafting for Fortnite Gameplay
- [New] Dial Back Unrequested YouTube Recommendations
- Triumph Over Ten Common Vlogging Worries
- Boosting Online Presence Top 30 FreeFire Hashtags and Tag Strategies
- [New] Animated Text That Jumps Master Class with Easy Steps
- 2024 Approved Brief Snippet Analysis for Beginners
- How To Fix iPhone SE (2020) Could Not Be Activated/Reached Issue
- 2024 Approved TikTok Copycat Techniques for Social Media Success
- In 2024, Latest way to get Shiny Meltan Box in Pokémon Go Mystery Box On Poco F5 5G | Dr.fone
- Apple ID is Greyed Out From Apple iPhone 13 Pro Max How to Bypass?
- [Updated] Behind-the-Curtain Peek Tracking Insta Post Watchers for 2024
- 2024 Approved Cutting-Edge Approaches to In-Game Auditory Logging
- Guide How To Unbrick a Bricked Vivo G2 Phone | Dr.fone
- How to Change GPS Location on Samsung Galaxy A14 4G Easily & Safely | Dr.fone
- [New] Maximizing TikTok Promotion Strategies & Top Ad Success Stories
- Undelete lost photos from Vivo X100.
- [New] 2024 Approved The Foundations of Building Your Twitter Profile
- [Updated] The Leaderboard of the Best Web Capture Apps for 2024
- [Updated] Navigating Video Visibility Barriers in Social Networking for 2024
- Updated In 2024, Tips for GIF to Animated PNG You Should Know
- [Updated] 360 Video Stitching Tips How to Stitch GoPro Clips Into 360 Videos
- Title: "Elevate Your Video's Discoverability - Mastering Tags for 2024"
- Author: Brian
- Created at : 2024-05-25 11:45:11
- Updated at : 2024-05-26 11:45:11
- Link: https://youtube-video-recordings.techidaily.com/elevate-your-videos-discoverability-mastering-tags-for-2024/
- License: This work is licensed under CC BY-NC-SA 4.0.
