
:max_bytes(150000):strip_icc()/New-iPad-air-and-iPad-mini-with-Apple-Pencil-03182019-60f2de1f64db4b8dbe4822e18a8e6672.jpg)
Elevate Your Video's Auditory Experience on YouTube
Elevate Your Video’s Auditory Experience on YouTube
How to Edit Audio on YouTube

Richard Bennett
Mar 27, 2024• Proven solutions
In this article, we are going to show you how to edit audio with YouTube Video Editor, and the tips on adding your own audio file to YouTube.
- Part 1: Add your Own Audio File to YouTube Video
- Part 2: How to Edit Audio with YouTube Video Editor
Part 1: Add your Own Audio File to YouTube Video
Tools You Are Going to Need
YouTube video editor is far from meeting the needs of people who want to have more control on their audio. On the bright side, if you are interested in learning how to edit audio on YouTube, there is a solution. There are many video editors in the market that allow you to add your own music or audio files to a video. Windows Movie Maker, iMovie, Adobe Premiere, and Magisto are some of the video editors available for you to choose from. In this guide, we recommend the Wondershare Filmora video editor. Below is a quick tutorial about how to edit audio in Filmora.
 Download Mac Version ](https://tools.techidaily.com/wondershare/filmora/download/ )
Why Should You Choose Wondershare Filmora?
There are many advantages associated with the use of Wondershare Filmora. You will see that it allows you to fully edit any audio file and gain 100% control over your files. It is an integrated solution that lacks nothing in terms of efficiency and quality standards. To be more specific, Filmora offers the following unique features:
- Built-in audio editing tools that allow you to gain full control of your audio in an easy way
- Exclusive audio track that enables you to mute, detach or even de-noise the audio from video
- All audio effects can easily be adjusted with one click only
- The built-in Equalizer is capable enough to create amazing audio effects
- Directly upload your video to YouTube, Facebook or Vimeo from Wondershare Filmora
How to add audio files to YouTube video with Wondershare Filmora
Do you want to know more about audio editing? Please read this article: How to add audio to video.
Step 1 Import Video Clips into Filmora
Filmora supports a wide range of video formats, such as MKV, MOV, AVI, WebM and MP4, you can import the video clip shot with Camera, smartphone or camcorder easily to it.
Step 2 Detach Audio
If you want to edit the original audio of the video, you can choose to split the audio file from the video by using the Audio Detach option on Wondershare Filmora. Then, the audio file will be shown in the audio track, and you can cut or trim it.

Note: If you do not want to keep the original audio file in the video, you can delete it from the audio track directly.
Step 3Add Audio Files
Wondershare Filmora offers you multiple royalty free audio effects and music in its rich audio library. What is more, you can also import your own music or audio file from your computer or iTunes. Of course, you should know that the audio should be royalty free for you to make use of. In a different situation, you cannot upload it and benefit from its quality and nature.
Step 4Edit Audio
In this step, you can adjust the audio volume and pitch, etc. There are multiple options for you to benefit from, including the Audio Equalizer, Music, Mix Audio. In this way, you can make sure that the audio is exactly like you have wanted it to be. For further information as to how you can improve the sound quality of your recorded videos, you can check out: How to improve sound quality of recorded videos.
Step 5Save Your Work and Upload on YouTube
If you are satisfied with your work on the audio file and you wish to publish it, the process is quite simple. You just hit Export and select to upload the video to YouTube. After signing in to your YouTube account, you will be ready to start uploading the audio file.

In case you wish to edit the audio from an already published video, you have to download the video first. Then, you can follow the steps above to edit the audio file in Filmora. As one of the widely used video editing software for YouTubers, Filmora is here to empower your imagination. Just download the free trial version and try it now.

Part 2: How to Edit Audio with YouTube Video Editor
Unfortunately, YouTube does not allow users to upload audio files such as MP3, WAV, etc. Instead, you can only upload audio files which are offered by YouTube in the first place. Since YouTube has got a plentiful audio library, you can find a lot of audio there. In this part, we will show you how to add and edit audio with YouTube Video Editor.
You may also like: How to Add Music to YouTube Videos >>
Note: From 20th September 2017 users will no longer be able to use the complimentary editing suite. Check the best YouTube video editor alternatives from this complete guide. In the following part, I will show you how to add audio track , replace the original audio and adjust the audio position and length as well.
- Step 1: Sign in to your YouTube account
- **Step 2:**Click your profile avatar and select Creator Studio option.
- Step 3: In the left pane, go to Video Manager and then click Videos. In the Videos list, choose the video that you want to add new audio track, and then select Audio from the Edit button.

- Step 4: Now you can add or replace the audio in your video. Here you will find that there are various songs and audio files you can choose from. Click ADD TO VIDEO and the audio track will be added to the video directly.

- Step 5: Now you will see the audio track appears at the bottom of the player. Here you can trim and drag the audio bar to adjust the audio positon and length. To Trim the audio, click the beginning or the end of the audio bar and then drag it to the left or right. After trimming, drag it to meet the target position.

Conclusion
Normally, it would be better to add and edit audio to video before updating to YouTube. In this case, Filmora is highly recommended as one of the best video editor for YouTubers , which provides some royalty free music sound in the Music Library to choose from and also the audio editing tools like remove background noise from the video, add fade in and fade out effects with ease or play the video backward or fast forward.
Richard Bennett
Richard Bennett is a writer and a lover of all things video.
Follow @Richard Bennett
Richard Bennett
Mar 27, 2024• Proven solutions
In this article, we are going to show you how to edit audio with YouTube Video Editor, and the tips on adding your own audio file to YouTube.
- Part 1: Add your Own Audio File to YouTube Video
- Part 2: How to Edit Audio with YouTube Video Editor
Part 1: Add your Own Audio File to YouTube Video
Tools You Are Going to Need
YouTube video editor is far from meeting the needs of people who want to have more control on their audio. On the bright side, if you are interested in learning how to edit audio on YouTube, there is a solution. There are many video editors in the market that allow you to add your own music or audio files to a video. Windows Movie Maker, iMovie, Adobe Premiere, and Magisto are some of the video editors available for you to choose from. In this guide, we recommend the Wondershare Filmora video editor. Below is a quick tutorial about how to edit audio in Filmora.
Download Mac Version ](https://tools.techidaily.com/wondershare/filmora/download/ )
Why Should You Choose Wondershare Filmora?
There are many advantages associated with the use of Wondershare Filmora. You will see that it allows you to fully edit any audio file and gain 100% control over your files. It is an integrated solution that lacks nothing in terms of efficiency and quality standards. To be more specific, Filmora offers the following unique features:
- Built-in audio editing tools that allow you to gain full control of your audio in an easy way
- Exclusive audio track that enables you to mute, detach or even de-noise the audio from video
- All audio effects can easily be adjusted with one click only
- The built-in Equalizer is capable enough to create amazing audio effects
- Directly upload your video to YouTube, Facebook or Vimeo from Wondershare Filmora
How to add audio files to YouTube video with Wondershare Filmora
Do you want to know more about audio editing? Please read this article: How to add audio to video.
Step 1 Import Video Clips into Filmora
Filmora supports a wide range of video formats, such as MKV, MOV, AVI, WebM and MP4, you can import the video clip shot with Camera, smartphone or camcorder easily to it.
Step 2 Detach Audio
If you want to edit the original audio of the video, you can choose to split the audio file from the video by using the Audio Detach option on Wondershare Filmora. Then, the audio file will be shown in the audio track, and you can cut or trim it.
Note: If you do not want to keep the original audio file in the video, you can delete it from the audio track directly.
Step 3Add Audio Files
Wondershare Filmora offers you multiple royalty free audio effects and music in its rich audio library. What is more, you can also import your own music or audio file from your computer or iTunes. Of course, you should know that the audio should be royalty free for you to make use of. In a different situation, you cannot upload it and benefit from its quality and nature.
Step 4Edit Audio
In this step, you can adjust the audio volume and pitch, etc. There are multiple options for you to benefit from, including the Audio Equalizer, Music, Mix Audio. In this way, you can make sure that the audio is exactly like you have wanted it to be. For further information as to how you can improve the sound quality of your recorded videos, you can check out: How to improve sound quality of recorded videos.
Step 5Save Your Work and Upload on YouTube
If you are satisfied with your work on the audio file and you wish to publish it, the process is quite simple. You just hit Export and select to upload the video to YouTube. After signing in to your YouTube account, you will be ready to start uploading the audio file.
In case you wish to edit the audio from an already published video, you have to download the video first. Then, you can follow the steps above to edit the audio file in Filmora. As one of the widely used video editing software for YouTubers, Filmora is here to empower your imagination. Just download the free trial version and try it now.
Part 2: How to Edit Audio with YouTube Video Editor
Unfortunately, YouTube does not allow users to upload audio files such as MP3, WAV, etc. Instead, you can only upload audio files which are offered by YouTube in the first place. Since YouTube has got a plentiful audio library, you can find a lot of audio there. In this part, we will show you how to add and edit audio with YouTube Video Editor.
You may also like: How to Add Music to YouTube Videos >>
Note: From 20th September 2017 users will no longer be able to use the complimentary editing suite. Check the best YouTube video editor alternatives from this complete guide. In the following part, I will show you how to add audio track , replace the original audio and adjust the audio position and length as well.
- Step 1: Sign in to your YouTube account
- **Step 2:**Click your profile avatar and select Creator Studio option.
- Step 3: In the left pane, go to Video Manager and then click Videos. In the Videos list, choose the video that you want to add new audio track, and then select Audio from the Edit button.
- Step 4: Now you can add or replace the audio in your video. Here you will find that there are various songs and audio files you can choose from. Click ADD TO VIDEO and the audio track will be added to the video directly.
- Step 5: Now you will see the audio track appears at the bottom of the player. Here you can trim and drag the audio bar to adjust the audio positon and length. To Trim the audio, click the beginning or the end of the audio bar and then drag it to the left or right. After trimming, drag it to meet the target position.
Conclusion
Normally, it would be better to add and edit audio to video before updating to YouTube. In this case, Filmora is highly recommended as one of the best video editor for YouTubers , which provides some royalty free music sound in the Music Library to choose from and also the audio editing tools like remove background noise from the video, add fade in and fade out effects with ease or play the video backward or fast forward.
Richard Bennett
Richard Bennett is a writer and a lover of all things video.
Follow @Richard Bennett
Must-Know YouTube Directives for Successful Channels
YouTube has become more than an entertainment now. Most content creators are using the platform to earn and bring their skills to some use. Good knowledge of YouTube Community Guidelines would work in the long run.
The article introduces the YouTube Community and covers how to make community posts on YouTube. Additionally, stay tuned to find out how to get the community tab on YouTube. So let us begin!
In this article
02 How to Make A Community Post on YouTube?
03 How to Get Community Tab on YouTube?
04 How to Make Good Use of Community Tab on YouTube?
Part 1: What is YouTube Community?
Before getting into YouTube community posts, it is crucial to understand what YouTube Community is and how it affects the content creators. The YouTube community is an extensive range of viewers or followers that one needs to grow their channel. Creating a connection with the viewers helps because you have loyal followers; you have got it all.
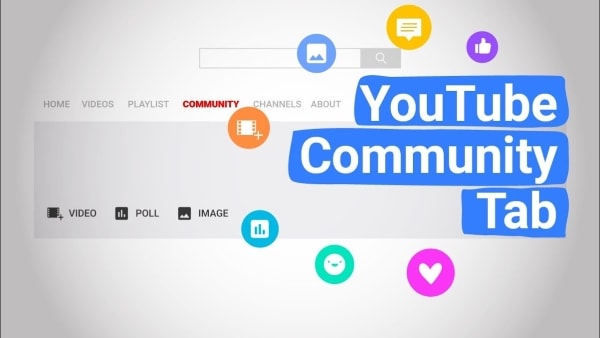
It is because the trusted followers would go above and beyond to share your content to their social media accounts and give you instant feedback. YouTube community tab works like a charm for creators to engage with the audience. They can use YouTube community posts such as polls, ask questions, use GIFs, and interact with the community.
Part 2: How to Make A Community Post on YouTube?
The first question to arise in one’s mind revolves around how to make a community post on YouTube. The community post YouTube helps in interaction with the general public and community. To make community posts YouTube via computer and mobile device, follow the guidelines below in detail.
Community Post YouTube Via Computer
The steps below shall help the reader to make a YouTube community post through the system.
Step 1: Launch YouTube from your browser and log in to your account. Now, click on the “Upload” button located at the top right corner of the screen.

Step 2: Tap on “Create Post” and type the message in the textbox. You can insert an image, GIF, or video as required. Now, pick the type of post.
Step 3: Hit “Post” afterward. The “Community” posts can be accessed from the “Community” tab in your account channel.

Community Post YouTube Via Mobile Phone
To know How to make community posts on YouTube mobile, follow the guidelines below:
Step 1: Launch the YouTube application from your iPhone or Android. Hit the “Create” icon that looks like a video camera located in the top right corner.

Step 2: Click on “Create Post,” add the post to the textbox and upload any required media. Choose the type of post and tap “Post.”
Part 3: How to Get Community Tab on YouTube?
The vital concern to be addressed in this section spins around how to enable a community tab on YouTube. On October 12, 2021, YouTube updated the policy that stated that a channel must have a minimal 500+ subscribers to get community tab YouTube.

Before October, the threshold for subscribers used to be 1000+. Now it has been reduced so that most channels can communicate and engage with the audience. The content creators can access the community tab on YouTube faster by following some pointers and tips.
For once, they can interact with the audience more and find ways to keep them in a loop. It creates a strong community of followers and subscribers. To do so, the account owners can reply to every comment, ask different questions, and pin the best comments. Additionally, you can ask for feedback and opinions in the comment tab to enable the community tab on YouTube.
Ask people their take on a certain stereotype, have a tip from viewers that can be shared with the community, and how they want to see the future. It also makes the community ponder upon the cruel realities of the world and express themselves out loud. You can also make more quality content videos to be a part of the community for good.
Part 4: How to Make Good Use of Community Tab on YouTube?
The users know how to get the community tab on your YouTube channel and how to post community posts on YouTube. It is time to know how to make good use of the community tab on YouTube. Having this knowledge shall help the new and old content creators to use their skills and bring good to the world.
So, without wasting any time, let us begin the process.
Showcase Behind the Scenes and Bloopers
Most viewers crave authenticity more than ever. The regular videos and updates on a channel and scripted and well-crafted, so there is no window for error. However, upload your life updates and BTS scenes from video production to engage the audience and use the community tab to its full potential.
Cross Channel Promotion Process
The community tab helps promote your various vlog or podcasts. It means that you can support new creators in the market and establish a cross-channel promotion network. Engaging with other creators helps the audience know about your community tab YouTube.
Use Teasers and Promos
Using different teasers and promos plays a significant role in developing the well-deserved hype for the show or video. It compels the audience to stay tuned to whatever the channel is bringing to the table. Moreover, the time between working on the video and uploading it can be filled by teasers that promote the upcoming project big time.
Exceptional and Planned Giveaways
Giveaways appear to be a devious plan to lure in the audience. However, if your content is worthy enough to stick around, you don’t need to worry much. Therefore, plan a giveaway and set some rules for it. The circle of interest is widely enhanced using this tactic from the platform of community tab on YouTube.
Hosting Q/A Sessions
Another effective way to use the YouTube community tab to its full potential revolves around hosting a Questions and Answer Session. The general public likes to relate to the bloggers and influencers and know about them. A Q/A session sparks the connection between the two where the viewers ask different personal and professional questions.
It is a huge possibility that you gain new followers, and they stick to the way you communicate and give importance to your subscribers.
Ask for Inspiration and Video
The most common practice of renowned content creators is to engage the audience and ask them for inspiration in the following video. You can ask your subscribers what they want to see you act on and what topic should be covered. Do not hesitate to use polls and gauge interest in general and stereotypical subjects.
Conclusion
YouTube has become a one-stop shop for watching impeccable content and earning through the creation of media. It is vital to know YouTube community guidelines to work better and efficiently.
To create good intros and outros for your YouTube channels, incorporate the usage of Wondershare Filmora . It offers some moving effects and transitions to create a spell-bound impact on the viewers.
Versatile Video Editor - Wondershare Filmora
An easy yet powerful editor
Numerous effects to choose from
Detailed tutorials provided by the official channel
02 How to Make A Community Post on YouTube?
03 How to Get Community Tab on YouTube?
04 How to Make Good Use of Community Tab on YouTube?
Part 1: What is YouTube Community?
Before getting into YouTube community posts, it is crucial to understand what YouTube Community is and how it affects the content creators. The YouTube community is an extensive range of viewers or followers that one needs to grow their channel. Creating a connection with the viewers helps because you have loyal followers; you have got it all.
It is because the trusted followers would go above and beyond to share your content to their social media accounts and give you instant feedback. YouTube community tab works like a charm for creators to engage with the audience. They can use YouTube community posts such as polls, ask questions, use GIFs, and interact with the community.
Part 2: How to Make A Community Post on YouTube?
The first question to arise in one’s mind revolves around how to make a community post on YouTube. The community post YouTube helps in interaction with the general public and community. To make community posts YouTube via computer and mobile device, follow the guidelines below in detail.
Community Post YouTube Via Computer
The steps below shall help the reader to make a YouTube community post through the system.
Step 1: Launch YouTube from your browser and log in to your account. Now, click on the “Upload” button located at the top right corner of the screen.
Step 2: Tap on “Create Post” and type the message in the textbox. You can insert an image, GIF, or video as required. Now, pick the type of post.
Step 3: Hit “Post” afterward. The “Community” posts can be accessed from the “Community” tab in your account channel.
Community Post YouTube Via Mobile Phone
To know How to make community posts on YouTube mobile, follow the guidelines below:
Step 1: Launch the YouTube application from your iPhone or Android. Hit the “Create” icon that looks like a video camera located in the top right corner.
Step 2: Click on “Create Post,” add the post to the textbox and upload any required media. Choose the type of post and tap “Post.”
Part 3: How to Get Community Tab on YouTube?
The vital concern to be addressed in this section spins around how to enable a community tab on YouTube. On October 12, 2021, YouTube updated the policy that stated that a channel must have a minimal 500+ subscribers to get community tab YouTube.
Before October, the threshold for subscribers used to be 1000+. Now it has been reduced so that most channels can communicate and engage with the audience. The content creators can access the community tab on YouTube faster by following some pointers and tips.
For once, they can interact with the audience more and find ways to keep them in a loop. It creates a strong community of followers and subscribers. To do so, the account owners can reply to every comment, ask different questions, and pin the best comments. Additionally, you can ask for feedback and opinions in the comment tab to enable the community tab on YouTube.
Ask people their take on a certain stereotype, have a tip from viewers that can be shared with the community, and how they want to see the future. It also makes the community ponder upon the cruel realities of the world and express themselves out loud. You can also make more quality content videos to be a part of the community for good.
Part 4: How to Make Good Use of Community Tab on YouTube?
The users know how to get the community tab on your YouTube channel and how to post community posts on YouTube. It is time to know how to make good use of the community tab on YouTube. Having this knowledge shall help the new and old content creators to use their skills and bring good to the world.
So, without wasting any time, let us begin the process.
Showcase Behind the Scenes and Bloopers
Most viewers crave authenticity more than ever. The regular videos and updates on a channel and scripted and well-crafted, so there is no window for error. However, upload your life updates and BTS scenes from video production to engage the audience and use the community tab to its full potential.
Cross Channel Promotion Process
The community tab helps promote your various vlog or podcasts. It means that you can support new creators in the market and establish a cross-channel promotion network. Engaging with other creators helps the audience know about your community tab YouTube.
Use Teasers and Promos
Using different teasers and promos plays a significant role in developing the well-deserved hype for the show or video. It compels the audience to stay tuned to whatever the channel is bringing to the table. Moreover, the time between working on the video and uploading it can be filled by teasers that promote the upcoming project big time.
Exceptional and Planned Giveaways
Giveaways appear to be a devious plan to lure in the audience. However, if your content is worthy enough to stick around, you don’t need to worry much. Therefore, plan a giveaway and set some rules for it. The circle of interest is widely enhanced using this tactic from the platform of community tab on YouTube.
Hosting Q/A Sessions
Another effective way to use the YouTube community tab to its full potential revolves around hosting a Questions and Answer Session. The general public likes to relate to the bloggers and influencers and know about them. A Q/A session sparks the connection between the two where the viewers ask different personal and professional questions.
It is a huge possibility that you gain new followers, and they stick to the way you communicate and give importance to your subscribers.
Ask for Inspiration and Video
The most common practice of renowned content creators is to engage the audience and ask them for inspiration in the following video. You can ask your subscribers what they want to see you act on and what topic should be covered. Do not hesitate to use polls and gauge interest in general and stereotypical subjects.
Conclusion
YouTube has become a one-stop shop for watching impeccable content and earning through the creation of media. It is vital to know YouTube community guidelines to work better and efficiently.
To create good intros and outros for your YouTube channels, incorporate the usage of Wondershare Filmora . It offers some moving effects and transitions to create a spell-bound impact on the viewers.
Versatile Video Editor - Wondershare Filmora
An easy yet powerful editor
Numerous effects to choose from
Detailed tutorials provided by the official channel
Also read:
- [Updated] Elevate Audience Engagement Top Hashtag Strategies Revealed
- Multitasking in Broadcast Captivate Viewers Across YT+TW
- In 2024, Becoming a Skin-Deep Sage Setting Up Your Beauty Channel
- [New] 8 Best YouTube Video Promotion Services (Real)
- In 2024, Elevate Your Video Game YouTube Production Mastery
- Econo Audio Amps for Youtubers with Limited Dough
- Fuse Melodies Into Your Youtube Digital Realm
- 2024 Approved Diving Into Popularity Top 10 YouTube Creators by Views & Subs
- [Updated] Achieving YouTube Apex with Smart Management Tools
- [New] Earning Potential Steps to Join the YouTube Premium Club
- [Updated] Converting Your Favourite Tracks Bridging Spotify with YouTube Music
- Shoot Cool Vids From Scratch with Your Mac, Newcomers Guide
- [New] Elegant Aesthetics Mastering YouTube's Beauty Landscape
- [New] Boost Visibility with Customized Channel Names
- Deciphering the Must-Haves for an Enhanced YouTube Experience
- [New] Capture and Relive Your Favorite Moments Anywhere, Anytime The Best in Free Video Downloaders for YouTubes
- [Updated] Elevate Your Digital Footprint Crafting Compelling Shorts Thumbnails
- In 2024, Creating Content with Confidence Free YouTube Training
- [Updated] Choosing the Right YouTube TV Package for You
- [Updated] Climbing to YouTube Zenith A Step-by-Step Guide to Creative Studio Mastery
- Design Dynamics Top 20 Font Choices for YouTube Success for 2024
- [Updated] Download All YouTube Images for Free
- [Updated] Cooking Crusaders YouTube Stars Serving Up Deliciousness
- In 2024, Cultivate Creativity Best Video Concepts for Viewers
- In 2024, Avoid the Backtrack Blunder with These Tips
- YouTube and Instagram Synergy Posting Content Easily
- 2024 Approved Crafting Quality Videos A Guide to Apple Device Screen Recording
- [Updated] Ensuring Correct Ad Revenue A Comprehensive Guide to YT Channel Earnings
- [New] In 2024, Top 5 Screen Capture Tools for W11/W10 Users
- Restore Missing App Icon on Nokia G22 Step-by-Step Solutions | Dr.fone
- [Updated] 2024 Approved Seize Your Facebook Videos with These Leading Apps
- Visual Virtuosos The Ultimate Resource for Filters Perfection for 2024
- [New] Decoding Twitter Archived Content for Clarity for 2024
- Mastering Monetization A Beginner’s Guide to Facebook Revenue
- PicPrankster LaughLens Lab
- In 2024, Mastering Copyright Compliance in Instagram's Musical World
- [New] 2024 Approved Top 10 Online Screen Video Recorders
- How to Reset a Locked Samsung Galaxy A14 5G Phone
- 2024 Approved Twitch Livestream Hacks to Boost Engagement and Followers
- Title: Elevate Your Video's Auditory Experience on YouTube
- Author: Brian
- Created at : 2024-05-25 11:45:10
- Updated at : 2024-05-26 11:45:10
- Link: https://youtube-video-recordings.techidaily.com/elevate-your-videos-auditory-experience-on-youtube/
- License: This work is licensed under CC BY-NC-SA 4.0.
