"Elevate Your Video Watchlist - Activate AV1 on YouTube"
Elevate Your Video Watchlist - Activate AV1 on YouTube
Do you notice that many YouTube videos have been streamed in AV1? YouTube AV1 just happened suddenly a few years ago. This article will inform you about all the things you want to know about AV1 Youtube settings. I will let you know the tutorial to turn in AV1 settings on YouTube and the reason why should choose AV1 along with the others, and some more things about AV1.

Part 1: How to turn on AV1 settings on YouTube?
Do you wonder how to turn on AV1 settings on YouTube? For your information, AV1 is a video codec that is developed by a consortium of companies. It offers you advanced compression, enabling you to do smoother HD streaming and data savings for the video. Google also has already implemented AV1 use on YouTube. To turn on AV1 settings on YouTube, here are the steps:
Step1Go to playback and performance
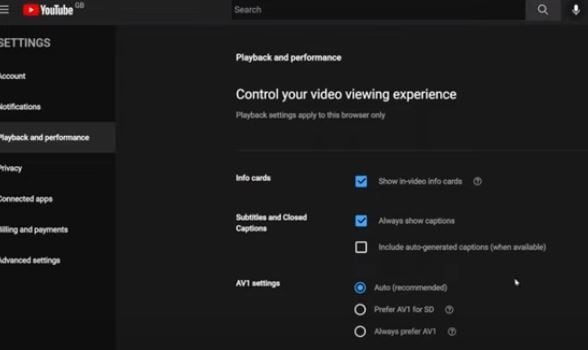
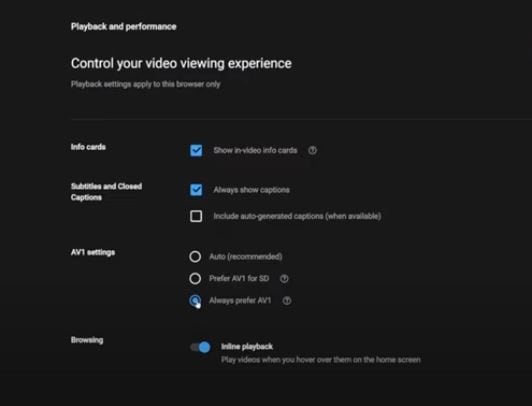
- To turn on the AV1 settings, go to your YouTube account, after that click “Playback and Performance”.
- In the AV1 settings. Besides “Auto (Recommended)”, there are other two options, which are “Prefer AV1 for SD” and also “Always prefer SD”.
- “Always Prefer AV1” uses the codec whenever it is available for a video while “Prefer AV1 for SD” limits it to SD videos. There are two options to avoid low-performance devices when AV1 videos are played on YouTube. You can select “Always Prefer AV1” to see if your device performance is good enough when you play videos on YouTube that support AV1.
Step2Test if the AV1 settings are already enabled in your video
You may ask how to confirm your YouTube videos are playing with AV1 Codec. Well, you can search playlist on YouTube with the keywords “4K, 5K, and 8K videos with the new AV1 Codec “. You can test it by playing one of the videos. You have to right-click on the media player and then select “Stats for nerd”. If it shows the av01 codec there, then the AV1 settings are enabled already.
Part 2: Why choose AV1 over VP9 and other formats?
Now, do you need a reason why you should choose AV1 compared to VP9 and the others? As you know, there is also another video codec like VP9. There are also the others such as VVC, and many more. So what is the superiority of AV1 over the others? I will let you know why you should choose AV1 in this part.
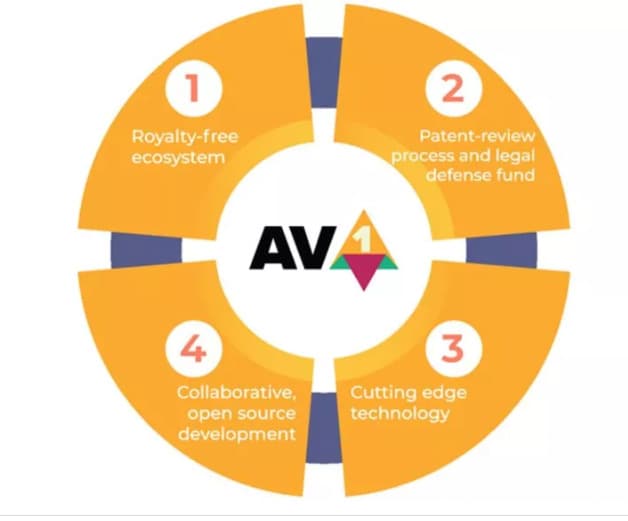
The main thing is, as mentioned before, AV1 is developed by a consortium of companies founded in 2015. It is supported by The Alliance for Open Media (AOMedia) such as Amazon, Facebook, Google, Microsoft, and Netflix, and also by web browser developers and semiconductor firms. Aomedia made it clear the algorithm is free-to-use. It means that there are no greedy negotiators that will be dependent on the developers.
Also, these days, with a format that provides a much smaller workload for internet providers. Their today focus is, that AV1 can reach the quality but can get the job done with 20% more efficiency. Then, with AV1 encoding, a “standard” 4K movie will be much more accessible than it is now. These are some more reasons why you should choose AV1.
1. Royalty-free
As mentioned before, AV1 is royalty-free. AV1 is such a next-generation of royalty video codec. It means that it is not just free to use, but also free of charge, obligations, or even liability. It is an open and royalty-free video codec that the video platform will not charge to pay royalties to the Moving Picture Experts Group (MPEG), the developer of video codecs.
When it comes to the group that will ask for the royalty, MPEG is not the only one. There are also other patent groups and companies that can ask for it. Aomedia integrated Google, Mozilla, and Cisco, while they were busy creating their new video codec. However, the three companies joined together to create one codec to beat them all.
2. Better performance
It is said that the AV1 codec is 30% more efficient. According to the tests conducted by Moscow State University, AV1 can outperform AV1 by about 28% in the efficiency of encoding and decoding. As per the performance graph from the Graphics & Media Lab Video Group, MSU below, AV1 can offer the exactly same quality as X264 at 55% of the average bitrate.
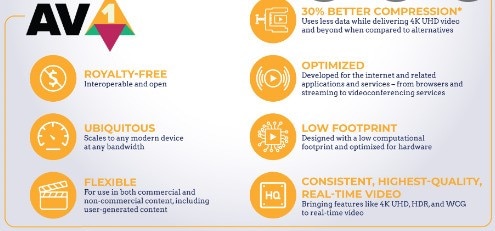
AV1 is designed so exclusively to function better than all the other codecs in the market. It is an open-sourced codec with simple patent licensing, and the integration manages to save, as mentioned, up to 30% of the bandwidth for the exactly same image quality. In other words, with AV1, distributors can send streams much faster and cheaper and we can enjoy higher definitions in the same bandwidth.
3. AV2 to come in the future
AV1 is undoubtedly superior if we compare it to other available video codecs and the exploration of the codec technology AV2 has already begun. This is such an early performance evaluation. There is some interesting part of the exploration development of AV2, such as multiple line selection for Intra prediction can make you select not just neighboring row/column for directional prediction. The same tool also exists in VVC.
There are also three essential improvements, which are simplifying the existing feature (also complete removal) and picking the tool used by VVC/H.266 (It is lack originality but so much work on it) and improvement periodically improvement of an existing tool, it is too few and also not original. We haven’t known yet when AV2 will be done completely though, maybe there still be some more essential improvements.
Part 3: What’s the best video editor for YouTubers with AV1 format?
When we talk about YouTube, it feels incomplete if we don’t talk about the video editor. So, what is the best video editing software for YouTubers with AV1 format? Yes, it is Filmora . It is such a great video editing software that allows you to import and edit many video file formats. Filmora also allows users to export AV1 MP4 format video and then can directly upload it to YouTube.

Filmora gives some ways to export your videos. Here are the five ways. You can also customize the export settings then you can save them to reuse the same settings next time. The first is you can export your project file and video to the local computer. It supports export as MP4, AVI, WMV, AV1, MOV, GoPro Cineform, F4V, MKV, TS, and 3GP.
After that, you can export your video to any device you want, such as iPhone, iPad, Apple TV, Apple TV 4K, iPod, Samsung Galaxy, Smart Phone, Android Generic, Google Pixel, Xbox One, PlayStation 4, PSP, and Smart TV. Then you can upload it to YouTube, Filmora provides you to export your video to Youtube directly. All you need to do is logging your Youtube account and export.
Free Download For Win 7 or later(64-bit)
Free Download For macOS 10.14 or later
Part 4: FAQ: Does YouTube use AV1 or VP9?
For today, YouTube encodes all the videos with the VP9 codec, but for some reason displays for low view count videos. AV1 usage also had been pushed to very low view counts. When it comes to cost or quality tradeoffs, AV1 took about 18 times longer to encode than x264.
Mastering YouTube Thumbnails with Neon Edges
Your YouTube video, or any other clip published on any forum, gets a larger number of hits if it has an attractive thumbnail. And, the fact is, a thumbnail becomes 10x more attractive when the main character that the image has have a neon border around it.
With that said, in the following sections, you will learn a couple of methods on how to add a YouTube thumbnail border around the main characters and/or objects that are significant to the clip.
In this article
01 Add Glowing Neon Border to YouTube Thumbnail with Filmora
02 Add a Glowing Neon Border in YouTube Thumbnail with Canva
03 Outline a Person in a YouTube Thumbnail with Photoshop
Part 1: How to Add Neon Border to YouTube Thumbnail for Free with Filmora
Being one of the most versatile and intuitive post-production tools available in the market today, Wondershare Filmora X allows you to add a neon border to a YouTube thumbnail quite conveniently. You can learn how to get this done on Windows or Mac by following the steps given below.
For Win 7 or later (64-bit)
For macOS 10.12 or later
Step 1: Define Project Settings and Add Image to the Timeline
Launch Wondershare Filmora X on your PC (a MacBook Pro M1 is used here), ensure that the project aspect ratio is set to 16:9 (Widescreen) on the splash screen, and click New Project. On the main interface, click the Preview quality and display settings icon from the upper-right area of the Timeline, click Change Project Aspect Ratio, click to select 1280 x 720 (HD) from the Resolution menu of the Project Settings box, and click OK to save the custom project settings.

Then select My Media from the menu bar if not already selected, click Project Media from the navigation pane, and click Import from the Media box to select and import the image of the main character or object that you want to use in the thumbnail.

Now, drag the image from the Media box to the Timeline at the bottom.

Step 2: Clear Image Background, Add Border, and Add Custom Background
Go to Effects from the menu bar, click to select the Default tab and then AI Portrait from the navigation pane, and click and drag the Human Segmentation preset from the right box, and place it over the image track in the Timeline.

Double-click the image layer, scroll down the upper-left box to the Video Effects section, and use the Edge Thickness and Edge Feather sliders to adjust the character’s edges to make them as realistic as possible. Click OK when done.

Next, click and drag the Human Border preset over the image track in the Timeline, and follow the same procedure to customize the border. This will give the character a neon border effect.

Now, use the method explained earlier to import a custom image for the background, and drag and place it under the previous track in the Timeline.

If you are running the latest version of Filmora, you will find there are some neon light effects available under AI Portrait as well.

Step 3: Add Titles to Thumbnail
Go to Titles from the menu bar, click to select the Default tab and then Lower 3rds from the navigation pane, and click and drag your preferred lower-third preset from the right window to a separate layer in the Timeline. Double-click the lower-third layer, and use the available options in the upper-left window to change the text, its color, etc., and drag the textbox to place it to your preferred position on the image as well. Click OK to save the changes.
Next, click to select Titles from the navigation pane, and drag your preferred title from the right window to the upper-most track in the Timeline. Now use the method explained earlier to edit the text, its color, position, etc. to make it look professional.

For more tips and tricks for creating YouTube thumbnail, you can check this You Tube thumbnail creating guide.
Step 4: Get the Neon Border Thumbnail
Click the Snapshot (Camera) icon from the upper-right area of the Timeline, go to My Media from the menu bar, right-click the thumbnail of the screenshot you captured, and click Reveal in Finder (on Mac) or Reveal in Explorer (on Windows) to get to the folder the YouTube thumbnail border is saved in.

Part 2: How to Add a Glowing Neon Border in Your YouTube Thumbnail with Canva
Canva is another intuitive editing program that works on the web interface rather than having you download and install an app on your PC. You can add a neon border for YouTube thumbnails using Canva by following the instructions given below:
Step 1: Define Project Settings and Add a Background
After signing in to your Canva account, click Create a design from the top-right corner of the page, click Custom size from the bottom, define 1280 and 720 in the Width and Height fields on the box that appears respectively, and click Create new design.

Now, click to select Background from the navigation bar on the left (if the Background tool is not visible, click More and then choose Background from the expanded list), and click to select a background from the images available in the center pane.

Step 2: Upload an Image and Add Effects
Click Uploads from the navigation bar, click the More icon from the right of the Upload media button present at the top of the center pane, choose your preferred method to upload the image (with the transparent background) that you want to use, upload the image, and drag it from the center pane to the Canvas.
Note: You can use any of the tools available online to remove the background from your image for free.

To add a YouTube thumbnail border, make sure that the image that you added to the Canvas is selected, click the Duplicate icon from the upper-right area, and use the scaling handles of the copy of the image to increase its size a bit. Reposition the image back to its original location as well.
Then, click Edit image from the upper-left corner of the Canvas, click Duotone from the Edit image pane at the center, if need be, click See all, choose your preferred duotone effect to apply on the image, choose your preferred highlight and shadow colors from the box that appears next, and click Back from the top of the pane.

Next, click See all next to the Adjust section from the center pane, and drag the Blur slider to the right to increase the blur effect on the image.

Step 3: Position the Layers
While keeping the duplicate image selected, click the Position button from the upper-right area of the Canvas, and click Background to send the second image behind the first one to get the neon border effect for the photo.

Part 3: How to Outline a Person in a YouTube Thumbnail with Photoshop
Because YouTube thumbnails are nothing but static images, creating YouTube thumbnail border with Adobe Photoshop is comparatively easier. The process of doing this is given below:
Step 1: Define Document Preferences and Import an Image
Launch Adobe Photoshop on your PC, click Create new, and on the New Document customization box, define the width and height values to 1280 and 720 pixels respectively. Select Transparent from the Background Contents menu as well if not already selected. Click Create from the bottom to create a new Photoshop document with the specified document settings. Next, open the folder that contains the source image, drag the photo to Photoshop, and press Enter to place the photo.

Step 2: Remove Background from the Image
Make sure that the image layer is selected in the Layers panel on the right, go to Select from the menu bar at the top, and click Subject. From the bottom of the Layers panel, click the Add a mask icon to get rid of the background, leaving only the human on the Canvas.

Step 3: Add a Custom Background and an Outline Around the Subject
Use the method explained earlier to import a background image of your choice to Photoshop. Drag the background image layer to the bottom in the Layers panel. Double-click the masked layer, click to select Stroke from the left pane of the Layer Style box, and use the options available on the right to manage the size, color, position, etc. of the stroke that has been added around the human subject. Click OK when done, and then export the image normally to use it as a YouTube thumbnail border.

Summary
It is important to know that the default resolution of a YouTube thumbnail is 1280 x 720 pixels that is usually written and referred to as 720p. While adding a YouTube thumbnail border, it is also imperative to have a good sense of color combination and fonts. Furthermore, a decent tool like Wondershare Filmora X must be used to add an appealing neon border around the main subject in the thumbnail image easily and quickly.
02 Add a Glowing Neon Border in YouTube Thumbnail with Canva
03 Outline a Person in a YouTube Thumbnail with Photoshop
Part 1: How to Add Neon Border to YouTube Thumbnail for Free with Filmora
Being one of the most versatile and intuitive post-production tools available in the market today, Wondershare Filmora X allows you to add a neon border to a YouTube thumbnail quite conveniently. You can learn how to get this done on Windows or Mac by following the steps given below.
For Win 7 or later (64-bit)
For macOS 10.12 or later
Step 1: Define Project Settings and Add Image to the Timeline
Launch Wondershare Filmora X on your PC (a MacBook Pro M1 is used here), ensure that the project aspect ratio is set to 16:9 (Widescreen) on the splash screen, and click New Project. On the main interface, click the Preview quality and display settings icon from the upper-right area of the Timeline, click Change Project Aspect Ratio, click to select 1280 x 720 (HD) from the Resolution menu of the Project Settings box, and click OK to save the custom project settings.
Then select My Media from the menu bar if not already selected, click Project Media from the navigation pane, and click Import from the Media box to select and import the image of the main character or object that you want to use in the thumbnail.
Now, drag the image from the Media box to the Timeline at the bottom.
Step 2: Clear Image Background, Add Border, and Add Custom Background
Go to Effects from the menu bar, click to select the Default tab and then AI Portrait from the navigation pane, and click and drag the Human Segmentation preset from the right box, and place it over the image track in the Timeline.
Double-click the image layer, scroll down the upper-left box to the Video Effects section, and use the Edge Thickness and Edge Feather sliders to adjust the character’s edges to make them as realistic as possible. Click OK when done.
Next, click and drag the Human Border preset over the image track in the Timeline, and follow the same procedure to customize the border. This will give the character a neon border effect.
Now, use the method explained earlier to import a custom image for the background, and drag and place it under the previous track in the Timeline.
If you are running the latest version of Filmora, you will find there are some neon light effects available under AI Portrait as well.
Step 3: Add Titles to Thumbnail
Go to Titles from the menu bar, click to select the Default tab and then Lower 3rds from the navigation pane, and click and drag your preferred lower-third preset from the right window to a separate layer in the Timeline. Double-click the lower-third layer, and use the available options in the upper-left window to change the text, its color, etc., and drag the textbox to place it to your preferred position on the image as well. Click OK to save the changes.
Next, click to select Titles from the navigation pane, and drag your preferred title from the right window to the upper-most track in the Timeline. Now use the method explained earlier to edit the text, its color, position, etc. to make it look professional.
For more tips and tricks for creating YouTube thumbnail, you can check this You Tube thumbnail creating guide.
Step 4: Get the Neon Border Thumbnail
Click the Snapshot (Camera) icon from the upper-right area of the Timeline, go to My Media from the menu bar, right-click the thumbnail of the screenshot you captured, and click Reveal in Finder (on Mac) or Reveal in Explorer (on Windows) to get to the folder the YouTube thumbnail border is saved in.
Part 2: How to Add a Glowing Neon Border in Your YouTube Thumbnail with Canva
Canva is another intuitive editing program that works on the web interface rather than having you download and install an app on your PC. You can add a neon border for YouTube thumbnails using Canva by following the instructions given below:
Step 1: Define Project Settings and Add a Background
After signing in to your Canva account, click Create a design from the top-right corner of the page, click Custom size from the bottom, define 1280 and 720 in the Width and Height fields on the box that appears respectively, and click Create new design.
Now, click to select Background from the navigation bar on the left (if the Background tool is not visible, click More and then choose Background from the expanded list), and click to select a background from the images available in the center pane.
Step 2: Upload an Image and Add Effects
Click Uploads from the navigation bar, click the More icon from the right of the Upload media button present at the top of the center pane, choose your preferred method to upload the image (with the transparent background) that you want to use, upload the image, and drag it from the center pane to the Canvas.
Note: You can use any of the tools available online to remove the background from your image for free.
To add a YouTube thumbnail border, make sure that the image that you added to the Canvas is selected, click the Duplicate icon from the upper-right area, and use the scaling handles of the copy of the image to increase its size a bit. Reposition the image back to its original location as well.
Then, click Edit image from the upper-left corner of the Canvas, click Duotone from the Edit image pane at the center, if need be, click See all, choose your preferred duotone effect to apply on the image, choose your preferred highlight and shadow colors from the box that appears next, and click Back from the top of the pane.
Next, click See all next to the Adjust section from the center pane, and drag the Blur slider to the right to increase the blur effect on the image.
Step 3: Position the Layers
While keeping the duplicate image selected, click the Position button from the upper-right area of the Canvas, and click Background to send the second image behind the first one to get the neon border effect for the photo.
Part 3: How to Outline a Person in a YouTube Thumbnail with Photoshop
Because YouTube thumbnails are nothing but static images, creating YouTube thumbnail border with Adobe Photoshop is comparatively easier. The process of doing this is given below:
Step 1: Define Document Preferences and Import an Image
Launch Adobe Photoshop on your PC, click Create new, and on the New Document customization box, define the width and height values to 1280 and 720 pixels respectively. Select Transparent from the Background Contents menu as well if not already selected. Click Create from the bottom to create a new Photoshop document with the specified document settings. Next, open the folder that contains the source image, drag the photo to Photoshop, and press Enter to place the photo.
Step 2: Remove Background from the Image
Make sure that the image layer is selected in the Layers panel on the right, go to Select from the menu bar at the top, and click Subject. From the bottom of the Layers panel, click the Add a mask icon to get rid of the background, leaving only the human on the Canvas.
Step 3: Add a Custom Background and an Outline Around the Subject
Use the method explained earlier to import a background image of your choice to Photoshop. Drag the background image layer to the bottom in the Layers panel. Double-click the masked layer, click to select Stroke from the left pane of the Layer Style box, and use the options available on the right to manage the size, color, position, etc. of the stroke that has been added around the human subject. Click OK when done, and then export the image normally to use it as a YouTube thumbnail border.
Summary
It is important to know that the default resolution of a YouTube thumbnail is 1280 x 720 pixels that is usually written and referred to as 720p. While adding a YouTube thumbnail border, it is also imperative to have a good sense of color combination and fonts. Furthermore, a decent tool like Wondershare Filmora X must be used to add an appealing neon border around the main subject in the thumbnail image easily and quickly.
Also read:
- [Updated] 2024 Approved Delving Into LG's High-End Gaming Screen 27UD68 Review
- [Updated] 2024 Approved Simplified HP Laptop Screen Recording - Four Effective Ways
- [Updated] Revolutionize Video Creation Make, Edit & Share on the Go
- 1. Free High-Resolution Video Converter: Quick and Easy Download of 5K & 8K Content
- Best Youthful Adventures: Top Netflix Movie Picks for Everyone
- Download the Ultimate Collection: Top 15 Christmas Anime Films in Full HD (MP4)
- Eradicating Aw, Snap! Faults in Google Chrome Windows
- Expert Tutorial: Successfully Installing and Using Moviebox App on Your IPhone 11 with iOS 13
- Future-Proof Laptops: How Lenovo Addresses Rising Demands for Advanced Artificer Intelligence and Robust Cybersecurity | ZDNet Tech Analysis
- Pace Perfection on Instagram A Guide to Tempo Tweaks for 2024
- Quick and Free Tools - HD YouTube Converter & VPN | Easy Social Media Video Downloads
- Step-by-Step Guide: Adding Your Favorite Tracks From PC/Mac to Your iPhone 11
- The New Face of Collaboration Video Events Post-VidCon for 2024
- Ultimate Guide: Best Free Downloaders for Videos on iPhone 11 Pre iOS 14 Devices
- Uplifting 20 Films That Will Boost Your Drive and Determination
- Title: Elevate Your Video Watchlist - Activate AV1 on YouTube
- Author: Brian
- Created at : 2024-11-28 00:55:53
- Updated at : 2024-12-02 16:03:50
- Link: https://youtube-video-recordings.techidaily.com/elevate-your-video-watchlist-activate-av1-on-youtube/
- License: This work is licensed under CC BY-NC-SA 4.0.