
:max_bytes(150000):strip_icc():format(webp)/coffeecup-free-html-editor-profile-3467555-8876645f89c444c8b94addcf4307b22d.png)
"Edible Imagery Stepwise Food Film Making for 2024"
Edible Imagery: Stepwise Food Film Making
How to Make a Cooking Video in Steps - an Ultimate Guide

Richard Bennett
Mar 27, 2024• Proven solutions
Cooking and food-oriented videos are among the most outreaching and popular categories of content to publish online, notably, on YouTube, Facebook, or Instagram. So if you are a cooking aficionado, you have excellent potential to gain positive attention and a loyal audience. But to create engaging videos, you’d need a lot more than excellent culinary skills. This article aims to enlighten aspiring food and recipe vloggers about the essentials of video making straight out of the oven, to create enriched content that’s professional, neat, and viral-worthy.
- Part 1: What to Prepare Before Making a Recipe Video?
- Part 2: Make a Cooking Video with Filmora: a Step-by-Step Guide
- Part 3: Tips to Make Your Cooking Videos Stand Out
- Part 4: How to Promote Your Cooking Channel on YouTube?
What to Prepare Before Making a Recipe Video
While you would know best about the prep work needed for the recipes, the prep work for making a video starts with a plan. What goes into the plan?
Brainstorm this equation - Main Content + Duration + Light + Sound + Camera + Camera Angle, Shots & Transition.
The main content is how you picture the finished video. Ask yourself - Do you want an intro gig? Are you going to talk in the video or show only hands and the cooking with a piece of background music? How do you wish to present the ingredients? Would there be additional tips? At what platform are you going to publish your content? How long should be your clippings? Consider all these questions to chalk out a basic framework of your video
The camera is a pivotal element. Whether it is a smartphone or a hi-fidelity digital camera, it is worthwhile to familiarise the best positions and light orientations and the capacity of the device to produce the best quality picture.
How is your sound going to be like? If you are going to talk in the video, it is recommended that you use a microphone. Or else, you can also use background sound. But to mix sound with the video, you’d need an excellent sound editing tool.
Finally, comes the editing and finishing part. Eventually, you’ll need purposive video-editing software to help you work out the video transitions, sound, and visual effects.Choose a toolkit that is easy to learn and that you can get comfortable with so that the job of video editing doesn’t take the focus away from the main task of cooking.

Now, once you have all the essential ingredients to create your video, start practicing. Remember that it is the most natural thing for the first videos to appear amateurish or inept. And that is part of the plan. Don’t be disheartened and keep going.
Make a Cooking Video with Filmora: a Step-by-Step Guide
As one of the easiest-to-use video editing tools, the full-featured Filmora is the right choice considering it can fit most of your needs. Moreover, you’d be delighted to know that the software also has a series of features and functions and even tutorial videos dedicated to cooking videos.


Step 1: Filming the Video
Whether you are going to present a traditional cook-with-me style video or feature the contemporary “jump-cut” style focusing on speedy short videos, you need to prepare all the equipment and ingredients to suit the frame by frame shots. Consider spills, drops, overcooking, etc. as part of the process, so keep adequate substitutes to continue with your project unwaveringly. If you are using a phone, keep it fully charged up. And have a plan beforehand about what you should do when you get an urgent call while shooting. Also, consider doing a site investigation of the shooting spot for any fragile items, pointy corners, slippery areas, curious pets, etc. to avoid trips and falls in the middle of the filming, especially when working with a cameraman who’s following your movement. If you are using a tripod, and floor-standing lights, remember to secure the equipment with plenty of adhesive tapes, lest they bump into an expensive trip or fall.
Step 2: mport Your Video In Filmora
You need to sync the device that you used to film the video with the computer that has Filmora installed. It may be a phone or a camcorder. Once the devices are synced, you should launch the Filmora software and go the “Media” button at the top right toolbar. There you will find the “Import” button. You will get a pop-up message asking you to choose the type of device. Select the right one, and your video will be imported in the Filmora interface.
Step 3: Edit Video Pace: Time-Lapse, Jump Cut, Slow Motion
To create crisp, fast-paced videos, you don’t have to gobble up the content eyeing at the duration. Think smart when you have the resources of a tool like Filmora. Here are the three best features that help you create fast-paced yet well-defined recipes.
Time-Lapse: The time-lapse feature allows you to adjust the speed of the video from slow-motion to 10x faster. To use this, double click on a specific clip in your imported video and open the custom speed settings. Use the adjusting meter beside speed to make your clip as fast or slow as you want. You may use the same feature to introduce the slow-motion effects in certain areas of the video.
Now, when you are using either the fast-forward or slow-motion effects, it is best to have stable video footage with consistent lighting and a static background. There are also the options of Reverse Speed that can play the clip backward, as in flash-back. The Ripple edit feature allows you to cut short a long clip seamlessly.
Jump Cut: The Jump Cut is about snipping unwanted areas in the clip. It may sound like the Ripple edit mentioned above, but the ripple edit is more functional for cutting short a continuous video so that the viewer won’t realize the snip. For the Jump Cut, it doesn’t have to be a constant clip. You can get to the next frame or scene with an abracadabra move.
To use Jump Cut, place the cursor over the starting of the clip that you want to cut, and right-click on it and select “Split” (the “scissors” feature on the toolbar does the same thing). To make this look neat, preview the portion of the clip once again and delete the cuts between two clips with the same right-click.
Step 4: Understanding Transitions on Filmora
Transitions make your video more interactive and help you segregate the video from frame-to-frame with effects like dissolve, fade, flash, etc. there are numerous transition options available within the Filmora suit.
The best way to do this drag and drop the clips on the timeline is to trim parts of the clip to shorten it. Once you have all the clips in place, go to the “Transitions” options at the top toolbar to apply it on the end or start of each clip.
Step 5: Audio, Playback & Sound Edits
There are plenty of options that you can remove background noise, add voiceover, add music, and detach audio from video. Refer to the Audios section from your toolbar.
Step 6: Save to Drive/ Emport/ Publish
Once you are satisfied with your content, then go to Export. Choose the format of the video, MOV, MP4, MPG, etc. and whether you wish to publish directly or save to drive.
Tips to Make Your Cooking Videos Stand Out
- Lighting is your best friend. Invest in some quality spotlights or use the best of daylight.
- Mind your video duration. Short and Simple videos get the most views, but your content should not look incomplete. It is not a fact that long and elaborate videos do not get a place on the table; it is all about the relevance of your content. So don’t stop till you get enough.
- If you appear in the video, keep yourself always look good.
- Keep your video titles relevant and prominent, so that people looking for it can readily find it.
- Have a scrumptious custom thumbnail.
How to Promote Your Cooking Channel on YouTube
- Create an inventory before publishing videos. YouTube vlogging is valued for consistency. If you have a list of 10, 15, 20 videos, then you can have enough time in hand to film your next videos.
- Have a consistent style to create brand recognition. Do you think branding is not for Vlogs? Well, I suppose you might be wrong. Branding is for anyone who uses it.
- Share the link of your YouTube videos on other platforms like Twitter and Facebook.
- Encourage your viewers to comment on the video.
- Explore the different YouTube SEO strategies and use the accurate keywords in your video descriptions with hashtags.
With prior planning and practicing, you are bent on developing more confident moves and camera angles. Once you have that, follow this step by step guide to gain speed and prowess and also enjoy the whole adventure.
Richard Bennett
Richard Bennett is a writer and a lover of all things video.
Follow @Richard Bennett
Richard Bennett
Mar 27, 2024• Proven solutions
Cooking and food-oriented videos are among the most outreaching and popular categories of content to publish online, notably, on YouTube, Facebook, or Instagram. So if you are a cooking aficionado, you have excellent potential to gain positive attention and a loyal audience. But to create engaging videos, you’d need a lot more than excellent culinary skills. This article aims to enlighten aspiring food and recipe vloggers about the essentials of video making straight out of the oven, to create enriched content that’s professional, neat, and viral-worthy.
- Part 1: What to Prepare Before Making a Recipe Video?
- Part 2: Make a Cooking Video with Filmora: a Step-by-Step Guide
- Part 3: Tips to Make Your Cooking Videos Stand Out
- Part 4: How to Promote Your Cooking Channel on YouTube?
What to Prepare Before Making a Recipe Video
While you would know best about the prep work needed for the recipes, the prep work for making a video starts with a plan. What goes into the plan?
Brainstorm this equation - Main Content + Duration + Light + Sound + Camera + Camera Angle, Shots & Transition.
The main content is how you picture the finished video. Ask yourself - Do you want an intro gig? Are you going to talk in the video or show only hands and the cooking with a piece of background music? How do you wish to present the ingredients? Would there be additional tips? At what platform are you going to publish your content? How long should be your clippings? Consider all these questions to chalk out a basic framework of your video
The camera is a pivotal element. Whether it is a smartphone or a hi-fidelity digital camera, it is worthwhile to familiarise the best positions and light orientations and the capacity of the device to produce the best quality picture.
How is your sound going to be like? If you are going to talk in the video, it is recommended that you use a microphone. Or else, you can also use background sound. But to mix sound with the video, you’d need an excellent sound editing tool.
Finally, comes the editing and finishing part. Eventually, you’ll need purposive video-editing software to help you work out the video transitions, sound, and visual effects.Choose a toolkit that is easy to learn and that you can get comfortable with so that the job of video editing doesn’t take the focus away from the main task of cooking.
Now, once you have all the essential ingredients to create your video, start practicing. Remember that it is the most natural thing for the first videos to appear amateurish or inept. And that is part of the plan. Don’t be disheartened and keep going.
Make a Cooking Video with Filmora: a Step-by-Step Guide
As one of the easiest-to-use video editing tools, the full-featured Filmora is the right choice considering it can fit most of your needs. Moreover, you’d be delighted to know that the software also has a series of features and functions and even tutorial videos dedicated to cooking videos.
Step 1: Filming the Video
Whether you are going to present a traditional cook-with-me style video or feature the contemporary “jump-cut” style focusing on speedy short videos, you need to prepare all the equipment and ingredients to suit the frame by frame shots. Consider spills, drops, overcooking, etc. as part of the process, so keep adequate substitutes to continue with your project unwaveringly. If you are using a phone, keep it fully charged up. And have a plan beforehand about what you should do when you get an urgent call while shooting. Also, consider doing a site investigation of the shooting spot for any fragile items, pointy corners, slippery areas, curious pets, etc. to avoid trips and falls in the middle of the filming, especially when working with a cameraman who’s following your movement. If you are using a tripod, and floor-standing lights, remember to secure the equipment with plenty of adhesive tapes, lest they bump into an expensive trip or fall.
Step 2: mport Your Video In Filmora
You need to sync the device that you used to film the video with the computer that has Filmora installed. It may be a phone or a camcorder. Once the devices are synced, you should launch the Filmora software and go the “Media” button at the top right toolbar. There you will find the “Import” button. You will get a pop-up message asking you to choose the type of device. Select the right one, and your video will be imported in the Filmora interface.
Step 3: Edit Video Pace: Time-Lapse, Jump Cut, Slow Motion
To create crisp, fast-paced videos, you don’t have to gobble up the content eyeing at the duration. Think smart when you have the resources of a tool like Filmora. Here are the three best features that help you create fast-paced yet well-defined recipes.
Time-Lapse: The time-lapse feature allows you to adjust the speed of the video from slow-motion to 10x faster. To use this, double click on a specific clip in your imported video and open the custom speed settings. Use the adjusting meter beside speed to make your clip as fast or slow as you want. You may use the same feature to introduce the slow-motion effects in certain areas of the video.
Now, when you are using either the fast-forward or slow-motion effects, it is best to have stable video footage with consistent lighting and a static background. There are also the options of Reverse Speed that can play the clip backward, as in flash-back. The Ripple edit feature allows you to cut short a long clip seamlessly.
Jump Cut: The Jump Cut is about snipping unwanted areas in the clip. It may sound like the Ripple edit mentioned above, but the ripple edit is more functional for cutting short a continuous video so that the viewer won’t realize the snip. For the Jump Cut, it doesn’t have to be a constant clip. You can get to the next frame or scene with an abracadabra move.
To use Jump Cut, place the cursor over the starting of the clip that you want to cut, and right-click on it and select “Split” (the “scissors” feature on the toolbar does the same thing). To make this look neat, preview the portion of the clip once again and delete the cuts between two clips with the same right-click.
Step 4: Understanding Transitions on Filmora
Transitions make your video more interactive and help you segregate the video from frame-to-frame with effects like dissolve, fade, flash, etc. there are numerous transition options available within the Filmora suit.
The best way to do this drag and drop the clips on the timeline is to trim parts of the clip to shorten it. Once you have all the clips in place, go to the “Transitions” options at the top toolbar to apply it on the end or start of each clip.
Step 5: Audio, Playback & Sound Edits
There are plenty of options that you can remove background noise, add voiceover, add music, and detach audio from video. Refer to the Audios section from your toolbar.
Step 6: Save to Drive/ Emport/ Publish
Once you are satisfied with your content, then go to Export. Choose the format of the video, MOV, MP4, MPG, etc. and whether you wish to publish directly or save to drive.
Tips to Make Your Cooking Videos Stand Out
- Lighting is your best friend. Invest in some quality spotlights or use the best of daylight.
- Mind your video duration. Short and Simple videos get the most views, but your content should not look incomplete. It is not a fact that long and elaborate videos do not get a place on the table; it is all about the relevance of your content. So don’t stop till you get enough.
- If you appear in the video, keep yourself always look good.
- Keep your video titles relevant and prominent, so that people looking for it can readily find it.
- Have a scrumptious custom thumbnail.
How to Promote Your Cooking Channel on YouTube
- Create an inventory before publishing videos. YouTube vlogging is valued for consistency. If you have a list of 10, 15, 20 videos, then you can have enough time in hand to film your next videos.
- Have a consistent style to create brand recognition. Do you think branding is not for Vlogs? Well, I suppose you might be wrong. Branding is for anyone who uses it.
- Share the link of your YouTube videos on other platforms like Twitter and Facebook.
- Encourage your viewers to comment on the video.
- Explore the different YouTube SEO strategies and use the accurate keywords in your video descriptions with hashtags.
With prior planning and practicing, you are bent on developing more confident moves and camera angles. Once you have that, follow this step by step guide to gain speed and prowess and also enjoy the whole adventure.
Richard Bennett
Richard Bennett is a writer and a lover of all things video.
Follow @Richard Bennett
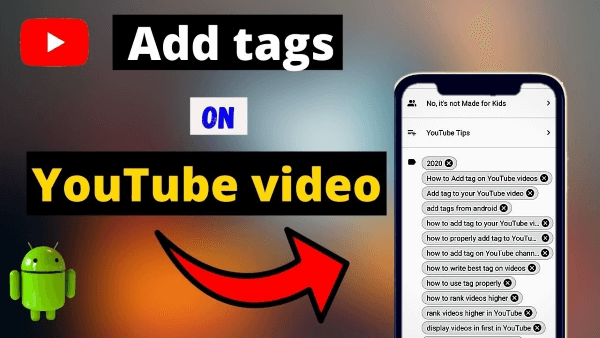
Tips & Tricks to Add Tags to YouTube Video
Create High-Quality Video - Wondershare Filmora
An easy and powerful YouTube video editor
Numerous video and audio effects to choose from
Detailed tutorials provided by the official channel
Tagging your content online greatly impacts how viewers will react to your post. However, it doesn’t end at adding tags; you need to know more. Be savvy to put the tags strategically depending on your topic’s trending. So, why add a tag to YouTube videos? You want to gain enough clicks, yes, right? And that’s what hashtags do. They are online content features that will push the number of clicks to an unimaginable level.
Your content will gain more views and go viral within a short time. After all, that’s what we purpose for when posting videos. No one wants to put effort into editing videos and posting then don’t get a considerable number of views or clicks. But also, know that the ball is at your court. There are no go-zone areas when it comes to dealing with YouTube tags. Check this article on what to do for more views.
In this article
02 How will YouTube tag affect your video performance?
03 Things to consider before you start adding a tag.
04 How to add a tag to YouTube video
What is a YouTube tag?
A tag is a word used to describe a video or image. It is generally added to video titles and descriptions or used independently. They make YouTubers easily discover other posts with similar tags. YouTube tags are vital as they help the YouTube algorithm fully understand the videos you post. It’s by this that those who are interested in your video get hooked to them.
For tags to work ideally, you need to include your brand-specific tags before adding similar tags. YouTube auto-suggest is another gem in this scenario. Just see what YouTube suggests when you type while searching other similar topics. For great results, place the most important keywords and tags first, as these will act as the face of your video.
How will YouTube tag affect your video performance?
It is YouTube tags that help viewers to find videos they are searching for on YouTube. Besides, this is how it works: An audience will type keywords into YouTube’s search bar. Then videos with the same tag and keywords will appear in the search results. If not correctly done, the YouTube tag could affect your video performance and lead to such outcomes.
1. No adequate audience engagement
Your main focus should be audience engagement. You are trying to drive the attention of many YouTube users as possible. A small mistake, and you lose track. It is wise to know the best approach to use your tags. Improper YouTube tagging will not drive enough audience to your channel. You, therefore, won’t get adequate audience engagement.
2. Your video won’t go viral
Anything selling should strive to reach thousands and probably millions of viewers. Perhaps you have put in several days and months of work on a single video, only for it to be viewed by a few fellows. You will feel like a waste of time when you put so much effort, yet your videos don’t go viral. It means there will be fewer people looking out for your content.
3. Limited chances of your video ranking high
If you don’t do YouTube tagging the right way, then the chances are that your video won’t rank high. Everyone feels better when they get a pat on the back for a well-done job. But what happens if there is no traffic to your video? You probably lose the urge to continue doing more videos. Just play right, so you are not demoralized whenever you post your videos.
Things to consider before you start adding a tag
If used properly, YouTube tags are a great way for your video and business to perform well. You’ll attract the audience and probably get a flux of customers. And the tricks are just at your fingertips. You only need to give the best approach possible to all the steps of your YouTube tagging. Here are some tips to help you out.
1) Use keyword variations
Try to use variations of keywords to increase the chances of your video ranking high. The audience will use several phrases to lead them to the right YouTube video. More so, they’ll even change the order of keywords for best results. It would be best to strive to appear in as many searches as possible. The best option is to use the “YouTube” tag generator to gather as many relevant tags as possible. It will pop you more ideas and let you identify the most important core terms that you can build on.
2) Research competitors
This trick works well for you before you add a tag to a YouTube video. Check out what your competitors are up to and what tags they use. While you check at what competitors do, also mind the trending tags. You don’t want to be left behind in the quick-paced technological advances. But ensure your searches are related to your content. Any misleading tags will plunge you into more drawbacks. Checking out on the latest trends will help you generate more ideas for useful keywords that make your videos rank better.
3) Conduct keyword research
Research is a vital point to start from. By this, you’ll find other keyword possibilities for your video. Don’t just think of keywords out of the blue but ensure that the audience searches what you use. It is better to check out the generic relationship between YouTube tags and your video content. Find keywords that will directly link to what your video is all about. You can also find out what has worked for those in your industry to know the best approach to give.
4) Write a keyword-optimized title and description
Ensure that the texts associated with your video are keyword-optimized. Your audience will majorly rely on the video title and description. The description should emphasize more on what the title is. Consider that first, and then find the kinds of tags that would correlate with both your title and description. Besides, it is the best way for your audience to quickly find your videos as the keywords will directly link them.
5) Don’t go overboard
Even though there are no limits on words for YouTube tags, don’t use so many words; it may turn away your audience. Instead, focus on adding relevant tags but don’t stuff in keywords. Going overboard may automatically take you off the topic and mislead your audience.
How to add a tag to a YouTube video
Adding the right YouTube tag will increase the chances of YouTubers finding and watching your video. Here are the steps how to add a tag to a YouTube video.
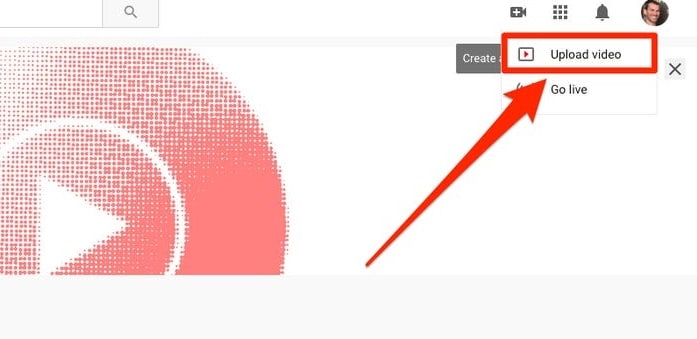
Step 1. First, log in to your YouTube account and hit the “Camera” icon. It is located at the top-right corner of your screen.
Step 2. Check the drop-down menu and choose the “Upload Video” option.
Step 3. Select from your videos which one to upload. Then click on the “Edit” tab to add relevant information like keywords, descriptions, etc.
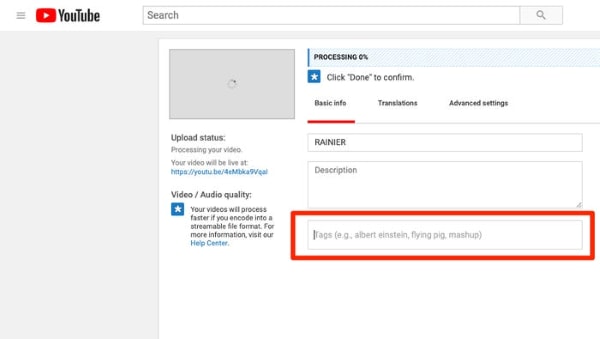
Step 4. Give your video a name and description. Ensure the description correlates to the title of your video.
Step 5. Add relevant tags, separating them with commas. You can use from five to fifteen tags. YouTube may ignore your tags if they are more than 15.
Step 6. Click on the “Save” tab to complete the upload.

Make Your Video Better with Filmora
You may know how to add a tag to a YouTube video, but you might not know how to come up with a compelling piece of video. Filmora works in simple steps to produce a quality video that makes heads turn around. Its powerful editing tools enable you to add several effects for better viewing. It has over 800 stunning effects to enhance your videos with. The export feature also lets you upload your videos to YouTube in any format just with a click of a button.
Key Features
- Edit and export your videos at a high resolution of up to 4K
- Easily remove any background noise from the video
- Make unique clips by slowing them down or increasing speed up to ten times
- It supports GIF files among other output formats
- Easily flip your clips and play them backward.
For Win 7 or later (64-bit)
For macOS 10.12 or later
Conclusion
● YouTube tags play a vital role for you and your potential customers. YouTube’s algorithm uses your tags to match them to similar search queries. When properly utilized, tags can bring an over flux of customers to your video. You have to know how to add a tag to a YouTube video for better results. Remember that YouTube tags can also drive away customers if not properly utilized. We have covered the effects and the best approach when settling on YouTube tags.
● Nonetheless, ensure your videos are top-notch before you tag them around. The best video editor – Filmora – works to produce high-end videos. Try it and gain additional traffic to your video.
Tagging your content online greatly impacts how viewers will react to your post. However, it doesn’t end at adding tags; you need to know more. Be savvy to put the tags strategically depending on your topic’s trending. So, why add a tag to YouTube videos? You want to gain enough clicks, yes, right? And that’s what hashtags do. They are online content features that will push the number of clicks to an unimaginable level.
Your content will gain more views and go viral within a short time. After all, that’s what we purpose for when posting videos. No one wants to put effort into editing videos and posting then don’t get a considerable number of views or clicks. But also, know that the ball is at your court. There are no go-zone areas when it comes to dealing with YouTube tags. Check this article on what to do for more views.
In this article
02 How will YouTube tag affect your video performance?
03 Things to consider before you start adding a tag.
04 How to add a tag to YouTube video
What is a YouTube tag?
A tag is a word used to describe a video or image. It is generally added to video titles and descriptions or used independently. They make YouTubers easily discover other posts with similar tags. YouTube tags are vital as they help the YouTube algorithm fully understand the videos you post. It’s by this that those who are interested in your video get hooked to them.
For tags to work ideally, you need to include your brand-specific tags before adding similar tags. YouTube auto-suggest is another gem in this scenario. Just see what YouTube suggests when you type while searching other similar topics. For great results, place the most important keywords and tags first, as these will act as the face of your video.
How will YouTube tag affect your video performance?
It is YouTube tags that help viewers to find videos they are searching for on YouTube. Besides, this is how it works: An audience will type keywords into YouTube’s search bar. Then videos with the same tag and keywords will appear in the search results. If not correctly done, the YouTube tag could affect your video performance and lead to such outcomes.
1. No adequate audience engagement
Your main focus should be audience engagement. You are trying to drive the attention of many YouTube users as possible. A small mistake, and you lose track. It is wise to know the best approach to use your tags. Improper YouTube tagging will not drive enough audience to your channel. You, therefore, won’t get adequate audience engagement.
2. Your video won’t go viral
Anything selling should strive to reach thousands and probably millions of viewers. Perhaps you have put in several days and months of work on a single video, only for it to be viewed by a few fellows. You will feel like a waste of time when you put so much effort, yet your videos don’t go viral. It means there will be fewer people looking out for your content.
3. Limited chances of your video ranking high
If you don’t do YouTube tagging the right way, then the chances are that your video won’t rank high. Everyone feels better when they get a pat on the back for a well-done job. But what happens if there is no traffic to your video? You probably lose the urge to continue doing more videos. Just play right, so you are not demoralized whenever you post your videos.
Things to consider before you start adding a tag
If used properly, YouTube tags are a great way for your video and business to perform well. You’ll attract the audience and probably get a flux of customers. And the tricks are just at your fingertips. You only need to give the best approach possible to all the steps of your YouTube tagging. Here are some tips to help you out.
1) Use keyword variations
Try to use variations of keywords to increase the chances of your video ranking high. The audience will use several phrases to lead them to the right YouTube video. More so, they’ll even change the order of keywords for best results. It would be best to strive to appear in as many searches as possible. The best option is to use the “YouTube” tag generator to gather as many relevant tags as possible. It will pop you more ideas and let you identify the most important core terms that you can build on.
2) Research competitors
This trick works well for you before you add a tag to a YouTube video. Check out what your competitors are up to and what tags they use. While you check at what competitors do, also mind the trending tags. You don’t want to be left behind in the quick-paced technological advances. But ensure your searches are related to your content. Any misleading tags will plunge you into more drawbacks. Checking out on the latest trends will help you generate more ideas for useful keywords that make your videos rank better.
3) Conduct keyword research
Research is a vital point to start from. By this, you’ll find other keyword possibilities for your video. Don’t just think of keywords out of the blue but ensure that the audience searches what you use. It is better to check out the generic relationship between YouTube tags and your video content. Find keywords that will directly link to what your video is all about. You can also find out what has worked for those in your industry to know the best approach to give.
4) Write a keyword-optimized title and description
Ensure that the texts associated with your video are keyword-optimized. Your audience will majorly rely on the video title and description. The description should emphasize more on what the title is. Consider that first, and then find the kinds of tags that would correlate with both your title and description. Besides, it is the best way for your audience to quickly find your videos as the keywords will directly link them.
5) Don’t go overboard
Even though there are no limits on words for YouTube tags, don’t use so many words; it may turn away your audience. Instead, focus on adding relevant tags but don’t stuff in keywords. Going overboard may automatically take you off the topic and mislead your audience.
How to add a tag to a YouTube video
Adding the right YouTube tag will increase the chances of YouTubers finding and watching your video. Here are the steps how to add a tag to a YouTube video.
Step 1. First, log in to your YouTube account and hit the “Camera” icon. It is located at the top-right corner of your screen.
Step 2. Check the drop-down menu and choose the “Upload Video” option.
Step 3. Select from your videos which one to upload. Then click on the “Edit” tab to add relevant information like keywords, descriptions, etc.
Step 4. Give your video a name and description. Ensure the description correlates to the title of your video.
Step 5. Add relevant tags, separating them with commas. You can use from five to fifteen tags. YouTube may ignore your tags if they are more than 15.
Step 6. Click on the “Save” tab to complete the upload.
Make Your Video Better with Filmora
You may know how to add a tag to a YouTube video, but you might not know how to come up with a compelling piece of video. Filmora works in simple steps to produce a quality video that makes heads turn around. Its powerful editing tools enable you to add several effects for better viewing. It has over 800 stunning effects to enhance your videos with. The export feature also lets you upload your videos to YouTube in any format just with a click of a button.
Key Features
- Edit and export your videos at a high resolution of up to 4K
- Easily remove any background noise from the video
- Make unique clips by slowing them down or increasing speed up to ten times
- It supports GIF files among other output formats
- Easily flip your clips and play them backward.
For Win 7 or later (64-bit)
For macOS 10.12 or later
Conclusion
● YouTube tags play a vital role for you and your potential customers. YouTube’s algorithm uses your tags to match them to similar search queries. When properly utilized, tags can bring an over flux of customers to your video. You have to know how to add a tag to a YouTube video for better results. Remember that YouTube tags can also drive away customers if not properly utilized. We have covered the effects and the best approach when settling on YouTube tags.
● Nonetheless, ensure your videos are top-notch before you tag them around. The best video editor – Filmora – works to produce high-end videos. Try it and gain additional traffic to your video.
Also read:
- Multitask Mastery in Media Co-Watching Channels with Ease
- 2024 Approved Access Exclusive Video Artwork – Free, Flawless, and Fast
- [New] Essential Knowledge for Engaging with ASMR Videos
- Starting a Channel with Confidence – Your Essential Kit
- In 2024, Download Custom MCB Banner Packs
- In 2024, Essential Gear Picking the Very Best Among Top 9 Free Logomakers
- Innovative Techniques for Compelling YouTube Beginnings
- 2024 Approved Altering Who Can Access Your YouTube Videos
- In 2024, Elevating Your YouTube Experience Tips on Channel Art and Sizes
- [Updated] Boosting YouTube Traffic Perfecting Titles & Tags for Max Views
- In 2024, Elevating Your Style with YouTube's Best Hauls
- Dive Into Digital Fandom Top 6 Interactive Questionnaires to Identify Your YouTube Spirituality
- Amplify Your Content Two Approaches to Skyrocket Traffic for 2024
- Mastering Morning Tweets Essential Rules & Prohibitions
- The Video Money Roadmap Dailymotion & YouTube Compared
- Easy Ways to Make a Great Educational Video for YouTube
- [Updated] Channel Title Genius Ideas for Your Video Hub
- 2024 Approved Elevate Your Content Game with These Powerful YouTube Shortcuts
- Toddler Tycoon Turned Teen Titan The Income of a Kid Star
- 2024 Approved Enigmatic Cuts YouTube Magicians at Work
- [Updated] Crafting Closure Secrets of Spectacative Video Sign-Offs
- Navigating the Financial Seas of YouTube Success (CarryMinati)
- Discovering Underrated Gems This Year (Films) for 2024
- In 2024, Conquering Cross-Platform Content Sharing YouTubes & FBs
- 2024 Approved A Peek Into Popularity List of the Top 10 YouTubers
- Champion of Cinematography Audio-Visual Artistry for 2024
- [Updated] Effective Strategies for Removing YouTube Media From Computers
- [New] Elevate Your Day Discovering Youtube's Prime Anime Sources
- Step-by-Step Guide to Rearranging YouTube Playlists
- Channel Dynamo Craft Your Content Empire
- How To Transfer WhatsApp From iPhone 12 to other iPhone 14 devices? | Dr.fone
- Updated 10 Superior Online Tools Transforming How You Tag Your Digital Audio Files for 2024
- Zoom Meetings Enhanced by Top 6 Webcam Options
- [Updated] 11 Audiophile's Choice for Sound Capture
- Updated In 2024, The Best of the Rest Windows Movie Maker Alternative Tools
- Proven Ways in How To Hide Location on Life360 For Realme Narzo N55 | Dr.fone
- Override Auto-Suggesting Feature for Podcasts in Spotify
- 2024 Approved Transform Your Videos 10 Online Rotators to Try
- [Updated] Permanent Banishment From the TikTok Community, Done Right for 2024
- [New] Best Screenshots Programs Ranked #1-8 for 2024
- Title: "Edible Imagery Stepwise Food Film Making for 2024"
- Author: Brian
- Created at : 2024-05-25 11:42:33
- Updated at : 2024-05-26 11:42:33
- Link: https://youtube-video-recordings.techidaily.com/edible-imagery-stepwise-food-film-making-for-2024/
- License: This work is licensed under CC BY-NC-SA 4.0.
