
:max_bytes(150000):strip_icc()/GettyImages-538600261-56c643115f9b5879cc3d6bde.jpg)
"Earn Online via YouTube How Reaching 500 Subscribers Pays Off"
Earn Online via YouTube: How Reaching 500 Subscribers Pays Off
For small creators on YouTube, getting monetized seemed like an uphill task. You had to accumulate over 1,000 subscribers and over 4,000 public watch hours. This can be difficult to attain, especially on a platform where creators are publishing new content every day. However, the 2023 update on the YouTube Partner Program (YPP) provided an easier way to start making money on YouTube. In this article, we look at how the YPP is changing and the beauty of the YouTube monetization 500 subscribers’ policy update.
YouTube Shorts Monetization A cross-platform for helping you present your content in the best way possible!
Free Download Free Download Learn More

Part 1. YouTube Monetization Revamp: 500 Subscribers Minimum Threshold Unveiled
The recent update in YouTube monetization requirements has made it easier than ever for small creators to make money on the platform. The YPP program changed and reduced the number of subscribers needed to be eligible. It has also reduced the amount of watch time needed. Let’s have a look at what the new eligibility criteria look like:

The eligibility criteria for the YPP program are now easier and more achievable than before. To apply, you now need:
- At least 500 subscribers
- Three Shorts or Video uploads in the last 90 days
- At least 3,000 public watch hours in the last 12 months or
- At least 3 million public Short videos in the last 90 days
The new requirements are lower than the old ones. Previously, you were required to have at least 1,000 subscribers with over 4,000 public watch hours. By lowering the threshold, YouTube makes it easier for all creators to monetize their content.
Part 2. YouTube Monetization with 500 Subscribers: A Brief Guide
YouTube announced in 2022 that they were evolving the YPP to continue rewarding more creators. Starting mid-June 2023, the program was expanded to allow more creators to access monetization benefits.
Know If You are Eligible
As a creator, you will want to know if you are eligible for the YouTube monetization 500 subscribers’ plan. Make sure that the notify feature on your channel is active to receive a notification. Go to the Earn area of the YouTube channel, and select Get Notified. Once selected, YouTube will send you an email when reach above the eligibility threshold.

What You Need to Join Expanded YPP
Joining the expanded YouTube Partner Program has the same requirements as the earlier version. These include:
- Being compliant with the YouTube channel monetization policies
- Active 2-Step verification on the Google Account
- Channel is based in any of the available regions or countries
- An active AdSense account linked to the channel
- No Community Guidelines strikes on your Channel
- Have advanced features access on YouTube
Where to Apply for Monetization
After meeting the eligibility criteria, you will need to apply to be enrolled in the YPP. Remember that being eligible does not automatically translate to instant income. You need to apply for the program and wait for the approval. Here are the steps to follow:
On Computer/Desktop
Step 1Sign in to YouTube Studio on your computer or desktop

Step 2Click Earn in the left menu

Step 3Click Apply Now to review and Accept the base terms

Step 4Click Start to set up an AdSense account

On Android, iPhone and iPad
Applying for YouTube monetization on your mobile devices follows the same process as the computer. Only in this case you will using the YouTube Studio app instead of the website. Follow these steps as outlined.
- Open the YouTube Studio mobile app on your Android device.
- Tap Earn from the bottom men
- Tap Apply now to review and accept the base terms.
- Set up an AdSense account as requested, or link an existing active one.
Once you complete these steps on your computer or mobile, In Progress status will surface in the Get Reviewed step. This means that YouTube will review your channel and provide feedback within a month.
What Monetization Review Entails
Once you submit your application, YouTube’s automated systems and human reviewers will look at your channel for a while. They will review it to make sure it follows all the platform’s policies and guidelines. As the reviews are in progress, creators are encouraged to back to the Earn section of YouTube Studio regularly. Typically, you will get the results within a month, but this may be affected by several factors:
- Application Volumes
- Resource Limitations
- System Issues
- Channel requiring several reviewers to determine suitability for YPP
Sometimes the first application may not be successful for some reason. In this case, creators are encouraged to continue uploading original content and try again after 30 days. For second or other rejections, you are allowed to try again after 90 days. During this period, make sure that your channel follows YouTube policies and guidelines to increase your chances of being accepted.
Choose How to Earn
The major way of earning money on YouTube is through ads that show in your videos. In the case of Shorts, the ad-sharing revenue involves YouTube sharing the revenue generated from the ads with creators. However, getting accepted to YPP also allows you to start earning with fan funding and Shopping features. This means that creators can earn money directly from their views using these unique features
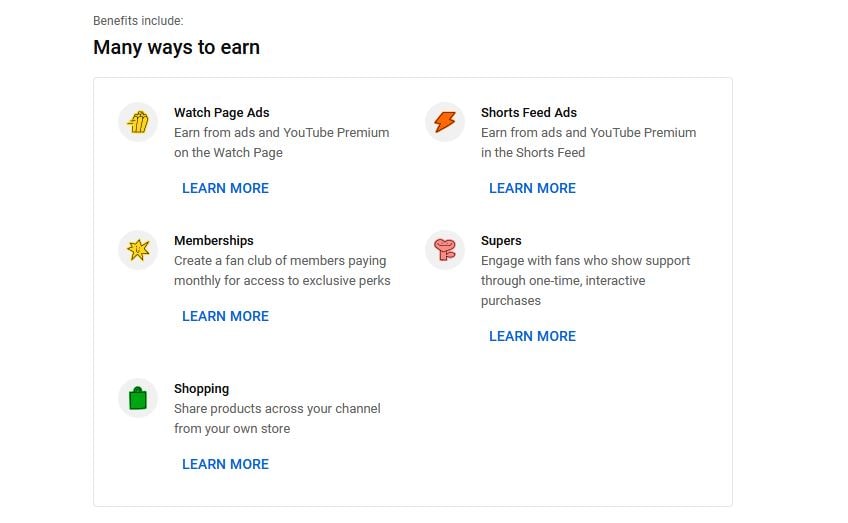
YouTube monetization 500 subscribers update allows you to earn money through monetization features that were not there before. This allows creators to interact more with their viewer while generating income. The main fan funding features include:
- Channel Membership: Offer a membership plan to your viewer through monthly payments in exchange for perks like emojis and badges.
- Super Thanks: Earn revenue from viewers who show extra gratitude for your videos.
- Super Stickers and Super Chat: Allows your fans to buy Super Chats that highlight their messages or add fun animated images in the live chat.
- Shopping: Allows you to connect your official merchandise story to YouTube to showcase your products.
Part 3. Edit Your Shorts for Monetization with WonderShare Filmora
The quality of your Shorts plays an essential role in determining whether your channel will be monetized. This is why you need good video editing software to help you present your content in the best way possible. Wondershare Filmora is a great choice when you want your YouTube Shorts to stand out. From cool green screen tricks to auto-reframing your videos for Shorts, Filmora gives you the whole editing package.
Free Download For Win 7 or later(64-bit)
Free Download For macOS 10.14 or later
Filmora offers creators fantastic editing features to create better Shorts. Let’s have a look at some of the features you may find helpful:
1. AI Copywriting
YouTube Shorts require quick content that covers everything within 60 seconds. With the Filmora AI Copywriting feature, you can get inspiration and add text to your videos. Express your thoughts more clearly and generate text that makes the video more engaging.
2. Split Screen Video Editor
YouTube Shorts are limited to a length of 1 minute only. Since 60 seconds is quite a short time, you may want to showcase your content on multiple screens. The Split Screen Video Editor on Filmora allows you to make a split screen instantly. Choose from the readily available templates and show your audience what you want from multiple perspectives in the same video.
3. Motion Tracking
With YouTube Shorts, you need to be more creative. Adding objects to your videos makes them fun and engaging. The motion tracking feature on Filmora allows you to track the movement of an object in the video. You can then pin graphics on the object, making the video more exciting. You can also add specific text and align it to an object, allowing your audience to follow through the story.
4. Speed Ramping
The way you present your video means a lot to the audience. No one wants a boring or a really slow-moving video. With the Speed Ramping feature on Filmora, you can adjust the speed of your Shorts with better control of your keyframes. This allows you to create unique cinematic effects that keep the audience wanting more of the content.
Conclusion
The introduction of the YouTube monetization 500 subscribers’ policy update was a special moment for small YouTubers. It meant that the platform was extending its YPP program to more creators, allowing them to earn money from their content. Lowering the monetization requirement gives more people a chance to make money faster. However, it is important to make sure that your videos are offering value to your audience. We recommend using Wondershare Filmora to edit your videos and make sure they stand out from the competition. The better your videos will be, the more views you will get, and the more money you will make.
Free Download Free Download Learn More
Part 1. YouTube Monetization Revamp: 500 Subscribers Minimum Threshold Unveiled
The recent update in YouTube monetization requirements has made it easier than ever for small creators to make money on the platform. The YPP program changed and reduced the number of subscribers needed to be eligible. It has also reduced the amount of watch time needed. Let’s have a look at what the new eligibility criteria look like:
The eligibility criteria for the YPP program are now easier and more achievable than before. To apply, you now need:
- At least 500 subscribers
- Three Shorts or Video uploads in the last 90 days
- At least 3,000 public watch hours in the last 12 months or
- At least 3 million public Short videos in the last 90 days
The new requirements are lower than the old ones. Previously, you were required to have at least 1,000 subscribers with over 4,000 public watch hours. By lowering the threshold, YouTube makes it easier for all creators to monetize their content.
Part 2. YouTube Monetization with 500 Subscribers: A Brief Guide
YouTube announced in 2022 that they were evolving the YPP to continue rewarding more creators. Starting mid-June 2023, the program was expanded to allow more creators to access monetization benefits.
Know If You are Eligible
As a creator, you will want to know if you are eligible for the YouTube monetization 500 subscribers’ plan. Make sure that the notify feature on your channel is active to receive a notification. Go to the Earn area of the YouTube channel, and select Get Notified. Once selected, YouTube will send you an email when reach above the eligibility threshold.
What You Need to Join Expanded YPP
Joining the expanded YouTube Partner Program has the same requirements as the earlier version. These include:
- Being compliant with the YouTube channel monetization policies
- Active 2-Step verification on the Google Account
- Channel is based in any of the available regions or countries
- An active AdSense account linked to the channel
- No Community Guidelines strikes on your Channel
- Have advanced features access on YouTube
Where to Apply for Monetization
After meeting the eligibility criteria, you will need to apply to be enrolled in the YPP. Remember that being eligible does not automatically translate to instant income. You need to apply for the program and wait for the approval. Here are the steps to follow:
On Computer/Desktop
Step 1Sign in to YouTube Studio on your computer or desktop
Step 2Click Earn in the left menu
Step 3Click Apply Now to review and Accept the base terms
Step 4Click Start to set up an AdSense account
On Android, iPhone and iPad
Applying for YouTube monetization on your mobile devices follows the same process as the computer. Only in this case you will using the YouTube Studio app instead of the website. Follow these steps as outlined.
- Open the YouTube Studio mobile app on your Android device.
- Tap Earn from the bottom men
- Tap Apply now to review and accept the base terms.
- Set up an AdSense account as requested, or link an existing active one.
Once you complete these steps on your computer or mobile, In Progress status will surface in the Get Reviewed step. This means that YouTube will review your channel and provide feedback within a month.
What Monetization Review Entails
Once you submit your application, YouTube’s automated systems and human reviewers will look at your channel for a while. They will review it to make sure it follows all the platform’s policies and guidelines. As the reviews are in progress, creators are encouraged to back to the Earn section of YouTube Studio regularly. Typically, you will get the results within a month, but this may be affected by several factors:
- Application Volumes
- Resource Limitations
- System Issues
- Channel requiring several reviewers to determine suitability for YPP
Sometimes the first application may not be successful for some reason. In this case, creators are encouraged to continue uploading original content and try again after 30 days. For second or other rejections, you are allowed to try again after 90 days. During this period, make sure that your channel follows YouTube policies and guidelines to increase your chances of being accepted.
Choose How to Earn
The major way of earning money on YouTube is through ads that show in your videos. In the case of Shorts, the ad-sharing revenue involves YouTube sharing the revenue generated from the ads with creators. However, getting accepted to YPP also allows you to start earning with fan funding and Shopping features. This means that creators can earn money directly from their views using these unique features
YouTube monetization 500 subscribers update allows you to earn money through monetization features that were not there before. This allows creators to interact more with their viewer while generating income. The main fan funding features include:
- Channel Membership: Offer a membership plan to your viewer through monthly payments in exchange for perks like emojis and badges.
- Super Thanks: Earn revenue from viewers who show extra gratitude for your videos.
- Super Stickers and Super Chat: Allows your fans to buy Super Chats that highlight their messages or add fun animated images in the live chat.
- Shopping: Allows you to connect your official merchandise story to YouTube to showcase your products.
Part 3. Edit Your Shorts for Monetization with WonderShare Filmora
The quality of your Shorts plays an essential role in determining whether your channel will be monetized. This is why you need good video editing software to help you present your content in the best way possible. Wondershare Filmora is a great choice when you want your YouTube Shorts to stand out. From cool green screen tricks to auto-reframing your videos for Shorts, Filmora gives you the whole editing package.
Free Download For Win 7 or later(64-bit)
Free Download For macOS 10.14 or later
Filmora offers creators fantastic editing features to create better Shorts. Let’s have a look at some of the features you may find helpful:
1. AI Copywriting
YouTube Shorts require quick content that covers everything within 60 seconds. With the Filmora AI Copywriting feature, you can get inspiration and add text to your videos. Express your thoughts more clearly and generate text that makes the video more engaging.
2. Split Screen Video Editor
YouTube Shorts are limited to a length of 1 minute only. Since 60 seconds is quite a short time, you may want to showcase your content on multiple screens. The Split Screen Video Editor on Filmora allows you to make a split screen instantly. Choose from the readily available templates and show your audience what you want from multiple perspectives in the same video.
3. Motion Tracking
With YouTube Shorts, you need to be more creative. Adding objects to your videos makes them fun and engaging. The motion tracking feature on Filmora allows you to track the movement of an object in the video. You can then pin graphics on the object, making the video more exciting. You can also add specific text and align it to an object, allowing your audience to follow through the story.
4. Speed Ramping
The way you present your video means a lot to the audience. No one wants a boring or a really slow-moving video. With the Speed Ramping feature on Filmora, you can adjust the speed of your Shorts with better control of your keyframes. This allows you to create unique cinematic effects that keep the audience wanting more of the content.
Conclusion
The introduction of the YouTube monetization 500 subscribers’ policy update was a special moment for small YouTubers. It meant that the platform was extending its YPP program to more creators, allowing them to earn money from their content. Lowering the monetization requirement gives more people a chance to make money faster. However, it is important to make sure that your videos are offering value to your audience. We recommend using Wondershare Filmora to edit your videos and make sure they stand out from the competition. The better your videos will be, the more views you will get, and the more money you will make.
Superior Streaming Technologies for YouTube Starters
Best YouTube Livestreaming Screen Recorders

Richard Bennett
Oct 26, 2023• Proven solutions
The global pandemic has changed the way we live for the time being, and right now, we cannot attend events in the same way we did at the beginning of the year.
A growing number of cultural organizations, businesses, and influential YouTubers are turning towards YouTube’s Live feature because it provides a simple way of broadcasting different types of content in real-time. YouTube Live is by no means a new option, since the platform first introduced live streaming features in 2008, and some twelve years later, the feature has never been more popular.
However, the live streams you broadcast on YouTube are stored for just a brief period of time, which means you have to search for alternative methods of saving them. That’s why in this article we are going to take you through the best YouTube Live screen recorders you can use to capture the video content you are sharing with your followers.
Note: We resolutely oppose all forms of copyright-infringing downloads. This tutorial is only for downloading YouTube videos/audio materials from your own channel.
Top 10+ YouTube Live Screen Recorders
The maximum resolution in which you can record computer screen , audio recording options, or customization of the recording area are some of the most important features you need to consider while choosing a YouTube Live screen recorder.
We have selected some of the best YouTube Live screen recorders that enable you to do much more than just record live streams. So, let’s take a look at what they have to offer.
1. OBS Studio
Price: Free
Compatibility: Windows, Linux, macOS
The vast majority of live streams you can find on Twitch and YouTube are made with OBS Studio, but besides broadcasting videos, the software also gives you access to screencasting tools. This means that you can specify the area of the screen you want to record, choose the recording’s resolution and frame rate, or adjust the audio recording options.
OBS Studio is the best free, open-source screen recording program you can download. You shouldn’t use a software just because it’s free, but OBS Studio is also an extremely versatile tool. You can both record and stream in high definition and it comes with the ability to record either through your webcam or through your screen. It records directly through the graphics card , which means it can capture games even when in full-screen mode whereas a lot of other screen-recording software forces you to play games in windowed mode. The high quality can be seen easily in whatever you choose to broadcast.
OBS Studio allows you to record videos from a variety of sources, which makes it a perfect option for capturing the content you share through YouTube Live since you can select a browser window you want to capture in just a few clicks. What’s more, this open-source software is equipped with basic video editing tools, which enables you to preview the video you recorded before publishing it, apply transitions between cuts, or perform basic color correction.
Check the detailed guide to How to Record with OBS .
2. XSplit
Price: $24.95 for a three-month license
Compatibility: Windows
This is yet another broadcasting software that is equipped with powerful screen recording tools. Setting up a new screencasting session with XSplit is a simple and intuitive process that is not going to take much more than a few moments of your time.
All you need to do is define a workspace, then pick the preferred resolution and frame rate. The software allows you to capture screens in 4K resolution and at 60 fps, but it also offers a variety of resolution and frame rate options so that you can choose the one that best fits your needs. Furthermore, you can record the computer audio, which enables you to capture the live stream’s audio in excellent quality. Besides YouTube Live, XSplit can be used with Zoom , Skype, Google Hangouts, and numerous other live streaming and video calling apps.
3. Filmora
Price: Free, pricing plans start at $49.99/year
Compatibility: macOS, Windows


If you are looking for a screen recorder that is stacked with powerful video editing features, then Filmora is a great option for you. Customizing a YouTube Live or any other screencasting session with this video editing software is easy, and you can choose the resolution, frame rate, or even if you want to show mouse clicks in the recording.
Capturing the webcam feed and the computer’s screen simultaneously is also an option, while you can also decide whether or not you want to record audio from a microphone, computer audio, or both at the same time.
What’s more Filmora lets you set up the maximum duration of a screen recording and you start, pause, resume or stop a screen recording session by using hotkeys. Once you are done recording the live stream you shared on YouTube, you can edit the footage you created before uploading it to your YouTube channel.
4. Wondershare DemoCreator
Compatibility: Windows
Price: Start from $9.99
DemoCreator is a recorder that focuses its overall user experience. It is able to easily record high-quality videos at up to 120 FPS (60 FPS for Mac) and allows you to simultaneously record both your screen and webcam. This software is incredibly user friendly and makes for an easy experience for new streamers. The dual recording makes it great for gamers who are also looking to film their reactions.
5. CloudApp
Price: Free, $10 per month for an individual user
Compatibility: Windows, macOS, Linux, Chrome
Starting a new screen capturing session with the CloudApp requires you to just specify the portion of the screen you want to capture and hit the record button. Moreover, you can choose if you want to record with or without a webcam and you have the option to enable or disable the audio recording option.
However, you can only create 90-second screen recordings with the free version of the CloudApp and you cannot set resolution or frame rate of the recording. That’s why you need to upgrade to the Pro version if you want to use it to record live streams on YouTube. The Pro subscription model also grants you access to basic video editing tools and a variety of file sharing options. In addition, CloudApp lets you create and annotate still images and GIFs, which makes it a great option for digital marketers.
6. Techsmith Camtasia
Price: Free trial, $269.05 one-time fee
Compatibility: Windows, macOS
You don’t need years of video editing experience to start a new screen recording session in Camtasia. In fact, you just have to click on the Record button that is located in the software’s tool panel and then customize the settings.
Camtasia lets you choose if you want to record the full screen or just a selected portion of the screen or decide if you want to switch the webcam or the microphone off. You should make sure that the System Audio feature is enabled in order to record the sound of the live stream you’re sharing on YouTube. Pausing or stopping a screencasting session requires you to either click on the appropriate buttons or use the keyboard-based hotkeys. After you are done recording a live stream you can edit the footage using Camtasia’s video editing tools.
7. ScreenRec
Price: Free
Compatibility: Windows, macOS, Linux
Recording any live stream or TV show you play on your computer with ScreenRec is a straightforward process that can be completed in just a few clicks. Simply drag the mouse cursor over the area you want to record, then hit the Record button when you are ready and ScreenRec will start capturing the computer screen.
Once the screencasting session is completed you will get a sharable link that can be embedded to a website or used to save an MP4 file on your hard drive. Furthermore, ScreenRec is equipped with analytics tools that show you how many views your videos attracted or for how long each visitor watched them. All of these features make ScreenRec an excellent option for anyone who wants to record a live stream on YouTube or any other on-screen activity.
8. Flashback Express
Price: Free
Compatibility: Windows
Flashback Express is a simple screen recorder that lets you create high-res videos effortlessly. Setting up a new screencasting session requires you to just specify the area of the screen you want to record, choose whether or not you want to record the webcam feed and hit the Record button.
There are no restrictions in terms of the duration of screen recordings you can make with Flashback Express and the software doesn’t watermark the video you create.
However, you can only save the files in MP4, AVI, or WMW formats and you cannot adjust the video’s frame rate or resolution. What’s more, editing videos or applying effects with Flashback Express isn’t possible and you must upgrade to FlashBack Pro if you want to edit the live streams you broadcast on YouTube.
This piece of software is user friendly, but it doesn’t have as many features as other products on the market. Having said that, it is still an excellent tool that will help you live stream gameplay easily. Although it doesn’t come with built-in video editing software, it is possible to download another program to do this for you (i.e. Filmora). Flashback Express has the ability to record through your headset or microphone as well.
9. VLC
Price: Free
Compatibility: macOS, Linux, Windows
This is an iconic media player that became famous for its versatility and support for nearly all video file formats. Besides being one of the best media players ever created, VLC is also equipped with screen recording and video editing tools.
In order to start a new screencasting session, you will have to go to the Media menu and then select the Open Capture Device option. Once the new window pops up on the screen you should change the Capture Mode to Desktop and then adjust the frame rate in accordance with your needs.
Click on the Play button, and then hit the Record button after the screen recording window appears on the screen. You can only record the entire screen with VLC, since customizing the recording area isn’t an option, and all your files will be captured in the RAW format which means that you may have to resize them before you upload them to YouTube.
10. Screencast-o-matic
Price: Free, pricing options start at $1.65 per month
Compatibility: macOS, Windows
As its name suggests, this software product makes the screen recording process almost automatic. You can choose if you want to record an entire screen or just a window you selected. In addition, Screencast-o-matic lets you record the desktop and webcam footage at the same time, and you can even zoom in while the screencasting session is still in progress.
The free version of the software offers only a basic set of features that doesn’t include the option to record system audio. This means that you have to opt for one of the available subscription models if you want to record your live streams on YouTube with Screencast-o-matic. What’s more, you will be to create videos that are longer than 15 minutes, create recordings without watermarks or add music to your recordings if you opt for Deluxe or Premiere pricing options.
11. QuickTime Player
Price: Free
Compatibility: macOS, Windows
Mac users who want to record content that is broadcasted via YouTube Live can do so without having to install a third-party app. Apple ceased the support for the Windows-based version of QuickTime Player in 2016 and PC users can only capture their screens with this software if they have some of its earlier versions.
In order to start a new screen recording session in QuickTime Player, you just have to go to the File menu and select the New Screen Recording option. The Screen Recording window where you can choose if you want to record audio or show mouse click in the recording will pop up on the screen. QuickTime Player lets you choose if you want to capture the entire screen or just a portion of it, and you can click on the Record button to start a new screencasting session. In order to save a video file you created, you just have to go to the File menu and pick the Save option.
How to Record a YouTube Live Stream with Filmora
Recording a YouTube Live stream with Filmora is easy even if you never went through this process before. You can set up a new screencasting session in just a few easy steps that won’t take more than a few moments to complete. Here’s what you need to do:
Step 1: Launch Filmora and create a new project. Go to the Media tab once the video editor’s main window loads and click on the Record drop-down menu that is located next to the Import drop-down menu.
Choose the Record PC Screen option and then proceed to customize the settings for your screencasting session.

Step 2: Click on the Rectangular icon in the upper left corner of the Wondershare Filmora Scrn window and choose either Full Screen, Custom, or Target Window option, depending on how you want to record a YouTube Live stream to define the area of the screen that is going to be recorded.
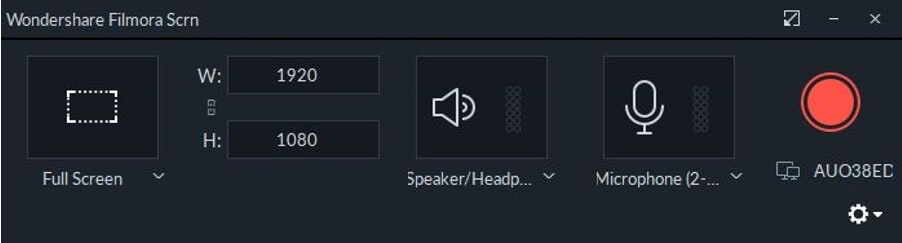
You can then proceed to insert the resolution your screen recording is going to have, and choose if you want to record system audio and sound from an external microphone.
Step 3: Click on the Gear icon below the Record button to gain access to additional settings, and then proceed to set the frame rate, adjust the video’s quality or activate the Show Mouse Clicks in Recording option.
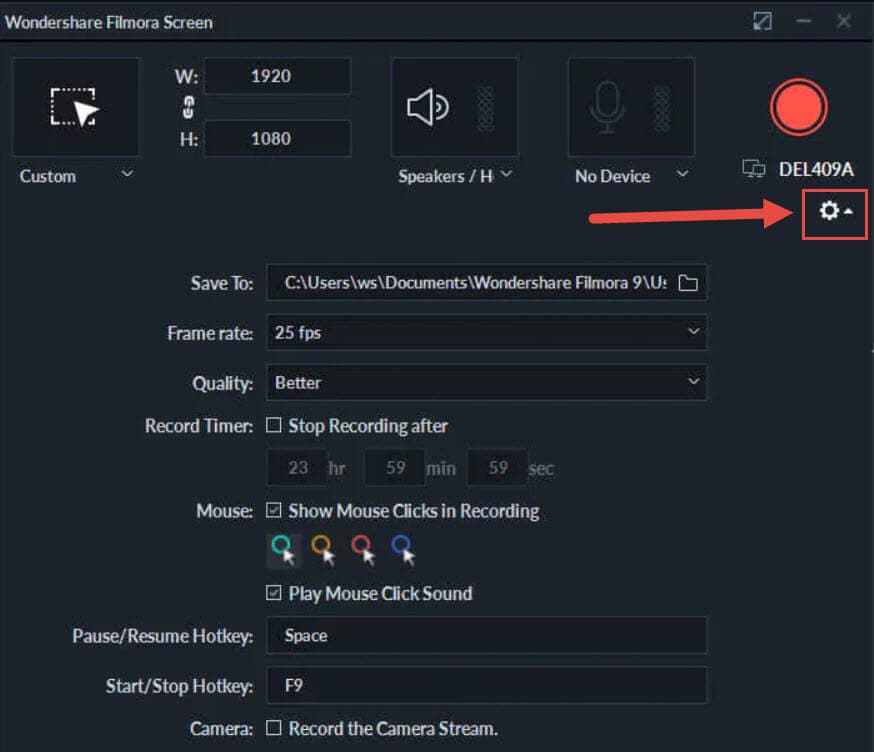
Make sure that the checkbox next to the Record the Camera Stream is marked if you want to record webcam feed and computer desktop at the same time.
Step 4: Press the red Record button in the upper right corner of the window and jump to the live stream. Once the broadcast is completed, you should click on the Stop button and use Filmora’s editing tools to remove all imperfections from the recording.
Filmora allows you to export all of your projects directly to your YouTube channel immediately after the rendering process is completed.
Frequently Asked Questions about YouTube Live Screen Recorders
1. Does YouTube Save Live Videos?
Stream Now, Mobile, Webcam, and Events streams can be stored automatically for 12 hours after they end. You can access all of your live streams by clicking on the Videos menu in the YouTube Studio and selecting the Live option and then change the Privacy setting in the Visibility menu.
2. How to use YouTube to Archive a Live Stream?
Once the live stream ends, you should go to the Dashboard and click on the Live feature, and then choose the Stream option. Check the Make Archive Unlisted When Complete checkbox and the live stream video will be saved accordingly.
Richard Bennett
Richard Bennett is a writer and a lover of all things video.
Follow @Richard Bennett
Richard Bennett
Oct 26, 2023• Proven solutions
The global pandemic has changed the way we live for the time being, and right now, we cannot attend events in the same way we did at the beginning of the year.
A growing number of cultural organizations, businesses, and influential YouTubers are turning towards YouTube’s Live feature because it provides a simple way of broadcasting different types of content in real-time. YouTube Live is by no means a new option, since the platform first introduced live streaming features in 2008, and some twelve years later, the feature has never been more popular.
However, the live streams you broadcast on YouTube are stored for just a brief period of time, which means you have to search for alternative methods of saving them. That’s why in this article we are going to take you through the best YouTube Live screen recorders you can use to capture the video content you are sharing with your followers.
Note: We resolutely oppose all forms of copyright-infringing downloads. This tutorial is only for downloading YouTube videos/audio materials from your own channel.
Top 10+ YouTube Live Screen Recorders
The maximum resolution in which you can record computer screen , audio recording options, or customization of the recording area are some of the most important features you need to consider while choosing a YouTube Live screen recorder.
We have selected some of the best YouTube Live screen recorders that enable you to do much more than just record live streams. So, let’s take a look at what they have to offer.
1. OBS Studio
Price: Free
Compatibility: Windows, Linux, macOS
The vast majority of live streams you can find on Twitch and YouTube are made with OBS Studio, but besides broadcasting videos, the software also gives you access to screencasting tools. This means that you can specify the area of the screen you want to record, choose the recording’s resolution and frame rate, or adjust the audio recording options.
OBS Studio is the best free, open-source screen recording program you can download. You shouldn’t use a software just because it’s free, but OBS Studio is also an extremely versatile tool. You can both record and stream in high definition and it comes with the ability to record either through your webcam or through your screen. It records directly through the graphics card , which means it can capture games even when in full-screen mode whereas a lot of other screen-recording software forces you to play games in windowed mode. The high quality can be seen easily in whatever you choose to broadcast.
OBS Studio allows you to record videos from a variety of sources, which makes it a perfect option for capturing the content you share through YouTube Live since you can select a browser window you want to capture in just a few clicks. What’s more, this open-source software is equipped with basic video editing tools, which enables you to preview the video you recorded before publishing it, apply transitions between cuts, or perform basic color correction.
Check the detailed guide to How to Record with OBS .
2. XSplit
Price: $24.95 for a three-month license
Compatibility: Windows
This is yet another broadcasting software that is equipped with powerful screen recording tools. Setting up a new screencasting session with XSplit is a simple and intuitive process that is not going to take much more than a few moments of your time.
All you need to do is define a workspace, then pick the preferred resolution and frame rate. The software allows you to capture screens in 4K resolution and at 60 fps, but it also offers a variety of resolution and frame rate options so that you can choose the one that best fits your needs. Furthermore, you can record the computer audio, which enables you to capture the live stream’s audio in excellent quality. Besides YouTube Live, XSplit can be used with Zoom , Skype, Google Hangouts, and numerous other live streaming and video calling apps.
3. Filmora
Price: Free, pricing plans start at $49.99/year
Compatibility: macOS, Windows
If you are looking for a screen recorder that is stacked with powerful video editing features, then Filmora is a great option for you. Customizing a YouTube Live or any other screencasting session with this video editing software is easy, and you can choose the resolution, frame rate, or even if you want to show mouse clicks in the recording.
Capturing the webcam feed and the computer’s screen simultaneously is also an option, while you can also decide whether or not you want to record audio from a microphone, computer audio, or both at the same time.
What’s more Filmora lets you set up the maximum duration of a screen recording and you start, pause, resume or stop a screen recording session by using hotkeys. Once you are done recording the live stream you shared on YouTube, you can edit the footage you created before uploading it to your YouTube channel.
4. Wondershare DemoCreator
Compatibility: Windows
Price: Start from $9.99
DemoCreator is a recorder that focuses its overall user experience. It is able to easily record high-quality videos at up to 120 FPS (60 FPS for Mac) and allows you to simultaneously record both your screen and webcam. This software is incredibly user friendly and makes for an easy experience for new streamers. The dual recording makes it great for gamers who are also looking to film their reactions.
5. CloudApp
Price: Free, $10 per month for an individual user
Compatibility: Windows, macOS, Linux, Chrome
Starting a new screen capturing session with the CloudApp requires you to just specify the portion of the screen you want to capture and hit the record button. Moreover, you can choose if you want to record with or without a webcam and you have the option to enable or disable the audio recording option.
However, you can only create 90-second screen recordings with the free version of the CloudApp and you cannot set resolution or frame rate of the recording. That’s why you need to upgrade to the Pro version if you want to use it to record live streams on YouTube. The Pro subscription model also grants you access to basic video editing tools and a variety of file sharing options. In addition, CloudApp lets you create and annotate still images and GIFs, which makes it a great option for digital marketers.
6. Techsmith Camtasia
Price: Free trial, $269.05 one-time fee
Compatibility: Windows, macOS
You don’t need years of video editing experience to start a new screen recording session in Camtasia. In fact, you just have to click on the Record button that is located in the software’s tool panel and then customize the settings.
Camtasia lets you choose if you want to record the full screen or just a selected portion of the screen or decide if you want to switch the webcam or the microphone off. You should make sure that the System Audio feature is enabled in order to record the sound of the live stream you’re sharing on YouTube. Pausing or stopping a screencasting session requires you to either click on the appropriate buttons or use the keyboard-based hotkeys. After you are done recording a live stream you can edit the footage using Camtasia’s video editing tools.
7. ScreenRec
Price: Free
Compatibility: Windows, macOS, Linux
Recording any live stream or TV show you play on your computer with ScreenRec is a straightforward process that can be completed in just a few clicks. Simply drag the mouse cursor over the area you want to record, then hit the Record button when you are ready and ScreenRec will start capturing the computer screen.
Once the screencasting session is completed you will get a sharable link that can be embedded to a website or used to save an MP4 file on your hard drive. Furthermore, ScreenRec is equipped with analytics tools that show you how many views your videos attracted or for how long each visitor watched them. All of these features make ScreenRec an excellent option for anyone who wants to record a live stream on YouTube or any other on-screen activity.
8. Flashback Express
Price: Free
Compatibility: Windows
Flashback Express is a simple screen recorder that lets you create high-res videos effortlessly. Setting up a new screencasting session requires you to just specify the area of the screen you want to record, choose whether or not you want to record the webcam feed and hit the Record button.
There are no restrictions in terms of the duration of screen recordings you can make with Flashback Express and the software doesn’t watermark the video you create.
However, you can only save the files in MP4, AVI, or WMW formats and you cannot adjust the video’s frame rate or resolution. What’s more, editing videos or applying effects with Flashback Express isn’t possible and you must upgrade to FlashBack Pro if you want to edit the live streams you broadcast on YouTube.
This piece of software is user friendly, but it doesn’t have as many features as other products on the market. Having said that, it is still an excellent tool that will help you live stream gameplay easily. Although it doesn’t come with built-in video editing software, it is possible to download another program to do this for you (i.e. Filmora). Flashback Express has the ability to record through your headset or microphone as well.
9. VLC
Price: Free
Compatibility: macOS, Linux, Windows
This is an iconic media player that became famous for its versatility and support for nearly all video file formats. Besides being one of the best media players ever created, VLC is also equipped with screen recording and video editing tools.
In order to start a new screencasting session, you will have to go to the Media menu and then select the Open Capture Device option. Once the new window pops up on the screen you should change the Capture Mode to Desktop and then adjust the frame rate in accordance with your needs.
Click on the Play button, and then hit the Record button after the screen recording window appears on the screen. You can only record the entire screen with VLC, since customizing the recording area isn’t an option, and all your files will be captured in the RAW format which means that you may have to resize them before you upload them to YouTube.
10. Screencast-o-matic
Price: Free, pricing options start at $1.65 per month
Compatibility: macOS, Windows
As its name suggests, this software product makes the screen recording process almost automatic. You can choose if you want to record an entire screen or just a window you selected. In addition, Screencast-o-matic lets you record the desktop and webcam footage at the same time, and you can even zoom in while the screencasting session is still in progress.
The free version of the software offers only a basic set of features that doesn’t include the option to record system audio. This means that you have to opt for one of the available subscription models if you want to record your live streams on YouTube with Screencast-o-matic. What’s more, you will be to create videos that are longer than 15 minutes, create recordings without watermarks or add music to your recordings if you opt for Deluxe or Premiere pricing options.
11. QuickTime Player
Price: Free
Compatibility: macOS, Windows
Mac users who want to record content that is broadcasted via YouTube Live can do so without having to install a third-party app. Apple ceased the support for the Windows-based version of QuickTime Player in 2016 and PC users can only capture their screens with this software if they have some of its earlier versions.
In order to start a new screen recording session in QuickTime Player, you just have to go to the File menu and select the New Screen Recording option. The Screen Recording window where you can choose if you want to record audio or show mouse click in the recording will pop up on the screen. QuickTime Player lets you choose if you want to capture the entire screen or just a portion of it, and you can click on the Record button to start a new screencasting session. In order to save a video file you created, you just have to go to the File menu and pick the Save option.
How to Record a YouTube Live Stream with Filmora
Recording a YouTube Live stream with Filmora is easy even if you never went through this process before. You can set up a new screencasting session in just a few easy steps that won’t take more than a few moments to complete. Here’s what you need to do:
Step 1: Launch Filmora and create a new project. Go to the Media tab once the video editor’s main window loads and click on the Record drop-down menu that is located next to the Import drop-down menu.
Choose the Record PC Screen option and then proceed to customize the settings for your screencasting session.
Step 2: Click on the Rectangular icon in the upper left corner of the Wondershare Filmora Scrn window and choose either Full Screen, Custom, or Target Window option, depending on how you want to record a YouTube Live stream to define the area of the screen that is going to be recorded.
You can then proceed to insert the resolution your screen recording is going to have, and choose if you want to record system audio and sound from an external microphone.
Step 3: Click on the Gear icon below the Record button to gain access to additional settings, and then proceed to set the frame rate, adjust the video’s quality or activate the Show Mouse Clicks in Recording option.
Make sure that the checkbox next to the Record the Camera Stream is marked if you want to record webcam feed and computer desktop at the same time.
Step 4: Press the red Record button in the upper right corner of the window and jump to the live stream. Once the broadcast is completed, you should click on the Stop button and use Filmora’s editing tools to remove all imperfections from the recording.
Filmora allows you to export all of your projects directly to your YouTube channel immediately after the rendering process is completed.
Frequently Asked Questions about YouTube Live Screen Recorders
1. Does YouTube Save Live Videos?
Stream Now, Mobile, Webcam, and Events streams can be stored automatically for 12 hours after they end. You can access all of your live streams by clicking on the Videos menu in the YouTube Studio and selecting the Live option and then change the Privacy setting in the Visibility menu.
2. How to use YouTube to Archive a Live Stream?
Once the live stream ends, you should go to the Dashboard and click on the Live feature, and then choose the Stream option. Check the Make Archive Unlisted When Complete checkbox and the live stream video will be saved accordingly.
Richard Bennett
Richard Bennett is a writer and a lover of all things video.
Follow @Richard Bennett
Also read:
- [New] Become a Science Whiz with These Prime 15 YouTube Picks
- Top 10 Yoga YouTube Channels to Follow - Keep Fit
- Scaling YouTube Earnings Device-Independent Studio Tactics
- Filmmaking Simplified Create an Inviting YouTube Subscription Button in Filmora
- 2024 Approved Cutting Edge Cadence Exclusive, Perfected DJ Templates Online
- Premium Video Starters The Best 16 to Skyrocket View Counts
- Craft the Ultimate Outro with Pro Maker Advice
- YouTube Collabs How to Find YouTube Collaboration Partners?
- A New Era of Streaming Leading Voices of Female Creators for 2024
- Optimizing Video Exposure on YouTube with High-Impact Channels
- Ultimate Tutorial Implementing Gamers' Channel Banners
- In 2024, A List of the Quickest Rising YouTube Spaces for Encouragement
- Deciphering YouTube's Subscriber Code
- In 2024, Essential Insights on ASMR Videos Unveiled
- [Updated] Earnings Update Navigating YouTube Monetization
- The Ultimate WireCast Playbook for Engaging YouTube Streamers
- Crafting Winning Titles & Tags for Your YouTube Videos
- Copycatting Charisma Making Ingenious Parodies
- [New] Custom-Length Filming Submitted to YouTube
- Demystifying YouTube's Keyword Power Play
- Expert Tips for Crafting Immersive Soundscapes in YouTube
- Million View Achievement and Its Monetary Benefit
- Stream-to-Script Service
- 2024 Approved 6 Easy, Free YouTube Closers for Your Videos (Top Picks)
- [Updated] Elevating Your Content's Reach Without Breaching Laws
- The Art of Multi-Platform Broadcasting in the Digital Age
- Streamlining Instagram Story Captioning Techniques for 2024
- [Updated] In 2024, How to Share Screen on Skype When Working From Home
- New 2024 Approved Acoustic Enhancements for Podcasts Top Locations for Sound Libraries
- Efficient Content Curation Multiple Photos/Videos to Instagram Storyboard
- 4 Ways to Fix Android Blue Screen of Death On Xiaomi Redmi Note 12T Pro | Dr.fone
- Techniques You Never Heard of for Learning YouTube AI Marketing for 2024
- In 2024, How to Transfer Contacts from Vivo X Flip to Other Android Devices Using Bluetooth? | Dr.fone
- A Layman’s Guide to Deciphering the Meaning of PFP in Social Media
- New The Ultimate List of 16 Free AVI Video Rotation Tools for Any Platform
- [New] 2024 Approved Leveraging Technology Tips for ScreenRec Utilization
- 2024 Approved Integrating Social Networks Sharing FB Videos on WhatsApp
- How to fix error 1015 while restoring iPhone 13 | Stellar
- [New] Advanced Skype Audio Filtration
- New Little Tricks to Make Canva Slideshow No One Is Telling You
- [Updated] In 2024, Unlock Instagram's Hidden Features Voice Modification
- Video Reverse Technique IPhone Expertise Guide
- Catch or Beat Sleeping Snorlax on Pokemon Go For Lava Blaze 2 5G | Dr.fone
- Essential #1-#5 iPhone Podcast Platforms Unveiled
- [New] Navigating TikTok to Twitter
- 2024 Approved Beat the Beast Instagram Video Troubleshooting Guide
- In 2024, 3 Effective Methods to Fake GPS location on Android For your Vivo V29e | Dr.fone
- Title: "Earn Online via YouTube How Reaching 500 Subscribers Pays Off"
- Author: Brian
- Created at : 2024-05-25 11:41:36
- Updated at : 2024-05-26 11:41:36
- Link: https://youtube-video-recordings.techidaily.com/earn-online-via-youtube-how-reaching-500-subscribers-pays-off/
- License: This work is licensed under CC BY-NC-SA 4.0.
