
:max_bytes(150000):strip_icc()/discoveryplusnotworking-74fa2392945842ebb9fd0e2dfcf1d1dd.jpg)
"Dynamic and Simple Building a Subscriber Button for YouTube Using Filmora for 2024"
Dynamic and Simple: Building a Subscriber Button for YouTube Using Filmora
How to Make Your YouTube Animated Subscribe Button Easily With Filmora

Richard Bennett
Mar 27, 2024• Proven solutions
The main goal of every content creator is to increase its audience to expand its reach and views. To do so, it’s essential to provide something unique and different to the viewer. Without providing them the content they are looking for, it is impossible to grow your channel and reach. Once your content is ready and you are getting many views, it is essential to make these potential viewers your permanent viewers. The animated subscribe button will help you achieve this goal. While your viewers are watching your videos, you must remind them about subscribing to your channel for receiving such incredible content in the future. Subscribe animation plays a vital role in converting your viewers into subscribers.
There are so many platforms on the internet from where you can get Youtube subscribe button animation free, and you can also purchase these subscribe png gifs. But creating your own animated subscribe button can make you stand out from the crowd and make your videos unique and exclusive. Because it enables you to design it the way you want according to your brand, so, let’s create your own subscribe animation using Wondershare Filmora .
Step-By-Step guide
Step 1: To get started,open Filmora X. On your upper left corner, click on the “Sample Colors,” select the Green color and drag it to Video Track into the timeline. We are using a Green background to easily remove it using the green screen feature in Filmora to use it in our future projects after exporting it, without creating it again. Adjust the duration of this track according to your requirement. In my case, I am trying to make an animated subscribe button of 5 seconds.
Step 2: Lock this track by clicking on the lock icon to work on subscribe animation without disturbing the background easily.
Step 3: Now it’s time to design the subscribe png gif. Go to the Sample colors again and drag the red color into the time above the green background.
Step 4: Double click on the red color in the timeline and adjust its size. Make it look like a subscribe button that is a rectangle and place it at the bottom center of the background. You can put it anywhere you want it to appear in your future videos.
Step 5: Now, let’s add Subscribe text into the button. Go to the Title and select any style that you like. “Basic 6” will work perfectly fine for this purpose. Drag and drop it into the timeline above all tracks.
Step 6: Double click on the Title on the timeline and edit it with “Subscribe” and place it under the red rectangle and click OK.
Step 7: We have put a cursor that can click on the animated subscribe button. You can use Google Search to find a transparent cursor. Make sure to save it in png format. Download it and import it into Filmora.
Step 8: Drag and drop the cursor into the timeline and place it above all the other three tracks to make it prominent. Adjust the size of the cursor place it on the Subscribe button where you want it to appear.
Step 9: Now, it’s time to animate the design using keyframes. First of all, let’s animate the red rectangle. Double click on the red color on the timeline. Go to the ‘Animation’ tab and then click ‘Customize.’ Move to the 1 second in the timeline and click ‘Add.’
Step 10: Now go back to the beginning in the timeline and adjust the scale to 0%. It will make the rectangle pop up when you play the clip.
Step 11: Text needs to be animated as well to match it with the rectangle. Double click on the text in the timeline and click ‘ADVANCED.’
Step 12: In this Advance text editor, go to the ‘Animation’ tab and select any animation that you like. On the timeline under the preview screen, adjusts the dark areas according to the time you set on the rectangle, which was 1 second. We want the text to appear on the screen in 1 second, like the rectangle. Also, adjust the ending time when you want the text to disappear again. We have set it on 4 seconds. Which means it will start to fade after 4 seconds.
Step 13: Now, to animate the mouse cursor, we will use the same process we used for a rectangle that is key framing. Double click on the cursor track on the timeline and move the time on your timeline to a point when you want the cursor to appear. Now add a key frame by clicking ‘Add’.
Step 14: Now jump back to a point in your timeline, when the cursor will start appearing from outside the screen. Move the cursor outside the screen from where you want it to start moving toward the subscribe animation.
Step 15: To animate the click of the cursor, move ahead a little bit into your timeline and scale down the cursor to around 70%. Move it a little further and scale it up to 100%.
Step 16: You can add the sound of mouse click to make it more realistic. You can find this sound anywhere on the internet. Download it and import it into Filmora. Now place it into the timeline where it can match the movement of the cursor.
Step 17: Now it’s time to make this subscribe animation button disappear. Move forward into the time to the end, at around 4 seconds. Double click on the red button in the timeline and add a key frame at its actual scale.
Step 18: After that, move further in the timeline to the end and make its scale 0. It will make it disappear.
Step 19: Do the same with the cursor. Double click on the cursor in the time and add a key frame at its actual position.
Step 20: Move ahead when you want it to disappear. Move the cursor out of the screen and click ‘OK’.
Step 21: Your Subscribe png gif is ready to be exported and used in your videos. Click on export and choose from various formats and options to choose from while exporting it.
You may also like: How to Get People to Subscribe Channel
Conclusion:Your own Animated Subscribe Button is ready to be used in your future videos and projects. This is a ready-to-use subscribe button that can be easily used using the green screen effect in Filmora. Just import the clip, remove the green screen, and you are good to go. You can also customize this Subscribe Animation using your channel and more. Keep experimenting with new things using Filmora.


Richard Bennett
Richard Bennett is a writer and a lover of all things video.
Follow @Richard Bennett
Richard Bennett
Mar 27, 2024• Proven solutions
The main goal of every content creator is to increase its audience to expand its reach and views. To do so, it’s essential to provide something unique and different to the viewer. Without providing them the content they are looking for, it is impossible to grow your channel and reach. Once your content is ready and you are getting many views, it is essential to make these potential viewers your permanent viewers. The animated subscribe button will help you achieve this goal. While your viewers are watching your videos, you must remind them about subscribing to your channel for receiving such incredible content in the future. Subscribe animation plays a vital role in converting your viewers into subscribers.
There are so many platforms on the internet from where you can get Youtube subscribe button animation free, and you can also purchase these subscribe png gifs. But creating your own animated subscribe button can make you stand out from the crowd and make your videos unique and exclusive. Because it enables you to design it the way you want according to your brand, so, let’s create your own subscribe animation using Wondershare Filmora .
Step-By-Step guide
Step 1: To get started,open Filmora X. On your upper left corner, click on the “Sample Colors,” select the Green color and drag it to Video Track into the timeline. We are using a Green background to easily remove it using the green screen feature in Filmora to use it in our future projects after exporting it, without creating it again. Adjust the duration of this track according to your requirement. In my case, I am trying to make an animated subscribe button of 5 seconds.
Step 2: Lock this track by clicking on the lock icon to work on subscribe animation without disturbing the background easily.
Step 3: Now it’s time to design the subscribe png gif. Go to the Sample colors again and drag the red color into the time above the green background.
Step 4: Double click on the red color in the timeline and adjust its size. Make it look like a subscribe button that is a rectangle and place it at the bottom center of the background. You can put it anywhere you want it to appear in your future videos.
Step 5: Now, let’s add Subscribe text into the button. Go to the Title and select any style that you like. “Basic 6” will work perfectly fine for this purpose. Drag and drop it into the timeline above all tracks.
Step 6: Double click on the Title on the timeline and edit it with “Subscribe” and place it under the red rectangle and click OK.
Step 7: We have put a cursor that can click on the animated subscribe button. You can use Google Search to find a transparent cursor. Make sure to save it in png format. Download it and import it into Filmora.
Step 8: Drag and drop the cursor into the timeline and place it above all the other three tracks to make it prominent. Adjust the size of the cursor place it on the Subscribe button where you want it to appear.
Step 9: Now, it’s time to animate the design using keyframes. First of all, let’s animate the red rectangle. Double click on the red color on the timeline. Go to the ‘Animation’ tab and then click ‘Customize.’ Move to the 1 second in the timeline and click ‘Add.’
Step 10: Now go back to the beginning in the timeline and adjust the scale to 0%. It will make the rectangle pop up when you play the clip.
Step 11: Text needs to be animated as well to match it with the rectangle. Double click on the text in the timeline and click ‘ADVANCED.’
Step 12: In this Advance text editor, go to the ‘Animation’ tab and select any animation that you like. On the timeline under the preview screen, adjusts the dark areas according to the time you set on the rectangle, which was 1 second. We want the text to appear on the screen in 1 second, like the rectangle. Also, adjust the ending time when you want the text to disappear again. We have set it on 4 seconds. Which means it will start to fade after 4 seconds.
Step 13: Now, to animate the mouse cursor, we will use the same process we used for a rectangle that is key framing. Double click on the cursor track on the timeline and move the time on your timeline to a point when you want the cursor to appear. Now add a key frame by clicking ‘Add’.
Step 14: Now jump back to a point in your timeline, when the cursor will start appearing from outside the screen. Move the cursor outside the screen from where you want it to start moving toward the subscribe animation.
Step 15: To animate the click of the cursor, move ahead a little bit into your timeline and scale down the cursor to around 70%. Move it a little further and scale it up to 100%.
Step 16: You can add the sound of mouse click to make it more realistic. You can find this sound anywhere on the internet. Download it and import it into Filmora. Now place it into the timeline where it can match the movement of the cursor.
Step 17: Now it’s time to make this subscribe animation button disappear. Move forward into the time to the end, at around 4 seconds. Double click on the red button in the timeline and add a key frame at its actual scale.
Step 18: After that, move further in the timeline to the end and make its scale 0. It will make it disappear.
Step 19: Do the same with the cursor. Double click on the cursor in the time and add a key frame at its actual position.
Step 20: Move ahead when you want it to disappear. Move the cursor out of the screen and click ‘OK’.
Step 21: Your Subscribe png gif is ready to be exported and used in your videos. Click on export and choose from various formats and options to choose from while exporting it.
You may also like: How to Get People to Subscribe Channel
Conclusion:Your own Animated Subscribe Button is ready to be used in your future videos and projects. This is a ready-to-use subscribe button that can be easily used using the green screen effect in Filmora. Just import the clip, remove the green screen, and you are good to go. You can also customize this Subscribe Animation using your channel and more. Keep experimenting with new things using Filmora.
Richard Bennett
Richard Bennett is a writer and a lover of all things video.
Follow @Richard Bennett
Step-by-Step: Adding Custom Images to YouTube Videos
How To Add Custom Thumbnails to Your YouTube Videos
Richard Bennett
Mar 27, 2024• Proven solutions
YouTube custom thumbnails are a great way to get people’s attention to your YouTube video. It’s a pretty simple process but if you are wondering how to create a thumbnail and add the thumbnail to YouTube video and customize it with the correct size. You have come to the right place. While in this article, I will show you how to create and add a thumbnail to a YouTube video and how to customize the YouTube video thumbnail. Follow these easy steps below and add eyecatching customed thumbnails to your YouTube videos in no time.
- Part 1: Create and Add Custom Thumbnails to YouTube
- Part 2: Tools to Create Custom YouTube Video Thumbnails
- Part 3: How to Change A Thumbnail On YouTube
- Part 4: Things You Need to Know Before Making a YouTube Custom Thumbnail
- Part 5: Tips on How to Make Good YouTube Thumbnails to Get More Clicks
- Part 6: YouTube Thumbnail FAQs
How To Add Custom Thumbnails to Your YouTube Videos [Steps, Tools and Tips]
We have just made a video tutorial about how to make a YouTube video thumbnail, check it below to find out the tips and tricks of making customized YouTube thumbnail.
Part 1: How to Make a Thumbnail for YouTube and Add Custom Thumbnails to YouTube
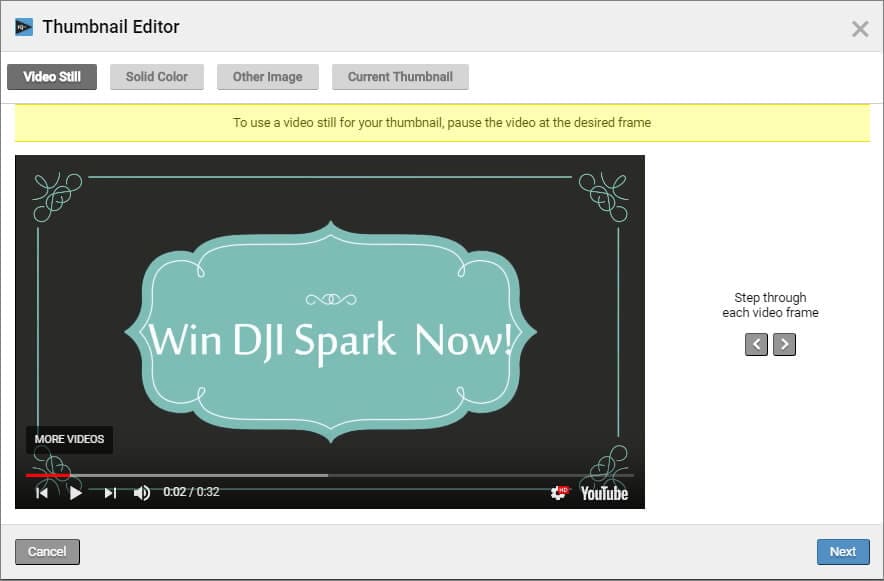
After you’ve verified your account and made your thumbnail, it’s finally time to upload it to your video and make a custom thumbnail. To do this, go to Creator Studio and then Video Manager. You’ll see a button labeled “Edit” next to each video, and an arrow pointing down. Click Thumbnail Editor.
In Thumbnail Editor, you can use the still images in the video as a thumbnail, choose a solid background color for the thumbnail, or add other images from your computer. I will show you the steps of how to customize the video still as a video thumbnail.
1. Preview the video and choose the target video still. You can click the Playback button and check the video and pause it at the desired frame. Or, you can step through each frame by clicking the Preview Frame button and Next Frame icon. Click Next to continue.
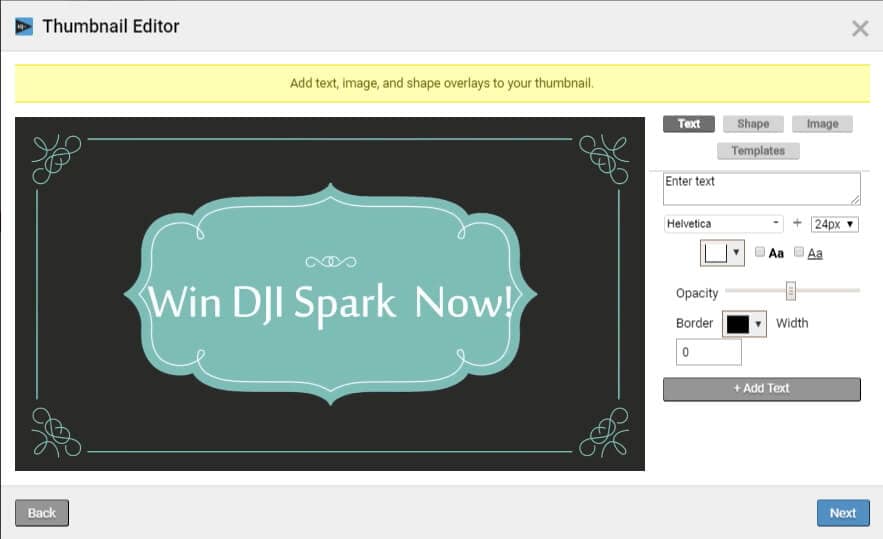
2. And now, you can add text, image and shape overlays to the thumbnail. You can change the text font, size, opacity and more.
3. Click Next to save the thumbnail and you will see how the thumbnail displays on different platforms such as YouTube, Facebook and Twitter. Click Save to save the video thumbnail.
In this way, you can add a custom thumbnail to the new videos and change the video thumbnail of the previously uploaded videos.
Part 2: Thumbnail Makers to Create Custom YouTube Thumbnails
Of course, you can use some of the best tools to make a YouTube video thumbnail. In this part, we will show you some of the best tools to create custom YouTube thumbnails.
Download Mac Version ](https://tools.techidaily.com/wondershare/filmora/download/ )
1. Create YouTube Thumbnail with Online solution - Canva
Canva is a free, powerful online image editing program with tons of great templates to get you started. One of their templates just happens to be YouTube thumbnails. Open Canva and select the “YouTube Thumbnail” design type. Use your own photo or choose from a huge library, then add text and effects to really make it stand out. Save and share — easy as that.
Check this video tutorial to see how to Make a Youtube Thumbnail using Canva.
You may also like: Best online Photo Editor
2. Design YouTube thumbnail with a Desktop solution - Gimp
Gimp is one of the most popular image editing programs around for one very simple reason: it’s powerful and free! Where Canva uses a lot of templates, Gimp gives you absolute, full control over how you want your image to look. Make a 1280x720 image and start putting together your eye-catching thumbnail exactly how you want to.
Check this video tutorial to see how to make professional Thumbnails for YouTube Videos with Gimp:
Part 3: How to Change A Thumbnail On YouTube
Note: YouTube allows verified YouTube accounts (accounts that provided YouTube with a working phone number) to upload custom thumbnail images and change them accordingly.
In this part, we’ll be going over how to change a thumbnail image on YouTube. There are pictures to make it easy to follow along.
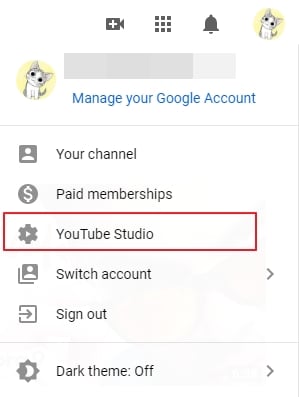
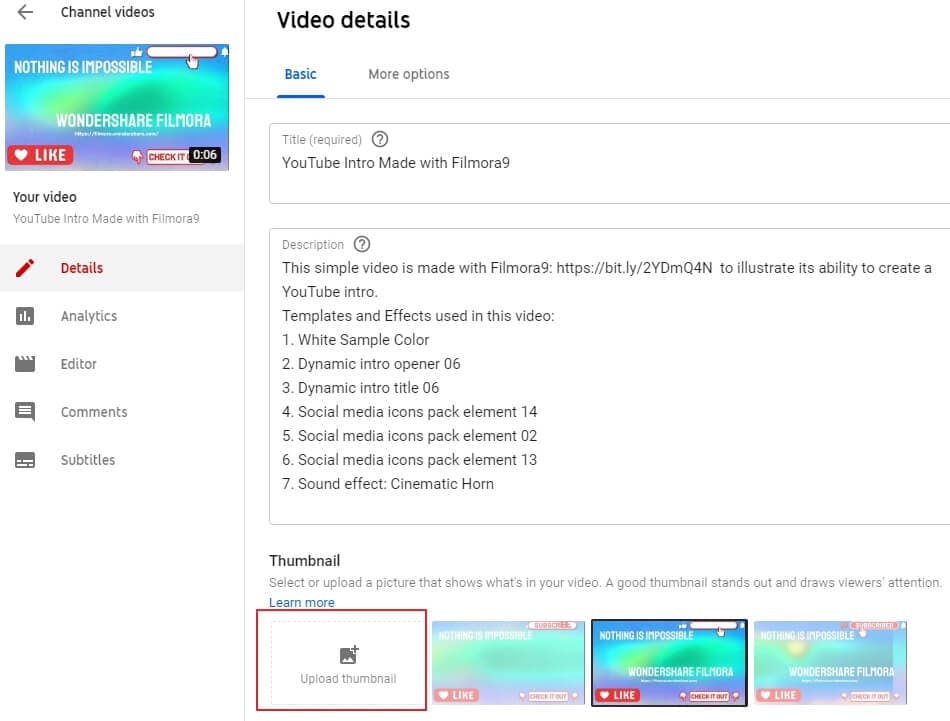
- After signing into YouTube with your Google account, click on your profile on the top right corner. Click on YouTube Studio from the drop-down menu.
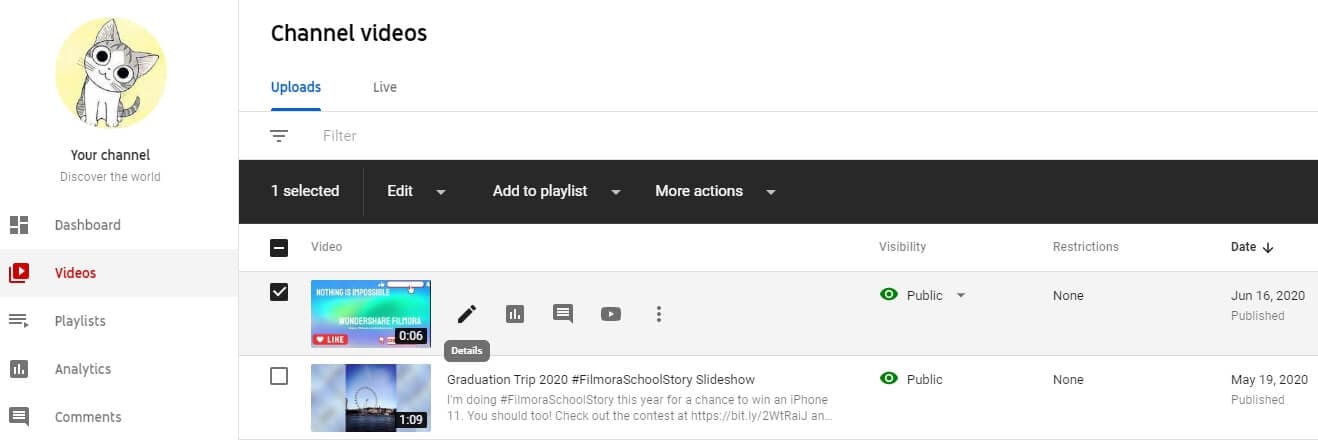
- On the left side of the page, click on Videos and then find your video and click on the details button.
- Find the Thumbnail section in the basic video details tab, and then click the Upload thumbnail to select the image that you want to upload.
- Finally, click on the Save button on the right upper corner. And just like that, in seven easy steps, we’re done changing the thumbnail of a YouTube video.
If you don’t have an image to upload but you want to check out some online resources to make your own, check out our Top YouTube Thumbnail Makers .
Part 4: Things You Need to Know Before Making a Custom Thumbnail
- About the proper YouTube video thumbnail size: Your thumbnail should be 1280x720 pixels in size and be less than 2MB. The minimum width of the image is 640 pixels.
- About the YouTube Image thumbnail format: Use .JPG, .PNG, .GIF or .BMP files for your thumbnail image.
- You’ll want your thumbnails to stand out. Bright colored text is a simple, easy way to draw people’s attention. Red, white, yellow, or orange are all popular choices.
- You can even do a little homework to see what colors others are using for similar videos to yours, and then choose different colors to stand out.
One word of warning: your thumbnail should be related to the content of your video. Misleading thumbnail images, if reported, will reflect poorly on your channel. You’ll get a negative rating in the community status part of your channel. This can actually remove your ability to use custom thumbnails, so keep it honest!
You may also like: How to Make YouTube Channel Art
To make a creative YouTube video, you may also need a powerful video editing software. Check how to edit a YouTube video in Filmora video editor and download it to try.
You may also like: Best video editing software for YouTube
Part 5: Tips on How to Make Good YouTube Thumbnails - Get More Clicks
The thumbnails of your videos play a huge role in convincing people to watch them; a good YouTube thumbnail will get you more views and more potential subscribers. This part will give you 6 tips on creating thumbnails that help grow your channel. Now let’s learn how to make thumbnails using Wondershare PixStudio.
1. Stay On Topic
Your thumbnail should tell a story; it should be clear from looking at it what viewers will get out of watching the video, be it knowledge or entertainment. If your thumbnail sets expectations that your video doesn’t deliver on, people will click away quickly. You may get views quickly, but you won’t get much watch time. That will tell YouTube’s search algorithm ‘people aren’t getting what they want from this, rank it lower’. That leads to fewer views over time, and gives the people who do manage to find your video a negative opinion of your channel.
Very few people intentionally use thumbnails that have nothing to do with the content of their videos – i.e, most people understand not to use a picture of a kitten in the thumbnail for their tech review, unless maybe their kitten is the one doing the review (which would be adorable, someone should do that). People who want serious advice won’t click, and people who click to see a kitten will click away fast.

This thumbnail had better be for a kitten’s iPhone review video or people will click away. Fast.
A mistake a lot of creators do make is creating a thumbnail that is meant to evoke an emotion which the video itself does not justify. For example, if you see a picture of a YouTuber looking nervous alongside text that reads ‘My Secret’, you will think they are going to share something deeply personal. You will be curious, and you may even be worried about them. You’ll probably click. Then, if their secret is that they don’t like pineapple on pizza, you’ll probably be angry. This technique gets clicks, but not a lot of watch time and it will lose you subs in the long run.
2. Don’t Be Mysterious
A good thumbnail doesn’t make people guess. Your thumbnail should tell people what’s in your video, not make them wonder about it. People want to know what they’re being asked to spend time watching.
Often, they will be looking for the answer to a specific question and will completely ignore anything that doesn’t show – in the thumbnail – that it has their answer.
Sometimes big channels can get away with stuff like this, because large portions of their audiences are interested in them as people and will already be curious about anything they post. This technique will not bring in new viewers, though.
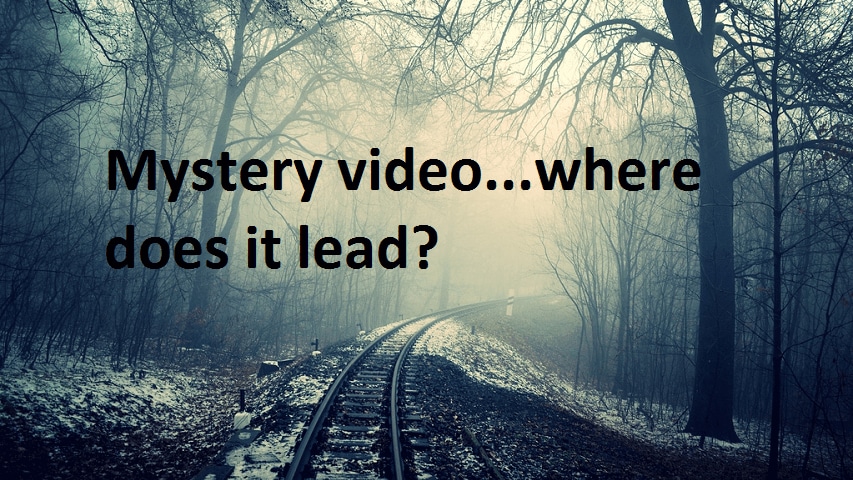
If this came up in a search for ‘smoky eye tutorial’, would you click it?
When people want answers, they want to feel confident that they video they click on will have those answers. If you have great content, then let people know it!
3. People Like People
Viewers are more likely to click on a thumbnail if they feel a connection when they look at it. One of the best ways to create a feeling of connection is through eye contact, and you can apply that principle to your YouTube thumbnails easily.
Just make sure you’re in them.
You can either compose a photo to use as your thumbnail, or use a screenshot from your video. Ideally, the image of you will convey the emotional tone of the video and tell potential viewers what it is about, besides you.
So, if you want to post a funny video that is also about making brownies, maybe a picture of you smiling while holding up a tray of brownies would be a better direction than just showing the brownies?
4. Check Out The Competition
Before you post your video, type your topic into YouTube’s search engine and see what comes up. This will give you insight into what kinds of thumbnails are performing well for other people, as well as what you can do to stand out in comparison.
Phil starts talking about thumbnails at 6:09, and he has great tips on checking out your competition!
For example, if all five of the top-ranked videos for the search ‘how to build a cabinet’ show images of the YouTuber smiling while holding a power tool, then your thumbnail for a video on the same topic should also be a picture of you smiling and holding a power tool. You know that works, so why not do it?
5. Use Color in Interesting Ways
You want to use colors that will help you stand out from the other search results. While checking out your competition if you notice that all the people in the other thumbnails are wearing black or navy blue, it will be a good idea for you to wear a brighter color for your shoot to grab a bit more attention.
Beyond simply using colors that are different from other people’s colors, you should consider the emotions different colors trigger.
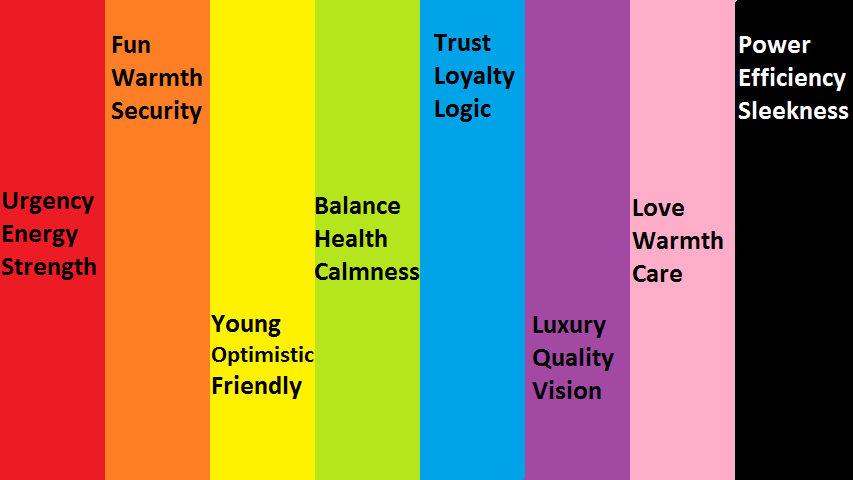
Maybe don’t use a lot of green and yellow in the thumbnail for your angry video rant?
6. Make Your Text Huge
Usually, you’ll want to use a bit of text in your thumbnail. It might be the full title of your video, or just a keyword or phrase. You don’t want to use a full sentence because you won’t have room for it if you’re using huge text.
The reason you should use huge text is so that people can read it. Remember that when people see your thumbnail in their search results, it will be much smaller than it will look while you are creating it. Text that looks big enough while you are creating your thumbnail will be much smaller when people are actually trying to read it, and that goes double for viewers watching on their small smartphone screens.
Frequently Asked Questions about YouTube Thumbnail
1. What is YouTube Thumbnail?
When you upload a video on YouTube, YouTube gives you three images to choose from in the selection of your video’s thumbnail image. These three images are just freeze-frame snapshots from different parts of your video, which may not tell your viewers what your video is really all about.
2. Can You Change YouTube Thumbnail After Publishing?
Yes, you can replace the auto-generated thumbnail with the customized thumbnail you like. But YouTube only allows verified YouTube accounts to upload custom thumbnail images.
3. How Long Does It Take for a Thumbnail to Change on YouTube?
Normally, if you have a good internet connection, you can see the thumbnail is changed within 10 seconds.
4. Why YouTube Thumbnail is Important?
When you get more people watching your video for longer, it increases your watch time and tells YouTube’s search algorithm ‘people like this, rank it higher’. Being ranked higher gets you more views, and even more watch time. It’s a wonderful cycle that all begins with a great thumbnail (paired with a good title and the right tags).
Richard Bennett
Richard Bennett is a writer and a lover of all things video.
Follow @Richard Bennett
Richard Bennett
Mar 27, 2024• Proven solutions
YouTube custom thumbnails are a great way to get people’s attention to your YouTube video. It’s a pretty simple process but if you are wondering how to create a thumbnail and add the thumbnail to YouTube video and customize it with the correct size. You have come to the right place. While in this article, I will show you how to create and add a thumbnail to a YouTube video and how to customize the YouTube video thumbnail. Follow these easy steps below and add eyecatching customed thumbnails to your YouTube videos in no time.
- Part 1: Create and Add Custom Thumbnails to YouTube
- Part 2: Tools to Create Custom YouTube Video Thumbnails
- Part 3: How to Change A Thumbnail On YouTube
- Part 4: Things You Need to Know Before Making a YouTube Custom Thumbnail
- Part 5: Tips on How to Make Good YouTube Thumbnails to Get More Clicks
- Part 6: YouTube Thumbnail FAQs
How To Add Custom Thumbnails to Your YouTube Videos [Steps, Tools and Tips]
We have just made a video tutorial about how to make a YouTube video thumbnail, check it below to find out the tips and tricks of making customized YouTube thumbnail.
Part 1: How to Make a Thumbnail for YouTube and Add Custom Thumbnails to YouTube
After you’ve verified your account and made your thumbnail, it’s finally time to upload it to your video and make a custom thumbnail. To do this, go to Creator Studio and then Video Manager. You’ll see a button labeled “Edit” next to each video, and an arrow pointing down. Click Thumbnail Editor.
In Thumbnail Editor, you can use the still images in the video as a thumbnail, choose a solid background color for the thumbnail, or add other images from your computer. I will show you the steps of how to customize the video still as a video thumbnail.
1. Preview the video and choose the target video still. You can click the Playback button and check the video and pause it at the desired frame. Or, you can step through each frame by clicking the Preview Frame button and Next Frame icon. Click Next to continue.
2. And now, you can add text, image and shape overlays to the thumbnail. You can change the text font, size, opacity and more.
3. Click Next to save the thumbnail and you will see how the thumbnail displays on different platforms such as YouTube, Facebook and Twitter. Click Save to save the video thumbnail.
In this way, you can add a custom thumbnail to the new videos and change the video thumbnail of the previously uploaded videos.
Part 2: Thumbnail Makers to Create Custom YouTube Thumbnails
Of course, you can use some of the best tools to make a YouTube video thumbnail. In this part, we will show you some of the best tools to create custom YouTube thumbnails.
Download Mac Version ](https://tools.techidaily.com/wondershare/filmora/download/ )
1. Create YouTube Thumbnail with Online solution - Canva
Canva is a free, powerful online image editing program with tons of great templates to get you started. One of their templates just happens to be YouTube thumbnails. Open Canva and select the “YouTube Thumbnail” design type. Use your own photo or choose from a huge library, then add text and effects to really make it stand out. Save and share — easy as that.
Check this video tutorial to see how to Make a Youtube Thumbnail using Canva.
You may also like: Best online Photo Editor
2. Design YouTube thumbnail with a Desktop solution - Gimp
Gimp is one of the most popular image editing programs around for one very simple reason: it’s powerful and free! Where Canva uses a lot of templates, Gimp gives you absolute, full control over how you want your image to look. Make a 1280x720 image and start putting together your eye-catching thumbnail exactly how you want to.
Check this video tutorial to see how to make professional Thumbnails for YouTube Videos with Gimp:
Part 3: How to Change A Thumbnail On YouTube
Note: YouTube allows verified YouTube accounts (accounts that provided YouTube with a working phone number) to upload custom thumbnail images and change them accordingly.
In this part, we’ll be going over how to change a thumbnail image on YouTube. There are pictures to make it easy to follow along.
- After signing into YouTube with your Google account, click on your profile on the top right corner. Click on YouTube Studio from the drop-down menu.
- On the left side of the page, click on Videos and then find your video and click on the details button.
- Find the Thumbnail section in the basic video details tab, and then click the Upload thumbnail to select the image that you want to upload.
- Finally, click on the Save button on the right upper corner. And just like that, in seven easy steps, we’re done changing the thumbnail of a YouTube video.
If you don’t have an image to upload but you want to check out some online resources to make your own, check out our Top YouTube Thumbnail Makers .
Part 4: Things You Need to Know Before Making a Custom Thumbnail
- About the proper YouTube video thumbnail size: Your thumbnail should be 1280x720 pixels in size and be less than 2MB. The minimum width of the image is 640 pixels.
- About the YouTube Image thumbnail format: Use .JPG, .PNG, .GIF or .BMP files for your thumbnail image.
- You’ll want your thumbnails to stand out. Bright colored text is a simple, easy way to draw people’s attention. Red, white, yellow, or orange are all popular choices.
- You can even do a little homework to see what colors others are using for similar videos to yours, and then choose different colors to stand out.
One word of warning: your thumbnail should be related to the content of your video. Misleading thumbnail images, if reported, will reflect poorly on your channel. You’ll get a negative rating in the community status part of your channel. This can actually remove your ability to use custom thumbnails, so keep it honest!
You may also like: How to Make YouTube Channel Art
To make a creative YouTube video, you may also need a powerful video editing software. Check how to edit a YouTube video in Filmora video editor and download it to try.
You may also like: Best video editing software for YouTube
Part 5: Tips on How to Make Good YouTube Thumbnails - Get More Clicks
The thumbnails of your videos play a huge role in convincing people to watch them; a good YouTube thumbnail will get you more views and more potential subscribers. This part will give you 6 tips on creating thumbnails that help grow your channel. Now let’s learn how to make thumbnails using Wondershare PixStudio.
1. Stay On Topic
Your thumbnail should tell a story; it should be clear from looking at it what viewers will get out of watching the video, be it knowledge or entertainment. If your thumbnail sets expectations that your video doesn’t deliver on, people will click away quickly. You may get views quickly, but you won’t get much watch time. That will tell YouTube’s search algorithm ‘people aren’t getting what they want from this, rank it lower’. That leads to fewer views over time, and gives the people who do manage to find your video a negative opinion of your channel.
Very few people intentionally use thumbnails that have nothing to do with the content of their videos – i.e, most people understand not to use a picture of a kitten in the thumbnail for their tech review, unless maybe their kitten is the one doing the review (which would be adorable, someone should do that). People who want serious advice won’t click, and people who click to see a kitten will click away fast.
This thumbnail had better be for a kitten’s iPhone review video or people will click away. Fast.
A mistake a lot of creators do make is creating a thumbnail that is meant to evoke an emotion which the video itself does not justify. For example, if you see a picture of a YouTuber looking nervous alongside text that reads ‘My Secret’, you will think they are going to share something deeply personal. You will be curious, and you may even be worried about them. You’ll probably click. Then, if their secret is that they don’t like pineapple on pizza, you’ll probably be angry. This technique gets clicks, but not a lot of watch time and it will lose you subs in the long run.
2. Don’t Be Mysterious
A good thumbnail doesn’t make people guess. Your thumbnail should tell people what’s in your video, not make them wonder about it. People want to know what they’re being asked to spend time watching.
Often, they will be looking for the answer to a specific question and will completely ignore anything that doesn’t show – in the thumbnail – that it has their answer.
Sometimes big channels can get away with stuff like this, because large portions of their audiences are interested in them as people and will already be curious about anything they post. This technique will not bring in new viewers, though.
If this came up in a search for ‘smoky eye tutorial’, would you click it?
When people want answers, they want to feel confident that they video they click on will have those answers. If you have great content, then let people know it!
3. People Like People
Viewers are more likely to click on a thumbnail if they feel a connection when they look at it. One of the best ways to create a feeling of connection is through eye contact, and you can apply that principle to your YouTube thumbnails easily.
Just make sure you’re in them.
You can either compose a photo to use as your thumbnail, or use a screenshot from your video. Ideally, the image of you will convey the emotional tone of the video and tell potential viewers what it is about, besides you.
So, if you want to post a funny video that is also about making brownies, maybe a picture of you smiling while holding up a tray of brownies would be a better direction than just showing the brownies?
4. Check Out The Competition
Before you post your video, type your topic into YouTube’s search engine and see what comes up. This will give you insight into what kinds of thumbnails are performing well for other people, as well as what you can do to stand out in comparison.
Phil starts talking about thumbnails at 6:09, and he has great tips on checking out your competition!
For example, if all five of the top-ranked videos for the search ‘how to build a cabinet’ show images of the YouTuber smiling while holding a power tool, then your thumbnail for a video on the same topic should also be a picture of you smiling and holding a power tool. You know that works, so why not do it?
5. Use Color in Interesting Ways
You want to use colors that will help you stand out from the other search results. While checking out your competition if you notice that all the people in the other thumbnails are wearing black or navy blue, it will be a good idea for you to wear a brighter color for your shoot to grab a bit more attention.
Beyond simply using colors that are different from other people’s colors, you should consider the emotions different colors trigger.
Maybe don’t use a lot of green and yellow in the thumbnail for your angry video rant?
6. Make Your Text Huge
Usually, you’ll want to use a bit of text in your thumbnail. It might be the full title of your video, or just a keyword or phrase. You don’t want to use a full sentence because you won’t have room for it if you’re using huge text.
The reason you should use huge text is so that people can read it. Remember that when people see your thumbnail in their search results, it will be much smaller than it will look while you are creating it. Text that looks big enough while you are creating your thumbnail will be much smaller when people are actually trying to read it, and that goes double for viewers watching on their small smartphone screens.
Frequently Asked Questions about YouTube Thumbnail
1. What is YouTube Thumbnail?
When you upload a video on YouTube, YouTube gives you three images to choose from in the selection of your video’s thumbnail image. These three images are just freeze-frame snapshots from different parts of your video, which may not tell your viewers what your video is really all about.
2. Can You Change YouTube Thumbnail After Publishing?
Yes, you can replace the auto-generated thumbnail with the customized thumbnail you like. But YouTube only allows verified YouTube accounts to upload custom thumbnail images.
3. How Long Does It Take for a Thumbnail to Change on YouTube?
Normally, if you have a good internet connection, you can see the thumbnail is changed within 10 seconds.
4. Why YouTube Thumbnail is Important?
When you get more people watching your video for longer, it increases your watch time and tells YouTube’s search algorithm ‘people like this, rank it higher’. Being ranked higher gets you more views, and even more watch time. It’s a wonderful cycle that all begins with a great thumbnail (paired with a good title and the right tags).
Richard Bennett
Richard Bennett is a writer and a lover of all things video.
Follow @Richard Bennett
Also read:
- 2024 Approved Elevate Your Content with These Top Keyword Discovery Tools
- Your Comprehensive Pathway to Hidden YouTube Treasures
- 2024 Approved Chorus of Creators Guidelines for Sharing Sounds Online
- In 2024, 5 Effective Tricks for YouTube Subscriber Surges
- [Updated] Enhancing Video Content IPhone/iPad Screen Capture Basics
- In 2024, Addressing Missing Image Display in YouTubes Shorts
- Guidelines for Authoritative Life Lesson Videos
- Crafting Professional Content on YouTube via Enhancements
- Capturing the Unseen 9 Must-Have CamGear for Aspiring Vloggers
- Elevate Every Story Prime Video Editor Apps for Android
- 15 Best Game Recording Software for YouTuber
- Rapid Ascendancy on YouTube Top Videos Shattering the 100MM Barrier
- Boosting YouTube Success Mastery with TubeBuddy
- [Updated] Charting the Peak #1 Shorter Videos Downloader Hub
- Mastering the Art of Shorts Imagery Quick, Smart Updates
- Bridging Platforms Loop-Ready Setups for YouTube and TV
- Key Strategies in Building Successful YouTube Shorts Templates
- Free YouTube Image Saver Compilation
- Elevating Viewers to Patrons A Vlogger's Guide to Income
- Instant Techniques Mix Up Your YouTube Watchlist
- Leapfrog Content Management From YouTube to Dailymotion Effortlessly
- Breaking Free From the Static of ZERO Views on YouTube Videos
- [Updated] Enrich YouTube Images With Radiant Neon Effects
- [New] Deciphering YouTube's Processing After Uploading
- Building Inspiring Lifestyle Content for Viewers for 2024
- Prime Screen Recording Tech for YouTube Broadcasts
- Rapid Response Sharing Plays with Pizzazz
- 2024 Approved Classic Cinema Revisited Step-by-Step Video Guide
- In 2024, Crafting a Content Schedule The Path to Gaining Traction on YouTube
- Bridging Gaps Transforming Trend Data Into Video Concepts for 2024
- [New] Break Bot Patterns, Enhance Organic Video Reach
- [Updated] Acquire No-Cost Sounds for Videos & Podcasts
- Ultimate Picks for Costless Subtitle Extraction Tools
- Channel Success Metrics Subscriber & Play Buttons for 2024
- In 2024, Boost Your Gaming Presence with These Top 14 Video Ideas
- 2024 Approved Cutting-Edge Computers Optimal Machines for Media Creation
- Tips & Tricks for Easily Finding Your YouTube Comments
- Mastery in Motion Transform YouTube Videos Into Expressive GIFs
- Essential Apps Best 10 Software to Capture Your Screens for 2024
- 2024 Approved Diving Into Popularity Top 10 YouTube Creators by Views & Subs
- 2024 Approved Creating Captivating YouTube Openers - Two Ways
- Navigating Account Creation on YouTube
- [New] In 2024, Deciphering No Snaps, Possible Blocking
- [New] Fist of Legends Highest-Rated Kung Fu Virtual Battles
- In 2024, How to Remove a Previously Synced Google Account from Your Xiaomi Redmi 13C
- In 2024, Blissful Bites Best Stress-Busting Gaming
- [Updated] In 2024, TikTok Prosperity Program Entry Guide & Earn with Filmora
- Updated In 2024, VLLO for Mac A Download Guide with Alternative Recommendations
- 8 Solutions to Solve YouTube App Crashing on Vivo S18e | Dr.fone
- [Updated] 2024 Approved Elevating Gameplay Preservation in Windows 11
- In 2024, 3 Effective Methods to Fake GPS location on Android For your Lava Yuva 2 | Dr.fone
- Exploring Advanced Features of Discord's Live Stream Functionality
- [New] Conquering Low-Light Shots on iPhone
- Plating Perfection Tips for Shooting Culinary Content
- [New] 2024 Approved Navigating TeamSnap Photo Functions for Effective Collaboration
- Title: "Dynamic and Simple Building a Subscriber Button for YouTube Using Filmora for 2024"
- Author: Brian
- Created at : 2024-05-25 11:41:25
- Updated at : 2024-05-26 11:41:25
- Link: https://youtube-video-recordings.techidaily.com/dynamic-and-simple-building-a-subscriber-button-for-youtube-using-filmora-for-2024/
- License: This work is licensed under CC BY-NC-SA 4.0.
