
:max_bytes(150000):strip_icc()/how-to-send-stars-monopoly-go-ebaba4b122c9437eaddefc3ae3d3031c.jpg)
DSLR Camera's Stand Against Mirrorless for Videographers
DSLR Camera’s Stand Against Mirrorless for Videographers
Mirrorless vs. DSLR Cameras: Which is Better for Videos?

Richard Bennett
Oct 26, 2023• Proven solutions
If you’re looking to shoot your videos with interchangeable lenses, your camera set up will either have to have a mirrorless camera body or a DSLR camera body. In this post, I’ll be comparing the two camera body types for recording video.
- Part 1: What is a DSLR Camera?
- Part 2: What is a Mirrorless Camera?
- Part 3: Mirrorless vs. DSLR - a Complete Comparison
- Part 4: Mirrorless vs. DSLR - Which One is Better for Video?
What is a DSLR Camera?
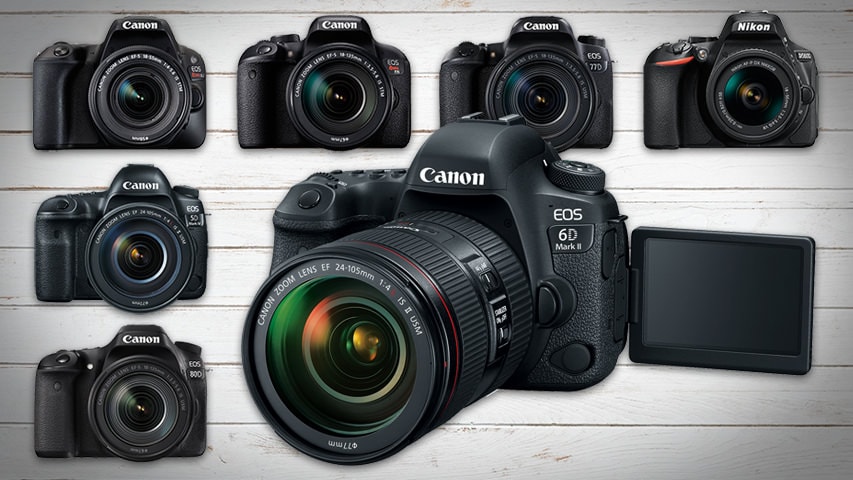
DSLR cameras are digital single-lens reflex cameras. Like 35mm film cameras of the past, DSLR cameras are built with an angled mirror inside its camera body. This mirror allows you to look into your camera’s optical viewfinder and see exactly what your camera sees.
The mirror inside a DSLR camera flips up out of the way when you open the shutter to allow light to reach the camera’s image sensor.
Check out our list of the 7 Best DSLR Cameras For Vlogging .
What is a Mirrorless Camera?
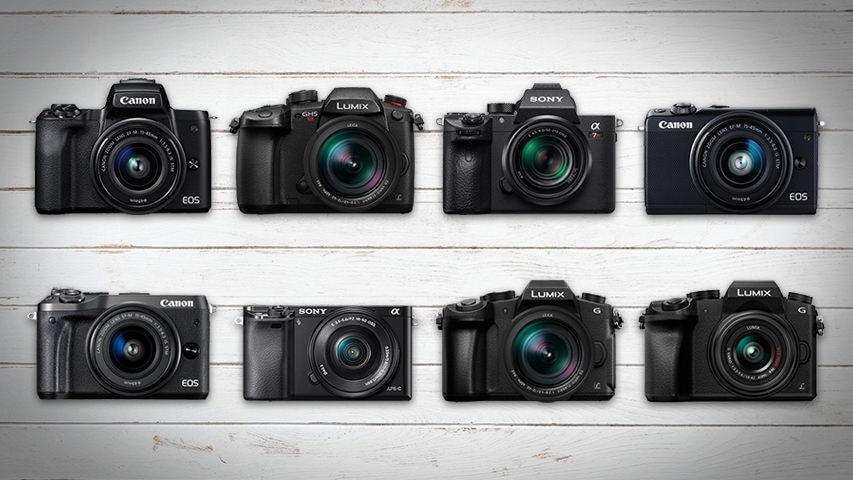
Mirrorless cameras are interchangeable lens cameras without a mirror inside the camera body. With nothing to reflect your image, you won’t find any optical viewfinder to look through to see exactly what your camera sees.
Light passes through the lens of a mirrorless camera and lands directly onto the camera’s sensor.
Check out our list of the 8 Best Mirrorless Cameras For Vlogging .
Mirrorless vs. DSLR - a Complete Comparison
Size and Weight
DSLR cameras are larger and heavier than mirrorless cameras because there are more parts that go into their camera bodies. DSLR cameras require enough space inside for an angled mirror to flip up out of the way.
If your video shooting style is more on-the-go, like that of a daily vlogger or travel vlogger, the smaller size and lighter weight of a mirrorless camera may be more suitable for you.
Previewing Images
When you’re using a DSLR camera, your optical viewfinder will show you exactly what your camera sees as opposed to a digital preview of what your image sensor picks up. No matter how bright or dark your scene actually is, through the optical viewfinder, you’ll be able to clearly see what your camera sees with the power of your eye.
Mirrorless cameras, on the other hand, display on your camera’s screen or electronic viewfinder a digital preview of what your camera is looking at. You will notice a lag, especially in low light, between actions that are taking place in front of the camera and the same actions being displayed in your live preview.
Lenses and Accessories
Having been around much longer, there are plenty more options for lenses and accessories when it comes to shooting with DSLR cameras. You can choose from all kinds of different quality levels and price ranges.
Video Resolution
4K video recording is more readily available in mirrorless cameras than DSLR cameras. At a much more affordable budget, you can get your hands on a 4K mirrorless camera. If you want to shoot 4K video on a DSLR camera, though, you will have to pay for some of the most expensive DSLR cameras on the market.
Image Stabilization
Up until quite recently, you needed to get the right lens with built-in optical image stabilization if you wanted to shoot stabilized photos and videos with an interchangeable lens camera. Image stabilization had not been readily available in the bodies of these cameras.
In recent years, however, mirrorless cameras have been much more active in their development of camera bodies equipped with shifting image sensors. Your shots can be even more stabilized when the optical image stabilization of your lens is combined with your camera’s in-body sensor-shift image stabilization.
Battery Life
When it comes to shooting video, DSLR cameras and mirrorless cameras consume about the same amount of power. It’s still safe to say, though, that DSLR cameras, for the most part, have better battery life than mirrorless cameras because their bigger batteries are packed with more power.
Mirrorless vs. DSLR - Which One is Better for Video?
In my opinion, when it comes to filming a video, mirrorless cameras are the way to go. In such a short time, mirrorless cameras have made huge leaps in their capabilities. It won’t be long before the ultimate vlogging camera comes out on the mirrorless market.
In the end, if you need to edit videos futhermore, try Filmora video editor . It’s a video editor which has significantly improved overall performance, making the product faster, and more powerful, and taking the user editing experience to a new level.
It is perfect for helping beginners, and intermediate users create stylish videos by providing an intuitive user interface and built-in effects.
![]()
Richard Bennett
Richard Bennett is a writer and a lover of all things video.
Follow @Richard Bennett
Richard Bennett
Oct 26, 2023• Proven solutions
If you’re looking to shoot your videos with interchangeable lenses, your camera set up will either have to have a mirrorless camera body or a DSLR camera body. In this post, I’ll be comparing the two camera body types for recording video.
- Part 1: What is a DSLR Camera?
- Part 2: What is a Mirrorless Camera?
- Part 3: Mirrorless vs. DSLR - a Complete Comparison
- Part 4: Mirrorless vs. DSLR - Which One is Better for Video?
What is a DSLR Camera?
DSLR cameras are digital single-lens reflex cameras. Like 35mm film cameras of the past, DSLR cameras are built with an angled mirror inside its camera body. This mirror allows you to look into your camera’s optical viewfinder and see exactly what your camera sees.
The mirror inside a DSLR camera flips up out of the way when you open the shutter to allow light to reach the camera’s image sensor.
Check out our list of the 7 Best DSLR Cameras For Vlogging .
What is a Mirrorless Camera?
Mirrorless cameras are interchangeable lens cameras without a mirror inside the camera body. With nothing to reflect your image, you won’t find any optical viewfinder to look through to see exactly what your camera sees.
Light passes through the lens of a mirrorless camera and lands directly onto the camera’s sensor.
Check out our list of the 8 Best Mirrorless Cameras For Vlogging .
Mirrorless vs. DSLR - a Complete Comparison
Size and Weight
DSLR cameras are larger and heavier than mirrorless cameras because there are more parts that go into their camera bodies. DSLR cameras require enough space inside for an angled mirror to flip up out of the way.
If your video shooting style is more on-the-go, like that of a daily vlogger or travel vlogger, the smaller size and lighter weight of a mirrorless camera may be more suitable for you.
Previewing Images
When you’re using a DSLR camera, your optical viewfinder will show you exactly what your camera sees as opposed to a digital preview of what your image sensor picks up. No matter how bright or dark your scene actually is, through the optical viewfinder, you’ll be able to clearly see what your camera sees with the power of your eye.
Mirrorless cameras, on the other hand, display on your camera’s screen or electronic viewfinder a digital preview of what your camera is looking at. You will notice a lag, especially in low light, between actions that are taking place in front of the camera and the same actions being displayed in your live preview.
Lenses and Accessories
Having been around much longer, there are plenty more options for lenses and accessories when it comes to shooting with DSLR cameras. You can choose from all kinds of different quality levels and price ranges.
Video Resolution
4K video recording is more readily available in mirrorless cameras than DSLR cameras. At a much more affordable budget, you can get your hands on a 4K mirrorless camera. If you want to shoot 4K video on a DSLR camera, though, you will have to pay for some of the most expensive DSLR cameras on the market.
Image Stabilization
Up until quite recently, you needed to get the right lens with built-in optical image stabilization if you wanted to shoot stabilized photos and videos with an interchangeable lens camera. Image stabilization had not been readily available in the bodies of these cameras.
In recent years, however, mirrorless cameras have been much more active in their development of camera bodies equipped with shifting image sensors. Your shots can be even more stabilized when the optical image stabilization of your lens is combined with your camera’s in-body sensor-shift image stabilization.
Battery Life
When it comes to shooting video, DSLR cameras and mirrorless cameras consume about the same amount of power. It’s still safe to say, though, that DSLR cameras, for the most part, have better battery life than mirrorless cameras because their bigger batteries are packed with more power.
Mirrorless vs. DSLR - Which One is Better for Video?
In my opinion, when it comes to filming a video, mirrorless cameras are the way to go. In such a short time, mirrorless cameras have made huge leaps in their capabilities. It won’t be long before the ultimate vlogging camera comes out on the mirrorless market.
In the end, if you need to edit videos futhermore, try Filmora video editor . It’s a video editor which has significantly improved overall performance, making the product faster, and more powerful, and taking the user editing experience to a new level.
It is perfect for helping beginners, and intermediate users create stylish videos by providing an intuitive user interface and built-in effects.
![]()
Richard Bennett
Richard Bennett is a writer and a lover of all things video.
Follow @Richard Bennett
From Video Lessons to Vivid, Engaging GIFs – No Download Needed
How to Convert YouTube Videos to GIFs

Shanoon Cox
Mar 27, 2024• Proven solutions
A GIF adds an extra element to any conversation and makes the reader feel connected to the post. Using GIF can turn useful if done rightly. It narrates a story in a single animated image for social media conversation. In this article, we will brief you about how to convert YouTube to gif, various GIF converters, their uses, and the pros and cons of each converter.
Let’s get started!
How to Convert a YouTube Video into GIFs?
1. YouTube to GIF Directly
Here is a quick way to convert the YouTube video to GIFs without typing a YouTube to GIF website.
Gif.com is a free and easy-to-use video editor available with multiple effects. This converter was created keeping in mind how people spend hours and money on paid platforms.
Follow the below steps to convert a YouTube video into gifs.
- In the YouTube video page, add gif before youtube.com. For example, I want to convert the YouTube video https://www.youtube.com/watch?v=40fuGLmwHwk to GIFs, here is how it looks like after adding gif at the beginning: https://www.gifyoutube.com/watch?v=40fuGLmwHwk . Press the enter button on your keyboard and you will enter the gifs.com directly.

- In gifs.com, you can play and pause the YouTube video and drag the bar to select a desired moment for gif. Press the “Create Gif” button on the top right side to convert the specific part of the YouTube video to gif.
- You will then be directed to the result page to see your GIF created using the YouTube video, and you can change the GIF title and the tag.
- Lastly, you need to copy the link and share it!
Pros of converting YouTube to GIFs with Gifs.com:
- The interface is easy to use and it provides lots of tools to adjust.
- Simple functionality.
Cons:
- The watermark on your created GIF can be removed only after purchasing the premium version.
- GIFs can be downloaded only by registered users.
2. FreeGifMaker.me
FreeGifMaker is one simple online tool that allows the creation of animated Gifs for free. A minimum of two pictures has to be uploaded out of ten. It takes few seconds and is super easy to make a GIF from a YouTube video. You can use FreeGifMaker.me in some easy steps.
- Open the website http://freegifmaker.me/youtube-to-gif/ on your desktop.
- Go to YouTube and copy the video URL you want to create a GIF of and paste it on the website mentioned above.
- Then click “Load YouTube Video” below the URL and wait for a few seconds while the tool checks the video source.
- Once the YouTube video is loaded, enter the gif duration, start time, and click on the “Make a GIF button.” It will redirect you to the result page.
- Pros:
- Conversion size is unlimited**.**
- There is no usage of ads.
- Easy to make Gifs.
- Cons:
- The upload speed is slow.
- The converter gives limited options for editing.
3. Wondershare Online UniConverter
Online UniConverter converts video into a high-quality animated GIF and allows editing. It is a simple converter with unique features.
If you want to convert your YouTube video into a GIF, follow the steps.
- You need to upload your video through the “Choose Files” option. You can also copy the link from YouTube.
- Wait for some time once you upload the file; you can then set your start time, end time, frame rate according to your needs.
- Lastly, click on “Create GIF” and download your GIF. You can also save it through the dropdown option available besides “Download.”
- Pros:
- Easy to handle.
- A wide range of customization tools is available.
- Zero ads.
- Cons:
- Upload speed is slow.
- Conversion size is limited.
4. GifRun
It is a video maker that started in 2013, and GifRun converts videos from YouTube, Facebook, and other sources to high-quality GIFs. You can create Gifs free of cost from GifRun.
Here is how you can use Gifrun.
- Open the website and paste the URL you want to convert into Gif. Later, press “Get Video” option below the URL box.
- In this step, you can adjust the duration, start time, add text, and also pause and preview the video. Once you’re done altering the video, click “Create GIF.”
- Lastly, click on the “Download” button beside the add text button, or share the link directly.
- Pros:
- Fast conversion and download.
- There is no upload limit.
- The video preview feature is available.
- Cons:
- UI is ad-infested.
- Supports YouTube videos only.
5. Makeagif
This GIF converter creates high-quality GIFs in no time. You need to paste the URL in Makeagif and nothing much. It can make GIFs from Instagram, Facebook, Twitter, and other platforms easily.
The only issue is that it supports one type of conversion with a maximum limit of 25MB.
Here is how you can make your favorite GIF in few steps.
- Open makeagif.com and paste the YouTube URL in the box available.
- Once you paste the URL, the website will automatically take you to the edit page to edit GIF length, start time, speed, and add caption and stickers. The next step is to select the category to which the video belongs available on the left side of the screen.
- After editing, click on “Continue to publishing” then “Create GIF” at the lower right corner of the screen. Voila! Your GIF is ready to use.
- Pros:
- The UI is user-friendly.
- Ads are minimal
- Various GIF conversions are supported.
- Cons:
- The conversion size is small.
- Batch conversions are not available.
6. ImgFlip
It is a creative GIF website supporting various videos from other websites such as Vimeo and YouTube. ImgFlip has innovative customization tools for cropping, reshaping, adding text and, a lot more, but you just need to be aware of the ads.
Want to know how to create GIF? Go through these simple steps.
- You can make GIFs both from Video and Images. To make GIF from a video, paste the YouTube URL in the box at the top, upload the tape from your device’s file.
- After pasting the URL, you will be given lots of customization options. Choose the effect of your choice for your GIF.
- Lastly, click on “Generate GIF” available on the right side of the screen. You can now share the GIF via your device or download it.
- Pros:
- Plenty of customization options.
- Fast conversion.
- Easy to upload and use.
- Cons:
- Ads pop up frequently.
- Offline conversion is unavailable.
7. GIPHY
It is a free GIF converter that helps you download free YouTube GIFs. You can also make GIFs from your photos, videos available on your device along with video URLs and images. The only problem is, to use Giphy you first have to log in to the app.
Follow the below steps to create a GIF from YouTube videos with Giphy:
- Open Giphy on your device and click on “Create” on the top right-side of your screen.
- Paste the URL in the space given below. A pop-up will tell you to log in. Log in to the website to continue.
- The video you choose should be less than 15 seconds and under 100MB. You will be given editing options from which you can select the start time and duration of your GIF along with Captions and Tags.
- In the end, press the “Create GIF” button to make the GIF. When it’s done, you will be redirected to the GIF page. You can then share your GIF on any social media site.
- Pros:
- Ads are absent
- Uploading is fast
- Wide range of free GIFs available
- Cons:
- Not perfect for green hands
8. Imgur
It is one of the best apps that offers tons of images, memes, and GIFs. You can make GIFs of less than 60 seconds with high quality, which you can share anywhere.
Here are three easy steps to make GIFs
- Visit the page “imgur.com/vidgif” and paste your YouTube URL there.
- Set a start time by clicking or dragging on the timeline. The total runtime is also adjustable, with 60 seconds as the maximum time for GIFs.
- Lastly, press on “Create GIF” to see the magic. The GIF is converted from the YouTube video.
- Pros:
- The users can share the post of their choice
- Users can save posts.
- Great collection of short GIFs and videos.
- Cons:
- During loading, the screen flashes.
9 VEED.IO
Veed is a simple YouTube video converter that makes your work super easy. It converts YouTube videos into GIFs with various editing options like crop, trim, text ads, and many more.
Check out how to use VEED in 3 steps.
- Start by pasting the URL of your YouTube video into VEED, Your video will be ready to convert into GIF.
- Now you are all set to edit your video. You have the option to crop and trim the video. You can also include different font styles, colors, and sizes of your choice.
- Lastly, download the GIF you made in VEED.
- Pros:
- Downloading the software is not mandatory.
- UI is simple and easy to navigate.
- The subtitle option is present.
- Cons:
- It takes a lot of time to upload video.
- Many basic tools.
10. Kapwing
Kapwing is a helpful video converter that can easily turn any video into GIFs with a click. It can also convert different files such as 3GP, GIF, WEBM.
To create beautiful GIFs with this video editor, follow these easy steps.
- Open Kapwing video editor and upload your video from YouTube.
- Choose the “Export dropdown” option and choose the format you wish to convert.
You can also preview the GIF and customize it as per your choice.
- In the final step, export the video by clicking the “Export Video” button. Save and download the newly created GIF and share it anywhere with your friends.
- Pros:
- Great editing tools.
- Easy to use.
- Cons:
- Available only on the website.
- Too many tools for the same purpose.
Final Thoughts
With the increased use of GIFs on social media, you can now easily convert your favorite YouTube videos into GIFs on your own. All you have to do is simply choose the tools mentioned above and share it with your friends.
Shanoon Cox
Shanoon Cox is a writer and a lover of all things video.
Follow @Shanoon Cox
Shanoon Cox
Mar 27, 2024• Proven solutions
A GIF adds an extra element to any conversation and makes the reader feel connected to the post. Using GIF can turn useful if done rightly. It narrates a story in a single animated image for social media conversation. In this article, we will brief you about how to convert YouTube to gif, various GIF converters, their uses, and the pros and cons of each converter.
Let’s get started!
How to Convert a YouTube Video into GIFs?
1. YouTube to GIF Directly
Here is a quick way to convert the YouTube video to GIFs without typing a YouTube to GIF website.
Gif.com is a free and easy-to-use video editor available with multiple effects. This converter was created keeping in mind how people spend hours and money on paid platforms.
Follow the below steps to convert a YouTube video into gifs.
- In the YouTube video page, add gif before youtube.com. For example, I want to convert the YouTube video https://www.youtube.com/watch?v=40fuGLmwHwk to GIFs, here is how it looks like after adding gif at the beginning: https://www.gifyoutube.com/watch?v=40fuGLmwHwk . Press the enter button on your keyboard and you will enter the gifs.com directly.
- In gifs.com, you can play and pause the YouTube video and drag the bar to select a desired moment for gif. Press the “Create Gif” button on the top right side to convert the specific part of the YouTube video to gif.
- You will then be directed to the result page to see your GIF created using the YouTube video, and you can change the GIF title and the tag.
- Lastly, you need to copy the link and share it!
Pros of converting YouTube to GIFs with Gifs.com:
- The interface is easy to use and it provides lots of tools to adjust.
- Simple functionality.
Cons:
- The watermark on your created GIF can be removed only after purchasing the premium version.
- GIFs can be downloaded only by registered users.
2. FreeGifMaker.me
FreeGifMaker is one simple online tool that allows the creation of animated Gifs for free. A minimum of two pictures has to be uploaded out of ten. It takes few seconds and is super easy to make a GIF from a YouTube video. You can use FreeGifMaker.me in some easy steps.
- Open the website http://freegifmaker.me/youtube-to-gif/ on your desktop.
- Go to YouTube and copy the video URL you want to create a GIF of and paste it on the website mentioned above.
- Then click “Load YouTube Video” below the URL and wait for a few seconds while the tool checks the video source.
- Once the YouTube video is loaded, enter the gif duration, start time, and click on the “Make a GIF button.” It will redirect you to the result page.
- Pros:
- Conversion size is unlimited**.**
- There is no usage of ads.
- Easy to make Gifs.
- Cons:
- The upload speed is slow.
- The converter gives limited options for editing.
3. Wondershare Online UniConverter
Online UniConverter converts video into a high-quality animated GIF and allows editing. It is a simple converter with unique features.
If you want to convert your YouTube video into a GIF, follow the steps.
- You need to upload your video through the “Choose Files” option. You can also copy the link from YouTube.
- Wait for some time once you upload the file; you can then set your start time, end time, frame rate according to your needs.
- Lastly, click on “Create GIF” and download your GIF. You can also save it through the dropdown option available besides “Download.”
- Pros:
- Easy to handle.
- A wide range of customization tools is available.
- Zero ads.
- Cons:
- Upload speed is slow.
- Conversion size is limited.
4. GifRun
It is a video maker that started in 2013, and GifRun converts videos from YouTube, Facebook, and other sources to high-quality GIFs. You can create Gifs free of cost from GifRun.
Here is how you can use Gifrun.
- Open the website and paste the URL you want to convert into Gif. Later, press “Get Video” option below the URL box.
- In this step, you can adjust the duration, start time, add text, and also pause and preview the video. Once you’re done altering the video, click “Create GIF.”
- Lastly, click on the “Download” button beside the add text button, or share the link directly.
- Pros:
- Fast conversion and download.
- There is no upload limit.
- The video preview feature is available.
- Cons:
- UI is ad-infested.
- Supports YouTube videos only.
5. Makeagif
This GIF converter creates high-quality GIFs in no time. You need to paste the URL in Makeagif and nothing much. It can make GIFs from Instagram, Facebook, Twitter, and other platforms easily.
The only issue is that it supports one type of conversion with a maximum limit of 25MB.
Here is how you can make your favorite GIF in few steps.
- Open makeagif.com and paste the YouTube URL in the box available.
- Once you paste the URL, the website will automatically take you to the edit page to edit GIF length, start time, speed, and add caption and stickers. The next step is to select the category to which the video belongs available on the left side of the screen.
- After editing, click on “Continue to publishing” then “Create GIF” at the lower right corner of the screen. Voila! Your GIF is ready to use.
- Pros:
- The UI is user-friendly.
- Ads are minimal
- Various GIF conversions are supported.
- Cons:
- The conversion size is small.
- Batch conversions are not available.
6. ImgFlip
It is a creative GIF website supporting various videos from other websites such as Vimeo and YouTube. ImgFlip has innovative customization tools for cropping, reshaping, adding text and, a lot more, but you just need to be aware of the ads.
Want to know how to create GIF? Go through these simple steps.
- You can make GIFs both from Video and Images. To make GIF from a video, paste the YouTube URL in the box at the top, upload the tape from your device’s file.
- After pasting the URL, you will be given lots of customization options. Choose the effect of your choice for your GIF.
- Lastly, click on “Generate GIF” available on the right side of the screen. You can now share the GIF via your device or download it.
- Pros:
- Plenty of customization options.
- Fast conversion.
- Easy to upload and use.
- Cons:
- Ads pop up frequently.
- Offline conversion is unavailable.
7. GIPHY
It is a free GIF converter that helps you download free YouTube GIFs. You can also make GIFs from your photos, videos available on your device along with video URLs and images. The only problem is, to use Giphy you first have to log in to the app.
Follow the below steps to create a GIF from YouTube videos with Giphy:
- Open Giphy on your device and click on “Create” on the top right-side of your screen.
- Paste the URL in the space given below. A pop-up will tell you to log in. Log in to the website to continue.
- The video you choose should be less than 15 seconds and under 100MB. You will be given editing options from which you can select the start time and duration of your GIF along with Captions and Tags.
- In the end, press the “Create GIF” button to make the GIF. When it’s done, you will be redirected to the GIF page. You can then share your GIF on any social media site.
- Pros:
- Ads are absent
- Uploading is fast
- Wide range of free GIFs available
- Cons:
- Not perfect for green hands
8. Imgur
It is one of the best apps that offers tons of images, memes, and GIFs. You can make GIFs of less than 60 seconds with high quality, which you can share anywhere.
Here are three easy steps to make GIFs
- Visit the page “imgur.com/vidgif” and paste your YouTube URL there.
- Set a start time by clicking or dragging on the timeline. The total runtime is also adjustable, with 60 seconds as the maximum time for GIFs.
- Lastly, press on “Create GIF” to see the magic. The GIF is converted from the YouTube video.
- Pros:
- The users can share the post of their choice
- Users can save posts.
- Great collection of short GIFs and videos.
- Cons:
- During loading, the screen flashes.
9 VEED.IO
Veed is a simple YouTube video converter that makes your work super easy. It converts YouTube videos into GIFs with various editing options like crop, trim, text ads, and many more.
Check out how to use VEED in 3 steps.
- Start by pasting the URL of your YouTube video into VEED, Your video will be ready to convert into GIF.
- Now you are all set to edit your video. You have the option to crop and trim the video. You can also include different font styles, colors, and sizes of your choice.
- Lastly, download the GIF you made in VEED.
- Pros:
- Downloading the software is not mandatory.
- UI is simple and easy to navigate.
- The subtitle option is present.
- Cons:
- It takes a lot of time to upload video.
- Many basic tools.
10. Kapwing
Kapwing is a helpful video converter that can easily turn any video into GIFs with a click. It can also convert different files such as 3GP, GIF, WEBM.
To create beautiful GIFs with this video editor, follow these easy steps.
- Open Kapwing video editor and upload your video from YouTube.
- Choose the “Export dropdown” option and choose the format you wish to convert.
You can also preview the GIF and customize it as per your choice.
- In the final step, export the video by clicking the “Export Video” button. Save and download the newly created GIF and share it anywhere with your friends.
- Pros:
- Great editing tools.
- Easy to use.
- Cons:
- Available only on the website.
- Too many tools for the same purpose.
Final Thoughts
With the increased use of GIFs on social media, you can now easily convert your favorite YouTube videos into GIFs on your own. All you have to do is simply choose the tools mentioned above and share it with your friends.
Shanoon Cox
Shanoon Cox is a writer and a lover of all things video.
Follow @Shanoon Cox
Also read:
- MP3 Conversion Guide Best Free Apps for iPhone & YouTube
- [Updated] Audience Augmentation Made Simple - $5 Solutions Available
- Shake the Sound Mobile Beats' Best Ripplers
- Discovering the Top 10 News-Driven YouTube Pages for 2024
- [New] Deciphering Digital Domination A Deep Dive Into Directors' Videos
- Mirthful Montage Mastering 7 Comical Video Vignettes
- YouTube Caption Implementation Essentials
- [Updated] Captivating Crafting Writing Intriguing Youtube Descriptions with Templates
- The Ultimate List of 10 Highest Subscribed YouTube Stars
- Tapping Into YouTube's Affiliate Income Streams
- Mastering the Art of Uploading Bulkier YouTube Video Snippets
- [New] Easy, Effective Strategy Immediate Clearance of Unwanted YouTube Comments
- In 2024, Channel Cashflow Crusade Unleashing Earnings with Youtube Studio
- 2024 Approved Ace Your Online Presence YouTube's Studio Command Center
- Conquer the Viewer Void 10 Tactics for YouTube Video Growth
- DSLR vs Mirrorless Optimal Choice for Video Production for 2024
- Viral Vibes Top 10 Playlists for Up-and-Coming Video Shorts
- Explore & Evaluate Top 7 Free Android AdBlockers Unveiled
- In 2024, Elevate Your Experience in Sub4sub - Prioritize the Essentials First
- A Complete Guide to Upload Longer Videos on YouTube for 2024
- [Updated] Essential Tech for New Channel Launches
- In 2024, Best Tales for YouTube Triumph Top 3 Strategies
- [New] Charting Innovative Territory with Youtubers’ Best Ad Work
- Facing Copyright Challenges on YouTube Know Your Rights
- [Updated] Download Premium Video Covers - Free, Fast & Easy
- [Updated] Crafting the Perfect YouTube Channel Url A Quick Guide
- Transcribing Online Master the Art of Free YouTube Conversion
- In 2024, Elite 8 Digital Stars on the Rise
- Mastering Visual Identity Top 6 Sources for YouTube Icons & Logos
- Halt Autoplay YouTube Recommendations
- In 2024, Comprehensive Guide to Embedding YouTube Playlists Online
- Guardians of the Most Watched YouTube Edition
- Escalate Your Channel's Popularity to 1K+
- Evaluating TSeries' Business Model with YouTube Viewership Metrics
- Bridging Platform Gaps YouTube Shorts to MP4 Transformation
- Interactive Subscription Buttons - Filmora's Guide to Animated Sign-Up Bars
- Elevate Video Engagement by Inserting Captions for 2024
- [Updated] Erasing Extra Borders for Smooth YouTube Playback
- Streamlining Your Content Upload with iOS Tools
- Top 12 Vlogger-Friendly Cameras Unveiled
- The Ultimate Yield Yardstick Calculating Your YouTube Influence and Earnings Potential
- Updated In 2024, Tune-Infused Photography Link Free Audio to Images
- Data Collection and Analysis
- [New] Vimeo Cameo Review-Video Editor & Movie Maker for iPhone for 2024
- New In 2024, Mac Video Editing Made Easy A QuickTime Tutorial
- About Tecno Pova 5 FRP Bypass
- Updated 2024 Approved Facebook Video Aspect Ratios, Aspect Ratio for Facebook Videos, Best Aspect Ratio for Facebook Video, Facebook Vertical Video Dimensions
- [New] In 2024, Decoding the Instagram Story Viewer Experience
- The Best of the Year Top 10 Playlists
- [Updated] 2024 Approved Ultimate Hash Tracker List for Major Social Media Sites (FB/Twitter/Insta)
- [New] 2024 Approved The Ultimate Guide to Windows 11 Gaming Recordings
- VideoHarvester FB Groups for 2024
- Simple and Effective Ways to Change Your Country on YouTube App Of your Motorola Edge 40 Pro | Dr.fone
- Updated 2024 Approved Wav Converter Mastery A Step-by-Step Tutorial
- Fix the Error of Unfortunately the Process.com.android.phone Has Stopped on Tecno Spark 10C | Dr.fone
- Soaring Social Success with Top 10 TikTok Strategies for 2024
- [Updated] Efficient Resurrection for Lost Images for 2024
- Pixel-Perfect Preservation The Best Practices of Recording Games
- Title: DSLR Camera's Stand Against Mirrorless for Videographers
- Author: Brian
- Created at : 2024-05-25 11:41:21
- Updated at : 2024-05-26 11:41:21
- Link: https://youtube-video-recordings.techidaily.com/dslr-cameras-stand-against-mirrorless-for-videographers/
- License: This work is licensed under CC BY-NC-SA 4.0.
