:max_bytes(150000):strip_icc()/how-to-watch-the-crow-movies-in-order-742a37ba4e0748e3a691420484c36796.jpg)
"Download YouTube Playlists Without Hassle - Our Guide for 2024"
Download YouTube Playlists Without Hassle - Our Guide
How to Download YouTube Playlist-Step by Step

Richard Bennett
Mar 27, 2024• Proven solutions
As we all agree, YouTube is the most dominant content provider on the internet. And, most of us rely on YouTube for creating or streaming video content. However, streaming playlists on YouTube can drain your data, and sometimes the internet connection can mess up the whole experience. However, you can always download YouTube playlist to enjoy pause-free streaming. Such downloaded YouTube playlists can be streamed limitlessly anywhere without an internet connection.
Now, with the advent of the YouTube playlist downloader apps, saving your favorite playlists with a single click has been made easier.
This article will show you how to convert a YouTube playlist to MP3 or MP4.
- Part 1: How to Download YouTube Playlist for Free
- Part 2: Bonus Tip-How to Make Your Own YouTube Video
Note: We resolutely oppose all forms of copyright-infringing downloads. This tutorial is only for downloading YouTube videos/audio materials from your own channel.
Part 1: How to Download YouTube Playlist for Free
If you are looking for a powerful YouTube playlist downloader, ddownr is your best bet. With ddownr, you can easily and instantly batch download YouTube playlist. Moreover, you can customize the output format.
Here are the steps to use this easy-going YouTube playlist downloader.
1. Open ddownr.com on your web browser.

2. Copy the YouTube playlist’s link.

3. Paste the copied URL into the text box on ddownr and click on Download. Then, select the output format.

4. The selected playlist will start loading. Upon completion, click on Download, and you will be directed to another window. Note that you can download multiple playlists together.

5. In this window, tap on Download.

6. Finally, the process to convert YouTube to MP3 or any other format selected will start and save the playlist to your device upon completion.

Part 2: Bonus Tip-How to Make Your Own YouTube Video
An easy way to craft your own engaging YouTube videos is through the very powerful video editor, Wondershare Filmora. With an incredibly simple and user-friendly interface, Filmora offers a wide array of professional-grade tools. With a single click, you can add keyframe animations or motion graphics to your videos. Also, a variety of aesthetics filters and overlays further enhance and make the videos perfect.


1. First, download and install Wondershare Filmora on your PC and launch it. On the main interface, click on the File tab and tap on Import Media Files.

2. After importing, drag and drop the media file/s to the timeline. From the Audio tab, select a song to compliment your video or just import your own music.

3. In the Titles tab, there are a variety of animated text templates. Choose one and add it to the timeline above the video track. Double-click on the title in the timeline to customize the text, font, color, style, size, and much more.

4. From the Transition tab, add dynamic and cinematic transitions to your video.

5. You can select some striking Filters from the Effects You can also adjust the duration of the filter by dragging the filter in the timeline.

6. Choose a creative Overlay like frame, old film, or damaged film from the Effects.

7. From the Elements tab, you can add animation, stickers, or emojis or make your video more compelling.

8. Finally, click on Export. Customize the resolution and either save the file locally or export it to your social media account.

CONCLUSION
Finally, you can enjoy unlimited and hassle-free streaming anytime and anywhere. Thanks to the YouTube playlist downloader, all your favorites can be saved to your device and even shared to other devices.
The ddownr YouTube playlist downloader is sure to make your life easier and your streaming experiences seamless. No need to download every song separately or worry about unsafe sites. With ddownr, you can quickly download YouTube playlist, and that too for free. And no matter which device you are using, this YouTube playlist downloader works fine on a variety of commonly used devices. So, go ahead and start using the ultimate YouTube playlist downloader.
Richard Bennett
Richard Bennett is a writer and a lover of all things video.
Follow @Richard Bennett
Richard Bennett
Mar 27, 2024• Proven solutions
As we all agree, YouTube is the most dominant content provider on the internet. And, most of us rely on YouTube for creating or streaming video content. However, streaming playlists on YouTube can drain your data, and sometimes the internet connection can mess up the whole experience. However, you can always download YouTube playlist to enjoy pause-free streaming. Such downloaded YouTube playlists can be streamed limitlessly anywhere without an internet connection.
Now, with the advent of the YouTube playlist downloader apps, saving your favorite playlists with a single click has been made easier.
This article will show you how to convert a YouTube playlist to MP3 or MP4.
- Part 1: How to Download YouTube Playlist for Free
- Part 2: Bonus Tip-How to Make Your Own YouTube Video
Note: We resolutely oppose all forms of copyright-infringing downloads. This tutorial is only for downloading YouTube videos/audio materials from your own channel.
Part 1: How to Download YouTube Playlist for Free
If you are looking for a powerful YouTube playlist downloader, ddownr is your best bet. With ddownr, you can easily and instantly batch download YouTube playlist. Moreover, you can customize the output format.
Here are the steps to use this easy-going YouTube playlist downloader.
1. Open ddownr.com on your web browser.
2. Copy the YouTube playlist’s link.
3. Paste the copied URL into the text box on ddownr and click on Download. Then, select the output format.
4. The selected playlist will start loading. Upon completion, click on Download, and you will be directed to another window. Note that you can download multiple playlists together.
5. In this window, tap on Download.
6. Finally, the process to convert YouTube to MP3 or any other format selected will start and save the playlist to your device upon completion.
Part 2: Bonus Tip-How to Make Your Own YouTube Video
An easy way to craft your own engaging YouTube videos is through the very powerful video editor, Wondershare Filmora. With an incredibly simple and user-friendly interface, Filmora offers a wide array of professional-grade tools. With a single click, you can add keyframe animations or motion graphics to your videos. Also, a variety of aesthetics filters and overlays further enhance and make the videos perfect.
1. First, download and install Wondershare Filmora on your PC and launch it. On the main interface, click on the File tab and tap on Import Media Files.
2. After importing, drag and drop the media file/s to the timeline. From the Audio tab, select a song to compliment your video or just import your own music.
3. In the Titles tab, there are a variety of animated text templates. Choose one and add it to the timeline above the video track. Double-click on the title in the timeline to customize the text, font, color, style, size, and much more.
4. From the Transition tab, add dynamic and cinematic transitions to your video.
5. You can select some striking Filters from the Effects You can also adjust the duration of the filter by dragging the filter in the timeline.
6. Choose a creative Overlay like frame, old film, or damaged film from the Effects.
7. From the Elements tab, you can add animation, stickers, or emojis or make your video more compelling.
8. Finally, click on Export. Customize the resolution and either save the file locally or export it to your social media account.
CONCLUSION
Finally, you can enjoy unlimited and hassle-free streaming anytime and anywhere. Thanks to the YouTube playlist downloader, all your favorites can be saved to your device and even shared to other devices.
The ddownr YouTube playlist downloader is sure to make your life easier and your streaming experiences seamless. No need to download every song separately or worry about unsafe sites. With ddownr, you can quickly download YouTube playlist, and that too for free. And no matter which device you are using, this YouTube playlist downloader works fine on a variety of commonly used devices. So, go ahead and start using the ultimate YouTube playlist downloader.
Richard Bennett
Richard Bennett is a writer and a lover of all things video.
Follow @Richard Bennett
TubeBuddy: The Key to YouTube Dominance
The Benefits of TubeBuddy | Manage Your YouTube Channel More Easily
Richard Bennett
Nov 01, 2022• Proven solutions
TubeBuddy is a YouTube certified extension for your Google Chrome browser. When you visit YouTube after installing TubeBuddy a whole new set of useful tools becomes available.
TubeBuddy’s tools were designed to save you time and effort when performing some of the more mundane tasks involved in running a YouTube channel, like adding cards. Many of TubeBuddy’s tools are completely free to use, but others might require a paid license. There are three levels of licensing: $9, $19, or $39 per month.
The Benefits of Using TubeBuddy for YouTube
- Increased Productivity
- Bulk Tools for Annotations, Cards, Thumbnails and More
- Quick Optimization for Your Video’s Tags
- Useful Data
Benefits of TubeBuddy
YouTubers who use TubeBuddy are able to spend less time on busy-work and more time on coming up with creative video ideas. Here are some of the ways TubeBuddy can help you, especially if you have a large or mid-sized channel:
1. Increased Productivity
Most of TubeBuddy’s Productivity Tools are available for free, but some require a $9 per month Pro license.
You can use these tools to get your videos ready for posting faster, embed them off-YouTube more easily, and save time by creating canned responses or templates for cards and annotations.
For example, you might find yourself creating the same YouTube Card over and over again to include it in every video you make. Creating a template through TubeBuddy will save you this effort.
Another great productivity tool is the Video Topic Planner. You can save video ideas you come up with, or ideas viewers have suggested to you, and arrange them in a queue so you never forget what you are planning to make next.
2. Bulk Tools for Annotations, Cards, Thumbnails and More
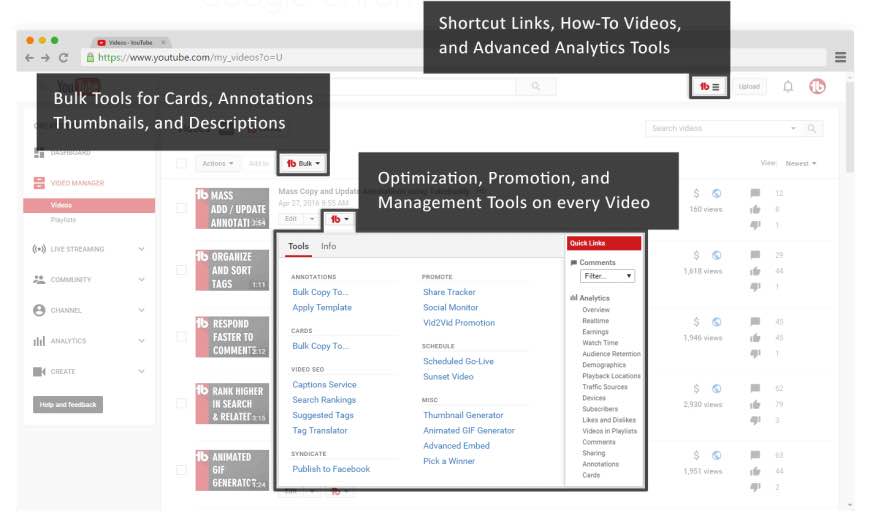
Most of TubeBuddy’s bulk processing tools require a $19 per month Star license.
Two of the most time-saving tools in this section are the Bulk Copy tools for cards and annotations. They will save you from having to recreate the same ones over and over. Then, using the Bulk Update tools, you will be able to make changes to all of your cards or annotations at once.
For example: if you use a YouTube Card to link to your personal website and include it in every video, and then you change your website, you change the link in all of your existing cards at once.
Another useful Bulk tool is Bulk Thumbnail Overlays, which will allow you to add a logo to all of your existing video thumbnails at once.
3. Quick Optimization for Your Video’s Tags
The SEO Tools in TubeBuddy will help you find the best tags for your videos and suggest tags you might want to target. Many of these tools are free, but others require a $19 Star license.
One of the best free tools in this category is View and Copy Video Tags. It allows you to see and copy the tags of other people’s videos. You will be able to see which keywords your competitors are targeting (and look for opportunities to target them more effectively). This can also save you a lot of time writing out tags that should really be the same as the ones on an existing video.
4. Useful Data
The most useful piece of data under Data and Research Tools is the Best Time to Publish. How many views you get on a video could vary greatly depending on when you post, and the best times to post vary depending on the demographics of your audience. This free tool from TubeBuddy will show you when you should be uploading.
Another interesting tool, which is unfortunately only available with $39 licenses, is the Competitor Scoreboard. It allows creators to compare their channels stats to those of their rival channels.
Have you ever tried TubeBuddy for YouTube?
Richard Bennett
Richard Bennett is a writer and a lover of all things video.
Follow @Richard Bennett
Richard Bennett
Nov 01, 2022• Proven solutions
TubeBuddy is a YouTube certified extension for your Google Chrome browser. When you visit YouTube after installing TubeBuddy a whole new set of useful tools becomes available.
TubeBuddy’s tools were designed to save you time and effort when performing some of the more mundane tasks involved in running a YouTube channel, like adding cards. Many of TubeBuddy’s tools are completely free to use, but others might require a paid license. There are three levels of licensing: $9, $19, or $39 per month.
The Benefits of Using TubeBuddy for YouTube
- Increased Productivity
- Bulk Tools for Annotations, Cards, Thumbnails and More
- Quick Optimization for Your Video’s Tags
- Useful Data
Benefits of TubeBuddy
YouTubers who use TubeBuddy are able to spend less time on busy-work and more time on coming up with creative video ideas. Here are some of the ways TubeBuddy can help you, especially if you have a large or mid-sized channel:
1. Increased Productivity
Most of TubeBuddy’s Productivity Tools are available for free, but some require a $9 per month Pro license.
You can use these tools to get your videos ready for posting faster, embed them off-YouTube more easily, and save time by creating canned responses or templates for cards and annotations.
For example, you might find yourself creating the same YouTube Card over and over again to include it in every video you make. Creating a template through TubeBuddy will save you this effort.
Another great productivity tool is the Video Topic Planner. You can save video ideas you come up with, or ideas viewers have suggested to you, and arrange them in a queue so you never forget what you are planning to make next.
2. Bulk Tools for Annotations, Cards, Thumbnails and More
Most of TubeBuddy’s bulk processing tools require a $19 per month Star license.
Two of the most time-saving tools in this section are the Bulk Copy tools for cards and annotations. They will save you from having to recreate the same ones over and over. Then, using the Bulk Update tools, you will be able to make changes to all of your cards or annotations at once.
For example: if you use a YouTube Card to link to your personal website and include it in every video, and then you change your website, you change the link in all of your existing cards at once.
Another useful Bulk tool is Bulk Thumbnail Overlays, which will allow you to add a logo to all of your existing video thumbnails at once.
3. Quick Optimization for Your Video’s Tags
The SEO Tools in TubeBuddy will help you find the best tags for your videos and suggest tags you might want to target. Many of these tools are free, but others require a $19 Star license.
One of the best free tools in this category is View and Copy Video Tags. It allows you to see and copy the tags of other people’s videos. You will be able to see which keywords your competitors are targeting (and look for opportunities to target them more effectively). This can also save you a lot of time writing out tags that should really be the same as the ones on an existing video.
4. Useful Data
The most useful piece of data under Data and Research Tools is the Best Time to Publish. How many views you get on a video could vary greatly depending on when you post, and the best times to post vary depending on the demographics of your audience. This free tool from TubeBuddy will show you when you should be uploading.
Another interesting tool, which is unfortunately only available with $39 licenses, is the Competitor Scoreboard. It allows creators to compare their channels stats to those of their rival channels.
Have you ever tried TubeBuddy for YouTube?
Richard Bennett
Richard Bennett is a writer and a lover of all things video.
Follow @Richard Bennett
Also read:
- [New] Best Gamers' Streaming Tools
- [Updated] In 2024, Insightful Selection Elite Free SRT Translation Services
- Clownfish Vocal Enhancer Troubleshooting: Quick Fixes for a Smooth Voice Transformation Experience
- Comic Crafting Mastering 7 Cheeky Content Strategies
- Detailed Guide on Removing Apple iPhone 15 Activation Lock without Previous Owner?
- Enhance Branding The Ultimate Guide to Custom URLs for YouTube for 2024
- Grab Crunchyroll Episodes FREE - Discover Easy Download Solutions
- How To Change Lava Yuva 3 Lock Screen Clock in Seconds
- Identifying and Accessing Your Music Picks on Youtube
- In 2024, A Perfect Guide To Remove or Disable Google Smart Lock On Honor Play 40C
- In 2024, Break Through Boundaries 15+ Best Free Video Starters
- In 2024, Essential Links for Acquiring YouTube Preview Templates Online
- In 2024, How to Unlock Honor Magic Vs 2 Pattern Lock if Forgotten? 6 Ways
- Mr. Beast Financial Evolution Analysis
- The Dawn of Dynamic Sound Design with ChatGPT Integration
- Top Tips How to Avoid the 8 Deadliest YouTube Dos and Don'ts for Newbies
- TurboUpload The Ultimate Guide to Fast YouTube Video Rendering
- Title: Download YouTube Playlists Without Hassle - Our Guide for 2024
- Author: Brian
- Created at : 2024-11-25 20:35:10
- Updated at : 2024-12-03 01:48:47
- Link: https://youtube-video-recordings.techidaily.com/download-youtube-playlists-without-hassle-our-guide-for-2024/
- License: This work is licensed under CC BY-NC-SA 4.0.