

"Digitally Delving Into Deleted YouTubes Easy Watch Options for 2024"
Digitally Delving Into Deleted YouTubes: Easy Watch Options
How to Watch Deleted YouTube Videos Online in 2 Ways | Ultimate Guide 
Richard Bennett
Mar 27, 2024• Proven solutions


YouTube features a wide variety of corporate and user-generated content ranging from music to DIY videos. Along with all this massive inflow, there are scenarios where the video content that you like or wanted to watch gets deleted for any reason. Either the uploading channel deleted the video, or YouTube sometimes deletes videos for violating any of the platform’s rules – showing the dismal message “We’re sorry, this video is no longer available”. You’ll be thinking it is probably impossible to access deleted YouTube videos that you wanted to watch so badly. Though it may be true to some extent, in reality, nothing gets deleted from the internet. To help you watch deleted YouTube videos, we’ll dive into the two most handy methods down below. So, let get started.
You might be interested in How to Make a Playlist of Uploaded Videos and Others’ Video on YouTube>>>
- Part 1: Watch Deleted YouTube Videos with a URL
- Part 2: Watch Deleted YouTube Videos without a URL
- Part 3: Bonus Tip—Make Your Own YouTube Video with Wondershare FilmoraX
[
Part 1: Watch Deleted YouTube Videos with a URL
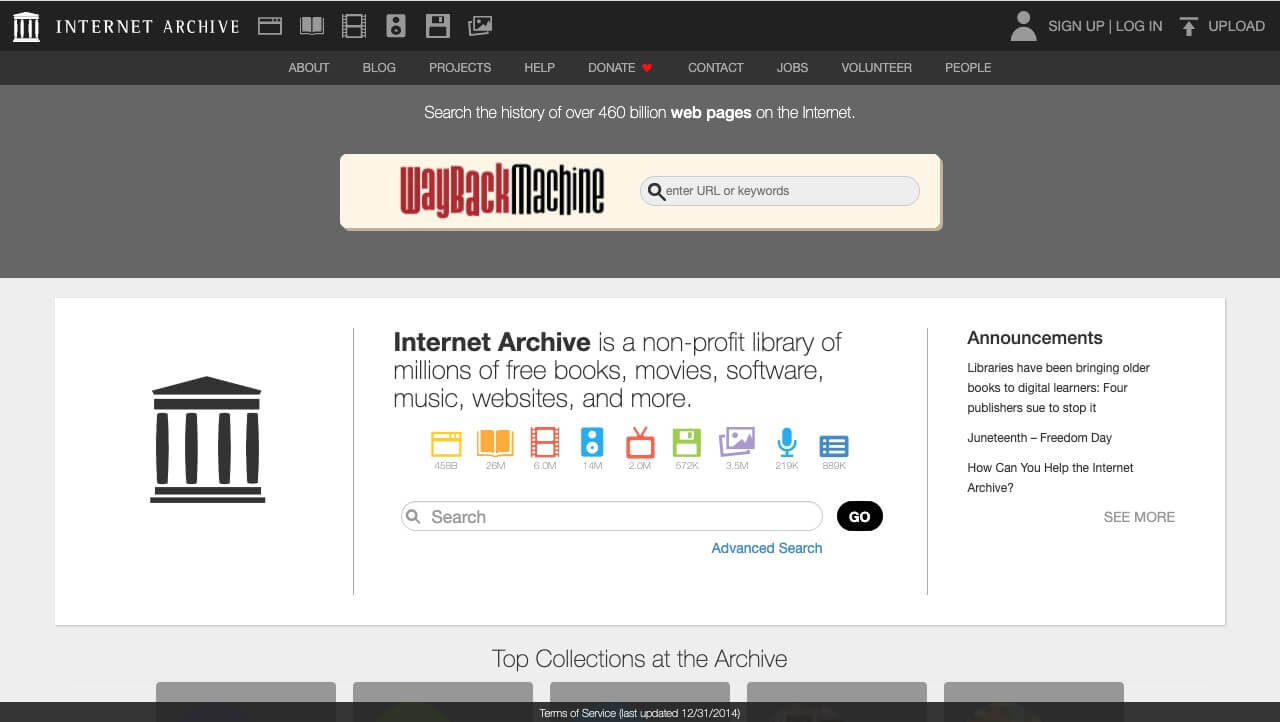
Internet Archive(known as the Wayback Machine) is a website archival system that has been collecting and cataloging websites since 1996. This means the system has effectively saved the site’s current layout and data. This enormous world archive of the Web’s past has amassed over 100 terabytes of storage with around 10 billion web pages.
On the archive.org website, you can find many of your favorite web site’s “snapshot” at a time in the past. For our case, we need to find and watch deleted YouTube videos, so for that, all we need is the link of the video, and we can most probably find it on archive.org. The steps for finding and restoring deleted YouTube videos are simple and as follows.
1. First of all, find the URL in your YouTube email, channel account if you’re searching for your uploaded video. You can find the link in browser history, in YouTube history, or you may have shared the link on social media.
If you want to watch a deleted YouTube video using the Wayback Machine, you must find the link to the video you want to access; without the URL, you won’t be able to access the deleted YouTube video.
2. Head over to the archive.org website and paste the YouTube video URL in the search bar and press return.
3. Once you find your video on the internet archive, you can see the details of the video.
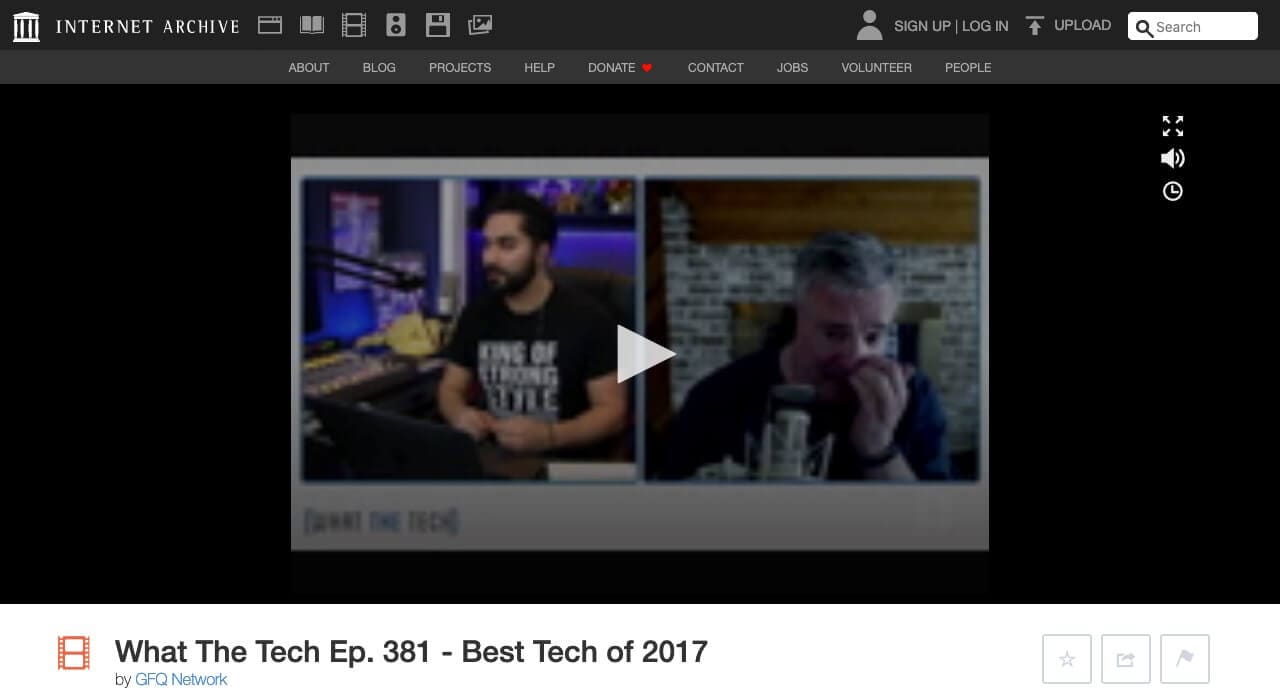
4. You won’t be able to play the video directly, but you should be able to download it. Right, click the video to find the option to download the video.

This method works mostly as the Wayback machine is pretty active and regularly crawls the web to archive the sites. But sometimes, this method may not work and would require a more sophisticated way to watch deleted YouTube videos.
[
Part 2: Watch Deleted YouTube Videos without a URL
But what if you don’t have a URL for the deleted YouTube video? The internet is a global village network. Everything on the internet is connected, and that connection makes it more useful for example, even though a YouTube video might be deleted, you can somehow access and watch the deleted YouTube videos without a URL because people always replicate videos and share them on other YouTube channels or social media platforms. To make sure you get to watch your favorite YouTube video again, we will dive into the vast internet and find the deleted YouTube videos.
This method can be a bit complicated and would require you to give full attention to find the video you want to watch that badly that you’ve landed on this article.
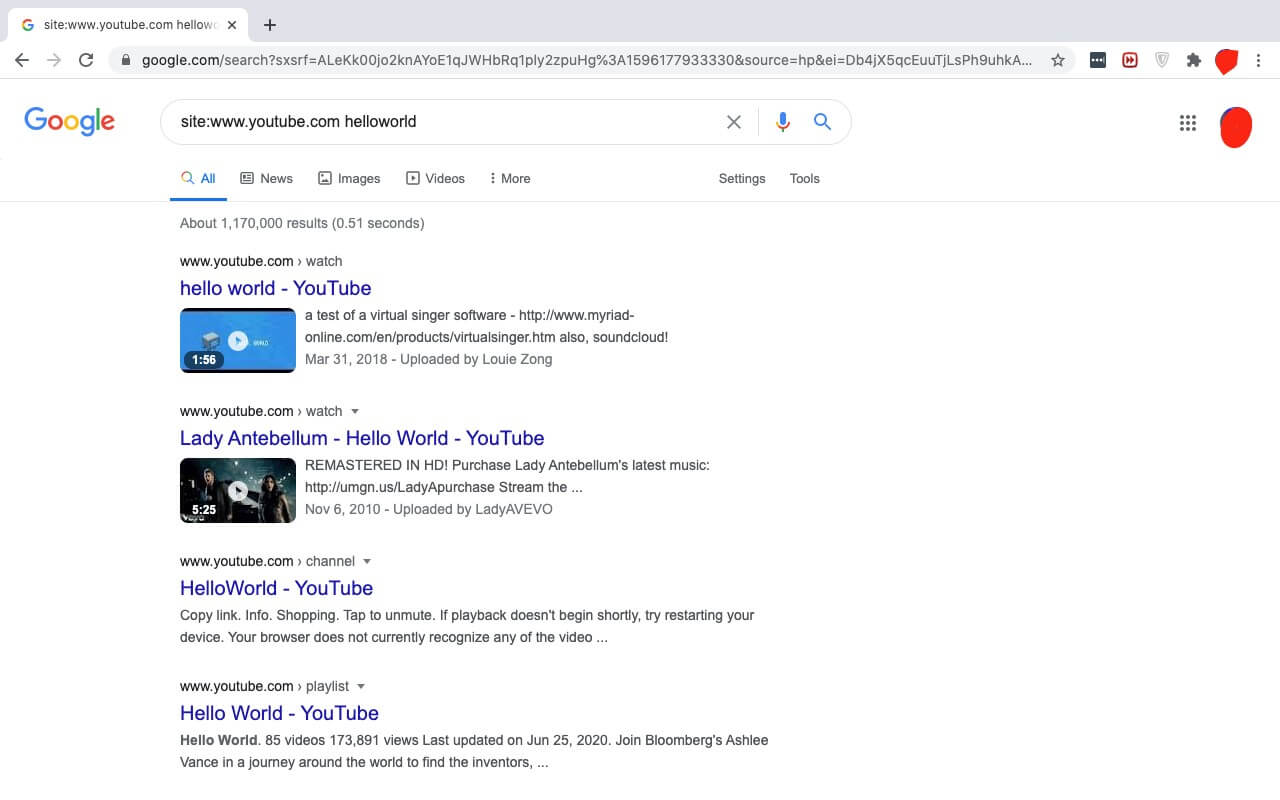
1. Open a new tab in your browser and go to the Google search bar. We’re going to employ a technique from the SEO expert’s toolbox – Google Search Operators.
2. In the search bar, type “site:www.youtube.com + name Of TheVideo”
3. This way Google will crawl all the name relevant videos only from the YouTube databases and move us closer to finding our deleted YouTube video.
4. If you know the video was shared by someone on Facebook or any other social media platform, you can change the site URL in the search bar, replacing YouTube with Facebook, for example.
5. Once you find the video URL, you can simply go back to the first method that we discussed and paste the URL into the internet archive. The archive will give you the video and you can enjoy watching a deleted YouTube video.
Note: If you still cannot find the video using this method, I’m sorry to tell you the video may be completely deleted from the server, and you cannot access it anymore.
Part 3: Bonus Tip—Make Your Own YouTube Video with Wondershare Filmora
Want to make a YouTube video again? Wondershare Filmora is a relatively lightweight and powerful platform you get an intuitive interface and the power to create wonderful, unique content. To help you make your own YouTube video with Filmora, we’ll go through a short introduction of the flow and features first:
- Organize media with folders and projects
- Cutting and trimming raw footage
- Unlimited Layering
- Visual effects and filters
- Attach/detach audio and music
- Add creative text and icons with a wide range of templates to choose from
- Advanced color correction tools
- Export videos to YouTube directly and support various output formats
Make a YouTube video with several clicks using Wondershare Filmora:
1. Download and install Wondershare Filmora on your computer by tapping the download wizard below. Remember to join the Wondershare Video Community to connect with other video creators.
2. Launch Wondershare Filmora, add your videos to the Media Library. And you’ll also be greeted with a sleek and simple interface with controls for everything such as transitions, titles, layering clips, soundtrack, and more.

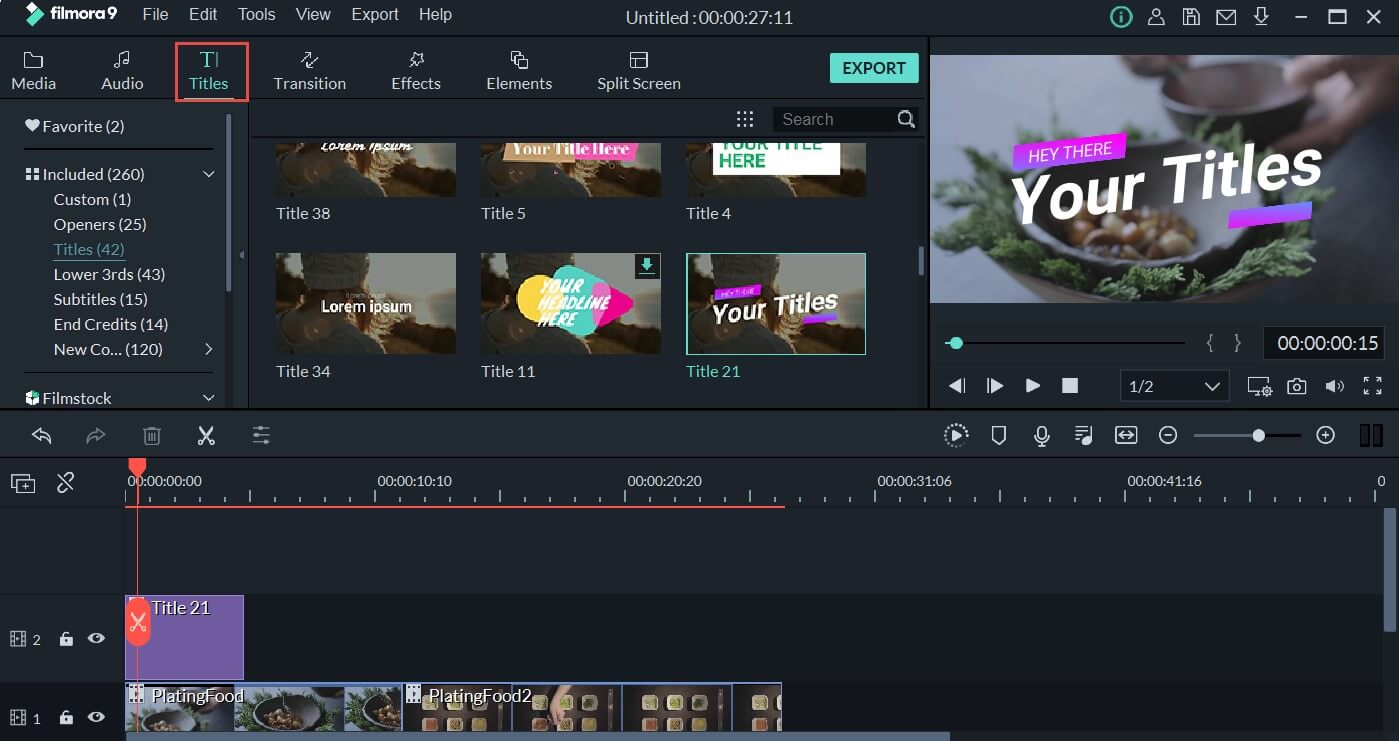
3. Add your video to the timeline, then go to the Titles tab, and you will see hundreds of titles and text templates. Select the template you love and add it to the video.
4. Then you can also go to the Effects tab and apply astonishing filters to the video 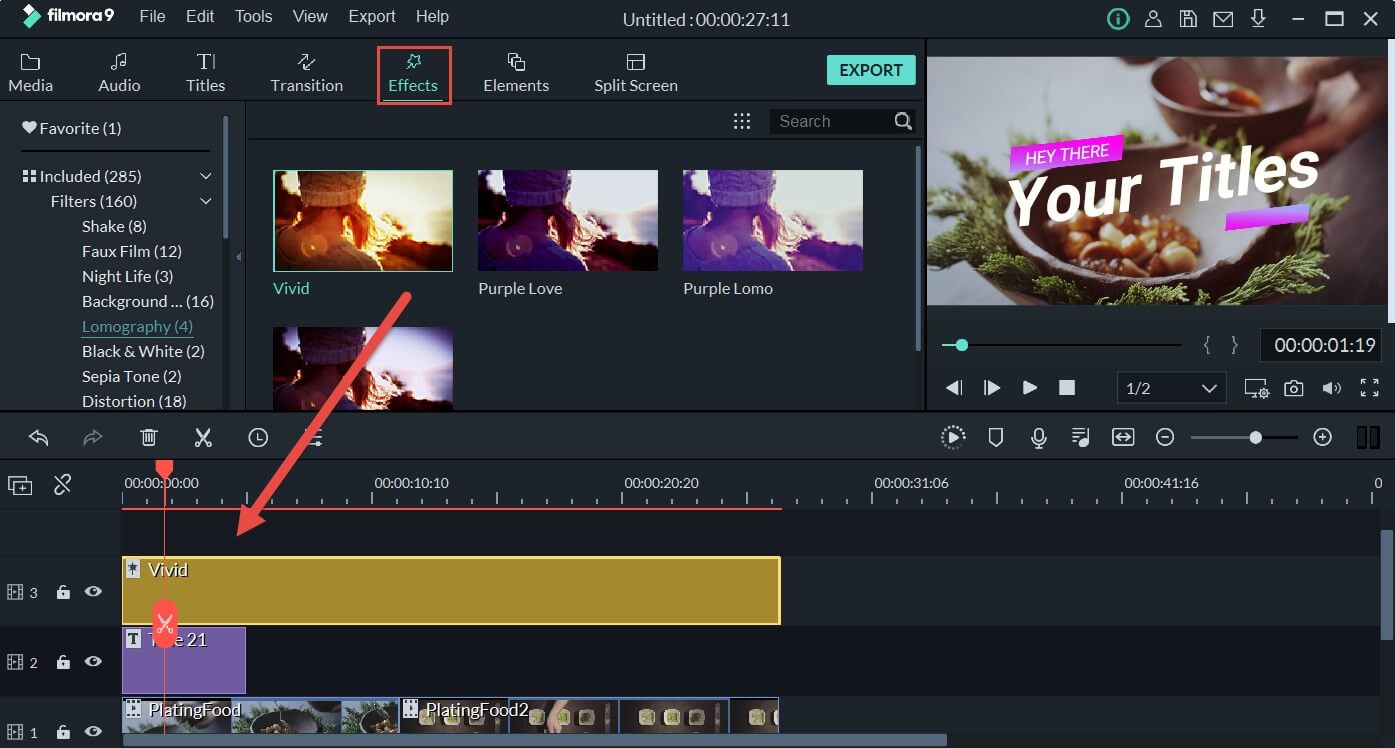
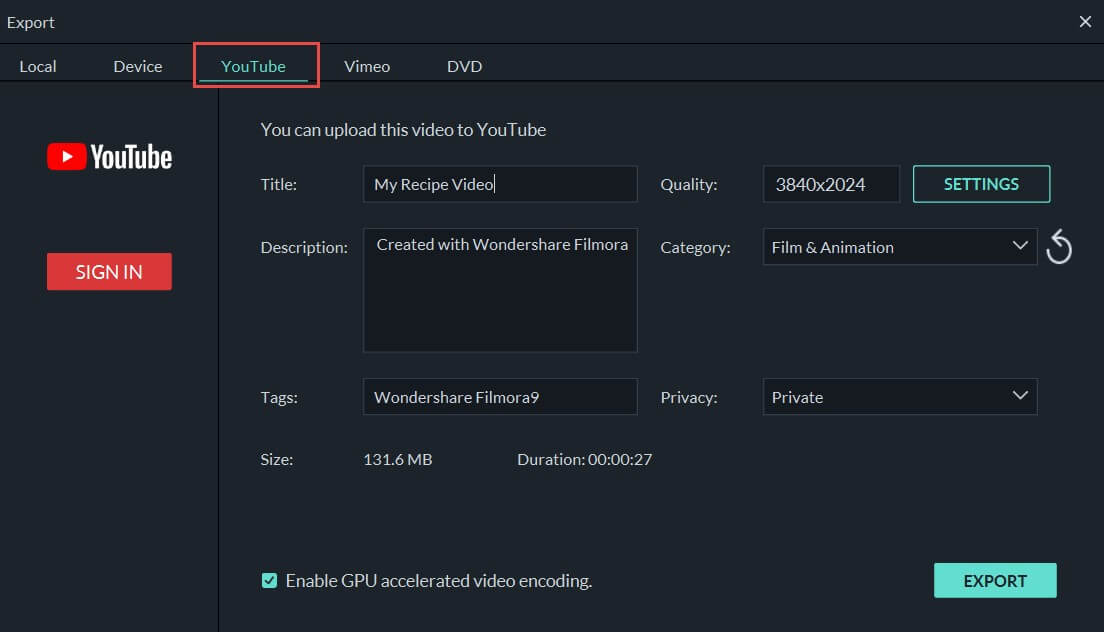
5. Once you’re done, you can click Export and upload your video to YouTube directly.
The free version will have a watermark on the exported video.
There’s nothing more delightful than to put your skills to work and save time by using Filmora. The time you save can be put into making more content and editing videos to boast of your creativity to friends.
Conclusion
YouTube has immersed so much in our day-to-day life that on average a mobile viewing session lasts more than 40 mins. To satiate our thirst for video content, YouTube has become the sole free platform. But even if your favorite song or movie gets deleted, you don’t have to worry as I’ve compiled the best solution to watch deleted YouTube videos and even be able to restore deleted YouTube videos to relish watching them with your friends and family. Leave your comments below if you love this article.

Richard Bennett
Richard Bennett is a writer and a lover of all things video.
Follow @Richard Bennett
Richard Bennett
Mar 27, 2024• Proven solutions
YouTube features a wide variety of corporate and user-generated content ranging from music to DIY videos. Along with all this massive inflow, there are scenarios where the video content that you like or wanted to watch gets deleted for any reason. Either the uploading channel deleted the video, or YouTube sometimes deletes videos for violating any of the platform’s rules – showing the dismal message “We’re sorry, this video is no longer available”. You’ll be thinking it is probably impossible to access deleted YouTube videos that you wanted to watch so badly. Though it may be true to some extent, in reality, nothing gets deleted from the internet. To help you watch deleted YouTube videos, we’ll dive into the two most handy methods down below. So, let get started.
You might be interested in How to Make a Playlist of Uploaded Videos and Others’ Video on YouTube>>>
- Part 1: Watch Deleted YouTube Videos with a URL
- Part 2: Watch Deleted YouTube Videos without a URL
- Part 3: Bonus Tip—Make Your Own YouTube Video with Wondershare FilmoraX
[
Part 1: Watch Deleted YouTube Videos with a URL
Internet Archive(known as the Wayback Machine) is a website archival system that has been collecting and cataloging websites since 1996. This means the system has effectively saved the site’s current layout and data. This enormous world archive of the Web’s past has amassed over 100 terabytes of storage with around 10 billion web pages.
On the archive.org website, you can find many of your favorite web site’s “snapshot” at a time in the past. For our case, we need to find and watch deleted YouTube videos, so for that, all we need is the link of the video, and we can most probably find it on archive.org. The steps for finding and restoring deleted YouTube videos are simple and as follows.
1. First of all, find the URL in your YouTube email, channel account if you’re searching for your uploaded video. You can find the link in browser history, in YouTube history, or you may have shared the link on social media.
If you want to watch a deleted YouTube video using the Wayback Machine, you must find the link to the video you want to access; without the URL, you won’t be able to access the deleted YouTube video.
2. Head over to the archive.org website and paste the YouTube video URL in the search bar and press return.
3. Once you find your video on the internet archive, you can see the details of the video.
4. You won’t be able to play the video directly, but you should be able to download it. Right, click the video to find the option to download the video.
This method works mostly as the Wayback machine is pretty active and regularly crawls the web to archive the sites. But sometimes, this method may not work and would require a more sophisticated way to watch deleted YouTube videos.
[
Part 2: Watch Deleted YouTube Videos without a URL
But what if you don’t have a URL for the deleted YouTube video? The internet is a global village network. Everything on the internet is connected, and that connection makes it more useful for example, even though a YouTube video might be deleted, you can somehow access and watch the deleted YouTube videos without a URL because people always replicate videos and share them on other YouTube channels or social media platforms. To make sure you get to watch your favorite YouTube video again, we will dive into the vast internet and find the deleted YouTube videos.
This method can be a bit complicated and would require you to give full attention to find the video you want to watch that badly that you’ve landed on this article.
1. Open a new tab in your browser and go to the Google search bar. We’re going to employ a technique from the SEO expert’s toolbox – Google Search Operators.
2. In the search bar, type “site:www.youtube.com + name Of TheVideo”
3. This way Google will crawl all the name relevant videos only from the YouTube databases and move us closer to finding our deleted YouTube video.
4. If you know the video was shared by someone on Facebook or any other social media platform, you can change the site URL in the search bar, replacing YouTube with Facebook, for example.
5. Once you find the video URL, you can simply go back to the first method that we discussed and paste the URL into the internet archive. The archive will give you the video and you can enjoy watching a deleted YouTube video.
Note: If you still cannot find the video using this method, I’m sorry to tell you the video may be completely deleted from the server, and you cannot access it anymore.
Part 3: Bonus Tip—Make Your Own YouTube Video with Wondershare Filmora
Want to make a YouTube video again? Wondershare Filmora is a relatively lightweight and powerful platform you get an intuitive interface and the power to create wonderful, unique content. To help you make your own YouTube video with Filmora, we’ll go through a short introduction of the flow and features first:
- Organize media with folders and projects
- Cutting and trimming raw footage
- Unlimited Layering
- Visual effects and filters
- Attach/detach audio and music
- Add creative text and icons with a wide range of templates to choose from
- Advanced color correction tools
- Export videos to YouTube directly and support various output formats
Make a YouTube video with several clicks using Wondershare Filmora:
1. Download and install Wondershare Filmora on your computer by tapping the download wizard below. Remember to join the Wondershare Video Community to connect with other video creators.
2. Launch Wondershare Filmora, add your videos to the Media Library. And you’ll also be greeted with a sleek and simple interface with controls for everything such as transitions, titles, layering clips, soundtrack, and more.
3. Add your video to the timeline, then go to the Titles tab, and you will see hundreds of titles and text templates. Select the template you love and add it to the video.
4. Then you can also go to the Effects tab and apply astonishing filters to the video
5. Once you’re done, you can click Export and upload your video to YouTube directly.
The free version will have a watermark on the exported video.
There’s nothing more delightful than to put your skills to work and save time by using Filmora. The time you save can be put into making more content and editing videos to boast of your creativity to friends.
Conclusion
YouTube has immersed so much in our day-to-day life that on average a mobile viewing session lasts more than 40 mins. To satiate our thirst for video content, YouTube has become the sole free platform. But even if your favorite song or movie gets deleted, you don’t have to worry as I’ve compiled the best solution to watch deleted YouTube videos and even be able to restore deleted YouTube videos to relish watching them with your friends and family. Leave your comments below if you love this article.
Richard Bennett
Richard Bennett is a writer and a lover of all things video.
Follow @Richard Bennett
Top 10 Tools to Enhance Your YouTube Vocal Recordings
Are you looking for the best voice-changing app for your YouTube channel?
Creating a YouTube video with professional output is straightforward, but many people find it challenging because they do not have the right vlogging tools at their disposal. There are countless vlogging tools and one of them is the voice changer.
With a voice-changing app, you can create multiple voices for one video clip with complete ease. Voice changer supports several background sound effects that you can import to spice up your content before uploading it on YouTube. The app makes your videos fun and interesting to watch that then drives traffic to your channel.
Presently, there is an array of YouTube voice-changers available online. While some are top-notch, others are nothing to write about. In this article, we will share with you some top-level YouTube voice-changers recommended by experts in the industry. Without further ado, let’s dive in.
For Win 7 or later (64-bit)
For macOS 10.12 or later
Part 1. Best Voice Changers for YouTubers
Here are the top 7 YouTube voice-changing apps available on the global market today:
1. AthTek [Online & Free]
AthTek is one the world-leading voice-changing apps suitable for Windows operating systems. This simple yet powerful app is well-customized with powerful features such as pitch and speed enhancer. The app allows you to edit your audio recordings easily and quickly.
It provides you with a comprehensive user interface that lets you switch your voice without stress. Compared to other voice-changers, AthTek stands out. The app integrates perfectly with platforms like Skype, etc.
AthTek is a fantastic voice changer, however, it isn’t without its dark sides. AthTek is not a real-time voice-changing app. Hence, you can only use it with ready-made sound recordings.
How to Use AthTek YouTube Voice Changer
Follow the procedure below to use the AthTek voice changing app on your YouTube channel:
Step1 Download AthTek from the official website. Follow the on-screen instructions to install the app, and launch it. When AthTek opens, the interface below will appear on your display screen:

Locate the Browse button beside File Path, and click on it. AthTek will automatically direct you to your local storage.

Step2 Choose your desired audio file from the list available on your computer, and tap the Open button. AthTek will immediately upload the audio file on its interface. The page below will come up on your screen:

Step3 Now move to the Change Parameter section and make the necessary adjustments. Once that’s set, click on the Play button to preview the audio file. If satisfied, tap on Export, choose a destination path and click on Save.

2. Voicechanger.io
Voicechanger.io is a cloud-based program that enables you to upload and edit audio files conveniently without distorting the quality. The program also allows you to record your voice, and add effects with complete ease. It’s an easy-to-use voice changer with no operating system limitations. Aside from voice changing, Voicechanger.io supports speech-to-text. Thus, you can convert speech to text without stress.
How to Use Voicechanger.io
Step1 With the help of an internet-enabled computer system, navigate to the official webpage for Voicechanger.io. The page below will come up if all goes well:

Step2 Choose your preferred audio input method to proceed. Should you select Upload audio, you will be directed to your local drive where your recordings are stored. Choose an audio file, and click on Open.

However, should you pick the Use microphone option, you will be prompted to grant access to the mic. Click on the appropriate key to complete this step.

3. Voxal Voice Changer
Voxal Voice Changer is another quality app mostly used by Mac owners to manipulate audio recordings. It’s also suitable for editing real-time chat audio recordings. The app provides you with several preset voices that you can select from to make your sound recordings fun to listen to.
Additionally, you have the privilege to customize the background effects that you could be used at any time. Voxal Voice Changer is a simple app with zero restrictions in the free version. It also offers paid versions with additional features for professional YouTubers. Besides editing ready-made audio, the app does allow you to create voice recordings.
How to Use Voxal Voice Changer
Here is the detailed procedure to use the Voxal Voice Changer app:
Step1 From the official website for Voxal, download and install a compatible version of the app on your computer system. Wait until the installation is successful and launch the app for usage.

When the interface above appears, locate the Menu drop-down menu at the top left corner of your display screen. Select File > Import Voice. Your local storage will automatically appear.
Step2 Choose an audio recording or voice to import on the Voxal Voice Changer interface, and tap on Open. After uploading the file, select a voice effect on the left sidebar.

Step3 Now click on the green Preview button at the top menubar. Listen to the audio file with the chosen effect. If satisfied, export the file to your preferred storage path.
4. Skype Voice Changer
As the name implies, this app is built for you to conceal your voice when using Skype social media platform. It can also serve as a voice changer for YouTube content creators. This app permits you to transform your audio recordings into interesting sounds easily and quickly.
Skype Voice Changer offers free and paid services to its end-users. However, the majority of its features are locked in the paid version. The app provides a clean voice editing interface so end-users, including those who aren’t conversant with information technology, can navigate easily.
How to Use Skype Voice Changer
Here is the set of instructions to use Skype Voice Changer:
Step1 Install the Skype Voice Changer app on your PC, and launch it for operation by clicking on the appropriate button.


A window with several easy-to-use options will come up just as below:

Click on the Effects button at the top menu bar.
Step2 Select a voice effect on the left panel of the Skype Voice Changer interface. Once that is set, click on Preview at the lower right corner of your screen.
Now speak into a microphone, and listen to your voice.
5. AV Voice Changer Diamond
AV Voice Changer Diamond is another wonderful voice-changing app with several entertaining effects that you can choose from to pimp your audio recordings or voice. The app provides you with several preset options, so you have control over your output. It’s one of the most versatile apps for YouTubers.
This voice changer offers an easy-to-manage user interface so beginners in the tech space can easily find their way without involving a third party. AV Voice Changer Diamond works perfectly with all VoIP programs and social media platforms like Skype, Viber, YouTube, and more. One challenge you may experience with this app is the very long installation process.
How to Use AV Voice Changer Diamond
Go to the AV Voice Changer Diamond website to install the latest version of the app on your computer system, and follow the steps below to use it:
Step1 Open the app on your Windows or Mac operating system. You will find the interface below on your screen:

Locate the Nickvoices at the top toolbar. Click on it, and a couple of voice effect options will pop up.

Step2 Select from the list to proceed. Alternatively, you could click on Custom on the list to customize a voice effect. However, mind you, you must subscribe to a premium package to create a voice effect.
Step3 On completing the step above, locate the Record button and click on it. A new window will come up. Follow the on-screen instructions to record your voice.

6. Voice Changer HD
If you are looking for a voice-changing app that you can use to modify your YouTube audio tracks at a zero-cost fee, Voice Changer HD is the perfect tool to use. The app allows you to turn boring audio recordings into enjoyable ones with the lovely effects it supports.
In addition to the audio editing features, Voice Changer HD lets end-users create sounds from texts. Thus, it supports text-to-speech. The app comes with an easy-to-manage user interface. It has over 25 preset voices tucked into it.
How to Use Voice Changer HD
Using Voice Changer HD isn’t difficult. Apply the stepwise guide below:
Step1 Download, install, and open Voice Changer HD on your computer. Once it opens, click on the appropriate button to record your voice.
Step2 Click on the Stop button to end the recording. Voice Changer HD will automatically load an interface with several voice effects. Select one to design your recorded file.

Step3 Next, click on Share to send the file to friends and relatives.

Part 2. Best Voice Editors for YouTubers
1. Filmora

Filmora is an industry-leading audio editing software well-designed with an interactive user interface that allows you to edit YouTube recordings before uploading them on the net. This multipurpose software is customized with endless audio editing features. It supports audio ducking, audio visualizer, auto synchronization, speech-to-text, text-to-speech, and lots more.
Free Download For Win 7 or later(64-bit)
Free Download For macOS 10.14 or later
Additionally, end-users can easily detect silence in an audio or video file via the Wondershare Filmora software. Besides audio editing, this software is capable of video editing. It enables you to modify/adjust videos without compromising the quality. This software permits you to add effects, transitions, detach audio, remove background, etc.
Wondershare Filmora has all you need in a video and audio editor as it integrates with several platforms, including YouTube and other social media apps. This audio editing solution is suitable for Windows and Mac operating systems.
2. Adobe Audition

Designed by the first PDF editing platform developer, Adobe Audition is another software you can count on to edit audio tracks with quality output. It edits all audio types, including MP3, WAV, and more, with zero limitations. The software sits at the second position on our list because of the rich editing features it holds. Adobe Audition allows you to mix sounds easily and quickly- a vital reason Disc Jerkers (DJs) use the software. Another feature you stand to enjoy when using this software is the freedom to design sound effects.
Part 3. FAQs
Q1. Can I change my voice for YouTube videos?
Yes!
With voice-changing apps, you can quickly change your voice for YouTube videos. These apps come with lots of incredible sound effects that you need to pimp your audio tracks on YouTube. Some of the top-rated voice changers available in the market presently have been introduced above. Check them out.
Q2. What voice changers do YouTubers use?
As earlier stated, there are countless voice-changing apps for YouTubers. Depending on the sound effect you need, you may need to try two or more. You can select one from the ones mentioned in the article.
Conclusion
Now you have the top 7 voice changers for YouTubers, select one of them and use it in your next project. All voice-changing apps are simple to use, fast and reliable. However, we advise that you consider the pricing before investing in it. If you need an audio/video editing software program, Filmora is the right tool to use. The software is well-known for excellent results.
For Win 7 or later (64-bit)
For macOS 10.12 or later
Part 1. Best Voice Changers for YouTubers
Here are the top 7 YouTube voice-changing apps available on the global market today:
1. AthTek [Online & Free]
AthTek is one the world-leading voice-changing apps suitable for Windows operating systems. This simple yet powerful app is well-customized with powerful features such as pitch and speed enhancer. The app allows you to edit your audio recordings easily and quickly.
It provides you with a comprehensive user interface that lets you switch your voice without stress. Compared to other voice-changers, AthTek stands out. The app integrates perfectly with platforms like Skype, etc.
AthTek is a fantastic voice changer, however, it isn’t without its dark sides. AthTek is not a real-time voice-changing app. Hence, you can only use it with ready-made sound recordings.
How to Use AthTek YouTube Voice Changer
Follow the procedure below to use the AthTek voice changing app on your YouTube channel:
Step1 Download AthTek from the official website. Follow the on-screen instructions to install the app, and launch it. When AthTek opens, the interface below will appear on your display screen:
Locate the Browse button beside File Path, and click on it. AthTek will automatically direct you to your local storage.
Step2 Choose your desired audio file from the list available on your computer, and tap the Open button. AthTek will immediately upload the audio file on its interface. The page below will come up on your screen:
Step3 Now move to the Change Parameter section and make the necessary adjustments. Once that’s set, click on the Play button to preview the audio file. If satisfied, tap on Export, choose a destination path and click on Save.
2. Voicechanger.io
Voicechanger.io is a cloud-based program that enables you to upload and edit audio files conveniently without distorting the quality. The program also allows you to record your voice, and add effects with complete ease. It’s an easy-to-use voice changer with no operating system limitations. Aside from voice changing, Voicechanger.io supports speech-to-text. Thus, you can convert speech to text without stress.
How to Use Voicechanger.io
Step1 With the help of an internet-enabled computer system, navigate to the official webpage for Voicechanger.io. The page below will come up if all goes well:
Step2 Choose your preferred audio input method to proceed. Should you select Upload audio, you will be directed to your local drive where your recordings are stored. Choose an audio file, and click on Open.
However, should you pick the Use microphone option, you will be prompted to grant access to the mic. Click on the appropriate key to complete this step.
3. Voxal Voice Changer
Voxal Voice Changer is another quality app mostly used by Mac owners to manipulate audio recordings. It’s also suitable for editing real-time chat audio recordings. The app provides you with several preset voices that you can select from to make your sound recordings fun to listen to.
Additionally, you have the privilege to customize the background effects that you could be used at any time. Voxal Voice Changer is a simple app with zero restrictions in the free version. It also offers paid versions with additional features for professional YouTubers. Besides editing ready-made audio, the app does allow you to create voice recordings.
How to Use Voxal Voice Changer
Here is the detailed procedure to use the Voxal Voice Changer app:
Step1 From the official website for Voxal, download and install a compatible version of the app on your computer system. Wait until the installation is successful and launch the app for usage.
When the interface above appears, locate the Menu drop-down menu at the top left corner of your display screen. Select File > Import Voice. Your local storage will automatically appear.
Step2 Choose an audio recording or voice to import on the Voxal Voice Changer interface, and tap on Open. After uploading the file, select a voice effect on the left sidebar.
Step3 Now click on the green Preview button at the top menubar. Listen to the audio file with the chosen effect. If satisfied, export the file to your preferred storage path.
4. Skype Voice Changer
As the name implies, this app is built for you to conceal your voice when using Skype social media platform. It can also serve as a voice changer for YouTube content creators. This app permits you to transform your audio recordings into interesting sounds easily and quickly.
Skype Voice Changer offers free and paid services to its end-users. However, the majority of its features are locked in the paid version. The app provides a clean voice editing interface so end-users, including those who aren’t conversant with information technology, can navigate easily.
How to Use Skype Voice Changer
Here is the set of instructions to use Skype Voice Changer:
Step1 Install the Skype Voice Changer app on your PC, and launch it for operation by clicking on the appropriate button.
A window with several easy-to-use options will come up just as below:
Click on the Effects button at the top menu bar.
Step2 Select a voice effect on the left panel of the Skype Voice Changer interface. Once that is set, click on Preview at the lower right corner of your screen.
Now speak into a microphone, and listen to your voice.
5. AV Voice Changer Diamond
AV Voice Changer Diamond is another wonderful voice-changing app with several entertaining effects that you can choose from to pimp your audio recordings or voice. The app provides you with several preset options, so you have control over your output. It’s one of the most versatile apps for YouTubers.
This voice changer offers an easy-to-manage user interface so beginners in the tech space can easily find their way without involving a third party. AV Voice Changer Diamond works perfectly with all VoIP programs and social media platforms like Skype, Viber, YouTube, and more. One challenge you may experience with this app is the very long installation process.
How to Use AV Voice Changer Diamond
Go to the AV Voice Changer Diamond website to install the latest version of the app on your computer system, and follow the steps below to use it:
Step1 Open the app on your Windows or Mac operating system. You will find the interface below on your screen:
Locate the Nickvoices at the top toolbar. Click on it, and a couple of voice effect options will pop up.
Step2 Select from the list to proceed. Alternatively, you could click on Custom on the list to customize a voice effect. However, mind you, you must subscribe to a premium package to create a voice effect.
Step3 On completing the step above, locate the Record button and click on it. A new window will come up. Follow the on-screen instructions to record your voice.
6. Voice Changer HD
If you are looking for a voice-changing app that you can use to modify your YouTube audio tracks at a zero-cost fee, Voice Changer HD is the perfect tool to use. The app allows you to turn boring audio recordings into enjoyable ones with the lovely effects it supports.
In addition to the audio editing features, Voice Changer HD lets end-users create sounds from texts. Thus, it supports text-to-speech. The app comes with an easy-to-manage user interface. It has over 25 preset voices tucked into it.
How to Use Voice Changer HD
Using Voice Changer HD isn’t difficult. Apply the stepwise guide below:
Step1 Download, install, and open Voice Changer HD on your computer. Once it opens, click on the appropriate button to record your voice.
Step2 Click on the Stop button to end the recording. Voice Changer HD will automatically load an interface with several voice effects. Select one to design your recorded file.
Step3 Next, click on Share to send the file to friends and relatives.
Part 2. Best Voice Editors for YouTubers
1. Filmora
Filmora is an industry-leading audio editing software well-designed with an interactive user interface that allows you to edit YouTube recordings before uploading them on the net. This multipurpose software is customized with endless audio editing features. It supports audio ducking, audio visualizer, auto synchronization, speech-to-text, text-to-speech, and lots more.
Free Download For Win 7 or later(64-bit)
Free Download For macOS 10.14 or later
Additionally, end-users can easily detect silence in an audio or video file via the Wondershare Filmora software. Besides audio editing, this software is capable of video editing. It enables you to modify/adjust videos without compromising the quality. This software permits you to add effects, transitions, detach audio, remove background, etc.
Wondershare Filmora has all you need in a video and audio editor as it integrates with several platforms, including YouTube and other social media apps. This audio editing solution is suitable for Windows and Mac operating systems.
2. Adobe Audition
Designed by the first PDF editing platform developer, Adobe Audition is another software you can count on to edit audio tracks with quality output. It edits all audio types, including MP3, WAV, and more, with zero limitations. The software sits at the second position on our list because of the rich editing features it holds. Adobe Audition allows you to mix sounds easily and quickly- a vital reason Disc Jerkers (DJs) use the software. Another feature you stand to enjoy when using this software is the freedom to design sound effects.
Part 3. FAQs
Q1. Can I change my voice for YouTube videos?
Yes!
With voice-changing apps, you can quickly change your voice for YouTube videos. These apps come with lots of incredible sound effects that you need to pimp your audio tracks on YouTube. Some of the top-rated voice changers available in the market presently have been introduced above. Check them out.
Q2. What voice changers do YouTubers use?
As earlier stated, there are countless voice-changing apps for YouTubers. Depending on the sound effect you need, you may need to try two or more. You can select one from the ones mentioned in the article.
Conclusion
Now you have the top 7 voice changers for YouTubers, select one of them and use it in your next project. All voice-changing apps are simple to use, fast and reliable. However, we advise that you consider the pricing before investing in it. If you need an audio/video editing software program, Filmora is the right tool to use. The software is well-known for excellent results.
Also read:
- 2024 Approved Comparative Assessment YouTube Vs. DailyMention
- Crafting Stellar Video Beginnings with Free Tools for 2024
- [Updated] Enhancing Your Stream's Visibility by Sharing via YouTube
- Quickcast Your Youtube Selection, Playlists
- Grow Your Channelnode Through Joint Videography Endeavors
- 2024 Approved Cut Down, Catch More The Best URL Reducers for YouTube
- Quick Tips for Continuous Playback on iPhone
- [New] Conquer the Crowd Initiating Your Top-Ranked Gaming Channel
- [Updated] 5 Leading Apps to Create Professional YouTube Intros
- Novice Net Worth Easy Sites for Beginner's Channel Buys
- [Updated] Discover the Top 10 Fitness Channels for Yogis
- The Ultimate Guide to Enriching YouTube Videos with Harmonics
- In 2024, Essential Steps for Organizing YouTube Content
- Tracing Trending Commentary Across Videos
- Understanding the Economics Behind YouTube's Shorts Fund
- Enhancing YouTube Presence Creating Professional Thumbnails From Smartphones
- From Couch-to-Camera Earning Through Personal Vlogging
- In 2024, 10 Most Popular Beauty Gurus on YouTube
- [New] Best ASMR YouTube Channels You Should Know
- Discover Keyword Power 30 Must-Use Hashtags for FreeGame Content for 2024
- A Novice's Navigational Guide on YouTube Channel Creation and Making Dough for 2024
- [Updated] Boost Your Content Access Free Vocal SFX
- 2024 Approved Enhancing Online Privacy YouTube's Access Controls
- 10 Top-Ranked YouTube News Entities for 2024
- Capture Clearness Without a Tripod Tool
- Mastering YouTube Dimensions A Comprehensive Guide
- Pranks & Puns Playbook 7 Clever Gags for Video Virtuosos
- [New] Captivating Your Audience YouTube Intro Excellence with iMovie
- In 2024, Craftsman of the Multimedia Medley
- How to Live Stream on YouTube Gaming?
- Professional Tips Designing YouTube Trailers in Filmora
- [Updated] Elevate Youtube Presence Ideal Release Windows
- Bring on the Browsers Top Strategies to Transform Your Unwatched Videos
- Maximize Video Discoverability Key YouTube SEO Techniques
- [Updated] Arena of Achievements A Million Gaming Milestones
- Channel Growth Blueprint Selecting Between Studio and Latest Beta for 2024
- Best 3D Software for Dynamic YouTube Intros for 2024
- Leading 10 Audio Boost Tools for Diverse Systems
- [New] Endless Escapades Discovering YouTube's 10 Best Films, Gratis
- Dissecting TSeries Profits From YouTube Platforms
- [New] Access Your Favorites Anytime The Leading 6 Free Video Downloaders
- Visionary Storytelling for Video Viewers' Growth
- Livestream Elite Top Equipment For YouTube Content Creators
- [New] Channel Gain Strategies for YouTube Aspirants
- 2024 Approved Engaging Tactics for Increased Subscriber Count
- In 2024, Essential Insights on ASMR Videos Unveiled
- In 2024, Breaking the Internet Hashtag Wisdom for Short Films
- [New] 2024 Approved Optimizing Film Length for Instagram on Mac
- In 2024, How to Capture Computer Screens and Webcam Video Simultaneously on Windows10?
- 6 Ways to Change Spotify Location On Your Google Pixel 7a | Dr.fone
- Precision Followers GPS Drones of the Year
- [New] Secrets of the Screen Elevating Your TikTok Video with Advanced Techniques for 2024
- Updated 7 Video Joiner Software with No Watermark Output for 2024
- A Detailed VPNa Fake GPS Location Free Review On Apple iPhone XS | Dr.fone
- In 2024, 5 Quick Methods to Bypass HTC U23 Pro FRP
- Full Scene Preview A Complete PPro Manual
- [New] 2024 Approved Elevate Your Presentations with Voiceovers
- Top 6 Apps/Services to Trace Any Samsung Galaxy S24 Location By Mobile Number | Dr.fone
- Best 10 Mock Location Apps Worth Trying On Poco C51 | Dr.fone
- [Updated] Elevate Your Live Recordings on Facebook with 4 Methods for 2024
- Title: "Digitally Delving Into Deleted YouTubes Easy Watch Options for 2024"
- Author: Brian
- Created at : 2024-06-26 00:20:22
- Updated at : 2024-06-27 00:20:22
- Link: https://youtube-video-recordings.techidaily.com/digitally-delving-into-deleted-youtubes-easy-watch-options-for-2024/
- License: This work is licensed under CC BY-NC-SA 4.0.
