
:max_bytes(150000):strip_icc()/christin-hume-309877-unsplash-5be72fd246e0fb005186530a.jpg)
"Deciphering Finances How Much Do YouTubers Earn Per Ad?"
Deciphering Finances: How Much Do YouTubers Earn Per Ad?
YouTube is a great way to make money online through sponsorship and selling merchandise and sponsorships. However, a big chunk of the creator generates their revenue from Google ads. The YouTube monetization rates defines how much you can make from the ads. In this article, we talk about YouTube monetization rates and what you need to start making money.
YouTububer Monetization Helper A cross-platform for creating visually appealing and engaging videos that will increase the chances of monetization on YouTube!
Free Download Free Download Learn More

Part 1. How Much Do YouTubers Make Per View?
Are you curious about how much YouTubers make per view? Most people are. The Influencer Marketing Hub estimates that the average YouTuber makes $0.018 per view. These rates vary from $0.10 to $0.30 per ad view depending on the type of video and location.

The YouTube monetization rates vary significantly because of various factors:
- The number of views a video receives
- The number of clicks an ad receives
- Ad blockers
- Ad Quality
- Video length
Part 2. How Much Do YouTubers Make Per 1,000 Views
A YouTube channel is a great way to generate revenye. Quality content attracts a large audience, enabling a way to generate ad revenue. Although it may be difficult to grow a YouTube channel, the revenue generated is worth. The youtube monetization rates determine the amount you can earn for every 1,000 views on your videos.
Allowing advertiser to run their ads on your channel through Google AdSense is an effective way of monetizing YouTube Content. The advertisers pay YouTube to display their products on the platform. YouTube then pays YouTubers for displaying the ads on their videos. Although the YouTube monetization rates may vary, overall revenue generated is usually substantial.
Each view will generate $0.10 to $0.30 or an average of $0.018. The YouTuber will be paid $18 on average for a video with 1,000 ad views. The amount paid depends on the CPM (Cost per Mille), which is the cost of advertising to 1,000 people. Brands will incur between $4 and $24 on YouTube to advertise on YouTube. However, the revenue generated by the Youtuber will be lower because not all the 1,000 views will be ad views.
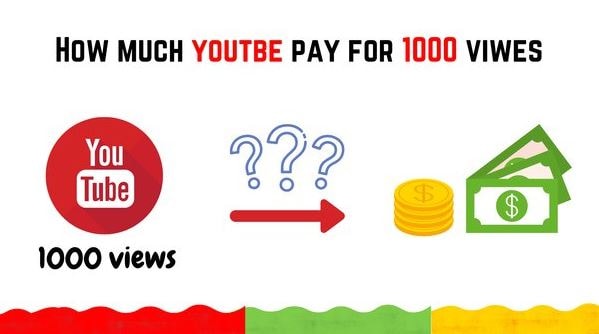
Most YouTubers report to earn around $5 to $7 from 1,000 views of their videos. Here is a breakdown of the earnings from this:
- Top talent on YouTube will likely earn $5 per 1,000
- Garnering 1 million views will earn the YouTuber $5,000
- Garnering 1 million views with 5 videos will earn the YouTuber $25,000
The figures above are just estimates. YouTubers often make more or less this amount.
Part 3. How Many Views Do YouTubers Need to Get Paid?
To get paid from revenues, you need to be eligible for the YouTube Partner Program (YPP). The following is the eligibility criteria.

The specific eligibility criteria include the following:
- Subscribers - At least 1,000
- YouTube Reach – At least 4,000 valid public watch hours in the past 12 months or at least 10M public Shorts views in the last 90 days
- YouTube Shorts Reach -
- Sign and agree to the terms and conditions
- Have an AdSense account
- Get reviewed and approved
Once approved for the YPP, you have the potential to start earning through ads. The revenue-sharing program allows you to earn income for the ads that show on your channel. Specifically, Google will pay you 68% of the revenue from the ads displayed with AdSense. For instance, a video that generates $1,000 from AdSense revenue will pay the YouTuber $680.
Part 4. The Top 6 Highest Paid YouTubers
YouTube creates a clear path for the birth of a new breed of celebrities. They have a huge following, and grow their wealth by sharing content with them. Let’s have a look at the top 6 paid YouTubers right now:
- Beast (Jimmy Donaldson) - $54 Million
- Jake Paul - $45 million
- Markiplier - $38 Million
- Rhett and Link - $30 million
- Unspeakable - $28.5 million
- Nastya - $28 million
1. Mr. Beast (Jimmy Donaldson) - $54 Million

Ranked first among the highest-paid YouTubers, Jimmy has the most popular channel. With more than 150 million subscribers, he creates videos about challenges, pranks, and giveaways. The videos have accumulated billions of views, contributing to his estimated net worth of over $100 million. Another important source of income is the Mr. Beast Burger app and menu that lets fans order MrBeast-banded meals from over 1,600 restaurants across the country.
2. Jake Paul - $45 million

Jake Paul is a renowned American professional boxer. Widely famous on social media, his YouTube is also one of the most highly ranked. He shares different kinds of videos from his boxing games. He also does pranks and reviews about different products.
3. Markiplier - $38 Million

Markiplier makes videos about playing games. The YouTube channel, which started in 2021 is renowned for moving merch. In addition to ad revenue, Markiplier records high sales of T-shirts, hoodies, and other items tied to the Unus Annus series.
4. Rhett and Link - $30 million
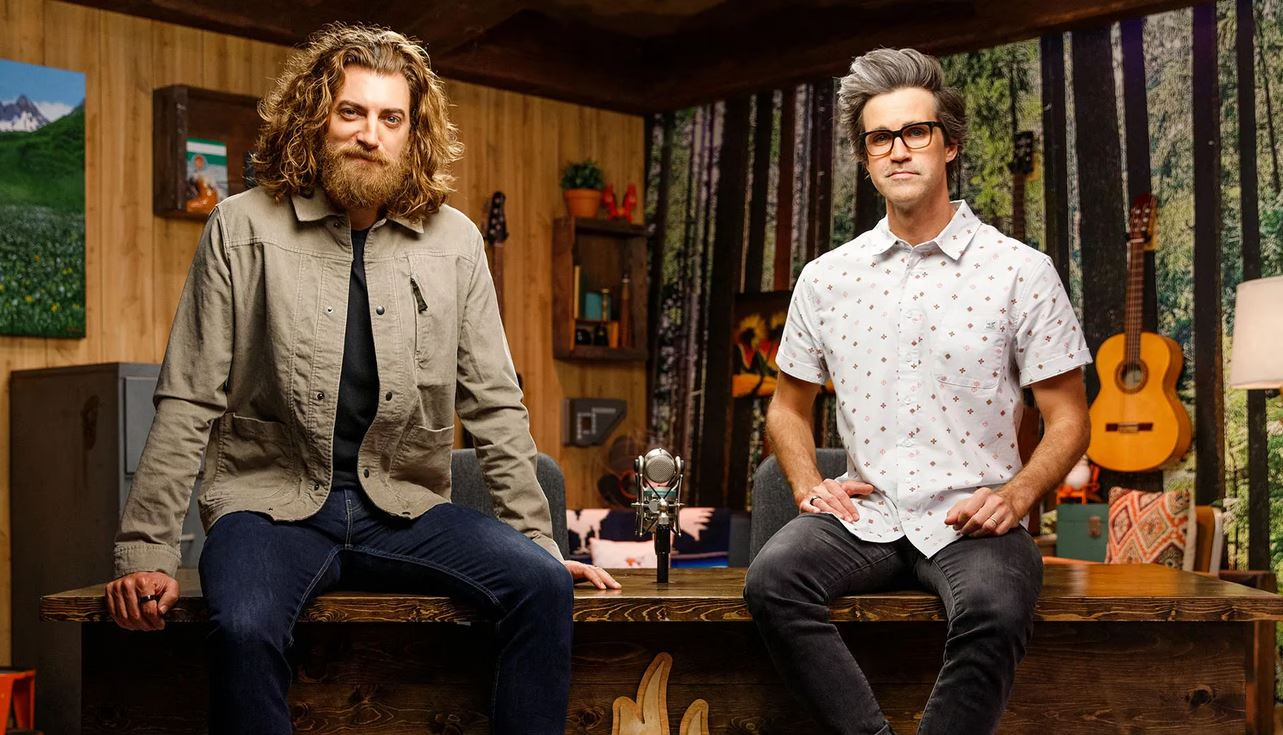
This YouTube channel started as the duo hosting a nerdy daily talk show called Good Mythical Morning. It quickly grew into an empire with brand extensions and spinoffs that boosted its views and earnings on YouTube.
5. Unspeakable - $28.5 million
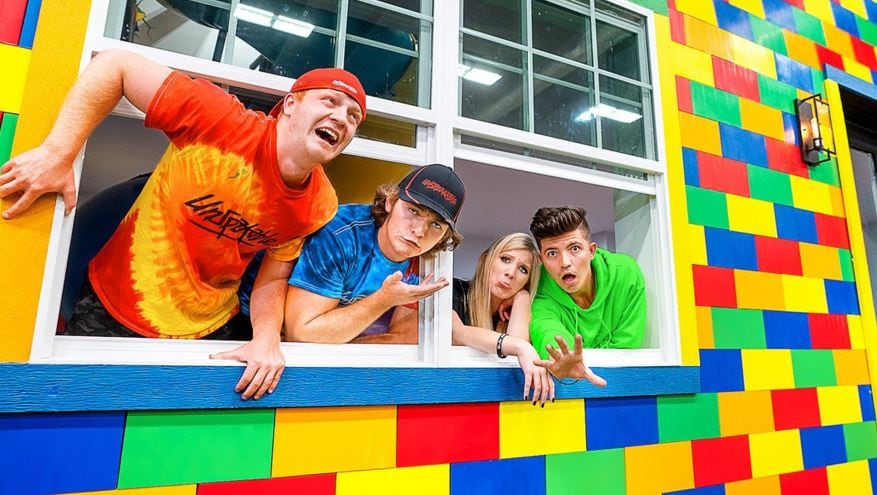
Unspeakable talks about Minecraft in the channel. Nathan Graham posts videos of himself playing this and other games. He also posts other kinds of entertaining content such as filling a room with live alligators. His creativity has allowed him to collaborate with brands in making different ads and promotions.
6. Nastya - $28 million

Nastya immigrated from Russia with her parents. With over 88 million subscribers on her channel, she chronicles her life in prosaic installments. In 2021, she did a Spotter deal and added other brand extensions like merchandise and NFT collection that contributed added income.
Part 5. Edit Your Videos for Monetization with Wondershare Filmora
The amount of money a YouTuber earns depends on several factors. However, the amount can be increased by uploading quality videos. YouTube will quality and engaging content attract more audience, increasing the opportunities for revenue generation. Wondershare Filmora is one such software, that allows you to tell your story in a better way.
Free Download For Win 7 or later(64-bit)
Free Download For macOS 10.14 or later
With the integration of AI, Filmora now offers a wide range of editing features that you can use to automate editing. Instantly generate images, remove image background, and now. These features help create visually appealing and engaging videos that will increase the chances of monetization on YouTube. One of the AI features that stands out is Instant Mode.
Filmora Instant Mode
The Instant Mode helps beginners design slideshow videos with minimal effort. You probably have no video editing experience or a professional content creator with no time to make more videos. With Instant Mode, you can create a video within minutes. Let’s have a look at the steps involved:
Step 1 – Start Instant Mode on Filmora
After opening Filmora on your device, click on Instant Mode. This feature is on the left side of the screen.

Step 2 – Choose a Template
From the Instant Mode window, choose the video template you want to use. Click on it and play to preview the Video. Once satisfied, click om the Download Slideshow button to start editing your video.

Step 3 – Import Media Items
Click on the Import Your Media icon, and add all the media files you want to use for the video. Make sure to import more media files for better use, and press the Auto Create icon to move to the next step.

Step 4 – Implement Text Titles
From the top-left corner of the screen, click the “Titles” category. Then choose from the options available for the required title template.

Step 5 – Replace Needed Media Items
Review all the media items in the timeline, and replace any that you want with another option. The Replace icon allows you to seamlessly achieve this. You can also import new files to replace it with.

Step 6: Add Project to Timeline
Once you are satisfied with your slideshow video, click on the Timeline button. This will take you to Filmora’s editing environment where you can add effects and other elements to enhance the video.

Step 7 – Preview and Export Your Video
Click on the Play icon to preview the edited video. Then export it in MP4 format for quick upload to YouTube.

Other Useful Filmora Video Editing Features
- AI Portrait – Remove the background of your videos with high accuracy and choose over 70 portrait and sticker effects.
- AI Copywriting : Get inspiration for your video through AI-generated scripts, and automatically generate text during video editing.
- AI Image – Generate an image automatically by typing what you want. Choose from 3 resolutions and use the image directly for your video project
- Auto Reframe – Automatically resize your videos within minutes to use on both YouTube and Shorts.
- Auto Beat Sync – Automatically match the footage with music, giving your video a smooth flow with the music you choose.
Conclusion
Running a YouTube Channel is lucrative. Although it may take time to build a following, YouTube is a great platform for generating revenue. Most YouTubers have monetized their channels through the YPP program. The program allows you to earn revenue from the ads that show up in your videos. This means that a successful YouTube needs high-quality videos. We recommend Wondershare Filmora for editing your videos and improving their rate of engagement with the audience. This is a key step in building recurring revenue with YouTube monetization options.
Free Download Free Download Learn More
Part 1. How Much Do YouTubers Make Per View?
Are you curious about how much YouTubers make per view? Most people are. The Influencer Marketing Hub estimates that the average YouTuber makes $0.018 per view. These rates vary from $0.10 to $0.30 per ad view depending on the type of video and location.
The YouTube monetization rates vary significantly because of various factors:
- The number of views a video receives
- The number of clicks an ad receives
- Ad blockers
- Ad Quality
- Video length
Part 2. How Much Do YouTubers Make Per 1,000 Views
A YouTube channel is a great way to generate revenye. Quality content attracts a large audience, enabling a way to generate ad revenue. Although it may be difficult to grow a YouTube channel, the revenue generated is worth. The youtube monetization rates determine the amount you can earn for every 1,000 views on your videos.
Allowing advertiser to run their ads on your channel through Google AdSense is an effective way of monetizing YouTube Content. The advertisers pay YouTube to display their products on the platform. YouTube then pays YouTubers for displaying the ads on their videos. Although the YouTube monetization rates may vary, overall revenue generated is usually substantial.
Each view will generate $0.10 to $0.30 or an average of $0.018. The YouTuber will be paid $18 on average for a video with 1,000 ad views. The amount paid depends on the CPM (Cost per Mille), which is the cost of advertising to 1,000 people. Brands will incur between $4 and $24 on YouTube to advertise on YouTube. However, the revenue generated by the Youtuber will be lower because not all the 1,000 views will be ad views.
Most YouTubers report to earn around $5 to $7 from 1,000 views of their videos. Here is a breakdown of the earnings from this:
- Top talent on YouTube will likely earn $5 per 1,000
- Garnering 1 million views will earn the YouTuber $5,000
- Garnering 1 million views with 5 videos will earn the YouTuber $25,000
The figures above are just estimates. YouTubers often make more or less this amount.
Part 3. How Many Views Do YouTubers Need to Get Paid?
To get paid from revenues, you need to be eligible for the YouTube Partner Program (YPP). The following is the eligibility criteria.
The specific eligibility criteria include the following:
- Subscribers - At least 1,000
- YouTube Reach – At least 4,000 valid public watch hours in the past 12 months or at least 10M public Shorts views in the last 90 days
- YouTube Shorts Reach -
- Sign and agree to the terms and conditions
- Have an AdSense account
- Get reviewed and approved
Once approved for the YPP, you have the potential to start earning through ads. The revenue-sharing program allows you to earn income for the ads that show on your channel. Specifically, Google will pay you 68% of the revenue from the ads displayed with AdSense. For instance, a video that generates $1,000 from AdSense revenue will pay the YouTuber $680.
Part 4. The Top 6 Highest Paid YouTubers
YouTube creates a clear path for the birth of a new breed of celebrities. They have a huge following, and grow their wealth by sharing content with them. Let’s have a look at the top 6 paid YouTubers right now:
- Beast (Jimmy Donaldson) - $54 Million
- Jake Paul - $45 million
- Markiplier - $38 Million
- Rhett and Link - $30 million
- Unspeakable - $28.5 million
- Nastya - $28 million
1. Mr. Beast (Jimmy Donaldson) - $54 Million
Ranked first among the highest-paid YouTubers, Jimmy has the most popular channel. With more than 150 million subscribers, he creates videos about challenges, pranks, and giveaways. The videos have accumulated billions of views, contributing to his estimated net worth of over $100 million. Another important source of income is the Mr. Beast Burger app and menu that lets fans order MrBeast-banded meals from over 1,600 restaurants across the country.
2. Jake Paul - $45 million
Jake Paul is a renowned American professional boxer. Widely famous on social media, his YouTube is also one of the most highly ranked. He shares different kinds of videos from his boxing games. He also does pranks and reviews about different products.
3. Markiplier - $38 Million
Markiplier makes videos about playing games. The YouTube channel, which started in 2021 is renowned for moving merch. In addition to ad revenue, Markiplier records high sales of T-shirts, hoodies, and other items tied to the Unus Annus series.
4. Rhett and Link - $30 million
This YouTube channel started as the duo hosting a nerdy daily talk show called Good Mythical Morning. It quickly grew into an empire with brand extensions and spinoffs that boosted its views and earnings on YouTube.
5. Unspeakable - $28.5 million
Unspeakable talks about Minecraft in the channel. Nathan Graham posts videos of himself playing this and other games. He also posts other kinds of entertaining content such as filling a room with live alligators. His creativity has allowed him to collaborate with brands in making different ads and promotions.
6. Nastya - $28 million
Nastya immigrated from Russia with her parents. With over 88 million subscribers on her channel, she chronicles her life in prosaic installments. In 2021, she did a Spotter deal and added other brand extensions like merchandise and NFT collection that contributed added income.
Part 5. Edit Your Videos for Monetization with Wondershare Filmora
The amount of money a YouTuber earns depends on several factors. However, the amount can be increased by uploading quality videos. YouTube will quality and engaging content attract more audience, increasing the opportunities for revenue generation. Wondershare Filmora is one such software, that allows you to tell your story in a better way.
Free Download For Win 7 or later(64-bit)
Free Download For macOS 10.14 or later
With the integration of AI, Filmora now offers a wide range of editing features that you can use to automate editing. Instantly generate images, remove image background, and now. These features help create visually appealing and engaging videos that will increase the chances of monetization on YouTube. One of the AI features that stands out is Instant Mode.
Filmora Instant Mode
The Instant Mode helps beginners design slideshow videos with minimal effort. You probably have no video editing experience or a professional content creator with no time to make more videos. With Instant Mode, you can create a video within minutes. Let’s have a look at the steps involved:
Step 1 – Start Instant Mode on Filmora
After opening Filmora on your device, click on Instant Mode. This feature is on the left side of the screen.
Step 2 – Choose a Template
From the Instant Mode window, choose the video template you want to use. Click on it and play to preview the Video. Once satisfied, click om the Download Slideshow button to start editing your video.
Step 3 – Import Media Items
Click on the Import Your Media icon, and add all the media files you want to use for the video. Make sure to import more media files for better use, and press the Auto Create icon to move to the next step.
Step 4 – Implement Text Titles
From the top-left corner of the screen, click the “Titles” category. Then choose from the options available for the required title template.
Step 5 – Replace Needed Media Items
Review all the media items in the timeline, and replace any that you want with another option. The Replace icon allows you to seamlessly achieve this. You can also import new files to replace it with.
Step 6: Add Project to Timeline
Once you are satisfied with your slideshow video, click on the Timeline button. This will take you to Filmora’s editing environment where you can add effects and other elements to enhance the video.
Step 7 – Preview and Export Your Video
Click on the Play icon to preview the edited video. Then export it in MP4 format for quick upload to YouTube.
Other Useful Filmora Video Editing Features
- AI Portrait – Remove the background of your videos with high accuracy and choose over 70 portrait and sticker effects.
- AI Copywriting : Get inspiration for your video through AI-generated scripts, and automatically generate text during video editing.
- AI Image – Generate an image automatically by typing what you want. Choose from 3 resolutions and use the image directly for your video project
- Auto Reframe – Automatically resize your videos within minutes to use on both YouTube and Shorts.
- Auto Beat Sync – Automatically match the footage with music, giving your video a smooth flow with the music you choose.
Conclusion
Running a YouTube Channel is lucrative. Although it may take time to build a following, YouTube is a great platform for generating revenue. Most YouTubers have monetized their channels through the YPP program. The program allows you to earn revenue from the ads that show up in your videos. This means that a successful YouTube needs high-quality videos. We recommend Wondershare Filmora for editing your videos and improving their rate of engagement with the audience. This is a key step in building recurring revenue with YouTube monetization options.
Make YT Previews Shine: With Splashy Neon Border
Your YouTube video, or any other clip published on any forum, gets a larger number of hits if it has an attractive thumbnail. And, the fact is, a thumbnail becomes 10x more attractive when the main character that the image has have a neon border around it.
With that said, in the following sections, you will learn a couple of methods on how to add a YouTube thumbnail border around the main characters and/or objects that are significant to the clip.
In this article
01 Add Glowing Neon Border to YouTube Thumbnail with Filmora
02 Add a Glowing Neon Border in YouTube Thumbnail with Canva
03 Outline a Person in a YouTube Thumbnail with Photoshop
Part 1: How to Add Neon Border to YouTube Thumbnail for Free with Filmora
Being one of the most versatile and intuitive post-production tools available in the market today, Wondershare Filmora X allows you to add a neon border to a YouTube thumbnail quite conveniently. You can learn how to get this done on Windows or Mac by following the steps given below.
For Win 7 or later (64-bit)
For macOS 10.12 or later
Step 1: Define Project Settings and Add Image to the Timeline
Launch Wondershare Filmora X on your PC (a MacBook Pro M1 is used here), ensure that the project aspect ratio is set to 16:9 (Widescreen) on the splash screen, and click New Project. On the main interface, click the Preview quality and display settings icon from the upper-right area of the Timeline, click Change Project Aspect Ratio, click to select 1280 x 720 (HD) from the Resolution menu of the Project Settings box, and click OK to save the custom project settings.

Then select My Media from the menu bar if not already selected, click Project Media from the navigation pane, and click Import from the Media box to select and import the image of the main character or object that you want to use in the thumbnail.

Now, drag the image from the Media box to the Timeline at the bottom.

Step 2: Clear Image Background, Add Border, and Add Custom Background
Go to Effects from the menu bar, click to select the Default tab and then AI Portrait from the navigation pane, and click and drag the Human Segmentation preset from the right box, and place it over the image track in the Timeline.

Double-click the image layer, scroll down the upper-left box to the Video Effects section, and use the Edge Thickness and Edge Feather sliders to adjust the character’s edges to make them as realistic as possible. Click OK when done.

Next, click and drag the Human Border preset over the image track in the Timeline, and follow the same procedure to customize the border. This will give the character a neon border effect.

Now, use the method explained earlier to import a custom image for the background, and drag and place it under the previous track in the Timeline.

If you are running the latest version of Filmora, you will find there are some neon light effects available under AI Portrait as well.

Step 3: Add Titles to Thumbnail
Go to Titles from the menu bar, click to select the Default tab and then Lower 3rds from the navigation pane, and click and drag your preferred lower-third preset from the right window to a separate layer in the Timeline. Double-click the lower-third layer, and use the available options in the upper-left window to change the text, its color, etc., and drag the textbox to place it to your preferred position on the image as well. Click OK to save the changes.
Next, click to select Titles from the navigation pane, and drag your preferred title from the right window to the upper-most track in the Timeline. Now use the method explained earlier to edit the text, its color, position, etc. to make it look professional.

For more tips and tricks for creating YouTube thumbnail, you can check this You Tube thumbnail creating guide.
Step 4: Get the Neon Border Thumbnail
Click the Snapshot (Camera) icon from the upper-right area of the Timeline, go to My Media from the menu bar, right-click the thumbnail of the screenshot you captured, and click Reveal in Finder (on Mac) or Reveal in Explorer (on Windows) to get to the folder the YouTube thumbnail border is saved in.

Part 2: How to Add a Glowing Neon Border in Your YouTube Thumbnail with Canva
Canva is another intuitive editing program that works on the web interface rather than having you download and install an app on your PC. You can add a neon border for YouTube thumbnails using Canva by following the instructions given below:
Step 1: Define Project Settings and Add a Background
After signing in to your Canva account, click Create a design from the top-right corner of the page, click Custom size from the bottom, define 1280 and 720 in the Width and Height fields on the box that appears respectively, and click Create new design.

Now, click to select Background from the navigation bar on the left (if the Background tool is not visible, click More and then choose Background from the expanded list), and click to select a background from the images available in the center pane.

Step 2: Upload an Image and Add Effects
Click Uploads from the navigation bar, click the More icon from the right of the Upload media button present at the top of the center pane, choose your preferred method to upload the image (with the transparent background) that you want to use, upload the image, and drag it from the center pane to the Canvas.
Note: You can use any of the tools available online to remove the background from your image for free.

To add a YouTube thumbnail border, make sure that the image that you added to the Canvas is selected, click the Duplicate icon from the upper-right area, and use the scaling handles of the copy of the image to increase its size a bit. Reposition the image back to its original location as well.
Then, click Edit image from the upper-left corner of the Canvas, click Duotone from the Edit image pane at the center, if need be, click See all, choose your preferred duotone effect to apply on the image, choose your preferred highlight and shadow colors from the box that appears next, and click Back from the top of the pane.

Next, click See all next to the Adjust section from the center pane, and drag the Blur slider to the right to increase the blur effect on the image.

Step 3: Position the Layers
While keeping the duplicate image selected, click the Position button from the upper-right area of the Canvas, and click Background to send the second image behind the first one to get the neon border effect for the photo.

Part 3: How to Outline a Person in a YouTube Thumbnail with Photoshop
Because YouTube thumbnails are nothing but static images, creating YouTube thumbnail border with Adobe Photoshop is comparatively easier. The process of doing this is given below:
Step 1: Define Document Preferences and Import an Image
Launch Adobe Photoshop on your PC, click Create new, and on the New Document customization box, define the width and height values to 1280 and 720 pixels respectively. Select Transparent from the Background Contents menu as well if not already selected. Click Create from the bottom to create a new Photoshop document with the specified document settings. Next, open the folder that contains the source image, drag the photo to Photoshop, and press Enter to place the photo.

Step 2: Remove Background from the Image
Make sure that the image layer is selected in the Layers panel on the right, go to Select from the menu bar at the top, and click Subject. From the bottom of the Layers panel, click the Add a mask icon to get rid of the background, leaving only the human on the Canvas.

Step 3: Add a Custom Background and an Outline Around the Subject
Use the method explained earlier to import a background image of your choice to Photoshop. Drag the background image layer to the bottom in the Layers panel. Double-click the masked layer, click to select Stroke from the left pane of the Layer Style box, and use the options available on the right to manage the size, color, position, etc. of the stroke that has been added around the human subject. Click OK when done, and then export the image normally to use it as a YouTube thumbnail border.

Summary
It is important to know that the default resolution of a YouTube thumbnail is 1280 x 720 pixels that is usually written and referred to as 720p. While adding a YouTube thumbnail border, it is also imperative to have a good sense of color combination and fonts. Furthermore, a decent tool like Wondershare Filmora X must be used to add an appealing neon border around the main subject in the thumbnail image easily and quickly.
02 Add a Glowing Neon Border in YouTube Thumbnail with Canva
03 Outline a Person in a YouTube Thumbnail with Photoshop
Part 1: How to Add Neon Border to YouTube Thumbnail for Free with Filmora
Being one of the most versatile and intuitive post-production tools available in the market today, Wondershare Filmora X allows you to add a neon border to a YouTube thumbnail quite conveniently. You can learn how to get this done on Windows or Mac by following the steps given below.
For Win 7 or later (64-bit)
For macOS 10.12 or later
Step 1: Define Project Settings and Add Image to the Timeline
Launch Wondershare Filmora X on your PC (a MacBook Pro M1 is used here), ensure that the project aspect ratio is set to 16:9 (Widescreen) on the splash screen, and click New Project. On the main interface, click the Preview quality and display settings icon from the upper-right area of the Timeline, click Change Project Aspect Ratio, click to select 1280 x 720 (HD) from the Resolution menu of the Project Settings box, and click OK to save the custom project settings.
Then select My Media from the menu bar if not already selected, click Project Media from the navigation pane, and click Import from the Media box to select and import the image of the main character or object that you want to use in the thumbnail.
Now, drag the image from the Media box to the Timeline at the bottom.
Step 2: Clear Image Background, Add Border, and Add Custom Background
Go to Effects from the menu bar, click to select the Default tab and then AI Portrait from the navigation pane, and click and drag the Human Segmentation preset from the right box, and place it over the image track in the Timeline.
Double-click the image layer, scroll down the upper-left box to the Video Effects section, and use the Edge Thickness and Edge Feather sliders to adjust the character’s edges to make them as realistic as possible. Click OK when done.
Next, click and drag the Human Border preset over the image track in the Timeline, and follow the same procedure to customize the border. This will give the character a neon border effect.
Now, use the method explained earlier to import a custom image for the background, and drag and place it under the previous track in the Timeline.
If you are running the latest version of Filmora, you will find there are some neon light effects available under AI Portrait as well.
Step 3: Add Titles to Thumbnail
Go to Titles from the menu bar, click to select the Default tab and then Lower 3rds from the navigation pane, and click and drag your preferred lower-third preset from the right window to a separate layer in the Timeline. Double-click the lower-third layer, and use the available options in the upper-left window to change the text, its color, etc., and drag the textbox to place it to your preferred position on the image as well. Click OK to save the changes.
Next, click to select Titles from the navigation pane, and drag your preferred title from the right window to the upper-most track in the Timeline. Now use the method explained earlier to edit the text, its color, position, etc. to make it look professional.
For more tips and tricks for creating YouTube thumbnail, you can check this You Tube thumbnail creating guide.
Step 4: Get the Neon Border Thumbnail
Click the Snapshot (Camera) icon from the upper-right area of the Timeline, go to My Media from the menu bar, right-click the thumbnail of the screenshot you captured, and click Reveal in Finder (on Mac) or Reveal in Explorer (on Windows) to get to the folder the YouTube thumbnail border is saved in.
Part 2: How to Add a Glowing Neon Border in Your YouTube Thumbnail with Canva
Canva is another intuitive editing program that works on the web interface rather than having you download and install an app on your PC. You can add a neon border for YouTube thumbnails using Canva by following the instructions given below:
Step 1: Define Project Settings and Add a Background
After signing in to your Canva account, click Create a design from the top-right corner of the page, click Custom size from the bottom, define 1280 and 720 in the Width and Height fields on the box that appears respectively, and click Create new design.
Now, click to select Background from the navigation bar on the left (if the Background tool is not visible, click More and then choose Background from the expanded list), and click to select a background from the images available in the center pane.
Step 2: Upload an Image and Add Effects
Click Uploads from the navigation bar, click the More icon from the right of the Upload media button present at the top of the center pane, choose your preferred method to upload the image (with the transparent background) that you want to use, upload the image, and drag it from the center pane to the Canvas.
Note: You can use any of the tools available online to remove the background from your image for free.
To add a YouTube thumbnail border, make sure that the image that you added to the Canvas is selected, click the Duplicate icon from the upper-right area, and use the scaling handles of the copy of the image to increase its size a bit. Reposition the image back to its original location as well.
Then, click Edit image from the upper-left corner of the Canvas, click Duotone from the Edit image pane at the center, if need be, click See all, choose your preferred duotone effect to apply on the image, choose your preferred highlight and shadow colors from the box that appears next, and click Back from the top of the pane.
Next, click See all next to the Adjust section from the center pane, and drag the Blur slider to the right to increase the blur effect on the image.
Step 3: Position the Layers
While keeping the duplicate image selected, click the Position button from the upper-right area of the Canvas, and click Background to send the second image behind the first one to get the neon border effect for the photo.
Part 3: How to Outline a Person in a YouTube Thumbnail with Photoshop
Because YouTube thumbnails are nothing but static images, creating YouTube thumbnail border with Adobe Photoshop is comparatively easier. The process of doing this is given below:
Step 1: Define Document Preferences and Import an Image
Launch Adobe Photoshop on your PC, click Create new, and on the New Document customization box, define the width and height values to 1280 and 720 pixels respectively. Select Transparent from the Background Contents menu as well if not already selected. Click Create from the bottom to create a new Photoshop document with the specified document settings. Next, open the folder that contains the source image, drag the photo to Photoshop, and press Enter to place the photo.
Step 2: Remove Background from the Image
Make sure that the image layer is selected in the Layers panel on the right, go to Select from the menu bar at the top, and click Subject. From the bottom of the Layers panel, click the Add a mask icon to get rid of the background, leaving only the human on the Canvas.
Step 3: Add a Custom Background and an Outline Around the Subject
Use the method explained earlier to import a background image of your choice to Photoshop. Drag the background image layer to the bottom in the Layers panel. Double-click the masked layer, click to select Stroke from the left pane of the Layer Style box, and use the options available on the right to manage the size, color, position, etc. of the stroke that has been added around the human subject. Click OK when done, and then export the image normally to use it as a YouTube thumbnail border.
Summary
It is important to know that the default resolution of a YouTube thumbnail is 1280 x 720 pixels that is usually written and referred to as 720p. While adding a YouTube thumbnail border, it is also imperative to have a good sense of color combination and fonts. Furthermore, a decent tool like Wondershare Filmora X must be used to add an appealing neon border around the main subject in the thumbnail image easily and quickly.
Also read:
- [Updated] Elite Video Influencers
- Sourav Joshi's Roadmap to Financial Freedom via YouTube
- In 2024, Crafting Impact Best 9 Video Thumbnail Makers Reviewed
- In 2024, Beyond YouTube IPhone/Android's Best Viewing App Options
- [New] Awe-Inspiring Allure Top YouTube Magic Editing Wonders
- [New] Directly Download YouTube Videos
- In 2024, Charting Success with These Top 15 YouTube Introduction Techniques
- Unleash Content Potential How to Increase Video Views on YouTube
- Crafting Success Leading Business Channels for Professionals
- 2024 Approved Channel Growth in 30 Minutes Viral Hashtag Insights
- How to Join the Success Circle YouTube's 2024 CP Guide
- [New] Essential Recording Steps for YouTube Audio Extraction
- A Comprehensive Guide to the 12 Superior Vlogging Cameras
- [Updated] Composing News Wrap-Up Scripts
- Delving Into YouTube's Digital Video Workshop
- In 2024, 6 Easy, Free YouTube Closers for Your Videos (Top Picks)
- Direct Download & MP3 Creation for Streaming Video Files
- Master Thumbnail Design for Mac Users - YouTube Edition
- In 2024, Banner Bliss Savor Your Complimentary Set of Designs
- Exploring How TSeries Harnesses Revenue From Online Viewer Base (YouTube)
- Building a Fanbase with YouTube Streams
- Master the Art of Repeating iPhones Videos
- Ace List of Low-Cost YouTube Caption Tools
- Subscription Sensation Top 10 YouTube Personalities by Counts
- Steering Clear of the 8 Most Frequent Pitfalls for First-Time YouTubers
- Building Awesome Channel Art for Your YouTube Presence
- Essential Tips for Successful YouTube Broadcasts for 2024
- 2024 Approved Deciphering YouTube Monetization Success Codes
- Top 10 Best Sites for Downloading YouTube Template Videos
- [Updated] Boost Views Strategic Partnerships on YouTube for Rapid Growth
- [New] Cultivating Connection, Not Compulsion in Subscriptions
- Step-by-Step Manual for Estimating YouTube Ad Revenue & Views
- Subscribe Smart - Hundreds for Under $5
- In 2024, Earnings Escalation Leveraging Your YouTube Channel on Mobile Devices
- Capture Your Audience The Smartphone Guide to YouTube Thumbnails for 2024
- In 2024, Elevate Your Stream A Comprehensive Ad Revenue Guide on YouTube
- 2024 Approved Banishing Dark Pixels From YouTube Views
- In 2024, Avoiding the Bottom Ranks Understanding Impactful Factors
- Achieving YouTube Earnings Excellence - Strategies and Beyond
- Cutting-Edge Camera & Recording Apps for Smartphones' Most Reliable Sources
- Track Your Traffic The Straightforward Strategy for Scrutinizing YouTube Earnings
- Charting the Course with YouTube's Top Makeup Influencers for 2024
- Best Video Makers with Music and Photos for 2024
- Global Gross Earnings of YouTube Luminaries
- In 2024, What Does Jailbreaking Apple iPhone 11 Pro i Do? Get Answers here | Dr.fone
- [Updated] In 2024, The Ultimate Compendium Chromes' Excellence in Video Grabs
- In 2024, The Ultimate Guide to MP4 Tag Editors for Windows and Mac
- Simple ways to get lost videos back from Honor X50
- Remove the Lock Screen Fingerprint Of Your Vivo V30
- [Updated] 2024 Approved TikTok Video Upload Guide Chrome/Android/iOS Strategies
- 2024 Approved Top 5 Methods to OBS Studio Video Editing
- Updated Hard to Remove Black Background in After Effects? Heres the Best Way to Deal With It for 2024
- [Updated] Premium Picks for Pros Top 10 Webcams in Win 11 for 2024
- [Updated] Likee Vs. TikTok Will Likee Surpass TikTok?
- Maximize Views The Ultimate YouTube Thumbnail Template and Tips
- [New] In 2024, Elevate Your Profile with Vimeo on Instagram
- In 2024, Dose Life360 Notify Me When Someone Checks My Location On Apple iPhone 13? | Dr.fone
- 2024 Approved 10 Secrets to Flawless Live Broadcasts of Cricket
- In 2024, 4 Most-Known Ways to Find Someone on Tinder For Motorola Razr 40 Ultra by Name | Dr.fone
- Chaotic Choices Top 10 Craziest TikTok Games to Try Now for 2024
- In 2024, Two Ways to Track My Boyfriends Realme C67 4G without Him Knowing | Dr.fone
- [New] Insta Speedster's Playbook Power Through Video and Likes for 2024
- [Updated] Which Livestreaming Tool Wins OBS or Bandicam for 2024
- How to Transfer Data After Switching From Xiaomi 14 to Latest Samsung | Dr.fone
- 2024 Approved Replicating Your Presence The Essential TikTok Clone Blueprint
- [Updated] 2024 Approved Capturing the Moment Expert Use of Aiseesoft's Recording Features
- [New] In 2024, The Loop Life Tips to Make Your Boomerangs Addictive
- How to Unlock Realme Narzo N53 Phone Pattern Lock without Factory Reset
- New Mobile Video Editing Best Apps to Blur Unwanted Parts for 2024
- 2024 Approved Deactivating Your Discord Server A Device-Centric Approach
- New In 2024, Dual-Window Video Editor Free Online and Offline Video Splitting Tools
- New Disrupt the Norm Top Glitch Art Video Editing Apps for iOS and Android Creators for 2024
- 2024 Approved Speech-to-MP3 Conversion Tool Windows, Mac, Android & iOS Compatibility
- In 2024, Crafting Perfect Slack-Filmo Meeting Experiences
- [New] 2024 Approved Unlock More Views & Likes on TikTok Top 50 Hashtags
- [New] From Twitter to Snaps A Guide to Cross-Platform Posting for 2024
- Behind the Screencast Scenes Industry Secrets Revealed
- In 2024, How to Mirror Your OnePlus 11 5G Screen to PC with Chromecast | Dr.fone
- In 2024, Best 3 Software to Transfer Files to/from Your Asus ROG Phone 7 Ultimate via a USB Cable | Dr.fone
- New In 2024, Extracting Crystal-Clear Audio From Videos A Step-by-Step Guide
- In 2024, Apple ID Locked for Security Reasons On iPhone 13 Pro Max? Find the Best Solution Here
- Title: "Deciphering Finances How Much Do YouTubers Earn Per Ad?"
- Author: Brian
- Created at : 2024-05-25 11:36:17
- Updated at : 2024-05-26 11:36:17
- Link: https://youtube-video-recordings.techidaily.com/deciphering-finances-how-much-do-youtubers-earn-per-ad/
- License: This work is licensed under CC BY-NC-SA 4.0.
