
:max_bytes(150000):strip_icc()/delioption2-9bda55697741460689d37ff358db63f8.png)
"Creating Hilarious Reactions Mastering YouTube Tricks (3 Methods)"
Creating Hilarious Reactions: Mastering YouTube Tricks (3 Methods)
How to Make a YouTube Reaction Video?

Richard Bennett
Mar 27, 2024• Proven solutions
Sharing ideas and opinions on virtually any topic you can think of with millions of people around the world is arguably one of the greatest benefits YouTube gives to content creators. Even so, building your channel exclusively around reaction videos may prove to be difficult, but this doesn’t mean that you can’t use this type of video to comment on what other YouTubers are saying.
The process of making a YouTube reaction video is not overly technical, although you will have to decide which video editing technique you are going to use to make a reaction video. That is why in this article we are going to take a look at different ways to make a YouTube reaction video.
- Method 1: Making Reaction Videos with PIP feature in Filmora
- Method 2: Create YouTube Reaction Video with Split Screen Templates
- Method 3: Make A Reaction Video for YouTube with AI Portrait
How to Make a Reaction Video for Your YouTube Channel? [3 Ways]
Using the footage without the consent of the copyright owner is punishable by the law, which means that you can only include the footage in a reaction video if you have the owner’s consent. Consequently, the selection of videos you can comment on is going to be limited, since it is entirely up to the creator of the video if they are going to give you permission to use their footage in your reaction video.
You can use the following video editing techniques, once you have access to the video you would like to comment on.
Method 1: Making a reaction video with the Picture-in-Picture feature in Filmora
Video editing software, like Filmora , can also be used to create YouTube reaction videos, but you must have all the footage you would like to include in that video before you can start putting it together.
The first step is to create a new project in Filmora and then import the media assets into the editor. Besides video clips, you can also add music, pictures, or create opening titles and end credits for your reaction video.


Place the video you’re reacting to on a video track on the timeline and then add the video of your reaction to the timeline that is directly above the one to which you added the first video clip. Click on the top video in the preview window and use the handles that are positioned around the edges of the video to adjust its size.
If you would like to change the on-screen position of the overlay clip, you should simply click on it and drag it to the new location within the preview window.

Filmora offers more than sixty motion effects, hundreds of transitions, and visual effects that can make your reaction video more visually appealing to the audience.

Moreover, Filmora video editing software offers a variety of blending modes, and it lets you control the opacity of the overlay video so that you can make it more transparent. Whether or not you are going to use these options depends on the footage you’re working with and the demands of a particular project.
Pros of using the Picture in Picture feature to make reaction videos in Filmora: You can place and adjust the videos with more customizable options. Get more tips about Making a PIP video in Filmora .
Method 2: Create several reaction windows with the Split Screen feature
Besides the Picture-in-Picture option, Filmora also enables you to play two or more videos simultaneously with Split Screen templates. Drag and drop the template you want to use in your reaction video to the timeline and click on the Enable Split Screen Animation tick box if you want to use the template without animations.

Afterward, you should drag the video clips from the Media tab and drop them onto the section of the preview window where you want them to be located. Keep in mind that you cannot add more than six videos to a split-screen template.

All videos you add to a split-screen template can be edited, and you just have to click on them if you want to adjust their sizes, enhance colors, mute their audio tracks or add a new audio file to the template.
Check the details about How to make a split-screen video step by step.
Pros of using Split-screen template to make reaction video in Filmora: various templates for creating stylish video side by side easily.
Method 3: Create A YouTube Reaction Video with AI Portrait
With the human segmentation effect in AI Portrait, you can now blend the reaction video in a more natural way. The human segmentation effect will isolate people from the background, you can use any background in the video.
Note: You can use this feature after version after V 10.5 for Windows, and V 10.4 for Mac. Click the button below to get the latest version of Filmora on your desktop.
Step 1: Import the videos to the media library, and then drag the background video to the first video track, and the reaction video to the track above.

Step 2: Go to the Effects tab at the top, and click the AI Portrait category, and then you will see many effects such as Human Segmentation, Human Pixelate, Human Noise, and lighting flash. Here, drag and drop the Human segmentation effect to the reaction video.

Step 3: Select the reaction video in the timeline, and then adjust its size and position by dragging it on the preview window. See, the reaction video is fine blended with the background video.

Step 4: That’s the basic editing of making a reaction video. You can also add the neon or flashing effect to the video. If everything goes well, click Export and save the video.

You can find out more details about using the AI Portrait effect to make a reaction video .
How to Avoid Copyright Infringements While Making a YouTube Reaction Video
All videos you can find on YouTube are protected by intellectual property regulations, and you can’t use them without the copyright owner’s permission. The only way to avoid being absolutely sure that your reaction video isn’t violating the law is to contact the video creator and ask for permission to use their intellectual property. However, most YouTubers are reluctant to let others download and edit their videos unless they already have a large fan base.
In case you’re granted permission to comment on a video, you have nothing to worry about. However, if you don’t get the permission you’re all the money the reaction video generates will go to the copyright owner or you will be forced to delete the video from your channel. There are still a few things you can do, even if you don’t get permission to use the video you would like to comment on.
Muting the video’s audio or altering its pitch will make it more difficult for YouTube’s bots to detect copyright infringement, although this method may not always work. In addition, you can play a video for up to thirty seconds, then comment on that segment, and then play another segment of that video.
There is no way of saying whether any of these editing tricks are going to help you avoid a copyright claim, and you should only use them if you have no other option.
Conclusion
Anyone can master the technical aspects of making a reaction video, but the topics you react to need to be related to the general topic your channel covers. What’s more, the idea of your reaction video has to be relevant for your audience if you want to attract their attention. Which video editing techniques are you using to make a YouTube reaction video?
Download Mac Version ](https://tools.techidaily.com/wondershare/filmora/download/ )
Richard Bennett
Richard Bennett is a writer and a lover of all things video.
Follow @Richard Bennett
Richard Bennett
Mar 27, 2024• Proven solutions
Sharing ideas and opinions on virtually any topic you can think of with millions of people around the world is arguably one of the greatest benefits YouTube gives to content creators. Even so, building your channel exclusively around reaction videos may prove to be difficult, but this doesn’t mean that you can’t use this type of video to comment on what other YouTubers are saying.
The process of making a YouTube reaction video is not overly technical, although you will have to decide which video editing technique you are going to use to make a reaction video. That is why in this article we are going to take a look at different ways to make a YouTube reaction video.
- Method 1: Making Reaction Videos with PIP feature in Filmora
- Method 2: Create YouTube Reaction Video with Split Screen Templates
- Method 3: Make A Reaction Video for YouTube with AI Portrait
How to Make a Reaction Video for Your YouTube Channel? [3 Ways]
Using the footage without the consent of the copyright owner is punishable by the law, which means that you can only include the footage in a reaction video if you have the owner’s consent. Consequently, the selection of videos you can comment on is going to be limited, since it is entirely up to the creator of the video if they are going to give you permission to use their footage in your reaction video.
You can use the following video editing techniques, once you have access to the video you would like to comment on.
Method 1: Making a reaction video with the Picture-in-Picture feature in Filmora
Video editing software, like Filmora , can also be used to create YouTube reaction videos, but you must have all the footage you would like to include in that video before you can start putting it together.
The first step is to create a new project in Filmora and then import the media assets into the editor. Besides video clips, you can also add music, pictures, or create opening titles and end credits for your reaction video.
Place the video you’re reacting to on a video track on the timeline and then add the video of your reaction to the timeline that is directly above the one to which you added the first video clip. Click on the top video in the preview window and use the handles that are positioned around the edges of the video to adjust its size.
If you would like to change the on-screen position of the overlay clip, you should simply click on it and drag it to the new location within the preview window.
Filmora offers more than sixty motion effects, hundreds of transitions, and visual effects that can make your reaction video more visually appealing to the audience.
Moreover, Filmora video editing software offers a variety of blending modes, and it lets you control the opacity of the overlay video so that you can make it more transparent. Whether or not you are going to use these options depends on the footage you’re working with and the demands of a particular project.
Pros of using the Picture in Picture feature to make reaction videos in Filmora: You can place and adjust the videos with more customizable options. Get more tips about Making a PIP video in Filmora .
Method 2: Create several reaction windows with the Split Screen feature
Besides the Picture-in-Picture option, Filmora also enables you to play two or more videos simultaneously with Split Screen templates. Drag and drop the template you want to use in your reaction video to the timeline and click on the Enable Split Screen Animation tick box if you want to use the template without animations.
Afterward, you should drag the video clips from the Media tab and drop them onto the section of the preview window where you want them to be located. Keep in mind that you cannot add more than six videos to a split-screen template.
All videos you add to a split-screen template can be edited, and you just have to click on them if you want to adjust their sizes, enhance colors, mute their audio tracks or add a new audio file to the template.
Check the details about How to make a split-screen video step by step.
Pros of using Split-screen template to make reaction video in Filmora: various templates for creating stylish video side by side easily.
Method 3: Create A YouTube Reaction Video with AI Portrait
With the human segmentation effect in AI Portrait, you can now blend the reaction video in a more natural way. The human segmentation effect will isolate people from the background, you can use any background in the video.
Note: You can use this feature after version after V 10.5 for Windows, and V 10.4 for Mac. Click the button below to get the latest version of Filmora on your desktop.
Step 1: Import the videos to the media library, and then drag the background video to the first video track, and the reaction video to the track above.
Step 2: Go to the Effects tab at the top, and click the AI Portrait category, and then you will see many effects such as Human Segmentation, Human Pixelate, Human Noise, and lighting flash. Here, drag and drop the Human segmentation effect to the reaction video.
Step 3: Select the reaction video in the timeline, and then adjust its size and position by dragging it on the preview window. See, the reaction video is fine blended with the background video.
Step 4: That’s the basic editing of making a reaction video. You can also add the neon or flashing effect to the video. If everything goes well, click Export and save the video.
You can find out more details about using the AI Portrait effect to make a reaction video .
How to Avoid Copyright Infringements While Making a YouTube Reaction Video
All videos you can find on YouTube are protected by intellectual property regulations, and you can’t use them without the copyright owner’s permission. The only way to avoid being absolutely sure that your reaction video isn’t violating the law is to contact the video creator and ask for permission to use their intellectual property. However, most YouTubers are reluctant to let others download and edit their videos unless they already have a large fan base.
In case you’re granted permission to comment on a video, you have nothing to worry about. However, if you don’t get the permission you’re all the money the reaction video generates will go to the copyright owner or you will be forced to delete the video from your channel. There are still a few things you can do, even if you don’t get permission to use the video you would like to comment on.
Muting the video’s audio or altering its pitch will make it more difficult for YouTube’s bots to detect copyright infringement, although this method may not always work. In addition, you can play a video for up to thirty seconds, then comment on that segment, and then play another segment of that video.
There is no way of saying whether any of these editing tricks are going to help you avoid a copyright claim, and you should only use them if you have no other option.
Conclusion
Anyone can master the technical aspects of making a reaction video, but the topics you react to need to be related to the general topic your channel covers. What’s more, the idea of your reaction video has to be relevant for your audience if you want to attract their attention. Which video editing techniques are you using to make a YouTube reaction video?
Download Mac Version ](https://tools.techidaily.com/wondershare/filmora/download/ )
Richard Bennett
Richard Bennett is a writer and a lover of all things video.
Follow @Richard Bennett
Building a Broad-Spectrum Audience with Multichannel Strategy
How to Stream to YouTube, Facebook, Twitch and Over 30 Platforms
Richard Bennett
Mar 27, 2024• Proven solutions
- Part1.How to Stream to YouTube, Twitch, Hitbox and other Platforms at the same time?
- Part2.How to Stream to YouTube and Facebook at the same time Without Restream Platform?
- Part3.About Restream.io
How to Stream to YouTube, Twitch, Hitbox and other Platforms at the same time?
Step 1: To begin with the process, first of all you need to go to <https://restream.io/ >. Sign up here and login with your account.

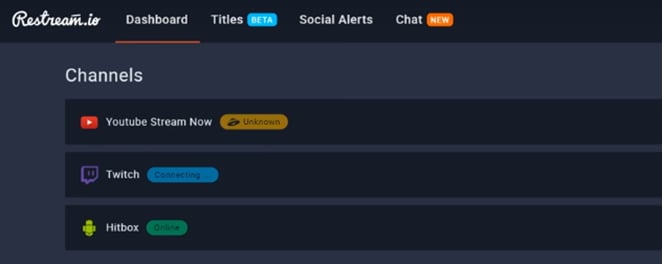
Step 2: Now go to the dashboard and simply add your channel.
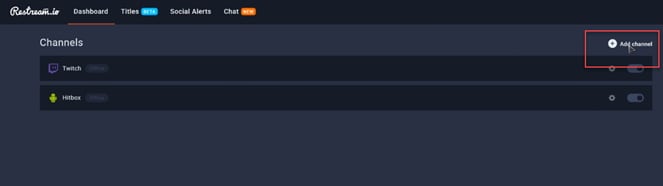
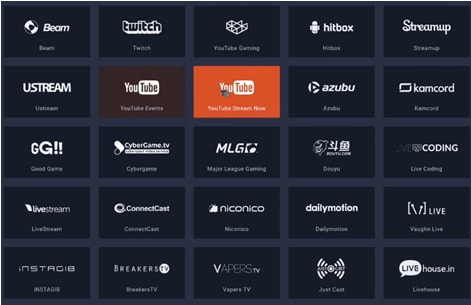
Step 3: Here you will find so many streaming platforms like YouTube, uStream, Dailymotion, HitBox etc.
Step 4: Select your desired platform out of this wide list and then sign in.

Step 5: The screen will proceed with simple to follow steps; go with specified instructions and sign in to your desired streaming platform.
Step 6: Now you can easily turn On-Off your channels for streaming.
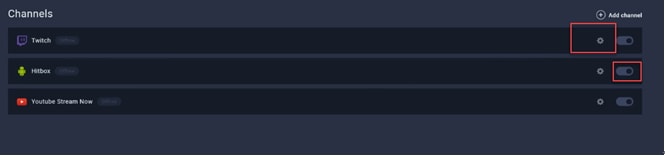
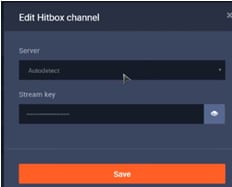
Step 7: It is time to edit your channel.
Step 8: Now put eye catching title for your live stream.
Step 9: This platform also allow users to get connected to their SNS account for the social alerts.
Step 10: Users can also manage their chats using interactive chat tools.
Step 11: Once you are done with all above settings on restream.io then it is time to start with streaming software. Professionals recommend using OBS, Wirecast or xSplit for best results and easy interface.

Step 12: Let us considered OBS for current restream.io services.
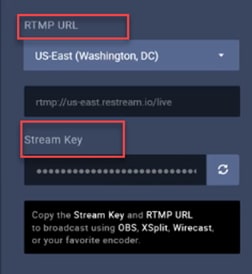
Step 13: Now simply copy your RTMP URL as well as the stream key from restream.io platform and paste it in the specified field on streaming software.
Step 14: As soon as you finished these settings then hit the Stream Button. Soon you will be able to find your videos on selected live stream platforms.
How to Stream to YouTube and Facebook at the same time Without Restream Platform?
Step 1: First of all you need to download Wirecast software tool on your device. Choose anyone from Wirecast Studio and Wirecast Pro as per your budget and needs. Get it installed.
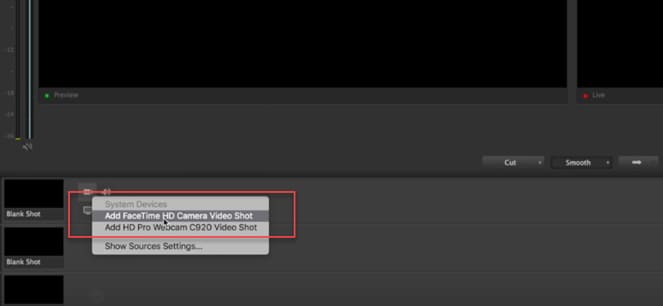
Step 2: Launch wirecast on your system and then add your camera.
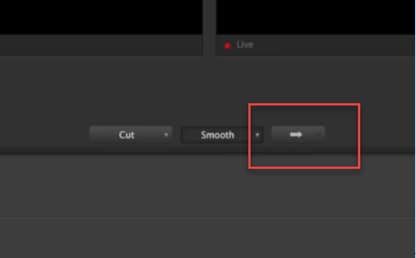
Step 3: Once you have added your camera to this tool then simply hit the Go Live button.
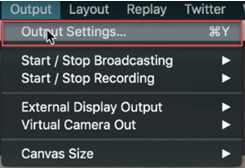
Step 4: Move to Output and adjust settings.
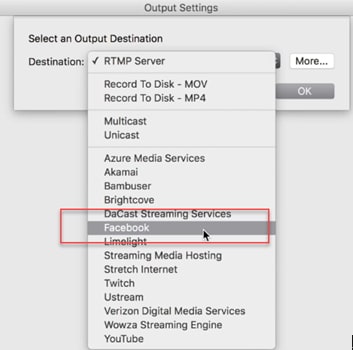
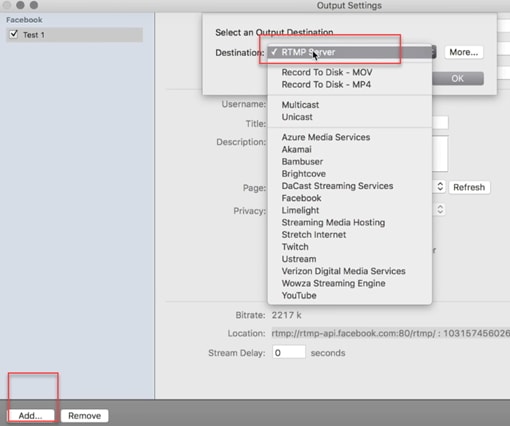
Step 5: From the drop down menu appearing on screen, choose Facebook as your destination.
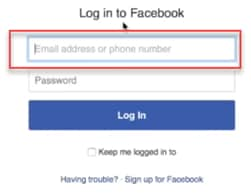
Step 6: It is time to enter name and then click on Authenticate.
Step 7: You need to login to facebook now.

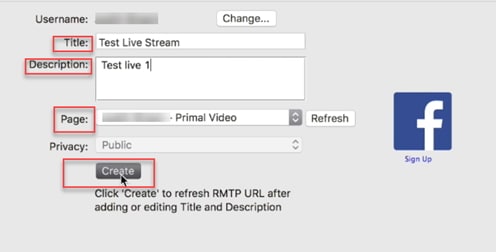
Step 8: Add your live stream title and an eye catching description.
Step 9: Select page for streaming and then hit the Create button.
Step 10: As soon as your facebook stream is developed, then go to bottom left corner of your screen and then click add. Create another live stream but instead of choosing YouTube as your preferences, select RTMP.
Step 11: Now add name for your YouTube stream and adjust the encoding quality to 720p. After this you need to move to YouTube and get your stream name as well as address from this platform.
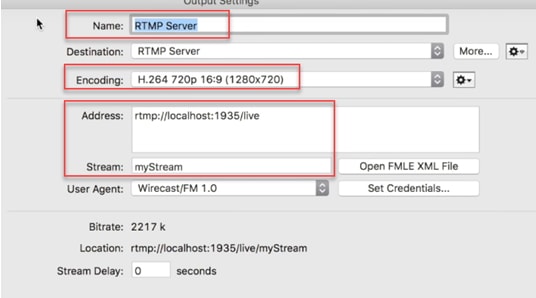
Step 12: Move to YouTube creator studio and then select live streaming. Choose live stream now option and then find encoder setup.

Step 13: It is time to copy the server URL and paste it on Wirecast address. Also copy the stream name and paste it on Wirecast platform.
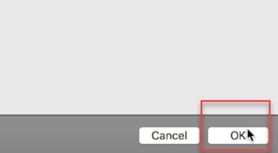
Step 14: Once all these settings are complete then hit OK.
Step 15: Now click Stream button on Wirecast platform.

About Restream.io
Restream.io allows streaming over 30 plus platforms with easy processing and intuitive interface. The best thing to know about this platform is that it never creates watermarks or pre-roll ads and there is no specific limit or restriction for stream duration. It not even forces users on specific bitrate limits. In simple words, here users can work with freedom and enjoy streaming with best results.
Restream Chats are highly interactive where users can add interesting imojies to grab more attention. It can be accessed on Window platform with all interactive features.
Richard Bennett
Richard Bennett is a writer and a lover of all things video.
Follow @Richard Bennett
Richard Bennett
Mar 27, 2024• Proven solutions
- Part1.How to Stream to YouTube, Twitch, Hitbox and other Platforms at the same time?
- Part2.How to Stream to YouTube and Facebook at the same time Without Restream Platform?
- Part3.About Restream.io
How to Stream to YouTube, Twitch, Hitbox and other Platforms at the same time?
Step 1: To begin with the process, first of all you need to go to <https://restream.io/ >. Sign up here and login with your account.
Step 2: Now go to the dashboard and simply add your channel.
Step 3: Here you will find so many streaming platforms like YouTube, uStream, Dailymotion, HitBox etc.
Step 4: Select your desired platform out of this wide list and then sign in.
Step 5: The screen will proceed with simple to follow steps; go with specified instructions and sign in to your desired streaming platform.
Step 6: Now you can easily turn On-Off your channels for streaming.
Step 7: It is time to edit your channel.
Step 8: Now put eye catching title for your live stream.
Step 9: This platform also allow users to get connected to their SNS account for the social alerts.
Step 10: Users can also manage their chats using interactive chat tools.
Step 11: Once you are done with all above settings on restream.io then it is time to start with streaming software. Professionals recommend using OBS, Wirecast or xSplit for best results and easy interface.
Step 12: Let us considered OBS for current restream.io services.
Step 13: Now simply copy your RTMP URL as well as the stream key from restream.io platform and paste it in the specified field on streaming software.
Step 14: As soon as you finished these settings then hit the Stream Button. Soon you will be able to find your videos on selected live stream platforms.
How to Stream to YouTube and Facebook at the same time Without Restream Platform?
Step 1: First of all you need to download Wirecast software tool on your device. Choose anyone from Wirecast Studio and Wirecast Pro as per your budget and needs. Get it installed.
Step 2: Launch wirecast on your system and then add your camera.
Step 3: Once you have added your camera to this tool then simply hit the Go Live button.
Step 4: Move to Output and adjust settings.
Step 5: From the drop down menu appearing on screen, choose Facebook as your destination.
Step 6: It is time to enter name and then click on Authenticate.
Step 7: You need to login to facebook now.
Step 8: Add your live stream title and an eye catching description.
Step 9: Select page for streaming and then hit the Create button.
Step 10: As soon as your facebook stream is developed, then go to bottom left corner of your screen and then click add. Create another live stream but instead of choosing YouTube as your preferences, select RTMP.
Step 11: Now add name for your YouTube stream and adjust the encoding quality to 720p. After this you need to move to YouTube and get your stream name as well as address from this platform.
Step 12: Move to YouTube creator studio and then select live streaming. Choose live stream now option and then find encoder setup.
Step 13: It is time to copy the server URL and paste it on Wirecast address. Also copy the stream name and paste it on Wirecast platform.
Step 14: Once all these settings are complete then hit OK.
Step 15: Now click Stream button on Wirecast platform.
About Restream.io
Restream.io allows streaming over 30 plus platforms with easy processing and intuitive interface. The best thing to know about this platform is that it never creates watermarks or pre-roll ads and there is no specific limit or restriction for stream duration. It not even forces users on specific bitrate limits. In simple words, here users can work with freedom and enjoy streaming with best results.
Restream Chats are highly interactive where users can add interesting imojies to grab more attention. It can be accessed on Window platform with all interactive features.
Richard Bennett
Richard Bennett is a writer and a lover of all things video.
Follow @Richard Bennett
Also read:
- [Updated] Enhancing Video Success Top 8 YT Thumbnail Strategies
- [New] Crafting Content for Success A Step-by-Step Channel Guide
- 2024 Approved Crafting Classic Cinematography Step-by-Step Guide
- Engage, Enchant, Excel The Quintessential 5 Strategies for YouTube Marketing for 2024
- Scrutinizing the Financial Lifelines that Drive TSeries' Youtube Success
- Enhancing Video Quality Editing Tips for Published Content
- A Step-by-Step Journey Through High-Impact YouTube Banner Designs
- 2024 Approved Essential Guide The Top 10 Inexpensive YouTube Channels for Visual Creators
- Privacy Preservation How to Make Faces Invisible Online
- Free Thumbnail Extract From YouTube Videos Today
- 2024 Approved Boost Your Video Impact Expert Tips on Using WM Maker
- Digital Dynamo Dames The Next Generation of YouTube's Powerhouses
- Elevate Your Online Presence with Expert Streaming Guide
- 2024 Approved Direct Download & MP3 Creation for Streaming Video Files
- Direct Video Transfer A Compreenas Guide to YouTube + TikTok Integration for 2024
- [New] Best ASMR Apps for Android and iOS You Should Know
- Uncovering YouTube's Star Comment
- In 2024, 3 Unconventional Tactics for Subscriber Growth
- Making a Mark on YouTube Proven Techniques From Creator Studio Experts
- 2024 Approved Debating Platform Preferences IGTV Versus YouTube Video Sharing
- Transform Your Videos Secrets of Effective YouTube SEO Tools
- [New] Comprehensive Guide to YouTube's Best Anime Stations
- Journey Around the World on YouTube, Including You
- 15 Steps Towards Perfecting Your Educational Video Content for YouTube for 2024
- Cultivating Your Persona in the World of Gamers for 2024
- Top YouTube Fonts for Striking, Shareable Thumbnails
- How to Mirror Your Samsung Galaxy S23 FE Screen to PC with Chromecast | Dr.fone
- Top 30 Slept-On Speech to Text Apps for macOS Users
- Updated 15 Types of Cartoon Drawing Styles Examples for 2024
- Invest in IG Success The Top 6 Secure Money Methods
- New In 2024, Video Pace Control A Beginners Guide to Camtasia
- Solutions to Spy on Xiaomi Redmi Note 12 Pro 4G with and without jailbreak | Dr.fone
- In 2024, Does Samsung Galaxy S24+ Have Find My Friends? | Dr.fone
- Chuckle-Worthy Captures for IPhones
- [Updated] 2024 Approved Transform Your Content Expert Tips for Bokeh on Social Media
- 2024 Approved Streamlining Your iPhone Memo Experience
- [Updated] Creating Revenue Streams on Snapchat for 2024
- Easily Unlock Your ZTE Axon 40 Lite Device SIM
- Building a Broadcast Brand with YouTube, Twitch and OBS for 2024
- New In 2024, Steps to Create Gold Text Effects After Effects
- How to Make A Tattoo Disappear Like A Magic
- Read This Guide to Find a Reliable Alternative to Fake GPS On OnePlus 11R | Dr.fone
- Title: "Creating Hilarious Reactions Mastering YouTube Tricks (3 Methods)"
- Author: Brian
- Created at : 2024-05-25 11:34:20
- Updated at : 2024-05-26 11:34:20
- Link: https://youtube-video-recordings.techidaily.com/creating-hilarious-reactions-mastering-youtube-tricks-3-methods/
- License: This work is licensed under CC BY-NC-SA 4.0.
