
:max_bytes(150000):strip_icc()/003_how-to-fix-it-when-a-zoom-microphone-is-not-working-4844958-fd711ebc7fc646ac86c36f8f5b56d84d.jpg)
"Crafting Stories Essential Tips for YouTube Video Editors for 2024"
Crafting Stories: Essential Tips for YouTube Video Editors
YouTube Video Editor Guide and Review

Richard Bennett
Mar 27, 2024• Proven solutions
YouTube has had a video editor for a long time, but over time it has changed for the better. 2010 was when the first major overhaul happened, and since then more and more features have been added. There is still the question if the YouTube Video Editor is good, and if it replaces desktop editors. Hopefully, our YouTube Video Editor Review helps you figure out if you want to use the editor.
Want to make your YouTube video more attractive and beautiful? here I recommend an easy-to-use video editing software - Wondershare Filmora which not only allows you cut, crop, rotate, and split your videos in minutes, but also simplify the advanced video editing like green screen effect and PIP. You can also find over 300 video effects like Fashion, Beauty, Gaming, Education, etc.


YouTube Video Editor Review
Note: From 20th September 2017 users will no longer be able to use the complimentary editing suite. Check the best YouTube video editor alternatives from this complete guide.
In the early days of the YouTube Video Editor , all you could do was trim video clips, arrange the clips on a timeline, add in basic transitions, and add music. Now the YouTube video editor is able to add video effects to the video and create multiple projects at the same time. While the editor can do more, it has stayed a simple tool.
This simplicity makes it very easy and quick to use. Unlike desktop editors, the YouTube Editor processes much faster. Since the tool is designed to be easy to use, you can learn to use the YouTube Editor in very little time. However, due to its simplicity, it does not offer all the same features. Some of the features that are missing means that it is not suited for every project.
The Basic Features
1.The editor

The YouTube Video Editor does come with some standard video editing functions like video splicing, Audioswap, and cropping videos. The video editor needs to have the videos already uploaded to YouTube. Along with using your own videos, you have the option to use videos that are part of the Creative Commons library. There transitions, and other features that other standard video editors have. Audioswap is easy to use, and there is access to the Creative Commons library in the editor.
2. The Enhancements

The Enhancements that are included in the YouTube Video Editor are not the best tools, but they are still pretty good overall. Enhancements can be found by clicking on a video picture after it has been added to the project. Enhancements are broken into four categories: Quick Fixes, Filters, Text, and Audio. Quick fixes are basic adjustments for small issues like the contrast and saturation of the video. YouTube added an auto-fix button and stabilize video button to make it quick to fix these issues. The filters, text, and audio, are about the same that you would find with any other video editing software.
Related: Want to know how to use the Enhancements feature in YouTube? Check this tutorial to know more: How to use YouTube Enhancements.
Pros and Cons of the YouTube Video Editor
The Pros of the YouTube Editor are that is it is free and has a huge library of free video clips and music. It is also super easy to learn. If you have a Google+ account, you can photos to your video straight from your cloud storage. You also have access to all the videos that you have uploaded to YouTube. All the features are easy to use, and many can be dragged and dropped making editing easy. Google is still improving the YouTube Video Editor to have more features and run smoother.
Related: Want to know YouTube alternatives? Check this article to know more: YouTube Video Editor Alternatives
The major con for YouTube Video Editor is that it only has the basic video editing features at the moment. Another major con is that the video editor is fully online. This means that a refresh is needed to see the changes that you have made. After the refresh of the video, the video jumps back to the beginning of the video making it frustrating to edit the end of a video. There is also no real way of shortening music in the editor at the moment. Unlike many desk top video editors, you cannot overlap music or video clips. This means that some of the transitions are choppy.
The Bottom Line
Since Google is still working on the YouTube Video Editor, hopefully, most of kinks will be worked out soon. While the YouTube Video Editor is getting better, it is still have the most basic features. The easy to use nature of the editor may mean that it stays more of a simple to use video tool. This does make it easy to edit, and it’s good for most projects. Millions of people use this editor because it is so easy to use. However, more advanced projects are still going to need a desktop video editor. We are hoping to see more advanced features in the future.
Many YouTubers and everyday people like the YouTube Video Editor, for its ease of use and the quick video editing that it provides. However, if it is right for you, depends greatly on what you are trying to do. If you plan on doing any editing past cropping videos, adding type and transitions, and switching music, you are better off using a desktop video editor. Hopefully, this YouTube Video Editor Review helps you figure out if YouTube’s editor is the right one of your projects.
Richard Bennett
Richard Bennett is a writer and a lover of all things video.
Follow @Richard Bennett
Richard Bennett
Mar 27, 2024• Proven solutions
YouTube has had a video editor for a long time, but over time it has changed for the better. 2010 was when the first major overhaul happened, and since then more and more features have been added. There is still the question if the YouTube Video Editor is good, and if it replaces desktop editors. Hopefully, our YouTube Video Editor Review helps you figure out if you want to use the editor.
Want to make your YouTube video more attractive and beautiful? here I recommend an easy-to-use video editing software - Wondershare Filmora which not only allows you cut, crop, rotate, and split your videos in minutes, but also simplify the advanced video editing like green screen effect and PIP. You can also find over 300 video effects like Fashion, Beauty, Gaming, Education, etc.
YouTube Video Editor Review
Note: From 20th September 2017 users will no longer be able to use the complimentary editing suite. Check the best YouTube video editor alternatives from this complete guide.
In the early days of the YouTube Video Editor , all you could do was trim video clips, arrange the clips on a timeline, add in basic transitions, and add music. Now the YouTube video editor is able to add video effects to the video and create multiple projects at the same time. While the editor can do more, it has stayed a simple tool.
This simplicity makes it very easy and quick to use. Unlike desktop editors, the YouTube Editor processes much faster. Since the tool is designed to be easy to use, you can learn to use the YouTube Editor in very little time. However, due to its simplicity, it does not offer all the same features. Some of the features that are missing means that it is not suited for every project.
The Basic Features
1.The editor
The YouTube Video Editor does come with some standard video editing functions like video splicing, Audioswap, and cropping videos. The video editor needs to have the videos already uploaded to YouTube. Along with using your own videos, you have the option to use videos that are part of the Creative Commons library. There transitions, and other features that other standard video editors have. Audioswap is easy to use, and there is access to the Creative Commons library in the editor.
2. The Enhancements
The Enhancements that are included in the YouTube Video Editor are not the best tools, but they are still pretty good overall. Enhancements can be found by clicking on a video picture after it has been added to the project. Enhancements are broken into four categories: Quick Fixes, Filters, Text, and Audio. Quick fixes are basic adjustments for small issues like the contrast and saturation of the video. YouTube added an auto-fix button and stabilize video button to make it quick to fix these issues. The filters, text, and audio, are about the same that you would find with any other video editing software.
Related: Want to know how to use the Enhancements feature in YouTube? Check this tutorial to know more: How to use YouTube Enhancements.
Pros and Cons of the YouTube Video Editor
The Pros of the YouTube Editor are that is it is free and has a huge library of free video clips and music. It is also super easy to learn. If you have a Google+ account, you can photos to your video straight from your cloud storage. You also have access to all the videos that you have uploaded to YouTube. All the features are easy to use, and many can be dragged and dropped making editing easy. Google is still improving the YouTube Video Editor to have more features and run smoother.
Related: Want to know YouTube alternatives? Check this article to know more: YouTube Video Editor Alternatives
The major con for YouTube Video Editor is that it only has the basic video editing features at the moment. Another major con is that the video editor is fully online. This means that a refresh is needed to see the changes that you have made. After the refresh of the video, the video jumps back to the beginning of the video making it frustrating to edit the end of a video. There is also no real way of shortening music in the editor at the moment. Unlike many desk top video editors, you cannot overlap music or video clips. This means that some of the transitions are choppy.
The Bottom Line
Since Google is still working on the YouTube Video Editor, hopefully, most of kinks will be worked out soon. While the YouTube Video Editor is getting better, it is still have the most basic features. The easy to use nature of the editor may mean that it stays more of a simple to use video tool. This does make it easy to edit, and it’s good for most projects. Millions of people use this editor because it is so easy to use. However, more advanced projects are still going to need a desktop video editor. We are hoping to see more advanced features in the future.
Many YouTubers and everyday people like the YouTube Video Editor, for its ease of use and the quick video editing that it provides. However, if it is right for you, depends greatly on what you are trying to do. If you plan on doing any editing past cropping videos, adding type and transitions, and switching music, you are better off using a desktop video editor. Hopefully, this YouTube Video Editor Review helps you figure out if YouTube’s editor is the right one of your projects.
Richard Bennett
Richard Bennett is a writer and a lover of all things video.
Follow @Richard Bennett
Device-Friendly Tutorial: Inserting Your Shorts Into YouTube
How to Upload Shorts Video on YouTube? [2024]
Richard Bennett
Mar 27, 2024• Proven solutions
Quite recently, YouTube launched Shorts to compete with Tik Tok. At the time of this writing, the users in India have access to the fully functional version of the app. Although YouTube Shorts is available for both Android and iOS platforms, its functions are limited as the application is still in its Beta phase for the remaining part of the globe.
With that said, the following sections explain the step-by-step process on how to upload a short video on YouTube Shorts both from your smartphone and a PC.
Part 1: How to Upload Short Video on YouTube from PC?
The fact is, if you are using a computer to upload short videos to YouTube, the process is identical to publishing your other, regular footage. However, there are a few guidelines that your clips must comply with so that the streaming platform could specifically identify them as YouTube Shorts. These norms include:
- Your videos must not be more than 60 seconds long in duration
- They must be shot in portrait orientation, ideally in the 9:16 aspect ratio
- The title or the description must contain ‘#Shorts’ (without quotes) in it
Once you have a video recorded using the first two guidelines from the above list, you can use the instructions given below to upload the media on YouTube:
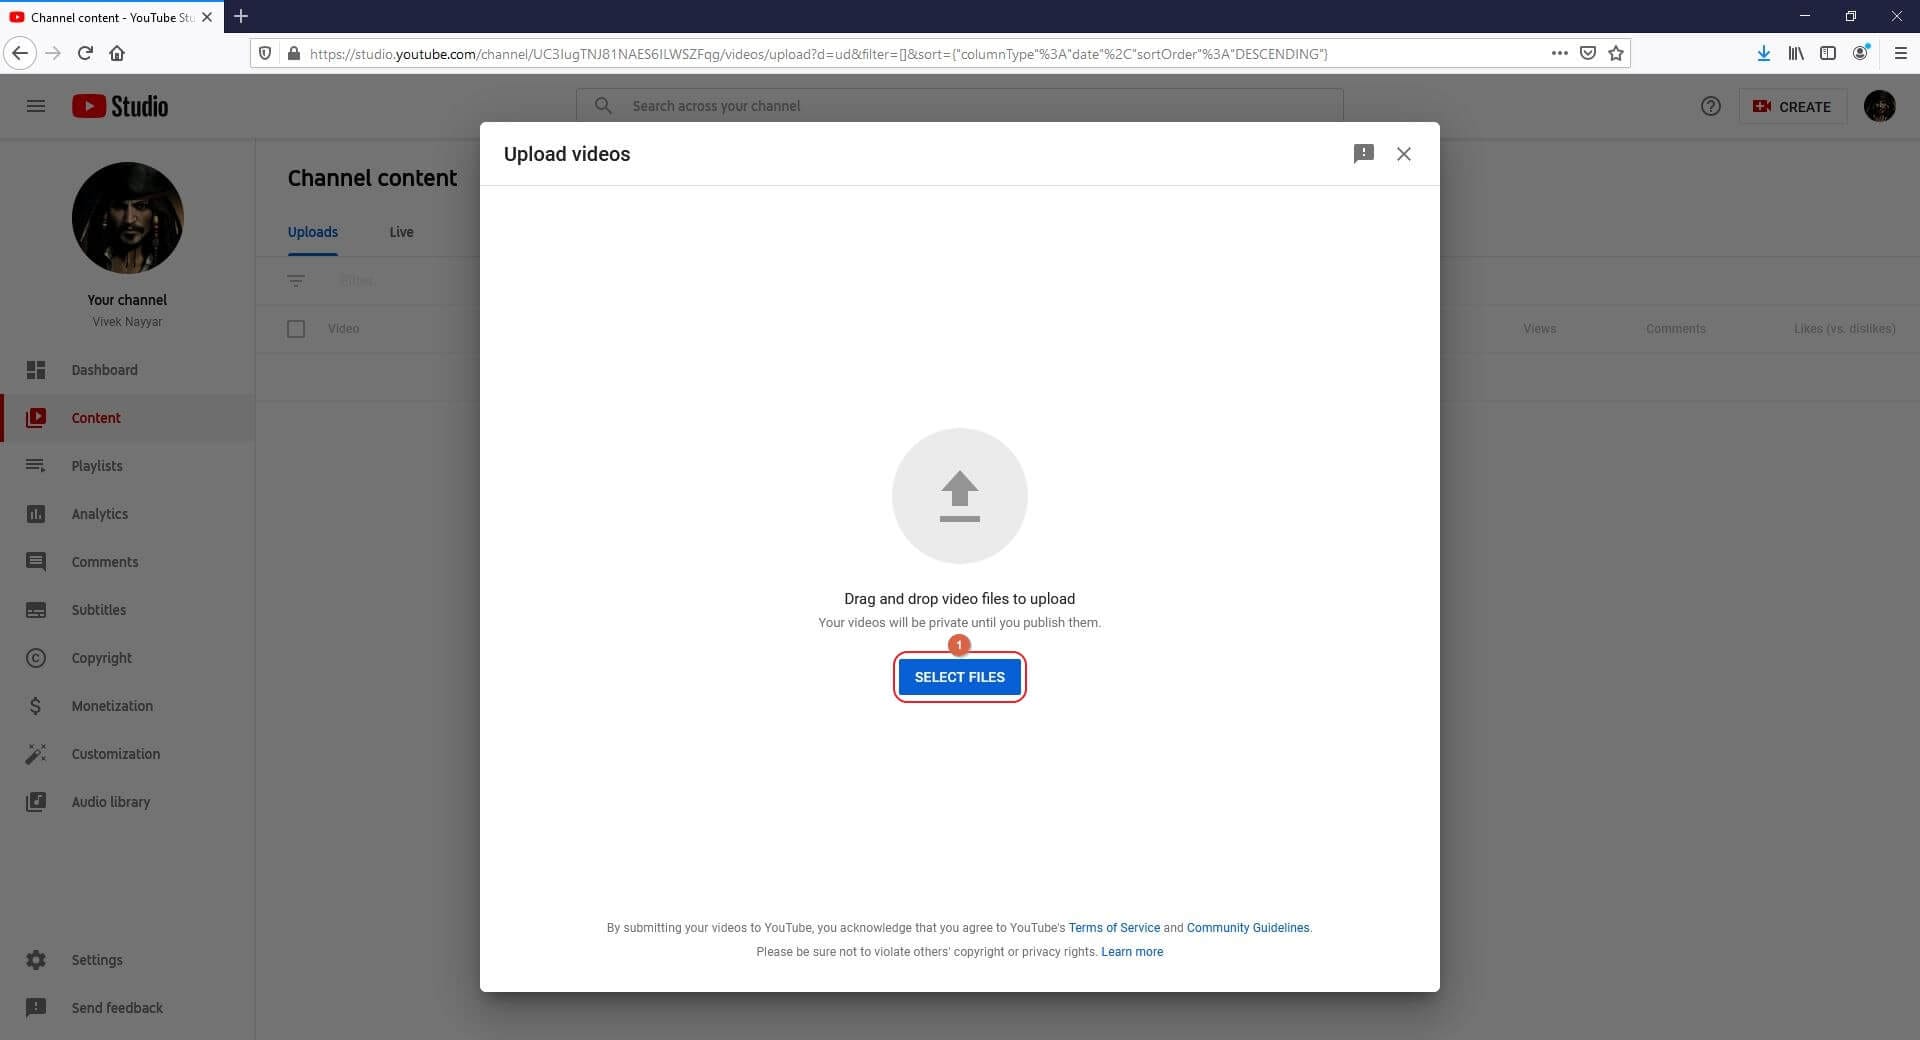
Step 1: Select a Short Video to Upload
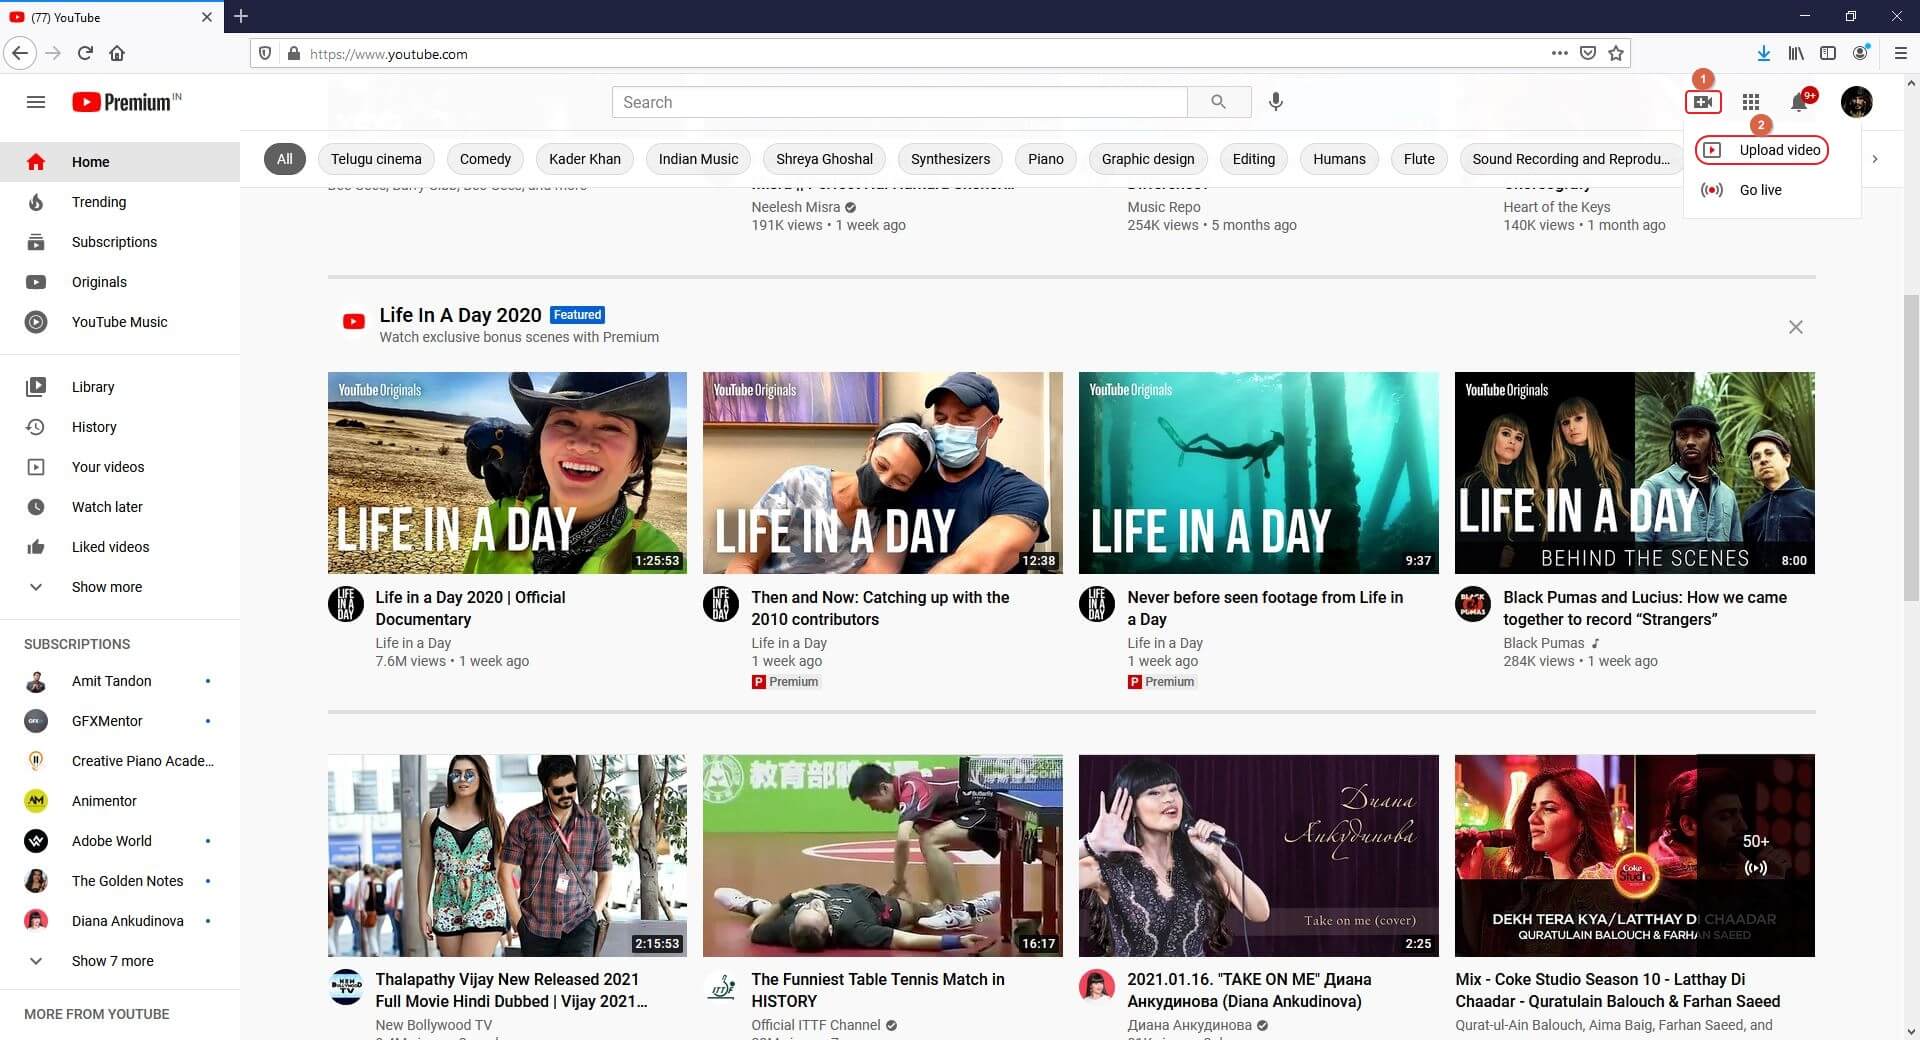
Launch your favorite web browser on your PC, go to YouTube, make sure to sign in to your YouTube account, click the Create (Camera) icon from the top-right corner of the web page, click SELECT FILES on the Upload videos window, and locate, select, and upload a short video from your PC to the portal.
Step 2: Mark the Video as Short
On the Details window that appears, add #Shorts in the Title or Description field, optionally pick a thumbnail from the suggested images present under the Thumbnail section (or upload a custom picture from your PC), select your preferred radio button from under the Audience section, make the other necessary changes if need be, and click NEXT. When the Video elements window comes up, choose your preferred options and elements, click NEXT.

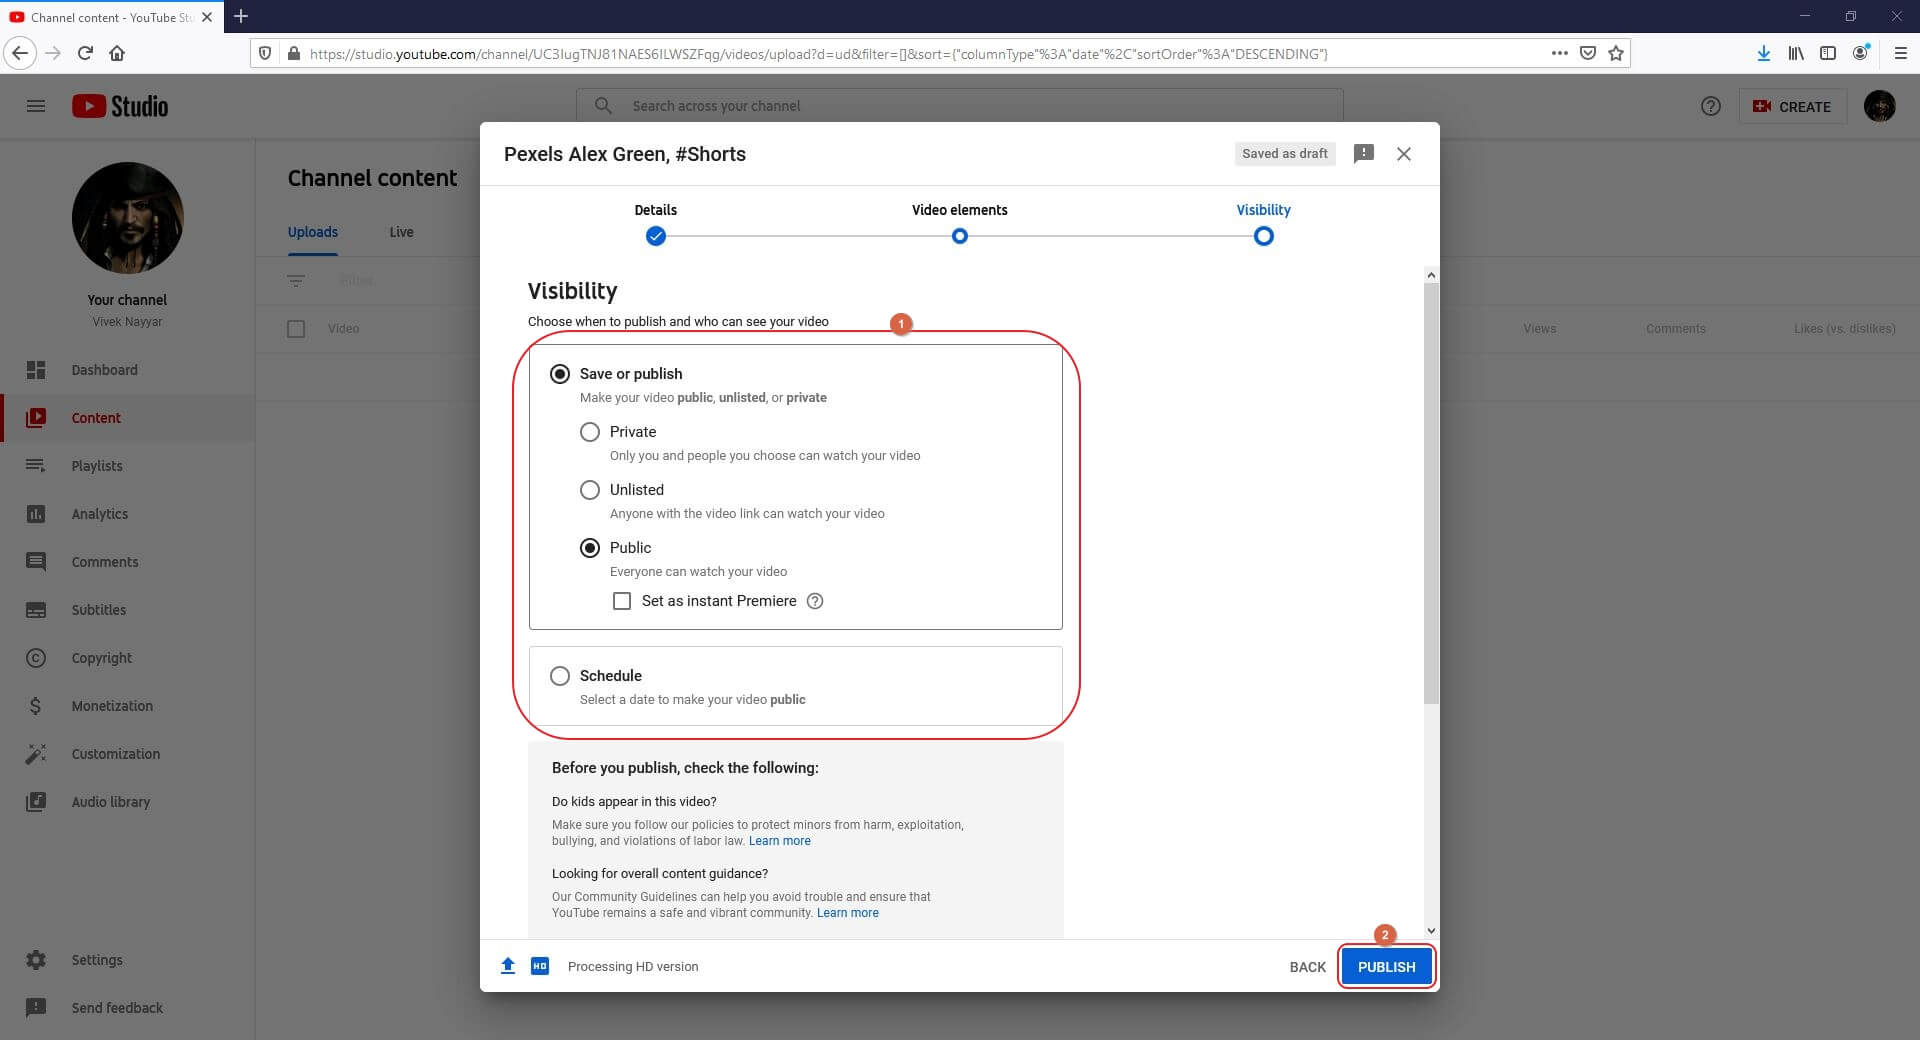
Step 3: Publish the Short Video
On the Visibility window, choose your preferred radio button from under the Save or publish section or select Schedule to set a different time when the short video should be published automatically. Finally, click SAVE to publish the clip as a short video on YouTube from your computer.
To sum up, uploading YouTube Shorts video from desktop has nothing different from uploading regular YouTube video besides the requirements listed at the beginning of this article. If you prefer to edit videos for YouTube Shortson a computer, I recommend you to try our video editor Filmora , which is an ideal solution for YouTubers. Download the free trial version below and get started.
For Win 7 or later (64-bit)
 Secure Download
For macOS 10.12 or later
Secure Download
Part 2: How to Upload Short Video on YouTube Mobile App?
The process of uploading YouTube Shorts from the mobile app is fairly simple compared to the method used on a computer. While using the app, you can either upload an existing video or shoot a new one from within the program itself then and there, add music and text, and upload it right away. Both these methods are explained below in detail:
Note: The guidelines for creating and uploading short videos to YouTube remain the same, regardless of the platform or device you use.
Method 1: Upload an Existing Short Video
Note: Make sure to have the target video on the smartphone and that you have downloaded, installed, and signed in to the YouTube app before proceeding.
Step 1: Select a Video to Upload

On your Android or iOS smartphone, launch the YouTube app, tap the + (Create) icon from the bottom, tap Create a Short from the Create box that pops up from the bottom, tap Upload from the bottom-right corner of the next screen, and select and upload a short, 60 seconds video recorded in portrait orientation from your device’s storage to the app.
Step 2: Add Details
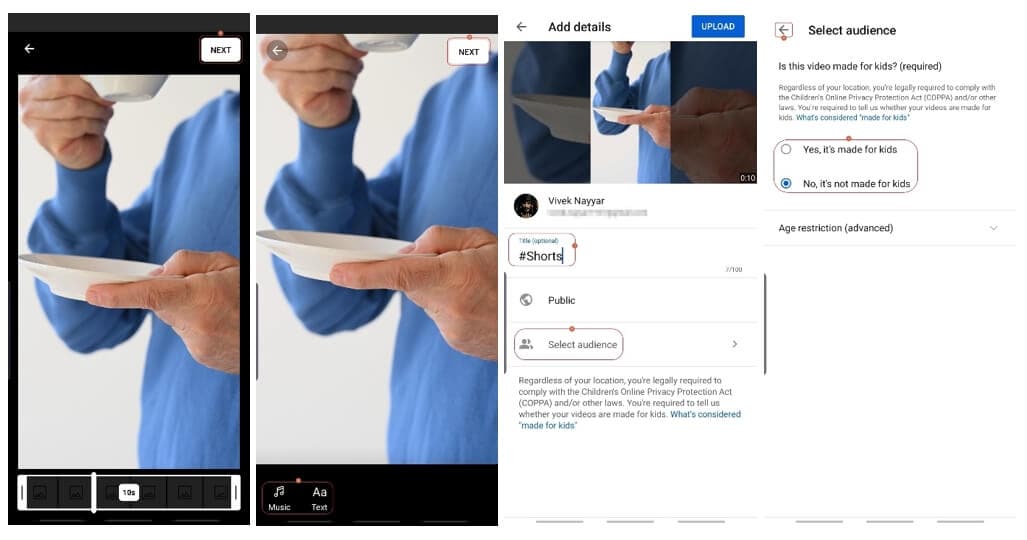
On the next screen, tap NEXT, user the Music and Text icons at the bottom-left corner to add a background music and caption to the video respectively, and tap NEXT from the top-right corner. On the next screen, enter a name for the video in the Title field along with the #Shorts tag, and tap Select audience to choose your preferred audience.
Step 3: Upload the Video
Finally tap UPLOAD from the top-right corner to upload the short video on YouTube.
Method 2: Record a Short Video and Upload
Step 1: Record Shorts Video
Previously, I have introduced how to record and upload YouTube Shorts videos , so I will keep the content concise here.
Please note you will not see the Create a Short option if you are outsides of India.

In the YouTube app, tap the + (Add) button and select Create a Short. Please note you will not see the Create a Short option if you are outsides of India.
Next, use the Speed and Timer icons to set the speed of the video and the countdown timer duration before the app starts recording the video when you press the Record button respectively.
Now tap the Record button from the bottom to start recording a video and stop to stop the recording. Make sure to shoot the footage in the portrait mode (ideally in the 9:16 aspect ratio). Tap NEXT from the bottom-right corner to proceed to the next step.
Step 2: Add Text and Music to the Short Video
On the next window, use the Music and Text buttons from the bottom-left corner to add a background music and caption to the video, and tap NEXT from the top-right corner.
Step 3: Upload and Post the Short Video
On the Add details window, enter a name for the video along with the #Shorts tag in the Create a title field, tap Select audience to select the target audience, and tap UPLOAD from the top-right corner to upload the short video on YouTube.
Conclusion
Learning the process of how to post short videos on YouTube is fairly simple as long as you have the video recorded in the portrait orientation, it is up to 60 seconds long, and contains the ‘#Shorts’ tag (without quotes) in the title or description. The good thing is, if you don’t have access to the YouTube app on your smartphone, the method for how to upload short video on YouTube explained in the first section can be followed while using your desktop computer.
Richard Bennett
Richard Bennett is a writer and a lover of all things video.
Follow @Richard Bennett
Richard Bennett
Mar 27, 2024• Proven solutions
Quite recently, YouTube launched Shorts to compete with Tik Tok. At the time of this writing, the users in India have access to the fully functional version of the app. Although YouTube Shorts is available for both Android and iOS platforms, its functions are limited as the application is still in its Beta phase for the remaining part of the globe.
With that said, the following sections explain the step-by-step process on how to upload a short video on YouTube Shorts both from your smartphone and a PC.
Part 1: How to Upload Short Video on YouTube from PC?
The fact is, if you are using a computer to upload short videos to YouTube, the process is identical to publishing your other, regular footage. However, there are a few guidelines that your clips must comply with so that the streaming platform could specifically identify them as YouTube Shorts. These norms include:
- Your videos must not be more than 60 seconds long in duration
- They must be shot in portrait orientation, ideally in the 9:16 aspect ratio
- The title or the description must contain ‘#Shorts’ (without quotes) in it
Once you have a video recorded using the first two guidelines from the above list, you can use the instructions given below to upload the media on YouTube:
Step 1: Select a Short Video to Upload
Launch your favorite web browser on your PC, go to YouTube, make sure to sign in to your YouTube account, click the Create (Camera) icon from the top-right corner of the web page, click SELECT FILES on the Upload videos window, and locate, select, and upload a short video from your PC to the portal.
Step 2: Mark the Video as Short
On the Details window that appears, add #Shorts in the Title or Description field, optionally pick a thumbnail from the suggested images present under the Thumbnail section (or upload a custom picture from your PC), select your preferred radio button from under the Audience section, make the other necessary changes if need be, and click NEXT. When the Video elements window comes up, choose your preferred options and elements, click NEXT.
Step 3: Publish the Short Video
On the Visibility window, choose your preferred radio button from under the Save or publish section or select Schedule to set a different time when the short video should be published automatically. Finally, click SAVE to publish the clip as a short video on YouTube from your computer.
To sum up, uploading YouTube Shorts video from desktop has nothing different from uploading regular YouTube video besides the requirements listed at the beginning of this article. If you prefer to edit videos for YouTube Shortson a computer, I recommend you to try our video editor Filmora , which is an ideal solution for YouTubers. Download the free trial version below and get started.
For Win 7 or later (64-bit)
Secure Download
For macOS 10.12 or later
Secure Download
Part 2: How to Upload Short Video on YouTube Mobile App?
The process of uploading YouTube Shorts from the mobile app is fairly simple compared to the method used on a computer. While using the app, you can either upload an existing video or shoot a new one from within the program itself then and there, add music and text, and upload it right away. Both these methods are explained below in detail:
Note: The guidelines for creating and uploading short videos to YouTube remain the same, regardless of the platform or device you use.
Method 1: Upload an Existing Short Video
Note: Make sure to have the target video on the smartphone and that you have downloaded, installed, and signed in to the YouTube app before proceeding.
Step 1: Select a Video to Upload
On your Android or iOS smartphone, launch the YouTube app, tap the + (Create) icon from the bottom, tap Create a Short from the Create box that pops up from the bottom, tap Upload from the bottom-right corner of the next screen, and select and upload a short, 60 seconds video recorded in portrait orientation from your device’s storage to the app.
Step 2: Add Details
On the next screen, tap NEXT, user the Music and Text icons at the bottom-left corner to add a background music and caption to the video respectively, and tap NEXT from the top-right corner. On the next screen, enter a name for the video in the Title field along with the #Shorts tag, and tap Select audience to choose your preferred audience.
Step 3: Upload the Video
Finally tap UPLOAD from the top-right corner to upload the short video on YouTube.
Method 2: Record a Short Video and Upload
Step 1: Record Shorts Video
Previously, I have introduced how to record and upload YouTube Shorts videos , so I will keep the content concise here.
Please note you will not see the Create a Short option if you are outsides of India.
In the YouTube app, tap the + (Add) button and select Create a Short. Please note you will not see the Create a Short option if you are outsides of India.
Next, use the Speed and Timer icons to set the speed of the video and the countdown timer duration before the app starts recording the video when you press the Record button respectively.
Now tap the Record button from the bottom to start recording a video and stop to stop the recording. Make sure to shoot the footage in the portrait mode (ideally in the 9:16 aspect ratio). Tap NEXT from the bottom-right corner to proceed to the next step.
Step 2: Add Text and Music to the Short Video
On the next window, use the Music and Text buttons from the bottom-left corner to add a background music and caption to the video, and tap NEXT from the top-right corner.
Step 3: Upload and Post the Short Video
On the Add details window, enter a name for the video along with the #Shorts tag in the Create a title field, tap Select audience to select the target audience, and tap UPLOAD from the top-right corner to upload the short video on YouTube.
Conclusion
Learning the process of how to post short videos on YouTube is fairly simple as long as you have the video recorded in the portrait orientation, it is up to 60 seconds long, and contains the ‘#Shorts’ tag (without quotes) in the title or description. The good thing is, if you don’t have access to the YouTube app on your smartphone, the method for how to upload short video on YouTube explained in the first section can be followed while using your desktop computer.
Richard Bennett
Richard Bennett is a writer and a lover of all things video.
Follow @Richard Bennett
Also read:
- [Updated] Elevate Views Prime SEO Equipment for Videos
- [Updated] Establishing an Individual Identity on YouTube Platform
- In 2024, Avoid Piracy Safe YouTube to MP4 Conversion Tips
- In 2024, Evaluating Rapid Subscription's Impact on Video Engagement
- In 2024, Cutting-Edge Techniques for Aspiring YouTube Game Streamers
- Decoding the Payment Structure on YouTube
- Essential Free Video Editing Apps for iPhones/iPads for 2024
- In 2024, Avoiding the Common Path The Route to Unique Streamer Identities
- [Updated] Captivating Viewers YouTubers’ Guide to Dynamic Game Sessions
- [New] Essential Tips for YouTube Audio Optimization
- 2024 Approved Earning Edge Reached for Subscribers Above 500
- YouTube Elite Ranking of Most Popular Channels
- 2024 Approved Charting the Course to YouTube Success – Top 5 Strategies Inside
- Chart-Topping Video Content on YouTube
- Best YouTube Music Gurus to Follow for 2024
- Learn From the Greats Strategies for Confident Online Sharing
- Best YouTube Mp3 Downloader Compilation (Top 10)
- How to Create a YouTube Auto-Subscribe Link
- Deciphering Digital Dominance YouTube Content Strategy Comparison for 2024
- [New] Ethical Approaches to Extract MP4 From YouTube
- In 2024, Elite Video Influencers
- Achieving Video Popularity Mastering YouTube Thumbnail Selection for 2024
- In 2024, Bridging Platforms Uploading From Twitch to YouTube
- [Updated] 10 Common Vlogging Fears and How To Beat Them
- Transforming YouTube Videos Bars-Free Vision
- Propel Your Online Presence via Creator Studio
- Digital Riches Unleashed Measuring Your Success on YouTube's Platform
- In 2024, Essential Quick Steps for Effective Double Take Filming
- In 2024, Digital Cash Kings Leading YouTube Creators
- Harmonizing Content and Platform YouTube's Brief Melodies Explained
- [New] Crafting Attention A Look at the Best 15 Video Intro Plans
- Effortlessly Replay Videos on iPhone for 2024
- [Updated] Empowering Audiences The Playlist Sharing Approach
- In 2024, Cognitive Conclaves Educational YT Powerhouses
- [Updated] Block Spontaneous YouTube Video Triggers
- The Essential How-To for YouTube Comment Control
- Cut to the Chase Techniques for Tightening YouTube Content for 2024
- 2024 Approved Economical Embellishments FREE YouTube Template Packs
- The Uncharted Territory of YouTube's Unlisted Content
- In 2024, Choosing Between TikTok and YouTube Shorts A User's Guide
- In 2024, Creators Uniting for Marvel's Digital Future
- [Updated] Efface Thin Borders for a Seamless YouTube Experience
- [Updated] Download YouTube Responsibly Legal MP4 Conversion Methods
- [New] Discover Time's Tales Top 10 Historical Channels to Study With
- Undercover Echo Enthusiasts 6 Hidden Voice Capture Apps
- 6 Fixes to Unfortunately WhatsApp has stopped Error Popups On Huawei P60 | Dr.fone
- How to Share/Fake Location on WhatsApp for Apple iPhone X | Dr.fone
- How To Transfer Data From iPhone 7 Plus To Android/iOS? | Dr.fone
- In 2024, The Ultimate Guide to Nubia Red Magic 8S Pro+ Pattern Lock Screen Everything You Need to Know
- How to Unlock iPhone SE (2020) Passcode without Computer? | Dr.fone
- In 2024, How to Bypass Google FRP Lock from Samsung Galaxy S21 FE 5G (2023) Devices
- In 2024, How Can You Cast Your Apple iPhone 14 Pro to Windows PC With Ease? | Dr.fone
- [Updated] Social Stream Snippets, Yearly Update
- In 2024, How To Unlock a Infinix Note 30 5G Easily?
- Complete Guide to Hard Reset Your Lava Yuva 3 Pro | Dr.fone
- [New] Innovate or Fall Behind Rejuvenating Your TikTok Videos Using Mac Techniques
- [Updated] In 2024, The Ultimate Guide to Instagram Video Descriptions
- The Top 5 Android Apps That Use Fingerprint Sensor to Lock Your Apps On Realme GT Neo 5 SE
- 2024 Approved FCPX Survival Guide Overcoming Common Obstacles and Challenges
- New All You Want to Know About Vimeo Video Aspect Ratio Included for 2024
- [Updated] Enhance Your Content Utilizing the Green Screen on Instagram for 2024
- From Beats to Pages The Ultimate Guide to Online MP3 Conversion to Text
- [New] 2024 Approved The Ultimate Guide to Using Sticker Queries on Instagram
- 2024 Approved Revolutionize Your Play with Top Tips for PS4 Gameplay Recording
- In 2024, The Best iSpoofer Alternative to Try On Oppo Find X6 Pro | Dr.fone
- [Updated] 2024 Approved Mastering TikTok Livestreams on Your Home Office Desktop
- How to Fix Pokemon Go Route Not Working On Xiaomi Redmi K70E? | Dr.fone
- How to Use Google Assistant on Your Lock Screen Of Infinix Note 30 Phone
- In 2024, Which Pokémon can Evolve with a Moon Stone For Vivo X Flip? | Dr.fone
- [Updated] 2024 Approved Innovative Approaches to Elevate ROI in Your FB Ads with Animation
- [New] Most Innovative 8 Private Video Downloaders
- [Updated] 2024 Approved How To Capture & Save Your Beloved Hulu Seasons Quickly & Conveniently
- [New] Compiling the Finest iOS PSP Game Tools #1-5 for 2024
- 2024 Approved Virtualdub Is It Still the Best? Exploring Top Alternatives
- How to Intercept Text Messages on Oppo Reno 10 Pro 5G | Dr.fone
- [Updated] 2024 Approved Unearthing Old Facebook Tales An Easy-to-Follow Device Method
- In 2024, How To Remove Phone Number From Your Apple ID from Your iPhone 15 Pro?
- [Updated] A Step-by-Step Approach to Zooming Success
- How to Change Lock Screen Wallpaper on Motorola Edge 40 Neo
- Tale Bearers School - Distinguished Dothee
- [Updated] InstaCrafts Seamless Video Assemblies on Android/iOS for 2024
- The Ultimate List of Free MKV Cutters for 2024
- 3 Things You Must Know about Fake Snapchat Location On Motorola Moto G Stylus 5G (2023) | Dr.fone
- Discover the Top 4K YouTube Converters for Quality Video Downloads
- [Updated] Mac Users' Guide Styling Top-Tier OOTD TikToks
- [Updated] 2024 Approved Leading Platforms Mimicking Twitter's Network
- In 2024, Effortless Audio Silencing An Audacity Users Manual
- 7 Ways to Unlock a Locked Realme 11 Pro Phone
- Title: "Crafting Stories Essential Tips for YouTube Video Editors for 2024"
- Author: Brian
- Created at : 2024-05-25 11:33:29
- Updated at : 2024-05-26 11:33:29
- Link: https://youtube-video-recordings.techidaily.com/crafting-stories-essential-tips-for-youtube-video-editors-for-2024/
- License: This work is licensed under CC BY-NC-SA 4.0.
