
:max_bytes(150000):strip_icc()/durable__omxi3w443rue_large_2x-1-732c438d9048476bb6103184b27ee893.jpg)
"Crafting GIFs From YouTube Detailed Step-by-Step Guide for PC/Mobile"
Crafting GIFs From YouTube: Detailed Step-by-Step Guide for PC/Mobile
How to Create GIFs from YouTube Videos

Shanoon Cox
Mar 27, 2024• Proven solutions
Who doesn’t love Gifs? They are one of the most entertaining means to communicate on the internet. But have you tried creating a GIF from YouTube videos? Generally, GIFs use humorous or relevant scenes from movies or shows to make them relatable to the situation. If you’re someone who wants to create GIFs from YouTube, this is for you.
The article below will show you how to create GIFs from YouTube videos on the desktop computers and mobile devices with some free online GIF makers and apps.
Part 1: How to Create GIFs from a YouTube Video on the Computer?
1. FreeGifMAKER.me
FreeGifMaker is a simple online tool that allows the creation of animated Gifs free of cost. A minimum of two pictures has to be uploaded out of ten. It’s super easy and takes a couple of minutes to make a GIF from a YouTube video.
Find out how to create GIFs using FreeGifMaker.me using these steps.
- Open the website on your desktop by typing http://freegifmaker.me/youtube-to-gif/
- Go to YouTube and copy the URL of the video you want to make a GIF. Paste it on the above-mentioned website.
- Click on “Load YouTube Video” below the URL space and wait for a few seconds while the tool checks the video source.
- After the YouTube video is loaded, finally enter the gif duration, start time and click on the “Make a GIF button” and it will redirect you to the result page.
2. VEED.IO
VEED is another easy way to make GIFs from YouTube videos. VEED allows you to copy a YouTube video link of your choice and paste it on VEED without any difficulty. VEED not only creates GIFs from YouTube videos but also gives few more facilities like trimming, adding text, cropping to the clip which helps in creating super-cool GIFs. VEED has both free and Pro versions and is a perfect browser software.
How to use VEED only in 3 steps, know about it below:
- First, you need to copy the link to the YouTube video of your choice and paste it into VEED. From there the software will start importing the video into its project editor and you can start creating the GIF from there.
- For the editing part, you need to trim the part of the video in which you want to make the GIF and crop the GIF. You can easily do that by choosing the canvas size menu available. After that, you can add text, font style, color, and size to your GIF.
- In the last step, you just have to download the GIF which you have made in VEED.
3. Kapwing
Kapwing is a great stage for creating GIFs as well as videos and images. Kapwing is one of the most used and liked online video editors available. It provides one single step for all the things to do while creating a GIF – upload, editing, and sharing the file.
To create unique GIFs with Kapwing, follow these easy steps.
- First, you need to open Kapwing video editor and copy the URL of the YouTube video of your choice and paste it on Kapwing to create your GIF from the video. Any video which is shorter than 30 minutes and less than 500 MB is supported by Kapwing.
- Once you have uploaded the video, you will find the video appearing in the timeline. The section of the video that you want to make the GIF of needs to be cut with the sliders which are available at the end. A GIF can be usually of any length but to maintain good resolution, it is always advised to not make the segment more than 10 seconds.
- You can preview the GIF you created after trimming the video which will allow you to see how the final output would be like. Other edits such as cropping, adding text, and experimenting with the speed can be done on Kapwing as well.
- In the last and final step, you just need to export the GIF which you will find in the dropdown arrow available just beside the red “Export Video” button. Then click on the dropdown button and choose the option “Export as GIF”.
After processing the GIF, you need to save it by downloading it.
4. File-converter-online.com
This online free video editor can convert videos into GIF without any watermark and the maximum length of the GIF from the video clip can be 20 seconds, which can be set by you as needed. It provides a simple and free GIF maker that again offers special effects as well such as setting up the speed of the video.
You can create your desirable GIF from YouTube video in 3 easy steps.
- First, provide the specific link of the YouTube video which you want to create the GIF of in the space given.
- Apply the start time of the video by sliding with the given slider and then set the desirable duration of the GIF which is available in the next “Duration (seconds)” by sliding the seconds.
- Next, you can choose the speed of the video which is optional, and then set the resolution from higher to lower as per your choice.
- The final step involves creating the GIF which you can do by clicking on the red button “Create GIF from the video” available below the resolution option and finally the downloading will start after a short waiting on the next page.
5. Clideo
Clideo is one of the most reliable video converters available online. It can create an animated GIF from YouTube videos without much complication.
You can make GIF on your own by following the 3 easy steps mentioned below.
- First, you need to copy your YouTube video that you want to create a GIF with. Come back on Clideo and you will find a dropdown menu beside “Choose file”, there paste the link that you have copied earlier in the URL space. You can also select Google Drive or Dropbox for the same.
- After pasting the URL, you have to choose the ‘infinity sign’ given on the right side which will create an endless GIF without sound. Click on the ‘loop’ button available just below the panel on the right side.
- After completing the steps, you can watch the preview of the GIF and go back to editing if you need to change anything. Else save the output on your PC or Mobile phone.
Part 2: How to Make a GIF from a YouTube Video on the Android and iPhone?
1. GIF Toaster – GIF Maker
Gif Toaster is one of the video editing apps which makes the work of creating Gif from YouTube video super-easy. It can convert photos, panoramas and, videos into GIFs easily. You just need to download the app to make GIFs of your own choice.

You need to follow a few simple steps to create GIFs on your own.
- It is accessible on the iOS App Store and the Google Play for free so you need to install GIF Toaster on your device. Once done, tap the “Make GIF” option available below, you can also click “Combine GIFs” to combine more than one video. After completing, scroll down the dropdown menu beside “Video>GIF” and select the video which you want to convert into GIF.
- Once the selection is done, you will be provided with various options like “Basic Option”, “Direction Option”, “Effect Option” where you can control the playback speed, range along with other options available. You also get the option to choose “Filters” for making the GIF.
- After selecting the options of your choice, you have to scroll back to the top again and press “Convert” to quickly convert the video into GIF.
- Once the GIF is ready, you will be able to see the final result and you just need to ‘Save’ the file.
Part 3: Bonus: How to Create GIFS from YouTube video on iPhone without installing any app?
It is now possible to convert YouTube videos into GIFs by using the 5SecondsApp available for iOS. To make this possible you just require few things in your iPhone – the device should be iOS 11 or more, YouTube in the browser or app, and the 5SecondsApp already available in the App store.
First, you need to find a video that is not more than 10 seconds then begin the screen recording on the iOS recording feature and go back to YouTube to play the video and record the portion you need. To make the GIF you have to launch the app and tap the plus option there. Later, trim the video as you see fit. After you’re done, crop the video with the help of the crop tool and finally save it.
Part 4: Why Should You Use GIFs?
1. GIFs don’t prevent web pages from loading quickly
GIFs which are animated becomes more popular for any website as it gives meaning compacted in a small video the website uses to boost its chances of getting more views. While GIF does not make a website much slow but for better performance, it can be converted into lossy optimizations which do not make a huge difference in front of the human eyes or it can also be converted into HTML5 videos which makes the GIF 95% smaller in size.
2. GIF is an integral part of communicating on social media
Using GIFs makes any communication bright and friendly. It delivers great messages through short animated videos and has become the spotlight for communication in the past few years. Almost everyone using social media is using GIF for communicating with their friends and family.
Final Thoughts
There are many apps and video editors available today available free of cost. You can easily make GIFs from your most-liked video on YouTube. It is smooth to create GIFs on your own with the help of these editors mentioned above. Each one of them is having a free version and easy to handle so do not forget to try them next time you are making a GIF from YouTube videos.
Shanoon Cox
Shanoon Cox is a writer and a lover of all things video.
Follow @Shanoon Cox
Shanoon Cox
Mar 27, 2024• Proven solutions
Who doesn’t love Gifs? They are one of the most entertaining means to communicate on the internet. But have you tried creating a GIF from YouTube videos? Generally, GIFs use humorous or relevant scenes from movies or shows to make them relatable to the situation. If you’re someone who wants to create GIFs from YouTube, this is for you.
The article below will show you how to create GIFs from YouTube videos on the desktop computers and mobile devices with some free online GIF makers and apps.
Part 1: How to Create GIFs from a YouTube Video on the Computer?
1. FreeGifMAKER.me
FreeGifMaker is a simple online tool that allows the creation of animated Gifs free of cost. A minimum of two pictures has to be uploaded out of ten. It’s super easy and takes a couple of minutes to make a GIF from a YouTube video.
Find out how to create GIFs using FreeGifMaker.me using these steps.
- Open the website on your desktop by typing http://freegifmaker.me/youtube-to-gif/
- Go to YouTube and copy the URL of the video you want to make a GIF. Paste it on the above-mentioned website.
- Click on “Load YouTube Video” below the URL space and wait for a few seconds while the tool checks the video source.
- After the YouTube video is loaded, finally enter the gif duration, start time and click on the “Make a GIF button” and it will redirect you to the result page.
2. VEED.IO
VEED is another easy way to make GIFs from YouTube videos. VEED allows you to copy a YouTube video link of your choice and paste it on VEED without any difficulty. VEED not only creates GIFs from YouTube videos but also gives few more facilities like trimming, adding text, cropping to the clip which helps in creating super-cool GIFs. VEED has both free and Pro versions and is a perfect browser software.
How to use VEED only in 3 steps, know about it below:
- First, you need to copy the link to the YouTube video of your choice and paste it into VEED. From there the software will start importing the video into its project editor and you can start creating the GIF from there.
- For the editing part, you need to trim the part of the video in which you want to make the GIF and crop the GIF. You can easily do that by choosing the canvas size menu available. After that, you can add text, font style, color, and size to your GIF.
- In the last step, you just have to download the GIF which you have made in VEED.
3. Kapwing
Kapwing is a great stage for creating GIFs as well as videos and images. Kapwing is one of the most used and liked online video editors available. It provides one single step for all the things to do while creating a GIF – upload, editing, and sharing the file.
To create unique GIFs with Kapwing, follow these easy steps.
- First, you need to open Kapwing video editor and copy the URL of the YouTube video of your choice and paste it on Kapwing to create your GIF from the video. Any video which is shorter than 30 minutes and less than 500 MB is supported by Kapwing.
- Once you have uploaded the video, you will find the video appearing in the timeline. The section of the video that you want to make the GIF of needs to be cut with the sliders which are available at the end. A GIF can be usually of any length but to maintain good resolution, it is always advised to not make the segment more than 10 seconds.
- You can preview the GIF you created after trimming the video which will allow you to see how the final output would be like. Other edits such as cropping, adding text, and experimenting with the speed can be done on Kapwing as well.
- In the last and final step, you just need to export the GIF which you will find in the dropdown arrow available just beside the red “Export Video” button. Then click on the dropdown button and choose the option “Export as GIF”.
After processing the GIF, you need to save it by downloading it.
4. File-converter-online.com
This online free video editor can convert videos into GIF without any watermark and the maximum length of the GIF from the video clip can be 20 seconds, which can be set by you as needed. It provides a simple and free GIF maker that again offers special effects as well such as setting up the speed of the video.
You can create your desirable GIF from YouTube video in 3 easy steps.
- First, provide the specific link of the YouTube video which you want to create the GIF of in the space given.
- Apply the start time of the video by sliding with the given slider and then set the desirable duration of the GIF which is available in the next “Duration (seconds)” by sliding the seconds.
- Next, you can choose the speed of the video which is optional, and then set the resolution from higher to lower as per your choice.
- The final step involves creating the GIF which you can do by clicking on the red button “Create GIF from the video” available below the resolution option and finally the downloading will start after a short waiting on the next page.
5. Clideo
Clideo is one of the most reliable video converters available online. It can create an animated GIF from YouTube videos without much complication.
You can make GIF on your own by following the 3 easy steps mentioned below.
- First, you need to copy your YouTube video that you want to create a GIF with. Come back on Clideo and you will find a dropdown menu beside “Choose file”, there paste the link that you have copied earlier in the URL space. You can also select Google Drive or Dropbox for the same.
- After pasting the URL, you have to choose the ‘infinity sign’ given on the right side which will create an endless GIF without sound. Click on the ‘loop’ button available just below the panel on the right side.
- After completing the steps, you can watch the preview of the GIF and go back to editing if you need to change anything. Else save the output on your PC or Mobile phone.
Part 2: How to Make a GIF from a YouTube Video on the Android and iPhone?
1. GIF Toaster – GIF Maker
Gif Toaster is one of the video editing apps which makes the work of creating Gif from YouTube video super-easy. It can convert photos, panoramas and, videos into GIFs easily. You just need to download the app to make GIFs of your own choice.
You need to follow a few simple steps to create GIFs on your own.
- It is accessible on the iOS App Store and the Google Play for free so you need to install GIF Toaster on your device. Once done, tap the “Make GIF” option available below, you can also click “Combine GIFs” to combine more than one video. After completing, scroll down the dropdown menu beside “Video>GIF” and select the video which you want to convert into GIF.
- Once the selection is done, you will be provided with various options like “Basic Option”, “Direction Option”, “Effect Option” where you can control the playback speed, range along with other options available. You also get the option to choose “Filters” for making the GIF.
- After selecting the options of your choice, you have to scroll back to the top again and press “Convert” to quickly convert the video into GIF.
- Once the GIF is ready, you will be able to see the final result and you just need to ‘Save’ the file.
Part 3: Bonus: How to Create GIFS from YouTube video on iPhone without installing any app?
It is now possible to convert YouTube videos into GIFs by using the 5SecondsApp available for iOS. To make this possible you just require few things in your iPhone – the device should be iOS 11 or more, YouTube in the browser or app, and the 5SecondsApp already available in the App store.
First, you need to find a video that is not more than 10 seconds then begin the screen recording on the iOS recording feature and go back to YouTube to play the video and record the portion you need. To make the GIF you have to launch the app and tap the plus option there. Later, trim the video as you see fit. After you’re done, crop the video with the help of the crop tool and finally save it.
Part 4: Why Should You Use GIFs?
1. GIFs don’t prevent web pages from loading quickly
GIFs which are animated becomes more popular for any website as it gives meaning compacted in a small video the website uses to boost its chances of getting more views. While GIF does not make a website much slow but for better performance, it can be converted into lossy optimizations which do not make a huge difference in front of the human eyes or it can also be converted into HTML5 videos which makes the GIF 95% smaller in size.
2. GIF is an integral part of communicating on social media
Using GIFs makes any communication bright and friendly. It delivers great messages through short animated videos and has become the spotlight for communication in the past few years. Almost everyone using social media is using GIF for communicating with their friends and family.
Final Thoughts
There are many apps and video editors available today available free of cost. You can easily make GIFs from your most-liked video on YouTube. It is smooth to create GIFs on your own with the help of these editors mentioned above. Each one of them is having a free version and easy to handle so do not forget to try them next time you are making a GIF from YouTube videos.
Shanoon Cox
Shanoon Cox is a writer and a lover of all things video.
Follow @Shanoon Cox
Your Ultimate Guide to Distinguishing Your Youtube Shorts
10 Expert Suggestions to Make Your YT Shorts Stand Out
Shanoon Cox
Oct 26, 2023• Proven solutions
To make it easier for its audience to find crisp and entertaining content, YouTube has recently come up with a dedicated “Shorts” feature.
Ideally, any YouTube user can find the Shorts option on the app to watch interesting videos of 60 seconds or less. Though, it might take a lot of effort to make your YouTube Shorts videos appealing.
If you also want to go viral, then get to know about these YouTube Shorts tips that every content creator should follow.
YouTube Shorts Feature and Shorts Fund: Things to Know
Before we make you familiar with all kinds of YouTube Shorts tips and tricks, let’s cover some basics. Ideally, YouTube has recently come up with the Shorts feature to focus on short-length videos (and to rival Instagram Reels and TikTok).
You can now find the Shorts icon at the bottom panel on the YouTube app. Using it, you can watch or record short videos on YouTube easily. These are short-form clips of 60 seconds or less that you can create via the Shorts interface of the YouTube app.
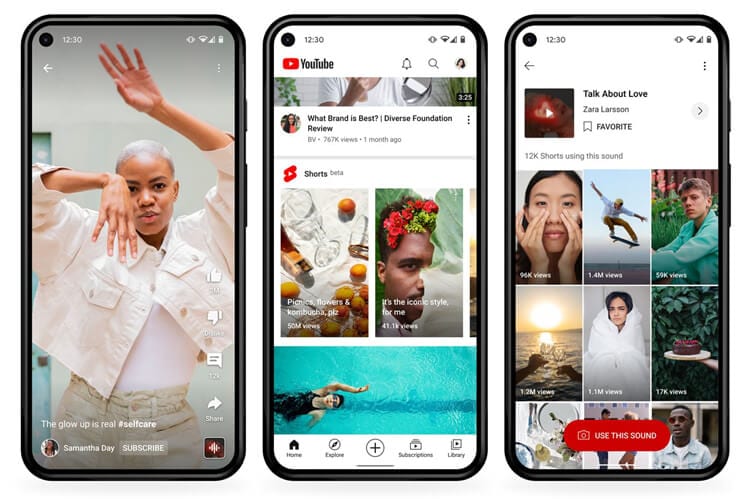
The interface would let you record multiple videos at different intervals and add sound to your clips as well. Later, you can post these short clips on your channel to get more views on YouTube.
YouTube Shorts Fund
YouTube Shorts already hosts a massive number of more than 6 billion daily views as of now. To promote it, Google has come up with a YouTube Shorts Fund of $100M that would be rewarded to various content creators each month.
That is, a “Shorts Bonus” would be added to the account of content creators to appreciate their viral content.
Top 10 Tips for YouTube Shorts That You Must Follow
Now when we have covered all the basics, let’s get to know about some effective YouTube Shorts tricks that would help you come up with interesting content and get more audience for it.
Tip 1: Learn How to Shoot YouTube Shorts
Before you start posting videos on YouTube Shorts, you should know how the feature works. Ideally, you can find a dedicated option for Shorts from the bottom panel on the updated YouTube app. From here, you can watch Shorts or simply choose to create them as well.
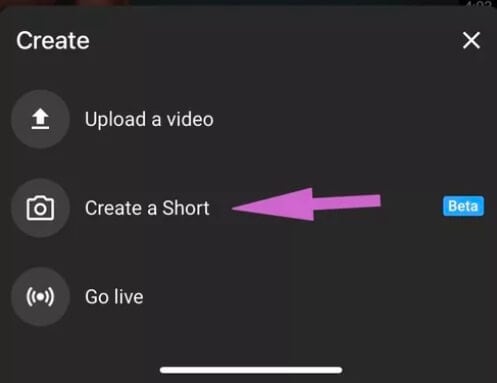
You can give YouTube access to your smartphone camera before you start recording. To record anything, you can just tap and hold the red button (the recording icon) on the interface.
As you would release it, the recording would be stopped. In this way, you can seamlessly move from one scene to another without worrying about editing in post-production.
Tip 2: Stick to a Selective Niche
To have a consistent growth of audience on YouTube shorts, you should stick to a specific niche. If you search on YouTube, you can find short videos related to funny, inspirational, fitness, romantic, and all kinds of niches.
Most of the prominent content creators already apply these YouTube Shorts tips in which they first identify their target audience. Based on that, you can work on the type of content that you want to create and share to attain consistent growth on YouTube.
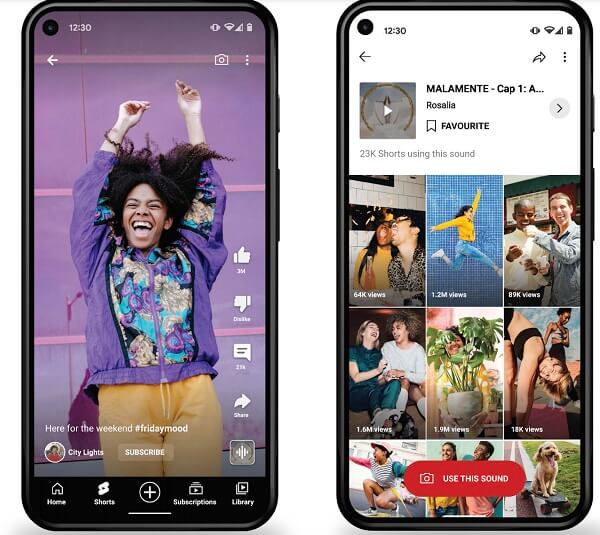
Tip 3: Add Appropriate Background Music to Your Short Videos
One of the best things about YouTube Shorts is that it lets us add a snippet of the music in the background, according to our content. Therefore, you must implement these tips for YouTube Shorts to make the most of this free feature of the app.
After recording your videos, you can tap on the “Sound” or the “Add Music” feature from the interface.
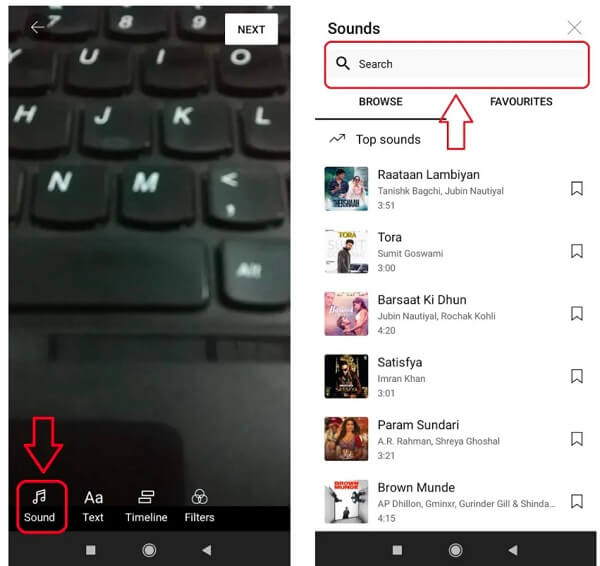
Now, YouTube will automatically load all kinds of trending music that you can use for free. If you want, you can enter the name of any song on the search option of YouTube shorts.
As you would select a track, it will automatically be loaded as the background music for your video. Though, you can also select a specific segment of the track and clip it accordingly to place it on your videos the way you like.
Tip 4: Insert Captions and Text Effects on Your Shorts
Apart from music, you can also add all kinds of text effects to make your YouTube Shorts videos appealing. After you have recorded a video, you can just tap on the text option from the bottom/side panel of the app.
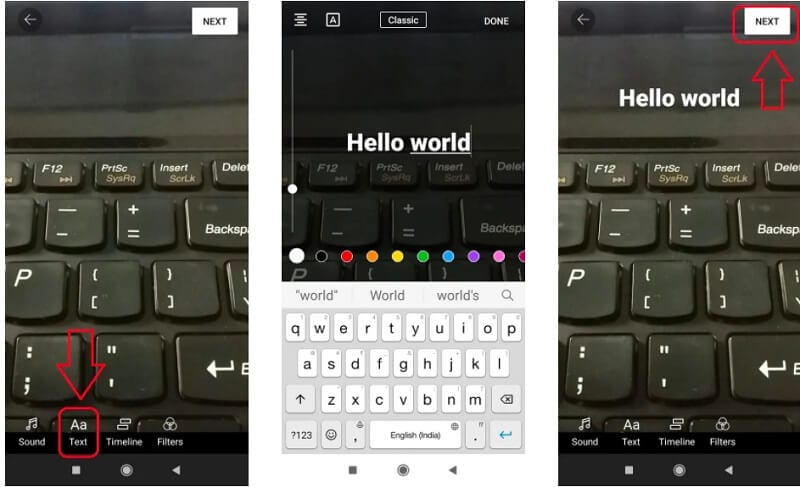
You can now type anything and place it on the video to make it more interesting. If you want, you can also implement these YouTube Shorts tips to add subtitles or pre/post video captions without any hassle.
Tip 5: Adjust the Playback Speed of YouTube Shorts
Since a lot of content creators are coming up with YouTube Shorts, you would have to walk an extra mile to make them more appealing. In these YouTube Shorts tricks, I would recommend adjusting the playback speed of the video.
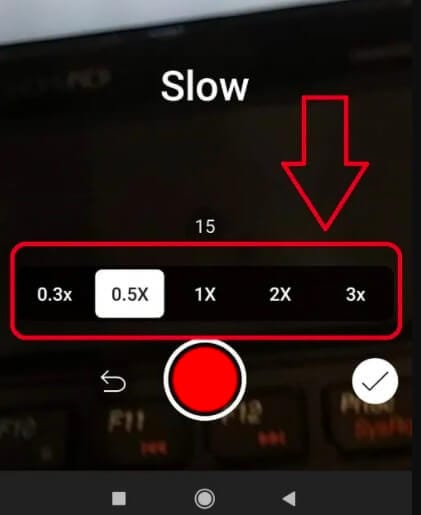
After recording the video, you can tap on the speed icon from the bottom/side panel. Here, you can make your videos play in slow motion or fast forward (in a range of 0.3x to 3x). This will add seamless speed control features to your videos without any technical issues.
Tip 6: Consider the Overall Length of Your Shorts Video
Even though the maximum length of the YouTube Shorts videos is 60 seconds, you don’t have to make it so long. If you look at most of the popular videos on YouTube Shorts, then you will find that they are of less than 30 seconds in length.
Remember, your goal is to come up with crisp and interesting content via YouTube Shorts. To implement these YouTube Shorts tips, you can consider the ideal length of 30-45 seconds and only have essential content in your videos.
Tip 7: Use the Timer Feature to Shoot Your Videos Correctly
A lot of people make the rookie mistake of shooting their videos for too long in Shorts. Therefore, if you want to implement these YouTube Shorts tips and tricks, then consider using the timer feature of the app.

Before shooting the video, you can tap on the timer button from the bottom and set up a preferred duration for it (like 10 or 15 seconds). In this way, you can be sure that you won’t go overboard and keep your videos short automatically.
Tip 8: Set a Preferred Target Audience for YouTube Shorts
Great! Now when you have recorded and edited your video by applying these tips for YouTube Shorts, you are ready to post them. While posting your videos, you would be asked whether the video is targeted at kids or not. If the video is made for kids, then you should select the relevant prompt, as YouTube would improve the overall visibility of your videos in this case.
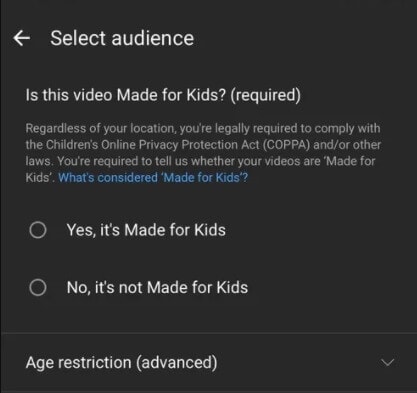
Though, if your videos are targeted at adults, then you should go with the second option instead. This would help you reach out to your target audience on YouTube easily.
Tip 9: Post Your YouTube Shorts the Right Way
Apart from setting the audience preferences of your YouTube Shorts videos, you should also take care of a couple of other things. For instance, you can consider making the visibility of your final video “Public” so that anyone on YouTube can watch it.
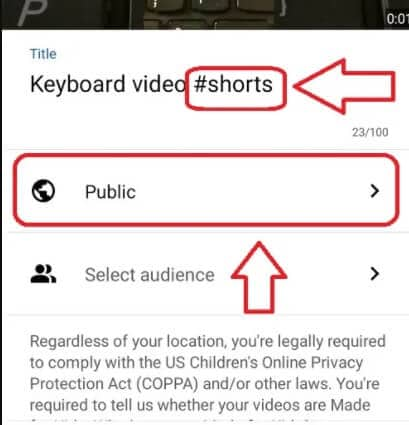
Besides that, it is also recommended to have the keyword “#Shorts” in the title of the video. You can also make the title of the video attractive and can even add a short description that would make your audience click on your YouTube video for sure.
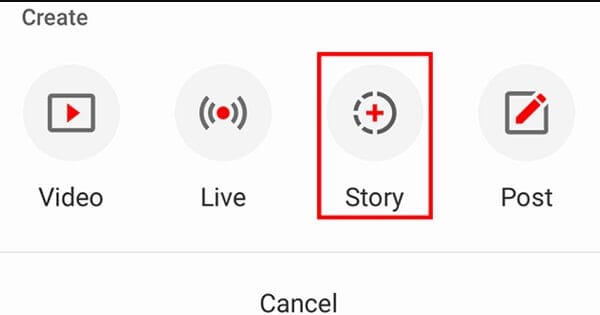
Tip 10: Promote Your YouTube Shorts Video on Other Places
Lastly, posting the YouTube Shorts video is not enough, as you should also promote it to get more views. One of the best YouTube Shorts tips for promotion would be posting the snippet of the video as your Stories on YouTube.
You can also post your YouTube Shorts on other popular social media platforms like Facebook, Twitter, Reddit, WhatsApp, Instagram, etc. by sharing their link. In this way, you can easily redirect your audience from other platforms and increase the visibility of your video.
Bonus Tip: Use a Professional Editor for Your YouTube Shorts Videos
As you can see after going through these YouTube Shorts tricks that the native tool of the app has limited editing options. Therefore, if you want to come up with better videos, then consider using a professional tool like Wondershare Filmora.


The desktop video editing tool has hundreds of filters, transitions, captions, stickers, and other effects to elevate the overall visual appeal of your videos. You can also access numerous AI-integrated features in Filmora and can directly export your videos in YouTube-compatible formats.
Conclusion
That’s a wrap, everyone! I’m sure that after following these expert YouTube Shorts tips and tricks, you can make the most of this newly added YouTube feature. You can consider following the above-listed YouTube Shorts tips to record your videos and make them interesting by adding sound and caption effects.
Though, if you want to make your videos even more appealing, then consider using a reliable and smart video editor like Wondershare Filmora.
Shanoon Cox
Shanoon Cox is a writer and a lover of all things video.
Follow @Shanoon Cox
Shanoon Cox
Oct 26, 2023• Proven solutions
To make it easier for its audience to find crisp and entertaining content, YouTube has recently come up with a dedicated “Shorts” feature.
Ideally, any YouTube user can find the Shorts option on the app to watch interesting videos of 60 seconds or less. Though, it might take a lot of effort to make your YouTube Shorts videos appealing.
If you also want to go viral, then get to know about these YouTube Shorts tips that every content creator should follow.
YouTube Shorts Feature and Shorts Fund: Things to Know
Before we make you familiar with all kinds of YouTube Shorts tips and tricks, let’s cover some basics. Ideally, YouTube has recently come up with the Shorts feature to focus on short-length videos (and to rival Instagram Reels and TikTok).
You can now find the Shorts icon at the bottom panel on the YouTube app. Using it, you can watch or record short videos on YouTube easily. These are short-form clips of 60 seconds or less that you can create via the Shorts interface of the YouTube app.
The interface would let you record multiple videos at different intervals and add sound to your clips as well. Later, you can post these short clips on your channel to get more views on YouTube.
YouTube Shorts Fund
YouTube Shorts already hosts a massive number of more than 6 billion daily views as of now. To promote it, Google has come up with a YouTube Shorts Fund of $100M that would be rewarded to various content creators each month.
That is, a “Shorts Bonus” would be added to the account of content creators to appreciate their viral content.
Top 10 Tips for YouTube Shorts That You Must Follow
Now when we have covered all the basics, let’s get to know about some effective YouTube Shorts tricks that would help you come up with interesting content and get more audience for it.
Tip 1: Learn How to Shoot YouTube Shorts
Before you start posting videos on YouTube Shorts, you should know how the feature works. Ideally, you can find a dedicated option for Shorts from the bottom panel on the updated YouTube app. From here, you can watch Shorts or simply choose to create them as well.
You can give YouTube access to your smartphone camera before you start recording. To record anything, you can just tap and hold the red button (the recording icon) on the interface.
As you would release it, the recording would be stopped. In this way, you can seamlessly move from one scene to another without worrying about editing in post-production.
Tip 2: Stick to a Selective Niche
To have a consistent growth of audience on YouTube shorts, you should stick to a specific niche. If you search on YouTube, you can find short videos related to funny, inspirational, fitness, romantic, and all kinds of niches.
Most of the prominent content creators already apply these YouTube Shorts tips in which they first identify their target audience. Based on that, you can work on the type of content that you want to create and share to attain consistent growth on YouTube.
Tip 3: Add Appropriate Background Music to Your Short Videos
One of the best things about YouTube Shorts is that it lets us add a snippet of the music in the background, according to our content. Therefore, you must implement these tips for YouTube Shorts to make the most of this free feature of the app.
After recording your videos, you can tap on the “Sound” or the “Add Music” feature from the interface.
Now, YouTube will automatically load all kinds of trending music that you can use for free. If you want, you can enter the name of any song on the search option of YouTube shorts.
As you would select a track, it will automatically be loaded as the background music for your video. Though, you can also select a specific segment of the track and clip it accordingly to place it on your videos the way you like.
Tip 4: Insert Captions and Text Effects on Your Shorts
Apart from music, you can also add all kinds of text effects to make your YouTube Shorts videos appealing. After you have recorded a video, you can just tap on the text option from the bottom/side panel of the app.
You can now type anything and place it on the video to make it more interesting. If you want, you can also implement these YouTube Shorts tips to add subtitles or pre/post video captions without any hassle.
Tip 5: Adjust the Playback Speed of YouTube Shorts
Since a lot of content creators are coming up with YouTube Shorts, you would have to walk an extra mile to make them more appealing. In these YouTube Shorts tricks, I would recommend adjusting the playback speed of the video.
After recording the video, you can tap on the speed icon from the bottom/side panel. Here, you can make your videos play in slow motion or fast forward (in a range of 0.3x to 3x). This will add seamless speed control features to your videos without any technical issues.
Tip 6: Consider the Overall Length of Your Shorts Video
Even though the maximum length of the YouTube Shorts videos is 60 seconds, you don’t have to make it so long. If you look at most of the popular videos on YouTube Shorts, then you will find that they are of less than 30 seconds in length.
Remember, your goal is to come up with crisp and interesting content via YouTube Shorts. To implement these YouTube Shorts tips, you can consider the ideal length of 30-45 seconds and only have essential content in your videos.
Tip 7: Use the Timer Feature to Shoot Your Videos Correctly
A lot of people make the rookie mistake of shooting their videos for too long in Shorts. Therefore, if you want to implement these YouTube Shorts tips and tricks, then consider using the timer feature of the app.
Before shooting the video, you can tap on the timer button from the bottom and set up a preferred duration for it (like 10 or 15 seconds). In this way, you can be sure that you won’t go overboard and keep your videos short automatically.
Tip 8: Set a Preferred Target Audience for YouTube Shorts
Great! Now when you have recorded and edited your video by applying these tips for YouTube Shorts, you are ready to post them. While posting your videos, you would be asked whether the video is targeted at kids or not. If the video is made for kids, then you should select the relevant prompt, as YouTube would improve the overall visibility of your videos in this case.
Though, if your videos are targeted at adults, then you should go with the second option instead. This would help you reach out to your target audience on YouTube easily.
Tip 9: Post Your YouTube Shorts the Right Way
Apart from setting the audience preferences of your YouTube Shorts videos, you should also take care of a couple of other things. For instance, you can consider making the visibility of your final video “Public” so that anyone on YouTube can watch it.
Besides that, it is also recommended to have the keyword “#Shorts” in the title of the video. You can also make the title of the video attractive and can even add a short description that would make your audience click on your YouTube video for sure.
Tip 10: Promote Your YouTube Shorts Video on Other Places
Lastly, posting the YouTube Shorts video is not enough, as you should also promote it to get more views. One of the best YouTube Shorts tips for promotion would be posting the snippet of the video as your Stories on YouTube.
You can also post your YouTube Shorts on other popular social media platforms like Facebook, Twitter, Reddit, WhatsApp, Instagram, etc. by sharing their link. In this way, you can easily redirect your audience from other platforms and increase the visibility of your video.
Bonus Tip: Use a Professional Editor for Your YouTube Shorts Videos
As you can see after going through these YouTube Shorts tricks that the native tool of the app has limited editing options. Therefore, if you want to come up with better videos, then consider using a professional tool like Wondershare Filmora.
The desktop video editing tool has hundreds of filters, transitions, captions, stickers, and other effects to elevate the overall visual appeal of your videos. You can also access numerous AI-integrated features in Filmora and can directly export your videos in YouTube-compatible formats.
Conclusion
That’s a wrap, everyone! I’m sure that after following these expert YouTube Shorts tips and tricks, you can make the most of this newly added YouTube feature. You can consider following the above-listed YouTube Shorts tips to record your videos and make them interesting by adding sound and caption effects.
Though, if you want to make your videos even more appealing, then consider using a reliable and smart video editor like Wondershare Filmora.
Shanoon Cox
Shanoon Cox is a writer and a lover of all things video.
Follow @Shanoon Cox
Also read:
- Disable Non-Specific YouTube Video Alerts for 2024
- In 2024, Angles of Perspective YouTube's Path to Dynamic Video Editing
- [New] 20 YouTube Channels for All-Time Favorite Bands
- Breaking Even on YouTube Key View Figures Explored
- Steps to Clear Out Your YouTube Watch Later Collection
- In 2024, Decoding Unlisted Videos A Deep Dive Into YouTube Secrecy
- Streaming Superstars The Leading Subscriber Crew
- The Art of Featured Channels An In-Depth Exploration for Maximizing Engagement
- Top 10 Free Movies to Watch on YouTube
- Building Brands Together A Guide to Selecting YouTube Teams for 2024
- The Ultimate Guide to Cost-Effective Media Providers Online
- The Evolution of YouTube Shorts Templates and Their Impact on Engagement
- Instantly Professional Masterful Thumbnails Created Fast
- 2024 Approved Editing Experience Workshop
- [Updated] Epic Video Journeys The Fastest Hits Reaching 100M Views by '24
- 2024 Approved Everlasting Deactivation Tactics Against YouTube's Sneaky Snack
- Build Your Wealth on YouTube A Guide to Creating Content Without Ads
- Boosting Streams Switching to AV1 in YouTube's Settings
- Master Your YouTube Thumbnail Size & Ratio
- [Updated] Crack the Code of Content Top 6 YouTuber Personality Tests Revealed
- [Updated] How to Easily Disable/Remove YouTube Shorts Permanently?
- [New] Enhancing Beauty on Streams via Color Grading
- Construct a Careerscape on Camera by Critiquing Closets
- [Updated] Break Bot Patterns, Enhance Organic Video Reach
- The Premier Selection of Top 10 Free YouTube Art Mentors
- [New] A Practical Pathway for Profit Tracking The Straightforward Steps to Analyze YouTube Earnings
- 2024 Approved CarryMinati Financial Triumphs with Ajey Nagar
- Essential Free Online Music Libraries 15 Picks for 2024
- Top Choice for Capturing Quality Content on YouTube
- Essential Rules of Engagement on YouTube for 2024
- Vivid Visuals Brush up Your YouTube Beauty Videos
- Finding Your Portal to YouTube's Video Mastery Hub
- Enhance Your Content Strategy - Discover the Power of Social Blade and YouTube Data for 2024
- In 2024, Essential Strategies for Memorable YouTube Closings
- Video Ranking Rise – Must-Have YouTube SEO Aids
- [New] Bringing Bygone Era Filmmaking to Life Today
- [Updated] Essential Techniques for Forming YouTube Collab Videos
- Unlocking Views with Optimal Thumbnail Design
- In 2024, Essential Quick Steps for Effective Double Take Filming
- YouTube Studio Editor Unveiled Ultimate Editing Companion
- [New] Crafting Effective YouTube Thumbnails & Banners
- In 2024, Data-Driven Decision Making in Your YouTube Shorts Strategy
- [Updated] Building a Bridge Between Twitch and YouTube Audience Loyalty
- Analytics Unlocked Your Step-by-Step YouTube Guide
- A Step-by-Step Journey Through High-Impact YouTube Banner Designs
- 2024 Approved 10 Must-Try Microphones for Exceptional ASMR Sounds
- Charting 8 Most Swiftly Increasing Video Platforms
- [New] Effortless Guide for Turning YouTube Shorts Into Mp4 Videos
- In 2024, How to Remove and Reset Face ID on iPhone 14 Pro Max
- In 2024, Ultimate Guide on Vivo Y100i FRP Bypass
- How to Change/Add Location Filters on Snapchat For your Nubia Red Magic 9 Pro | Dr.fone
- New 2024 Approved Beyond the Basics Secrets for TikTok Live Studio Success
- New In 2024, Do You Know How AI Is Helping Video Editors and Enthusiasts? Many Video Editing Software Allows an Auto Reframe Option to Use that Can Help Manage Videos
- In 2024, How to Change Google Play Location On Motorola Razr 40 Ultra | Dr.fone
- 2024 Approved Crucial Steps to Preserve Your Youtube LIVE Video
- Updated Timeless Tunes Collection Perfect Pairings of Classical Music for Modern Wedding Films
- OBS Tutorial Capturing Every Moment of Gameplay for 2024
- [Updated] In 2024, Angle Adjustments The Instagram Guide for Perfecting Photo Flips
- [New] VidHarvest Instagram Live (FB) for 2024
- [New] The Ultimate PPT Recording Process Explained for 2024
- How Can I Catch the Regional Pokémon without Traveling On Vivo Y55s 5G (2023) | Dr.fone
- New 2024 Approved Cartoonize Your Videos The Ultimate Conversion Tutorial
- The Ultimate Guide to Samsung Galaxy A23 5G Pattern Lock Screen Everything You Need to Know
- [Updated] In 2024, 5 Strategies for Storing .mov on Windows 10
- How to Detect and Remove Spyware on Poco C65? | Dr.fone
- New Free Video Editing Essentials Top 5 Splitter Tools for 2024
- [Updated] Climbing the Popularity Ladder with Staff-Chosen Videos at Vimeo for 2024
- [New] 2024 Approved The Secret to Stellar Instagram Video Engagement Flawless Sizing Techniques
- [New] Beyond the Basics A Compreran Comparative Analysis
- Title: "Crafting GIFs From YouTube Detailed Step-by-Step Guide for PC/Mobile"
- Author: Brian
- Created at : 2024-05-25 11:33:14
- Updated at : 2024-05-26 11:33:14
- Link: https://youtube-video-recordings.techidaily.com/crafting-gifs-from-youtube-detailed-step-by-step-guide-for-pcmobile/
- License: This work is licensed under CC BY-NC-SA 4.0.
