
"Content Distribution Excellence Vimeo vs YouTube"
Content Distribution Excellence: Vimeo vs YouTube
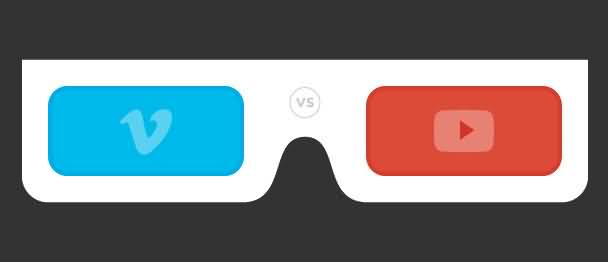
Vimeo vs YouTube: Which is Better?

Ollie Mattison
Mar 27, 2024• Proven solutions
Lots of people nowadays use videos to share with people all around the world. Two of the main platforms are YouTube and Vimeo. This article tells you the difference between both so that you can decide which the best platform is for you. Whether you are a marketer, video producer or gamer you will find the information useful to find your target audience easily.
Also read:
Vimeo Basic, Vimeo Plus or Vimeo Pro: Which is Right for You?
Please watch the video below for more information:
Detailed View of YouTube and Vimeo
1 Communities
YouTube: When it comes to users YouTube comes out on top with over a billion views each and every month. You are able to interact with your viewers by using the comments and people are able to follow you so that they are notified of new videos and comments. As there is already a huge following on YouTube it’s easy to get a good following if you have great content. It’s harder to control public content which is a downside to using YouTube and there is very little customer support. With the comments being moderated rarely it can cause a distraction from your video. Businesses tend to internally block YouTube video’s which means you won’t get the viewings from people on their lunch breaks.
Vimeo: With higher quality content and no advertisements video owners can quickly build a valid following and gain comments from people that are contributing high value information. You have more detailed analytics which makes it easier to see where you are going wrong should you not have the following you want and you are able to use your own domain. With Google owning YouTube you are unlikely to get the same exposure you would, however the followers tend to be valid giving you a real idea of where you are going right or wrong. Because of the higher quality followers you are less likely to get negative or abusive comments when you use Vimeo, however it is a paid subscription with each tier giving you more space to upload.
2 Membership
YouTube: YouTube on the other hand is free for all to use because the main focus is getting their equity through advertisements. There is however the option to take out a subscription which is known as YouTube Red. This lets you watch as many video’s as you want without having to view the ads and also gets you the ability to download so you don’t have to go online to view your favourite videos, a music app and original programming facilities.
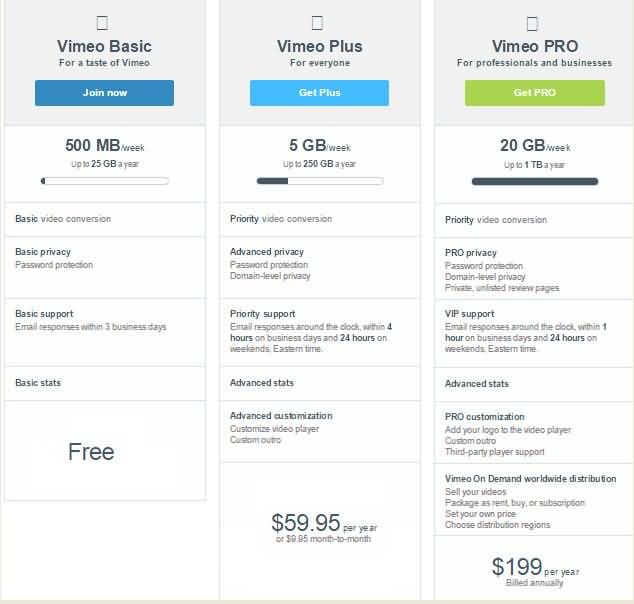
Vimeo: There are 4 different membership options with Vimeo allowing you to tailor it to your needs; there is the basic, plus, pro and business. The higher the cost, the greater level of support and storage capacity you will get. There is a free membership available but you will only be able to use up to 500MB each week.
3 Advertising
YouTube: What makes YouTube free is the fact they get their money from the advertisements they put not only on their sites but before video’s that people have to watch a set amount of seconds for before they can view their video of choice. This is great news if you are a marketer as it will allow you to reach out to viewers on video’s that are relevant to your brand/product/service, however for those that are viewing the sheer amount of ads can be off-putting.

Vimeo: As a paid subscription service and even the limited free package, you won’t have to view or show viewers ads, which means that your videos are more likely to be seen in their entirety not abandoned due to advertisements.
4 Updating video
YouTube: If you upload videos to YouTube you do not have the same benefits as the only way to amend a video is to take it down, delete it and re-upload a new one. This unfortunately takes with it any statistics such as views that you have gained. If you do choose YouTube for your videos then do make sure you check everything vigorously before you upload it as there’s no way to change it.
Vimeo: Occasionally an uploaded video may need some changes made. This could be due to changes to the offer you have or you have noticed something else that needs amending. With Vimeo if you need to update a video you can do so without losing the statistics it has already gained, which is great news if you notice an error later down the line or need to add or take something away.
Conclusion
When it comes down to making the final decision between using YouTube or Vimeo you will need to look at the type of audience you want to attract. With Vimeo you are more likely to attract creators and film makers, whereas with YouTube you will have a bigger audience to target which gives you a better chance of a higher rank on search engines.
Ollie Mattison
Ollie Mattison is a writer and a lover of all things video.
Follow @Ollie Mattison
Ollie Mattison
Mar 27, 2024• Proven solutions
Lots of people nowadays use videos to share with people all around the world. Two of the main platforms are YouTube and Vimeo. This article tells you the difference between both so that you can decide which the best platform is for you. Whether you are a marketer, video producer or gamer you will find the information useful to find your target audience easily.
Also read:
Vimeo Basic, Vimeo Plus or Vimeo Pro: Which is Right for You?
Please watch the video below for more information:
Detailed View of YouTube and Vimeo
1 Communities
YouTube: When it comes to users YouTube comes out on top with over a billion views each and every month. You are able to interact with your viewers by using the comments and people are able to follow you so that they are notified of new videos and comments. As there is already a huge following on YouTube it’s easy to get a good following if you have great content. It’s harder to control public content which is a downside to using YouTube and there is very little customer support. With the comments being moderated rarely it can cause a distraction from your video. Businesses tend to internally block YouTube video’s which means you won’t get the viewings from people on their lunch breaks.
Vimeo: With higher quality content and no advertisements video owners can quickly build a valid following and gain comments from people that are contributing high value information. You have more detailed analytics which makes it easier to see where you are going wrong should you not have the following you want and you are able to use your own domain. With Google owning YouTube you are unlikely to get the same exposure you would, however the followers tend to be valid giving you a real idea of where you are going right or wrong. Because of the higher quality followers you are less likely to get negative or abusive comments when you use Vimeo, however it is a paid subscription with each tier giving you more space to upload.
2 Membership
YouTube: YouTube on the other hand is free for all to use because the main focus is getting their equity through advertisements. There is however the option to take out a subscription which is known as YouTube Red. This lets you watch as many video’s as you want without having to view the ads and also gets you the ability to download so you don’t have to go online to view your favourite videos, a music app and original programming facilities.
Vimeo: There are 4 different membership options with Vimeo allowing you to tailor it to your needs; there is the basic, plus, pro and business. The higher the cost, the greater level of support and storage capacity you will get. There is a free membership available but you will only be able to use up to 500MB each week.
3 Advertising
YouTube: What makes YouTube free is the fact they get their money from the advertisements they put not only on their sites but before video’s that people have to watch a set amount of seconds for before they can view their video of choice. This is great news if you are a marketer as it will allow you to reach out to viewers on video’s that are relevant to your brand/product/service, however for those that are viewing the sheer amount of ads can be off-putting.
Vimeo: As a paid subscription service and even the limited free package, you won’t have to view or show viewers ads, which means that your videos are more likely to be seen in their entirety not abandoned due to advertisements.
4 Updating video
YouTube: If you upload videos to YouTube you do not have the same benefits as the only way to amend a video is to take it down, delete it and re-upload a new one. This unfortunately takes with it any statistics such as views that you have gained. If you do choose YouTube for your videos then do make sure you check everything vigorously before you upload it as there’s no way to change it.
Vimeo: Occasionally an uploaded video may need some changes made. This could be due to changes to the offer you have or you have noticed something else that needs amending. With Vimeo if you need to update a video you can do so without losing the statistics it has already gained, which is great news if you notice an error later down the line or need to add or take something away.
Conclusion
When it comes down to making the final decision between using YouTube or Vimeo you will need to look at the type of audience you want to attract. With Vimeo you are more likely to attract creators and film makers, whereas with YouTube you will have a bigger audience to target which gives you a better chance of a higher rank on search engines.
Ollie Mattison
Ollie Mattison is a writer and a lover of all things video.
Follow @Ollie Mattison
Enhancing Your YouTube Content: Basic Premiere Pro Edits
How to Edit YouTube Videos in Adobe Premiere

Richard Bennett
Mar 27, 2024• Proven solutions
You just made a few videos, and you want to edit them first before uploading to YouTube. The truth is that you may find the editing part a bit more challenging compared to uploading. However, there are now tools like Adobe Premiere that can help make the editing process easier. Read on and learn how to edit YouTube videos with Adobe Premier so that you can create amazing videos.
Related article:Adobe Premiere User Guide
Adobe Premiere is largely targeted towards professional users, and the best alternative you can use today, whether you are a professional user or just a casual YouTube user, is Wondershare Filmora . This is not only a highly effective video editing program, but it is also user-friendly and very easy to use.
 Download Mac Version ](https://tools.techidaily.com/wondershare/filmora/download/ )
Adobe is well known for having some of the leading video production tools in the industry. In fact, most of their tools ranging from the Premier Pro and Photoshop to Audition and many others have been used in many video and movie productions, including some of the popular theatrical releases of our times. Their latest professional video editor, Adobe Premier can be summarized as one of the best editors with versatility, depth, and power for high-quality video editing.
How to edit YouTube Videos with Adobe Premier
Step 1: Import the Video Clips
The first step in how to edit YouTube videos with Adobe Premier is to basically import the video clips you want to edit. This is achieved using a simple process of clicking “import” from the “file” drop-down menu. Once you have finished importing your photos or video files, you can then drag them from the sidebar and into the editing area.

Note
- If the videos you want to import are already published online, you can start the process by first downloading them directly from YouTube first, making sure to save them as MP4 files.
- The best way of importing videos from YouTube is by using an innovative video converter like Wondershare Video Converter Ultimate. This program will help in downloading and converting files to a format that is supported by Adobe Premier.
Step 2: Editing
The next step in how edit YouTube videos with Adobe Premiere is to start modifying the video files or photos the way you want. To achieve this, click on “Effects Control” and apply the desired effects. If you want to insert some text or words into your video, select “title” and then click “new title.” Now choose how you would like the words to behave, for instance, “Default Roll” makes the text roll upwards in the page.
Now drag the text that you have created into the editor area. If you want to edit the text, simply double-click to select it, and it will bring up a separate page where you can make further edits. You can then modify the text, font, and the positioning as well. This page also allows you to set whether the text will crawl or roll.

The final part of the process is to import your chosen audio file. This could be the chosen soundtrack for your presentation. Simply drag the audio file onto your editor. You can then modify how the length of your videos or photos by selecting and dragging the specific photo or video. Finally, press enter and your video will start rendering.
Step 3: Save the Edited File and Upload to YouTube
It is important to note that even as you edit YouTube videos with Adobe Premier, the software does not allow direct uploads to YouTube. This means you will need to save the edited file first on your computer and ensure you use a YouTube supported format. The most effective option is to use the codec, which will then save your file in the MPEG-4 format. This is the preferred format for YouTube and Video uploads.
Richard Bennett
Richard Bennett is a writer and a lover of all things video.
Follow @Richard Bennett
Richard Bennett
Mar 27, 2024• Proven solutions
You just made a few videos, and you want to edit them first before uploading to YouTube. The truth is that you may find the editing part a bit more challenging compared to uploading. However, there are now tools like Adobe Premiere that can help make the editing process easier. Read on and learn how to edit YouTube videos with Adobe Premier so that you can create amazing videos.
Related article:Adobe Premiere User Guide
Adobe Premiere is largely targeted towards professional users, and the best alternative you can use today, whether you are a professional user or just a casual YouTube user, is Wondershare Filmora . This is not only a highly effective video editing program, but it is also user-friendly and very easy to use.
Download Mac Version ](https://tools.techidaily.com/wondershare/filmora/download/ )
Adobe is well known for having some of the leading video production tools in the industry. In fact, most of their tools ranging from the Premier Pro and Photoshop to Audition and many others have been used in many video and movie productions, including some of the popular theatrical releases of our times. Their latest professional video editor, Adobe Premier can be summarized as one of the best editors with versatility, depth, and power for high-quality video editing.
How to edit YouTube Videos with Adobe Premier
Step 1: Import the Video Clips
The first step in how to edit YouTube videos with Adobe Premier is to basically import the video clips you want to edit. This is achieved using a simple process of clicking “import” from the “file” drop-down menu. Once you have finished importing your photos or video files, you can then drag them from the sidebar and into the editing area.
Note
- If the videos you want to import are already published online, you can start the process by first downloading them directly from YouTube first, making sure to save them as MP4 files.
- The best way of importing videos from YouTube is by using an innovative video converter like Wondershare Video Converter Ultimate. This program will help in downloading and converting files to a format that is supported by Adobe Premier.
Step 2: Editing
The next step in how edit YouTube videos with Adobe Premiere is to start modifying the video files or photos the way you want. To achieve this, click on “Effects Control” and apply the desired effects. If you want to insert some text or words into your video, select “title” and then click “new title.” Now choose how you would like the words to behave, for instance, “Default Roll” makes the text roll upwards in the page.
Now drag the text that you have created into the editor area. If you want to edit the text, simply double-click to select it, and it will bring up a separate page where you can make further edits. You can then modify the text, font, and the positioning as well. This page also allows you to set whether the text will crawl or roll.
The final part of the process is to import your chosen audio file. This could be the chosen soundtrack for your presentation. Simply drag the audio file onto your editor. You can then modify how the length of your videos or photos by selecting and dragging the specific photo or video. Finally, press enter and your video will start rendering.
Step 3: Save the Edited File and Upload to YouTube
It is important to note that even as you edit YouTube videos with Adobe Premier, the software does not allow direct uploads to YouTube. This means you will need to save the edited file first on your computer and ensure you use a YouTube supported format. The most effective option is to use the codec, which will then save your file in the MPEG-4 format. This is the preferred format for YouTube and Video uploads.
Richard Bennett
Richard Bennett is a writer and a lover of all things video.
Follow @Richard Bennett
Also read:
- [New] Channel Gain Strategies for YouTube Aspirants
- [New] Evaluating Radiant Qualities of HD Lighting
- [Updated] Breaking Down LG's 360 Camera Updates & Features
- [Updated] Culinary Comrades YouTube's Best Food Blogs
- [Updated] In 2024, 10 Innovative Ideas to Shield Your Webcam
- [Updated] Riding the Wave Strategies for High-Likes TikTok Unpacking Videos
- 2024 Approved Easy Guide to YouTube Livestreaming From Google Meet
- Download the Latest Epson Perfection V39 Scanner Drivers for Windows 7, 8 & 10
- Forgotten The Voicemail Password Of Xiaomi 13T Pro? Try These Fixes
- Mastering the Fix for 'NTLDR Is Absent' BSOD Problem on PC: Effective Strategies and Solutions
- Perfecting Your Channel's Visual Impact A Comprehensive YT Banner & Art Guide
- Quick Cure for That Persistent Green Pixel Problem (Mac Edition)
- The Roadmap to YouTube Fame Accruing More Subscribers
- The Ultimate How-To for Your YouTube Music Collection
- The Visionary's Toolkit for Personalized Animation Techniques
- Unleashing Creativity in YouTube Banner & Thumbnail Design
- VR and the Future of Teaching Strategies
- Title: Content Distribution Excellence Vimeo vs YouTube
- Author: Brian
- Created at : 2024-12-03 04:32:34
- Updated at : 2024-12-09 17:22:45
- Link: https://youtube-video-recordings.techidaily.com/content-distribution-excellence-vimeo-vs-youtube/
- License: This work is licensed under CC BY-NC-SA 4.0.