
"Content Creators' Preferences Vimeo or YouTube?"
Content Creators’ Preferences: Vimeo or YouTube?
Vimeo vs YouTube: Which is Better?

Ollie Mattison
Mar 27, 2024• Proven solutions
Lots of people nowadays use videos to share with people all around the world. Two of the main platforms are YouTube and Vimeo. This article tells you the difference between both so that you can decide which the best platform is for you. Whether you are a marketer, video producer or gamer you will find the information useful to find your target audience easily.
Also read:
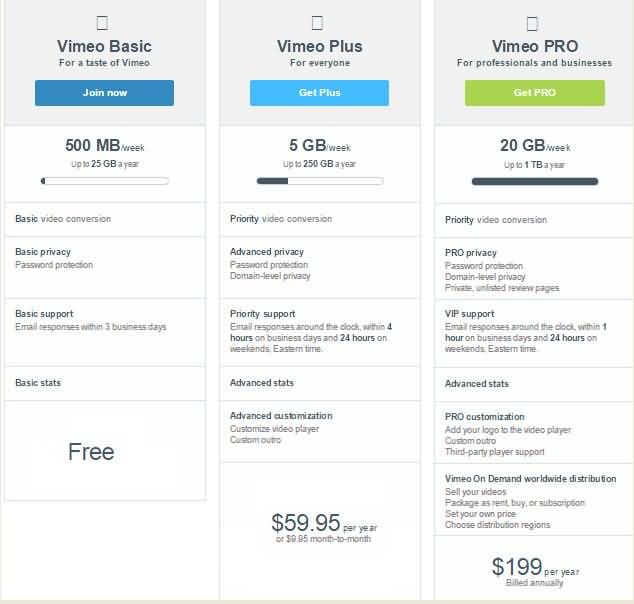
Vimeo Basic, Vimeo Plus or Vimeo Pro: Which is Right for You?
Please watch the video below for more information:
Detailed View of YouTube and Vimeo
1 Communities
YouTube: When it comes to users YouTube comes out on top with over a billion views each and every month. You are able to interact with your viewers by using the comments and people are able to follow you so that they are notified of new videos and comments. As there is already a huge following on YouTube it’s easy to get a good following if you have great content. It’s harder to control public content which is a downside to using YouTube and there is very little customer support. With the comments being moderated rarely it can cause a distraction from your video. Businesses tend to internally block YouTube video’s which means you won’t get the viewings from people on their lunch breaks.

Vimeo: With higher quality content and no advertisements video owners can quickly build a valid following and gain comments from people that are contributing high value information. You have more detailed analytics which makes it easier to see where you are going wrong should you not have the following you want and you are able to use your own domain. With Google owning YouTube you are unlikely to get the same exposure you would, however the followers tend to be valid giving you a real idea of where you are going right or wrong. Because of the higher quality followers you are less likely to get negative or abusive comments when you use Vimeo, however it is a paid subscription with each tier giving you more space to upload.
2 Membership
YouTube: YouTube on the other hand is free for all to use because the main focus is getting their equity through advertisements. There is however the option to take out a subscription which is known as YouTube Red. This lets you watch as many video’s as you want without having to view the ads and also gets you the ability to download so you don’t have to go online to view your favourite videos, a music app and original programming facilities.
Vimeo: There are 4 different membership options with Vimeo allowing you to tailor it to your needs; there is the basic, plus, pro and business. The higher the cost, the greater level of support and storage capacity you will get. There is a free membership available but you will only be able to use up to 500MB each week.
3 Advertising
YouTube: What makes YouTube free is the fact they get their money from the advertisements they put not only on their sites but before video’s that people have to watch a set amount of seconds for before they can view their video of choice. This is great news if you are a marketer as it will allow you to reach out to viewers on video’s that are relevant to your brand/product/service, however for those that are viewing the sheer amount of ads can be off-putting.

Vimeo: As a paid subscription service and even the limited free package, you won’t have to view or show viewers ads, which means that your videos are more likely to be seen in their entirety not abandoned due to advertisements.
4 Updating video
YouTube: If you upload videos to YouTube you do not have the same benefits as the only way to amend a video is to take it down, delete it and re-upload a new one. This unfortunately takes with it any statistics such as views that you have gained. If you do choose YouTube for your videos then do make sure you check everything vigorously before you upload it as there’s no way to change it.
Vimeo: Occasionally an uploaded video may need some changes made. This could be due to changes to the offer you have or you have noticed something else that needs amending. With Vimeo if you need to update a video you can do so without losing the statistics it has already gained, which is great news if you notice an error later down the line or need to add or take something away.
Conclusion
When it comes down to making the final decision between using YouTube or Vimeo you will need to look at the type of audience you want to attract. With Vimeo you are more likely to attract creators and film makers, whereas with YouTube you will have a bigger audience to target which gives you a better chance of a higher rank on search engines.
Ollie Mattison
Ollie Mattison is a writer and a lover of all things video.
Follow @Ollie Mattison
Ollie Mattison
Mar 27, 2024• Proven solutions
Lots of people nowadays use videos to share with people all around the world. Two of the main platforms are YouTube and Vimeo. This article tells you the difference between both so that you can decide which the best platform is for you. Whether you are a marketer, video producer or gamer you will find the information useful to find your target audience easily.
Also read:
Vimeo Basic, Vimeo Plus or Vimeo Pro: Which is Right for You?
Please watch the video below for more information:
Detailed View of YouTube and Vimeo
1 Communities
YouTube: When it comes to users YouTube comes out on top with over a billion views each and every month. You are able to interact with your viewers by using the comments and people are able to follow you so that they are notified of new videos and comments. As there is already a huge following on YouTube it’s easy to get a good following if you have great content. It’s harder to control public content which is a downside to using YouTube and there is very little customer support. With the comments being moderated rarely it can cause a distraction from your video. Businesses tend to internally block YouTube video’s which means you won’t get the viewings from people on their lunch breaks.
Vimeo: With higher quality content and no advertisements video owners can quickly build a valid following and gain comments from people that are contributing high value information. You have more detailed analytics which makes it easier to see where you are going wrong should you not have the following you want and you are able to use your own domain. With Google owning YouTube you are unlikely to get the same exposure you would, however the followers tend to be valid giving you a real idea of where you are going right or wrong. Because of the higher quality followers you are less likely to get negative or abusive comments when you use Vimeo, however it is a paid subscription with each tier giving you more space to upload.
2 Membership
YouTube: YouTube on the other hand is free for all to use because the main focus is getting their equity through advertisements. There is however the option to take out a subscription which is known as YouTube Red. This lets you watch as many video’s as you want without having to view the ads and also gets you the ability to download so you don’t have to go online to view your favourite videos, a music app and original programming facilities.
Vimeo: There are 4 different membership options with Vimeo allowing you to tailor it to your needs; there is the basic, plus, pro and business. The higher the cost, the greater level of support and storage capacity you will get. There is a free membership available but you will only be able to use up to 500MB each week.
3 Advertising
YouTube: What makes YouTube free is the fact they get their money from the advertisements they put not only on their sites but before video’s that people have to watch a set amount of seconds for before they can view their video of choice. This is great news if you are a marketer as it will allow you to reach out to viewers on video’s that are relevant to your brand/product/service, however for those that are viewing the sheer amount of ads can be off-putting.
Vimeo: As a paid subscription service and even the limited free package, you won’t have to view or show viewers ads, which means that your videos are more likely to be seen in their entirety not abandoned due to advertisements.
4 Updating video
YouTube: If you upload videos to YouTube you do not have the same benefits as the only way to amend a video is to take it down, delete it and re-upload a new one. This unfortunately takes with it any statistics such as views that you have gained. If you do choose YouTube for your videos then do make sure you check everything vigorously before you upload it as there’s no way to change it.
Vimeo: Occasionally an uploaded video may need some changes made. This could be due to changes to the offer you have or you have noticed something else that needs amending. With Vimeo if you need to update a video you can do so without losing the statistics it has already gained, which is great news if you notice an error later down the line or need to add or take something away.
Conclusion
When it comes down to making the final decision between using YouTube or Vimeo you will need to look at the type of audience you want to attract. With Vimeo you are more likely to attract creators and film makers, whereas with YouTube you will have a bigger audience to target which gives you a better chance of a higher rank on search engines.
Ollie Mattison
Ollie Mattison is a writer and a lover of all things video.
Follow @Ollie Mattison
IDevice Integration for Streamlined YouTube Video Uploads
Create High-Quality Video - Wondershare Filmora
An easy and powerful YouTube video editor
Numerous video and audio effects to choose from
Detailed tutorials provided by the official channel
Initially, iOS users had the option to load videos directly to YouTube via the tap-to-upload feature. However, this option is missing in the recent iOS devices versions. Therefore, many users search for possible ways to post a video on YouTube from iPhone. For this, you have to put some considerations into place before moving on. The video title length should not exceed 100 characters, while the description is maintained at 5,000 characters. Also, ensure the video length doesn’t exceed 15 minutes. Let’s roll out the best ways to upload your videos and make that big catch on subscribers.

In this article
01 [ How to upload a video to YouTube from iPhone or iPad](#Part 1)
02 [Why your phone doesn’t post videos to YouTube](#Part 2)
03 [Make your YouTube video better with Filmora](#Part 3)
How to upload a video to YouTube from iPhone or iPad
Are you ready to start on that big adventure and share your videos on YouTube? Follow these steps to learn how to upload a video to YouTube from your iPhone.
Method 1: Upload using the YouTube iOS app
Using the YouTube app is the simplest way to upload your YouTube videos. The YouTube app should be installed on your iOS device.
Step 1. Launch the YouTube app on your device, then sign in to your account. If you don’t have an account yet, you will need to “Sign up” for a new one before continuing the upload process.
Step 2. Click on the “+” icon found at the bottom of the screen.
Step 3. Then choose the “Upload a video” option from the populated list of options.
Step 4. Check out the pop-up that appears and “Allow access” to it.
Step 5. Edit your video to your preference by trimming or cropping as you desire. Then click on the “Next” option.

Step 6. Add “title and description” to your video. Remember, the title should contain less than 100 characters and the description no more than 500 characters.
Step 7. Then set the visibility mode as “Public” to enable you to share your video over the internet.
Step 8. Click on the “Upload” button to finally upload your video to YouTube.

Method 2: Upload using Photo App
The Photo App has a “Share” option that you can use to upload your videos to YouTube. Here is the guide.
Step 1. Go to your iOS device and tap on the “Photos” app.
Step 2. Then tap on the “Videos Folder” to locate the video you wish to upload to YouTube.

Step 3. Next, tap on the video that you want to upload.
Step 4. Then tap on the “Share” icon located at the bottom left of your iOS device screen.
Step 5. You’ll then access a “Share” menu from where you have various share options for your video.
Step 6. Choose the “YouTube” option to continue to share your video there. At this juncture, ensure you have logged in to your Google Account.

Step 7. You need to provide a “Title” and “Description” of your video. Then go to the “Privacy” Options and make your video “Public.”
Step 8. Finally, tap on the “Publish” tab found at the top-right corner of your screen to make your video viewable by the public.

Method 3: Upload video to YouTube using Safari
Safari is another alternative method to upload a video to YouTube.
Step 1. First, go to “youtube.com” on Safari and sign in.

Step 2. Then tap on the “account” icon at the top right side of the screen.
Step 3. Hit on the “Upload” icon and wait to be redirected to the YouTube Studio desktop site.
Step 4. Click on the “Select Files” option.
Step 5. Choose the video you wish to add to YouTube from the “Photo” library and tap on the “Add” button.

Step 6. Add your video’s “title and description” and hit the “Next” button.
Step 7. Tap on the “Next” button once more to go to the “Visibility” page.
Step 8. Select the “Public” option to upload your video to the public.
Why your phone doesn’t post videos to YouTube
Despite learning how to upload to YouTube from iPhone, you may be perplexed to realize that your phone refuses to post videos to YouTube. What could be the reason?
1) YouTube issues
In most cases, the problem doesn’t arise from your phone but from YouTube. This streaming app may also experience some hitches along the way. Remember that even if your phone sync with your YouTube account to upload videos from the “Camera Roll,” YouTube isn’t managed from the Camera Roll but the YouTube app directly. You can solve the issue by signing out of your YouTube account and signing back in.
2) Connection Strength
Some videos may appear quite large and cause a time-out during the upload process. Check your Wi-Fi or internet connection strength to determine if it needs a boost or wait until the streaming strength is strong for a quick upload. Test your internet speed by searching “internet test speed” on Google. Then click the “Run Speed Test” in the search box. A window will open and give you an estimate of the Mbps that your connection is operating at. If too low, switch to other alternatives.
3) Verify your YouTube account
Verifying your account will help you to enjoy YouTube’s full features. It’s then that you’ll manage to upload videos without any drawbacks. Also, that’s when you’ll manage to upload longer videos that go beyond the 15-minute duration.
4) Pay attention to the video size
There is a limit for videos to post to YouTube. If it is too large or long, the upload will cancel before completion.
5) Be patient
YouTube can save your partial upload for 24 hours. So, you can continue to upload from where you left. Learn to be patient as there could be a surge of user traffic, especially during evenings.
Make your YouTube video better with Filmora
Good video quality will make you go miles ahead of your marketing gig. You can use Filmora mobile application to make your videos look better before uploading them to YouTube. This intuitive video editing app has advanced features and several ways to compose creative videos.
- Stunning video effects that let you add animated text to video
- Easily record your voice-overs with its perfect sound effects
- Split functionality that allows you to slice your video footage into two or more separate video clips
- Playback your clips in reverse and adjust the speed for fast or slow motion
- Select the best aspect ratio for your video
- Advanced camera to create emoji selfies and other video beautification
- Directly share your videos to social media sites like YouTube and Facebook.
Check out the steps to edit your video with Filmora on your iOS device
Step 1. Download and install Filmora
For iOS devices, go to the “Apple Store” to download and install the app. Also, allow it to access your videos, camera, and pictures in the process.
Step 2. Import video
You may already have a video in your library that you wish to upload to YouTube. Nonetheless, you can shoot a video afresh to add. To shoot one, you need to settle on a topic before recording and downloading other images you may need. Ensure you watch what you are filming and use adequate lighting during the shooting process.
Next, begin to import your video file. Just open the application and select the “Create new video” option. Then choose the “Video” icon and select a folder that contains the video to be added. Hit the “Add” button from the bottom right corner.
Step 3. Edit video
Filmora has several editing features to make your video better. Use the “Edit tools” feature to turn your video into an impeccable piece. Easily add filters, adjust the speed, or create subtitles, among other functions. You can also split, trim, or delete the unwanted clip parts.
It is important to add a title and description to your video. Just use the “Titles” button to add the title. Other precepts that you can add include transitions, sound like voice-over,
Step 4. Export and share
You’ve just finished creating and editing your video. Click on the “Save” tab and let the application export your video. Then select the “Save to Camera Roll” option to save the video to your iPhone. Finally, you can upload and share the video directly to your YouTube account.
Conclusion
● However, it appears to be a difficult task; you must have found relief after going through these procedures. You don’t need prior knowledge on how to upload a video to YouTube from your iPhone. Several options are at your disposal. You can use the Safari, YouTube app, or the Photo app to upload your videos. The better part is that you can create top-notch videos with Filmora. This mobile video editing app has a lot to offer, ensuring quality content.
Initially, iOS users had the option to load videos directly to YouTube via the tap-to-upload feature. However, this option is missing in the recent iOS devices versions. Therefore, many users search for possible ways to post a video on YouTube from iPhone. For this, you have to put some considerations into place before moving on. The video title length should not exceed 100 characters, while the description is maintained at 5,000 characters. Also, ensure the video length doesn’t exceed 15 minutes. Let’s roll out the best ways to upload your videos and make that big catch on subscribers.
In this article
01 [ How to upload a video to YouTube from iPhone or iPad](#Part 1)
02 [Why your phone doesn’t post videos to YouTube](#Part 2)
03 [Make your YouTube video better with Filmora](#Part 3)
How to upload a video to YouTube from iPhone or iPad
Are you ready to start on that big adventure and share your videos on YouTube? Follow these steps to learn how to upload a video to YouTube from your iPhone.
Method 1: Upload using the YouTube iOS app
Using the YouTube app is the simplest way to upload your YouTube videos. The YouTube app should be installed on your iOS device.
Step 1. Launch the YouTube app on your device, then sign in to your account. If you don’t have an account yet, you will need to “Sign up” for a new one before continuing the upload process.
Step 2. Click on the “+” icon found at the bottom of the screen.
Step 3. Then choose the “Upload a video” option from the populated list of options.
Step 4. Check out the pop-up that appears and “Allow access” to it.
Step 5. Edit your video to your preference by trimming or cropping as you desire. Then click on the “Next” option.
Step 6. Add “title and description” to your video. Remember, the title should contain less than 100 characters and the description no more than 500 characters.
Step 7. Then set the visibility mode as “Public” to enable you to share your video over the internet.
Step 8. Click on the “Upload” button to finally upload your video to YouTube.
Method 2: Upload using Photo App
The Photo App has a “Share” option that you can use to upload your videos to YouTube. Here is the guide.
Step 1. Go to your iOS device and tap on the “Photos” app.
Step 2. Then tap on the “Videos Folder” to locate the video you wish to upload to YouTube.
Step 3. Next, tap on the video that you want to upload.
Step 4. Then tap on the “Share” icon located at the bottom left of your iOS device screen.
Step 5. You’ll then access a “Share” menu from where you have various share options for your video.
Step 6. Choose the “YouTube” option to continue to share your video there. At this juncture, ensure you have logged in to your Google Account.
Step 7. You need to provide a “Title” and “Description” of your video. Then go to the “Privacy” Options and make your video “Public.”
Step 8. Finally, tap on the “Publish” tab found at the top-right corner of your screen to make your video viewable by the public.
Method 3: Upload video to YouTube using Safari
Safari is another alternative method to upload a video to YouTube.
Step 1. First, go to “youtube.com” on Safari and sign in.
Step 2. Then tap on the “account” icon at the top right side of the screen.
Step 3. Hit on the “Upload” icon and wait to be redirected to the YouTube Studio desktop site.
Step 4. Click on the “Select Files” option.
Step 5. Choose the video you wish to add to YouTube from the “Photo” library and tap on the “Add” button.
Step 6. Add your video’s “title and description” and hit the “Next” button.
Step 7. Tap on the “Next” button once more to go to the “Visibility” page.
Step 8. Select the “Public” option to upload your video to the public.
Why your phone doesn’t post videos to YouTube
Despite learning how to upload to YouTube from iPhone, you may be perplexed to realize that your phone refuses to post videos to YouTube. What could be the reason?
1) YouTube issues
In most cases, the problem doesn’t arise from your phone but from YouTube. This streaming app may also experience some hitches along the way. Remember that even if your phone sync with your YouTube account to upload videos from the “Camera Roll,” YouTube isn’t managed from the Camera Roll but the YouTube app directly. You can solve the issue by signing out of your YouTube account and signing back in.
2) Connection Strength
Some videos may appear quite large and cause a time-out during the upload process. Check your Wi-Fi or internet connection strength to determine if it needs a boost or wait until the streaming strength is strong for a quick upload. Test your internet speed by searching “internet test speed” on Google. Then click the “Run Speed Test” in the search box. A window will open and give you an estimate of the Mbps that your connection is operating at. If too low, switch to other alternatives.
3) Verify your YouTube account
Verifying your account will help you to enjoy YouTube’s full features. It’s then that you’ll manage to upload videos without any drawbacks. Also, that’s when you’ll manage to upload longer videos that go beyond the 15-minute duration.
4) Pay attention to the video size
There is a limit for videos to post to YouTube. If it is too large or long, the upload will cancel before completion.
5) Be patient
YouTube can save your partial upload for 24 hours. So, you can continue to upload from where you left. Learn to be patient as there could be a surge of user traffic, especially during evenings.
Make your YouTube video better with Filmora
Good video quality will make you go miles ahead of your marketing gig. You can use Filmora mobile application to make your videos look better before uploading them to YouTube. This intuitive video editing app has advanced features and several ways to compose creative videos.
- Stunning video effects that let you add animated text to video
- Easily record your voice-overs with its perfect sound effects
- Split functionality that allows you to slice your video footage into two or more separate video clips
- Playback your clips in reverse and adjust the speed for fast or slow motion
- Select the best aspect ratio for your video
- Advanced camera to create emoji selfies and other video beautification
- Directly share your videos to social media sites like YouTube and Facebook.
Check out the steps to edit your video with Filmora on your iOS device
Step 1. Download and install Filmora
For iOS devices, go to the “Apple Store” to download and install the app. Also, allow it to access your videos, camera, and pictures in the process.
Step 2. Import video
You may already have a video in your library that you wish to upload to YouTube. Nonetheless, you can shoot a video afresh to add. To shoot one, you need to settle on a topic before recording and downloading other images you may need. Ensure you watch what you are filming and use adequate lighting during the shooting process.
Next, begin to import your video file. Just open the application and select the “Create new video” option. Then choose the “Video” icon and select a folder that contains the video to be added. Hit the “Add” button from the bottom right corner.
Step 3. Edit video
Filmora has several editing features to make your video better. Use the “Edit tools” feature to turn your video into an impeccable piece. Easily add filters, adjust the speed, or create subtitles, among other functions. You can also split, trim, or delete the unwanted clip parts.
It is important to add a title and description to your video. Just use the “Titles” button to add the title. Other precepts that you can add include transitions, sound like voice-over,
Step 4. Export and share
You’ve just finished creating and editing your video. Click on the “Save” tab and let the application export your video. Then select the “Save to Camera Roll” option to save the video to your iPhone. Finally, you can upload and share the video directly to your YouTube account.
Conclusion
● However, it appears to be a difficult task; you must have found relief after going through these procedures. You don’t need prior knowledge on how to upload a video to YouTube from your iPhone. Several options are at your disposal. You can use the Safari, YouTube app, or the Photo app to upload your videos. The better part is that you can create top-notch videos with Filmora. This mobile video editing app has a lot to offer, ensuring quality content.
Also read:
- A Comprehensive List of 8 Authentic Propagation Tools
- In 2024, Cutting-Edge Techniques for Aspiring YouTube Game Streamers
- Flip the Script on Classic Films, #7 List
- Optimize Video Quality Turning ON AV1 in YouTube Settings
- Tactics for Making YouTube Videos Go Viral
- 2024 Approved Elevating Your YouTube Presence with Customized Subtitles
- Stream YouTube in the Background Using iPhone & Android
- [Updated] Crafting Your Custom YouTube Subscriber URL
- [New] Beyond the Algorithm Top 27 Alternative Streaming Services Reviewed
- [New] Effortless Shuffle of Your YouTube Playlists
- The Key to Successful Collaborations in the Digital Age
- [New] Analyzing Why YouTube Features Specific Comments
- Five Ideas of Winter YouTube Background to Warm Up Your Videos
- 2024 Approved Captivating Viewers YouTubers’ Guide to Dynamic Game Sessions
- YouTube Channel Art How to Make Banners, Icons, and Thumbnails?
- Expert Calls Merging YouTube & Sustainable Backgrounds
- [Updated] Content Curation YouTube Vs. TikTok Showdown
- Trustworthy Tactics for Multiplying a Million Views on YouTube
- In 2024, Chart a Course for Success Top 5 Effective Video Marketing Strategies on YouTube
- [New] E-Gaming Economy YouTube Income Horizon 2024
- 2024 Approved Crafting Captivating Haul Vlogs for Online Fame
- Elite Collection of Online Video Grabbers & Savers for 2024
- [New] Critical Components Affecting YouTube Video Scores
- [Updated] Crafting Captivating YouTube Closures - Expert Guides Included
- Can You Lawfully Archive YouTube Content?
- Enhancing Video Signals with YouTube Cards
- Ranking 8 Proven Online Promotion Techniques for Videos
- How to Custom Your YouTube Channel URL – Super Easy
- 2024 Approved Elevating Engagement Strategic Use of Youtube Titles
- The Path to YouTube Gaming Popularity
- 2024 Approved Best Screen Replayer for High-Impact YouTubing Experience
- Maximizing Subscribers YouTube's Expansion Blueprint
- Discover the 10 YT Channels with Swift Ascendancy and Intellect
- 2024 Approved Enjoy Uninterrupted Viewing Top 20 YouTube Download Apps
- Architects of Online Marvel Adventures
- 2024 Approved Cutting Through the Clutter How to Stream Top-Notch Upside-Down Content on Youtube
- [New] Amassing Audiences and Assets Launching a Livestream Business
- [Updated] Elevate Visibility, Maximize Views - SEO for Videos
- In 2024, Download YouTube Beats on Android The Ultimate 6-App Guide
- In 2024, Building Interest with Budget-Friendly YouTube Video Intros
- [New] How to Easily Add Subtitles and Closed Captions to YouTube Video
- Decoding the Art of YouTube Playlist Recalibration
- In 2024, Content Curation YouTube Vs. TikTok Showdown
- Unveiling the Process Making High-Impact Educational Videos on YouTube
- New Unlock Your Creative Potential Best Free Software to Produce Music on PC & Mac, 2023 Edition
- [Updated] Pioneering the Path to Financial Independence on Social Media Platforms
- Updated 2024 Approved How to Make a Video a Live Photo
- How to Lock Apps on Itel P40 to Protect Your Individual Information
- In 2024, How I Transferred Messages from Nokia C210 to iPhone 12/XS (Max) in Seconds | Dr.fone
- Pokémon Go Cooldown Chart On Samsung Galaxy Z Flip 5 | Dr.fone
- How to Reset Samsung Galaxy M14 4G Without the Home Button | Dr.fone
- Ultimate Guide to Catch the Regional-Located Pokemon For Lava Blaze Curve 5G | Dr.fone
- [Updated] In 2024, Embedded Recorder Usage in Huawei's Mate Series and the P Lineup.
- Turning Off Two Factor Authentication From Apple iPhone 13 mini? 5 Tips You Must Know
- Updated Dont Let Lag Hold You Back Top 8 Fast Video Editing Software
- MP4 Video Repair Tool - Repair corrupt, damaged, unplayable video files of Google
- [Updated] SeamlessCapture W10's Simple Recording Tool for 2024
- In 2024, 7 Fixes to No GPS - Showing Approximate Location on Apple iPhone 8 Waze | Dr.fone
- How To Bypass iCloud Activation Lock on Mac For iPhone XR?
- [Updated] 2024 Approved Transforming Engagement on Instagram Top 10 Compelling IGTV Content Concepts for Brands
- In 2024, How To Reset the Security Questions of Your Apple ID From Your iPhone 12
- New Unleash Your Voice Budget-Friendly Tools to Clear Out Background Noise
- New Premier Background Music Remover App Enhance Your Videos for 2024
- [New] 2024 Approved Strategies for Effective Screen Sharing via Skype at Home
- In 2024, How to Remove Find My iPhone without Apple ID On your iPhone 14 Pro Max?
- In 2024, 9 Mind-Blowing Tricks to Hatch Eggs in Pokemon Go Without Walking On Apple iPhone SE (2020) | Dr.fone
- New Sync It Up! Expert Tips for Aligning Video with a Soundtrack in FCPX for 2024
- Title: "Content Creators' Preferences Vimeo or YouTube?"
- Author: Brian
- Created at : 2024-05-25 11:31:35
- Updated at : 2024-05-26 11:31:35
- Link: https://youtube-video-recordings.techidaily.com/content-creators-preferences-vimeo-or-youtube/
- License: This work is licensed under CC BY-NC-SA 4.0.
