
:max_bytes(150000):strip_icc()/emoji-keyboard-57cc58a33df78c71b650ec86.jpg)
"Conquered Everlasting Deactivation of YouTube Shorts for 2024"
Conquered: Everlasting Deactivation of YouTube Shorts
How to Disable/Remove YouTube Shorts Permanently?

Shanoon Cox
Nov 07, 2023• Proven solutions
YouTube Shorts is undoubtedly one of the most trending features, just like TikTok, which has also followed it for many years and created a vast user base. Creating such a short duration video is quick, grabs attention, and gets spread like a fire.
But, do you know that inclusion of YouTube shorts replaces the explore option to make proper adjustments for YouTube Shorts under the application. Not only this, many users dislike getting disturbed by such a short duration video while searching for some beneficial, informative, or detailed information.
If any of such cases, attune with you, and you want to know how to disable YouTube Shorts or remove Shorts from the YouTube platform. Then, this is the right place.
In this article, you will learn the process of disabling YouTube Shorts or removing YouTube shorts permanently. Just remain stick with the guidelines, and soon you will become able to do the same with easy steps.
- Method 1: Three dots option
- Method 2: Settings menu of YouTube
- Method 3: Can go with YouTube browser
- Method 4: Factory reset
- Method 5: Link to downgrade the YouTube
- Method 6: Removing all update
- Method 7: Try YouTube Vanced
Easy Ways to Disable/Remove YouTube Shorts
Now, as you have reached this section, you should be curious, what are the steps or methods with the help of which you would be able to disable YouTube Shorts. Don’t worry. Here, we shall cover all the methods of removing shorts from YouTube in detail.
You can choose either of them as per your suitability or the one which best suits you. Some of these methods are pretty easy to follow, or you might need to follow some steps for some. But the main essence is, following any method will show how to remove shorts from YouTube. So, now go with the methods one by one and follow the guidelines to remove shorts from YouTube.
Method 1: Three dots option
One of the primary things you can do with any short videos is to click on the three dots next to each of such videos if you are not particularly willing to see something. Doing so will open the pop-up window, which will give you the option of “Not interested”. Click on this option. That’s it. Next time, such a video will not appear to you while surfing videos on YouTube.
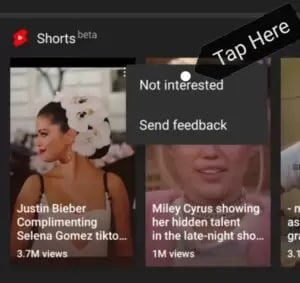
Here, no doubt the method is simple, but this method needs repetitiveness. As, whenever you see Shorts videos, you need to click on three dots to remove that.
Method 2: Settings menu of YouTube
At your YouTube homepage at the top end, you will see the profile icon. If you click on it, that will lead you towards the Settings menu of YouTube.
From there, you need to select “General”, which will show up some options. Here, click on the Shorts option to turn it off.
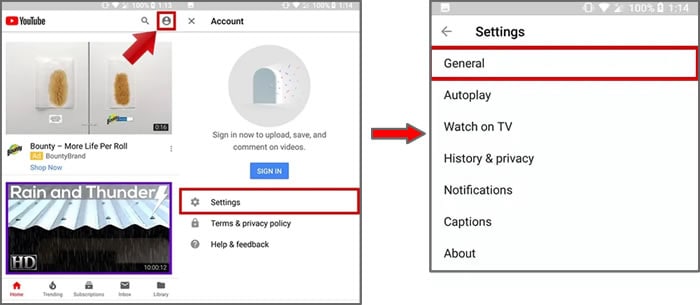
This way, by simply following and managing settings, you can easily disable YouTube shorts from the platform.
Now, restart your device to apply the removal process of YouTube shorts from there entirely. Thus, the next time you open the application, you will find that there exists no such YouTube shorts video as this option will disable YouTube Shorts.
Try Filmora to Create Funny yet Trendy YouTube Shorts!
As a YouTube fan, you can also create interesting video by yourself with Filmora YouTube Video Editor. You can add cool visual effects and popular emojis to decorate your video. Plus, there is a vast media library to add audio and filter! You are free to create popular YouTube Shorts and post it on YouTube or other social media directly.
Create YouTube Shorts Free Create YouTube Shorts Free Learn More >


Method 3: Can go with YouTube browser
Hey guys, there is one more trick. Whenever you want to access YouTube, instead of going through the application, try to open YouTube website either from your mobile or PC browser window. You would wonder why so and what difference it will make. The fact is that the Shorts tab has not yet been incorporated under the browser version of YouTube.
So friends, try this to avoid seeing YouTube Shorts videos either from phone or desktop. This is not only simple but also device-free. And even if you do not have a YouTube application, you can use this trick to solve your concern.
Method 4: Factory reset
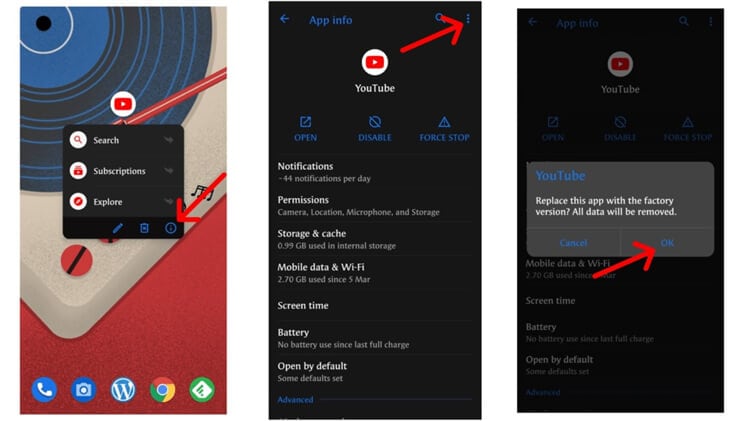
If you disagree with the shorts video and want to get off of it entirely. This trick might help you. For this, visit the YouTube app on your mobile and press on it for some time. Doing so will lead you to the info section under the settings.
When you click on the Uninstall option, the YouTube version will get downgraded to the factory version. This is the version that is a pre-installed version of YouTube that comes with the device.
Also, if you have not updated your YouTube app, then don’t go with that. However, you will receive notifications many times that you should update your application. Just ignore it, especially if you are not willing to add the Shorts video option on your YouTube application.
Method 5: Link to downgrade the YouTube
Friends, for every problem, there exists some solution. And, if you are finding it difficult to factory reset the YouTube, you can download the downgraded version of YouTube. This is the version that does not contain the YouTube Shorts feature. Do like this:
- Visit the Link and download the downgraded version.
- Install by allowing unknown resources also.
- Then, disable the auto-update of the YouTube option also.
Note: While downloading and installing this version, you need to allow installation from unknown sources.
Filmora YouTube Video Editor
Get started easily with Filmora’s powerful performance, intuitive interface, and countless effects! Create YouTube Shorts with ease!
Make YouTube Shorts Make YouTube Shorts Make YouTube Shorts

Method 6: Removing all update
There exists one more simple trick to understand how to turn off YouTube Shorts. That is to remove all update options. How to do that, follow the below-mentioned steps you can do so.
On your smartphone, open the Settings > Apps or Manage Apps option > choose YouTube app> at the top right end, click on three dots there > click on Uninstall Updates. That will replace your YouTube app with that of the older version of YouTube.
Using this method, you can remove shorts easily from YouTube. And, it is not going to take much amount of time. So, go and follow the steps.
Method 7: Try YouTube Vanced
Wait, the list is not over yet. If none of the previous methods work, try YouTube Vanced, the advanced and premium version of YouTube to get rid of YouTube Shorts. Well, not only that, but YouTube Vanced also comes up with multiple services that you can enjoy along with it, such as disabling YouTube Shorts, blocking ads, stories, or any of the sponsored features.
If not sure how to go about it, then let’s have a look over the following steps that will guide you to get YouTube Vanced.
Step 1: Download YouTube Vanced
First, download the YouTube Vanced application from its website.
Step 2: Install and complete the setup process
After that, complete the installation process and follow the on-screen direction rightly to make it work effectively for you.
Note: If you are downloading from the website, not from the app store, then there might appear the warning. So ignore that and go with the downloading and installation process.
Step 3: Open application and visit settings
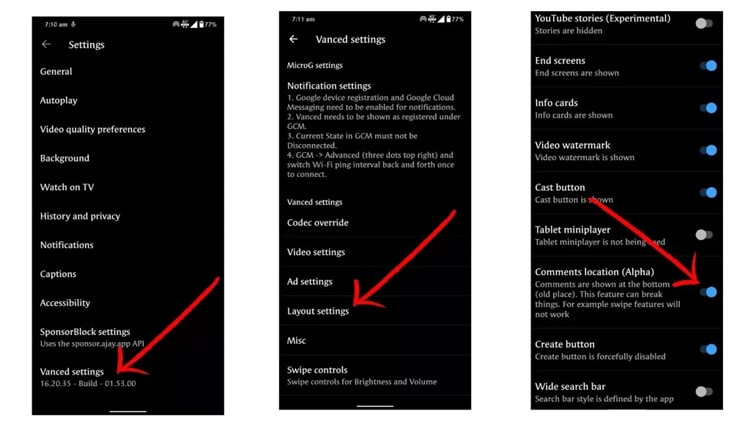
Once you have launched the application, under the settings, you need to go for the Vanced settings option> there opt for “Ad settings” > at the end of the page, switch on the Shorts shelf.
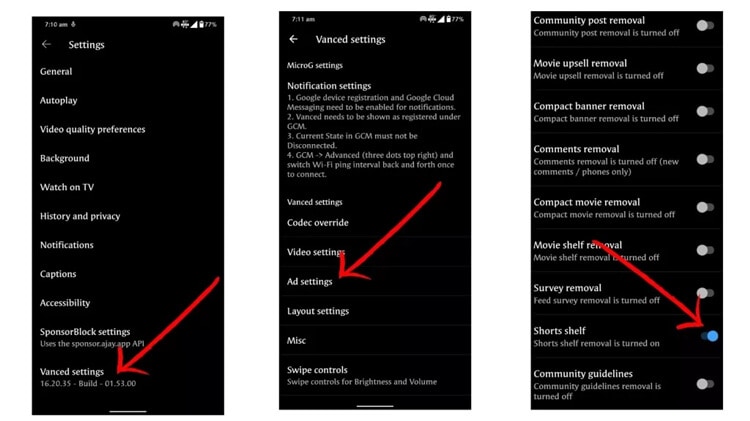
Doing so will disable the YouTube Shorts option from the Home screen.
Alternatively, remove the YouTube Shorts button also from the screen. Under the “Vanced settings” > Visit Layout settings > Switch on the Comments location option. That will further remove the Shorts button from the bottom end of the Home screen of the YouTube page.
Voila, now you can say that you get rid of those shorts videos by removing shorts from YouTube using YouTube Vanced option.
Thus, following the methods mentioned above gives you multiple ways to turn off shorts on YouTube. I hope that now you will be able to use YouTube without any concern or interference of YouTube Shorts videos.
![]()
A cross-platform for making videos anywhere for all creators

Why your video editing isn’t good enough? How about some creative inspo?
- 100 Million+ Users
- 150+ Countries and Regions
- 4 Million+ Social Media Followers
- 5 Million+ Stock Media for Use
* Secure Download

Conclusion
YouTube has always been the favorite choice for many users to explain videos under the same platform just a few steps away. Somehow, the YouTube Shorts will not be a good choice for those dedicated users who always explore YouTube for detailed videos or information.
Thus, keeping that issue in mind, this article assisted with both the ways to turn off YouTube shorts or remove YouTube shorts with simple steps.
So, friends, let’s not wait for anymore. Scroll up the article and get a detailed steps-wise guide and get a good grab of the process. So that your concern will get resolved, and soon you will be able to access the platform with the last look.
Shanoon Cox
Shanoon Cox is a writer and a lover of all things video.
Follow @Shanoon Cox
Shanoon Cox
Nov 07, 2023• Proven solutions
YouTube Shorts is undoubtedly one of the most trending features, just like TikTok, which has also followed it for many years and created a vast user base. Creating such a short duration video is quick, grabs attention, and gets spread like a fire.
But, do you know that inclusion of YouTube shorts replaces the explore option to make proper adjustments for YouTube Shorts under the application. Not only this, many users dislike getting disturbed by such a short duration video while searching for some beneficial, informative, or detailed information.
If any of such cases, attune with you, and you want to know how to disable YouTube Shorts or remove Shorts from the YouTube platform. Then, this is the right place.
In this article, you will learn the process of disabling YouTube Shorts or removing YouTube shorts permanently. Just remain stick with the guidelines, and soon you will become able to do the same with easy steps.
- Method 1: Three dots option
- Method 2: Settings menu of YouTube
- Method 3: Can go with YouTube browser
- Method 4: Factory reset
- Method 5: Link to downgrade the YouTube
- Method 6: Removing all update
- Method 7: Try YouTube Vanced
Easy Ways to Disable/Remove YouTube Shorts
Now, as you have reached this section, you should be curious, what are the steps or methods with the help of which you would be able to disable YouTube Shorts. Don’t worry. Here, we shall cover all the methods of removing shorts from YouTube in detail.
You can choose either of them as per your suitability or the one which best suits you. Some of these methods are pretty easy to follow, or you might need to follow some steps for some. But the main essence is, following any method will show how to remove shorts from YouTube. So, now go with the methods one by one and follow the guidelines to remove shorts from YouTube.
Method 1: Three dots option
One of the primary things you can do with any short videos is to click on the three dots next to each of such videos if you are not particularly willing to see something. Doing so will open the pop-up window, which will give you the option of “Not interested”. Click on this option. That’s it. Next time, such a video will not appear to you while surfing videos on YouTube.
Here, no doubt the method is simple, but this method needs repetitiveness. As, whenever you see Shorts videos, you need to click on three dots to remove that.
Method 2: Settings menu of YouTube
At your YouTube homepage at the top end, you will see the profile icon. If you click on it, that will lead you towards the Settings menu of YouTube.
From there, you need to select “General”, which will show up some options. Here, click on the Shorts option to turn it off.
This way, by simply following and managing settings, you can easily disable YouTube shorts from the platform.
Now, restart your device to apply the removal process of YouTube shorts from there entirely. Thus, the next time you open the application, you will find that there exists no such YouTube shorts video as this option will disable YouTube Shorts.
Try Filmora to Create Funny yet Trendy YouTube Shorts!
As a YouTube fan, you can also create interesting video by yourself with Filmora YouTube Video Editor. You can add cool visual effects and popular emojis to decorate your video. Plus, there is a vast media library to add audio and filter! You are free to create popular YouTube Shorts and post it on YouTube or other social media directly.
Create YouTube Shorts Free Create YouTube Shorts Free Learn More >
Method 3: Can go with YouTube browser
Hey guys, there is one more trick. Whenever you want to access YouTube, instead of going through the application, try to open YouTube website either from your mobile or PC browser window. You would wonder why so and what difference it will make. The fact is that the Shorts tab has not yet been incorporated under the browser version of YouTube.
So friends, try this to avoid seeing YouTube Shorts videos either from phone or desktop. This is not only simple but also device-free. And even if you do not have a YouTube application, you can use this trick to solve your concern.
Method 4: Factory reset
If you disagree with the shorts video and want to get off of it entirely. This trick might help you. For this, visit the YouTube app on your mobile and press on it for some time. Doing so will lead you to the info section under the settings.
When you click on the Uninstall option, the YouTube version will get downgraded to the factory version. This is the version that is a pre-installed version of YouTube that comes with the device.
Also, if you have not updated your YouTube app, then don’t go with that. However, you will receive notifications many times that you should update your application. Just ignore it, especially if you are not willing to add the Shorts video option on your YouTube application.
Method 5: Link to downgrade the YouTube
Friends, for every problem, there exists some solution. And, if you are finding it difficult to factory reset the YouTube, you can download the downgraded version of YouTube. This is the version that does not contain the YouTube Shorts feature. Do like this:
- Visit the Link and download the downgraded version.
- Install by allowing unknown resources also.
- Then, disable the auto-update of the YouTube option also.
Note: While downloading and installing this version, you need to allow installation from unknown sources.
Filmora YouTube Video Editor
Get started easily with Filmora’s powerful performance, intuitive interface, and countless effects! Create YouTube Shorts with ease!
Make YouTube Shorts Make YouTube Shorts Make YouTube Shorts
Method 6: Removing all update
There exists one more simple trick to understand how to turn off YouTube Shorts. That is to remove all update options. How to do that, follow the below-mentioned steps you can do so.
On your smartphone, open the Settings > Apps or Manage Apps option > choose YouTube app> at the top right end, click on three dots there > click on Uninstall Updates. That will replace your YouTube app with that of the older version of YouTube.
Using this method, you can remove shorts easily from YouTube. And, it is not going to take much amount of time. So, go and follow the steps.
Method 7: Try YouTube Vanced
Wait, the list is not over yet. If none of the previous methods work, try YouTube Vanced, the advanced and premium version of YouTube to get rid of YouTube Shorts. Well, not only that, but YouTube Vanced also comes up with multiple services that you can enjoy along with it, such as disabling YouTube Shorts, blocking ads, stories, or any of the sponsored features.
If not sure how to go about it, then let’s have a look over the following steps that will guide you to get YouTube Vanced.
Step 1: Download YouTube Vanced
First, download the YouTube Vanced application from its website.
Step 2: Install and complete the setup process
After that, complete the installation process and follow the on-screen direction rightly to make it work effectively for you.
Note: If you are downloading from the website, not from the app store, then there might appear the warning. So ignore that and go with the downloading and installation process.
Step 3: Open application and visit settings
Once you have launched the application, under the settings, you need to go for the Vanced settings option> there opt for “Ad settings” > at the end of the page, switch on the Shorts shelf.
Doing so will disable the YouTube Shorts option from the Home screen.
Alternatively, remove the YouTube Shorts button also from the screen. Under the “Vanced settings” > Visit Layout settings > Switch on the Comments location option. That will further remove the Shorts button from the bottom end of the Home screen of the YouTube page.
Voila, now you can say that you get rid of those shorts videos by removing shorts from YouTube using YouTube Vanced option.
Thus, following the methods mentioned above gives you multiple ways to turn off shorts on YouTube. I hope that now you will be able to use YouTube without any concern or interference of YouTube Shorts videos.
![]()
A cross-platform for making videos anywhere for all creators
Why your video editing isn’t good enough? How about some creative inspo?
- 100 Million+ Users
- 150+ Countries and Regions
- 4 Million+ Social Media Followers
- 5 Million+ Stock Media for Use
* Secure Download
Conclusion
YouTube has always been the favorite choice for many users to explain videos under the same platform just a few steps away. Somehow, the YouTube Shorts will not be a good choice for those dedicated users who always explore YouTube for detailed videos or information.
Thus, keeping that issue in mind, this article assisted with both the ways to turn off YouTube shorts or remove YouTube shorts with simple steps.
So, friends, let’s not wait for anymore. Scroll up the article and get a detailed steps-wise guide and get a good grab of the process. So that your concern will get resolved, and soon you will be able to access the platform with the last look.
Shanoon Cox
Shanoon Cox is a writer and a lover of all things video.
Follow @Shanoon Cox
The Chef’s Roadmap: Creating Culinary Content
How to Make a Cooking Video in Steps - an Ultimate Guide

Richard Bennett
Mar 27, 2024• Proven solutions
Cooking and food-oriented videos are among the most outreaching and popular categories of content to publish online, notably, on YouTube, Facebook, or Instagram. So if you are a cooking aficionado, you have excellent potential to gain positive attention and a loyal audience. But to create engaging videos, you’d need a lot more than excellent culinary skills. This article aims to enlighten aspiring food and recipe vloggers about the essentials of video making straight out of the oven, to create enriched content that’s professional, neat, and viral-worthy.
- Part 1: What to Prepare Before Making a Recipe Video?
- Part 2: Make a Cooking Video with Filmora: a Step-by-Step Guide
- Part 3: Tips to Make Your Cooking Videos Stand Out
- Part 4: How to Promote Your Cooking Channel on YouTube?
What to Prepare Before Making a Recipe Video
While you would know best about the prep work needed for the recipes, the prep work for making a video starts with a plan. What goes into the plan?
Brainstorm this equation - Main Content + Duration + Light + Sound + Camera + Camera Angle, Shots & Transition.
The main content is how you picture the finished video. Ask yourself - Do you want an intro gig? Are you going to talk in the video or show only hands and the cooking with a piece of background music? How do you wish to present the ingredients? Would there be additional tips? At what platform are you going to publish your content? How long should be your clippings? Consider all these questions to chalk out a basic framework of your video
The camera is a pivotal element. Whether it is a smartphone or a hi-fidelity digital camera, it is worthwhile to familiarise the best positions and light orientations and the capacity of the device to produce the best quality picture.
How is your sound going to be like? If you are going to talk in the video, it is recommended that you use a microphone. Or else, you can also use background sound. But to mix sound with the video, you’d need an excellent sound editing tool.
Finally, comes the editing and finishing part. Eventually, you’ll need purposive video-editing software to help you work out the video transitions, sound, and visual effects.Choose a toolkit that is easy to learn and that you can get comfortable with so that the job of video editing doesn’t take the focus away from the main task of cooking.

Now, once you have all the essential ingredients to create your video, start practicing. Remember that it is the most natural thing for the first videos to appear amateurish or inept. And that is part of the plan. Don’t be disheartened and keep going.
Make a Cooking Video with Filmora: a Step-by-Step Guide
As one of the easiest-to-use video editing tools, the full-featured Filmora is the right choice considering it can fit most of your needs. Moreover, you’d be delighted to know that the software also has a series of features and functions and even tutorial videos dedicated to cooking videos.


Step 1: Filming the Video
Whether you are going to present a traditional cook-with-me style video or feature the contemporary “jump-cut” style focusing on speedy short videos, you need to prepare all the equipment and ingredients to suit the frame by frame shots. Consider spills, drops, overcooking, etc. as part of the process, so keep adequate substitutes to continue with your project unwaveringly. If you are using a phone, keep it fully charged up. And have a plan beforehand about what you should do when you get an urgent call while shooting. Also, consider doing a site investigation of the shooting spot for any fragile items, pointy corners, slippery areas, curious pets, etc. to avoid trips and falls in the middle of the filming, especially when working with a cameraman who’s following your movement. If you are using a tripod, and floor-standing lights, remember to secure the equipment with plenty of adhesive tapes, lest they bump into an expensive trip or fall.
Step 2: mport Your Video In Filmora
You need to sync the device that you used to film the video with the computer that has Filmora installed. It may be a phone or a camcorder. Once the devices are synced, you should launch the Filmora software and go the “Media” button at the top right toolbar. There you will find the “Import” button. You will get a pop-up message asking you to choose the type of device. Select the right one, and your video will be imported in the Filmora interface.
Step 3: Edit Video Pace: Time-Lapse, Jump Cut, Slow Motion
To create crisp, fast-paced videos, you don’t have to gobble up the content eyeing at the duration. Think smart when you have the resources of a tool like Filmora. Here are the three best features that help you create fast-paced yet well-defined recipes.
Time-Lapse: The time-lapse feature allows you to adjust the speed of the video from slow-motion to 10x faster. To use this, double click on a specific clip in your imported video and open the custom speed settings. Use the adjusting meter beside speed to make your clip as fast or slow as you want. You may use the same feature to introduce the slow-motion effects in certain areas of the video.
Now, when you are using either the fast-forward or slow-motion effects, it is best to have stable video footage with consistent lighting and a static background. There are also the options of Reverse Speed that can play the clip backward, as in flash-back. The Ripple edit feature allows you to cut short a long clip seamlessly.
Jump Cut: The Jump Cut is about snipping unwanted areas in the clip. It may sound like the Ripple edit mentioned above, but the ripple edit is more functional for cutting short a continuous video so that the viewer won’t realize the snip. For the Jump Cut, it doesn’t have to be a constant clip. You can get to the next frame or scene with an abracadabra move.
To use Jump Cut, place the cursor over the starting of the clip that you want to cut, and right-click on it and select “Split” (the “scissors” feature on the toolbar does the same thing). To make this look neat, preview the portion of the clip once again and delete the cuts between two clips with the same right-click.
Step 4: Understanding Transitions on Filmora
Transitions make your video more interactive and help you segregate the video from frame-to-frame with effects like dissolve, fade, flash, etc. there are numerous transition options available within the Filmora suit.
The best way to do this drag and drop the clips on the timeline is to trim parts of the clip to shorten it. Once you have all the clips in place, go to the “Transitions” options at the top toolbar to apply it on the end or start of each clip.
Step 5: Audio, Playback & Sound Edits
There are plenty of options that you can remove background noise, add voiceover, add music, and detach audio from video. Refer to the Audios section from your toolbar.
Step 6: Save to Drive/ Emport/ Publish
Once you are satisfied with your content, then go to Export. Choose the format of the video, MOV, MP4, MPG, etc. and whether you wish to publish directly or save to drive.
Tips to Make Your Cooking Videos Stand Out
- Lighting is your best friend. Invest in some quality spotlights or use the best of daylight.
- Mind your video duration. Short and Simple videos get the most views, but your content should not look incomplete. It is not a fact that long and elaborate videos do not get a place on the table; it is all about the relevance of your content. So don’t stop till you get enough.
- If you appear in the video, keep yourself always look good.
- Keep your video titles relevant and prominent, so that people looking for it can readily find it.
- Have a scrumptious custom thumbnail.
How to Promote Your Cooking Channel on YouTube
- Create an inventory before publishing videos. YouTube vlogging is valued for consistency. If you have a list of 10, 15, 20 videos, then you can have enough time in hand to film your next videos.
- Have a consistent style to create brand recognition. Do you think branding is not for Vlogs? Well, I suppose you might be wrong. Branding is for anyone who uses it.
- Share the link of your YouTube videos on other platforms like Twitter and Facebook.
- Encourage your viewers to comment on the video.
- Explore the different YouTube SEO strategies and use the accurate keywords in your video descriptions with hashtags.
With prior planning and practicing, you are bent on developing more confident moves and camera angles. Once you have that, follow this step by step guide to gain speed and prowess and also enjoy the whole adventure.
Richard Bennett
Richard Bennett is a writer and a lover of all things video.
Follow @Richard Bennett
Richard Bennett
Mar 27, 2024• Proven solutions
Cooking and food-oriented videos are among the most outreaching and popular categories of content to publish online, notably, on YouTube, Facebook, or Instagram. So if you are a cooking aficionado, you have excellent potential to gain positive attention and a loyal audience. But to create engaging videos, you’d need a lot more than excellent culinary skills. This article aims to enlighten aspiring food and recipe vloggers about the essentials of video making straight out of the oven, to create enriched content that’s professional, neat, and viral-worthy.
- Part 1: What to Prepare Before Making a Recipe Video?
- Part 2: Make a Cooking Video with Filmora: a Step-by-Step Guide
- Part 3: Tips to Make Your Cooking Videos Stand Out
- Part 4: How to Promote Your Cooking Channel on YouTube?
What to Prepare Before Making a Recipe Video
While you would know best about the prep work needed for the recipes, the prep work for making a video starts with a plan. What goes into the plan?
Brainstorm this equation - Main Content + Duration + Light + Sound + Camera + Camera Angle, Shots & Transition.
The main content is how you picture the finished video. Ask yourself - Do you want an intro gig? Are you going to talk in the video or show only hands and the cooking with a piece of background music? How do you wish to present the ingredients? Would there be additional tips? At what platform are you going to publish your content? How long should be your clippings? Consider all these questions to chalk out a basic framework of your video
The camera is a pivotal element. Whether it is a smartphone or a hi-fidelity digital camera, it is worthwhile to familiarise the best positions and light orientations and the capacity of the device to produce the best quality picture.
How is your sound going to be like? If you are going to talk in the video, it is recommended that you use a microphone. Or else, you can also use background sound. But to mix sound with the video, you’d need an excellent sound editing tool.
Finally, comes the editing and finishing part. Eventually, you’ll need purposive video-editing software to help you work out the video transitions, sound, and visual effects.Choose a toolkit that is easy to learn and that you can get comfortable with so that the job of video editing doesn’t take the focus away from the main task of cooking.
Now, once you have all the essential ingredients to create your video, start practicing. Remember that it is the most natural thing for the first videos to appear amateurish or inept. And that is part of the plan. Don’t be disheartened and keep going.
Make a Cooking Video with Filmora: a Step-by-Step Guide
As one of the easiest-to-use video editing tools, the full-featured Filmora is the right choice considering it can fit most of your needs. Moreover, you’d be delighted to know that the software also has a series of features and functions and even tutorial videos dedicated to cooking videos.
Step 1: Filming the Video
Whether you are going to present a traditional cook-with-me style video or feature the contemporary “jump-cut” style focusing on speedy short videos, you need to prepare all the equipment and ingredients to suit the frame by frame shots. Consider spills, drops, overcooking, etc. as part of the process, so keep adequate substitutes to continue with your project unwaveringly. If you are using a phone, keep it fully charged up. And have a plan beforehand about what you should do when you get an urgent call while shooting. Also, consider doing a site investigation of the shooting spot for any fragile items, pointy corners, slippery areas, curious pets, etc. to avoid trips and falls in the middle of the filming, especially when working with a cameraman who’s following your movement. If you are using a tripod, and floor-standing lights, remember to secure the equipment with plenty of adhesive tapes, lest they bump into an expensive trip or fall.
Step 2: mport Your Video In Filmora
You need to sync the device that you used to film the video with the computer that has Filmora installed. It may be a phone or a camcorder. Once the devices are synced, you should launch the Filmora software and go the “Media” button at the top right toolbar. There you will find the “Import” button. You will get a pop-up message asking you to choose the type of device. Select the right one, and your video will be imported in the Filmora interface.
Step 3: Edit Video Pace: Time-Lapse, Jump Cut, Slow Motion
To create crisp, fast-paced videos, you don’t have to gobble up the content eyeing at the duration. Think smart when you have the resources of a tool like Filmora. Here are the three best features that help you create fast-paced yet well-defined recipes.
Time-Lapse: The time-lapse feature allows you to adjust the speed of the video from slow-motion to 10x faster. To use this, double click on a specific clip in your imported video and open the custom speed settings. Use the adjusting meter beside speed to make your clip as fast or slow as you want. You may use the same feature to introduce the slow-motion effects in certain areas of the video.
Now, when you are using either the fast-forward or slow-motion effects, it is best to have stable video footage with consistent lighting and a static background. There are also the options of Reverse Speed that can play the clip backward, as in flash-back. The Ripple edit feature allows you to cut short a long clip seamlessly.
Jump Cut: The Jump Cut is about snipping unwanted areas in the clip. It may sound like the Ripple edit mentioned above, but the ripple edit is more functional for cutting short a continuous video so that the viewer won’t realize the snip. For the Jump Cut, it doesn’t have to be a constant clip. You can get to the next frame or scene with an abracadabra move.
To use Jump Cut, place the cursor over the starting of the clip that you want to cut, and right-click on it and select “Split” (the “scissors” feature on the toolbar does the same thing). To make this look neat, preview the portion of the clip once again and delete the cuts between two clips with the same right-click.
Step 4: Understanding Transitions on Filmora
Transitions make your video more interactive and help you segregate the video from frame-to-frame with effects like dissolve, fade, flash, etc. there are numerous transition options available within the Filmora suit.
The best way to do this drag and drop the clips on the timeline is to trim parts of the clip to shorten it. Once you have all the clips in place, go to the “Transitions” options at the top toolbar to apply it on the end or start of each clip.
Step 5: Audio, Playback & Sound Edits
There are plenty of options that you can remove background noise, add voiceover, add music, and detach audio from video. Refer to the Audios section from your toolbar.
Step 6: Save to Drive/ Emport/ Publish
Once you are satisfied with your content, then go to Export. Choose the format of the video, MOV, MP4, MPG, etc. and whether you wish to publish directly or save to drive.
Tips to Make Your Cooking Videos Stand Out
- Lighting is your best friend. Invest in some quality spotlights or use the best of daylight.
- Mind your video duration. Short and Simple videos get the most views, but your content should not look incomplete. It is not a fact that long and elaborate videos do not get a place on the table; it is all about the relevance of your content. So don’t stop till you get enough.
- If you appear in the video, keep yourself always look good.
- Keep your video titles relevant and prominent, so that people looking for it can readily find it.
- Have a scrumptious custom thumbnail.
How to Promote Your Cooking Channel on YouTube
- Create an inventory before publishing videos. YouTube vlogging is valued for consistency. If you have a list of 10, 15, 20 videos, then you can have enough time in hand to film your next videos.
- Have a consistent style to create brand recognition. Do you think branding is not for Vlogs? Well, I suppose you might be wrong. Branding is for anyone who uses it.
- Share the link of your YouTube videos on other platforms like Twitter and Facebook.
- Encourage your viewers to comment on the video.
- Explore the different YouTube SEO strategies and use the accurate keywords in your video descriptions with hashtags.
With prior planning and practicing, you are bent on developing more confident moves and camera angles. Once you have that, follow this step by step guide to gain speed and prowess and also enjoy the whole adventure.
Richard Bennett
Richard Bennett is a writer and a lover of all things video.
Follow @Richard Bennett
Also read:
- Elevate Streams Using YouTube's AV1 Settings for 2024
- Dazzle Viewers Visuals on Thumbnails for 2024
- [New] Cutting-Edge Icons and Logos From 6 Innovative Websites
- In 2024, Digital Riches Transitioning YouTube Earnings to Currency
- Boost Engagement Through Best Thumbnail Practices for 2024
- Seamless Content Propagation Beyond YouTube and Facebook
- [New] Decoding YouTube's Payment Scheme
- [New] Boosting Viewership with Animated Subscribe Buttons in Filmora (Easy Guide)
- Top 5 YouTube Video Editor Alternatives for 2024
- Unveiling the Leading YouTube Stations for Daily Headlines
- In 2024, Efficient Techniques for YouTube Shorts Revenue
- [Updated] Check Your YouTube Channels for Accurate Monetization Practices
- 2024 Approved Best YouTube Video Ideas to Spark Inspiration [For YouTube Channels]
- In 2024, Beyond BingeWatching The Best Non-YouTube Platforms for Videos
- Delicious Dynamos YouTubers for Your Food Journey
- [Updated] Cutting-Edge Voice Altering Apps for Vloggers
- Crafting Motivational Life Vlogs for Fan Engagement
- Reverse Engineering a YouTube Ban
- Enhancing YouTube Music Soundscape
- In 2024, Command the YouTube Stage Mastering Visibility Through Tactics
- Preventing Total Loss of Image in Streaming Videos on YouTube
- In 2024, Create Professional Minecraft Graphics
- [Updated] Audience Engagement Where to Captivate Viewers
- How to Live Stream on YouTube Gaming?
- 2024 Approved Best Screen Replayer for High-Impact YouTubing Experience
- Crafting YouTube Success by Uploading From Twitch Streams for 2024
- Top Earner YouTube Star - Global Leader
- Break Bot Patterns, Enhance Organic Video Reach for 2024
- [New] Deciding on the Best Videography Camera Type DSLR or Mirrorless?
- In 2024, Behind the Scenes Top Tactics for Consistent Vlogging
- [New] Contrasting Copyright Clauses in Youtube & the Freedom of CC
- In 2024, Essential 8 Mirrorless Cams for Professional Videographers
- The Ultimate Networking Haven Beyond VidCon
- Charting the Course for YouTube Music Uploads
- [New] 5 Winter YouTube Background Ideas to Warm Up Your Videos
- [Updated] Break It Down Free Techniques to Go Frame by Frame on YouTube
- In 2024, Demystifying Income Flow to Creators Within the Short Video Model
- 2024 Approved Ensuring Earning Potential on YouTubers
- From Scratch Building a Lighthearted Image Meme
- [Updated] Quick Guide Capturing Moments with Snap in Real-Time Conferencing
- Journey of Joyrides Top 6 Easy MC Habitats Revealed
- In 2024, All You Need To Know About Mega Greninja For Oppo A79 5G | Dr.fone
- New The Best Explainer Video Makers for Businesses for 2024
- [Updated] In 2024, How to Change Name in Google Meet?
- 2024 Approved A Step-by-Step Approach to Popularizing Instagram Posts
- [Updated] Boost Engagement with Free Intro Templates
- In 2024, Your Wayback Machine Facebook’s Story Archives at Your Service
- [New] In 2024, Unlock the Magic of Stories in FB – Free, Cross-Platform Tools
- How to Enable, Disable, and Change Safari Location on Apple iPhone 11 Pro | Dr.fone
- How to Unlock iPhone 13 Pro Without Passcode?
- [Updated] Facebook's Inverse Image Labyrinth - Navigate with These 3 Methods for 2024
- 11 Proven Solutions to Fix Google Play Store Not Working Issue on Honor 90 Lite | Dr.fone
- In 2024, Step-by-Step Tutorial How To Bypass Samsung Galaxy Z Flip 5 FRP
- How To Recover Data from Apple iPhone SE (2020)? | Dr.fone
- 2024 Approved Mastering PPT A Comprehensive Voice Guidance Manual
- Updated Say Goodbye to Adobe 10 Best Linux Video Editors
- This is how you can recover deleted pictures from C300.
- How Do You Get Sun Stone Evolutions in Pokémon For Realme 10T 5G? | Dr.fone
- In 2024, Premier Zero-Cost Facebook Video/Image Craftsman
- In 2024, AudioTrack Evaluation
- Proven Ways to Fix There Was A Problem Parsing the Package on Honor Magic 6 Lite | Dr.fone
- Title: "Conquered Everlasting Deactivation of YouTube Shorts for 2024"
- Author: Brian
- Created at : 2024-05-25 11:31:21
- Updated at : 2024-05-26 11:31:21
- Link: https://youtube-video-recordings.techidaily.com/conquered-everlasting-deactivation-of-youtube-shorts-for-2024/
- License: This work is licensed under CC BY-NC-SA 4.0.
