
:max_bytes(150000):strip_icc():format(webp)/woman-with-remote-cropped-getty-169707531-5b2ebd5943a1030036b1eb56.jpg)
"Comprehensible Guide to High-Quality Audios on YouTube"
Comprehensible Guide to High-Quality Audios on YouTube
How to Edit Audio on YouTube

Richard Bennett
Mar 27, 2024• Proven solutions
In this article, we are going to show you how to edit audio with YouTube Video Editor, and the tips on adding your own audio file to YouTube.
- Part 1: Add your Own Audio File to YouTube Video
- Part 2: How to Edit Audio with YouTube Video Editor
Part 1: Add your Own Audio File to YouTube Video
Tools You Are Going to Need
YouTube video editor is far from meeting the needs of people who want to have more control on their audio. On the bright side, if you are interested in learning how to edit audio on YouTube, there is a solution. There are many video editors in the market that allow you to add your own music or audio files to a video. Windows Movie Maker, iMovie, Adobe Premiere, and Magisto are some of the video editors available for you to choose from. In this guide, we recommend the Wondershare Filmora video editor. Below is a quick tutorial about how to edit audio in Filmora.
 Download Mac Version ](https://tools.techidaily.com/wondershare/filmora/download/ )
Why Should You Choose Wondershare Filmora?
There are many advantages associated with the use of Wondershare Filmora. You will see that it allows you to fully edit any audio file and gain 100% control over your files. It is an integrated solution that lacks nothing in terms of efficiency and quality standards. To be more specific, Filmora offers the following unique features:
- Built-in audio editing tools that allow you to gain full control of your audio in an easy way
- Exclusive audio track that enables you to mute, detach or even de-noise the audio from video
- All audio effects can easily be adjusted with one click only
- The built-in Equalizer is capable enough to create amazing audio effects
- Directly upload your video to YouTube, Facebook or Vimeo from Wondershare Filmora
How to add audio files to YouTube video with Wondershare Filmora
Do you want to know more about audio editing? Please read this article: How to add audio to video.
Step 1 Import Video Clips into Filmora
Filmora supports a wide range of video formats, such as MKV, MOV, AVI, WebM and MP4, you can import the video clip shot with Camera, smartphone or camcorder easily to it.
Step 2 Detach Audio
If you want to edit the original audio of the video, you can choose to split the audio file from the video by using the Audio Detach option on Wondershare Filmora. Then, the audio file will be shown in the audio track, and you can cut or trim it.

Note: If you do not want to keep the original audio file in the video, you can delete it from the audio track directly.
Step 3Add Audio Files
Wondershare Filmora offers you multiple royalty free audio effects and music in its rich audio library. What is more, you can also import your own music or audio file from your computer or iTunes. Of course, you should know that the audio should be royalty free for you to make use of. In a different situation, you cannot upload it and benefit from its quality and nature.
Step 4Edit Audio
In this step, you can adjust the audio volume and pitch, etc. There are multiple options for you to benefit from, including the Audio Equalizer, Music, Mix Audio. In this way, you can make sure that the audio is exactly like you have wanted it to be. For further information as to how you can improve the sound quality of your recorded videos, you can check out: How to improve sound quality of recorded videos.
Step 5Save Your Work and Upload on YouTube
If you are satisfied with your work on the audio file and you wish to publish it, the process is quite simple. You just hit Export and select to upload the video to YouTube. After signing in to your YouTube account, you will be ready to start uploading the audio file.

In case you wish to edit the audio from an already published video, you have to download the video first. Then, you can follow the steps above to edit the audio file in Filmora. As one of the widely used video editing software for YouTubers, Filmora is here to empower your imagination. Just download the free trial version and try it now.

Part 2: How to Edit Audio with YouTube Video Editor
Unfortunately, YouTube does not allow users to upload audio files such as MP3, WAV, etc. Instead, you can only upload audio files which are offered by YouTube in the first place. Since YouTube has got a plentiful audio library, you can find a lot of audio there. In this part, we will show you how to add and edit audio with YouTube Video Editor.
You may also like: How to Add Music to YouTube Videos >>
Note: From 20th September 2017 users will no longer be able to use the complimentary editing suite. Check the best YouTube video editor alternatives from this complete guide. In the following part, I will show you how to add audio track , replace the original audio and adjust the audio position and length as well.
- Step 1: Sign in to your YouTube account
- **Step 2:**Click your profile avatar and select Creator Studio option.
- Step 3: In the left pane, go to Video Manager and then click Videos. In the Videos list, choose the video that you want to add new audio track, and then select Audio from the Edit button.

- Step 4: Now you can add or replace the audio in your video. Here you will find that there are various songs and audio files you can choose from. Click ADD TO VIDEO and the audio track will be added to the video directly.

- Step 5: Now you will see the audio track appears at the bottom of the player. Here you can trim and drag the audio bar to adjust the audio positon and length. To Trim the audio, click the beginning or the end of the audio bar and then drag it to the left or right. After trimming, drag it to meet the target position.

Conclusion
Normally, it would be better to add and edit audio to video before updating to YouTube. In this case, Filmora is highly recommended as one of the best video editor for YouTubers , which provides some royalty free music sound in the Music Library to choose from and also the audio editing tools like remove background noise from the video, add fade in and fade out effects with ease or play the video backward or fast forward.
Richard Bennett
Richard Bennett is a writer and a lover of all things video.
Follow @Richard Bennett
Richard Bennett
Mar 27, 2024• Proven solutions
In this article, we are going to show you how to edit audio with YouTube Video Editor, and the tips on adding your own audio file to YouTube.
- Part 1: Add your Own Audio File to YouTube Video
- Part 2: How to Edit Audio with YouTube Video Editor
Part 1: Add your Own Audio File to YouTube Video
Tools You Are Going to Need
YouTube video editor is far from meeting the needs of people who want to have more control on their audio. On the bright side, if you are interested in learning how to edit audio on YouTube, there is a solution. There are many video editors in the market that allow you to add your own music or audio files to a video. Windows Movie Maker, iMovie, Adobe Premiere, and Magisto are some of the video editors available for you to choose from. In this guide, we recommend the Wondershare Filmora video editor. Below is a quick tutorial about how to edit audio in Filmora.
Download Mac Version ](https://tools.techidaily.com/wondershare/filmora/download/ )
Why Should You Choose Wondershare Filmora?
There are many advantages associated with the use of Wondershare Filmora. You will see that it allows you to fully edit any audio file and gain 100% control over your files. It is an integrated solution that lacks nothing in terms of efficiency and quality standards. To be more specific, Filmora offers the following unique features:
- Built-in audio editing tools that allow you to gain full control of your audio in an easy way
- Exclusive audio track that enables you to mute, detach or even de-noise the audio from video
- All audio effects can easily be adjusted with one click only
- The built-in Equalizer is capable enough to create amazing audio effects
- Directly upload your video to YouTube, Facebook or Vimeo from Wondershare Filmora
How to add audio files to YouTube video with Wondershare Filmora
Do you want to know more about audio editing? Please read this article: How to add audio to video.
Step 1 Import Video Clips into Filmora
Filmora supports a wide range of video formats, such as MKV, MOV, AVI, WebM and MP4, you can import the video clip shot with Camera, smartphone or camcorder easily to it.
Step 2 Detach Audio
If you want to edit the original audio of the video, you can choose to split the audio file from the video by using the Audio Detach option on Wondershare Filmora. Then, the audio file will be shown in the audio track, and you can cut or trim it.
Note: If you do not want to keep the original audio file in the video, you can delete it from the audio track directly.
Step 3Add Audio Files
Wondershare Filmora offers you multiple royalty free audio effects and music in its rich audio library. What is more, you can also import your own music or audio file from your computer or iTunes. Of course, you should know that the audio should be royalty free for you to make use of. In a different situation, you cannot upload it and benefit from its quality and nature.
Step 4Edit Audio
In this step, you can adjust the audio volume and pitch, etc. There are multiple options for you to benefit from, including the Audio Equalizer, Music, Mix Audio. In this way, you can make sure that the audio is exactly like you have wanted it to be. For further information as to how you can improve the sound quality of your recorded videos, you can check out: How to improve sound quality of recorded videos.
Step 5Save Your Work and Upload on YouTube
If you are satisfied with your work on the audio file and you wish to publish it, the process is quite simple. You just hit Export and select to upload the video to YouTube. After signing in to your YouTube account, you will be ready to start uploading the audio file.
In case you wish to edit the audio from an already published video, you have to download the video first. Then, you can follow the steps above to edit the audio file in Filmora. As one of the widely used video editing software for YouTubers, Filmora is here to empower your imagination. Just download the free trial version and try it now.
Part 2: How to Edit Audio with YouTube Video Editor
Unfortunately, YouTube does not allow users to upload audio files such as MP3, WAV, etc. Instead, you can only upload audio files which are offered by YouTube in the first place. Since YouTube has got a plentiful audio library, you can find a lot of audio there. In this part, we will show you how to add and edit audio with YouTube Video Editor.
You may also like: How to Add Music to YouTube Videos >>
Note: From 20th September 2017 users will no longer be able to use the complimentary editing suite. Check the best YouTube video editor alternatives from this complete guide. In the following part, I will show you how to add audio track , replace the original audio and adjust the audio position and length as well.
- Step 1: Sign in to your YouTube account
- **Step 2:**Click your profile avatar and select Creator Studio option.
- Step 3: In the left pane, go to Video Manager and then click Videos. In the Videos list, choose the video that you want to add new audio track, and then select Audio from the Edit button.
- Step 4: Now you can add or replace the audio in your video. Here you will find that there are various songs and audio files you can choose from. Click ADD TO VIDEO and the audio track will be added to the video directly.
- Step 5: Now you will see the audio track appears at the bottom of the player. Here you can trim and drag the audio bar to adjust the audio positon and length. To Trim the audio, click the beginning or the end of the audio bar and then drag it to the left or right. After trimming, drag it to meet the target position.
Conclusion
Normally, it would be better to add and edit audio to video before updating to YouTube. In this case, Filmora is highly recommended as one of the best video editor for YouTubers , which provides some royalty free music sound in the Music Library to choose from and also the audio editing tools like remove background noise from the video, add fade in and fade out effects with ease or play the video backward or fast forward.
Richard Bennett
Richard Bennett is a writer and a lover of all things video.
Follow @Richard Bennett
Lifelong Banishment Process for Compact YouTube Videos
How to Disable/Remove YouTube Shorts Permanently?

Shanoon Cox
Nov 07, 2023• Proven solutions
YouTube Shorts is undoubtedly one of the most trending features, just like TikTok, which has also followed it for many years and created a vast user base. Creating such a short duration video is quick, grabs attention, and gets spread like a fire.
But, do you know that inclusion of YouTube shorts replaces the explore option to make proper adjustments for YouTube Shorts under the application. Not only this, many users dislike getting disturbed by such a short duration video while searching for some beneficial, informative, or detailed information.
If any of such cases, attune with you, and you want to know how to disable YouTube Shorts or remove Shorts from the YouTube platform. Then, this is the right place.
In this article, you will learn the process of disabling YouTube Shorts or removing YouTube shorts permanently. Just remain stick with the guidelines, and soon you will become able to do the same with easy steps.
- Method 1: Three dots option
- Method 2: Settings menu of YouTube
- Method 3: Can go with YouTube browser
- Method 4: Factory reset
- Method 5: Link to downgrade the YouTube
- Method 6: Removing all update
- Method 7: Try YouTube Vanced
Easy Ways to Disable/Remove YouTube Shorts
Now, as you have reached this section, you should be curious, what are the steps or methods with the help of which you would be able to disable YouTube Shorts. Don’t worry. Here, we shall cover all the methods of removing shorts from YouTube in detail.
You can choose either of them as per your suitability or the one which best suits you. Some of these methods are pretty easy to follow, or you might need to follow some steps for some. But the main essence is, following any method will show how to remove shorts from YouTube. So, now go with the methods one by one and follow the guidelines to remove shorts from YouTube.
Method 1: Three dots option
One of the primary things you can do with any short videos is to click on the three dots next to each of such videos if you are not particularly willing to see something. Doing so will open the pop-up window, which will give you the option of “Not interested”. Click on this option. That’s it. Next time, such a video will not appear to you while surfing videos on YouTube.
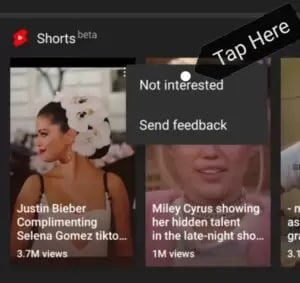
Here, no doubt the method is simple, but this method needs repetitiveness. As, whenever you see Shorts videos, you need to click on three dots to remove that.
Method 2: Settings menu of YouTube
At your YouTube homepage at the top end, you will see the profile icon. If you click on it, that will lead you towards the Settings menu of YouTube.
From there, you need to select “General”, which will show up some options. Here, click on the Shorts option to turn it off.
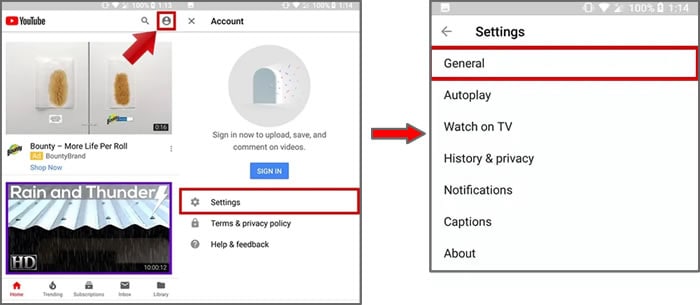
This way, by simply following and managing settings, you can easily disable YouTube shorts from the platform.
Now, restart your device to apply the removal process of YouTube shorts from there entirely. Thus, the next time you open the application, you will find that there exists no such YouTube shorts video as this option will disable YouTube Shorts.
Try Filmora to Create Funny yet Trendy YouTube Shorts!
As a YouTube fan, you can also create interesting video by yourself with Filmora YouTube Video Editor. You can add cool visual effects and popular emojis to decorate your video. Plus, there is a vast media library to add audio and filter! You are free to create popular YouTube Shorts and post it on YouTube or other social media directly.
Create YouTube Shorts Free Create YouTube Shorts Free Learn More >


Method 3: Can go with YouTube browser
Hey guys, there is one more trick. Whenever you want to access YouTube, instead of going through the application, try to open YouTube website either from your mobile or PC browser window. You would wonder why so and what difference it will make. The fact is that the Shorts tab has not yet been incorporated under the browser version of YouTube.
So friends, try this to avoid seeing YouTube Shorts videos either from phone or desktop. This is not only simple but also device-free. And even if you do not have a YouTube application, you can use this trick to solve your concern.
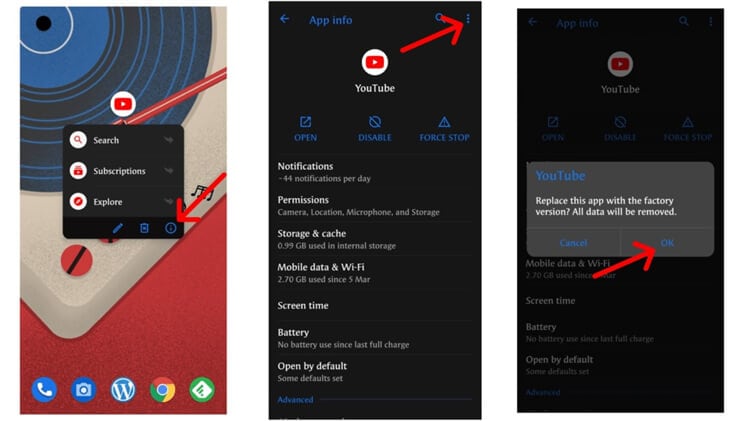
Method 4: Factory reset
If you disagree with the shorts video and want to get off of it entirely. This trick might help you. For this, visit the YouTube app on your mobile and press on it for some time. Doing so will lead you to the info section under the settings.
When you click on the Uninstall option, the YouTube version will get downgraded to the factory version. This is the version that is a pre-installed version of YouTube that comes with the device.
Also, if you have not updated your YouTube app, then don’t go with that. However, you will receive notifications many times that you should update your application. Just ignore it, especially if you are not willing to add the Shorts video option on your YouTube application.
Method 5: Link to downgrade the YouTube
Friends, for every problem, there exists some solution. And, if you are finding it difficult to factory reset the YouTube, you can download the downgraded version of YouTube. This is the version that does not contain the YouTube Shorts feature. Do like this:
- Visit the Link and download the downgraded version.
- Install by allowing unknown resources also.
- Then, disable the auto-update of the YouTube option also.
Note: While downloading and installing this version, you need to allow installation from unknown sources.
Filmora YouTube Video Editor
Get started easily with Filmora’s powerful performance, intuitive interface, and countless effects! Create YouTube Shorts with ease!
Make YouTube Shorts Make YouTube Shorts Make YouTube Shorts

Method 6: Removing all update
There exists one more simple trick to understand how to turn off YouTube Shorts. That is to remove all update options. How to do that, follow the below-mentioned steps you can do so.
On your smartphone, open the Settings > Apps or Manage Apps option > choose YouTube app> at the top right end, click on three dots there > click on Uninstall Updates. That will replace your YouTube app with that of the older version of YouTube.
Using this method, you can remove shorts easily from YouTube. And, it is not going to take much amount of time. So, go and follow the steps.
Method 7: Try YouTube Vanced
Wait, the list is not over yet. If none of the previous methods work, try YouTube Vanced, the advanced and premium version of YouTube to get rid of YouTube Shorts. Well, not only that, but YouTube Vanced also comes up with multiple services that you can enjoy along with it, such as disabling YouTube Shorts, blocking ads, stories, or any of the sponsored features.
If not sure how to go about it, then let’s have a look over the following steps that will guide you to get YouTube Vanced.
Step 1: Download YouTube Vanced
First, download the YouTube Vanced application from its website.
Step 2: Install and complete the setup process
After that, complete the installation process and follow the on-screen direction rightly to make it work effectively for you.
Note: If you are downloading from the website, not from the app store, then there might appear the warning. So ignore that and go with the downloading and installation process.
Step 3: Open application and visit settings
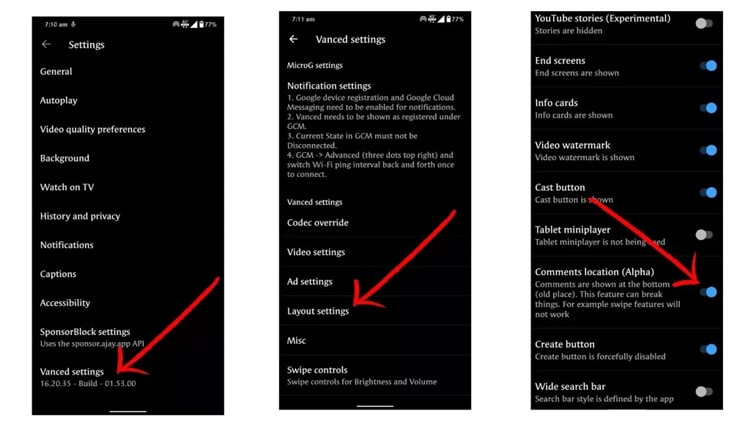
Once you have launched the application, under the settings, you need to go for the Vanced settings option> there opt for “Ad settings” > at the end of the page, switch on the Shorts shelf.
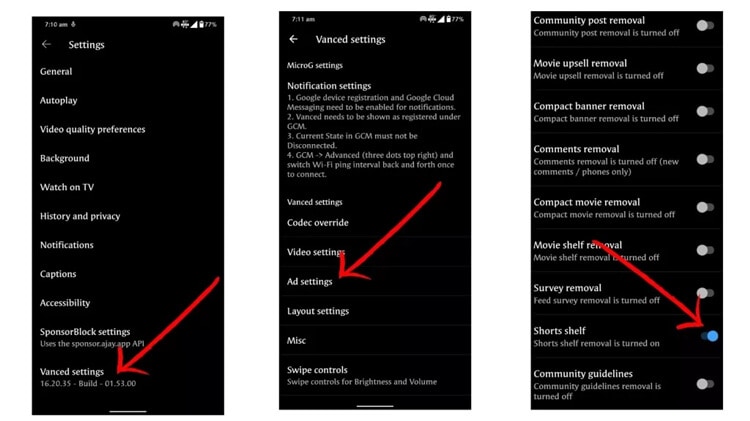
Doing so will disable the YouTube Shorts option from the Home screen.
Alternatively, remove the YouTube Shorts button also from the screen. Under the “Vanced settings” > Visit Layout settings > Switch on the Comments location option. That will further remove the Shorts button from the bottom end of the Home screen of the YouTube page.
Voila, now you can say that you get rid of those shorts videos by removing shorts from YouTube using YouTube Vanced option.
Thus, following the methods mentioned above gives you multiple ways to turn off shorts on YouTube. I hope that now you will be able to use YouTube without any concern or interference of YouTube Shorts videos.
![]()
A cross-platform for making videos anywhere for all creators

Why your video editing isn’t good enough? How about some creative inspo?
- 100 Million+ Users
- 150+ Countries and Regions
- 4 Million+ Social Media Followers
- 5 Million+ Stock Media for Use
* Secure Download

Conclusion
YouTube has always been the favorite choice for many users to explain videos under the same platform just a few steps away. Somehow, the YouTube Shorts will not be a good choice for those dedicated users who always explore YouTube for detailed videos or information.
Thus, keeping that issue in mind, this article assisted with both the ways to turn off YouTube shorts or remove YouTube shorts with simple steps.
So, friends, let’s not wait for anymore. Scroll up the article and get a detailed steps-wise guide and get a good grab of the process. So that your concern will get resolved, and soon you will be able to access the platform with the last look.
Shanoon Cox
Shanoon Cox is a writer and a lover of all things video.
Follow @Shanoon Cox
Shanoon Cox
Nov 07, 2023• Proven solutions
YouTube Shorts is undoubtedly one of the most trending features, just like TikTok, which has also followed it for many years and created a vast user base. Creating such a short duration video is quick, grabs attention, and gets spread like a fire.
But, do you know that inclusion of YouTube shorts replaces the explore option to make proper adjustments for YouTube Shorts under the application. Not only this, many users dislike getting disturbed by such a short duration video while searching for some beneficial, informative, or detailed information.
If any of such cases, attune with you, and you want to know how to disable YouTube Shorts or remove Shorts from the YouTube platform. Then, this is the right place.
In this article, you will learn the process of disabling YouTube Shorts or removing YouTube shorts permanently. Just remain stick with the guidelines, and soon you will become able to do the same with easy steps.
- Method 1: Three dots option
- Method 2: Settings menu of YouTube
- Method 3: Can go with YouTube browser
- Method 4: Factory reset
- Method 5: Link to downgrade the YouTube
- Method 6: Removing all update
- Method 7: Try YouTube Vanced
Easy Ways to Disable/Remove YouTube Shorts
Now, as you have reached this section, you should be curious, what are the steps or methods with the help of which you would be able to disable YouTube Shorts. Don’t worry. Here, we shall cover all the methods of removing shorts from YouTube in detail.
You can choose either of them as per your suitability or the one which best suits you. Some of these methods are pretty easy to follow, or you might need to follow some steps for some. But the main essence is, following any method will show how to remove shorts from YouTube. So, now go with the methods one by one and follow the guidelines to remove shorts from YouTube.
Method 1: Three dots option
One of the primary things you can do with any short videos is to click on the three dots next to each of such videos if you are not particularly willing to see something. Doing so will open the pop-up window, which will give you the option of “Not interested”. Click on this option. That’s it. Next time, such a video will not appear to you while surfing videos on YouTube.
Here, no doubt the method is simple, but this method needs repetitiveness. As, whenever you see Shorts videos, you need to click on three dots to remove that.
Method 2: Settings menu of YouTube
At your YouTube homepage at the top end, you will see the profile icon. If you click on it, that will lead you towards the Settings menu of YouTube.
From there, you need to select “General”, which will show up some options. Here, click on the Shorts option to turn it off.
This way, by simply following and managing settings, you can easily disable YouTube shorts from the platform.
Now, restart your device to apply the removal process of YouTube shorts from there entirely. Thus, the next time you open the application, you will find that there exists no such YouTube shorts video as this option will disable YouTube Shorts.
Try Filmora to Create Funny yet Trendy YouTube Shorts!
As a YouTube fan, you can also create interesting video by yourself with Filmora YouTube Video Editor. You can add cool visual effects and popular emojis to decorate your video. Plus, there is a vast media library to add audio and filter! You are free to create popular YouTube Shorts and post it on YouTube or other social media directly.
Create YouTube Shorts Free Create YouTube Shorts Free Learn More >
Method 3: Can go with YouTube browser
Hey guys, there is one more trick. Whenever you want to access YouTube, instead of going through the application, try to open YouTube website either from your mobile or PC browser window. You would wonder why so and what difference it will make. The fact is that the Shorts tab has not yet been incorporated under the browser version of YouTube.
So friends, try this to avoid seeing YouTube Shorts videos either from phone or desktop. This is not only simple but also device-free. And even if you do not have a YouTube application, you can use this trick to solve your concern.
Method 4: Factory reset
If you disagree with the shorts video and want to get off of it entirely. This trick might help you. For this, visit the YouTube app on your mobile and press on it for some time. Doing so will lead you to the info section under the settings.
When you click on the Uninstall option, the YouTube version will get downgraded to the factory version. This is the version that is a pre-installed version of YouTube that comes with the device.
Also, if you have not updated your YouTube app, then don’t go with that. However, you will receive notifications many times that you should update your application. Just ignore it, especially if you are not willing to add the Shorts video option on your YouTube application.
Method 5: Link to downgrade the YouTube
Friends, for every problem, there exists some solution. And, if you are finding it difficult to factory reset the YouTube, you can download the downgraded version of YouTube. This is the version that does not contain the YouTube Shorts feature. Do like this:
- Visit the Link and download the downgraded version.
- Install by allowing unknown resources also.
- Then, disable the auto-update of the YouTube option also.
Note: While downloading and installing this version, you need to allow installation from unknown sources.
Filmora YouTube Video Editor
Get started easily with Filmora’s powerful performance, intuitive interface, and countless effects! Create YouTube Shorts with ease!
Make YouTube Shorts Make YouTube Shorts Make YouTube Shorts
Method 6: Removing all update
There exists one more simple trick to understand how to turn off YouTube Shorts. That is to remove all update options. How to do that, follow the below-mentioned steps you can do so.
On your smartphone, open the Settings > Apps or Manage Apps option > choose YouTube app> at the top right end, click on three dots there > click on Uninstall Updates. That will replace your YouTube app with that of the older version of YouTube.
Using this method, you can remove shorts easily from YouTube. And, it is not going to take much amount of time. So, go and follow the steps.
Method 7: Try YouTube Vanced
Wait, the list is not over yet. If none of the previous methods work, try YouTube Vanced, the advanced and premium version of YouTube to get rid of YouTube Shorts. Well, not only that, but YouTube Vanced also comes up with multiple services that you can enjoy along with it, such as disabling YouTube Shorts, blocking ads, stories, or any of the sponsored features.
If not sure how to go about it, then let’s have a look over the following steps that will guide you to get YouTube Vanced.
Step 1: Download YouTube Vanced
First, download the YouTube Vanced application from its website.
Step 2: Install and complete the setup process
After that, complete the installation process and follow the on-screen direction rightly to make it work effectively for you.
Note: If you are downloading from the website, not from the app store, then there might appear the warning. So ignore that and go with the downloading and installation process.
Step 3: Open application and visit settings
Once you have launched the application, under the settings, you need to go for the Vanced settings option> there opt for “Ad settings” > at the end of the page, switch on the Shorts shelf.
Doing so will disable the YouTube Shorts option from the Home screen.
Alternatively, remove the YouTube Shorts button also from the screen. Under the “Vanced settings” > Visit Layout settings > Switch on the Comments location option. That will further remove the Shorts button from the bottom end of the Home screen of the YouTube page.
Voila, now you can say that you get rid of those shorts videos by removing shorts from YouTube using YouTube Vanced option.
Thus, following the methods mentioned above gives you multiple ways to turn off shorts on YouTube. I hope that now you will be able to use YouTube without any concern or interference of YouTube Shorts videos.
![]()
A cross-platform for making videos anywhere for all creators
Why your video editing isn’t good enough? How about some creative inspo?
- 100 Million+ Users
- 150+ Countries and Regions
- 4 Million+ Social Media Followers
- 5 Million+ Stock Media for Use
* Secure Download
Conclusion
YouTube has always been the favorite choice for many users to explain videos under the same platform just a few steps away. Somehow, the YouTube Shorts will not be a good choice for those dedicated users who always explore YouTube for detailed videos or information.
Thus, keeping that issue in mind, this article assisted with both the ways to turn off YouTube shorts or remove YouTube shorts with simple steps.
So, friends, let’s not wait for anymore. Scroll up the article and get a detailed steps-wise guide and get a good grab of the process. So that your concern will get resolved, and soon you will be able to access the platform with the last look.
Shanoon Cox
Shanoon Cox is a writer and a lover of all things video.
Follow @Shanoon Cox
Also read:
- [New] Audiovisual Attraction 3 Approaches to Neon-Bordered YouTubes
- 2024 Approved Cutting-Edge Design Top 5 3D Intro Makers
- In 2024, Cutting Edge Advanced Techniques in YouTube Video Editing
- In 2024, Essential Thumbnail Strategies for Amplifying Viewership on YouTube
- Charting the Course to YouTube Livestream Mastery
- Disseminating Data-Driven Insights You Vs. Others on Video Markets
- [Updated] Banner Bliss Get a Peek at Our Library of 50 Free YouTube Banners
- Bypass Youtube and Shine with These 5 Next-Gen Editing Software
- 2024 Approved Club Vibes Best DJ Template Video Selections
- In 2024, Boost or Bust Is Investing in Video Popularity Worthwhile?
- 2024 Approved Discovering & Perfecting Your Individual Style
- A Guide to the 8 Truly Effective Youtube Marketing Methods for 2024
- MP3 Masterclass Easy Audio to Video for YouTube Enthusiasts
- 2024 Approved Essential Tips Sharing Your Apple Devices Screen with YouTube
- [Updated] Elevate Your Content Strategy with Social Blade and YouTube Stats
- Top Tricks in Sports Video Production
- [Updated] Best Free YouTube Ending Creators - Top 6 Picks
- 2024 Approved Craft Your Content Cross-Pollination with YouTube+TikTok
- Vimeo Vs. YouTube A Content Creator's Guide
- [Updated] Earning Stream Start Small, See Big on YouTube
- [New] Entryway Investments Cost-Effective Channels for Newbies
- 2024 Approved Digital Recorder Snap Your Screen, Upload to YouTube Online/PC/Mac
- In 2024, Elevate Your Stream A Comprehensive Ad Revenue Guide on YouTube
- In 2024, Cut, Color & Compile A Deep Dive Into YouTube Studio Video Editing
- In 2024, Discovering the Best Music Playback on YouTube, 2023
- Integrating Tailored Thumbnails in Your Videos
- In 2024, Building Audience Organically Tactics That Deliver Views
- Channeling Wealth Through Beauty Online Platforms for 2024
- In 2024, Craft an Attractive Animation From Any Video - A Comprehensive Youtube-to-GIF Guide
- Breaking Through YouTube's Walls Using Advanced Creator Studio Skills for 2024
- [New] Boost Engagement Through Anime-Style Subscribe Buttons (Filmora Tutorial)
- Securely Sharing Video on YouTube with Settings
- Best YouTube Video Ideas to Spark Inspiration for 2024
- 2024 Approved Elevating Video Marketing with YouTube Thumbnails
- [New] Chart a Course to Success YouTube Studio Blueprint
- [Updated] Elevating Channel Excellence with Best Ideas
- 2024 Approved Build Your Brand with Dynamic Haul Videography
- Experience a Bundle of 9 Whole-Film Christmas Treasures for Free
- [New] Learn the Easy Way Unlocking Iphone Screen Recording for 2024
- How To Fix Unresponsive Touch Screen on Oppo Reno 8T | Dr.fone
- 2024 Approved Have You a Desire to Imbibe Your PowerPoint Presentations with Custom Effects and Tools? Be There to Learn All About Creating Custom Slideshows in PowerPoint with Utmost Ease
- How to Unlock iPhone 12 Pro With an Apple Watch & What to Do if It Doesnt Work
- How to Fake Snapchat Location without Jailbreak On Realme Narzo 60 5G | Dr.fone
- Behind the Scenes Crafting a Screenplay
- In 2024, Audio Mastery Techniques for Windows Users
- 2024 Approved Expert Tips to Correct Video Transmission Problem on Mobile Messengers
- Add a Touch of Pro Best Bokeh Effect Apps for iPhone and Android
- Simple Solutions to Fix Android SystemUI Has Stopped Error For Oppo A38 | Dr.fone
- Updated In 2024, Chart the Audio Capture of a Church Bell Echo
- Is pgsharp legal when you are playing pokemon On Samsung Galaxy F04? | Dr.fone
- In 2024, 5 Easy Ways to Copy Contacts from Oppo Find X7 Ultra to iPhone 14 and 15 | Dr.fone
- 2024 Approved Free Video Looping Websites Top 10 Picks for Seamless Repeats
- [Updated] In 2024, Exclusive Access to the Best 7 Vids
- [Updated] Ace Video Reporter for Windows 11
- Unveiling Six Techniques to Screen Record Your Streamed Movies on MacOS for 2024
- Perfect TikTok Start Mac-Based Production Strategies
- New In 2024, Create Stunning Lyric Videos with These Web Apps
- [Updated] 2024 Approved Premium Emoji Creation Software for Discord Users
- In 2024, Privacy in Focus The Leading 10 No-Cost, Highly-Secured Video Calling Platforms
- New In 2024, Picture to Cartoon Transformation Made Easy
- 2024 Approved VN Video Editor App Analysis Features, Pricing, and More
- Updated Unlocking the Power of DaVinci Resolve Scopes Enhance Your Color Grad for 2024
- In 2024, 3 Things You Must Know about Fake Snapchat Location On Poco F5 5G | Dr.fone
- How to Remove and Reset Face ID on iPhone 11
- [New] In 2024, Mastering the Art of Videography A Comparative Analysis Between TikTok and Snap
- 11 Proven Solutions to Fix Google Play Store Not Working Issue on Vivo Y17s | Dr.fone
- 2024 Approved Taste Bud Travels Delicious Dishes From Abroad
- [New] 2024 Approved The Art of Cross-Promotion Twitters to Facebooks
- Chill-Out Playlists for Non-Profit Video Arrangements
- In 2024, Is Fake GPS Location Spoofer a Good Choice On Apple iPhone 13? | Dr.fone
- Title: "Comprehensible Guide to High-Quality Audios on YouTube"
- Author: Brian
- Created at : 2024-05-25 11:30:49
- Updated at : 2024-05-26 11:30:49
- Link: https://youtube-video-recordings.techidaily.com/comprehensible-guide-to-high-quality-audios-on-youtube/
- License: This work is licensed under CC BY-NC-SA 4.0.
