
:max_bytes(150000):strip_icc()/GettyImages-1250476440-2ff779100e984029aa752236f9791b11.jpg)
Choose From the Finest 7 Android Browsers Without Ads
Choose From the Finest 7 Android Browsers Without Ads
Developers make money by including ADS in their applications. They have two alternatives for customers who want to use their apps: either pay for such a lifetime purchase of the app or enjoy the free version that includes ADS. Best ad blocker for android helps eliminate ADS from apps installed on our Android devices.
Many people choose to use the free version since they can’t afford to pay for a standard app, while some opt for Mods, but the best method to avoid ADS is to use programs that block them entirely. Although most of the best ad blockers for android applications listed below work on browsers, you may need to root your Android smartphone to utilize some of them.
Let’s get started with this article’s list of the best ad blocker for android applications, which will help you get rid of the annoying ads you encounter in apps regularly.
Free ad blocker for android apps
To find the best free ad blocker for android apps, you’re probably searching for an app that can block ads in the browser rather than system-wide ad blocking (as explained above). If you’re looking for ad-blocking software for your Android phone, there are a plethora of free, high-quality options.
1.AdAway

AdWay is the best free ad blocker for android apps. Even though AdAway is a free program, it can block all adverts on your smartphone. There are no security checks on the Google Play store, but as it is open-source software, anybody may verify its code for safety and problems should be rapidly fixed.
Features:
- Ads are blocked on all devices.
- Whitelisting and blacklisting are both options for a high degree of personalization.
- Access to the root filesystem is not necessary (optional)
2.AdBlock

AdBlock is a good and free ad blocker for android apps that does a good job at preventing ads. Even though it doesn’t seem like much, it does the job of blocking banners, pop-ups, pop-unders, and other types of adverts.
Features:
- Multiple Android browsers are supported: Chrome, Firefox, Opera, & more.
- It prevents advertising and trackers from loading, allowing you to browse more quickly.
3.TrustGo Ad Detector

TrustGo Ad Detector works a little differently than the best and free ad blocker for android apps in that it analyses your device to find the source of advertising and trackers. Then you can choose whether or not to snooze or remove the programs that are constantly bombarding you with intrusive adverts and pop-ups.
Features:
- It detects unwanted programs and allows you to take back control of your smartphone.
- identifies potentially dangerous applications that might steal your personal information
- It’s simple to use.
4.AdClear

AdClear is the best free ad blocker for android apps created by seven networks. Using this software, you can stop your phone from being bombarded with irritating adverts. As an example, YouTube adverts and malware may be blocked and other ads that appear on websites or applications. This app shields you from in-app, pop-up, and clickbait adverts. The software is free to download and use on Android-powered smartphones and tablets.
Features:
- AdClear is the best non-root adblocker out there.
- Ads on YouTube are effectively blocked by AdClear, the most effective product on the market.
The paid best ad blocker for android apps
There are many free and best ad blockers for android apps (ad remover for android) available, so why spend money on a premium app? It’s very uncommon for premium adblockers to have sophisticated features like more dependable blocking functionality or high degrees of customization. The following are a handful of our personal favorites.
1.AdGuard

Rather than merely blocking advertising in your browser, AdGuard is a comprehensive ad remover for android. Anti-tracking protection, blocking of activity analyzers, and a wide range of customization are also included in the package. However, the most useful functions are only accessible to those who pay.
Features:
- Advertising, pop-ups, banners, & video ads are blocked.
- Once the ad is blocked, it hides the frames and empty areas that remain.
- Doesn’t need to have root access on your phone or tablet.
2.AdShield AdBlocker

AdShield is one of the best ad remover for android. Through the use of cutting-edge interception technology, the AdShield service blocks advertising and provides a non-interrupted online browsing experience. With its basic design, AdShield effortlessly fits with the Android platform.
Features:
- Customizable Dark Mode as well as an intuitive interface
- Anti-malicious websites and trackers are also included in this package
- Battery and data use are saved since advertising is blocked.
3.AdLock
AdLock is an all-in-one ad blocker or ad remover for android that shields you from adverts in any software, whether it is a web browser or an instant messaging app. Because of this, it isn’t accessible on Google Play, but its benefits may persuade you to get it anyhow.
- Ads are blocked on all devices.
- There is no need for root access.
- Checks for harmful material in HTTPS connections and links
Conclusion
You may use these programs to block advertisements from your Android browser or your Android apps. They are safe to use & will not do any damage to your Android device. Some of them also function as a VPN app, which is a huge advantage and the other benefits we can receive from them.
For Win 7 or later (64-bit)
For macOS 10.12 or later
AdWay is the best free ad blocker for android apps. Even though AdAway is a free program, it can block all adverts on your smartphone. There are no security checks on the Google Play store, but as it is open-source software, anybody may verify its code for safety and problems should be rapidly fixed.
Features:
- Ads are blocked on all devices.
- Whitelisting and blacklisting are both options for a high degree of personalization.
- Access to the root filesystem is not necessary (optional)
2.AdBlock
AdBlock is a good and free ad blocker for android apps that does a good job at preventing ads. Even though it doesn’t seem like much, it does the job of blocking banners, pop-ups, pop-unders, and other types of adverts.
Features:
- Multiple Android browsers are supported: Chrome, Firefox, Opera, & more.
- It prevents advertising and trackers from loading, allowing you to browse more quickly.
3.TrustGo Ad Detector
TrustGo Ad Detector works a little differently than the best and free ad blocker for android apps in that it analyses your device to find the source of advertising and trackers. Then you can choose whether or not to snooze or remove the programs that are constantly bombarding you with intrusive adverts and pop-ups.
Features:
- It detects unwanted programs and allows you to take back control of your smartphone.
- identifies potentially dangerous applications that might steal your personal information
- It’s simple to use.
4.AdClear
AdClear is the best free ad blocker for android apps created by seven networks. Using this software, you can stop your phone from being bombarded with irritating adverts. As an example, YouTube adverts and malware may be blocked and other ads that appear on websites or applications. This app shields you from in-app, pop-up, and clickbait adverts. The software is free to download and use on Android-powered smartphones and tablets.
Features:
- AdClear is the best non-root adblocker out there.
- Ads on YouTube are effectively blocked by AdClear, the most effective product on the market.
The paid best ad blocker for android apps
There are many free and best ad blockers for android apps (ad remover for android) available, so why spend money on a premium app? It’s very uncommon for premium adblockers to have sophisticated features like more dependable blocking functionality or high degrees of customization. The following are a handful of our personal favorites.
1.AdGuard
Rather than merely blocking advertising in your browser, AdGuard is a comprehensive ad remover for android. Anti-tracking protection, blocking of activity analyzers, and a wide range of customization are also included in the package. However, the most useful functions are only accessible to those who pay.
Features:
- Advertising, pop-ups, banners, & video ads are blocked.
- Once the ad is blocked, it hides the frames and empty areas that remain.
- Doesn’t need to have root access on your phone or tablet.
2.AdShield AdBlocker
AdShield is one of the best ad remover for android. Through the use of cutting-edge interception technology, the AdShield service blocks advertising and provides a non-interrupted online browsing experience. With its basic design, AdShield effortlessly fits with the Android platform.
Features:
- Customizable Dark Mode as well as an intuitive interface
- Anti-malicious websites and trackers are also included in this package
- Battery and data use are saved since advertising is blocked.
3.AdLock
AdLock is an all-in-one ad blocker or ad remover for android that shields you from adverts in any software, whether it is a web browser or an instant messaging app. Because of this, it isn’t accessible on Google Play, but its benefits may persuade you to get it anyhow.
- Ads are blocked on all devices.
- There is no need for root access.
- Checks for harmful material in HTTPS connections and links
Conclusion
You may use these programs to block advertisements from your Android browser or your Android apps. They are safe to use & will not do any damage to your Android device. Some of them also function as a VPN app, which is a huge advantage and the other benefits we can receive from them.
For Win 7 or later (64-bit)
For macOS 10.12 or later
Navigating 4K Video Submission: YouTube Best Practices Unveiled
Create High-Quality Video - Wondershare Filmora
An easy and powerful YouTube video editor
Numerous video and audio effects to choose from
Detailed tutorials provided by the official channel
Many people have a strong desire to make videos. Whether you make videos for a living or as a pastime, it doesn’t matter. When you make a fantastic film that you’re pleased with, you want to show it off to your friends and family. YouTube, the most popular site for sharing videos on various themes, is one of the most incredible places to start.
YouTube is fantastic for sharing videos, but it can be harsh on artists due to the high bar for content and video quality. If you want to succeed as a YouTuber, you must create videos that are informative and high-resolution. This is critical since your viewers may wish to watch your movies on a computer screen or a 4K smart TV.
If you’ve decided to make videos in 4K resolution, you’ll find information on recommended encoding settings, how to upload a video to YouTube, potential problems, and more below.
In this article
01 What Is The Distinction Between Various Resolutions?
02 Why Would You Want To Upload A 4k Video?
03 What Is The Best Way To Upload A 4k Video To Youtube?
04 Tips On How To Make Sure The Video You’re Uploading Is Of High Quality
What Is The Distinction Between Various Resolutions?
The number of pixels on a screen is referred to as resolution. Low resolution indicates fewer pixels and typically less space, whereas high resolution means more pixels and generally greater space and detail. You probably have a poor resolution if you’re using a standard laptop or an old screen.
When watching a video on a larger screen, the resolution significantly impacts your viewing experience. Whether it’s a live stream or an on-demand movie, the correct resolution is crucial to reaching a wider audience, and this is where iPhones and iPads appear to have an advantage. Let’s take a closer look at each of these resolution types and their associated pixel sizes.
1. SD RESOLUTION (STANDARD DEFINITION)
Previously, resolutions were separated into SD (Standard Definition) and HD (High Definition) categories. SD was defined as a video with a resolution of less than 720p. However, as television and computer monitor display resolutions improved over time, a video was less likely to be shot in Standard Definition.
The following are the most common standard video resolutions:
- 640 × 360 pixels (or 360p)
- 640 × 480 pixels (or 480p)
2. RESOLUTION: 720P HD (HIGH DEFINITION)
The lowest video resolution is 720p, which is commonly referred to as ‘HD.’ 720p (1280 x 720 pixels) is a resolution recognized for modest web content, even though most videos require at least 1080p. Because most computer monitors are now in HD, the recommended practice for web and streaming is to choose a resolution higher than 720p.
The resolution of HD videos is usually: 1280 x 720 pixels (or 720p)
3. 1080P FULL HD RESOLUTION
1080p resolutions, also known as ‘Full HD,’ have become the industry standard for a clear HD video that doesn’t take up a lot of storage space. It’s also worth noting that this is the standard screen resolution for all smartphones.
The resolution of full HD videos is usually: 1920 x 1080 pixels (or 1080p)
4. 2K RESOLUTION WITH QHD (QUAD HIGH DEFINITION)
Quad HD resolution, or QHD for short, is widely found on high-end smartphones and gaming monitors. The resolution of 1440p is four times that of HD Ready (or 720p HD). Many high-end smartphones have a Quad HD+ resolution (296 x 1440 pixels), which is ideal for 1440p. Another common screen resolution is 2K, which allows for larger displays and reframing without sacrificing quality or image editing.
The resolution of QHD and 2K videos is:
- 2560 x 1440 pixels in QHD (or 1440p)
- 2048 x 1080 pixels in 2K (or 1080p)
5. 4K (OR UHD/ULTRA-HIGH-DEFINITION) RESOLUTION
This sort of resolution, often known as 4Kor UHD (Ultra High Definition), has a pixel size of 3840 x 2160 pixels. It has a similar appearance to 2K, but it provides video artists more room to edit and zoom in. For vivid color, graphics, or dramatic viewing, both 2K and 4K resolutions are available. Unless you wish to tweak colors or trim in closer, there aren’t enough visible distinctions between 2K and 4K. So, it matters when you want to change a certain detail, but it doesn’t matter when someone else is looking at it.
The resolution of 4K videos is: 3840 x 2160 (or 2160p / simply 4K) is a resolution of 3840 x 2160 pixels.
Why Would You Want To Upload A 4k Video?
YouTube is the second-largest social media site, with approximately 1.9 billion monthly active users. YouTube is where you want to be to access this large audience and promote your brand, with one billion hours of video watched every day on the platform.
However, for your target audience to watch your videos, you must ensure excellent video quality. Poorly shot or edited films may alienate your viewers, especially when there are billions of other videos to choose from on the site.
- 4k is the most satisfactory resolution for uploading to YouTube. Although not every viewer can watch videos in 4k, it ensures that your visitors get the best possible experience.
- Traditional Full HD (1920 x 1080) TVs feature four times as many pixels as 4K TVs. Because of the higher pixel density, the picture quality of 4K TVs is more colorful and detailed, even on TV displays of the same size. This distinction is most noticeable on large-screen televisions.
- Even if you recorded in 1080p and upscaled to 4K, you should post in 4K to YouTube for the finest image quality. Recording in 1080p, editing in 1080p, exporting in 4k, and YouTube viewing is sharper in 1080p.
- With 4K, you get stunning visuals with a resolution of 38402160, which is four times that of Full-HD. That’s why visuals appear crisp and lifelike, even on large-screen TVs rather than pixelated. Down-converted 4K to Full-HD photographs have superior quality and resolution than images shot in Full-HD from the start.
What Is The Best Way To Upload A 4k Video To Youtube?
The YouTube upload process is not complicated, but it does need several steps. You can finally post your video once it has been prepared and converted to MP4 format.
Follow the steps below to post your video to YouTube:
1. Go to YouTube.com in your browser.
2. Log in to your account and click the “Create” symbol, which looks like a camera with a plus sign, in the right corner of the menu bar.
3. Select “Upload video” from the drop-down menu.
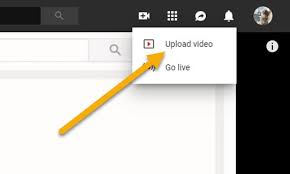
4. Drag and drop your video file into the upload box, or select your file from the “Select File” menu and click “Open.”
5. Make a note of the title and description while YouTube is processing your video.

6. Select a video thumbnail from the options or upload your own and select your “Audience” from the drop-down menu. To manage age restriction settings.
7. Select “More Options” to add searchable keywords to your video, manage subtitles and comments, and more.
8. Select if you want to add promotions to your video by clicking “Next.”
9. Finally, click “Next” and wait for the video to be processed entirely before publishing it.
10. You can also automatically set it to publish at a later date.
Tips On How To Make Sure The Video You’re Uploading Is Of High Quality
The following are five tips for amateur and top newbie YouTubers who want to improve their videos.
1. Cut Your Video Into Clips And Organize It
While it may appear to be the simplest solution to perform an entire video at once, this might make the process tedious or even damage your video if you are interrupted or make a speech error. Smaller video segments are easier to edit and blend into a single, well-formatted video.
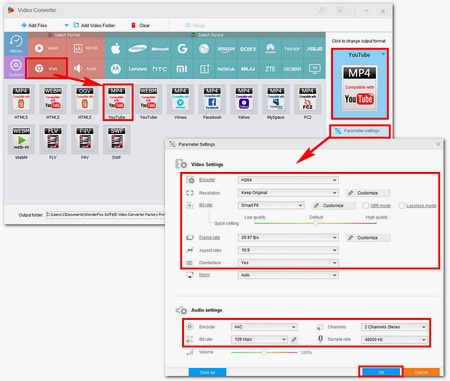
2. Youtube Video Export
You can also modify your videos in various formats to your heart’s content before exporting them to YouTube and publishing them. Although uploading and exporting may take some time, the quality of your video will significantly increase, and the time and work you put in will be evident.
3. Change Up Your Shots
Rather than keeping your camera fixed, try varied angles while shooting. This may not work for all of your videos, but it is critical to keep your viewers engaged while they watch them, especially if you want them to stay until the finish and come back for more. Unless you’re talking about anything incredibly essential, sitting and listening to someone talk for more than 10 minutes without the camera moving will quickly become dull or old.
4. Transitions And Effects
When editing a video with numerous parts, the use of effects and transitions can considerably impact the overall quality of the video. Filmora is far more sophisticated than Windows Movie Maker and iMovie on Mac. It also allows you to create a professional-looking YouTube video with hundreds of presets such as filters, overlays, components, transitions, and blending several layers of effects and audio to enhance your YouTube tale.
Wondershare Filmii is one of the greatest choices for Windows for beginners who wish to create video footage with templates automatically. Smart video templates, trendy filters and overlays, fun stickers and motion components, and, most importantly, advanced editing capabilities are all available.
For Win 7 or later (64-bit)
For macOS 10.12 or later
Conclusion
● This is pretty much everything we’ve gathered to assist you in uploading 4K videos to YouTube. Do not become worried. Your 4K video will be in low resolution when you first publish it. This is due to YouTube’s high-resolution processing requiring time. It could take a few hours for your video to be available in 4K mode.
● The duration, format, frame rate, and resolution of your video all affect the processing time for high-definition videos. If you don’t want your video to be seen unless it has a high-quality option, upload it as unlisted and then publish it once 4K resolution is available.
Many people have a strong desire to make videos. Whether you make videos for a living or as a pastime, it doesn’t matter. When you make a fantastic film that you’re pleased with, you want to show it off to your friends and family. YouTube, the most popular site for sharing videos on various themes, is one of the most incredible places to start.
YouTube is fantastic for sharing videos, but it can be harsh on artists due to the high bar for content and video quality. If you want to succeed as a YouTuber, you must create videos that are informative and high-resolution. This is critical since your viewers may wish to watch your movies on a computer screen or a 4K smart TV.
If you’ve decided to make videos in 4K resolution, you’ll find information on recommended encoding settings, how to upload a video to YouTube, potential problems, and more below.
In this article
01 What Is The Distinction Between Various Resolutions?
02 Why Would You Want To Upload A 4k Video?
03 What Is The Best Way To Upload A 4k Video To Youtube?
04 Tips On How To Make Sure The Video You’re Uploading Is Of High Quality
What Is The Distinction Between Various Resolutions?
The number of pixels on a screen is referred to as resolution. Low resolution indicates fewer pixels and typically less space, whereas high resolution means more pixels and generally greater space and detail. You probably have a poor resolution if you’re using a standard laptop or an old screen.
When watching a video on a larger screen, the resolution significantly impacts your viewing experience. Whether it’s a live stream or an on-demand movie, the correct resolution is crucial to reaching a wider audience, and this is where iPhones and iPads appear to have an advantage. Let’s take a closer look at each of these resolution types and their associated pixel sizes.
1. SD RESOLUTION (STANDARD DEFINITION)
Previously, resolutions were separated into SD (Standard Definition) and HD (High Definition) categories. SD was defined as a video with a resolution of less than 720p. However, as television and computer monitor display resolutions improved over time, a video was less likely to be shot in Standard Definition.
The following are the most common standard video resolutions:
- 640 × 360 pixels (or 360p)
- 640 × 480 pixels (or 480p)
2. RESOLUTION: 720P HD (HIGH DEFINITION)
The lowest video resolution is 720p, which is commonly referred to as ‘HD.’ 720p (1280 x 720 pixels) is a resolution recognized for modest web content, even though most videos require at least 1080p. Because most computer monitors are now in HD, the recommended practice for web and streaming is to choose a resolution higher than 720p.
The resolution of HD videos is usually: 1280 x 720 pixels (or 720p)
3. 1080P FULL HD RESOLUTION
1080p resolutions, also known as ‘Full HD,’ have become the industry standard for a clear HD video that doesn’t take up a lot of storage space. It’s also worth noting that this is the standard screen resolution for all smartphones.
The resolution of full HD videos is usually: 1920 x 1080 pixels (or 1080p)
4. 2K RESOLUTION WITH QHD (QUAD HIGH DEFINITION)
Quad HD resolution, or QHD for short, is widely found on high-end smartphones and gaming monitors. The resolution of 1440p is four times that of HD Ready (or 720p HD). Many high-end smartphones have a Quad HD+ resolution (296 x 1440 pixels), which is ideal for 1440p. Another common screen resolution is 2K, which allows for larger displays and reframing without sacrificing quality or image editing.
The resolution of QHD and 2K videos is:
- 2560 x 1440 pixels in QHD (or 1440p)
- 2048 x 1080 pixels in 2K (or 1080p)
5. 4K (OR UHD/ULTRA-HIGH-DEFINITION) RESOLUTION
This sort of resolution, often known as 4Kor UHD (Ultra High Definition), has a pixel size of 3840 x 2160 pixels. It has a similar appearance to 2K, but it provides video artists more room to edit and zoom in. For vivid color, graphics, or dramatic viewing, both 2K and 4K resolutions are available. Unless you wish to tweak colors or trim in closer, there aren’t enough visible distinctions between 2K and 4K. So, it matters when you want to change a certain detail, but it doesn’t matter when someone else is looking at it.
The resolution of 4K videos is: 3840 x 2160 (or 2160p / simply 4K) is a resolution of 3840 x 2160 pixels.
Why Would You Want To Upload A 4k Video?
YouTube is the second-largest social media site, with approximately 1.9 billion monthly active users. YouTube is where you want to be to access this large audience and promote your brand, with one billion hours of video watched every day on the platform.
However, for your target audience to watch your videos, you must ensure excellent video quality. Poorly shot or edited films may alienate your viewers, especially when there are billions of other videos to choose from on the site.
- 4k is the most satisfactory resolution for uploading to YouTube. Although not every viewer can watch videos in 4k, it ensures that your visitors get the best possible experience.
- Traditional Full HD (1920 x 1080) TVs feature four times as many pixels as 4K TVs. Because of the higher pixel density, the picture quality of 4K TVs is more colorful and detailed, even on TV displays of the same size. This distinction is most noticeable on large-screen televisions.
- Even if you recorded in 1080p and upscaled to 4K, you should post in 4K to YouTube for the finest image quality. Recording in 1080p, editing in 1080p, exporting in 4k, and YouTube viewing is sharper in 1080p.
- With 4K, you get stunning visuals with a resolution of 38402160, which is four times that of Full-HD. That’s why visuals appear crisp and lifelike, even on large-screen TVs rather than pixelated. Down-converted 4K to Full-HD photographs have superior quality and resolution than images shot in Full-HD from the start.
What Is The Best Way To Upload A 4k Video To Youtube?
The YouTube upload process is not complicated, but it does need several steps. You can finally post your video once it has been prepared and converted to MP4 format.
Follow the steps below to post your video to YouTube:
1. Go to YouTube.com in your browser.
2. Log in to your account and click the “Create” symbol, which looks like a camera with a plus sign, in the right corner of the menu bar.
3. Select “Upload video” from the drop-down menu.
4. Drag and drop your video file into the upload box, or select your file from the “Select File” menu and click “Open.”
5. Make a note of the title and description while YouTube is processing your video.
6. Select a video thumbnail from the options or upload your own and select your “Audience” from the drop-down menu. To manage age restriction settings.
7. Select “More Options” to add searchable keywords to your video, manage subtitles and comments, and more.
8. Select if you want to add promotions to your video by clicking “Next.”
9. Finally, click “Next” and wait for the video to be processed entirely before publishing it.
10. You can also automatically set it to publish at a later date.
Tips On How To Make Sure The Video You’re Uploading Is Of High Quality
The following are five tips for amateur and top newbie YouTubers who want to improve their videos.
1. Cut Your Video Into Clips And Organize It
While it may appear to be the simplest solution to perform an entire video at once, this might make the process tedious or even damage your video if you are interrupted or make a speech error. Smaller video segments are easier to edit and blend into a single, well-formatted video.
2. Youtube Video Export
You can also modify your videos in various formats to your heart’s content before exporting them to YouTube and publishing them. Although uploading and exporting may take some time, the quality of your video will significantly increase, and the time and work you put in will be evident.
3. Change Up Your Shots
Rather than keeping your camera fixed, try varied angles while shooting. This may not work for all of your videos, but it is critical to keep your viewers engaged while they watch them, especially if you want them to stay until the finish and come back for more. Unless you’re talking about anything incredibly essential, sitting and listening to someone talk for more than 10 minutes without the camera moving will quickly become dull or old.
4. Transitions And Effects
When editing a video with numerous parts, the use of effects and transitions can considerably impact the overall quality of the video. Filmora is far more sophisticated than Windows Movie Maker and iMovie on Mac. It also allows you to create a professional-looking YouTube video with hundreds of presets such as filters, overlays, components, transitions, and blending several layers of effects and audio to enhance your YouTube tale.
Wondershare Filmii is one of the greatest choices for Windows for beginners who wish to create video footage with templates automatically. Smart video templates, trendy filters and overlays, fun stickers and motion components, and, most importantly, advanced editing capabilities are all available.
For Win 7 or later (64-bit)
For macOS 10.12 or later
Conclusion
● This is pretty much everything we’ve gathered to assist you in uploading 4K videos to YouTube. Do not become worried. Your 4K video will be in low resolution when you first publish it. This is due to YouTube’s high-resolution processing requiring time. It could take a few hours for your video to be available in 4K mode.
● The duration, format, frame rate, and resolution of your video all affect the processing time for high-definition videos. If you don’t want your video to be seen unless it has a high-quality option, upload it as unlisted and then publish it once 4K resolution is available.
Also read:
- Income Accumulation with Cosmetic Videos
- Analyzing T-Series Youtube Financial Gains
- 2024 Approved Craft a Unique Channel Look for Free
- In 2024, Creating a Singular Stream From Diverse YouTube Videos
- [New] Essential Steps to Producing a YouTube Hit Music Reaction Video Guide
- [Updated] A Comprehensive Guide to the 12 Superior Vlogging Cameras
- Beef up Your CGI with These 8 Online Repositories of FREE Green Screens and Clips for 2024
- [New] Enhance Branding The Ultimate Guide to Custom URLs for YouTube
- 2024 Approved Essential Free Resources for YouTube Intros
- Essential Guide Top 10 Steps for Instructors on YouTube Channels for 2024
- The Essentials of Making Engaging YouTube Shorts
- Revel in the Power of Leading Video Rank Tracker Tools
- [Updated] Best Streaming Setup Leading Livestream Hardware & Software Guide
- Angular Adjustments on YouTube Videos - The Ultimate 2023 Guide for 2024
- In 2024, Discovering the Best Music Playback on YouTube, 2023
- In 2024, Dial in the Ideal Aspect Ratio for Stunning YouTube Videos
- 2024 Approved Becoming a Wealthy Beauty Channel Host
- [New] Deciding on the Best Videography Camera Type DSLR or Mirrorless?
- 2024 Approved Elevate Streams to Next Level with AV1 on YouTube
- Your Ultimate Guide to Distinguishing Your Youtube Shorts
- 2024 Approved ClipCrafter Window Edition
- In 2024, The Ultimate Guide to Video Editors with Music Integration
- Updated 2024 Approved Looking for an Alternative to Ezvid on Mac to Create Slideshows and Home Videos? Check Filmora Video Editor for Mac
- [Updated] 2024 Approved Premier Zombie Apocalypse Battles Ranking Top Titles
- How to Hide/Fake Snapchat Location on Your Xiaomi Redmi A2+ | Dr.fone
- [New] Perfect Your Snapchat Boomerangs Quickly for 2024
- Complete Guide to Hard Reset Your Honor 80 Pro Straight Screen Edition | Dr.fone
- Evening Stories Visualized Evaluations
- In 2024, How to Screen Mirroring Huawei P60 to PC? | Dr.fone
- 2024 Approved Expert's Rankings Top Social Media Viewers
- How To Open Your Apple iPhone 13 mini Without a Home Button | Dr.fone
- [Updated] In 2024, Guide to Sharing on Instagram Videos & More
- [Updated] 2024 Approved Unlocking Lenovo's Full Potential with Screen Recordings
- Experience Seamless Video Editing on Windows 8 and Beyond for 2024
- In 2024, Here Are Some Reliable Ways to Get Pokemon Go Friend Codes For Vivo X100 Pro | Dr.fone
- New 2024 Approved The Best Ways to Convert Soundcloud Tracks T
- [Updated] 2024 Approved The Ultimate Compilation Top 6 Downloader Apps for Facebook's Lite Version
- How to Repair corrupt MP4 and AVI files of Realme C33 2023 with Video Repair Utility on Windows?
- In 2024, How to Unlock Apple iPhone SE (2022) When We Dont Have Apple ID or Password?
- Title: Choose From the Finest 7 Android Browsers Without Ads
- Author: Brian
- Created at : 2024-05-25 11:29:30
- Updated at : 2024-05-26 11:29:30
- Link: https://youtube-video-recordings.techidaily.com/choose-from-the-finest-7-android-browsers-without-ads/
- License: This work is licensed under CC BY-NC-SA 4.0.
