
"Captivating Call-to-Action Designing a Dynamic Subscribe Buttons with Filmora"
Captivating Call-to-Action: Designing a Dynamic Subscribe Buttons with Filmora
How to Make Your YouTube Animated Subscribe Button Easily With Filmora

Richard Bennett
Mar 27, 2024• Proven solutions
The main goal of every content creator is to increase its audience to expand its reach and views. To do so, it’s essential to provide something unique and different to the viewer. Without providing them the content they are looking for, it is impossible to grow your channel and reach. Once your content is ready and you are getting many views, it is essential to make these potential viewers your permanent viewers. The animated subscribe button will help you achieve this goal. While your viewers are watching your videos, you must remind them about subscribing to your channel for receiving such incredible content in the future. Subscribe animation plays a vital role in converting your viewers into subscribers.
There are so many platforms on the internet from where you can get Youtube subscribe button animation free, and you can also purchase these subscribe png gifs. But creating your own animated subscribe button can make you stand out from the crowd and make your videos unique and exclusive. Because it enables you to design it the way you want according to your brand, so, let’s create your own subscribe animation using Wondershare Filmora .
Step-By-Step guide
Step 1: To get started,open Filmora X. On your upper left corner, click on the “Sample Colors,” select the Green color and drag it to Video Track into the timeline. We are using a Green background to easily remove it using the green screen feature in Filmora to use it in our future projects after exporting it, without creating it again. Adjust the duration of this track according to your requirement. In my case, I am trying to make an animated subscribe button of 5 seconds.
Step 2: Lock this track by clicking on the lock icon to work on subscribe animation without disturbing the background easily.
Step 3: Now it’s time to design the subscribe png gif. Go to the Sample colors again and drag the red color into the time above the green background.
Step 4: Double click on the red color in the timeline and adjust its size. Make it look like a subscribe button that is a rectangle and place it at the bottom center of the background. You can put it anywhere you want it to appear in your future videos.
Step 5: Now, let’s add Subscribe text into the button. Go to the Title and select any style that you like. “Basic 6” will work perfectly fine for this purpose. Drag and drop it into the timeline above all tracks.
Step 6: Double click on the Title on the timeline and edit it with “Subscribe” and place it under the red rectangle and click OK.
Step 7: We have put a cursor that can click on the animated subscribe button. You can use Google Search to find a transparent cursor. Make sure to save it in png format. Download it and import it into Filmora.
Step 8: Drag and drop the cursor into the timeline and place it above all the other three tracks to make it prominent. Adjust the size of the cursor place it on the Subscribe button where you want it to appear.
Step 9: Now, it’s time to animate the design using keyframes. First of all, let’s animate the red rectangle. Double click on the red color on the timeline. Go to the ‘Animation’ tab and then click ‘Customize.’ Move to the 1 second in the timeline and click ‘Add.’
Step 10: Now go back to the beginning in the timeline and adjust the scale to 0%. It will make the rectangle pop up when you play the clip.
Step 11: Text needs to be animated as well to match it with the rectangle. Double click on the text in the timeline and click ‘ADVANCED.’
Step 12: In this Advance text editor, go to the ‘Animation’ tab and select any animation that you like. On the timeline under the preview screen, adjusts the dark areas according to the time you set on the rectangle, which was 1 second. We want the text to appear on the screen in 1 second, like the rectangle. Also, adjust the ending time when you want the text to disappear again. We have set it on 4 seconds. Which means it will start to fade after 4 seconds.
Step 13: Now, to animate the mouse cursor, we will use the same process we used for a rectangle that is key framing. Double click on the cursor track on the timeline and move the time on your timeline to a point when you want the cursor to appear. Now add a key frame by clicking ‘Add’.
Step 14: Now jump back to a point in your timeline, when the cursor will start appearing from outside the screen. Move the cursor outside the screen from where you want it to start moving toward the subscribe animation.
Step 15: To animate the click of the cursor, move ahead a little bit into your timeline and scale down the cursor to around 70%. Move it a little further and scale it up to 100%.
Step 16: You can add the sound of mouse click to make it more realistic. You can find this sound anywhere on the internet. Download it and import it into Filmora. Now place it into the timeline where it can match the movement of the cursor.
Step 17: Now it’s time to make this subscribe animation button disappear. Move forward into the time to the end, at around 4 seconds. Double click on the red button in the timeline and add a key frame at its actual scale.
Step 18: After that, move further in the timeline to the end and make its scale 0. It will make it disappear.
Step 19: Do the same with the cursor. Double click on the cursor in the time and add a key frame at its actual position.
Step 20: Move ahead when you want it to disappear. Move the cursor out of the screen and click ‘OK’.
Step 21: Your Subscribe png gif is ready to be exported and used in your videos. Click on export and choose from various formats and options to choose from while exporting it.
You may also like: How to Get People to Subscribe Channel
Conclusion:Your own Animated Subscribe Button is ready to be used in your future videos and projects. This is a ready-to-use subscribe button that can be easily used using the green screen effect in Filmora. Just import the clip, remove the green screen, and you are good to go. You can also customize this Subscribe Animation using your channel and more. Keep experimenting with new things using Filmora.


Richard Bennett
Richard Bennett is a writer and a lover of all things video.
Follow @Richard Bennett
Richard Bennett
Mar 27, 2024• Proven solutions
The main goal of every content creator is to increase its audience to expand its reach and views. To do so, it’s essential to provide something unique and different to the viewer. Without providing them the content they are looking for, it is impossible to grow your channel and reach. Once your content is ready and you are getting many views, it is essential to make these potential viewers your permanent viewers. The animated subscribe button will help you achieve this goal. While your viewers are watching your videos, you must remind them about subscribing to your channel for receiving such incredible content in the future. Subscribe animation plays a vital role in converting your viewers into subscribers.
There are so many platforms on the internet from where you can get Youtube subscribe button animation free, and you can also purchase these subscribe png gifs. But creating your own animated subscribe button can make you stand out from the crowd and make your videos unique and exclusive. Because it enables you to design it the way you want according to your brand, so, let’s create your own subscribe animation using Wondershare Filmora .
Step-By-Step guide
Step 1: To get started,open Filmora X. On your upper left corner, click on the “Sample Colors,” select the Green color and drag it to Video Track into the timeline. We are using a Green background to easily remove it using the green screen feature in Filmora to use it in our future projects after exporting it, without creating it again. Adjust the duration of this track according to your requirement. In my case, I am trying to make an animated subscribe button of 5 seconds.
Step 2: Lock this track by clicking on the lock icon to work on subscribe animation without disturbing the background easily.
Step 3: Now it’s time to design the subscribe png gif. Go to the Sample colors again and drag the red color into the time above the green background.
Step 4: Double click on the red color in the timeline and adjust its size. Make it look like a subscribe button that is a rectangle and place it at the bottom center of the background. You can put it anywhere you want it to appear in your future videos.
Step 5: Now, let’s add Subscribe text into the button. Go to the Title and select any style that you like. “Basic 6” will work perfectly fine for this purpose. Drag and drop it into the timeline above all tracks.
Step 6: Double click on the Title on the timeline and edit it with “Subscribe” and place it under the red rectangle and click OK.
Step 7: We have put a cursor that can click on the animated subscribe button. You can use Google Search to find a transparent cursor. Make sure to save it in png format. Download it and import it into Filmora.
Step 8: Drag and drop the cursor into the timeline and place it above all the other three tracks to make it prominent. Adjust the size of the cursor place it on the Subscribe button where you want it to appear.
Step 9: Now, it’s time to animate the design using keyframes. First of all, let’s animate the red rectangle. Double click on the red color on the timeline. Go to the ‘Animation’ tab and then click ‘Customize.’ Move to the 1 second in the timeline and click ‘Add.’
Step 10: Now go back to the beginning in the timeline and adjust the scale to 0%. It will make the rectangle pop up when you play the clip.
Step 11: Text needs to be animated as well to match it with the rectangle. Double click on the text in the timeline and click ‘ADVANCED.’
Step 12: In this Advance text editor, go to the ‘Animation’ tab and select any animation that you like. On the timeline under the preview screen, adjusts the dark areas according to the time you set on the rectangle, which was 1 second. We want the text to appear on the screen in 1 second, like the rectangle. Also, adjust the ending time when you want the text to disappear again. We have set it on 4 seconds. Which means it will start to fade after 4 seconds.
Step 13: Now, to animate the mouse cursor, we will use the same process we used for a rectangle that is key framing. Double click on the cursor track on the timeline and move the time on your timeline to a point when you want the cursor to appear. Now add a key frame by clicking ‘Add’.
Step 14: Now jump back to a point in your timeline, when the cursor will start appearing from outside the screen. Move the cursor outside the screen from where you want it to start moving toward the subscribe animation.
Step 15: To animate the click of the cursor, move ahead a little bit into your timeline and scale down the cursor to around 70%. Move it a little further and scale it up to 100%.
Step 16: You can add the sound of mouse click to make it more realistic. You can find this sound anywhere on the internet. Download it and import it into Filmora. Now place it into the timeline where it can match the movement of the cursor.
Step 17: Now it’s time to make this subscribe animation button disappear. Move forward into the time to the end, at around 4 seconds. Double click on the red button in the timeline and add a key frame at its actual scale.
Step 18: After that, move further in the timeline to the end and make its scale 0. It will make it disappear.
Step 19: Do the same with the cursor. Double click on the cursor in the time and add a key frame at its actual position.
Step 20: Move ahead when you want it to disappear. Move the cursor out of the screen and click ‘OK’.
Step 21: Your Subscribe png gif is ready to be exported and used in your videos. Click on export and choose from various formats and options to choose from while exporting it.
You may also like: How to Get People to Subscribe Channel
Conclusion:Your own Animated Subscribe Button is ready to be used in your future videos and projects. This is a ready-to-use subscribe button that can be easily used using the green screen effect in Filmora. Just import the clip, remove the green screen, and you are good to go. You can also customize this Subscribe Animation using your channel and more. Keep experimenting with new things using Filmora.
Richard Bennett
Richard Bennett is a writer and a lover of all things video.
Follow @Richard Bennett
Safekeeping Your Online Space: Youtube Channel Blocking Guide
How to Block YouTube Channels on Computer and Mobile Phones
Richard Bennett
Mar 27, 2024• Proven solutions
Anyone spending any time online recently might have come across something they regard as deplorable. YouTube consumes more than half of the internet’s users with its whopping 2 billion active monthly users. For all that might seem good on the humongous video sharing platform some of the most divisive of all human interactions happen on YouTube.
Now the question arises on how you can safeguard yourself and your family from the bad and inadequate content and how to block YouTube channels that create the toxic material.
In this article, we’ll go through how you can block YouTube channels and content creators that you consider will have bad effects on your mental health. You will learn:
- Part 1: How to block YouTube channels on a computer (Mac & Windows)
- Part 2: How to block YouTube channels on Mobile Phones (Android & iPhone)
- Part 3: How to block content on YouTube Kids
Part 1: How to block YouTube channels on a computer (Mac & Windows)
Blocking will prevent the user from trolling and bullying you or your channel subscribers. This will effectively prevent them to comment and interact with your video content. However, there is no way for you to prevent the bullies from watching your content you can at least prevent them from damaging your reputation, badmouthing, and inciting your active subscribers.
The process of blocking YouTube channels on a computer system is fairly simple and will only require a minute if you know the name of the user you want to block. Follow the steps below:
- 1. Log in to your YouTube account and look out for the account you want to block.
- 2. When you’re in the account head over to the About section. You can find it in the toolbar beneath the channel art or banner.
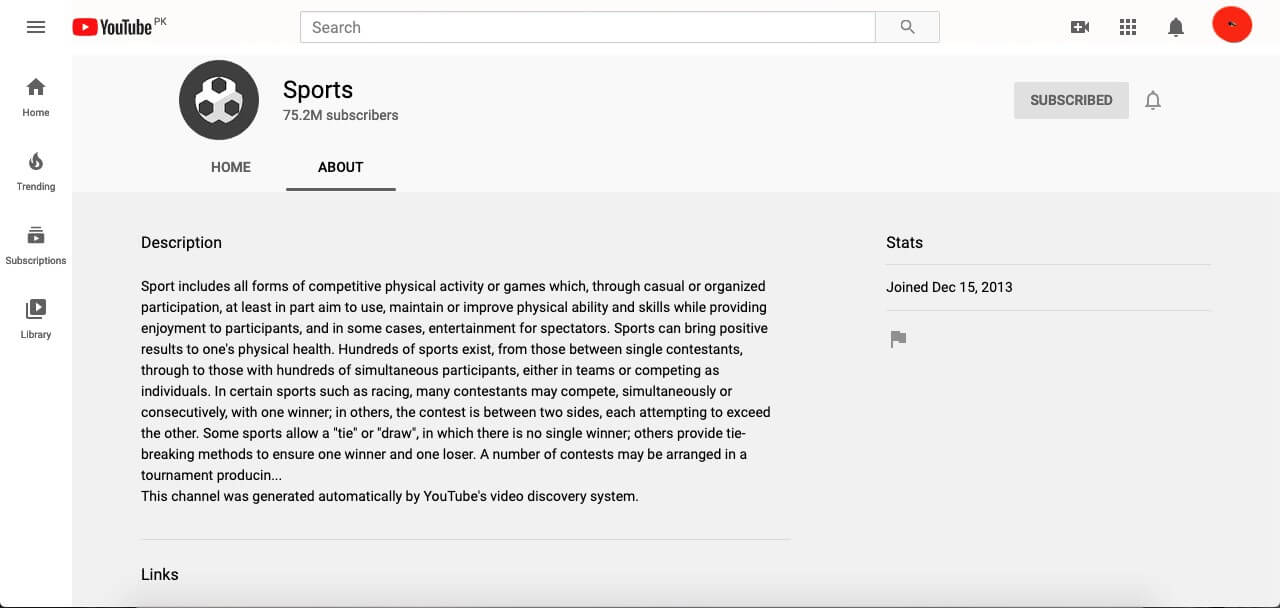
- 3. On the right-hand side right under the Stats, you will find a flag icon. Press the icon and it will show a drop-down menu, select Block user.
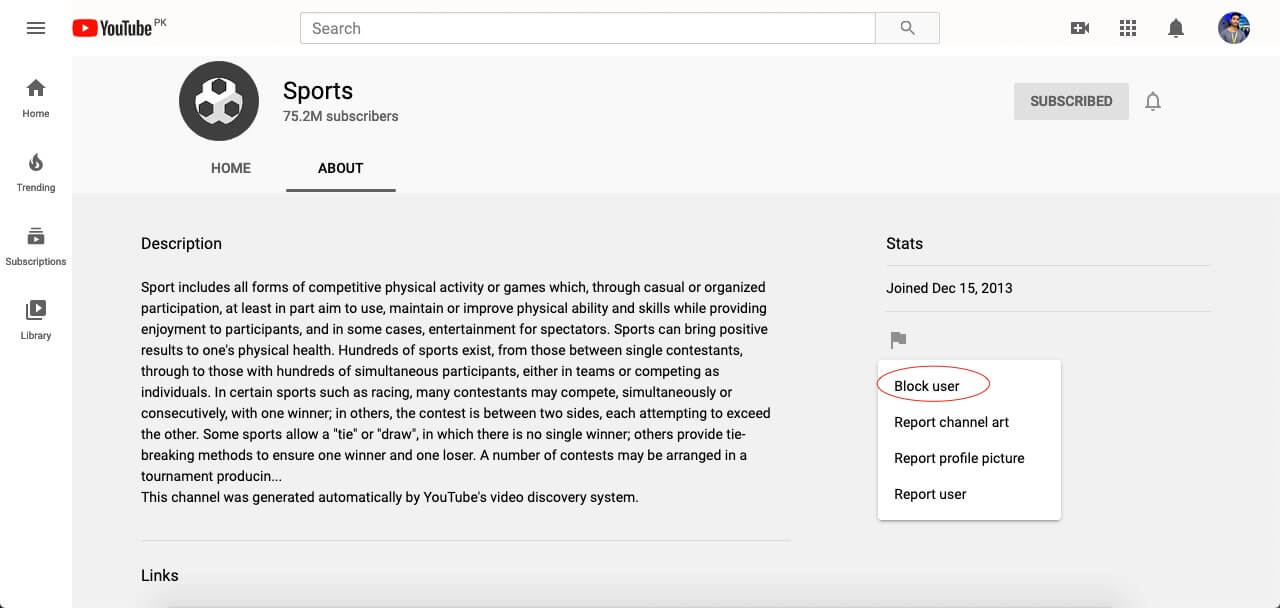
- 4. You will be prompted to confirm your selection, click Submit to confirm.

Part 2: How to block YouTube channels on Mobile Phones (Android & iPhone)
One can also block YouTube channels on mobile devices in the same manner as you would do it on the desktop computer. It will do the same effect and prevent bullying users from interacting with your content.
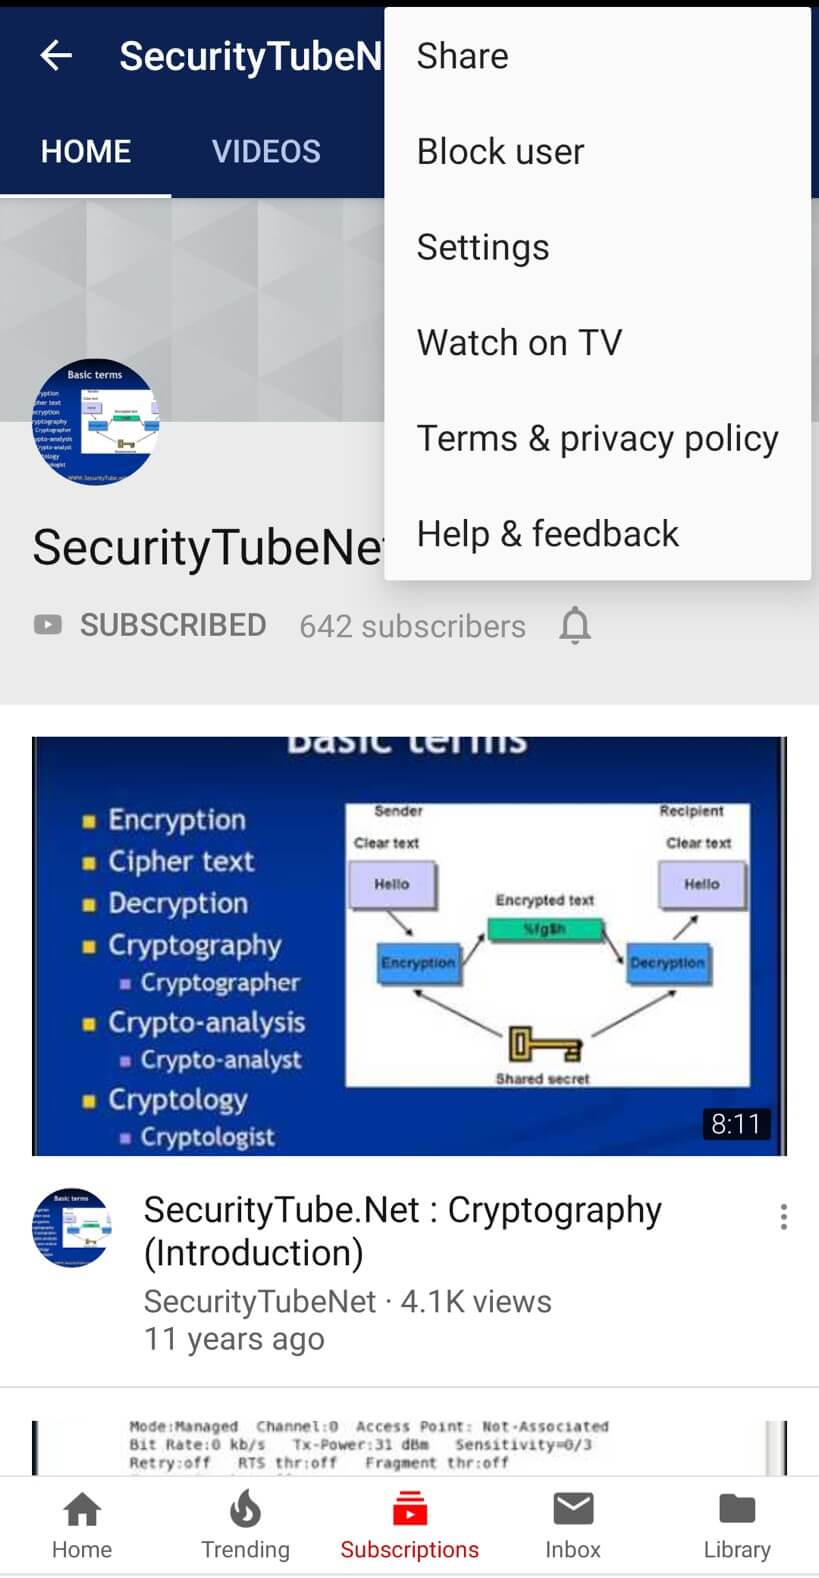
- 1. Sign in to your YouTube account on either YouTube’s Android or iPhone app.
- 2. Look around for the account or user you want to block.
- 3. Open a particular account that you intend to block and go to their main account page.

- 4. When you’re on the account page, open the menu at the top-right corner of the screen and tap Block user.
Part 3: Block content on YouTube kids
YouTube Kids is the alternative version of YouTube’s video service dedicated and designed for kids. It’s entirely for children with all the content curated for kids’ education, family-friendly videos, and channels surrounding kid’s liking. The interface features colorful large images, and icons with five categories to explore from.
The app filters all the content allowing only safe content and parental control to watch their children’s online activity. The app prevents commenting and any kind of cyber bullying-related issues. YouTube Kids need to be set up by an adult with singing into the app with their Google credentials. Parents can sign in and block channels or videos they don’t see fit for their children. Let us see how to block YouTube channels on YouTube kids.
- 1. Open the YouTube Kids app and tap on I’m a parent to set up the app.

- 2. Sign in with your preferred Google account.

- 3. Here you’ll see a button Send Parental Consent Email, press it.
- 4. You’ll get an activation code on your email address.
- 5. Come back to the application and enter the code.
Now as you’re signed in as a parent you can block channels and specific content.
I. Block on Home screen
- 1. On the Home screen press the dotted menu next to the video

- 2. In the menu list, you will see Block this video, tap it.
- 3. You’ll be asked to enter the numbers written on the screen or a custom passcode.

II. Block from Watch Page
- 1. On the Watch Page tap the dotted More option at the top right corner of the video.

- 2. Press the Block option.
- 3. A dialog box will appear with two options, Block this video for blocking only this particular video or Block this channel to block the entire channel associated with the video.

- 4. Select any of the two options and then press Block again.
- 5. Enter the numbers you calculate from the presented numbers or a custom passcode.

Conclusion
Every minute more than 300 hours of video content is uploaded on to the YouTube databases while 5 billion videos are watched every day. This only shows the metrics a content creator and a user have to deal with. Content creators need to protect themselves from the unending trolls and scams that hit every other channel and affect its userbase. While kids and sensitive portions of the human population have to maintain a safe distance from damaging and provoking content that circulates on the platform. To safeguard both ends of the platform I made this guide to streamline the process of how to block YouTube channels and videos from affecting your happy life.
Richard Bennett
Richard Bennett is a writer and a lover of all things video.
Follow @Richard Bennett
Richard Bennett
Mar 27, 2024• Proven solutions
Anyone spending any time online recently might have come across something they regard as deplorable. YouTube consumes more than half of the internet’s users with its whopping 2 billion active monthly users. For all that might seem good on the humongous video sharing platform some of the most divisive of all human interactions happen on YouTube.
Now the question arises on how you can safeguard yourself and your family from the bad and inadequate content and how to block YouTube channels that create the toxic material.
In this article, we’ll go through how you can block YouTube channels and content creators that you consider will have bad effects on your mental health. You will learn:
- Part 1: How to block YouTube channels on a computer (Mac & Windows)
- Part 2: How to block YouTube channels on Mobile Phones (Android & iPhone)
- Part 3: How to block content on YouTube Kids
Part 1: How to block YouTube channels on a computer (Mac & Windows)
Blocking will prevent the user from trolling and bullying you or your channel subscribers. This will effectively prevent them to comment and interact with your video content. However, there is no way for you to prevent the bullies from watching your content you can at least prevent them from damaging your reputation, badmouthing, and inciting your active subscribers.
The process of blocking YouTube channels on a computer system is fairly simple and will only require a minute if you know the name of the user you want to block. Follow the steps below:
- 1. Log in to your YouTube account and look out for the account you want to block.
- 2. When you’re in the account head over to the About section. You can find it in the toolbar beneath the channel art or banner.
- 3. On the right-hand side right under the Stats, you will find a flag icon. Press the icon and it will show a drop-down menu, select Block user.
- 4. You will be prompted to confirm your selection, click Submit to confirm.
Part 2: How to block YouTube channels on Mobile Phones (Android & iPhone)
One can also block YouTube channels on mobile devices in the same manner as you would do it on the desktop computer. It will do the same effect and prevent bullying users from interacting with your content.
- 1. Sign in to your YouTube account on either YouTube’s Android or iPhone app.
- 2. Look around for the account or user you want to block.
- 3. Open a particular account that you intend to block and go to their main account page.
- 4. When you’re on the account page, open the menu at the top-right corner of the screen and tap Block user.
Part 3: Block content on YouTube kids
YouTube Kids is the alternative version of YouTube’s video service dedicated and designed for kids. It’s entirely for children with all the content curated for kids’ education, family-friendly videos, and channels surrounding kid’s liking. The interface features colorful large images, and icons with five categories to explore from.
The app filters all the content allowing only safe content and parental control to watch their children’s online activity. The app prevents commenting and any kind of cyber bullying-related issues. YouTube Kids need to be set up by an adult with singing into the app with their Google credentials. Parents can sign in and block channels or videos they don’t see fit for their children. Let us see how to block YouTube channels on YouTube kids.
- 1. Open the YouTube Kids app and tap on I’m a parent to set up the app.
- 2. Sign in with your preferred Google account.
- 3. Here you’ll see a button Send Parental Consent Email, press it.
- 4. You’ll get an activation code on your email address.
- 5. Come back to the application and enter the code.
Now as you’re signed in as a parent you can block channels and specific content.
I. Block on Home screen
- 1. On the Home screen press the dotted menu next to the video
- 2. In the menu list, you will see Block this video, tap it.
- 3. You’ll be asked to enter the numbers written on the screen or a custom passcode.
II. Block from Watch Page
- 1. On the Watch Page tap the dotted More option at the top right corner of the video.
- 2. Press the Block option.
- 3. A dialog box will appear with two options, Block this video for blocking only this particular video or Block this channel to block the entire channel associated with the video.
- 4. Select any of the two options and then press Block again.
- 5. Enter the numbers you calculate from the presented numbers or a custom passcode.
Conclusion
Every minute more than 300 hours of video content is uploaded on to the YouTube databases while 5 billion videos are watched every day. This only shows the metrics a content creator and a user have to deal with. Content creators need to protect themselves from the unending trolls and scams that hit every other channel and affect its userbase. While kids and sensitive portions of the human population have to maintain a safe distance from damaging and provoking content that circulates on the platform. To safeguard both ends of the platform I made this guide to streamline the process of how to block YouTube channels and videos from affecting your happy life.
Richard Bennett
Richard Bennett is a writer and a lover of all things video.
Follow @Richard Bennett
Also read:
- Rejuvenate Your Visuals Neon Outlines Included
- In 2024, Enhance Viewer Engagement The Top 6 Methods for Higher YouTube Audience Retention
- From Novice to Pro Building a High-Quality Unboxing Series
- In 2024, Enhancing Video Visibility on YouTube with Imaginative Thumbnails
- [Updated] Automatic Cycling of Videos on iPhone Ease
- 2024 Approved Essential iPhone/Android Apps for Aspiring Creators
- Pioneering the Way with Innovative Approaches to YouTube Banners
- Unmasking the World of Live-Streamed Digital Personalities
- Maximize Your Video Sound Best Free WAV Extractors From YouTube
- How to Choose the Right Thumbnail Size for Impact
- [Updated] Engaging Students The Power of YouTube in Education
- [New] Diving Deep YouTube's Best Immersive Experiences
- Navigating YouTube's Rules The Safe Way
- Navigating the Backlink Jungle A Video Content Guide
- [New] Effortless WebM Creation 10 Best YouTube Video Transformers
- [New] Endless Creativity FREE YouTube Art Resources
- In 2024, Easy Path to Popularity Two Tactics for YouTube Fame
- All About YouTube Micro Videos for 2024
- Excellence Exchange Global Creators
- Premier 10 Decibel Boosters MacOS to Mobile Devices
- Elevate Video Appeal Crafting Unforgettable Thumbnail Images
- In 2024, Elite Influencer Economy Leaders
- Mastering YouTube Shorts A Guide to Music Videos
- Digital Dynamics Mastering YouTube Video Distribution on Facebook for 2024
- [New] Clear and Steady Essential YouTube Camera Tech
- Perfecting Projects A Deep Dive Into YouTube Studio Editor
- Best 5 YouTube Tag Generators & Tips to Tag Videos Properly
- 2024 Approved A Fresh Take on Frigidity Crafting Inviting Backdrops
- [Updated] Artisans Crafting Marvel Fantasy Landscapes
- Avoid Oversaturated Greenscreen Effective Strategies for Mac Editors for 2024
- 2024 Approved 10+ Best Free Video Editing Programs of 2023
- [Updated] 10 Best Online Video Cutters on YouTube
- Calculating Your Digital Footprint Understanding Views & Income From YouTube
- [New] Elevate Your Content' Writability with These Best Fonts
- The Essential Guide to Free, Licensed Audio for YT
- In 2024, Earning Mastery in Streams A Comprehensive Review
- Charting Your Financial Course The 3-Step Methodology for Estimating YouTube Income
- Create a Standout Presence with YouTube Custom Imagery
- Top Tips How to Avoid the 8 Deadliest YouTube Dos and Don'ts for Newbies
- In 2024, Dissecting Video Platform Distinctions YouTube Vs. DailyMention
- Design Principles for Orderly YouTube Broadcasts
- NextGen Video Havens - Step Away From YouTube
- Unlock Your iDevice's Capabilities for Effortless Video Uploads to YouTube
- 2024 Approved Elite Listings Easy Purchases of Startup YouTube Revenue Streams
- 2024 Approved Eternal Banishment of YouTube's Quick Clips
- 2024 Approved The Best Facebook Music Downloaders in MP3 Format
- How to Transfer Photos from Tecno Spark 20C to New Android? | Dr.fone
- [Updated] Navigating Twitter’s Video Content Aspect Ratios Included
- 2024 Approved Movie Maker Replacements Explore These 10+ Options
- [Updated] Streamlining MOV Files on Windows 11 OS
- In 2024, Windows 11 Game Recordings The Ultimate Guide to Successful Techniques
- [Updated] In 2024, Screen-Saver Games The Top 9 Independent Titles for Android (No Wi-Fi)
- Updated Online Movie Creation Made Easy Top 9 Free Tools
- How To Recover Data From Lost or Stolen iPhone 13 In Easy Steps | Stellar
- How to restore wiped call history on Xiaomi 14?
- How to Unlock a Network Locked Vivo X Flip Phone?
- New In 2024, How to Create Funny Talking Avatars Using Oddcast Text to Speech
- In 2024, Top Five New Facebook Features You Should Know
- Create Amazing Slow-Motion Videos 8 Affordable Slow-Motion Cameras for 2024
- Full Guide to Hard Reset Your Nokia C12 Plus | Dr.fone
- How to Unlock Realme 11 Pro Phone without PIN
- Apowersoft Reviewed A Guide to PC Screen Capture for 2024
- [New] Unlock the Secrets of Effective Video Cropping for Instagram for 2024
- Title: "Captivating Call-to-Action Designing a Dynamic Subscribe Buttons with Filmora"
- Author: Brian
- Created at : 2024-05-25 11:27:25
- Updated at : 2024-05-26 11:27:25
- Link: https://youtube-video-recordings.techidaily.com/captivating-call-to-action-designing-a-dynamic-subscribe-buttons-with-filmora/
- License: This work is licensed under CC BY-NC-SA 4.0.
