
:max_bytes(150000):strip_icc()/GettyImages-1443716794-411cf2c5404b4f35b2a1153826e5a280.jpg)
"Boost Your Content Access Free Vocal SFX"
Boost Your Content: Access Free Vocal SFX
Download Free Sound Effects for YouTubers

Richard Bennett
Oct 26, 2023• Proven solutions
Whether you’re making a short film and need sounds to go with your action sequences, or just want some fun noises for your vlog or challenge video, it’s easy to find great sound effects you can use for free online.
Here are 7 places to download free sound effects! Or, if you’re interested in making your own, click here to jump to ‘Make Your Own Sound Effects’.


Part 1: YouTube Free Sound Effects Download
1. Filmora Sound Effects
Filmora Video Editor provides you with a huge library of free sound effects without download from anywhere else. There are 25 pieces of sound effect available in Filmora, such as transition swoosh, cinematic horn, beep sound and phone ring.

If you do not see the sound effect you want in Filmora, you can also go to the online effect store to find out more sound effects. The sounds are in.wav or mp3 files, so you do not have to use them inside Filmora only. They’re free to use for everyone after downloading, no matter what video editor you use.
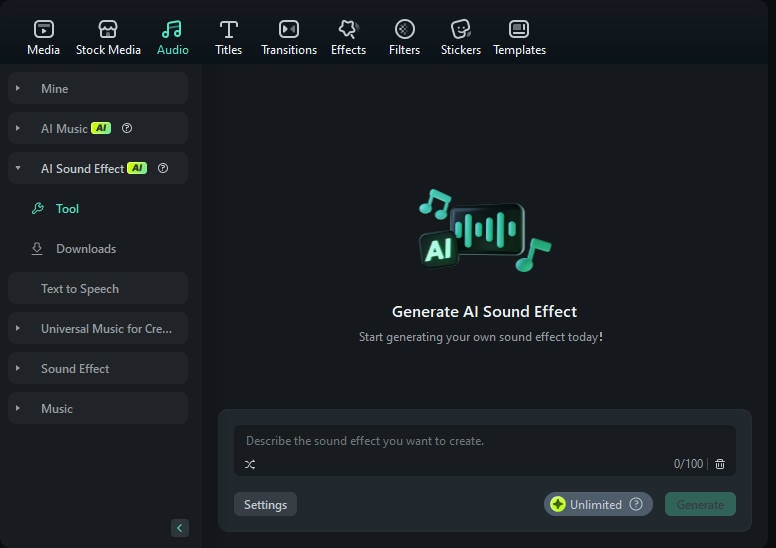
The Filmstock audio effect library covers sound effects in different categories: nature sounds, animal sounds, movie sounds, gun sounds, fireworks, bird sounds, cricket sounds, wet sounds, dog barking, water sounds, guitar sounds, city sounds, monster sounds, laughing sounds, dinosaur sounds, fart sounds, pet sounds, dog sounds, car sounds, video game, and thunderstorm.
2. Freesound
Sounds on Freesound are uploaded by users under various Creative Commons licenses (some may require attribution, some may not allow commercial use).
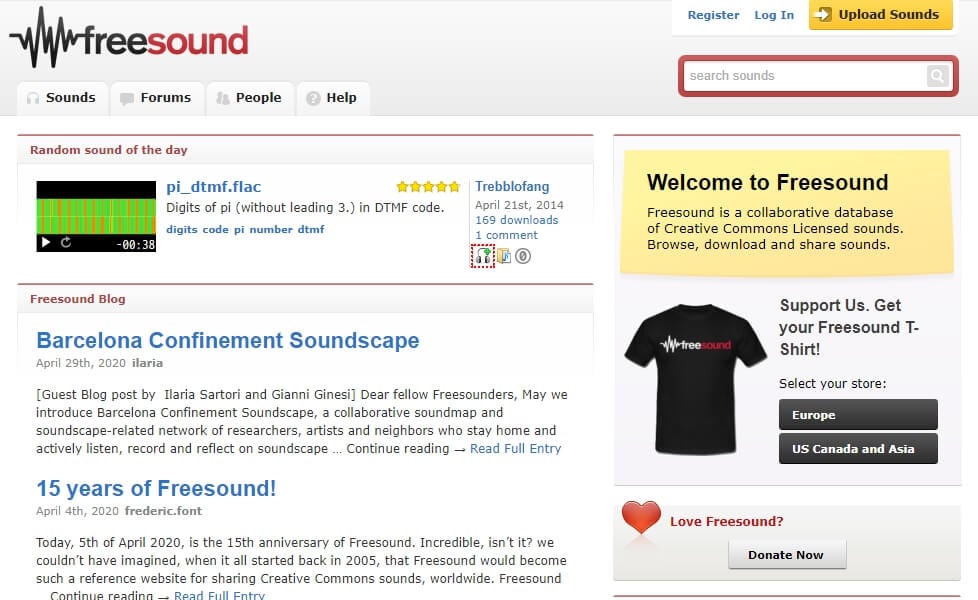
The easiest way to browse the sounds on Freesound is probably to click into Sounds in the top menu, and then ‘Browse tags’ in the menu on the right of your screen. All of the tags on the site will be displayed, and the most commonly used ones will be biggest. The tags include what the sounds are meant to be (i.e. percussion or thunder) and what type of sounds they are (i.e. field-recording or synth).
3. PacDV
PacDV has been producing sound effects since 2001. You can browse and download sounds individually from their site, or download all at once in a huge bundle. You can use all the sounds for free (you just can’t sell them or provide direct download links to other people).
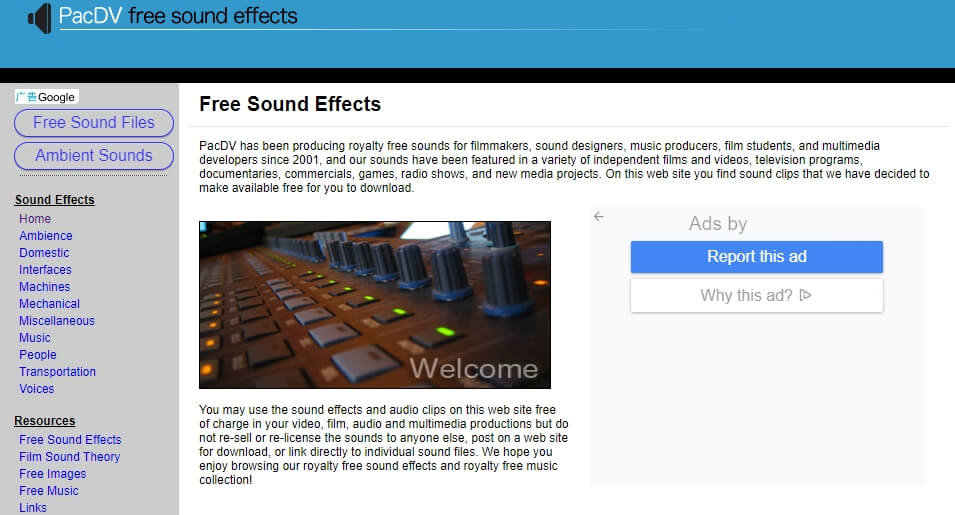
On the left of the website there’s a menu where you can choose what kinds of sound effects you’re interested in. The categories are:
Ambience: this is where you’ll find general background sounds, like ‘car interior’ or ‘grocery store’. Even when nothing in particular is happening, locations have sounds. This is also where you’ll find things like crowd noises.
Domestic: these are sounds you hear around the home, like sounds related to doors and appliances.
Interfaces: a lot of tech sounds live here, like beeps and clicks. Beeps are all titled ‘Beep’, but nothing else is really labeled beyond being called ‘Interface Sound’. You just have to listen and find out.
Machines: a variety of different machine sounds can be found here, from power tools like chainsaws and drills to things like typewriters or paper shredders.
Mechanical: this is where you’ll find sounds associated with cameras, coin slots, zippers, and more.
People: laughing, clapping, footsteps and even farts – this is where you’ll find human sounds.
Transportation: these sounds are all related to vehicles, be they cars or airplanes.
Voices: here you’ll find voices saying common things like ‘hi’, ‘aaah’, or ‘come on’.
Music: PacDV also has a selection of royalty free music. If you use it in your video, you need to give them credit by including Music by <www.pacdv.com/sounds/> in your video description.
Miscellaneous: sounds that don’t quite fit into other categories.
4. Sound Bible
The sounds on Sound Bible are either in the public domain, which means anyone can use them for anything without restriction, or licensed under the Creative Commons Attribution 3.0 License, which means you just need to provide a credit for the person who created the effect you use. When you click on sound effects on Sound Bible you’ll be able to see whether the effect is Public Domain or Attribution 3.0, and it will tell you who the sound was recorded by. Both public domain and Attribution 3.0 sounds are available for commercial use.
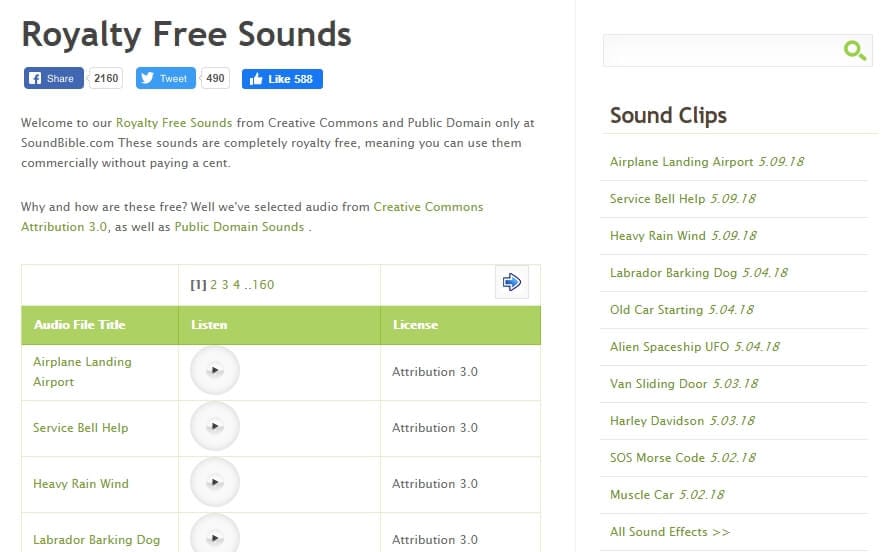
This site has a search function, so if you want dog sounds you can search for ‘dog’. This might be easier than trying to pick the category closest to what you’re looking for and just scrolling through, like you do on some sites.
Sound Bible is updated about 3 times a week, so you can always check back for fresh sounds.
5. Sound Gator
Sound Gator has a huge number of sound effects divided into too many categories to list (24). The categories tend to be very specific, like ‘drink sound effects’ or ‘phone sound effects. If you don’t see a category that sounds like what you’re looking for, make sure to check under Misc Sound Effects because there are 68 Mp3#s in there for everything from tools to static.
You can sort the sound effects on Sound Gator by date added, popularity, top rated, runtime, top favorites, or most discussed.
6. Sounds Crate
Sounds Crate is part of the larger Production Crate which provides all kinds of resources to creators for free (you can upgrade to a paid account to access exclusive content, but there’s a lot of great content available for free). The categories available on Sounds Crate are:

Ambient: room tones and general background noises from nature or cities.
Animal: includes things like puppy barks and angry cats.
Blades and Metal: you’ll find sounds from swords, chains, and other metal implements here.
Crashes and Debris: perfect for action, this is where you’ll find sounds associated with destruction.
Electricity: things like electrical blasts and charges can be found here.
Electronics: any sound made by anything electrical, like beeps and appliance sounds.
Explosions and Bangs: if you have a visual explosion effect, you’ll probably need to combine it with something from here.
Fight: find sounds associated with action sequences, like whooshes and punches.
Gun Related: everything from reloads to gunshots.
Impact: any kind of thud or shattering sound.
Lock n’ Load: although there are some ‘gun checking’ sounds in here, it’s mostly clothing related sounds like zippers and Velcro.
Movement: wind sounds and whooshes.
People: sounds humans make, from voices to footsteps.
Sci-Fi SFX: zaps, beeps, and sci-fi ambience.
Vehicle: includes both common vehicles like cars and less-common vehicles like tanks.
Weapons: both modern weapons like missiles and old-timey things like arrows.
7. Zapsplat
Zapsplat claims to be the fastest growing free sound effects library on the internet. With more than 23,999 professional sounds, and more being added every week, they might just be right. The owner of the site, Alan McKinney, adds 500 sound effects every week by himself and the site also accepts sounds from contributors. All of their sounds were recorded using professional equipment and then edited to make them perfect.
You can even send Alan a message and request specific sound effects if you can’t already find what you want on the site.
On Zapsplat you can browse 26 categories including fantasy, warfare, and animals for individual sounds. Or, you can visit the Free SFX Packs section and download a set of related sounds together. Packs include ‘Magic Wand’, ‘Science Fiction Alarms’, and ‘Cartoon Boings’.
Part 2: Make Your Own Sound Effects for YouTube Videos
Here are some easy ways you can make your own sound effects at home.
1. Making Natural Sounds
Fire using cellophane. Just crinkle the cellophane wrap to create a sound like a crackling fire. Chip bags work too.
Rain using rice. Sprinkle rice (or birdseed) onto a thin metal sheet.
Alternatively for rain, you could record the sound of bacon frying.
Wind using a Ziploc. Fill a large ziplock with air and then open the bag a bit and force the air out.
Thunder with aluminum. Just shake a sheet of aluminum to make a thunder sound.
2. Making Action or Sci-Fi Sounds
Ticking Bomb with a clock. Any clock that ticks will do.
Hits/Blows with a pillow. Hit a pillow to make a sound like a body blow. For really hard hits, you might want to whack a sofa cushion with a broomstick.
Bones breaking with celery. Just snap the celery stalks in half.
Richard Bennett
Richard Bennett is a writer and a lover of all things video.
Follow @Richard Bennett
Richard Bennett
Oct 26, 2023• Proven solutions
Whether you’re making a short film and need sounds to go with your action sequences, or just want some fun noises for your vlog or challenge video, it’s easy to find great sound effects you can use for free online.
Here are 7 places to download free sound effects! Or, if you’re interested in making your own, click here to jump to ‘Make Your Own Sound Effects’.
Part 1: YouTube Free Sound Effects Download
1. Filmora Sound Effects
Filmora Video Editor provides you with a huge library of free sound effects without download from anywhere else. There are 25 pieces of sound effect available in Filmora, such as transition swoosh, cinematic horn, beep sound and phone ring.
If you do not see the sound effect you want in Filmora, you can also go to the online effect store to find out more sound effects. The sounds are in.wav or mp3 files, so you do not have to use them inside Filmora only. They’re free to use for everyone after downloading, no matter what video editor you use.
The Filmstock audio effect library covers sound effects in different categories: nature sounds, animal sounds, movie sounds, gun sounds, fireworks, bird sounds, cricket sounds, wet sounds, dog barking, water sounds, guitar sounds, city sounds, monster sounds, laughing sounds, dinosaur sounds, fart sounds, pet sounds, dog sounds, car sounds, video game, and thunderstorm.
2. Freesound
Sounds on Freesound are uploaded by users under various Creative Commons licenses (some may require attribution, some may not allow commercial use).
The easiest way to browse the sounds on Freesound is probably to click into Sounds in the top menu, and then ‘Browse tags’ in the menu on the right of your screen. All of the tags on the site will be displayed, and the most commonly used ones will be biggest. The tags include what the sounds are meant to be (i.e. percussion or thunder) and what type of sounds they are (i.e. field-recording or synth).
3. PacDV
PacDV has been producing sound effects since 2001. You can browse and download sounds individually from their site, or download all at once in a huge bundle. You can use all the sounds for free (you just can’t sell them or provide direct download links to other people).
On the left of the website there’s a menu where you can choose what kinds of sound effects you’re interested in. The categories are:
Ambience: this is where you’ll find general background sounds, like ‘car interior’ or ‘grocery store’. Even when nothing in particular is happening, locations have sounds. This is also where you’ll find things like crowd noises.
Domestic: these are sounds you hear around the home, like sounds related to doors and appliances.
Interfaces: a lot of tech sounds live here, like beeps and clicks. Beeps are all titled ‘Beep’, but nothing else is really labeled beyond being called ‘Interface Sound’. You just have to listen and find out.
Machines: a variety of different machine sounds can be found here, from power tools like chainsaws and drills to things like typewriters or paper shredders.
Mechanical: this is where you’ll find sounds associated with cameras, coin slots, zippers, and more.
People: laughing, clapping, footsteps and even farts – this is where you’ll find human sounds.
Transportation: these sounds are all related to vehicles, be they cars or airplanes.
Voices: here you’ll find voices saying common things like ‘hi’, ‘aaah’, or ‘come on’.
Music: PacDV also has a selection of royalty free music. If you use it in your video, you need to give them credit by including Music by <www.pacdv.com/sounds/> in your video description.
Miscellaneous: sounds that don’t quite fit into other categories.
4. Sound Bible
The sounds on Sound Bible are either in the public domain, which means anyone can use them for anything without restriction, or licensed under the Creative Commons Attribution 3.0 License, which means you just need to provide a credit for the person who created the effect you use. When you click on sound effects on Sound Bible you’ll be able to see whether the effect is Public Domain or Attribution 3.0, and it will tell you who the sound was recorded by. Both public domain and Attribution 3.0 sounds are available for commercial use.
This site has a search function, so if you want dog sounds you can search for ‘dog’. This might be easier than trying to pick the category closest to what you’re looking for and just scrolling through, like you do on some sites.
Sound Bible is updated about 3 times a week, so you can always check back for fresh sounds.
5. Sound Gator
Sound Gator has a huge number of sound effects divided into too many categories to list (24). The categories tend to be very specific, like ‘drink sound effects’ or ‘phone sound effects. If you don’t see a category that sounds like what you’re looking for, make sure to check under Misc Sound Effects because there are 68 Mp3#s in there for everything from tools to static.
You can sort the sound effects on Sound Gator by date added, popularity, top rated, runtime, top favorites, or most discussed.
6. Sounds Crate
Sounds Crate is part of the larger Production Crate which provides all kinds of resources to creators for free (you can upgrade to a paid account to access exclusive content, but there’s a lot of great content available for free). The categories available on Sounds Crate are:
Ambient: room tones and general background noises from nature or cities.
Animal: includes things like puppy barks and angry cats.
Blades and Metal: you’ll find sounds from swords, chains, and other metal implements here.
Crashes and Debris: perfect for action, this is where you’ll find sounds associated with destruction.
Electricity: things like electrical blasts and charges can be found here.
Electronics: any sound made by anything electrical, like beeps and appliance sounds.
Explosions and Bangs: if you have a visual explosion effect, you’ll probably need to combine it with something from here.
Fight: find sounds associated with action sequences, like whooshes and punches.
Gun Related: everything from reloads to gunshots.
Impact: any kind of thud or shattering sound.
Lock n’ Load: although there are some ‘gun checking’ sounds in here, it’s mostly clothing related sounds like zippers and Velcro.
Movement: wind sounds and whooshes.
People: sounds humans make, from voices to footsteps.
Sci-Fi SFX: zaps, beeps, and sci-fi ambience.
Vehicle: includes both common vehicles like cars and less-common vehicles like tanks.
Weapons: both modern weapons like missiles and old-timey things like arrows.
7. Zapsplat
Zapsplat claims to be the fastest growing free sound effects library on the internet. With more than 23,999 professional sounds, and more being added every week, they might just be right. The owner of the site, Alan McKinney, adds 500 sound effects every week by himself and the site also accepts sounds from contributors. All of their sounds were recorded using professional equipment and then edited to make them perfect.
You can even send Alan a message and request specific sound effects if you can’t already find what you want on the site.
On Zapsplat you can browse 26 categories including fantasy, warfare, and animals for individual sounds. Or, you can visit the Free SFX Packs section and download a set of related sounds together. Packs include ‘Magic Wand’, ‘Science Fiction Alarms’, and ‘Cartoon Boings’.
Part 2: Make Your Own Sound Effects for YouTube Videos
Here are some easy ways you can make your own sound effects at home.
1. Making Natural Sounds
Fire using cellophane. Just crinkle the cellophane wrap to create a sound like a crackling fire. Chip bags work too.
Rain using rice. Sprinkle rice (or birdseed) onto a thin metal sheet.
Alternatively for rain, you could record the sound of bacon frying.
Wind using a Ziploc. Fill a large ziplock with air and then open the bag a bit and force the air out.
Thunder with aluminum. Just shake a sheet of aluminum to make a thunder sound.
2. Making Action or Sci-Fi Sounds
Ticking Bomb with a clock. Any clock that ticks will do.
Hits/Blows with a pillow. Hit a pillow to make a sound like a body blow. For really hard hits, you might want to whack a sofa cushion with a broomstick.
Bones breaking with celery. Just snap the celery stalks in half.
Richard Bennett
Richard Bennett is a writer and a lover of all things video.
Follow @Richard Bennett
Harnessing iMovie’s Potential for YouTube Broadcasting
How to Upload a Video from iMovie to YouTube?

Liza Brown
Aug 18, 2022• Proven solutions
“Is iMovie good for YouTube?”
The iMovie is not only good for YouTube but various other social media platforms. The thing is, you have to compromise with the quality offered by Apple’s video editor iMovie. Well, iMovie is perfect for getting started for beginners. But, the professionals and ones who want a bit high features than basic ones should look elsewhere. Thus, we always recommend alternatives to a particular software for our audience. In this article, there is a mention of Wondershare Filmora to overcome the drawbacks of iMovie.
Without further ado, let’s begin with how to upload a video from iMovie to YouTube. We want to lead with the best iMovie export settings, specific troubleshooting issues, and our alternative intro section to overcome iMovie’s limitations.
Part 1: How to Upload a Video from iMovie to YouTube?
iMovie is ideal for making YouTube videos if you are too basic and are not looking for advanced features. Remember that professionalism pays in these platforms and helps you stand better among others. If you’re still interested in making introductory videos, here is a step-by-step guide on uploading a video to YouTube from iMovie on Mac first and leading with iPhone.
Step-by-Step Tutorial on how to upload a video from iMovie to YouTube on Mac
Step 1: Create a Project
On the first step, go to iMovie on Mac and click the Create New tab below.
Step 2: Import Media
Click the Import Media button and browse the files on your computer, as shown below.
Step 3: Edit Clips
It’s time to edit video footage. Drag your video to the timeline, as shown below.
Then, you can trim and drag the edges of video clips to allow editing.
Step 4: Add Titles
You can add titles by clicking the Title tab and further drag the Title’s template into the timeline.
Step 5: Export the Video
Click the Export button as follows after editing is over.
Select YouTube to upload your video over the platform directly.
Step 6: Save
After selecting the desired platform, click the Next tab to proceed with saving the file.
At last, save your video as shown below.
Step-by-Step Tutorial on how to upload iMovie to YouTube from iPhone
Step 1: Share the iMovie Project
Go to iMovie on your iPhone. Open the iMovie project on your iPhone and tap the Share button to select YouTube. Enter the information of Title, Description, Size, Tags, Privacy, and Location (optional).
Step 2: Upload iMovie Files
For ease of use, you can upload saved videos in Photo Library on your iPhone. Then, you can upload iMovie videos via the YouTube iOS app. Sign In to YouTube and click the Camera icon at the top of the Home page. Select your iPhone Photo Library file and set the video Title, Description, Size, Tags, and Privacy. Then, hit the Upload button to confirm.
Part 2: The Best iMovie Export Settings for YouTube Videos
As we all know that iMovie consists of a bit long procedure to export projects. Here are some tips on the best iMovie export settings to avoid an unnecessary headache.
- Set small resolution: Small resolution plays a more significant role, especially while uploading. Thus, you can set the smallest resolution in the Email tab of the Export button.
2. Change Export settings in the File tab: There is a File tab under the Export button. Click it and find various settings that you need to change to get the best export settings for YouTube 2021. Make the Title of the video as small as possible. Set the resolution at 1080P than 4K.
However, it isn’t going to upgrade the resolution if your video is already in the 1080P definition. Now, the last setting that will crazily offer you the best quality and lots of space-saving. You have to select Best (ProRes) in quality settings for this purpose. These settings also take less time to upload to YouTube.
3. Compress is not for speed: Various options you see in the Compresstab are not for speed. They are for how you save the video on a desktop. Thus, always choose the Better Quality tab than Faster.
- Do not export directly to YouTube: iMovie is pretty basic and doesn’t offer great settings to upload your video instantly. You may have to make changes to the uploaded video even if you do this as per our step-by-step guide mentioned above.
Part 3: How to fix the “Failed to Upload to YouTube” Error on iMovie?
The “iMovie to YouTube failed” problem occurs when you directly upload a YouTube video from iMovie. The issue will result if you upload from any third-party uploader. That is why the direct upload doesn’t work, especially in iMovie. You can opt to share your video to the desktop first and then drag it to upload to the YouTube platform.
Part 4: Upload Videos to YouTube with the Best Alternative to iMovie - Wondershare Filmora
“What can I use instead of iMovie to overcome its limitations?”
When you see that iMovie is not uploading to YouTube or iMovie upload to YouTube got stuck, go for a better alternative. In this section, we’d like to recommend Wondershare Filmora that offers the best export settings compared to iMovie. It is the go-to solution if you can’t upload video from iMovie to YouTube directly. Filmora further provides intuitive editing tools that professionally make your YouTube video projects.
Export Key Aspects of Wondershare Filmora in comparison to iMovie:
- It offers a long list of export resolutions to choose from.
- You get separate video and audio settings such as Encoder, Channel, Frame Rate, Bit Rate, Resolution, etc.
- It is further compatible with export to various devices including the iPhone, Samsung, iPod, Apple TV, iPad, Google Pixel, PSP, Smart TV, etc.
Step-by-Step Guide on how to upload a video from iMovie to YouTube via Wondershare Filmora
Step 1: Click the Export button and select resolution
After your project in Wondershare Filmora is over, click the Export tab and select video resolution from the Local tab, as shown below.
It has a list of formats. You can also edit the Name and saving location here.
Step 2: Select Quality
Select the Settings button and choose from three quality levels of Best, Better, and Good. You can also adjust video and audio parameters, including the Encoder, Frame Rate, Resolution, Bit Rate, etc.
Step 3: Select platform
Select the YouTube tab, Sign In to your YouTube account, and hit the Export button after modifying the Title and Quality if needed. Also, make sure to check the Enable GPU accelerated video encoding tab.
Select Wondershare Filmora as the ultimate solution even if iMovie upload to YouTube not showing up.
Conclusion
Hopefully, we’ve informed you of the relevant facts on how to upload a video from iMovie to YouTube. We have also examined the number of troubleshooting issues involved in the iMovie video editor. Well, you will get to face similar kinds of export difficulties in the iMovie editor. Also, the entire procedure to end the exporting task is a bit long in iMovie compared to any other video editing software. Thus, it’s crucial to check out what other alternatives the technological world has today. We can’t state to you a better beginner-friendly yet advanced editing option than Wondershare Filmora that rightly outtakes the iMovie video editor in all aspects.
Liza Brown
Liza Brown is a writer and a lover of all things video.
Follow @Liza Brown
Liza Brown
Aug 18, 2022• Proven solutions
“Is iMovie good for YouTube?”
The iMovie is not only good for YouTube but various other social media platforms. The thing is, you have to compromise with the quality offered by Apple’s video editor iMovie. Well, iMovie is perfect for getting started for beginners. But, the professionals and ones who want a bit high features than basic ones should look elsewhere. Thus, we always recommend alternatives to a particular software for our audience. In this article, there is a mention of Wondershare Filmora to overcome the drawbacks of iMovie.
Without further ado, let’s begin with how to upload a video from iMovie to YouTube. We want to lead with the best iMovie export settings, specific troubleshooting issues, and our alternative intro section to overcome iMovie’s limitations.
Part 1: How to Upload a Video from iMovie to YouTube?
iMovie is ideal for making YouTube videos if you are too basic and are not looking for advanced features. Remember that professionalism pays in these platforms and helps you stand better among others. If you’re still interested in making introductory videos, here is a step-by-step guide on uploading a video to YouTube from iMovie on Mac first and leading with iPhone.
Step-by-Step Tutorial on how to upload a video from iMovie to YouTube on Mac
Step 1: Create a Project
On the first step, go to iMovie on Mac and click the Create New tab below.
Step 2: Import Media
Click the Import Media button and browse the files on your computer, as shown below.
Step 3: Edit Clips
It’s time to edit video footage. Drag your video to the timeline, as shown below.
Then, you can trim and drag the edges of video clips to allow editing.
Step 4: Add Titles
You can add titles by clicking the Title tab and further drag the Title’s template into the timeline.
Step 5: Export the Video
Click the Export button as follows after editing is over.
Select YouTube to upload your video over the platform directly.
Step 6: Save
After selecting the desired platform, click the Next tab to proceed with saving the file.
At last, save your video as shown below.
Step-by-Step Tutorial on how to upload iMovie to YouTube from iPhone
Step 1: Share the iMovie Project
Go to iMovie on your iPhone. Open the iMovie project on your iPhone and tap the Share button to select YouTube. Enter the information of Title, Description, Size, Tags, Privacy, and Location (optional).
Step 2: Upload iMovie Files
For ease of use, you can upload saved videos in Photo Library on your iPhone. Then, you can upload iMovie videos via the YouTube iOS app. Sign In to YouTube and click the Camera icon at the top of the Home page. Select your iPhone Photo Library file and set the video Title, Description, Size, Tags, and Privacy. Then, hit the Upload button to confirm.
Part 2: The Best iMovie Export Settings for YouTube Videos
As we all know that iMovie consists of a bit long procedure to export projects. Here are some tips on the best iMovie export settings to avoid an unnecessary headache.
- Set small resolution: Small resolution plays a more significant role, especially while uploading. Thus, you can set the smallest resolution in the Email tab of the Export button.
2. Change Export settings in the File tab: There is a File tab under the Export button. Click it and find various settings that you need to change to get the best export settings for YouTube 2021. Make the Title of the video as small as possible. Set the resolution at 1080P than 4K.
However, it isn’t going to upgrade the resolution if your video is already in the 1080P definition. Now, the last setting that will crazily offer you the best quality and lots of space-saving. You have to select Best (ProRes) in quality settings for this purpose. These settings also take less time to upload to YouTube.
3. Compress is not for speed: Various options you see in the Compresstab are not for speed. They are for how you save the video on a desktop. Thus, always choose the Better Quality tab than Faster.
- Do not export directly to YouTube: iMovie is pretty basic and doesn’t offer great settings to upload your video instantly. You may have to make changes to the uploaded video even if you do this as per our step-by-step guide mentioned above.
Part 3: How to fix the “Failed to Upload to YouTube” Error on iMovie?
The “iMovie to YouTube failed” problem occurs when you directly upload a YouTube video from iMovie. The issue will result if you upload from any third-party uploader. That is why the direct upload doesn’t work, especially in iMovie. You can opt to share your video to the desktop first and then drag it to upload to the YouTube platform.
Part 4: Upload Videos to YouTube with the Best Alternative to iMovie - Wondershare Filmora
“What can I use instead of iMovie to overcome its limitations?”
When you see that iMovie is not uploading to YouTube or iMovie upload to YouTube got stuck, go for a better alternative. In this section, we’d like to recommend Wondershare Filmora that offers the best export settings compared to iMovie. It is the go-to solution if you can’t upload video from iMovie to YouTube directly. Filmora further provides intuitive editing tools that professionally make your YouTube video projects.
Export Key Aspects of Wondershare Filmora in comparison to iMovie:
- It offers a long list of export resolutions to choose from.
- You get separate video and audio settings such as Encoder, Channel, Frame Rate, Bit Rate, Resolution, etc.
- It is further compatible with export to various devices including the iPhone, Samsung, iPod, Apple TV, iPad, Google Pixel, PSP, Smart TV, etc.
Step-by-Step Guide on how to upload a video from iMovie to YouTube via Wondershare Filmora
Step 1: Click the Export button and select resolution
After your project in Wondershare Filmora is over, click the Export tab and select video resolution from the Local tab, as shown below.
It has a list of formats. You can also edit the Name and saving location here.
Step 2: Select Quality
Select the Settings button and choose from three quality levels of Best, Better, and Good. You can also adjust video and audio parameters, including the Encoder, Frame Rate, Resolution, Bit Rate, etc.
Step 3: Select platform
Select the YouTube tab, Sign In to your YouTube account, and hit the Export button after modifying the Title and Quality if needed. Also, make sure to check the Enable GPU accelerated video encoding tab.
Select Wondershare Filmora as the ultimate solution even if iMovie upload to YouTube not showing up.
Conclusion
Hopefully, we’ve informed you of the relevant facts on how to upload a video from iMovie to YouTube. We have also examined the number of troubleshooting issues involved in the iMovie video editor. Well, you will get to face similar kinds of export difficulties in the iMovie editor. Also, the entire procedure to end the exporting task is a bit long in iMovie compared to any other video editing software. Thus, it’s crucial to check out what other alternatives the technological world has today. We can’t state to you a better beginner-friendly yet advanced editing option than Wondershare Filmora that rightly outtakes the iMovie video editor in all aspects.
Liza Brown
Liza Brown is a writer and a lover of all things video.
Follow @Liza Brown
Also read:
- Next-Level Cinema Selection - YouTube Edition
- Effective, Legal Strategies for Content Visibility
- 2024 Approved Decrypting the Mystery Understanding 'Unlisted' Content on YouTube
- Best 12 YouTube Gaming Intro Makers - Free and Paid for 2024
- 2024 Approved Captivate Viewers Social Media Strategies for YouTube
- [Updated] Cheap Yet Good Quality Cameras Reviewed Here
- Crafting News End Credits A Step-by-Step Guide for 2024
- Gain More Views Beginner’s Guide to YouTube SEO
- Leading Audio-to-Text Online Solutions
- YouTube Success Elevating Audience Count
- DIY Digital Footprint Creating YouTube Thumbnails From Mobile Devices for 2024
- YouTube Listening Made Easy with Direct Recording
- [Updated] Essential 8 Linux Software for Editors
- Shortcut to Go-To Tags Maximizing Your YouTube Impact
- The Ultimate Blueprint for Captivating and Professional-Looking Live Video Thumbnails
- [New] Dissecting YouTube Chatter
- [Updated] Elevate Your Channels Selecting Prime Microphones for Every Content Category
- [New] 2024 Approved FB Video Retrieval The Top 5 Software Compared
- Updated Beyond Vegas Pro 10 Exceptional Video Editing Software Options for Mac Users
- Refining Your TikTok Profile Age with Ease
- How to Reset a Vivo S17 Phone that is Locked?
- [New] In 2024, Simplify Meetings A Comprehensive Guide to Skype Call Recorders
- Play Store Not Working On Xiaomi Mix Fold 3? 8 Solutions Inside | Dr.fone
- 8 Solutions to Fix Find My Friends Location Not Available On Honor 80 Pro Straight Screen Edition | Dr.fone
- 2024 Approved Revolutionize Your Workflow Top Free Mac Dictation Apps
- [Updated] Exploring the Depths of Screen Recording Software for 2024
- New In 2024, Discover the 8 Most Compelling Soundscapes for YouTube Debut Videos
- Title: "Boost Your Content Access Free Vocal SFX"
- Author: Brian
- Created at : 2024-05-25 11:24:23
- Updated at : 2024-05-26 11:24:23
- Link: https://youtube-video-recordings.techidaily.com/boost-your-content-access-free-vocal-sfx/
- License: This work is licensed under CC BY-NC-SA 4.0.
