
Best Practices for Organizing Online Video Stories
Best Practices for Organizing Online Video Stories
How to structure YouTube videos

Richard Bennett
Mar 27, 2024• Proven solutions
Creating a YouTube channel and uploading video content is only one part of the key to your success. With so much competition on the platform, it’s crucial that you stand out from the crowd with efficient, professional videos that are a pleasure to watch.
Without some planning and structure in mind before you begin filming, it’s all too easy to get a bit lost and start to ramble or fumble your words. Video’s filled with ‘umm’ and ‘err’ are neither pleasant to watch nor engaging.
If you’re serious about making a great YouTube channel and developing a loyal fan base, you’re going to need a workable structure for every video to help you stay on track. Here’s what you need to know:
Quick Jump Menu
- Why is structuring your video important?
- How should you structure YouTube Video Content?
- Ready to go out and make amazing videos?
Why is structuring your video important?
The structure of your video can make all the difference between a successful YouTube channel and a big waste of time. Your objective is to get people watching more and watching all the way to the end. A great structure can:
- Build interest and engagement: By keeping something in reserve and naturally building interest as you go along, people will be compelled to watch longer and interact more with your channel.
- Helps you rank higher: Longer and higher numbers of views will demonstrate your position as an authority well. The YouTube algorithm uses these metrics as part of their ranking factor, so the more and longer views you get, the higher you’ll rank in search.
- Builds consistency and familiarity: If all your videos follow a typical structure, your fans will come to be familiar with your format. They’ll know what to expect from your content and will watch more regularly as a result.
So, now you understand why structure is so important to your channel, let’s take a look at ways in which you can create an amazing structure for every video you produce.
How should you structure YouTube video content?
There are some key elements of a YouTube video’s structure which can make it more natural, more engaging and more fun to watch. When you’re planning your structure, you should follow a logical timeline to take the viewer from start to finish easily, and to ensure you get the actions you want at the end.
Intro
People love to be told what’s about to happen, and an intro can be a crucial step in ensuring they are going to continue watching your content. By explaining clearly what they are about to see, why it’s important to them and what problems you’re aiming to solve, you’ll keep them hooked and prevent them from browsing away to the next search result.
An introduction doesn’t need to be long or particularly involved. Remember, you don’t want to give away all your information here, as what you want is to encourage them to watch until the end. Something like “I’m going to show you … which will help you to …” is fine.
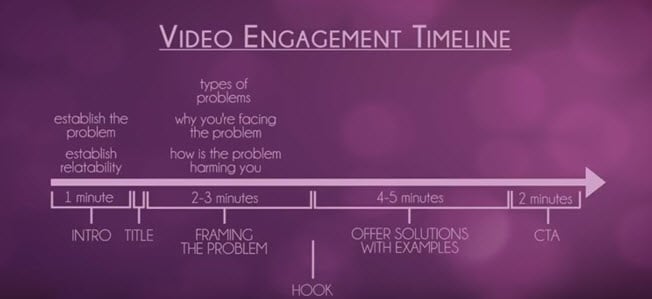
Your idea and purpose need to be conveyed fast and effectively if you’re keen to get their interest. Most viewers will decide within the first three to five seconds of a video if they want to invest their time in watching, so it’s crucial you capture their interest and engage them fast to stop them drifting away.
Main content
Once you’ve introduced your video, it’s time to start working through your content. This should be done by:
- Framing the problem
What are the types of problems that your viewers will have encountered which your video can solve? How is the problem affecting you and your viewers? Take around two to three minutes to describe the problems that you hope your video will solve, and work on being empathetic so people can relate to you and the issue you’re discussing.
- Offer solutions with examples
Move on to your solution to the problem. How did you find this solution? Is it easy to implement? Take around four to five minutes to address your solution and give examples of how it works in practice.
Now you’ve addressed the issue that your video content will solve, you’re almost ready to ask them to take the next step. Almost. There’s one more key element in your structure that you need to remember to include.
Hook
The hook can be placed anywhere in your content, although it’s most successful when placed either in the introduction or while you are framing the problem. The hook is a tidbit that aims to encourage a full viewing of your video, so don’t give away your solutions but do give them a reason to carry on watching.
If there’s a particular point where you think they might become bored or distracted, this is a great time to insert your hook. Come up with a powerful hook, for instance ‘with my solution I managed to go from ten views to two hundred in an hour’ or ‘when you hear this solution you’ll understand how I tripled my profits overnight’. Give them a reason to want to stay to the end.
Outro
Your outro shouldn’t just be about signing off in your unique way with some lovely music and visuals. This is the point at which you can ask something back from your audience, whatever that may be. We call this a ‘call to action’, and it could eb something as simple as subscribing through to something more involved like visiting your website.
Think about what you want from your audience; what should they do next? Remember to ask via a strong call to action, otherwise you’ve simply given them some free advice with very little in the way of a return for you.
Script or no script?
Many YouTubers shy away from using any sort of script, feeling that this will make them less relatable and natural. Choosing whether or not to script is entirely up to you; some people feel more comfortable with a script to hand, whereas others prefer to just wing it as they go.
If you don’t feel a script would work for you, do consider having a very rough outline of your structure and the points you want to make readily available while filming. It will help you regain control if you do happen to lose your place and will ensure you get all the information across that you’d planned to.
If you do think a full script would work better for you, make sure you are able to come across as naturally as possible while reading it. Write your script the same way you speak and run through a few times so you’re not squinting at words while you’re on camera. If you regularly wander off script, this could be a sign that a freer flowing style is more your thing.
Read More to Get : How to Loop a YouTube Video >>
Ready to go out and make amazing videos?
Having a structure to your videos might seem a little unnatural at first, but there’s plenty of evidence to show that people who take the time to plan their content get far better results than those who just improvise. If you’re unsure of the best structure for your content, watch videos made by others in your niche to see how they organize theirs.
That’s not to say you have to copy the leaders to be a success; indeed, you’ll be far more successful on YouTube if you continue to be unique. But there’s always room to learn from the best and to take inspiration from those who’ve been getting the very best results.
Richard Bennett
Richard Bennett is a writer and a lover of all things video.
Follow @Richard Bennett
Richard Bennett
Mar 27, 2024• Proven solutions
Creating a YouTube channel and uploading video content is only one part of the key to your success. With so much competition on the platform, it’s crucial that you stand out from the crowd with efficient, professional videos that are a pleasure to watch.
Without some planning and structure in mind before you begin filming, it’s all too easy to get a bit lost and start to ramble or fumble your words. Video’s filled with ‘umm’ and ‘err’ are neither pleasant to watch nor engaging.
If you’re serious about making a great YouTube channel and developing a loyal fan base, you’re going to need a workable structure for every video to help you stay on track. Here’s what you need to know:
Quick Jump Menu
- Why is structuring your video important?
- How should you structure YouTube Video Content?
- Ready to go out and make amazing videos?
Why is structuring your video important?
The structure of your video can make all the difference between a successful YouTube channel and a big waste of time. Your objective is to get people watching more and watching all the way to the end. A great structure can:
- Build interest and engagement: By keeping something in reserve and naturally building interest as you go along, people will be compelled to watch longer and interact more with your channel.
- Helps you rank higher: Longer and higher numbers of views will demonstrate your position as an authority well. The YouTube algorithm uses these metrics as part of their ranking factor, so the more and longer views you get, the higher you’ll rank in search.
- Builds consistency and familiarity: If all your videos follow a typical structure, your fans will come to be familiar with your format. They’ll know what to expect from your content and will watch more regularly as a result.
So, now you understand why structure is so important to your channel, let’s take a look at ways in which you can create an amazing structure for every video you produce.
How should you structure YouTube video content?
There are some key elements of a YouTube video’s structure which can make it more natural, more engaging and more fun to watch. When you’re planning your structure, you should follow a logical timeline to take the viewer from start to finish easily, and to ensure you get the actions you want at the end.
Intro
People love to be told what’s about to happen, and an intro can be a crucial step in ensuring they are going to continue watching your content. By explaining clearly what they are about to see, why it’s important to them and what problems you’re aiming to solve, you’ll keep them hooked and prevent them from browsing away to the next search result.
An introduction doesn’t need to be long or particularly involved. Remember, you don’t want to give away all your information here, as what you want is to encourage them to watch until the end. Something like “I’m going to show you … which will help you to …” is fine.
Your idea and purpose need to be conveyed fast and effectively if you’re keen to get their interest. Most viewers will decide within the first three to five seconds of a video if they want to invest their time in watching, so it’s crucial you capture their interest and engage them fast to stop them drifting away.
Main content
Once you’ve introduced your video, it’s time to start working through your content. This should be done by:
- Framing the problem
What are the types of problems that your viewers will have encountered which your video can solve? How is the problem affecting you and your viewers? Take around two to three minutes to describe the problems that you hope your video will solve, and work on being empathetic so people can relate to you and the issue you’re discussing.
- Offer solutions with examples
Move on to your solution to the problem. How did you find this solution? Is it easy to implement? Take around four to five minutes to address your solution and give examples of how it works in practice.
Now you’ve addressed the issue that your video content will solve, you’re almost ready to ask them to take the next step. Almost. There’s one more key element in your structure that you need to remember to include.
Hook
The hook can be placed anywhere in your content, although it’s most successful when placed either in the introduction or while you are framing the problem. The hook is a tidbit that aims to encourage a full viewing of your video, so don’t give away your solutions but do give them a reason to carry on watching.
If there’s a particular point where you think they might become bored or distracted, this is a great time to insert your hook. Come up with a powerful hook, for instance ‘with my solution I managed to go from ten views to two hundred in an hour’ or ‘when you hear this solution you’ll understand how I tripled my profits overnight’. Give them a reason to want to stay to the end.
Outro
Your outro shouldn’t just be about signing off in your unique way with some lovely music and visuals. This is the point at which you can ask something back from your audience, whatever that may be. We call this a ‘call to action’, and it could eb something as simple as subscribing through to something more involved like visiting your website.
Think about what you want from your audience; what should they do next? Remember to ask via a strong call to action, otherwise you’ve simply given them some free advice with very little in the way of a return for you.
Script or no script?
Many YouTubers shy away from using any sort of script, feeling that this will make them less relatable and natural. Choosing whether or not to script is entirely up to you; some people feel more comfortable with a script to hand, whereas others prefer to just wing it as they go.
If you don’t feel a script would work for you, do consider having a very rough outline of your structure and the points you want to make readily available while filming. It will help you regain control if you do happen to lose your place and will ensure you get all the information across that you’d planned to.
If you do think a full script would work better for you, make sure you are able to come across as naturally as possible while reading it. Write your script the same way you speak and run through a few times so you’re not squinting at words while you’re on camera. If you regularly wander off script, this could be a sign that a freer flowing style is more your thing.
Read More to Get : How to Loop a YouTube Video >>
Ready to go out and make amazing videos?
Having a structure to your videos might seem a little unnatural at first, but there’s plenty of evidence to show that people who take the time to plan their content get far better results than those who just improvise. If you’re unsure of the best structure for your content, watch videos made by others in your niche to see how they organize theirs.
That’s not to say you have to copy the leaders to be a success; indeed, you’ll be far more successful on YouTube if you continue to be unique. But there’s always room to learn from the best and to take inspiration from those who’ve been getting the very best results.
Richard Bennett
Richard Bennett is a writer and a lover of all things video.
Follow @Richard Bennett
Efficient Mac Video Resizing to Fixed Ratio
Quick Resize YouTube Videos to Right Aspect Ratio on Mac

Liza Brown
Oct 26, 2023• Proven solutions
YouTube is one of the demanding platforms with more than 2.3 billion users worldwide as of 2021. And, in this digitally oriented world, you’re left with no reason not to create a YouTube channel specifically when you have the right talent to use one. Well, this guide is for those who are already into YouTube video creation and now need help on how to resize YouTube videos as per different aspect ratios. According to YouTube’s aspect ratio, it’s the right place to move forward even if you want to resize your videos present on other social media apps. We know brands and other influencers generally practice this kind of social media marketing.
So, let’s get started with our session on resizing YouTube as per the ideal aspect ratio without further ado.
Part 1: What’s the Right Aspect Ratio of YouTube Videos?
For attracting more audience and increasing engagement on YouTube videos, you have to look at each factor, along with the YouTube video quality. And, you cannot overlook the size of YouTube video among these factors to make it your perfect shot among competitors. Considering the importance of such factors, we’ve come up with this specific section on introducing you to the correct aspect ratio for YouTube videos.
It’s crucial to know the size before you start the YouTube game!
YouTube allows you to upload videos of different sizes ranging from 240p to 8K. And, the dimensions for these different sizes are as follows.
- 240p: 426x240 pixels
- 360p: 640x360 pixels
- 480p: 854x480 pixels
- 720p: 1280x720 pixels
- 1080p: 1920x1080 pixels
- 1440p: 2560x1440 pixels
- 2160p: 3840x2160 pixels
- 43200p: 7680×4320 pixels
Along with these, the aspect ratio, video size, and length of YouTube video should also be taken into consideration while uploading YouTube videos.
Thus, the ideal aspect ratio to resize YouTube video is perfect as 16:9, which we’ll diversify in the following three sections.
1. Computer
On a computer, the standard aspect ratio for YouTube video is 16:9. And, the YouTube player will automatically adjust other aspect ratios than the standard size. For instance, it may add padding of white or gray color depending upon the theme. However, it’s advisable to avoid these things like padding as they interfere with YouTube’s dynamic adjustments.
2. Android Phone
In the Android application, the scenario is quite different from YouTube videos. The app automatically adjusts the player as per the video size. The video will always fit the screen, whether it’s square, vertical, or horizontal. Ultimately, the videos will be shorter for widescreen and square for vertical.
3. iPad & iPhone
Similarly, the YouTube app for iPad and iPhone automatically adjust the video size to fit the screen. Thus, every video will fit the screen, even if it’s square, horizontal, or vertical.
Before we let you know how to resize YouTube videos, here are some tips for creating awesome YouTube videos.
- Create a strategy for YouTube video beforehand.
- Search for ideas and topics.
- Understand the use of the best equipment and gear.
- Ensure the best YouTube video editing.
- Optimize YouTube videos.
Part 2: Automatically Resize YouTube Videos to Right Aspect Ratio with Wondershare Filmora for Mac
Hopefully, you have noted the correct aspect ratio required for YouTube videos. Now, it’s time to understand the quick process on how to resize YouTube videos as per this aspect ratio via Wondershare Filmora for Mac. Yes, the Filmora Mac’s latest version, 10.2, has recently launched a competitive feature - Auto Reframe. The feature automatically adjusts your video as per the selected aspect ratio and fits the video’s motion element quite instantly.
About Wondershare Filmora for Mac
Wondershare Filmora is one of the robust video editing programs containing both primary and advanced tools such as Motion Tracking, Keyframing, Green Screen, Audio Ducking, Color Matching, Auto Reframe, and so on.


Steps to Use Auto Reframe in Wondershare Filmora for Mac to Resize YouTube Videos
Step 1. Click the “Try It Free” button to download its latest version and launch it.
Step 2. Choose the More Tools > Auto Reframe after launching the Wondershare Filmora for Mac.

Step 3. Hit the Import button to upload a YouTube video for its resizing.

Step 4. Choose among five different aspect ratios, namely the Vertical, Square, Widescreen, Standard, and Cinema.

Tap the eye icon and preview the whole video.

Step 5. Toggle the Adjust frame tab and adjust the YouTube video screen as shown below.

It is present before the Advanced tab.
Then, adjust the Advanced settings, namely the Tracking Subject and Tracking Speed.

Step 6. Hit the Export tab to save the cropped video.

You can also upload the reframed video to Filmora for further editing.
Conclusion
So, this’s all about how to resize YouTube videos in its ideal aspect ratio. Right from the beginning, we’ve discussed the importance of creating YouTube videos in this digital transformation age and further considering the right fit of factors, including the size, length, quality, and aspect ratio of specific YouTube videos. Even though YouTube has the facility to adjust the video automatically, you have to edit in the cropped video, which is possible through integrated editing programs such as the one we’ve discussed above via Wondershare Filmora for Mac. This video editing software is quite remarkable and offers all the competitive features that both basic and advanced video editors need.
Liza Brown
Liza Brown is a writer and a lover of all things video.
Follow @Liza Brown
Liza Brown
Oct 26, 2023• Proven solutions
YouTube is one of the demanding platforms with more than 2.3 billion users worldwide as of 2021. And, in this digitally oriented world, you’re left with no reason not to create a YouTube channel specifically when you have the right talent to use one. Well, this guide is for those who are already into YouTube video creation and now need help on how to resize YouTube videos as per different aspect ratios. According to YouTube’s aspect ratio, it’s the right place to move forward even if you want to resize your videos present on other social media apps. We know brands and other influencers generally practice this kind of social media marketing.
So, let’s get started with our session on resizing YouTube as per the ideal aspect ratio without further ado.
Part 1: What’s the Right Aspect Ratio of YouTube Videos?
For attracting more audience and increasing engagement on YouTube videos, you have to look at each factor, along with the YouTube video quality. And, you cannot overlook the size of YouTube video among these factors to make it your perfect shot among competitors. Considering the importance of such factors, we’ve come up with this specific section on introducing you to the correct aspect ratio for YouTube videos.
It’s crucial to know the size before you start the YouTube game!
YouTube allows you to upload videos of different sizes ranging from 240p to 8K. And, the dimensions for these different sizes are as follows.
- 240p: 426x240 pixels
- 360p: 640x360 pixels
- 480p: 854x480 pixels
- 720p: 1280x720 pixels
- 1080p: 1920x1080 pixels
- 1440p: 2560x1440 pixels
- 2160p: 3840x2160 pixels
- 43200p: 7680×4320 pixels
Along with these, the aspect ratio, video size, and length of YouTube video should also be taken into consideration while uploading YouTube videos.
Thus, the ideal aspect ratio to resize YouTube video is perfect as 16:9, which we’ll diversify in the following three sections.
1. Computer
On a computer, the standard aspect ratio for YouTube video is 16:9. And, the YouTube player will automatically adjust other aspect ratios than the standard size. For instance, it may add padding of white or gray color depending upon the theme. However, it’s advisable to avoid these things like padding as they interfere with YouTube’s dynamic adjustments.
2. Android Phone
In the Android application, the scenario is quite different from YouTube videos. The app automatically adjusts the player as per the video size. The video will always fit the screen, whether it’s square, vertical, or horizontal. Ultimately, the videos will be shorter for widescreen and square for vertical.
3. iPad & iPhone
Similarly, the YouTube app for iPad and iPhone automatically adjust the video size to fit the screen. Thus, every video will fit the screen, even if it’s square, horizontal, or vertical.
Before we let you know how to resize YouTube videos, here are some tips for creating awesome YouTube videos.
- Create a strategy for YouTube video beforehand.
- Search for ideas and topics.
- Understand the use of the best equipment and gear.
- Ensure the best YouTube video editing.
- Optimize YouTube videos.
Part 2: Automatically Resize YouTube Videos to Right Aspect Ratio with Wondershare Filmora for Mac
Hopefully, you have noted the correct aspect ratio required for YouTube videos. Now, it’s time to understand the quick process on how to resize YouTube videos as per this aspect ratio via Wondershare Filmora for Mac. Yes, the Filmora Mac’s latest version, 10.2, has recently launched a competitive feature - Auto Reframe. The feature automatically adjusts your video as per the selected aspect ratio and fits the video’s motion element quite instantly.
About Wondershare Filmora for Mac
Wondershare Filmora is one of the robust video editing programs containing both primary and advanced tools such as Motion Tracking, Keyframing, Green Screen, Audio Ducking, Color Matching, Auto Reframe, and so on.
Steps to Use Auto Reframe in Wondershare Filmora for Mac to Resize YouTube Videos
Step 1. Click the “Try It Free” button to download its latest version and launch it.
Step 2. Choose the More Tools > Auto Reframe after launching the Wondershare Filmora for Mac.
Step 3. Hit the Import button to upload a YouTube video for its resizing.
Step 4. Choose among five different aspect ratios, namely the Vertical, Square, Widescreen, Standard, and Cinema.
Tap the eye icon and preview the whole video.
Step 5. Toggle the Adjust frame tab and adjust the YouTube video screen as shown below.
It is present before the Advanced tab.
Then, adjust the Advanced settings, namely the Tracking Subject and Tracking Speed.
Step 6. Hit the Export tab to save the cropped video.
You can also upload the reframed video to Filmora for further editing.
Conclusion
So, this’s all about how to resize YouTube videos in its ideal aspect ratio. Right from the beginning, we’ve discussed the importance of creating YouTube videos in this digital transformation age and further considering the right fit of factors, including the size, length, quality, and aspect ratio of specific YouTube videos. Even though YouTube has the facility to adjust the video automatically, you have to edit in the cropped video, which is possible through integrated editing programs such as the one we’ve discussed above via Wondershare Filmora for Mac. This video editing software is quite remarkable and offers all the competitive features that both basic and advanced video editors need.
Liza Brown
Liza Brown is a writer and a lover of all things video.
Follow @Liza Brown
Also read:
- [New] Access Unlimited Free, High-Quality Green Screen Footage Online
- [Updated] 2024 Approved Leading Popular Instagram After Effects Designs
- [Updated] Achieving YouTube Apex with Smart Management Tools
- [Updated] Optimizing Engagement on IGTV Through Thoughtful Dimension Tweaks
- 2024 Approved Boosting Earnings in Cosmetic Videography
- Ajey's YouTube Profit Milestones
- Expert Tips for Getting Your Google Chrome to Open After a Persistent Problem
- In 2024, Effective Thumbnails The Secret to Video Success
- In 2024, Elevate Your Channel'enas Expensive? Check Out Our 11 Free Name Generators Guide
- In 2024, Enhancing Images The Secret to Subtracting Backdrops in Photopea
- In 2024, Is GSM Flasher ADB Legit? Full Review To Bypass Your Samsung Galaxy M14 5G Phone FRP Lock
- In 2024, Top 4 Ways to Trace Samsung Galaxy M34 5G Location | Dr.fone
- Mr. Beast's Wealth Estimated Net Worth
- Pixelation Portraiture Sketching a Playful Virtual Emblem for 2024
- Premier Directory of Economical Visual Content Providers for 2024
- Prowl Without Interrups Find the Best 7 Android AdBlock Tools
- Spotify Plus: Is Paid Access a Smart Move?
- Step-by-Step Integrating Comments in YouTube Videos
- Unlock the Ultimate List of Prime Day 2 Cuyamanga 2024 Gaming Discounts Still On Sale | ZDNET Insights
- Title: Best Practices for Organizing Online Video Stories
- Author: Brian
- Created at : 2024-12-14 18:09:45
- Updated at : 2024-12-15 21:26:32
- Link: https://youtube-video-recordings.techidaily.com/best-practices-for-organizing-online-video-stories/
- License: This work is licensed under CC BY-NC-SA 4.0.