
:max_bytes(150000):strip_icc()/Streaming_GettyImages-1317927924_grinvalds_CROPPED-71ab52546b8b477ca2c0788bc26d150f.jpg)
"Best 10 Echo Augmentation Apps Desktop/Mobile"
Best 10 Echo Augmentation Apps: Desktop/Mobile
Best 10 YouTube Volume Boosters for Windows, macOS, Android, and iPhone

Shanoon Cox
Mar 27, 2024• Proven solutions
Have you ever listened to a YouTube video on max volume but still the sound wasn’t audible - even after turning up the YouTube volume as well as device audio? It is super annoying and inconvenient when you increase volume to max yet the video remains inaudible. YouTube volume issue could be due to various reasons such as poor audio quality of the built-in speakers or low original video sound. Well, there is a simple way to combat this problem i.e., sound booster. You can set different volume levels for the YouTube app on your PC or smartphone’s native volume controls. There are different YouTube volume boosters for Android, Windows, macOS, and iOS devices.
From listening to your favorite podcast to watching vlogs with your friends, you can use the best volume booster apps to increase the media sound volume and quality!
- Part 1: Best YouTube Volume Boosters for Windows and macOS
- Part 2: Best YouTube Volume Boosters for Android and iOS
- Part 3: Best YouTube Video Editing Software-Wondershare Filmora (Bonus Tip)
Part 1: Best YouTube Volume Boosters for Windows and macOS
Let’s introduce the best YouTube volume boosters for Windows and macOS:
1. FxSound (Windows and Mac)
FxSound is a very powerful tool that is made for Windows and macOS to enhance and boost the quality and volume of sound. This app comes with many features. For example, this audio software provides better sound quality, volume booster, and sound effects. Now you can listen to music, watch movies and play games without any distortion. Easily boost base, get customized effects and play with custom presets. You can download this app for your PC for free through the official website. People like this equalizer because it can make any audio format sound good even if it is 100 years old!

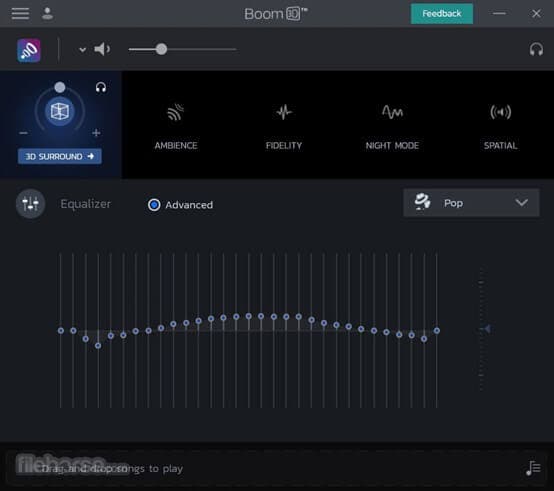
2. Boom 3D (Windows and macOS)
Boom 3D is a very popular app among many Windows and macOS users. This software is designed to help improve the audio on speakers or headphones that are connected to your computer. Boom 3D audio booster software also works with the Bluetooth devices that are connected to your PC. It can make any sound louder, clearer, and much better without buying any external devices. It provides us a 3D audio experience and works with any music player, video player, etc.!
3. Chrome Volume Booster Plugin (Windows)
This plugin has been rated 5 stars on the chrome web store as it is the best plugin for boosting up your volume on windows PC. This booster is so easy to download; you just have to go to the chrome web store and add the extension to your Google Chrome Browser. After adding it you can simply click on the icon and boost your volume up to 1000%! This plugin is free in the chrome store, just add it and choose how much louder you want your sound to be.

4. Letasoft Sound Booster (Windows)
Letasoft Sound Booster can only be used on windows. You can download it through the official website of Letasoft. It comes with a 14 days free trial period but after that, you have to buy their license to keep using it. This software is made to be used as an extra amplifier to boost up the volume of your audio or video if you think it is too low. The Letasoft Sound Booster app is very easy to use as you can control the volume from the slider. Moreover, it auto-starts and has no sound distortion.

5. Froyosoft Sound Booster (Mac)
Froyosoft Sound Booster is made for macOS users so they can boost video and audio file volumes. Individual application volumes can also be adjusted with the help of the Froyosoft Sound Booster. The good thing about this booster is that it is free for all users and it is 100% safe - you will not get any virus on your PC. You can download it from their website and increase the volume as high as you want to. So, get ready to get a clear and enhanced sound with the help of this app!

Part 2: Best YouTube Volume Boosters for Android and iOS
Following are the best YouTube sound boosters for Android and iOS devices:
1. AmpMe (Android and iOS)
With the help of AmpMe, you can start your little party through music apps. You don’t just get to listen to music but you can also chat with your friends - yup that’s right, it is a two-in-one app! The AmpMe app helps you to play the same music with your friends at the same time. It is one of the best volume booster apps that is available for both Android and iOS. It uses Bluetooth to connect with several devices, and the more the devices the higher the volume of the music. AmpMe offers a free trial and it costs $9.99 per week.

2. Super Volume Booster (Android)
To enjoy your music more than ever, you need a good volume enhancer. And, what can be better than an app that is free and boosts your audio? Android users are in luck because Super Volume Booster is a user-friendly app that allows you to increase the volume of YouTube and other apps. It gives you the best music experience. Moreover, it is clean, simple and has a one-touch operation. Not to forget that it has amazing reviews on Playstore. This app also increases the bass and also supports headphones and Bluetooth.

3. Volume Booster GOODEV (Android)
Volume Booster GOODEV is another app that boosts up the audio for you from 20 to 30% more! If you want to listen to an audiobook, watch a YouTube video or a movie on Netflix, volume Booster GOODEV can help you increase the volume of any media on any app! The volume can get so high that it might be dangerous for your ears so be careful. It offers a sound equalizer and is simple to use.

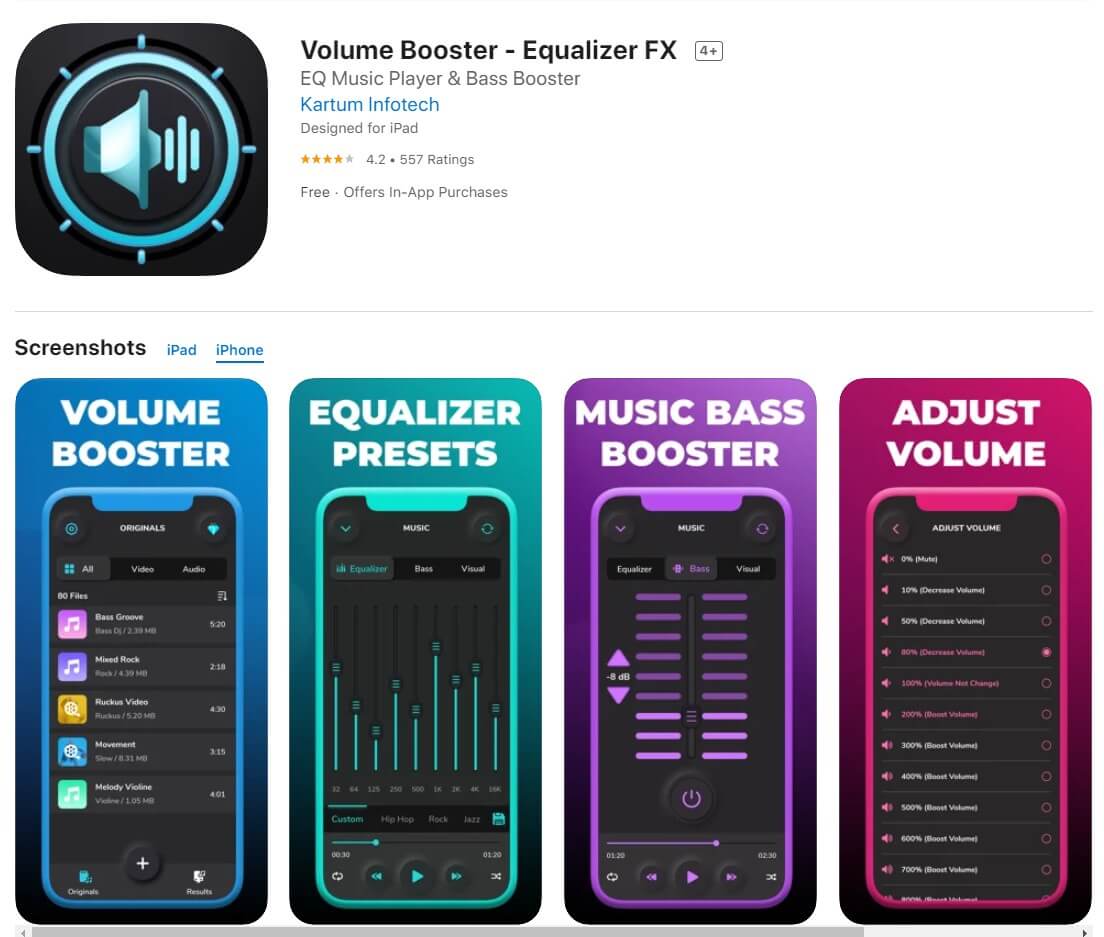
4. Volume Booster - Equalizer FX (iOS)
Volume Booster Equalizer FX can increase your volume higher than the default audio controller. With the help of this app, your device’s speaker will give the best result. You can adjust the sound effect levels according to your need. It makes the sound quality better and boosts up the volume with a single tap. You can get a weekly, monthly or yearly subscription. It is a great premium YouTube Volume booster for all iOS devices.
5. Max Volume Booster (iOS)
Max Volume Booster, as the name shows, boosts the volume to the maximum. You can find this app in the AppStore for free but it offers a premium version as well. With the help of the premium version, you can get an ad-free experience with no time limit. You can decrease or increase the volume based on your needs. Max Volume Booster gives you the experience and you will get addicted to it because it is a high-quality YouTube volume booster.

Part 3: Best YouTube Video Editing Software-Wondershare Filmora (Bonus Tip)
Wondershare Filmora is one of the most popular and user-friendly video editing software available. From beginners to pros, this app world for all. With Filmora you can create home videos, vlogs, Instagram reels, tutorials, guides, podcasts, and more! Wondershare Filmora is also the best YouTube video editor you will find! From editing to volume booster, you will find all the tools to create the perfect YouTube videos.


Here are some of the key features of Filmora that can help YouTubers make their YouTube videos:
- Offers multiple drawing video editing tools like speed control, volume booster, and color grading
- Offers special effects to enhance the appearance of your videos
- Allows you to custom create different animations
- Green Screen feature to help you change backgrounds and make the perfect videos
- Cross-platform accessibility as you can use it on both Windows and Mac
- Supports multiple file formats
- Ultra 4k HD support for the best quality of videos
- Free download and super easy to use with an intuitive interface
- Anyone can use it whether beginner or pro
- Online customer support available 24/7
Summing up
Stop worrying about low audio. Use one of the YouTube volume booster apps mentioned in this article. If you are making vlogs, tutorials, and other YouTube content, you can increase volume and create ideal videos with Wondershare video editor. So, to create the perfect videos with high-quality sound get Wondershare Filmora!
Shanoon Cox
Shanoon Cox is a writer and a lover of all things video.
Follow @Shanoon Cox
Shanoon Cox
Mar 27, 2024• Proven solutions
Have you ever listened to a YouTube video on max volume but still the sound wasn’t audible - even after turning up the YouTube volume as well as device audio? It is super annoying and inconvenient when you increase volume to max yet the video remains inaudible. YouTube volume issue could be due to various reasons such as poor audio quality of the built-in speakers or low original video sound. Well, there is a simple way to combat this problem i.e., sound booster. You can set different volume levels for the YouTube app on your PC or smartphone’s native volume controls. There are different YouTube volume boosters for Android, Windows, macOS, and iOS devices.
From listening to your favorite podcast to watching vlogs with your friends, you can use the best volume booster apps to increase the media sound volume and quality!
- Part 1: Best YouTube Volume Boosters for Windows and macOS
- Part 2: Best YouTube Volume Boosters for Android and iOS
- Part 3: Best YouTube Video Editing Software-Wondershare Filmora (Bonus Tip)
Part 1: Best YouTube Volume Boosters for Windows and macOS
Let’s introduce the best YouTube volume boosters for Windows and macOS:
1. FxSound (Windows and Mac)
FxSound is a very powerful tool that is made for Windows and macOS to enhance and boost the quality and volume of sound. This app comes with many features. For example, this audio software provides better sound quality, volume booster, and sound effects. Now you can listen to music, watch movies and play games without any distortion. Easily boost base, get customized effects and play with custom presets. You can download this app for your PC for free through the official website. People like this equalizer because it can make any audio format sound good even if it is 100 years old!
2. Boom 3D (Windows and macOS)
Boom 3D is a very popular app among many Windows and macOS users. This software is designed to help improve the audio on speakers or headphones that are connected to your computer. Boom 3D audio booster software also works with the Bluetooth devices that are connected to your PC. It can make any sound louder, clearer, and much better without buying any external devices. It provides us a 3D audio experience and works with any music player, video player, etc.!
3. Chrome Volume Booster Plugin (Windows)
This plugin has been rated 5 stars on the chrome web store as it is the best plugin for boosting up your volume on windows PC. This booster is so easy to download; you just have to go to the chrome web store and add the extension to your Google Chrome Browser. After adding it you can simply click on the icon and boost your volume up to 1000%! This plugin is free in the chrome store, just add it and choose how much louder you want your sound to be.
4. Letasoft Sound Booster (Windows)
Letasoft Sound Booster can only be used on windows. You can download it through the official website of Letasoft. It comes with a 14 days free trial period but after that, you have to buy their license to keep using it. This software is made to be used as an extra amplifier to boost up the volume of your audio or video if you think it is too low. The Letasoft Sound Booster app is very easy to use as you can control the volume from the slider. Moreover, it auto-starts and has no sound distortion.
5. Froyosoft Sound Booster (Mac)
Froyosoft Sound Booster is made for macOS users so they can boost video and audio file volumes. Individual application volumes can also be adjusted with the help of the Froyosoft Sound Booster. The good thing about this booster is that it is free for all users and it is 100% safe - you will not get any virus on your PC. You can download it from their website and increase the volume as high as you want to. So, get ready to get a clear and enhanced sound with the help of this app!
Part 2: Best YouTube Volume Boosters for Android and iOS
Following are the best YouTube sound boosters for Android and iOS devices:
1. AmpMe (Android and iOS)
With the help of AmpMe, you can start your little party through music apps. You don’t just get to listen to music but you can also chat with your friends - yup that’s right, it is a two-in-one app! The AmpMe app helps you to play the same music with your friends at the same time. It is one of the best volume booster apps that is available for both Android and iOS. It uses Bluetooth to connect with several devices, and the more the devices the higher the volume of the music. AmpMe offers a free trial and it costs $9.99 per week.
2. Super Volume Booster (Android)
To enjoy your music more than ever, you need a good volume enhancer. And, what can be better than an app that is free and boosts your audio? Android users are in luck because Super Volume Booster is a user-friendly app that allows you to increase the volume of YouTube and other apps. It gives you the best music experience. Moreover, it is clean, simple and has a one-touch operation. Not to forget that it has amazing reviews on Playstore. This app also increases the bass and also supports headphones and Bluetooth.
3. Volume Booster GOODEV (Android)
Volume Booster GOODEV is another app that boosts up the audio for you from 20 to 30% more! If you want to listen to an audiobook, watch a YouTube video or a movie on Netflix, volume Booster GOODEV can help you increase the volume of any media on any app! The volume can get so high that it might be dangerous for your ears so be careful. It offers a sound equalizer and is simple to use.
4. Volume Booster - Equalizer FX (iOS)
Volume Booster Equalizer FX can increase your volume higher than the default audio controller. With the help of this app, your device’s speaker will give the best result. You can adjust the sound effect levels according to your need. It makes the sound quality better and boosts up the volume with a single tap. You can get a weekly, monthly or yearly subscription. It is a great premium YouTube Volume booster for all iOS devices.
5. Max Volume Booster (iOS)
Max Volume Booster, as the name shows, boosts the volume to the maximum. You can find this app in the AppStore for free but it offers a premium version as well. With the help of the premium version, you can get an ad-free experience with no time limit. You can decrease or increase the volume based on your needs. Max Volume Booster gives you the experience and you will get addicted to it because it is a high-quality YouTube volume booster.
Part 3: Best YouTube Video Editing Software-Wondershare Filmora (Bonus Tip)
Wondershare Filmora is one of the most popular and user-friendly video editing software available. From beginners to pros, this app world for all. With Filmora you can create home videos, vlogs, Instagram reels, tutorials, guides, podcasts, and more! Wondershare Filmora is also the best YouTube video editor you will find! From editing to volume booster, you will find all the tools to create the perfect YouTube videos.
Here are some of the key features of Filmora that can help YouTubers make their YouTube videos:
- Offers multiple drawing video editing tools like speed control, volume booster, and color grading
- Offers special effects to enhance the appearance of your videos
- Allows you to custom create different animations
- Green Screen feature to help you change backgrounds and make the perfect videos
- Cross-platform accessibility as you can use it on both Windows and Mac
- Supports multiple file formats
- Ultra 4k HD support for the best quality of videos
- Free download and super easy to use with an intuitive interface
- Anyone can use it whether beginner or pro
- Online customer support available 24/7
Summing up
Stop worrying about low audio. Use one of the YouTube volume booster apps mentioned in this article. If you are making vlogs, tutorials, and other YouTube content, you can increase volume and create ideal videos with Wondershare video editor. So, to create the perfect videos with high-quality sound get Wondershare Filmora!
Shanoon Cox
Shanoon Cox is a writer and a lover of all things video.
Follow @Shanoon Cox
Crafting an Auto-Subscription URL for Your Channel’s YouTube Profile
Create High-Quality Video - Wondershare Filmora
An easy and powerful YouTube video editor
Numerous video and audio effects to choose from
Detailed tutorials provided by the official channel
Building a YouTube channel isn’t a walk-in-the-park. As a content creator, you go toiling several processes to ensure its success. More so, you are probably building a brand and want people to know about your product or services. What about one easy way to remember the URL and share it with your potential subscribers? Besides sending such links to people, you’ll be reminding them to subscribe with just a click. And that’s YouTube auto-subscribe link. It is a more effective way than asking or directing to check your YouTube channel. They’ll probably not find it easy, maneuvering around numbers of other channels that bear names close to your channel. A visitor will quickly give up. You can save them the crap and engage more effectively.

In this article
01 How to subscribe to a YouTube channel?
02 How to create an auto-subscribe link for your YouTube channel?
03 Other tricks that work besides YouTube auto-subscribe.
How to subscribe to a YouTube channel?
A YouTube auto-subscribe link will be beneficial in many ways. Here are the steps to subscribe to a YouTube channel. You can subscribe from your phone or computer.
Using a phone
- First, open the YouTube app. Look for it on your phone’s home screen or search through apps.
- Then sign in to your “Google” account for you to be able to subscribe to YouTube channels.
- Next, locate the channel that you want to subscribe to. You can either subscribe from the channel home page or watch the channel video.
- Tap on the “Subscribe” button. The text on the “Subscribe” button will immediately change to “Subscribed” once you hit the subscribe tab.
- Finally, hit the “Subscriptions” tab to manage your channel subscriptions. You’ll also manage to see other latest updates from your subscription.
- You can now easily manage your notifications. You now start to receive notifications of other new channels by default. It is possible to modify this by choosing “All,” “None,” or “Personalized” to determine how to get notifications.

Using a computer
- First, visit the YouTube web page https://www.youtube.com in a web browser. The YouTube website will then be open.
- Then sign in to your YT account. Remember, you must also be signed in to a Google account to subscribe to YouTube channels.
- Browse for a channel and find what’s trending in the left-side panel of the screen.
- Hit the “Subscribe” button to subscribe to a channel. Once you are subscribed, the Subscribe text button will turn grey and change to “Subscribed.”
- View subscriptions by clicking the “three horizontal lines” found at the top-left corner of YouTube. You can also adjust your notification preferences to receive more or fewer updates from a channel.

How an auto-subscribe link will help boost your YouTube channel?
1. Links will auto-prompt visitors to subscribe to your YouTube channel.
2. You can use the link anywhere and reach very many visitors.
3. It works automatically to boost your subscriber count.
How to create an auto-subscribe link for your YouTube channel?
Here are the steps to create YouTube auto subscribers’ links on your computer and mobile device.

How to create a YouTube subscribe link on your computer
- Step 1. First, go to your YouTube Channel URL.
- Step 2. Press on your “Profile,” then click on the “Settings” option in the drop-down menu.
- Step 3. Next, click on the “Profile” picture and copy the URL link.
- Step 4. Add your “YouTube” channel URL with an “Auto Subscribe Tag.” “YouTube channel URL + ?sub_confirmation=1 Then remove the Plus Sign in between to get a YouTube subscribe link.
How to create a YouTube subscribe link on your mobile
- Step 1. Launch the YouTube app on your mobile phone, then click on the “Profile” icon.
- Step 2. Then go to the “Menu” tab and click on the “Your Channel” option.
- Step 3. Select the “Share” option from the drop-down menu.
- Step 4. Next, click on the “Copy link” of your YouTube Channel.
- Step 5. Finally, add your “YouTube” channel URL with the Auto Subscribe Tag.
How to locate your YouTube Channel URL
Unfortunately, many people don’t know their YouTube Channel URL. Check out how to locate your URL.
- Click on your “Profile” icon in the top-right corner of the YouTube page.
- Choose the “Settings” option from the drop-down menu.
- Next, hit the “Advanced” tab below your name.
- Boom! You get your link.
- Finally, combine your channel URL with the “Auto Subscribe” Tag.
● The formula: YouTube channel URL + “?sub_confirmation=1.” Remember to remove the parenthesis to get your auto-subscribe link.
Other tricks that work besides YouTube auto-subscribe
As a content creator, you need to do more to add YouTube auto subscribers to your channel.
Use closed captions to improve accessibility
Including subtitles or closed captions can drive a larger audience to access your content. Some YouTube users have challenges, for example, the deaf or those with hearing problems. Creating a video and not considering this may limit such users from getting to your channel as they may not get all the needed information. Follow these steps to create subtitles or closed captions.
- Sign in to YouTube Studio.
- Then select the “Subtitles” option from the left menu.
- Click on the video that you wish to edit.
- Next, click on the “Add Language” button and select your language.
- Go to the “Subtitles” section and select the “Add” button.
- Finally, enter your captions as the video plays. It will enable viewers who find it challenging to understand your video in detail and probably hit the subscribe button.

Translate your video descriptions
YouTube is accessed worldwide and not necessarily by those who speak your language. You can increase the chances of subscribers by translating your video titles and descriptions to make them understandable to people from across the world. It will make your videos more discoverable and show that you care about those from other regions. Check out how to add translations to YouTube videos.
- First, sign in to YouTube Studio.
- Then go to the left menu and select the “Subtitles” option.
- Choose the video in which you want to add the translations.
- It would be best if you choose a language for your video. Click the “Confirm” button.
- Then select the “Add language” option and choose the language you wish to translate your video into
- Go to “Titles & descriptions” and select the “Add” tab.
- Lastly, enter the translated description and hit the “Publish” button.
Use end screens for extra content promotion
An end screen call-to-action is essential in every video that you post on YouTube. They appear in the last 10 seconds and are useful in directing viewers to your chosen destination. Use them to direct a viewer to visit another channel, subscribe to your channel, or play another video. Here’s how to do it:
- Firstly, sign in to YouTube Studio.
- Then go to the “Videos” page and select a video to use.
- Select the “Editor” tab from the left menu.
- Next, choose the “Add an end screen” option to direct viewers appropriately.
Add a comment to your feed
This functionality is essential if many commenters repeatedly ask the same question. Besides, it will help you to boost engagement with a question.
Here are the simple steps on how to pin a comment to the top of your feed.
- Go to your “Community” tab.
- Then choose the comment that you wish to pin.
- Click on the “More” tab > “Pin” option.

Bonus: Will YouTube auto-subscribe me to a new channel?
It is not necessarily true that YouTube auto-subscribe will subscribe to a new channel. However, some reasons may contribute to that. You may have realized that YouTube just subscribed you to random channels without asking you. Here are the possible reasons for that.
• Spinoff Channel
A content creator may decide to come up with a Spinoff channel. In this case, they may automatically subscribe you to their new channel. In most cases, such content creators want to promote their new channel.
• Check your extensions
One of your browsers may be playing tricks on your YouTube account. Extensions may change your browser’s settings and make the “Unsubscribe” option unavailable. Try disabling all of your browser extensions, then check back if YouTube still subscribes you to channels unknown to you. If so, solve the issue by uninstalling the specific extensions. These could be ad blockers or free VPN extensions.
• Someone else can hit the button
Do you share your computer with other fellows? The chances are that someone hit the “Subscribe” button without your consent. Just unsubscribe and keep watching next time.
Conclusion
● The internet arena is very competitive. It would be best if you did everything right to drive as many YouTube auto-subscribers as possible to your channel. And creating a YouTube auto-subscribe link is the first step to making things easier for your potential subscribers. We have covered how to create a YouTube subscribe link and shown other tricks to help you keep your viewers locked.
Building a YouTube channel isn’t a walk-in-the-park. As a content creator, you go toiling several processes to ensure its success. More so, you are probably building a brand and want people to know about your product or services. What about one easy way to remember the URL and share it with your potential subscribers? Besides sending such links to people, you’ll be reminding them to subscribe with just a click. And that’s YouTube auto-subscribe link. It is a more effective way than asking or directing to check your YouTube channel. They’ll probably not find it easy, maneuvering around numbers of other channels that bear names close to your channel. A visitor will quickly give up. You can save them the crap and engage more effectively.
In this article
01 How to subscribe to a YouTube channel?
02 How to create an auto-subscribe link for your YouTube channel?
03 Other tricks that work besides YouTube auto-subscribe.
How to subscribe to a YouTube channel?
A YouTube auto-subscribe link will be beneficial in many ways. Here are the steps to subscribe to a YouTube channel. You can subscribe from your phone or computer.
Using a phone
- First, open the YouTube app. Look for it on your phone’s home screen or search through apps.
- Then sign in to your “Google” account for you to be able to subscribe to YouTube channels.
- Next, locate the channel that you want to subscribe to. You can either subscribe from the channel home page or watch the channel video.
- Tap on the “Subscribe” button. The text on the “Subscribe” button will immediately change to “Subscribed” once you hit the subscribe tab.
- Finally, hit the “Subscriptions” tab to manage your channel subscriptions. You’ll also manage to see other latest updates from your subscription.
- You can now easily manage your notifications. You now start to receive notifications of other new channels by default. It is possible to modify this by choosing “All,” “None,” or “Personalized” to determine how to get notifications.
Using a computer
- First, visit the YouTube web page https://www.youtube.com in a web browser. The YouTube website will then be open.
- Then sign in to your YT account. Remember, you must also be signed in to a Google account to subscribe to YouTube channels.
- Browse for a channel and find what’s trending in the left-side panel of the screen.
- Hit the “Subscribe” button to subscribe to a channel. Once you are subscribed, the Subscribe text button will turn grey and change to “Subscribed.”
- View subscriptions by clicking the “three horizontal lines” found at the top-left corner of YouTube. You can also adjust your notification preferences to receive more or fewer updates from a channel.
How an auto-subscribe link will help boost your YouTube channel?
1. Links will auto-prompt visitors to subscribe to your YouTube channel.
2. You can use the link anywhere and reach very many visitors.
3. It works automatically to boost your subscriber count.
How to create an auto-subscribe link for your YouTube channel?
Here are the steps to create YouTube auto subscribers’ links on your computer and mobile device.
How to create a YouTube subscribe link on your computer
- Step 1. First, go to your YouTube Channel URL.
- Step 2. Press on your “Profile,” then click on the “Settings” option in the drop-down menu.
- Step 3. Next, click on the “Profile” picture and copy the URL link.
- Step 4. Add your “YouTube” channel URL with an “Auto Subscribe Tag.” “YouTube channel URL + ?sub_confirmation=1 Then remove the Plus Sign in between to get a YouTube subscribe link.
How to create a YouTube subscribe link on your mobile
- Step 1. Launch the YouTube app on your mobile phone, then click on the “Profile” icon.
- Step 2. Then go to the “Menu” tab and click on the “Your Channel” option.
- Step 3. Select the “Share” option from the drop-down menu.
- Step 4. Next, click on the “Copy link” of your YouTube Channel.
- Step 5. Finally, add your “YouTube” channel URL with the Auto Subscribe Tag.
How to locate your YouTube Channel URL
Unfortunately, many people don’t know their YouTube Channel URL. Check out how to locate your URL.
- Click on your “Profile” icon in the top-right corner of the YouTube page.
- Choose the “Settings” option from the drop-down menu.
- Next, hit the “Advanced” tab below your name.
- Boom! You get your link.
- Finally, combine your channel URL with the “Auto Subscribe” Tag.
● The formula: YouTube channel URL + “?sub_confirmation=1.” Remember to remove the parenthesis to get your auto-subscribe link.
Other tricks that work besides YouTube auto-subscribe
As a content creator, you need to do more to add YouTube auto subscribers to your channel.
Use closed captions to improve accessibility
Including subtitles or closed captions can drive a larger audience to access your content. Some YouTube users have challenges, for example, the deaf or those with hearing problems. Creating a video and not considering this may limit such users from getting to your channel as they may not get all the needed information. Follow these steps to create subtitles or closed captions.
- Sign in to YouTube Studio.
- Then select the “Subtitles” option from the left menu.
- Click on the video that you wish to edit.
- Next, click on the “Add Language” button and select your language.
- Go to the “Subtitles” section and select the “Add” button.
- Finally, enter your captions as the video plays. It will enable viewers who find it challenging to understand your video in detail and probably hit the subscribe button.
Translate your video descriptions
YouTube is accessed worldwide and not necessarily by those who speak your language. You can increase the chances of subscribers by translating your video titles and descriptions to make them understandable to people from across the world. It will make your videos more discoverable and show that you care about those from other regions. Check out how to add translations to YouTube videos.
- First, sign in to YouTube Studio.
- Then go to the left menu and select the “Subtitles” option.
- Choose the video in which you want to add the translations.
- It would be best if you choose a language for your video. Click the “Confirm” button.
- Then select the “Add language” option and choose the language you wish to translate your video into
- Go to “Titles & descriptions” and select the “Add” tab.
- Lastly, enter the translated description and hit the “Publish” button.
Use end screens for extra content promotion
An end screen call-to-action is essential in every video that you post on YouTube. They appear in the last 10 seconds and are useful in directing viewers to your chosen destination. Use them to direct a viewer to visit another channel, subscribe to your channel, or play another video. Here’s how to do it:
- Firstly, sign in to YouTube Studio.
- Then go to the “Videos” page and select a video to use.
- Select the “Editor” tab from the left menu.
- Next, choose the “Add an end screen” option to direct viewers appropriately.
Add a comment to your feed
This functionality is essential if many commenters repeatedly ask the same question. Besides, it will help you to boost engagement with a question.
Here are the simple steps on how to pin a comment to the top of your feed.
- Go to your “Community” tab.
- Then choose the comment that you wish to pin.
- Click on the “More” tab > “Pin” option.
Bonus: Will YouTube auto-subscribe me to a new channel?
It is not necessarily true that YouTube auto-subscribe will subscribe to a new channel. However, some reasons may contribute to that. You may have realized that YouTube just subscribed you to random channels without asking you. Here are the possible reasons for that.
• Spinoff Channel
A content creator may decide to come up with a Spinoff channel. In this case, they may automatically subscribe you to their new channel. In most cases, such content creators want to promote their new channel.
• Check your extensions
One of your browsers may be playing tricks on your YouTube account. Extensions may change your browser’s settings and make the “Unsubscribe” option unavailable. Try disabling all of your browser extensions, then check back if YouTube still subscribes you to channels unknown to you. If so, solve the issue by uninstalling the specific extensions. These could be ad blockers or free VPN extensions.
• Someone else can hit the button
Do you share your computer with other fellows? The chances are that someone hit the “Subscribe” button without your consent. Just unsubscribe and keep watching next time.
Conclusion
● The internet arena is very competitive. It would be best if you did everything right to drive as many YouTube auto-subscribers as possible to your channel. And creating a YouTube auto-subscribe link is the first step to making things easier for your potential subscribers. We have covered how to create a YouTube subscribe link and shown other tricks to help you keep your viewers locked.
Also read:
- [New] Collaborative Video Creation & Growth Tips
- In 2024, Cutting-Edge Techniques Mastering YouTube Subtitle/CC Additions
- Charting the Course with YouTube's Top Makeup Influencers for 2024
- YouTube's Commercial Free Chrome, Firefox, Android & iPhone Tips
- [New] Discover the Ideal 10 Online Yoga Classrooms for Fitness Growth
- Maximize Engagement Discover the Right YouTube Thumbnail Size
- Climb the Popularity Ladder Essential YouTube SEO Practices Uncovered
- In 2024, Cutting-Edge Chapter Tactics to Complement Your YouTube Presentations
- 2024 Approved Downloading Videos Directly to iPhone/iPad - YouTube's Quick Guide
- Best 12 YouTube Gaming Intro Makers - Free and Paid
- In 2024, Captivate Audiences Unveiling Secrets for Striking YouTube Banners
- Budget-Friendly Methods for YouTube Card Creation for 2024
- Covert Content Creation How to Invisibly Alter Videos for 2024
- The Ultimate Guide Top 3D Introduction Software
- Filmmaking Simplified Create an Inviting YouTube Subscription Button in Filmora
- Effortless Subscriber Acquisition for Enhanced Viewership
- In 2024, Digital Storyboard Studio
- 2024 Approved Amplify YouTube Visibility Crafting Effective Descriptions & Tags
- Infographics Boosting Buzz Through Social Videos
- [New] A Step-by-Step Approach to YT Channel Descriptors
- The Editor's Journey Mastering the Art of Youtube Cuts
- [New] A Practical Pathway for Profit Tracking The Straightforward Steps to Analyze YouTube Earnings
- [Updated] Clip Curator Platform
- In 2024, Clip Narration Devisee
- MP3ify Your Favorite Videos Top Free Converters Online
- [New] Academic Avenue Leading Educators on YouTube
- 2024 Approved Brand Battlegrounds Mastery of Marketing Metrics on YouTube
- Dive Into Maker's Earnings Exploring YouTube Shorts Revenue Structure for 2024
- A Step-by-Step Guide Share YouTube Vids with FB Friends
- Understanding the Economics Behind YouTube's Shorts Fund
- Maximize Views with These Top-Rated Keyword Analysis Tools
- Leveraging Multiple Channels to Boost Online Visibility
- [Updated] Essential Techniques for Designing YouTube Video Thumbnails
- In 2024, Chart Your Course Navigating the Waters of YouTube Subscription Surges
- Unlock the Full Potential of Your Video with Studio Editor
- Convert & Share Optimal Tools for YouTube-to-AVI Transfers
- Visual Storytelling Hack Crafting YouTube Thumbnails on Mobiles
- 2024 Approved GPU Narrative Radeon's Recent Revolution
- In 2024, How To Change Your Apple ID Password On your Apple iPhone 11 Pro
- How To Change Vivo Y27s Lock Screen Password?
- How To Remove Phone Number From Your Apple ID on Your iPhone 15 Plus?
- New In 2024, Slow Down Time Add Free Slow-Mo Effects to Your Videos with Filmora
- New Top Applications That Can Help Apply The Best VHS Camera Effect
- Supercharge Your Content How to Convert Text to Audio Like a Pro
- [New] Unlock TikTok Potential PC & Mac Video Sharing Guide
- In 2024, 3 Methods to Mirror Honor X50 GT to Roku | Dr.fone
- In 2024, Mastering OBS Mobile Top Techniques
- [New] Navigating the Process of Modifying Your Network's Visual Backdrop
- New 2024 Approved Compressor Essentials A Beginners Guide to Video Compression in FCPX
- [New] 2024 Approved Exploring and Utilizing Your Twitter Archive
- [New] 2024 Approved Delectable Delights Best Food on TikTok
- Peering Through the Lens An In-Depth Review of Polaroid Cube+
- Delete Gmail Account With/Without Password On Lava Blaze Pro 5G
- In 2024, Top Security Accessories for Webcams
- iPogo will be the new iSpoofer On Realme 11X 5G? | Dr.fone
- [Updated] Signs That You've Been Muted by Someone
- In 2024, Premier Imagery Unboxing Analysis
- In 2024, The Art of Captivating Viewers InstaVideo Marketing Essentials
- [New] 2024 Approved Secrets Unveiled The Ultimate Strategies for Saving Disco Livestreams
- From SD to HD A Beginners Journey to High-Definition Video for 2024
- Free Vs. Paid Linux Audio Software An Insiders Look at Leading Choices
- [New] Efficient Screen Capture Devices for Education
- Streamlined Techniques for Capturing Stories on Instagram
- In 2024, Best Music Visualizers
- Full Guide on Mirroring Your Lava Agni 2 5G to Your PC/Mac | Dr.fone
- Title: "Best 10 Echo Augmentation Apps Desktop/Mobile"
- Author: Brian
- Created at : 2024-05-25 11:22:22
- Updated at : 2024-05-26 11:22:22
- Link: https://youtube-video-recordings.techidaily.com/best-10-echo-augmentation-apps-desktopmobile/
- License: This work is licensed under CC BY-NC-SA 4.0.
