
:max_bytes(150000):strip_icc():format(webp)/CODA-d4dd2a9b6c3d4a008a05c9718c9bce1e.jpg)
"Beauty Breakdown Mastering Makeup and Hauls Online"
Beauty Breakdown: Mastering Makeup and Hauls Online
Ultimate Guide to Beauty on YouTube - Gear, Makeup Tutorials, and More

Richard Bennett
Oct 26, 2023• Proven solutions
Beauty and lifestyle are two of the most popular categories on YouTube, and they might also be the categories most associated with brand deals. Whether you’re hoping to earn revenue as a beauty influencer, or just want to post some fun makeup tutorials, this guide is for you!
We’ll walk you through deciding on a theme for your channel, setting up your equipment, and give you tips for actually recording your videos.
1. **[Finding Your Niche in Beauty or Lifestyle](#niche)**
- Types of Beauty Videos – Your Content Strategy
- How to Get Products to Review
- Simple Camera Setup for Beauty Vloggers
- Lighting for Beauty
- Top Ring Lights for YouTube
- Build Your Own Diva Ring Light
- How to Make a Makeup Tutorial – Before You Start
- How to Make a Makeup Tutorial – Recording
- How to Make a Makeup Tutorial – After Shooting
Best YouTube Video Editor- Wondershare Filmora
Wondershare Filmora is specifically made keeping quality on priority and to make sure all the videos are edited well with the highest accuracy. You can trim, merge, crop, add background music, rotate videos as well as add motion elements, animated texts, overlays, and filters, etc. to your makeup video, and the video can also be uploaded to YouTube or burned to DVD directly.


Finding Your Niche in Beauty or Lifestyle
As a new makeup, beauty, or lifestyle YouTuber you’ll be jumping into a category that’s already packed with thousands of channels. In order to gain any momentum, you’ll have to decide on a particular thing you want to be known for. That’s your niche.
People looking for beauty tutorials are often looking for someone who has something in particular in common with them. Hairstyling for a specific ethnicity, for example, is a potential niche because people want to learn how to style their own hair, not a hair in general.
Another way you could find a niche is by taking on a specific area of interest, like a skincare channel with a focus on coping with acne or a makeup channel with a focus on natural products.
SunKissAlba has a lifestyle channel that focuses on a ‘natural’ niche. She posts videos about every aspect of her lifestyle from putting on makeup to cooking, but natural/non-toxic products are a constant theme through everything she does. By niching her channel she hasn’t limited what kinds of videos she can do at all - she posts a huge variety of different types of videos. What she has done is to make her channel particularly valuable to audiences interested in things that are natural or organic.
Types of Beauty Videos – Your Content Strategy
It’s a lot easier to come up with weekly video ideas when you have an overarching strategy.
The easiest way to figure out what kinds of videos you should make (and this can also help determine your niche!) is to think about what you already do and enjoy. If skincare is particularly important to you, for example, then you could build a content strategy that includes things like your favorite sunscreen, what different ingredients in skincare products are for, or even how to make a DIY face mask.
The same thing goes if you love doing big glamourous makeups for going out. Think about what you like, and that will determine what you should talk about in your videos.
Instead of buying new products to use in videos, try to use and showcase what you already have.
Here are some common types of beauty and lifestyle videos:
Get Ready With Me: a video where you put your makeup on which helps your audience get to know you better.
Monthly Favorites: showcases your favorite products from the last month.
Makeup Collection: viewers will want to see what you have.
DIY: create something, like a homemade moisturizer, and show your viewers how to make their own.
Makeup Hauls: show off what you’ve bought recently.
Lookbooks: put together a few looks based on a theme, like a specific color or event.
First Impressions: show yourself using a new product for the first time.
Makeup Tutorials: teach your viewers how to achieve a particular look, like a smokey eye.
What’s In My Bag: empty your handbag to show viewers what you carry around with you, particularly your most essential makeup.
My Routine: show viewers your morning skincare routine, or how you usually take your makeup off before bed. Any of your beauty-related routines will be interesting to your followers.
You should also be ready to jump on trends as they jump up. You can get a bump in viewership from people searching for a particular trend. Here are a couple of examples of past trends:
- Boyfriend Does My Makeup
- Kid’s Makeup Challenge
- No Mirror Makeup Challenge
How to Get Products to Review
You probably already know that a lot of the products popular beauty YouTubers review in their videos were sent to them for free. Brands want to get their products into the hands of creators who have ‘influence’ both in the hopes that their audiences will decide to buy them and as part of generating buzz – getting more people talking about their products so more people become interested.
In order for a brand to consider sending you a free product to review or feature in a video, you will first have to have a large enough following.
What is ‘large enough’? There’s no magic number of YouTube subscribers or Instagram followers. How large your following needs to be will depend on what brands you want to work with, as well as whether your channel has a specific niche.
Large brands will want to work with larger creators. Smaller brands that are still trying to build notoriety may be more open to working with creators whose followings are not as large.
If you have a very specific niche then that could create more opportunities for you as a mid-sized YouTuber. If you specialize in styling curly black hair, and a brand is marketing a product made specifically for styling curly black hair, then your smaller following will be more valuable to that brand than the larger audience of a more general channel.
Here are 4 tips for getting free products for review:
- Follow your favorite brands on Instagram and subscribe to their YouTube channels. Make sure to take them when you feature their products in your posts or videos.
- Focus on growing your community/audience. As you start getting more subscribers and building up momentum for your channel, brands might start reaching out to you. We’ve got some tips on growing your YouTube channel here .
- Make a pitch to a brand. The first step in this is figuring out who to pitch to. You can send smaller brands DMs via Instagram or Twitter and politely ask for contact info for a PR person. Never ask for free product or sponsorship at this point, just information you can use to contact PR.
- Send an email with your pitch to the brand’s PR person. Your email should introduce yourself, describe your content, and talk about what type of audience you have (how many subscribers, where are they located, how old are they, etc. This information is all available in your Creator Studio analytics).
Make sure to link to your channel so they can verify what you say (do not hide your subscriber count).
Emphasize what value you could provide the brand with (i.e. ‘I’ve had a lot of success with videos on managing acne and I’m sure my subscribers would love to see a review of your cream’) and outline what kind of video you’d like to make (i.e. a five-minute review focusing on the product, or a short feature in a longer makeup tutorial).
Simple Camera Setup for Beauty Vloggers
There are a lot of different ways to set up your camera for a ‘talking head’ video (anything that is primarily you talking to the camera). Keep reading to learn about a popular ring-light setup for beauty videos, or click here to learn 4 different camera setups .
In an ideal situation, this is what you’ll build your setup out of:
- Camera with a flip-out screen
- Ring light
- Camera-mounted shotgun mic
- Tripod (unless you can mount your camera inside your ring light)
If you don’t have access to all of the equipment above, try some of these:
- Smartphone camera
- DIY ring light
- Smartphone shotgun mic or LAV
Step 1: Set your camera and ring light (your camera should be sitting directly behind your ring light, or mounted inside of it) up about 3 feet away from your subject (yourself).
You might want to experiment with sitting at different distances to see how the lighting looks on your face.
Step 2: Set your camera up a bit higher than your face and tilt it down towards yourself (shooting from slightly above is always more flattering). It should be set up at about a 15° angle to you.
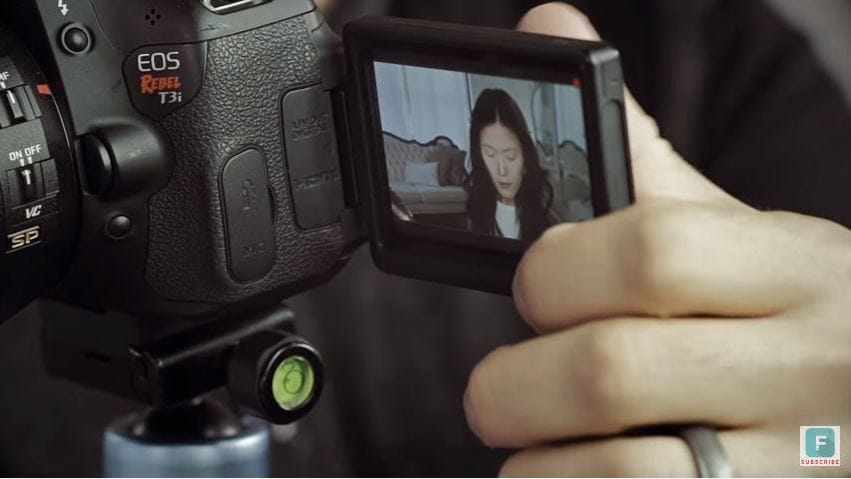
Step 3: Check your frame (this is easiest if your camera has a screen that flips out) to make sure there’s not too much empty space in your shot.
Step 4: Adjust your camera’s focus so your picture is clear. You may need to set up a lamp, chair, or stuffed animal as a stand-in for yourself while you stand behind the camera adjusting the focus.
Turn off autofocus and adjust your focus manually by turning the focus ring on your lens, if you’re using a DSLR or mirrorless camera.
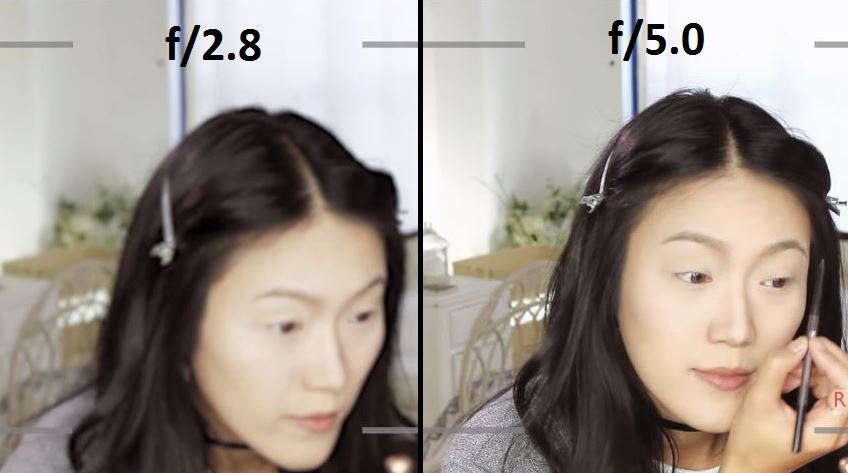
Step 5: Set your f-stop (aperture) so that your depth of field is deep enough for you to lean forwards or backward without becoming blurry.
An aperture of f/5.0 is good if you’re going to be moving around a lot, but if you’re not going to be moving much and want a blurry background you might want to go with f/2.8 or lower.
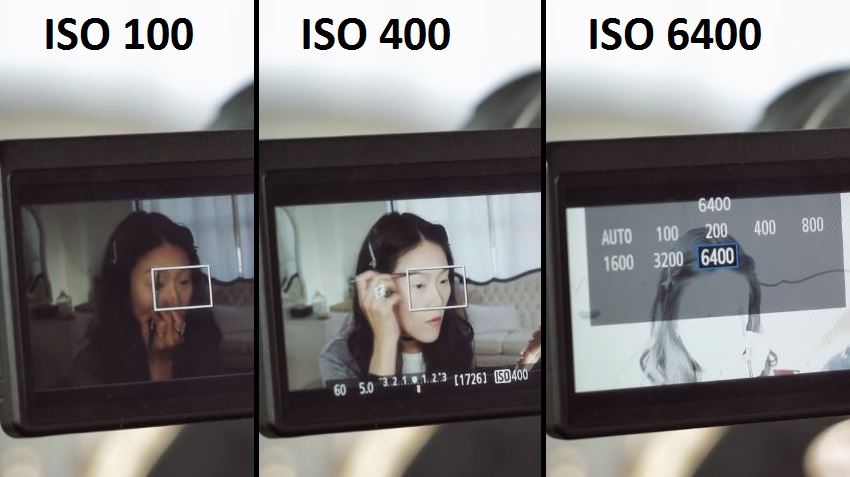
Step 6: Set your ISO (film speed). A lower ISO will give you a darker, but higher quality, image. A higher ISO will lower your quality and give you a brighter image.
ISO 400 should be a happy medium for shooting inside with your ring light, but you may need to try out a couple of settings to find one perfect for your situation.
For more info on camera settings for beauty videos, click here .
Lighting for Beauty
The key to achieving a high-quality picture for your beauty video is having a lot of light.
A ring light (whether it’s one you purchase or one you make) will give you even light over your whole face, and that may be enough. Ring lights are considered one of the biggest ‘secrets’ to beauty on YouTube (as explained in this Racked article ).
There are, however, some reasons you might want additional light:
To Light your Background/Space
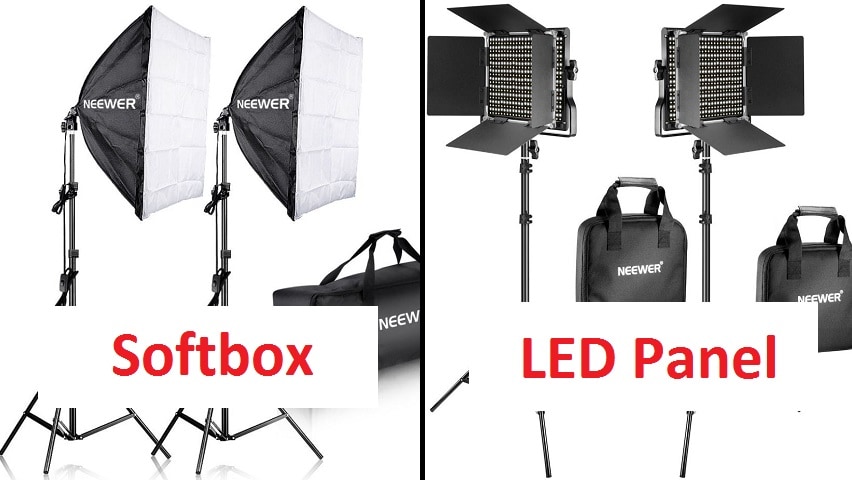
If you only have a ring light/front light then you may end up looking like you’re surrounded by shadows. If you want more light for your space you can use windows, household lamps, or professional video lights like softboxes or LED panels.
To Stand Out Against your Background (‘Backlighting’)
A front light that’s lighting you evenly is also lighting whatever’s behind you evenly, which can make your overall picture look flat.
Setting up a light to shine up at you from behind will help you pop out from your background by creating a silhouette.
You can use an LED panel or a household lamp as a backlight.
To Add Dimension to Your Face (Side Lights/ Fill Lights)
Setting up lights to hit you from the sides will help you look more three dimensional. It can also give your video a general quality boost because the picture quality is always better when there’s tons of light.
You can use softboxes, LED panels, clamp lights, household lamps, or any other light source you can think of.
Lighting Tips!
* **_Use ‘daylight’ bulbs in any household lighting/clamp lights you use._ This way, your light will all be the same color and you won’t have to do a lot of color correction (the more yellow-colored light most indoor lights give off will make you look orange).**
You can buy daylight-colored bulbs for about $5.
- Clamp lights ($10 each) and paper lanterns ($10 each) provide great lighting and are much more affordable than professional lighting kits. The paper lanterns will provide even, diffused, light and the clamp lights will be easy to set up wherever you need them.
- Check out these DIY tips for creating your own reflectors and diffusers .
Top Ring Lights for YouTube
1. Neewer Dimmable Fluorescent Ring Light - $110
One cool feature of the Neewer Ring Light is that you can choose between daylight and a more orange-tinted light depending on which of the included filters you use. In almost all situations you’ll want to use white light/daylight because the orange light will make you look orange, but if you ever wanted to create a warmer image to achieve a particular effect you’d have that option with this light.
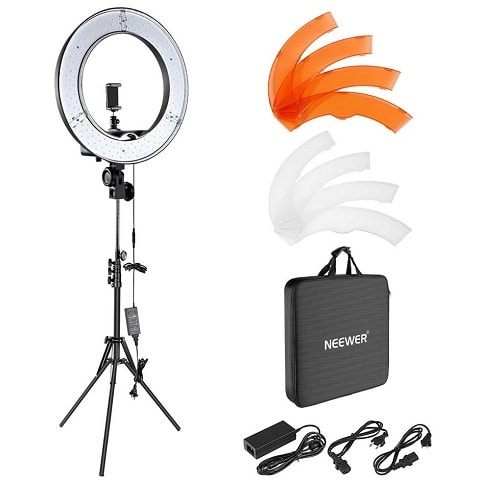
This light is dimmable and can be adjusted to the angle that suits your shot. That’s true of our number 2 pick too, and the second place light actually has a slight edge over the Neewer light because its color temperature is 5400K which is slightly closer to daylight than Neewer’s 5500K, but that’s honestly not super important for YouTube. They’re close enough that you won’t be able to tell the difference, and this light is over $100 more affordable.
2. Prismatic Halo Ring Light - $260
This lightweight ring light is easy to transport, set up, and mount your phone or camera to. It’s a fluorescent ‘daylight’ (5400K) light, so the colors in your videos will look natural.
This light is dimmable, so you can turn it down if it’s too bright, and the Prismatic Light Stand will allow you to tilt your light to the perfect angle. This will be handy if you’re mounting your camera inside the ring but want to place it slightly above your face instead of having it look at you head on.
Build Your Own Diva Ring Light
A ring light is an important tool for a lot of beauty YouTubers, but it doesn’t fit into everyone’s budget. Here’s one popular way to create your own ring light for about $20.
A lot of people have done this DIY, but we’re using Kevin’s video because we love how he added the stand.
What you need:
- A wire wreath frame
- Zip ties
- LED rope light (16 ft, daylight)
- Tinfoil
- Metal paper towel stand
- Scissors
Step 1: Wrap your wreath frame in tinfoil. Make sure the tinfoil is shaped to the wreath so that there is a curve on the inside where your rope light can sit.
Step 2: Place your rope light inside the curve of your frame. Wind it around for 3 loops so you have 2 rows of lighting tube sitting next to each other.
Step 3: Use the zip ties to fasten in the rope light. Wrap them tightly around your frame and lights in several (6-8) places.
Step 4: Cut off the tails of the zip ties.
This is your ring light. Continue to step 5 if you want it to have a stand (you might just want to clip it up somewhere).
Step 5: Fasten your ring light tightly to your paper towel stand securely with several zip ties. Make sure to fasten it at the bottom (where the excess rope light is coming out of your ring light). Cut off the tails of the zip ties.
How to Make a Makeup Tutorial – Before You Start
Before you start recording your makeup tutorial there are a few things you should do.
- Write an outline. You might even want to write yourself a transcript. Having a concrete plan before you start recording will help ensure your tutorial is useful for viewers. You’ll realize where you might need to slow down and show a particular step in more detail, or where your viewers might find a particular step tricky, in a way you want if you just jump into a makeup routine you know perfectly.
- Layout your supplies. Make sure everything you need for your tutorial is laid out neatly in front of you so you can access it all easily. Try to use clean brushes – it just looks nicer.
- Tidy up. If you want your viewers to trust you when it comes to aesthetics, it’s important that your studio area is clean and tidy. You may even want to use a backdrop.
- Do a video test. Before you start your video for real, start recording and shoot some test footage. Watch that back to make sure you like the look of your frame, your face is never blurry, and you’re happy with the overall look of things.
- Do an audio test. If you’re going to be talking in your video instead of recording a voiceover after, do an audio test to make sure your audience will be able to hear you clearly.
How to Make a Makeup Tutorial – Recording
Here are some things to keep in mind while you record your makeup tutorial:
- Show what you’re using. When you use a product, brush, or any other beauty supply make sure to let your audience know what you’re using and why you chose it. This isn’t about promoting brands, it’s about making it easy for viewers to duplicate your results.
If you’re using autofocus, you can hold products up to the screen and wait for it to kick in. If you’re not using autofocus, just hold them up next to you for a moment. You can also shoot separate closeups of each product and cut them into your main tutorial video. - Highlight small details. Describe what you’re doing in a lot of detail and don’t gloss over anything. Assume the person watching your tutorial doesn’t know anything about putting on makeup.
- Take stills for your thumbnail. Remember to take some still photos of your finished makeup to use in your YouTube thumbnail.
How to Make a Makeup Tutorial – After Shooting
Once you’ve finished recording and put away all your camera gear, there’s still work to do. You still need to edit your video and post it on YouTube. Here are some tips for that:
- Add transitions and effects. If you have several clips or even just distinct sections of your main clip, then adding transitions can be a great way to hold your viewers’ attention.
If you spend a lot of time on a repetitive step, you may want to speed that part up and make it a time-lapse. - Add your intro. Having a short (usually around 5 seconds) intro sequence is a great way to strengthen your personal lifestyle brand. You can download free intros right here on filmora.io .
- Title your video. Make sure your most important keyword – the type of look you’re creating, or a product you’re reviewing – is near the beginning of your video’s title. Searching for the topic of your video and writing a title similar to the highest-ranking results is a good way to start.
Remember to include what type of video you made, i.e. ‘tutorial’, ‘review’, or ‘get ready with me’, in your title. People might include these kinds of words in their search queries and, even if they find your video another way, they’ll probably want to know what they’re clicking on before they click. - Customize your thumbnail. Again, search for your video’s topic and see what comes up. You want your thumbnail to look related to the top results, but you also want it to jump out at potential viewers. There may be something you can add to the thumbnail photos you took that will help you stand out, like a bright border, an emoji, or a closeup of a product you feature in the video.
- Write a detailed description. Putting the products you use in your video description will help your viewers, and it’s a great place to include affiliate links if you ever join an affiliate program (like Amazon’s) to generate some revenue.
Are you already making beauty videos? If so, let us know if you have any of your own tips!
Richard Bennett
Richard Bennett is a writer and a lover of all things video.
Follow @Richard Bennett
Richard Bennett
Oct 26, 2023• Proven solutions
Beauty and lifestyle are two of the most popular categories on YouTube, and they might also be the categories most associated with brand deals. Whether you’re hoping to earn revenue as a beauty influencer, or just want to post some fun makeup tutorials, this guide is for you!
We’ll walk you through deciding on a theme for your channel, setting up your equipment, and give you tips for actually recording your videos.
1. **[Finding Your Niche in Beauty or Lifestyle](#niche)**
- Types of Beauty Videos – Your Content Strategy
- How to Get Products to Review
- Simple Camera Setup for Beauty Vloggers
- Lighting for Beauty
- Top Ring Lights for YouTube
- Build Your Own Diva Ring Light
- How to Make a Makeup Tutorial – Before You Start
- How to Make a Makeup Tutorial – Recording
- How to Make a Makeup Tutorial – After Shooting
Best YouTube Video Editor- Wondershare Filmora
Wondershare Filmora is specifically made keeping quality on priority and to make sure all the videos are edited well with the highest accuracy. You can trim, merge, crop, add background music, rotate videos as well as add motion elements, animated texts, overlays, and filters, etc. to your makeup video, and the video can also be uploaded to YouTube or burned to DVD directly.
Finding Your Niche in Beauty or Lifestyle
As a new makeup, beauty, or lifestyle YouTuber you’ll be jumping into a category that’s already packed with thousands of channels. In order to gain any momentum, you’ll have to decide on a particular thing you want to be known for. That’s your niche.
People looking for beauty tutorials are often looking for someone who has something in particular in common with them. Hairstyling for a specific ethnicity, for example, is a potential niche because people want to learn how to style their own hair, not a hair in general.
Another way you could find a niche is by taking on a specific area of interest, like a skincare channel with a focus on coping with acne or a makeup channel with a focus on natural products.
SunKissAlba has a lifestyle channel that focuses on a ‘natural’ niche. She posts videos about every aspect of her lifestyle from putting on makeup to cooking, but natural/non-toxic products are a constant theme through everything she does. By niching her channel she hasn’t limited what kinds of videos she can do at all - she posts a huge variety of different types of videos. What she has done is to make her channel particularly valuable to audiences interested in things that are natural or organic.
Types of Beauty Videos – Your Content Strategy
It’s a lot easier to come up with weekly video ideas when you have an overarching strategy.
The easiest way to figure out what kinds of videos you should make (and this can also help determine your niche!) is to think about what you already do and enjoy. If skincare is particularly important to you, for example, then you could build a content strategy that includes things like your favorite sunscreen, what different ingredients in skincare products are for, or even how to make a DIY face mask.
The same thing goes if you love doing big glamourous makeups for going out. Think about what you like, and that will determine what you should talk about in your videos.
Instead of buying new products to use in videos, try to use and showcase what you already have.
Here are some common types of beauty and lifestyle videos:
Get Ready With Me: a video where you put your makeup on which helps your audience get to know you better.
Monthly Favorites: showcases your favorite products from the last month.
Makeup Collection: viewers will want to see what you have.
DIY: create something, like a homemade moisturizer, and show your viewers how to make their own.
Makeup Hauls: show off what you’ve bought recently.
Lookbooks: put together a few looks based on a theme, like a specific color or event.
First Impressions: show yourself using a new product for the first time.
Makeup Tutorials: teach your viewers how to achieve a particular look, like a smokey eye.
What’s In My Bag: empty your handbag to show viewers what you carry around with you, particularly your most essential makeup.
My Routine: show viewers your morning skincare routine, or how you usually take your makeup off before bed. Any of your beauty-related routines will be interesting to your followers.
You should also be ready to jump on trends as they jump up. You can get a bump in viewership from people searching for a particular trend. Here are a couple of examples of past trends:
- Boyfriend Does My Makeup
- Kid’s Makeup Challenge
- No Mirror Makeup Challenge
How to Get Products to Review
You probably already know that a lot of the products popular beauty YouTubers review in their videos were sent to them for free. Brands want to get their products into the hands of creators who have ‘influence’ both in the hopes that their audiences will decide to buy them and as part of generating buzz – getting more people talking about their products so more people become interested.
In order for a brand to consider sending you a free product to review or feature in a video, you will first have to have a large enough following.
What is ‘large enough’? There’s no magic number of YouTube subscribers or Instagram followers. How large your following needs to be will depend on what brands you want to work with, as well as whether your channel has a specific niche.
Large brands will want to work with larger creators. Smaller brands that are still trying to build notoriety may be more open to working with creators whose followings are not as large.
If you have a very specific niche then that could create more opportunities for you as a mid-sized YouTuber. If you specialize in styling curly black hair, and a brand is marketing a product made specifically for styling curly black hair, then your smaller following will be more valuable to that brand than the larger audience of a more general channel.
Here are 4 tips for getting free products for review:
- Follow your favorite brands on Instagram and subscribe to their YouTube channels. Make sure to take them when you feature their products in your posts or videos.
- Focus on growing your community/audience. As you start getting more subscribers and building up momentum for your channel, brands might start reaching out to you. We’ve got some tips on growing your YouTube channel here .
- Make a pitch to a brand. The first step in this is figuring out who to pitch to. You can send smaller brands DMs via Instagram or Twitter and politely ask for contact info for a PR person. Never ask for free product or sponsorship at this point, just information you can use to contact PR.
- Send an email with your pitch to the brand’s PR person. Your email should introduce yourself, describe your content, and talk about what type of audience you have (how many subscribers, where are they located, how old are they, etc. This information is all available in your Creator Studio analytics).
Make sure to link to your channel so they can verify what you say (do not hide your subscriber count).
Emphasize what value you could provide the brand with (i.e. ‘I’ve had a lot of success with videos on managing acne and I’m sure my subscribers would love to see a review of your cream’) and outline what kind of video you’d like to make (i.e. a five-minute review focusing on the product, or a short feature in a longer makeup tutorial).
Simple Camera Setup for Beauty Vloggers
There are a lot of different ways to set up your camera for a ‘talking head’ video (anything that is primarily you talking to the camera). Keep reading to learn about a popular ring-light setup for beauty videos, or click here to learn 4 different camera setups .
In an ideal situation, this is what you’ll build your setup out of:
- Camera with a flip-out screen
- Ring light
- Camera-mounted shotgun mic
- Tripod (unless you can mount your camera inside your ring light)
If you don’t have access to all of the equipment above, try some of these:
- Smartphone camera
- DIY ring light
- Smartphone shotgun mic or LAV
Step 1: Set your camera and ring light (your camera should be sitting directly behind your ring light, or mounted inside of it) up about 3 feet away from your subject (yourself).
You might want to experiment with sitting at different distances to see how the lighting looks on your face.
Step 2: Set your camera up a bit higher than your face and tilt it down towards yourself (shooting from slightly above is always more flattering). It should be set up at about a 15° angle to you.
Step 3: Check your frame (this is easiest if your camera has a screen that flips out) to make sure there’s not too much empty space in your shot.
Step 4: Adjust your camera’s focus so your picture is clear. You may need to set up a lamp, chair, or stuffed animal as a stand-in for yourself while you stand behind the camera adjusting the focus.
Turn off autofocus and adjust your focus manually by turning the focus ring on your lens, if you’re using a DSLR or mirrorless camera.
Step 5: Set your f-stop (aperture) so that your depth of field is deep enough for you to lean forwards or backward without becoming blurry.
An aperture of f/5.0 is good if you’re going to be moving around a lot, but if you’re not going to be moving much and want a blurry background you might want to go with f/2.8 or lower.
Step 6: Set your ISO (film speed). A lower ISO will give you a darker, but higher quality, image. A higher ISO will lower your quality and give you a brighter image.
ISO 400 should be a happy medium for shooting inside with your ring light, but you may need to try out a couple of settings to find one perfect for your situation.
For more info on camera settings for beauty videos, click here .
Lighting for Beauty
The key to achieving a high-quality picture for your beauty video is having a lot of light.
A ring light (whether it’s one you purchase or one you make) will give you even light over your whole face, and that may be enough. Ring lights are considered one of the biggest ‘secrets’ to beauty on YouTube (as explained in this Racked article ).
There are, however, some reasons you might want additional light:
To Light your Background/Space
If you only have a ring light/front light then you may end up looking like you’re surrounded by shadows. If you want more light for your space you can use windows, household lamps, or professional video lights like softboxes or LED panels.
To Stand Out Against your Background (‘Backlighting’)
A front light that’s lighting you evenly is also lighting whatever’s behind you evenly, which can make your overall picture look flat.
Setting up a light to shine up at you from behind will help you pop out from your background by creating a silhouette.
You can use an LED panel or a household lamp as a backlight.
To Add Dimension to Your Face (Side Lights/ Fill Lights)
Setting up lights to hit you from the sides will help you look more three dimensional. It can also give your video a general quality boost because the picture quality is always better when there’s tons of light.
You can use softboxes, LED panels, clamp lights, household lamps, or any other light source you can think of.
Lighting Tips!
* **_Use ‘daylight’ bulbs in any household lighting/clamp lights you use._ This way, your light will all be the same color and you won’t have to do a lot of color correction (the more yellow-colored light most indoor lights give off will make you look orange).**
You can buy daylight-colored bulbs for about $5.
- Clamp lights ($10 each) and paper lanterns ($10 each) provide great lighting and are much more affordable than professional lighting kits. The paper lanterns will provide even, diffused, light and the clamp lights will be easy to set up wherever you need them.
- Check out these DIY tips for creating your own reflectors and diffusers .
Top Ring Lights for YouTube
1. Neewer Dimmable Fluorescent Ring Light - $110
One cool feature of the Neewer Ring Light is that you can choose between daylight and a more orange-tinted light depending on which of the included filters you use. In almost all situations you’ll want to use white light/daylight because the orange light will make you look orange, but if you ever wanted to create a warmer image to achieve a particular effect you’d have that option with this light.
This light is dimmable and can be adjusted to the angle that suits your shot. That’s true of our number 2 pick too, and the second place light actually has a slight edge over the Neewer light because its color temperature is 5400K which is slightly closer to daylight than Neewer’s 5500K, but that’s honestly not super important for YouTube. They’re close enough that you won’t be able to tell the difference, and this light is over $100 more affordable.
2. Prismatic Halo Ring Light - $260
This lightweight ring light is easy to transport, set up, and mount your phone or camera to. It’s a fluorescent ‘daylight’ (5400K) light, so the colors in your videos will look natural.
This light is dimmable, so you can turn it down if it’s too bright, and the Prismatic Light Stand will allow you to tilt your light to the perfect angle. This will be handy if you’re mounting your camera inside the ring but want to place it slightly above your face instead of having it look at you head on.
Build Your Own Diva Ring Light
A ring light is an important tool for a lot of beauty YouTubers, but it doesn’t fit into everyone’s budget. Here’s one popular way to create your own ring light for about $20.
A lot of people have done this DIY, but we’re using Kevin’s video because we love how he added the stand.
What you need:
- A wire wreath frame
- Zip ties
- LED rope light (16 ft, daylight)
- Tinfoil
- Metal paper towel stand
- Scissors
Step 1: Wrap your wreath frame in tinfoil. Make sure the tinfoil is shaped to the wreath so that there is a curve on the inside where your rope light can sit.
Step 2: Place your rope light inside the curve of your frame. Wind it around for 3 loops so you have 2 rows of lighting tube sitting next to each other.
Step 3: Use the zip ties to fasten in the rope light. Wrap them tightly around your frame and lights in several (6-8) places.
Step 4: Cut off the tails of the zip ties.
This is your ring light. Continue to step 5 if you want it to have a stand (you might just want to clip it up somewhere).
Step 5: Fasten your ring light tightly to your paper towel stand securely with several zip ties. Make sure to fasten it at the bottom (where the excess rope light is coming out of your ring light). Cut off the tails of the zip ties.
How to Make a Makeup Tutorial – Before You Start
Before you start recording your makeup tutorial there are a few things you should do.
- Write an outline. You might even want to write yourself a transcript. Having a concrete plan before you start recording will help ensure your tutorial is useful for viewers. You’ll realize where you might need to slow down and show a particular step in more detail, or where your viewers might find a particular step tricky, in a way you want if you just jump into a makeup routine you know perfectly.
- Layout your supplies. Make sure everything you need for your tutorial is laid out neatly in front of you so you can access it all easily. Try to use clean brushes – it just looks nicer.
- Tidy up. If you want your viewers to trust you when it comes to aesthetics, it’s important that your studio area is clean and tidy. You may even want to use a backdrop.
- Do a video test. Before you start your video for real, start recording and shoot some test footage. Watch that back to make sure you like the look of your frame, your face is never blurry, and you’re happy with the overall look of things.
- Do an audio test. If you’re going to be talking in your video instead of recording a voiceover after, do an audio test to make sure your audience will be able to hear you clearly.
How to Make a Makeup Tutorial – Recording
Here are some things to keep in mind while you record your makeup tutorial:
- Show what you’re using. When you use a product, brush, or any other beauty supply make sure to let your audience know what you’re using and why you chose it. This isn’t about promoting brands, it’s about making it easy for viewers to duplicate your results.
If you’re using autofocus, you can hold products up to the screen and wait for it to kick in. If you’re not using autofocus, just hold them up next to you for a moment. You can also shoot separate closeups of each product and cut them into your main tutorial video. - Highlight small details. Describe what you’re doing in a lot of detail and don’t gloss over anything. Assume the person watching your tutorial doesn’t know anything about putting on makeup.
- Take stills for your thumbnail. Remember to take some still photos of your finished makeup to use in your YouTube thumbnail.
How to Make a Makeup Tutorial – After Shooting
Once you’ve finished recording and put away all your camera gear, there’s still work to do. You still need to edit your video and post it on YouTube. Here are some tips for that:
- Add transitions and effects. If you have several clips or even just distinct sections of your main clip, then adding transitions can be a great way to hold your viewers’ attention.
If you spend a lot of time on a repetitive step, you may want to speed that part up and make it a time-lapse. - Add your intro. Having a short (usually around 5 seconds) intro sequence is a great way to strengthen your personal lifestyle brand. You can download free intros right here on filmora.io .
- Title your video. Make sure your most important keyword – the type of look you’re creating, or a product you’re reviewing – is near the beginning of your video’s title. Searching for the topic of your video and writing a title similar to the highest-ranking results is a good way to start.
Remember to include what type of video you made, i.e. ‘tutorial’, ‘review’, or ‘get ready with me’, in your title. People might include these kinds of words in their search queries and, even if they find your video another way, they’ll probably want to know what they’re clicking on before they click. - Customize your thumbnail. Again, search for your video’s topic and see what comes up. You want your thumbnail to look related to the top results, but you also want it to jump out at potential viewers. There may be something you can add to the thumbnail photos you took that will help you stand out, like a bright border, an emoji, or a closeup of a product you feature in the video.
- Write a detailed description. Putting the products you use in your video description will help your viewers, and it’s a great place to include affiliate links if you ever join an affiliate program (like Amazon’s) to generate some revenue.
Are you already making beauty videos? If so, let us know if you have any of your own tips!
Richard Bennett
Richard Bennett is a writer and a lover of all things video.
Follow @Richard Bennett
A-List Films: Must-Watch Channel Compilation
Versatile Video Editor - Wondershare Filmora
An easy yet powerful editor
Numerous effects to choose from
Detailed tutorials provided by the official channel
The movie industry is a creative art that requires a lot of different elements such as business, design, music, photography, and filmmaking. As time went by, movie reviews and news became more in demand in a digital video format rather than print. YouTube has made watching movies a lot easier just with your mobile phones and at your comfort. There are many hallmark movies on YouTube that you can manage to help you kill time.
While there are paid hallmark movies on YouTube, there are also free hallmark movies channels to watch to kill time ranging from a short film, cartoon, movie trailer, movie reaction, etc. In this article, I will show the top 15 YouTube movies channels to kill time in 2024.
In this article
01 Does YouTube Have a Movie Channel?
02 15 Best YouTube Movies Channels to Watch Films in 2024
04 How to Create Your Own Short Film?
Part 1: Does YouTube Have a Movie Channel?
Are you a fan of watching movies? The good news is you can watch a variety of films on YouTube at the comfort of your home more easily just with the use of your mobile phone or your computer system. YouTube, a well-known platform for video-sharing with live broadcasting and music videos, also offers users the option to watch free and paid movies on the best YouTube movies channel.
Part 2: 15 Best YouTube Movies Channels to Watch Films in 2024
If you are looking for YouTube channels to watch movies, the fact is that there are lots of best YouTube movies channels to watch films in your comfort and kill time. It is also vital to understand that some channels are free while others are paid based on the channel owner.
Stay tuned, as I’ll be giving you 15 top channels to watch movies and kill time this 2024!
1.Movieclips
Movieclips covers all aspects of movies, whether Western, action, comedy, horror, drama, film and many more genres. The Fandango Movieclips channel is the most extensive collection of licensed movie clips on the web.
2.Mr Sunday Movies
Mr. Sunday Movies is a cartoon movie network where you can find videos on Easter Eggs, Movie Reviews, Trailer Breakdowns, Deleted Scenes, and more.
3.Indietrix Film Reviews
Indietrix Film Reviews showcase film reviews from old to new with blockbusters and art-house movies and also create guides to genres of film and recommendations for Blu-ray, Amazon, and Netflix.
4.Screen Rant | Movie and TV
Screen Rant is one of the fastest-growing YouTube channels in the United States for watching movies.
5.Movieclips Trailers
Movieclips Trailer gives you hot new thrillers as they drop, and make sure all the hottest contemporary thrillers are available to you as you watch.
6.TopMovieClips
TopMovieClips is a cartoon superhero movie channel where you watch the best scenes, moments, and clips.
7.Screen Junkies
Screen Junkies is a movie channel with the original showcase series, stream of pop-culture parody, and thoughtful commentary.
8.Film Riot
Film Riot is a how-to full trip through filmmaking which Riot explores the art of filmmaking, from making significant effects to following Triune Films through production.
9.Beyond the Trailer
Beyond the Trailer, hosted and created by Grace Randolph is meant to give you an inside track of Hollywood thrillers and hot movies and also with movie reviews.
10.CineFix
CineFix is a final place for filmmakers and true movie buffs showing on their YouTube channel.
11.Looper
Looper is a YouTube channel for sourcing TV shows, video games, movies that everyone loves. Viewers of this channel are addicted to Star Wars and superheroes.
12.The Film Theorists
The Film Theorists is referred to as a did-you-know movie. This channel is good with theorizing movies bringing you little-known behind-the-scenes moments and incredible facts from all your favorite big-screen hits.
13.WhatCulture
WhatCulture is an online culture magazine covering TV, Film, Gaming, etc. It gives you the option to check back regularly for exclusive Top-10s, reviews, previews, etc.
14.ScreenPrism
ScreenPrism helps you to understand more about TV shows and movies. The channel aims at creating insightful video essays by commenting, entertaining, analyzing, and exploring various topics.
15.Film Gob
Film Gob is a YouTube channel meant for weird comedy mashup stuff, trailer, reactions, reviews, movie news, and rants.
Part 3: Where to Find Free Movies?
There are many paid movies on the internet, but it’s also necessary to note that there are other platforms where you can watch free interesting movies or free hallmark movies at your comfort. This platform includes:
1. Kanopy
Kanopy is home to free classic movies or art houses with the best streaming website for contemporary Indies. Kanopy is known for showing critically acclaimed and high-quality cinema.
2. Crackle
Crackle offers hundreds and thousands of full-length free movies. No matter the size of the screen or monitor you use to watch the movie, the movie still maintains its high quality.
3. Vimeo
Vimeo is also a video platform that operates like YouTube, allowing users to upload their movies and clips in HD quality and share. Vimeo offers paid and free hallmark movies for users and serves as an excellent alternative for those who are not into the idea of Google what you are watching. It has an Android and iOS app and a website to stream or watch directly without downloading the movies.
Part 4: How to Create Your Own Short Film?
Have you ever been taught how to create your short film? Wondershare Filmora is the best and easy tool to do this accordingly. When you finish making the short film, you can share it on your social media, including your Instagram, YouTube, and Facebook. Below, we will show you use Filmora to create your short film, like hallmark movies on YouTube in clicks.
Step 1: Install Filmora and Import Files
Open Wondershare Filmora, click the “Import” button, and load media files using the navigation import panel. Also, arrange the order by directly dragging and dropping your media files into the program.
Wondershare Filmora
Get started easily with Filmora’s powerful performance, intuitive interface, and countless effects!
Try It Free Try It Free Try It Free Learn More >

Step 2: Edit Videos using Filters
Start editing to make Stunning Videos using Various Effects & Filters. Go to the “Transition” tab. Then drag your clips to join it with one or several different transitions.
To add words to the film, click on the “Text” button, select the text type you like, and drag the icon to the Text track.

Step 3: Export and Share your Final Video
When you are happy with the final file, save and export your video in the format of your choice and directly upload it to your Facebook or YouTube account. You can also burn it to disk.
For more insight on how to create your short film on Wondershare Filmora, watch the video.
Conclusion
Thus, as we saw, finding the best YouTube movies channel in 2024 to kill your time will make you happy, and this article has given a broad explanation of the top free YouTube movies channel that can suit your needs. Filmora has also proven to be one of the most powerful tools to make your short films and teach you how to go about it.
The movie industry is a creative art that requires a lot of different elements such as business, design, music, photography, and filmmaking. As time went by, movie reviews and news became more in demand in a digital video format rather than print. YouTube has made watching movies a lot easier just with your mobile phones and at your comfort. There are many hallmark movies on YouTube that you can manage to help you kill time.
While there are paid hallmark movies on YouTube, there are also free hallmark movies channels to watch to kill time ranging from a short film, cartoon, movie trailer, movie reaction, etc. In this article, I will show the top 15 YouTube movies channels to kill time in 2024.
In this article
01 Does YouTube Have a Movie Channel?
02 15 Best YouTube Movies Channels to Watch Films in 2024
04 How to Create Your Own Short Film?
Part 1: Does YouTube Have a Movie Channel?
Are you a fan of watching movies? The good news is you can watch a variety of films on YouTube at the comfort of your home more easily just with the use of your mobile phone or your computer system. YouTube, a well-known platform for video-sharing with live broadcasting and music videos, also offers users the option to watch free and paid movies on the best YouTube movies channel.
Part 2: 15 Best YouTube Movies Channels to Watch Films in 2024
If you are looking for YouTube channels to watch movies, the fact is that there are lots of best YouTube movies channels to watch films in your comfort and kill time. It is also vital to understand that some channels are free while others are paid based on the channel owner.
Stay tuned, as I’ll be giving you 15 top channels to watch movies and kill time this 2024!
1.Movieclips
Movieclips covers all aspects of movies, whether Western, action, comedy, horror, drama, film and many more genres. The Fandango Movieclips channel is the most extensive collection of licensed movie clips on the web.
2.Mr Sunday Movies
Mr. Sunday Movies is a cartoon movie network where you can find videos on Easter Eggs, Movie Reviews, Trailer Breakdowns, Deleted Scenes, and more.
3.Indietrix Film Reviews
Indietrix Film Reviews showcase film reviews from old to new with blockbusters and art-house movies and also create guides to genres of film and recommendations for Blu-ray, Amazon, and Netflix.
4.Screen Rant | Movie and TV
Screen Rant is one of the fastest-growing YouTube channels in the United States for watching movies.
5.Movieclips Trailers
Movieclips Trailer gives you hot new thrillers as they drop, and make sure all the hottest contemporary thrillers are available to you as you watch.
6.TopMovieClips
TopMovieClips is a cartoon superhero movie channel where you watch the best scenes, moments, and clips.
7.Screen Junkies
Screen Junkies is a movie channel with the original showcase series, stream of pop-culture parody, and thoughtful commentary.
8.Film Riot
Film Riot is a how-to full trip through filmmaking which Riot explores the art of filmmaking, from making significant effects to following Triune Films through production.
9.Beyond the Trailer
Beyond the Trailer, hosted and created by Grace Randolph is meant to give you an inside track of Hollywood thrillers and hot movies and also with movie reviews.
10.CineFix
CineFix is a final place for filmmakers and true movie buffs showing on their YouTube channel.
11.Looper
Looper is a YouTube channel for sourcing TV shows, video games, movies that everyone loves. Viewers of this channel are addicted to Star Wars and superheroes.
12.The Film Theorists
The Film Theorists is referred to as a did-you-know movie. This channel is good with theorizing movies bringing you little-known behind-the-scenes moments and incredible facts from all your favorite big-screen hits.
13.WhatCulture
WhatCulture is an online culture magazine covering TV, Film, Gaming, etc. It gives you the option to check back regularly for exclusive Top-10s, reviews, previews, etc.
14.ScreenPrism
ScreenPrism helps you to understand more about TV shows and movies. The channel aims at creating insightful video essays by commenting, entertaining, analyzing, and exploring various topics.
15.Film Gob
Film Gob is a YouTube channel meant for weird comedy mashup stuff, trailer, reactions, reviews, movie news, and rants.
Part 3: Where to Find Free Movies?
There are many paid movies on the internet, but it’s also necessary to note that there are other platforms where you can watch free interesting movies or free hallmark movies at your comfort. This platform includes:
1. Kanopy
Kanopy is home to free classic movies or art houses with the best streaming website for contemporary Indies. Kanopy is known for showing critically acclaimed and high-quality cinema.
2. Crackle
Crackle offers hundreds and thousands of full-length free movies. No matter the size of the screen or monitor you use to watch the movie, the movie still maintains its high quality.
3. Vimeo
Vimeo is also a video platform that operates like YouTube, allowing users to upload their movies and clips in HD quality and share. Vimeo offers paid and free hallmark movies for users and serves as an excellent alternative for those who are not into the idea of Google what you are watching. It has an Android and iOS app and a website to stream or watch directly without downloading the movies.
Part 4: How to Create Your Own Short Film?
Have you ever been taught how to create your short film? Wondershare Filmora is the best and easy tool to do this accordingly. When you finish making the short film, you can share it on your social media, including your Instagram, YouTube, and Facebook. Below, we will show you use Filmora to create your short film, like hallmark movies on YouTube in clicks.
Step 1: Install Filmora and Import Files
Open Wondershare Filmora, click the “Import” button, and load media files using the navigation import panel. Also, arrange the order by directly dragging and dropping your media files into the program.
Wondershare Filmora
Get started easily with Filmora’s powerful performance, intuitive interface, and countless effects!
Try It Free Try It Free Try It Free Learn More >
Step 2: Edit Videos using Filters
Start editing to make Stunning Videos using Various Effects & Filters. Go to the “Transition” tab. Then drag your clips to join it with one or several different transitions.
To add words to the film, click on the “Text” button, select the text type you like, and drag the icon to the Text track.
Step 3: Export and Share your Final Video
When you are happy with the final file, save and export your video in the format of your choice and directly upload it to your Facebook or YouTube account. You can also burn it to disk.
For more insight on how to create your short film on Wondershare Filmora, watch the video.
Conclusion
Thus, as we saw, finding the best YouTube movies channel in 2024 to kill your time will make you happy, and this article has given a broad explanation of the top free YouTube movies channel that can suit your needs. Filmora has also proven to be one of the most powerful tools to make your short films and teach you how to go about it.
Also read:
- Premier Roundup 2023'S Top Free Video Editing Apps
- Sprinting Success The Swift Growth of YouTube's Most Popular Vids
- Build Your Wealth on YouTube A Guide to Creating Content Without Ads for 2024
- 2024 Approved Auditing for Accuracy YouTube Monetization Compliance
- [Updated] Deciphering YouTube Monetization Success Codes
- Tips for YouTube Thumbnail Size
- 2024 Approved Elite 7 Cameras Elevating Interactive Learning Vlogs & Tutorials
- Masterclass in Time The Top 10 YouTube Channels For History Students
- Unleash Gaming Potential Top 30 Strategies to Increase Video Popularity
- Essential Tips for YouTube Shorts Success for 2024
- In 2024, A Comprehensive List of the Best Video Sites Post-YouTube
- How Many Viewers Equates to Profit? Decoding YouTube's Earnings Formula
- Elevate Your Video Game with These 5 YouTube Thumbnail Builders for 2024
- 2024 Approved 10 YouTube Havens for Entrepreneurs & Business Gurus
- 50+ Youtube Channel Names for Vloggers [100%% New] - Filmora
- Architecting Authoritative Adjuncts for 2024
- 2024 Approved Charting New Territory Strategies for YouTube Keyword Research
- In 2024, Efficiently Broadcasting Twitch Streams to YouTube Audiences
- [New] Discover Device-Friendly Ways to Locate Your YT Comments
- [New] Best Practices for Producing Encouragement-Driven Vlogs
- Audio Recording 101 From YouTube Playback To Files for 2024
- Picture and Sound Summary Device
- IPhone & Android The Five Best Non-Youtube Apps
- [New] Essential Game Streamers for Your Watchlist
- [New] In 2024, Unlocking Live Streams Roku's Path to FB LIVE
- [Updated] In 2024, Mastering Background Replacement on Instagram's Platform
- LumaFusion Offers Various Look Up Table Presets, or LUTs, Such as FiLMiC deLog and FiLMiC DeFlat, and Several Stylistic LUTs for Use with Neutral Use Video. You Can Also Manually Add the LUTs
- In 2024, Is Fake GPS Location Spoofer a Good Choice On Lenovo ThinkPhone? | Dr.fone
- [Updated] Innovative Approaches to Social Media Video Making for 2024
- In 2024, Converting Photographic Moments Into Cinematic Vignettes
- How to Remove an AirTag from Your Apple ID Account From iPhone SE (2022)?
- Updated In 2024, Online Video Compression Made Easy 10 Free Tools to Try
- 2024 Approved The Ultimate Process Rewiring Audio in Film Projects
- In 2024, How to Bypass Google FRP Lock on Tecno Spark 20 Pro+ Devices
- Updated Elevating Visuals with Vocal Synchrony A Curated List of Pivotal Song Choices for 2024
- Title: "Beauty Breakdown Mastering Makeup and Hauls Online"
- Author: Brian
- Created at : 2024-05-25 11:21:42
- Updated at : 2024-05-26 11:21:42
- Link: https://youtube-video-recordings.techidaily.com/beauty-breakdown-mastering-makeup-and-hauls-online/
- License: This work is licensed under CC BY-NC-SA 4.0.
