
:max_bytes(150000):strip_icc()/how-to-post-a-video-on-twitter-4589824-3f57aabcb3554c58bc8d55d90c5c336a.jpg)
"Audiovisual Harmony Merging Audio and Visual Elements on YouTube"
Audiovisual Harmony: Merging Audio and Visual Elements on YouTube
10 Tips For Shooting Profesional YouTube Videos

Richard Bennett
Mar 27, 2024• Proven solutions
We have mentioned before about the equipment you should have to start your YouTube video shooting , however, being methodical in your approach to the video making process and knowing exactly what and where you are going to stage and record will increase the quality of the content. Focus on the technical aspects of your YouTube video before you actually start shooting and strive to be well prepared for all the challenges a day on the set may bring.
These and other useful tips may help you make better videos for your YouTube channel, so let’s explore different ways of improving your video making skills.
10 Tips for Shooting Better YouTube Videos
All videographers agree that you shouldn’t come to the set unprepared. Everything has to be in its place, no matter how insignificant it may seem, because a tiny detail can completely ruin the shot or even an entire day of work. These tips are going to help you avoid common mistakes, inexperienced video producers often make.
1. Write the Script
Everything starts with a script, at least in the cinematography world. You don’t have to write long, detailed descriptions of all scenes, just make a short note of every scene, what is being said in the shot, on-screen actions, camera positions, and so on. By doing this, you’ll save yourself a lot of valuable time, you can then dedicate to other burning issues on the set. Besides, knowing what you are going to say throughout the video so you don’t have to improvise all the time is going to help you feel more relaxed in front of a camera.
2. Build the Set (Lighting included)
Don’t leave anything to chance. You should control everything that is going to be in the shot, so avoid working at locations you can’t at least partially control. Shooting in studio-like conditions will enable you to carefully select the scenography and to design light so it matches the scene perfectly. The actors must always be clearly visible to the audience, which is why you need to pay attention to where they are located in the shot and how much light you have in that part of the shot.
3. Keep Your Batteries Charged
There is nothing more frustrating than arriving at the set anxious to start shooting just to find out that the batteries are empty. Charge the batteries at the end of each day on the set, because the chances are that you are going to need them early in the morning. Always have several spare batteries with you, so even if one battery is empty you have the replacement ready. You can also prolong the battery life by switching the camera off when you are not recording.
4. Do a Microphone Check
Capturing audio with an external microphone drastically increases the quality of the sound in your videos. That’s why making absolutely sure that all cables are connected and that the microphone is perfectly placed is paramount if you want to get the sound right. The host or the hosts of the video must be at the right distance from the microphone, usually, the length of their fist with the thumb and pinky finger extended, but this can vary a few inches to either side.
Check out the best microphone for YouTuber in 2018
5. Pay Attention to The Shot Composition
The rule of thirds is a common composition principle used by videographers to create balanced and unified images. The rule suggests that the subjects in a shot should be placed at the intersections of the lines that divide the screen. Most digital cameras have a grid that makes using the rule of thirds quite simple because you can easily see when the subjects in the shot are not positioned correctly.
This is just one of many shot composition techniques you have at your disposal, and as you gain more experience you’ll learn how to combine them and get aesthetically pleasing results.
6. Always Record Videos in Landscape Mode


Posting vertically oriented videos to your YouTube channel will make you look unprofessional because portrait mode is never used for capturing videos. YouTubers who record their videos with Smartphones are more likely to fall into this trap, but all you need to do to avoid this is remember to hold the device horizontally.
By switching to portrait mode, you’ll be cropping the frame in a way, so you might unknowingly end up removing parts of the shot you wanted to record.
In case that you want to convert your portrait video to landscape, do not miss this article about How to Convert A Portrait Video to Landscape.
7. Eliminate The Background Noises
Professional microphones can pick up even the softest sounds, that might prove difficult to remove in the post-production. You can reduce the noise levels in your videos by using shotgun microphones that only capture sounds that come directly into the microphone, or by using the omnidirectional mic to eliminate the wind if you’re shooting on an outdoor location.
Background noises can be particularly unpleasant when recording narration, because the viewers of the video may not want to watch it until the end if they can’t hear what the person in the video is saying.
If it is hard for you to record your YouTube video in quite environment, you can remove the background noise by using some video editing software. For YouTubers, we recommend you to try Wondershare Filmora to de-noise. Check the video below about how to remove background noise with one click.
8. Keep The Shot in Focus
You can always keep the shot in focus by simply enabling the autofocus feature, but if you do so you won’t be able to control where the focus is going to be. Pulling focus manually is an art that takes years to master, and you have to keep practicing it as much as you can in order to become good at it.
The best way to deal with out of focus shots is to avoid shooting scenes that include a lot of action because you won’t have to pull focus that often.
9. Put The Camera on a Tripod

The footage you produce should be smooth and free of camera shakes. All video cameras pick up vibrations easily, so even the slightest movement or impact can ruin a shot. Putting the camera on a tripod is one of the best ways to stabilize the shot and avoid camera shaking.
In addition, a tripod enables you to maintain image stability even when shooting form lower or upper angles, something that cannot be achieved by simply holding the camera.
We have chosen some of the best tripods that you can use for starting a YouTube vlogging Video shooting . If you are using a 4K camera, here are some tripods that you can use for your 4K Cameras .
10. Find The Best Angle
Every scene has its perfect angle, you just have to find it. This job is much easier if you have already built the set and adjusted the lighting before approaching the shot selection process because it will allow you to know exactly where the camera should be.
The camera position depends on a number of factors, including the video’s aesthetics or the action that takes place in the shot, and you have to go through this process for each shot in your video.
Read More to Get : How to Download YouTube Videos without Any Software Easily >>
Conclusion
Hopefully, the tips we provided in this article are going to help you create better YouTube videos. There are hundreds of tricks you’ll have to learn as your skills become more polished, but sometimes just paying attention to the basic rules of videography is more than enough to create a stunning video.
Leave a comment and let us know which tips helped you the most or tell us which useful tips we failed to mention in this article.
Richard Bennett
Richard Bennett is a writer and a lover of all things video.
Follow @Richard Bennett
Richard Bennett
Mar 27, 2024• Proven solutions
We have mentioned before about the equipment you should have to start your YouTube video shooting , however, being methodical in your approach to the video making process and knowing exactly what and where you are going to stage and record will increase the quality of the content. Focus on the technical aspects of your YouTube video before you actually start shooting and strive to be well prepared for all the challenges a day on the set may bring.
These and other useful tips may help you make better videos for your YouTube channel, so let’s explore different ways of improving your video making skills.
10 Tips for Shooting Better YouTube Videos
All videographers agree that you shouldn’t come to the set unprepared. Everything has to be in its place, no matter how insignificant it may seem, because a tiny detail can completely ruin the shot or even an entire day of work. These tips are going to help you avoid common mistakes, inexperienced video producers often make.
1. Write the Script
Everything starts with a script, at least in the cinematography world. You don’t have to write long, detailed descriptions of all scenes, just make a short note of every scene, what is being said in the shot, on-screen actions, camera positions, and so on. By doing this, you’ll save yourself a lot of valuable time, you can then dedicate to other burning issues on the set. Besides, knowing what you are going to say throughout the video so you don’t have to improvise all the time is going to help you feel more relaxed in front of a camera.
2. Build the Set (Lighting included)
Don’t leave anything to chance. You should control everything that is going to be in the shot, so avoid working at locations you can’t at least partially control. Shooting in studio-like conditions will enable you to carefully select the scenography and to design light so it matches the scene perfectly. The actors must always be clearly visible to the audience, which is why you need to pay attention to where they are located in the shot and how much light you have in that part of the shot.
3. Keep Your Batteries Charged
There is nothing more frustrating than arriving at the set anxious to start shooting just to find out that the batteries are empty. Charge the batteries at the end of each day on the set, because the chances are that you are going to need them early in the morning. Always have several spare batteries with you, so even if one battery is empty you have the replacement ready. You can also prolong the battery life by switching the camera off when you are not recording.
4. Do a Microphone Check
Capturing audio with an external microphone drastically increases the quality of the sound in your videos. That’s why making absolutely sure that all cables are connected and that the microphone is perfectly placed is paramount if you want to get the sound right. The host or the hosts of the video must be at the right distance from the microphone, usually, the length of their fist with the thumb and pinky finger extended, but this can vary a few inches to either side.
Check out the best microphone for YouTuber in 2018
5. Pay Attention to The Shot Composition
The rule of thirds is a common composition principle used by videographers to create balanced and unified images. The rule suggests that the subjects in a shot should be placed at the intersections of the lines that divide the screen. Most digital cameras have a grid that makes using the rule of thirds quite simple because you can easily see when the subjects in the shot are not positioned correctly.
This is just one of many shot composition techniques you have at your disposal, and as you gain more experience you’ll learn how to combine them and get aesthetically pleasing results.
6. Always Record Videos in Landscape Mode
Posting vertically oriented videos to your YouTube channel will make you look unprofessional because portrait mode is never used for capturing videos. YouTubers who record their videos with Smartphones are more likely to fall into this trap, but all you need to do to avoid this is remember to hold the device horizontally.
By switching to portrait mode, you’ll be cropping the frame in a way, so you might unknowingly end up removing parts of the shot you wanted to record.
In case that you want to convert your portrait video to landscape, do not miss this article about How to Convert A Portrait Video to Landscape.
7. Eliminate The Background Noises
Professional microphones can pick up even the softest sounds, that might prove difficult to remove in the post-production. You can reduce the noise levels in your videos by using shotgun microphones that only capture sounds that come directly into the microphone, or by using the omnidirectional mic to eliminate the wind if you’re shooting on an outdoor location.
Background noises can be particularly unpleasant when recording narration, because the viewers of the video may not want to watch it until the end if they can’t hear what the person in the video is saying.
If it is hard for you to record your YouTube video in quite environment, you can remove the background noise by using some video editing software. For YouTubers, we recommend you to try Wondershare Filmora to de-noise. Check the video below about how to remove background noise with one click.
8. Keep The Shot in Focus
You can always keep the shot in focus by simply enabling the autofocus feature, but if you do so you won’t be able to control where the focus is going to be. Pulling focus manually is an art that takes years to master, and you have to keep practicing it as much as you can in order to become good at it.
The best way to deal with out of focus shots is to avoid shooting scenes that include a lot of action because you won’t have to pull focus that often.
9. Put The Camera on a Tripod
The footage you produce should be smooth and free of camera shakes. All video cameras pick up vibrations easily, so even the slightest movement or impact can ruin a shot. Putting the camera on a tripod is one of the best ways to stabilize the shot and avoid camera shaking.
In addition, a tripod enables you to maintain image stability even when shooting form lower or upper angles, something that cannot be achieved by simply holding the camera.
We have chosen some of the best tripods that you can use for starting a YouTube vlogging Video shooting . If you are using a 4K camera, here are some tripods that you can use for your 4K Cameras .
10. Find The Best Angle
Every scene has its perfect angle, you just have to find it. This job is much easier if you have already built the set and adjusted the lighting before approaching the shot selection process because it will allow you to know exactly where the camera should be.
The camera position depends on a number of factors, including the video’s aesthetics or the action that takes place in the shot, and you have to go through this process for each shot in your video.
Read More to Get : How to Download YouTube Videos without Any Software Easily >>
Conclusion
Hopefully, the tips we provided in this article are going to help you create better YouTube videos. There are hundreds of tricks you’ll have to learn as your skills become more polished, but sometimes just paying attention to the basic rules of videography is more than enough to create a stunning video.
Leave a comment and let us know which tips helped you the most or tell us which useful tips we failed to mention in this article.
Richard Bennett
Richard Bennett is a writer and a lover of all things video.
Follow @Richard Bennett
Launchpad to Success: The YouTube Entrepreneur’s Guide
Hello, I’m looking to start my journey as a YouTuber, but I do not know how the process works. Please, can you share with me how I can create a YouTube channel and make money from it? Kindly, help.
Starting a successful YouTube channel is very tricky. So, if you’re wondering how to create a YouTube channel and make money, worry less, we understand your struggle, and that is why we’ve created this YouTube beginners guide.
Regardless of whether you’re looking to start a tech YouTube channel, a money-making online YouTube channel, a lifestyle YouTube channel, or other topics, this guide will walk you through the simple process of how to create a YouTube channel and make money from it.
Part 1: Why choose YouTube to make money?
Boasting over 2 billion active users globally, YouTube remains the most used video-playing platform on the internet with all kinds of videos.
Today, many folks use YouTube as a means of generating income because it offers users more opportunities to reach a wide range of audiences, and the means of generating income via YouTube easily. As of when this article is written, research shows that an average YouTuber could earn up to $10,000 yearly.
Also, YouTube is a free marketing platform. So, if you have a website, you can add links to your website in the video description, thus enabling you to boost your website traffic via the platform. And it’ll allow you to advertise your product or services 100% free.
Part 2: 5-Step Formula to Start a YouTube Channel
Now you understand why you should choose YouTube to make money, the following steps will teach you how to create a YouTube channel within a few clicks. So, read on.
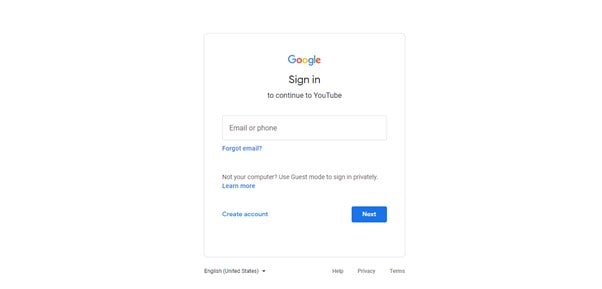
Step1 Create a google account
To get started, you need to create a google account. But if you already have a Google account you can skip this step.
Head to Google Account and click Create Account at the top right corner.

On the new screen, enter the necessary details and click Next.

Provide your phone number and other required details. Then, click Next.

On the new page, click I Agree to accept Google’s terms and conditions. Then finish the Google Account setup.

Step2 Create a YouTube account
Once you’ve successfully created a Google account, the next thing is to create your YouTube account. You just have to do the following to carry out the operation;
Open YouTube’s official website in your browser and click Sign in from the top right corner.

On the new page, sign in to the Google account that you want to use in creating your YouTube channel.
After you sign in to your Google account, you’ll be prompted back to the YouTube home interface. Click on your profile icon from the top right corner and select Create A Channel from the drop-down list.

Choose the Name you want to appear on your YouTube channel profile and upload a preferred Picture. Then, click Create Channel to proceed.

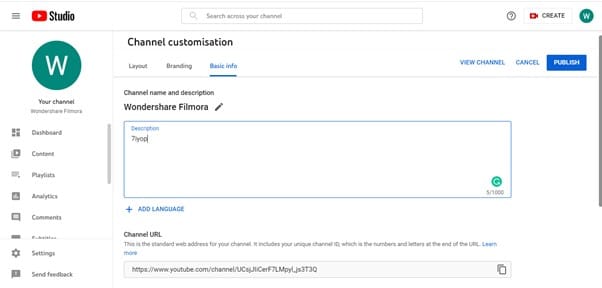
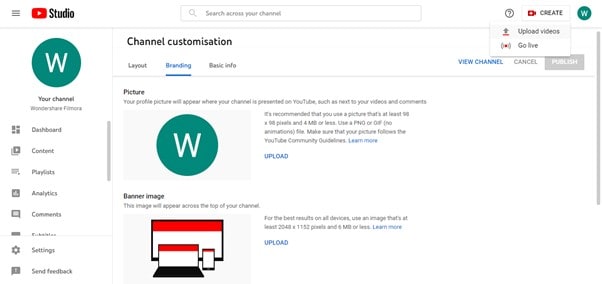
Step3 Customize your YouTube channel
After you’ve successfully created the channel, the next thing is to customize the channel as per requirement. Click Customise Channel from the left-hand side.

You’ll be prompted to the YouTube creator studio. There, you’ll find Layout, Branding, and Basic Info options displayed at the top of the page.
In the Layout section, you’ll be allowed to apply customization of how you want your YouTube channel homepage to look.

Under Branding, you can upload your brand logo as a profile photo, upload a banner image, and add the video watermark that you want to appear on all videos you upload on YouTube.

Under Basic Info, you’ll be able to enter a description for your YouTube channel, edit your channel URL, and do lots more. However, remember to always use the PUBLISH button to save customization.
Step4 Upload your first YouTube video
Now, it’s to upload your first YouTube video. To do so, navigate to the top-right corner of the page and click Create New. Select Upload Video.
If you have a video ready, click Select Files and upload the video you want to post.

Complete the required editing/settings after the video is uploaded.

Speaking of videos, you upload on YouTube, there are certain types of videos that can make you popular within a short time. Such YouTube video category includes;
- Singing
- Teaching
- Fashion Advice
- Cooking Tutorial
- Make-Up Tutorial
Step5 Make your YouTube channel discoverable
It’s time to start making your YouTube channel discoverable online. You need the subscribers, views, and all that a creator like you is worth having. However, to make this possible, you need to do the following;
Optimize Video Titles
Using Google-friendly titles for your videos is vital to allow them to rank well on Google search ranking. It should be catchy and compelling that users will be prompted to want to know what the video is about. Make sure it contains keywords too.

Optimize Video Description
Adding descriptions to your video is as important as the title. This will help search engines understand what your video is all about. So, make sure you add rich keywords to your video description and keep it concise.

Promote Your Channel on Other Social Media Platforms
You shouldn’t limit yourself to just creating videos and uploading them on YouTube. Make sure you always make it a priority to promote your YouTube videos on other platforms like Facebook, Twitter, or Instagram. This will help you give your existing fans a heads-up that you’re starting a YouTube channel.

Add Tags to your videos
When we say add tags to your videos, it does not mean you should add any tag to any video you upload on YouTube. Only add tags that’s relating to the theme of your video.
Tags will help YouTube understand the kind of video you’re uploading, and it’ll help you maintain the quality of not just your videos but your YouTube channel.

Use Keywords in Your Videos
Using rich keywords in your YouTube videos is a great way to increase the chances of your videos being seen online. Make sure you use the right keyword in the video title, as it’ll help guide viewers to your video when they search for similar words or phrases online.

Part 3: YouTube Must-Have Tools: What Are They?
Congratulations on creating your YouTube channel. But, before you get over-excited, there are essential tools you need as a YouTuber to help you stand out in the industry. These tools include the following;
1. Video Editor – Wondershare Filmora
As a YouTuber, regardless of your niche of expertise, you need an efficient video editing tool like Wondershare Filmora to create quality videos. Filmora is different from the regular video editor you find online, and it offers a plethora of video editing features that you can rely on to edit your videos and spice them up without requiring any kind of video editing knowledge.
See how you can use Filmora video editor on your YouTube videos;
Free Download For Win 7 or later(64-bit)
Free Download For macOS 10.14 or later
Step1 Go to the official website and install the Filmora video editing software on your computer. Then, launch the tool and import the video you want to edit using the Import button.

Drag-n-drop the video to the timeline.

Step2 Click Effects from the top of the screen. Select AI Portrait from the left-hand side and find a preferred AI Portrait effect. Then, click on it and drag-n-drop the effect to the Timeline.

Adjust the effect starting and ending point of where you want the AI Portrait effect to be displayed.
Step3 Again, adjust the AI Portrait effect settings by double-clicking on it, then, from the pop-up, apply the preferred settings.

Step4 You can also add a “Subscribe” watermark to your YouTube video. To do so, just click the >> icon next to Export at the top of the screen, then select Element.

Select the ‘Social Media Show Element 07’ Effects. Then, drag-n-drop it to the Timeline.

Step5 Lastly, preview the edited video, and if you’re okay with it, click Export from the top bar and select Burn DVD from the drop-down list.
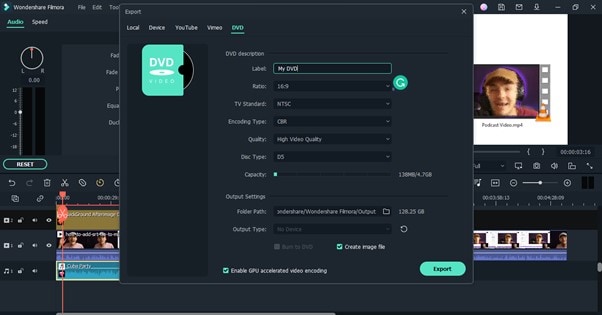
From the pop-up window that appears on your PC screen, select the Folder Path and give the video file a preferred name. Then, click Export to complete the operation.

2. Google Keyword Planner
The Google keyword planner is vital to help you do keyword research and see the trends of how a particular keyword is searched in a particular month, within a given year, or more. It’ll help you understand how people are searching for a particular keyword and what time of the year it usually has more searches from folks.
By using Google Keyword planner, you’ll put yourself ahead of your competitors by using the right keyword that you need for your SEO and PPC strategies at the right time. From search volume to trends, CPC, competition scores, and more, it’s crucial you have this tool at your fingertips. Besides, it’s 100% free to use.
3. YouTube Studio
YouTube Studio is a crucial analytic tool that can come in handy to help you improve your video as you grow your YouTube channel. It is like Google Analytics in a way. It’ll allow you to track the analytics of how people view your videos, comment on your video, and more. YouTube Studio is available for free. You can use it through the Android App, on your PC or online from YouTube itself.

4. VidIQ
Are you looking for a tool to grow your YouTube channel efficiently? Then VidIQ is the ideal tool for you. Yes, with VidIQ, you’ll get access to essential tools to grow your YouTube audience faster than you can think. It’s just a scorecard that offers you in-depth analytics of how your YouTube videos are performing compared to your competitors, thus allowing you to get helpful info on how you can get ahead of them and stand out in the industry.
With VidIQ, you’ll get access to a checklist that will highlight titles, descriptions, cards, end screens, closed captions, and lots more in your videos. And of all, it’ll suggest tags that you can use in your videos to get more traffic and improve SEO.

Part 4: Tips & Tricks to Make your YouTube Grow Faster
Stay Consistent
There’s no doubt that the key to succeeding in whatever you do is to stay consistent. It can be quite hard for anyone, especially newbies to keep up with different difficulties encountered in the pursuit to create a successful YouTube channel.
So, for you to achieve your dreams of being a popular YouTuber, you must keep up with the consistency of creating quality videos, promoting your videos, and doing the right thing that’s needed for your YouTube channel to stand out online.
Collaborate With Other YouTubers
Don’t be shy to reach out to your fellow YouTubers for collaboration. Yes, by collaborating with popular YouTubers, you get to enhance your online presence, thereby increasing your subscriber base and increasing your video views.
YouTube SEO Is Crucial
You might have heard of SEO (Search Engine Optimization) being crucial for websites to rank well, but the truth is it also applies to YouTube channels. YouTube SEO is a great way to optimize your YouTube channel and video to make it rank well on online search results.
It’s important you understand how YouTube SEO works and implement it in your YouTube channel, as it’ll increase your chances of more viewers visiting your channel and watching your videos.
Final Words
That’s all you need to know about creating a successful YouTube channel. If you fancy creating videos, the above tips will teach you how to create a YouTube channel and make money. Also, if you read the article to this point, we believe you’ve understood different ways you can make your YouTube channel stand out and enhance your chances of making more money on YouTube. Don’t hesitate to start your journey now!
Free Download For Win 7 or later(64-bit)
Free Download For macOS 10.14 or later
Part 1: Why choose YouTube to make money?
Boasting over 2 billion active users globally, YouTube remains the most used video-playing platform on the internet with all kinds of videos.
Today, many folks use YouTube as a means of generating income because it offers users more opportunities to reach a wide range of audiences, and the means of generating income via YouTube easily. As of when this article is written, research shows that an average YouTuber could earn up to $10,000 yearly.
Also, YouTube is a free marketing platform. So, if you have a website, you can add links to your website in the video description, thus enabling you to boost your website traffic via the platform. And it’ll allow you to advertise your product or services 100% free.
Part 2: 5-Step Formula to Start a YouTube Channel
Now you understand why you should choose YouTube to make money, the following steps will teach you how to create a YouTube channel within a few clicks. So, read on.
Step1 Create a google account
To get started, you need to create a google account. But if you already have a Google account you can skip this step.
Head to Google Account and click Create Account at the top right corner.
On the new screen, enter the necessary details and click Next.
Provide your phone number and other required details. Then, click Next.
On the new page, click I Agree to accept Google’s terms and conditions. Then finish the Google Account setup.
Step2 Create a YouTube account
Once you’ve successfully created a Google account, the next thing is to create your YouTube account. You just have to do the following to carry out the operation;
Open YouTube’s official website in your browser and click Sign in from the top right corner.
On the new page, sign in to the Google account that you want to use in creating your YouTube channel.
After you sign in to your Google account, you’ll be prompted back to the YouTube home interface. Click on your profile icon from the top right corner and select Create A Channel from the drop-down list.
Choose the Name you want to appear on your YouTube channel profile and upload a preferred Picture. Then, click Create Channel to proceed.
Step3 Customize your YouTube channel
After you’ve successfully created the channel, the next thing is to customize the channel as per requirement. Click Customise Channel from the left-hand side.
You’ll be prompted to the YouTube creator studio. There, you’ll find Layout, Branding, and Basic Info options displayed at the top of the page.
In the Layout section, you’ll be allowed to apply customization of how you want your YouTube channel homepage to look.
Under Branding, you can upload your brand logo as a profile photo, upload a banner image, and add the video watermark that you want to appear on all videos you upload on YouTube.
Under Basic Info, you’ll be able to enter a description for your YouTube channel, edit your channel URL, and do lots more. However, remember to always use the PUBLISH button to save customization.
Step4 Upload your first YouTube video
Now, it’s to upload your first YouTube video. To do so, navigate to the top-right corner of the page and click Create New. Select Upload Video.
If you have a video ready, click Select Files and upload the video you want to post.
Complete the required editing/settings after the video is uploaded.
Speaking of videos, you upload on YouTube, there are certain types of videos that can make you popular within a short time. Such YouTube video category includes;
- Singing
- Teaching
- Fashion Advice
- Cooking Tutorial
- Make-Up Tutorial
Step5 Make your YouTube channel discoverable
It’s time to start making your YouTube channel discoverable online. You need the subscribers, views, and all that a creator like you is worth having. However, to make this possible, you need to do the following;
Optimize Video Titles
Using Google-friendly titles for your videos is vital to allow them to rank well on Google search ranking. It should be catchy and compelling that users will be prompted to want to know what the video is about. Make sure it contains keywords too.
Optimize Video Description
Adding descriptions to your video is as important as the title. This will help search engines understand what your video is all about. So, make sure you add rich keywords to your video description and keep it concise.
Promote Your Channel on Other Social Media Platforms
You shouldn’t limit yourself to just creating videos and uploading them on YouTube. Make sure you always make it a priority to promote your YouTube videos on other platforms like Facebook, Twitter, or Instagram. This will help you give your existing fans a heads-up that you’re starting a YouTube channel.
Add Tags to your videos
When we say add tags to your videos, it does not mean you should add any tag to any video you upload on YouTube. Only add tags that’s relating to the theme of your video.
Tags will help YouTube understand the kind of video you’re uploading, and it’ll help you maintain the quality of not just your videos but your YouTube channel.
Use Keywords in Your Videos
Using rich keywords in your YouTube videos is a great way to increase the chances of your videos being seen online. Make sure you use the right keyword in the video title, as it’ll help guide viewers to your video when they search for similar words or phrases online.
Part 3: YouTube Must-Have Tools: What Are They?
Congratulations on creating your YouTube channel. But, before you get over-excited, there are essential tools you need as a YouTuber to help you stand out in the industry. These tools include the following;
1. Video Editor – Wondershare Filmora
As a YouTuber, regardless of your niche of expertise, you need an efficient video editing tool like Wondershare Filmora to create quality videos. Filmora is different from the regular video editor you find online, and it offers a plethora of video editing features that you can rely on to edit your videos and spice them up without requiring any kind of video editing knowledge.
See how you can use Filmora video editor on your YouTube videos;
Free Download For Win 7 or later(64-bit)
Free Download For macOS 10.14 or later
Step1 Go to the official website and install the Filmora video editing software on your computer. Then, launch the tool and import the video you want to edit using the Import button.
Drag-n-drop the video to the timeline.
Step2 Click Effects from the top of the screen. Select AI Portrait from the left-hand side and find a preferred AI Portrait effect. Then, click on it and drag-n-drop the effect to the Timeline.
Adjust the effect starting and ending point of where you want the AI Portrait effect to be displayed.
Step3 Again, adjust the AI Portrait effect settings by double-clicking on it, then, from the pop-up, apply the preferred settings.
Step4 You can also add a “Subscribe” watermark to your YouTube video. To do so, just click the >> icon next to Export at the top of the screen, then select Element.
Select the ‘Social Media Show Element 07’ Effects. Then, drag-n-drop it to the Timeline.
Step5 Lastly, preview the edited video, and if you’re okay with it, click Export from the top bar and select Burn DVD from the drop-down list.
From the pop-up window that appears on your PC screen, select the Folder Path and give the video file a preferred name. Then, click Export to complete the operation.
2. Google Keyword Planner
The Google keyword planner is vital to help you do keyword research and see the trends of how a particular keyword is searched in a particular month, within a given year, or more. It’ll help you understand how people are searching for a particular keyword and what time of the year it usually has more searches from folks.
By using Google Keyword planner, you’ll put yourself ahead of your competitors by using the right keyword that you need for your SEO and PPC strategies at the right time. From search volume to trends, CPC, competition scores, and more, it’s crucial you have this tool at your fingertips. Besides, it’s 100% free to use.
3. YouTube Studio
YouTube Studio is a crucial analytic tool that can come in handy to help you improve your video as you grow your YouTube channel. It is like Google Analytics in a way. It’ll allow you to track the analytics of how people view your videos, comment on your video, and more. YouTube Studio is available for free. You can use it through the Android App, on your PC or online from YouTube itself.
4. VidIQ
Are you looking for a tool to grow your YouTube channel efficiently? Then VidIQ is the ideal tool for you. Yes, with VidIQ, you’ll get access to essential tools to grow your YouTube audience faster than you can think. It’s just a scorecard that offers you in-depth analytics of how your YouTube videos are performing compared to your competitors, thus allowing you to get helpful info on how you can get ahead of them and stand out in the industry.
With VidIQ, you’ll get access to a checklist that will highlight titles, descriptions, cards, end screens, closed captions, and lots more in your videos. And of all, it’ll suggest tags that you can use in your videos to get more traffic and improve SEO.
Part 4: Tips & Tricks to Make your YouTube Grow Faster
Stay Consistent
There’s no doubt that the key to succeeding in whatever you do is to stay consistent. It can be quite hard for anyone, especially newbies to keep up with different difficulties encountered in the pursuit to create a successful YouTube channel.
So, for you to achieve your dreams of being a popular YouTuber, you must keep up with the consistency of creating quality videos, promoting your videos, and doing the right thing that’s needed for your YouTube channel to stand out online.
Collaborate With Other YouTubers
Don’t be shy to reach out to your fellow YouTubers for collaboration. Yes, by collaborating with popular YouTubers, you get to enhance your online presence, thereby increasing your subscriber base and increasing your video views.
YouTube SEO Is Crucial
You might have heard of SEO (Search Engine Optimization) being crucial for websites to rank well, but the truth is it also applies to YouTube channels. YouTube SEO is a great way to optimize your YouTube channel and video to make it rank well on online search results.
It’s important you understand how YouTube SEO works and implement it in your YouTube channel, as it’ll increase your chances of more viewers visiting your channel and watching your videos.
Final Words
That’s all you need to know about creating a successful YouTube channel. If you fancy creating videos, the above tips will teach you how to create a YouTube channel and make money. Also, if you read the article to this point, we believe you’ve understood different ways you can make your YouTube channel stand out and enhance your chances of making more money on YouTube. Don’t hesitate to start your journey now!
Free Download For Win 7 or later(64-bit)
Free Download For macOS 10.14 or later
Also read:
- [New] Easy Guide to YouTube Livestreaming From Google Meet
- 2024 Approved Cutting-Edge Editors Elevating Online Videos
- 2024 Approved A Step-by-Step Guide Share YouTube Vids with FB Friends
- Feast Your Eyes on 9 Whole-Film Winter Wonders No Charge!
- [New] Boosting Engagement From the Start Premium, Paid-Free Intra Creators
- Top 12 YouTube Game Openers Both Free & Fee-Based Options
- [Updated] DIY Movie Making YouTube's Boutique Method
- [Updated] Enchanting the Screen with Edit Mastery
- Transforming Views Into Virtual Winnings YouTube Edition
- Scaling YouTube Earnings Device-Independent Studio Tactics
- YouTube Success Elevating Audience Count
- In 2024, Battle Royale Queens Top 10 Female YouTubers
- In 2024, Become a Short-Form Video Star with These 10 Proven Methods
- The Ultimate Guide to Producing Hysterical YouTube Video Reactions (3 Key Techniques)
- In 2024, Crafting a Customized Soundscape YouTube Playlist Building on the Internet/Apps
- Top Content Pioneers Assembly
- In 2024, DIY Tripods| How to Stabilize Your Camera without Buying a Tripod
- In 2024, Charting Success with YouTube Income Streams
- Designing a Personalized YouTube Subscribe Link
- Unlocking YouTube's Potential with Targeted Keywords
- The Roadmap for Effective Education Videos - Making a Mark on YouTube
- Comprehensible Guide to High-Quality Audios on YouTube
- [New] Blurred Lines The Art of Anonymizing YouTube Content
- The Artisanal Analysis Unveiling Video Value Versus Vendors
- Top 11 Strategies for Boosting Your YouTube Videos' Visibility
- [New] Crafting Winning Titles & Tags for Your YouTube Videos
- Flip Order 3 Easy Steps to Rewind Youtube Listeners
- Unifying Social Media Video Practices
- How to Make Fortnite Thumbnail for Free and Easy
- 2024 Approved Essentials Checklist - What You Must Know Before Sharing 4K Videos on Youtube
- Multitasking in Broadcast Captivate Viewers Across YT+TW
- [Updated] 8 Best Free Video Editing Software for YouTube
- 2024 Approved Analyzing the Frequency of YouTube Payments
- [New] Sites Like FameBit Where You Can Find YouTube Sponsorships
- [New] Amplify Engagement A Compilation of Powerful 30 FreeGame Tags
- Epicurean Escapades Crafting Kitchen Films for 2024
- Engaging Viewers at the End of a YT Video
- The Ultimate List of 8 Youtube Mistakes to Evade
- Essential Rules of Engagement on YouTube for 2024
- The Ultimate Checklist Before Choosing YouTube TV
- The Secrets to Boosting Your Income via YouTube Shorts Monetization
- 2024 Approved Direct Your Media Essential Flv-to-YouTube Applications Ranked
- In 2024, Chart-Topping Ideas to Invigorate Your YouTube Channel
- Unleashing YouTube Profits Non-Ad Revenue Techniques for Growth
- [New] Essential Guide to Uploading High-Res Videos on Youtube
- Capture the Essence of Your Favorite Series with These Extractors
- 2024 Approved Best 8 Linux Platforms for Video Mastery
- [New] Beyond the Basics Advanced Techniques for Improved Recordings
- Effortless Audio Downloads These 24 Tools Split YouTube Sounds
- In 2024, How to Unlock Apple iPhone 6, Apples New iPhone | Dr.fone
- Action Filmmaking Camera Picks for Newbies for 2024
- New Sonic Landscapes Amplify Your Visual Storytelling in Films with Filmora for 2024
- In 2024, Ultimate Guide on Vivo Y27s FRP Bypass
- [New] Step-By-Step Guide to Snapchat's Captivating Boomers
- In 2024, ChromeOS Direct Screens Capture Tool
- [New] Mastering InstaVid Promotion Crafting a Successful Marketing Gameplan
- Ultimate Guide on iPhone X iCloud Activation Lock Bypass
- A How-To Guide on Bypassing Apple iPhone 8 Plus iCloud Activation Lock
- Videographer's Guide to Capturing Sports Competitions
- Clearing Dark Frames on Video Capture Software
- Reasons why Pokémon GPS does not Work On Itel P55T? | Dr.fone
- [New] Best macOS Sierra Tools for Optimized Video Transformation
- Lock Your Vivo V29e Phone in Style The Top 5 Gesture Lock Screen Apps
- Uniting Music & Chat Spotify on Discord Explained
- In 2024, Sharing Vimeo Content Instagram Tips
- In 2024, How Can I Use a Fake GPS Without Mock Location On Apple iPhone 14 Pro Max? | Dr.fone
- In 2024, How To Pause Life360 Location Sharing For Lava Blaze Pro 5G | Dr.fone
- [New] In 2024, Explore Advanced Techniques Making a Difference with Your Captivating Slow-Motion Videos & Photos for Instagram
- [New] In 2024, Streamline Your Gaming Memories Easy Minecraft Recordings on Macs
- Restoring Lost Eyes-Only Snapshots on Snapchat
- [New] In 2024, Join the Discord Emoji Revolution with Free Resources Here
- The 10 Best Tools to Bypass iCloud Activation Lock On Apple iPhone 14 You Should Try Out
- Top 10 Skype Recorder to Use 2023
- In 2024, Full Guide on Mirroring Your Realme Narzo N53 to Your PC/Mac | Dr.fone
- [New] Guide to Retaining Your TikTok Content Post-Reload Glitch for 2024
- Best Mac Audio Conversion Tools Expert Recommendations
- [Updated] 2024 Approved Expert's Choice Android's Best Large Group Calling
- [Updated] In 2024, Reinstate FB Watch Video Tile
- In 2024, What Pokémon Evolve with A Dawn Stone For Xiaomi Civi 3? | Dr.fone
- [New] In 2024, Maximizing Memories Phones' Snapchat Recording
- In 2024, No Budget? No Problem! Top Free WMV Video Editors
- [New] Adding a Cinematic Touch Ken Burns in Camtasa 9
- Title: "Audiovisual Harmony Merging Audio and Visual Elements on YouTube"
- Author: Brian
- Created at : 2024-05-25 11:20:48
- Updated at : 2024-05-26 11:20:48
- Link: https://youtube-video-recordings.techidaily.com/audiovisual-harmony-merging-audio-and-visual-elements-on-youtube/
- License: This work is licensed under CC BY-NC-SA 4.0.
