
"Anonymous Sharing Simplified Blurring Techniques for Videos"
Anonymous Sharing Simplified: Blurring Techniques for Videos
How to Blur Faces or Objects in YouTube Videos

Richard Bennett
Mar 27, 2024• Proven solutions
Suppose you are interested in preserving the identity of people in your YouTube videos, or you are simply interested in luring out some of the faces of the objects in your YouTube videos to retain filming rights. In that case, you can do it quite easily. With the help of a proper editing application and some online tools, you can very quickly blur out faces or objects from your YouTube videos.
Blur Faces With the Best YouTube Video Editing Software
Wondershare Filmora is one of the best video editing tools for YouTube videos. Through the Filmora editing suite, you can quickly import the video and then go to the power town to blur out faces, distort objects, and more.
 Download Mac Version ](https://tools.techidaily.com/wondershare/filmora/download/ )
- You first need to download and install Wondershare Filmora
- Then it is time to load the video you wish to edit
- You can either browse the tape from your computer or drag and drop it
- Once loading is finished, you can drag and drop the video to the Video Timeline
- Afterward, you must target the exact video on the timeline
- Right-click and choose the Power Tool available
- A pop-up window will appear, where you must choose Face-Off and then Apply Face Off to the Clip
- The effect you want is the first option you get, or else the mosaic
- By clicking on the mosaic, it will be applied to your video
- Click OK
- Now you must choose Export to save the video
- Please choose the right format and the save option of your choosing (instant post on YouTube, burn the video on CD/DVD or save it on your PC)
If you are recording your tutorial for YouTube or your demonstration videos, you may need to blur or hide the private and sensitive information. Click to check how did I hide the personal info in the video .
How to Blur Faces or Objects in Videos With YouTube Video Editor
YouTube has offered the chance to blur out images, faces, and more since 2012. The face blur tool available on YouTube works quite well.
Here is what you need to do:
- First of all, open YouTube Video Manager
- Click on the Edit button
- Choose the Enhancements
- Click on the Blurring option (it is on the right of your screen)
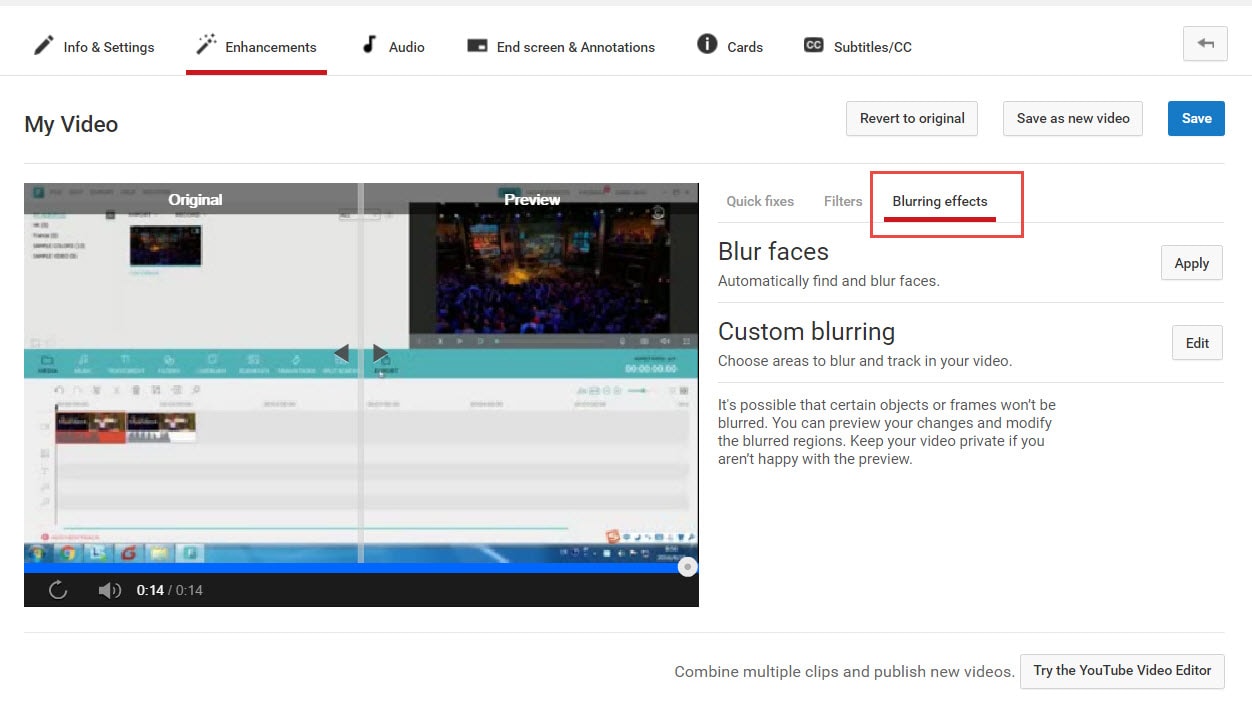
- Click on the Edit button of the Custom blurring option
- This time, a pop-up window will appear
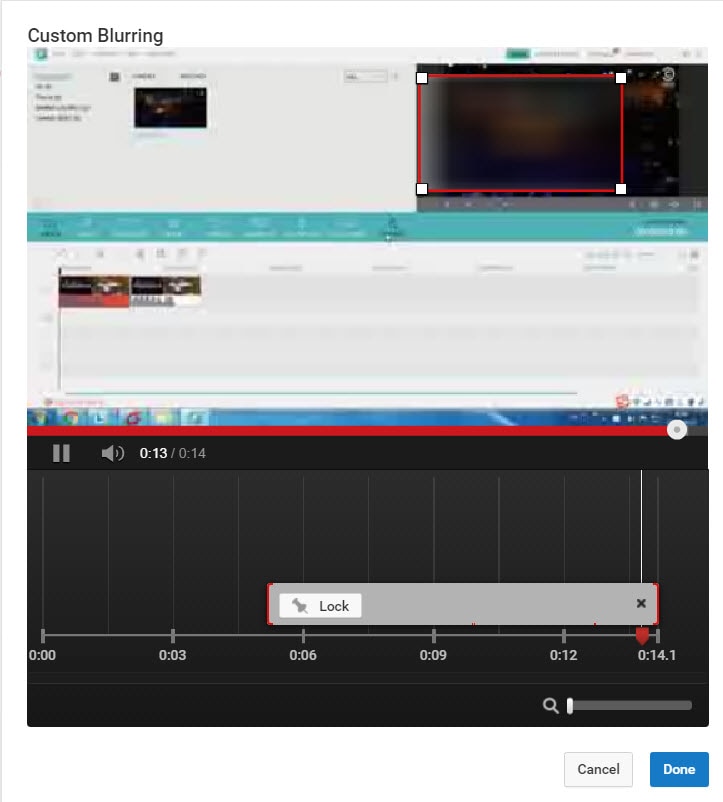
- With the use of click and drag properties, you can create the blurred content
- Click on Done
- Save the video, as per your preferences (Save as new video, revert to the original or overwrite)
Here is a tutorial video for how to blur faces or objects on YouTube:
Richard Bennett
Richard Bennett is a writer and a lover of all things video.
Follow @Richard Bennett
Richard Bennett
Mar 27, 2024• Proven solutions
Suppose you are interested in preserving the identity of people in your YouTube videos, or you are simply interested in luring out some of the faces of the objects in your YouTube videos to retain filming rights. In that case, you can do it quite easily. With the help of a proper editing application and some online tools, you can very quickly blur out faces or objects from your YouTube videos.
Blur Faces With the Best YouTube Video Editing Software
Wondershare Filmora is one of the best video editing tools for YouTube videos. Through the Filmora editing suite, you can quickly import the video and then go to the power town to blur out faces, distort objects, and more.
Download Mac Version ](https://tools.techidaily.com/wondershare/filmora/download/ )
- You first need to download and install Wondershare Filmora
- Then it is time to load the video you wish to edit
- You can either browse the tape from your computer or drag and drop it
- Once loading is finished, you can drag and drop the video to the Video Timeline
- Afterward, you must target the exact video on the timeline
- Right-click and choose the Power Tool available
- A pop-up window will appear, where you must choose Face-Off and then Apply Face Off to the Clip
- The effect you want is the first option you get, or else the mosaic
- By clicking on the mosaic, it will be applied to your video
- Click OK
- Now you must choose Export to save the video
- Please choose the right format and the save option of your choosing (instant post on YouTube, burn the video on CD/DVD or save it on your PC)
If you are recording your tutorial for YouTube or your demonstration videos, you may need to blur or hide the private and sensitive information. Click to check how did I hide the personal info in the video .
How to Blur Faces or Objects in Videos With YouTube Video Editor
YouTube has offered the chance to blur out images, faces, and more since 2012. The face blur tool available on YouTube works quite well.
Here is what you need to do:
- First of all, open YouTube Video Manager
- Click on the Edit button
- Choose the Enhancements
- Click on the Blurring option (it is on the right of your screen)
- Click on the Edit button of the Custom blurring option
- This time, a pop-up window will appear
- With the use of click and drag properties, you can create the blurred content
- Click on Done
- Save the video, as per your preferences (Save as new video, revert to the original or overwrite)
Here is a tutorial video for how to blur faces or objects on YouTube:
Richard Bennett
Richard Bennett is a writer and a lover of all things video.
Follow @Richard Bennett
The Essential Guide to Editing YouTube Videos Seamlessly in iMovie
Easy Way to Edit YouTube Videos in iMovie
Richard Bennett
Mar 27, 2024• Proven solutions
iMovie is the built-in video editor that allows you to combine several video clips. It is available for both Mac and iOS devices. This app was first released in 1999 when it came with the iMac DV model.
With the use of the iMovie, you are able to create movies that include sound effects, menus, transitions, titles, themes, and music, just to name a few. The resulting movie can be saved onto physical media or as a file on the hard drive.
If you are a Mac user, then you can easily edit YouTube videos in iMovie. All you need to do is to follow the simple steps below. In this article, you will learn how to import videos, organize videos, add YouTube titles and add transitions.
Part 1. Steps on Editing YouTube Videos Using iMovie
To edit a video for YouTube with iMovie, you can follow these steps.
Step 1: Import Video Clips into iMovie
If you have recorded the video clips with the use of a videocam, then connect the camera to the Mac and open the app. You can import the videos by manually selecting the clips that will be part of the YouTube video.
Note: If you want to import videos that you have already published on your YouTube channel, then you can download them from the channel, and save them as MP4. However, if the videos were uploaded by other users, then you need to use a video converter, this article will let you know the 8 best video converters to convert video to MP4.
Step 2: Edit the Video Clips
Once you have all the clips that you need, the next step is to edit YouTube videos in iMovie. When you import the clips, you have created an Event in the app. If you want to include a clip in your final video, just drag the file to the project browser, where you can edit the video.

You can also add videos from other Events into the current project. You can select the parts of the video by dragging across the video from the chosen start to stop points. Edit the video until you are satisfied with the results.
Step 3: Enhance the Video
Once you have edited the video, you can then add background music, themes, sound effects, onscreen text, transitions between clips, and photos. The best thing about iMovie is that it comes with a sound effects library. It also allows you to upload audio from your iTunes library, iLife, and GarageBand.
iMovie allows you to add text to any part of the video, whether it is a title screen at the start, credits at the end, and everything in between. Try to enhance the video until you think it is ready to be uploaded to YouTube.
- Add YouTube title : If you want to add a title for YouTube Video, all you need to do is click Title in the toolbar, and then highlight My Movie on the left. From here, enter the title you like.
- Organize videos : You also can rearrange video clips in the timeline. Just drag the video on the timeline to wherever you want.
- Add transitions : If you have more than one video clip, you definitely need transitions between them. Click the Transitions tab, and then select one transition you like. In the end, drag it to stop between two clips.
Step 4: Export and Upload the Video to YouTube

When you edit YouTube videos in iMovie, you have the option to export the video straight to the video streaming website. All you need to do is to click on the Share button found at the top of the screen. Then select YouTube. Add your YouTube account in iMovie by entering your username and password. Then you choose a title, description, and tags for the video.
You can choose the resolution and size of the video that includes HD 720p and HD 1080p, mobile, medium, and large. Click on Publish to upload the video to YouTube. Uploading the video will take several minutes to a couple of hours, depending on the resolution and size of the video.
Part 2. A Better Choice to Edit YouTube Videos
There’s a better way to edit YouTube videos. It involves the use of Wondershare Filmora . It is user-friendly and allows beginners to make videos professional-looking videos.

This software has more than 300 video effects for family, weddings, love, and travel, etc. You can also add animated captions to photos that will help tell the story. It comes with an array of intro and credit templates that will enhance your video.
Lastly, you can easily share the resulting movie on YouTube, DVD, other devices, and a lot more.
Richard Bennett
Richard Bennett is a writer and a lover of all things video.
Follow @Richard Bennett
Richard Bennett
Mar 27, 2024• Proven solutions
iMovie is the built-in video editor that allows you to combine several video clips. It is available for both Mac and iOS devices. This app was first released in 1999 when it came with the iMac DV model.
With the use of the iMovie, you are able to create movies that include sound effects, menus, transitions, titles, themes, and music, just to name a few. The resulting movie can be saved onto physical media or as a file on the hard drive.
If you are a Mac user, then you can easily edit YouTube videos in iMovie. All you need to do is to follow the simple steps below. In this article, you will learn how to import videos, organize videos, add YouTube titles and add transitions.
Part 1. Steps on Editing YouTube Videos Using iMovie
To edit a video for YouTube with iMovie, you can follow these steps.
Step 1: Import Video Clips into iMovie
If you have recorded the video clips with the use of a videocam, then connect the camera to the Mac and open the app. You can import the videos by manually selecting the clips that will be part of the YouTube video.
Note: If you want to import videos that you have already published on your YouTube channel, then you can download them from the channel, and save them as MP4. However, if the videos were uploaded by other users, then you need to use a video converter, this article will let you know the 8 best video converters to convert video to MP4.
Step 2: Edit the Video Clips
Once you have all the clips that you need, the next step is to edit YouTube videos in iMovie. When you import the clips, you have created an Event in the app. If you want to include a clip in your final video, just drag the file to the project browser, where you can edit the video.
You can also add videos from other Events into the current project. You can select the parts of the video by dragging across the video from the chosen start to stop points. Edit the video until you are satisfied with the results.
Step 3: Enhance the Video
Once you have edited the video, you can then add background music, themes, sound effects, onscreen text, transitions between clips, and photos. The best thing about iMovie is that it comes with a sound effects library. It also allows you to upload audio from your iTunes library, iLife, and GarageBand.
iMovie allows you to add text to any part of the video, whether it is a title screen at the start, credits at the end, and everything in between. Try to enhance the video until you think it is ready to be uploaded to YouTube.
- Add YouTube title : If you want to add a title for YouTube Video, all you need to do is click Title in the toolbar, and then highlight My Movie on the left. From here, enter the title you like.
- Organize videos : You also can rearrange video clips in the timeline. Just drag the video on the timeline to wherever you want.
- Add transitions : If you have more than one video clip, you definitely need transitions between them. Click the Transitions tab, and then select one transition you like. In the end, drag it to stop between two clips.
Step 4: Export and Upload the Video to YouTube
When you edit YouTube videos in iMovie, you have the option to export the video straight to the video streaming website. All you need to do is to click on the Share button found at the top of the screen. Then select YouTube. Add your YouTube account in iMovie by entering your username and password. Then you choose a title, description, and tags for the video.
You can choose the resolution and size of the video that includes HD 720p and HD 1080p, mobile, medium, and large. Click on Publish to upload the video to YouTube. Uploading the video will take several minutes to a couple of hours, depending on the resolution and size of the video.
Part 2. A Better Choice to Edit YouTube Videos
There’s a better way to edit YouTube videos. It involves the use of Wondershare Filmora . It is user-friendly and allows beginners to make videos professional-looking videos.
This software has more than 300 video effects for family, weddings, love, and travel, etc. You can also add animated captions to photos that will help tell the story. It comes with an array of intro and credit templates that will enhance your video.
Lastly, you can easily share the resulting movie on YouTube, DVD, other devices, and a lot more.
Richard Bennett
Richard Bennett is a writer and a lover of all things video.
Follow @Richard Bennett
Also read:
- [New] Cost-Effective Growth Tactic for YouTube Fanbases
- [Updated] Sounding Off on Channel Titling Tips From Experienced Filmmakers
- 2024 Approved Digital Diving Into YouTube’s Veiled Video Vaults
- Creating Customized URLs for Channel Subscribers for 2024
- Effective Methods for Troubleshooting acroCEF.exe Application Malfunctions
- Effective Streaming Across Platforms, Including Facebook and Twitch for 2024
- Eliminating Backlogged Videos From Your YouTube History for 2024
- In 2024, Discovering Video Opportunities with Google Trend Analysis
- In 2024, How to Fake Snapchat Location without Jailbreak On Vivo Y100 | Dr.fone
- In 2024, Top 5 PS2 Simulators to Transform Your iOS Gaming
- New Best Mac Video Editing Programs for Creators In
- Process of Screen Sharing Motorola Edge 40 to PC- Detailed Steps | Dr.fone
- Sharpen Your Content for Unlimited YouTube Exposure for 2024
- Talent Acquisition Treasure Trove - Top 10 Video Series
- Title: Anonymous Sharing Simplified Blurring Techniques for Videos
- Author: Brian
- Created at : 2024-12-21 09:06:28
- Updated at : 2024-12-25 08:47:55
- Link: https://youtube-video-recordings.techidaily.com/anonymous-sharing-simplified-blurring-techniques-for-videos/
- License: This work is licensed under CC BY-NC-SA 4.0.