
:max_bytes(150000):strip_icc():format(webp)/linksys-default-password-list-2619153-5fccecc7c0b04133b2202a1fa9e8d37a.png)
Achieve Wider Exposure by Transferring Twitch Broadcasts to YouTube for 2024
Achieve Wider Exposure by Transferring Twitch Broadcasts to YouTube
Create High-Quality Video - Wondershare Filmora
An easy and powerful YouTube video editor
Numerous video and audio effects to choose from
Detailed tutorials provided by the official channel
Amidst many online applications is Twitch. This live streaming platform takes your experience to another level. You can use it to make crafts, play games, attract broadcasters, and many more. Twitch was launched in 2011, and since then, it has attracted millions of users, managing a database of about 4 million broadcasters by early 2020. With it, users can stream their activities as others watch in real-time. Just browse a category to find a stream.
You can also follow streamers that you like on the platform and get updates and notifications immediately after they are posted. But how do you start a career on a platform like Twitch? You need to broadcast and gather a large following. You can use built-in audiences from other platforms like Facebook. Let’s dive into the core of the matter and look at how to upload Twitch streams to YouTube and build your platform.

In this article
02 What is the benefit of uploading your Twitch Streams to YouTube
03 How to upload your Twitch Streams to YouTube
What is Twitch VOD?
Twitch Video on Demand (VOD) is a recording of previously streamed content. It provides briefings if you missed catching the Twitch live stream. Just watch the VOD from your favorite streamer and be engaged the best way possible. However, VODs don’t last forever. They are removed after two weeks of broadcast. But streamers with Partner Status can have their VODs last up to 60 days.
- How to enable Twitch VOD?
VODs are the best form to archive streams that your fans missed. Even though they are not enabled by default, you can manually enable them and not let your fans miss any important event from your channel. They’ll find it under the “Videos” tab on any Twitch channel. Follow these steps to enable VOD on your channel.
Step 1. Go to your profile icon in the top right corner of Twitch
Check in the “Channel & Video” section and locate the “Stream Key & Preferences” menu.

Step 2. Click on “Creator Dashboard”
Remember, you can enable VODs from your creator dashboard. Just go under the “Settings” tab and click on the “Stream section” of the creator dashboard. Check under the subtitle “VOD Settings” and get the option to store past broadcasts. You can also toggle the slider to store your past broadcasts.

Step 3 Click on the “Settings” tab on the left-hand side and go to Stream
You’ll get various drop-down menu options. Click on the “Settings” tab and choose the “Stream” option. The system will navigate to a new page, thus setting your preferences for VODs and clips.
Step 4. Go to “VOD Settings” and toggle on the “Store Past Broadcast.”
Ensure you have the toggle option turned ON under the “VOD Settings.” If it’s “ON,” you’ll realize the toggle will be purple, with a checkmark in it. Twitch will be confirmed to be enabled if it’s purple.

- Frequently Asked Question about Twitch VOD
These are some questions frequently asked by Twitch users.
1. How long will Twitch store my VOD
Your Twitch can either be stored for 14 or 60 days, depending on your level. For Twitch Prime, Twitch Partner or a Twitch Turbo user has their past broadcasts automatically saved for 60 days before deletion. But if you are not connected to these three options, your past broadcasts will be saved for only 14 days before deletion.
Since your past broadcasts cannot be live for more than 60 days, you have the option to download the video to your computer before the validity days expire and Twitch deletes it. You can use an External Hard drive to save the past broadcast content. Likewise, it is possible to turn your past broadcast content into Highlight and, in turn, permanently store them on Twitch.
2. What is the difference between Twitch VOD, Highlights, and Clips
Twitch VOD is a previously saved video of your live stream content. You choose to save either part or the entire content of your previously streamed content. More so, you don’t need any additional requirements to use VOD.
Highlights are short videos that have been edited from your past broadcast content. You can save them on Twitch permanently. Streamers majorly use highlights to save video game achievements. Unlike VOD Twitch that can be saved up to 60 days, Highlights usually lasts no more than 3 minutes.
- To make Highlights on Twitch, first, navigate to your Dashboard.
- Then scroll down and click on “Content” > “Video Producer.
- Next, press on “All Videos” to change them to “Past Broadcasts.”
- Now press the “Highlight” button, and Twitch will immediately open a new tab for “Twitch Highlighter Tool.”
- Then select the video part to include as “Highlight” and press the “Create Highlights” button.
- Wait a while for the process to be completed, and Voila! You have your Highlights created.
When it comes to Twitch Clip, you can capture special moments in a stream you are currently watching. On the same note, you can share clips with friends and other users on social media platforms. Such shared clips contain a link where others view the source or video from.
The clips you create will automatically be saved on the streamer’s channel on the “Clips” page, where other viewers can see them too. Nonetheless, you can download “clips” to your computer and, in turn, upload them whenever you want to. And note that you can help your stream grow via “Clips” by letting your viewers clip and share your stream moments.
- To create “Clips” on Twitch, identify which Streamers channel you wish to create a clip from.
- Then click on the “Clapper board” icon. Next, edit your clip between 5 and 60 seconds long.
- Finally, create a title and publish your Clip. You’ll also enjoy the privilege to share your clip’s link to other social media networks.
What is the benefit of uploading your Twitch Streams to YouTube
You stand to gain a lot when you upload your Twitch Streams to YouTube.
1) To enlighten your followers
Your followers will see your streams and make the best decisions. Viewers can check out your recordings and other highlights from past streams. It will help them decide whether they like what they see and probably join your live streams.
2) Twitch provides content for you to share and monetize on YouTube
Since Twitch streaming is more popular nowadays, many people throng it for content. It is not wise to rely entirely on Twitch to discover as a Twitch Streamer. Posting to YouTube will make it known within a short time. You would have announced your streams most nobly and kept your followers up to date, attracting new ones as well.
3) To keep your followers engaged even when you are offline
Even though live streaming is important, some viewers may not attend the live sessions due to different time zones or other commitments. In this regard, when uploaded to YouTube, Twitch will give them a chance to watch your content just whenever they log in. They, therefore, have the option to watch a Twitch VOD of the live stream they missed.
How to upload your Twitch Streams to YouTube
Check how to upload Twitch streams to YouTube from the Twitch website.
Step 1. Identify the little arrow next to your name on the Twitch website and click on it. Then click on the “Video Producer” to take you to a list of your Twitch videos.

Step 2. Check out and click on the “three-dots” on the video you wish to upload to YouTube. Click on the “Export” tab.
Step 3. A menu will then pop up. Here, you can fill in the description, title, and tags that you would like to appear on the YouTube video. There is an option for Twitch to split your video automatically. If you wish so, then tick the “Checkbox” to enable it. Then click on the “Start Export” option to export your Twitch streams to YouTube.

Bouns! Edit Your Twitch Video with Filmora
The quality of your video matters when it comes to uploading Twitch Streams to YouTube. Using a third-party tool to edit your video is the first step in ensuring your videos communicate meaningful content. Filmora comes in handy to bring your imaginations to life. Use it for simple creation without limits, even for beginners.
- Use it to track moving objects in video clips
- Easily match any image of the selected clip
- Its powerful tools let you edit your video by cropping, splitting, adjusting speed, etc
- The video keyframe easily indicates the beginning and end of the parameters
For Win 7 or later (64-bit)
For macOS 10.12 or later
Conclusion
● Don’t just focus on how to upload Twitch streams to YouTube but also consider the quality of video you are posting to YouTube. Remember, your video quality will speak much more of you than any other description. So, strive to produce quality videos using the best tool, Filmora. The app is easy to use and will elevate your views and imaginations through your video in the most impactful way.
Amidst many online applications is Twitch. This live streaming platform takes your experience to another level. You can use it to make crafts, play games, attract broadcasters, and many more. Twitch was launched in 2011, and since then, it has attracted millions of users, managing a database of about 4 million broadcasters by early 2020. With it, users can stream their activities as others watch in real-time. Just browse a category to find a stream.
You can also follow streamers that you like on the platform and get updates and notifications immediately after they are posted. But how do you start a career on a platform like Twitch? You need to broadcast and gather a large following. You can use built-in audiences from other platforms like Facebook. Let’s dive into the core of the matter and look at how to upload Twitch streams to YouTube and build your platform.
In this article
02 What is the benefit of uploading your Twitch Streams to YouTube
03 How to upload your Twitch Streams to YouTube
What is Twitch VOD?
Twitch Video on Demand (VOD) is a recording of previously streamed content. It provides briefings if you missed catching the Twitch live stream. Just watch the VOD from your favorite streamer and be engaged the best way possible. However, VODs don’t last forever. They are removed after two weeks of broadcast. But streamers with Partner Status can have their VODs last up to 60 days.
- How to enable Twitch VOD?
VODs are the best form to archive streams that your fans missed. Even though they are not enabled by default, you can manually enable them and not let your fans miss any important event from your channel. They’ll find it under the “Videos” tab on any Twitch channel. Follow these steps to enable VOD on your channel.
Step 1. Go to your profile icon in the top right corner of Twitch
Check in the “Channel & Video” section and locate the “Stream Key & Preferences” menu.
Step 2. Click on “Creator Dashboard”
Remember, you can enable VODs from your creator dashboard. Just go under the “Settings” tab and click on the “Stream section” of the creator dashboard. Check under the subtitle “VOD Settings” and get the option to store past broadcasts. You can also toggle the slider to store your past broadcasts.
Step 3 Click on the “Settings” tab on the left-hand side and go to Stream
You’ll get various drop-down menu options. Click on the “Settings” tab and choose the “Stream” option. The system will navigate to a new page, thus setting your preferences for VODs and clips.
Step 4. Go to “VOD Settings” and toggle on the “Store Past Broadcast.”
Ensure you have the toggle option turned ON under the “VOD Settings.” If it’s “ON,” you’ll realize the toggle will be purple, with a checkmark in it. Twitch will be confirmed to be enabled if it’s purple.
- Frequently Asked Question about Twitch VOD
These are some questions frequently asked by Twitch users.
1. How long will Twitch store my VOD
Your Twitch can either be stored for 14 or 60 days, depending on your level. For Twitch Prime, Twitch Partner or a Twitch Turbo user has their past broadcasts automatically saved for 60 days before deletion. But if you are not connected to these three options, your past broadcasts will be saved for only 14 days before deletion.
Since your past broadcasts cannot be live for more than 60 days, you have the option to download the video to your computer before the validity days expire and Twitch deletes it. You can use an External Hard drive to save the past broadcast content. Likewise, it is possible to turn your past broadcast content into Highlight and, in turn, permanently store them on Twitch.
2. What is the difference between Twitch VOD, Highlights, and Clips
Twitch VOD is a previously saved video of your live stream content. You choose to save either part or the entire content of your previously streamed content. More so, you don’t need any additional requirements to use VOD.
Highlights are short videos that have been edited from your past broadcast content. You can save them on Twitch permanently. Streamers majorly use highlights to save video game achievements. Unlike VOD Twitch that can be saved up to 60 days, Highlights usually lasts no more than 3 minutes.
- To make Highlights on Twitch, first, navigate to your Dashboard.
- Then scroll down and click on “Content” > “Video Producer.
- Next, press on “All Videos” to change them to “Past Broadcasts.”
- Now press the “Highlight” button, and Twitch will immediately open a new tab for “Twitch Highlighter Tool.”
- Then select the video part to include as “Highlight” and press the “Create Highlights” button.
- Wait a while for the process to be completed, and Voila! You have your Highlights created.
When it comes to Twitch Clip, you can capture special moments in a stream you are currently watching. On the same note, you can share clips with friends and other users on social media platforms. Such shared clips contain a link where others view the source or video from.
The clips you create will automatically be saved on the streamer’s channel on the “Clips” page, where other viewers can see them too. Nonetheless, you can download “clips” to your computer and, in turn, upload them whenever you want to. And note that you can help your stream grow via “Clips” by letting your viewers clip and share your stream moments.
- To create “Clips” on Twitch, identify which Streamers channel you wish to create a clip from.
- Then click on the “Clapper board” icon. Next, edit your clip between 5 and 60 seconds long.
- Finally, create a title and publish your Clip. You’ll also enjoy the privilege to share your clip’s link to other social media networks.
What is the benefit of uploading your Twitch Streams to YouTube
You stand to gain a lot when you upload your Twitch Streams to YouTube.
1) To enlighten your followers
Your followers will see your streams and make the best decisions. Viewers can check out your recordings and other highlights from past streams. It will help them decide whether they like what they see and probably join your live streams.
2) Twitch provides content for you to share and monetize on YouTube
Since Twitch streaming is more popular nowadays, many people throng it for content. It is not wise to rely entirely on Twitch to discover as a Twitch Streamer. Posting to YouTube will make it known within a short time. You would have announced your streams most nobly and kept your followers up to date, attracting new ones as well.
3) To keep your followers engaged even when you are offline
Even though live streaming is important, some viewers may not attend the live sessions due to different time zones or other commitments. In this regard, when uploaded to YouTube, Twitch will give them a chance to watch your content just whenever they log in. They, therefore, have the option to watch a Twitch VOD of the live stream they missed.
How to upload your Twitch Streams to YouTube
Check how to upload Twitch streams to YouTube from the Twitch website.
Step 1. Identify the little arrow next to your name on the Twitch website and click on it. Then click on the “Video Producer” to take you to a list of your Twitch videos.
Step 2. Check out and click on the “three-dots” on the video you wish to upload to YouTube. Click on the “Export” tab.
Step 3. A menu will then pop up. Here, you can fill in the description, title, and tags that you would like to appear on the YouTube video. There is an option for Twitch to split your video automatically. If you wish so, then tick the “Checkbox” to enable it. Then click on the “Start Export” option to export your Twitch streams to YouTube.
Bouns! Edit Your Twitch Video with Filmora
The quality of your video matters when it comes to uploading Twitch Streams to YouTube. Using a third-party tool to edit your video is the first step in ensuring your videos communicate meaningful content. Filmora comes in handy to bring your imaginations to life. Use it for simple creation without limits, even for beginners.
- Use it to track moving objects in video clips
- Easily match any image of the selected clip
- Its powerful tools let you edit your video by cropping, splitting, adjusting speed, etc
- The video keyframe easily indicates the beginning and end of the parameters
For Win 7 or later (64-bit)
For macOS 10.12 or later
Conclusion
● Don’t just focus on how to upload Twitch streams to YouTube but also consider the quality of video you are posting to YouTube. Remember, your video quality will speak much more of you than any other description. So, strive to produce quality videos using the best tool, Filmora. The app is easy to use and will elevate your views and imaginations through your video in the most impactful way.
The Art of Featured Channels: An In-Depth Exploration for Maximizing Engagement
Versatile YouTube Video Editor - Filmora
An easy yet powerful editor
Numerous effects to choose from
Detailed tutorials provided by the official channel
Since the inception of YouTube, accessing videos and content has become easy for social media users. You can get content in the comfort of your home because millions of featured channel owners feature more channels every minute across the globe. Many YouTubers have learned the importance of how to add featured channels on YouTube mobile; many audiences can access mobile that they can use to access the internet. Featured channels have many advantages for the owner because it is the easiest way to reach many audiences than other means of getting the viewers. Featured channels attract larger target audiences, which leads to more subscribers.
In this article
01 What are Featured Channels on YouTube?
02 Why does Add Feature Channels on YouTube Matter?
03 How to Add Featured Channels on YouTube?
04 Fix the Problem - Why Can’t I Feature Channels on YouTube?
05 Bonus Tip - Make YouTube Videos with Good Video Editor
Part 1: What are Featured Channels on YouTube?
YouTube featured channels displayed on YouTube have videos that YouTube considers worth watching by the audience, based on the site’s algorithms. Using featured channels expands your channel being viewed and accessed by many audiences, which leads to many subscribing to the channels recommended on your channel.
Part 2: Why does Adding Feature Channels on YouTube Matter?
Here we shall mention the importance of featured channels on YouTube:
1. Give audiences more required content
The channels with videos and YouTube featured channels have more audience because of their content. The audience always visits the channels with more informative content and even refers friends to it.
2. Source of more traffic
Many viewers visit the YouTube channels searching for information found in videos featured and knowing how to add a featured channel on YouTube in 2021 and get what they are looking for. Featured Channels with good content attract traffic and increase subscribers and referrals to the channels.
3. Personal connection
Featured Channels on YouTube matter immensely because they attract viewers to the actors or someone featured in the video. This leads to the audience is getting closer connected to the videos and information conveyed through the content. Videos increase familiarity and build a larger community where the audience identifies themselves with the channels.
4. Source of Revenue
Adding feature channels on YouTube matters because they lead to income/revenue through YouTube Ads, a course on your channels, and subscriptions to the channels by the viewers who view the channels daily.
5. Growing audience
Most audiences are visual learners worldwide, so having channels featured on YouTube matters because they attract many audiences globally. Uploading videos/content more often leads to more visitors flocking to your featured channels.
6. High credibility
Featuring channels on YouTube increases the channel’s credibility among the audience. Especially when the content answers the audiences’ questions and solves the problems they face, audiences develop trust, associate, and frequently interact with your YouTube featured channels.
Part 3: How to Add Featured Channels on YouTube?
Adding featured channels on YouTube is more accessible than most people think to follow the steps required to upload the channels and videos.
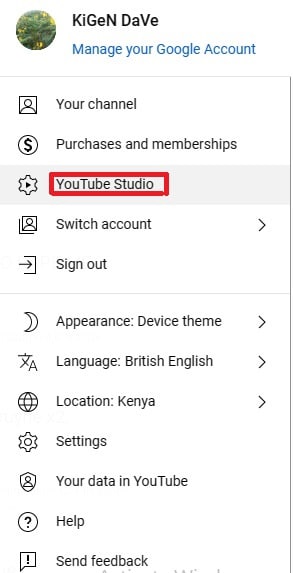
1 Login into YouTube studio
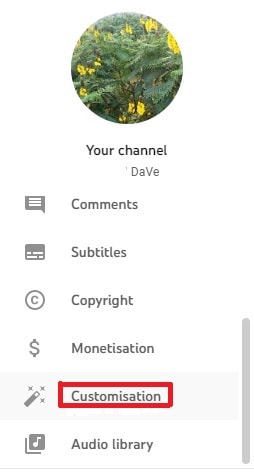
2 Go to the sidebar on the left and scroll to customization
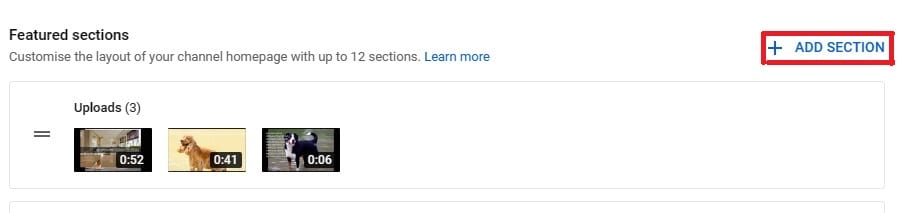
3 Click on ADD section
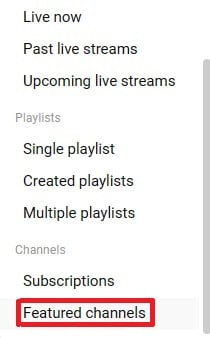
4 A small window will unroll, scroll down and click featured channels
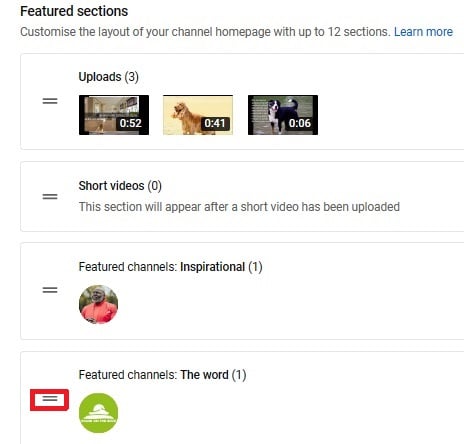
5 You can change featured channels on YouTube on the featured section, place the mouse cursor on the double lines next to the channel’s name as shown below on “featured channels name, The word,” and drag it to wherever you want.
Part 4: Fix the Problem - Why Can’t I Feature Channels on YouTube?
Many reasons can cause failure to feature your channel on YouTube that make you wonder why you can’t feature channels on YouTube.
1. Your YouTube Thumbnails
Your video thumbnail is the first thing your viewers see on their home feed when they click on your channels. The thumbnail must be catchy with accurate images showing what your video entails.
How to fix this issue?
Create relevant and exciting thumbnails that will attract viewers. It is advisable to use custom thumbnails and contrast to be catchy. This will make the viewers desire to visit your channel more often.
2. Lack of Consistency
Being inconsistent in your channels makes your viewers distrust your future work. If you take too long to feature your YouTube video/contents, viewers may decide to even unsubscribe from your channels, which may lead your traffic to drop to zero.
How to fix the inconsistency?
Be open to your viewers about when to expect the following videos on your channels, and it is good manners to keep your audience updated about what is coming. Consistently featured channels always get a good flow of viewers and even referrals.
3. Lack of content on the channels
Failing to update the channels often leads viewers not to visit your YouTube channels; viewers search for up-to-date information. If your channels lack content, audiences will quickly hop onto others in the market for the information they need.
How to fix the lack of content?
Read the minds of your audiences, primarily through comments they leave behind. You should update the channels with the required videos to satisfy your audience. Having quality content is the crucial thing here.
4. Lack of value in your videos
Before uploading videos on your channels, it’s good to ask yourself some questions, like:
What value does my video add to the audience?
How to fix it?
You are ready to value your videos if you answer these few questions. Value is the crucial thing in every product in the market. YouTube channel owners ought to know what the competitors offer to the same viewers and exceed them by posting videos that meet audiences’ needs.
It’s good manners to go back to the drawing board and research why your YouTube channels aren’t being featured.
Part 5: Bonus Tip - Make YouTube Videos with Good Video Editor
Making videos featured in the YouTube channels requires a good video editor. Although various video editors do excellent work, making videos with an exceptional video editor must be a goal. Filmora is such kind of best video editor that can handle the editing of videos very well. It is an excellent software for beginners and pros, and it is more potent than other video editors in the market.
It allows a person to make professional-looking videos because Filmora has various presets like overplays, transitions, elements, filters, and several layers of effects.
Wondershare Filmora
Get started easily with Filmora’s powerful performance, intuitive interface, and countless effects!
Try It Free Try It Free Try It Free Learn More >

Key features of Wondershare filmora
Filmora video editor comes with several features that make it the best video editor. The features include an advanced text editor, GIF support, Color tuning, noise removal, audio equalizer, stabilization of the video, and scene detection.
Conclusion
YouTube featured channels with quality informative videos/contents attract more audiences, mainly social media users, in the larger market. Before featuring channels on YouTube, one has to know what the target audiences need, test and the demography of the audiences matters a lot.
Featured channels on the YouTube platform can be an excellent source of revenue for ready, consistent, and considerate value on their videos uploaded on the channels. Inconsistency can be detrimental to the owner of the channels because the channels can end up being dormant with no one subscribing to them. The owner ought to learn how to add featured channels on YouTube by following the complete guide.
Also, making YouTube videos with a good video editor is advisable for quality videos that will attract more audiences. Value is what viewers are after on the featured channels on YouTube.
Since the inception of YouTube, accessing videos and content has become easy for social media users. You can get content in the comfort of your home because millions of featured channel owners feature more channels every minute across the globe. Many YouTubers have learned the importance of how to add featured channels on YouTube mobile; many audiences can access mobile that they can use to access the internet. Featured channels have many advantages for the owner because it is the easiest way to reach many audiences than other means of getting the viewers. Featured channels attract larger target audiences, which leads to more subscribers.
In this article
01 What are Featured Channels on YouTube?
02 Why does Add Feature Channels on YouTube Matter?
03 How to Add Featured Channels on YouTube?
04 Fix the Problem - Why Can’t I Feature Channels on YouTube?
05 Bonus Tip - Make YouTube Videos with Good Video Editor
Part 1: What are Featured Channels on YouTube?
YouTube featured channels displayed on YouTube have videos that YouTube considers worth watching by the audience, based on the site’s algorithms. Using featured channels expands your channel being viewed and accessed by many audiences, which leads to many subscribing to the channels recommended on your channel.
Part 2: Why does Adding Feature Channels on YouTube Matter?
Here we shall mention the importance of featured channels on YouTube:
1. Give audiences more required content
The channels with videos and YouTube featured channels have more audience because of their content. The audience always visits the channels with more informative content and even refers friends to it.
2. Source of more traffic
Many viewers visit the YouTube channels searching for information found in videos featured and knowing how to add a featured channel on YouTube in 2021 and get what they are looking for. Featured Channels with good content attract traffic and increase subscribers and referrals to the channels.
3. Personal connection
Featured Channels on YouTube matter immensely because they attract viewers to the actors or someone featured in the video. This leads to the audience is getting closer connected to the videos and information conveyed through the content. Videos increase familiarity and build a larger community where the audience identifies themselves with the channels.
4. Source of Revenue
Adding feature channels on YouTube matters because they lead to income/revenue through YouTube Ads, a course on your channels, and subscriptions to the channels by the viewers who view the channels daily.
5. Growing audience
Most audiences are visual learners worldwide, so having channels featured on YouTube matters because they attract many audiences globally. Uploading videos/content more often leads to more visitors flocking to your featured channels.
6. High credibility
Featuring channels on YouTube increases the channel’s credibility among the audience. Especially when the content answers the audiences’ questions and solves the problems they face, audiences develop trust, associate, and frequently interact with your YouTube featured channels.
Part 3: How to Add Featured Channels on YouTube?
Adding featured channels on YouTube is more accessible than most people think to follow the steps required to upload the channels and videos.
1 Login into YouTube studio
2 Go to the sidebar on the left and scroll to customization
3 Click on ADD section
4 A small window will unroll, scroll down and click featured channels
5 You can change featured channels on YouTube on the featured section, place the mouse cursor on the double lines next to the channel’s name as shown below on “featured channels name, The word,” and drag it to wherever you want.
Part 4: Fix the Problem - Why Can’t I Feature Channels on YouTube?
Many reasons can cause failure to feature your channel on YouTube that make you wonder why you can’t feature channels on YouTube.
1. Your YouTube Thumbnails
Your video thumbnail is the first thing your viewers see on their home feed when they click on your channels. The thumbnail must be catchy with accurate images showing what your video entails.
How to fix this issue?
Create relevant and exciting thumbnails that will attract viewers. It is advisable to use custom thumbnails and contrast to be catchy. This will make the viewers desire to visit your channel more often.
2. Lack of Consistency
Being inconsistent in your channels makes your viewers distrust your future work. If you take too long to feature your YouTube video/contents, viewers may decide to even unsubscribe from your channels, which may lead your traffic to drop to zero.
How to fix the inconsistency?
Be open to your viewers about when to expect the following videos on your channels, and it is good manners to keep your audience updated about what is coming. Consistently featured channels always get a good flow of viewers and even referrals.
3. Lack of content on the channels
Failing to update the channels often leads viewers not to visit your YouTube channels; viewers search for up-to-date information. If your channels lack content, audiences will quickly hop onto others in the market for the information they need.
How to fix the lack of content?
Read the minds of your audiences, primarily through comments they leave behind. You should update the channels with the required videos to satisfy your audience. Having quality content is the crucial thing here.
4. Lack of value in your videos
Before uploading videos on your channels, it’s good to ask yourself some questions, like:
What value does my video add to the audience?
How to fix it?
You are ready to value your videos if you answer these few questions. Value is the crucial thing in every product in the market. YouTube channel owners ought to know what the competitors offer to the same viewers and exceed them by posting videos that meet audiences’ needs.
It’s good manners to go back to the drawing board and research why your YouTube channels aren’t being featured.
Part 5: Bonus Tip - Make YouTube Videos with Good Video Editor
Making videos featured in the YouTube channels requires a good video editor. Although various video editors do excellent work, making videos with an exceptional video editor must be a goal. Filmora is such kind of best video editor that can handle the editing of videos very well. It is an excellent software for beginners and pros, and it is more potent than other video editors in the market.
It allows a person to make professional-looking videos because Filmora has various presets like overplays, transitions, elements, filters, and several layers of effects.
Wondershare Filmora
Get started easily with Filmora’s powerful performance, intuitive interface, and countless effects!
Try It Free Try It Free Try It Free Learn More >
Key features of Wondershare filmora
Filmora video editor comes with several features that make it the best video editor. The features include an advanced text editor, GIF support, Color tuning, noise removal, audio equalizer, stabilization of the video, and scene detection.
Conclusion
YouTube featured channels with quality informative videos/contents attract more audiences, mainly social media users, in the larger market. Before featuring channels on YouTube, one has to know what the target audiences need, test and the demography of the audiences matters a lot.
Featured channels on the YouTube platform can be an excellent source of revenue for ready, consistent, and considerate value on their videos uploaded on the channels. Inconsistency can be detrimental to the owner of the channels because the channels can end up being dormant with no one subscribing to them. The owner ought to learn how to add featured channels on YouTube by following the complete guide.
Also, making YouTube videos with a good video editor is advisable for quality videos that will attract more audiences. Value is what viewers are after on the featured channels on YouTube.
Also read:
- Joshi's Success YouTube Earnings Strategy
- Enhance Your Shorts Fresh and Original Thumbnails with Minimal Effort
- Dynamic Scripting for Videos
- [New] Android & iOS Users' Choice Top Playlist Saving Apps for YouTube
- 2024 Approved Building Direct URLs for YouTube Channel Subscribers
- [Updated] Crafting the Perfect Pitch Inviting Listeners to Join Us
- In 2024, Authenticating Your YouTube Username & Email
- 2024 Approved Converting iMovie Edits for Online Exhibition - YouTube Edition
- Securing Financial Stability Through Beauty Content
- Hasty Thumbnail Crafting for Fortnite Gameplay
- Maximize Reach The Top Ten Keywords Discovery Platforms for YouTubers
- 2024 Approved Essential GIF Tool Guide Tips From the Experts
- 2024 Approved Crafting Compelling Combinations A Guide to Creating Your Own YouTube Playlists
- Unlocking the Secrets to Parallel Playback Prowess
- 2024 Approved Enchanting Editing YouTube's Best Video Magic Hits
- Unlocking Potential Creating Your YouTube Identity
- In 2024, Direct to Mp3 Ease Select 10 Video-to-Audio Devices
- [Updated] Constructing an Accessible Subscribe URL to YT Channels
- [New] Discover 8 Essential Sites for Pristine Green Screen Images
- Yearly Review How Sourav Joshi Achieved Success on YouTube by 2024
- Adopting Nature-Positive Policies in Urban Governance
- [New] Early Bird Winners Youtube's Quick Favorites
- The Path to YouTube Gaming Popularity
- Starting Strong with These Trendy 15 Video Intros
- In 2024, Streamline Your Workflow Best Fast Video Editors
- Methods to Change GPS Location On Samsung Galaxy S21 FE 5G (2023) | Dr.fone
- In 2024, 7 Top Ways To Resolve Apple ID Not Active Issue For iPhone 12 mini
- [Updated] In 2024, Elevate Your Visual Content Perfectly Place Icons & Emojis on Instagram
- In 2024, Instant IG Glory High-Quality Covers on Apple and Android Devices
- [New] Unveiling Simple, Smooth Gaming Video Editors for Starters
- [Updated] 2024 Approved Telling Stories Vertically Video Editing for Instagram with FCPX
- How To Fix OEM Unlock Missing on Lava Storm 5G?
- How to Change/Fake Your Motorola Defy 2 Location on Viber | Dr.fone
- Updated Advanced Protocols for Adding Melodies to Instagram Live Streams for 2024
- In 2024, AudiExtractoReview Free Audio Tool's New Horizon
- [Updated] Transform YourFB Watchlist with Easy Youtube Video Autoplay Configuration
- How to recover old music from your Itel P40+
- Honor 90 Bootloop Problem, How to Fix it Without Data Loss | Dr.fone
- [Updated] Expertly Curated Facebook's #1-#10 Plays for 2024
- [Updated] Computational Time for a 20Mb Media Piece
- [New] 2024 Approved Comprehensive Guide to Enhancing TikToks Adding Texts Professionally
- [Updated] 2024 Approved Transform Your Feed A Comprehensive Guide to Videos
- 2024 Approved Mastering the Zoom Meeting Experience Tips for Fluid Online Discussion
- Title: Achieve Wider Exposure by Transferring Twitch Broadcasts to YouTube for 2024
- Author: Brian
- Created at : 2024-05-25 11:18:14
- Updated at : 2024-05-26 11:18:14
- Link: https://youtube-video-recordings.techidaily.com/achieve-wider-exposure-by-transferring-twitch-broadcasts-to-youtube-for-2024/
- License: This work is licensed under CC BY-NC-SA 4.0.
