
:max_bytes(150000):strip_icc()/MetrobyT-Mobilelogo-43185fc123d54b1fa301b05f4c01e173.jpg)
Achieve Uninterrupted YouTube Experience Across OS Platforms
Achieve Uninterrupted YouTube Experience Across OS Platforms
How to Block YouTube Ads on Chrome/Firefox/Android/iPhone

Richard Bennett
Mar 27, 2024• Proven solutions
YouTube is unquestionably the world’s most popular video-sharing platform with a massive 2 billion active monthly users. With such a large audience, advertisers are pouring a lot of funds into Google’s video platform that makes up a big portion of the company’s advertising revenue. Unfortunately, according to the BI Intelligence Digital Trust Survey , YouTube serves up the most annoying ads with 43 percent of the respondents considering YouTube ads most irksome.
Every now and then you’ll get annoyed with the obtrusive ads and ask how to block YouTube ads. Getting away with the un-skippable and plagued 30-second ads during the playback or the onscreen pop-up ads that come suddenly on the playing screen will make your life miserable when watching a show or practicing a dance move. To help you escape the forced ads on YouTube we’ll go through the YouTube ad blocking techniques available. You will learn:
- Part 1: How to block YouTube ads on the computer (Chrome & Firefox)
- Part 2: How to block YouTube ads on the mobile phone (Android & iPhone)
Here is the video guide to help you block Youtube ads on the computer and mobile phone


Part 1: How to block YouTube ads on the computer (Chrome & Firefox)
In case you care about and want to support content creators on YouTube, you can buy the YouTube Premium which will also give you access to exclusive shows and will eliminate ads from your YouTube life.
However, as most of us won’t like the idea of paying for a free service, there are possible solutions of how to block YouTube ads in Chrome or Firefox. You will need to install a third-party browser extension proficient in blocking the annoying YouTube ads in Google Chrome or Mozilla Firefox.
1.Google Chrome
Chrome allows you to have extensions to enhance the browser features and interact more with the content presented to you. These third-party extensions or sometimes called Add-ons can help prevent the irritating YouTube ads to show up on the site. To install them, follow the steps.
- 1. Open Google Chrome browser and go to Menu.
- 2. In the Menu look for “More Tools” and in there tap the “Extensions”.
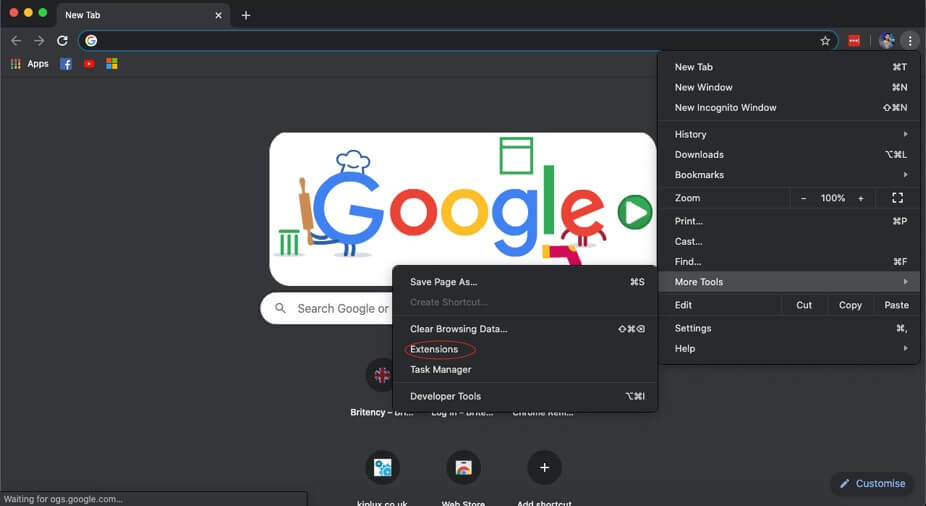
- 3. In the Extensions tap the “Main menu” at the left-hand side. It will show the menu here open the Chrome Web Store. Or you can simply open Chrome Web Store
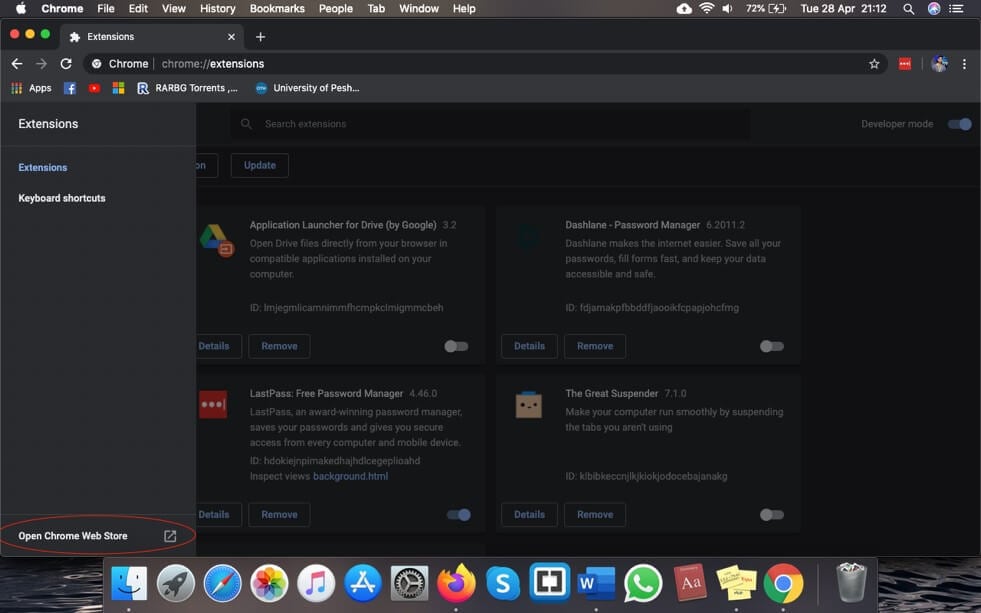
- 4. You will need to sign in with your Google account if you’re not already signed in.
- 5. In the search box type “ad blocker YouTube” and tap enter. You’ll see a list of ad blockers available for chrome.
- 6. You will adblocker’s specifically for YouTube ads. Select whichever you like and it will block the YouTube ads on Chrome.

2.Mozilla Firefox
You can also install third-party extensions to block YouTube ads from popping up in the middle of the playback. To install the extensions, follow the steps.
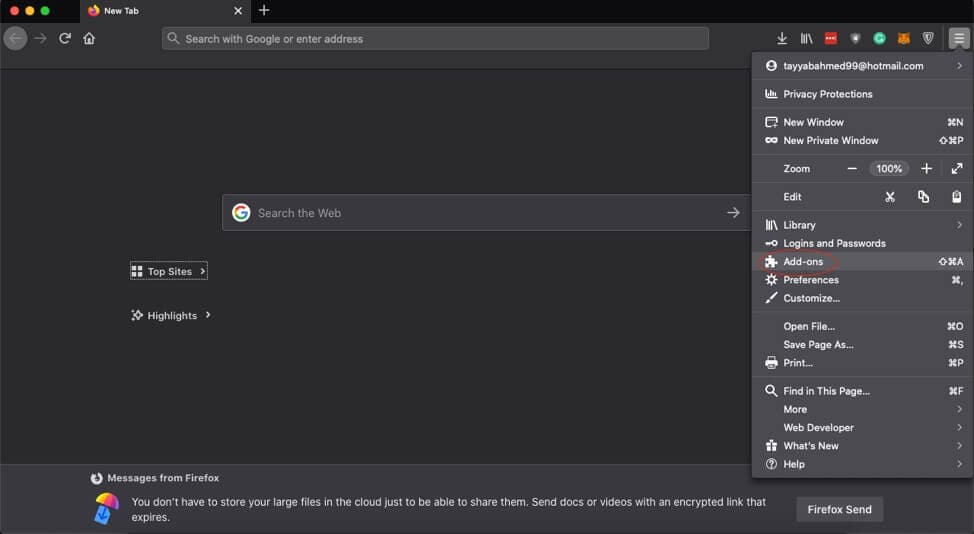
- 1. Tap the Hamburger Menu on Firefox at the top-right corner and select Add-ons.
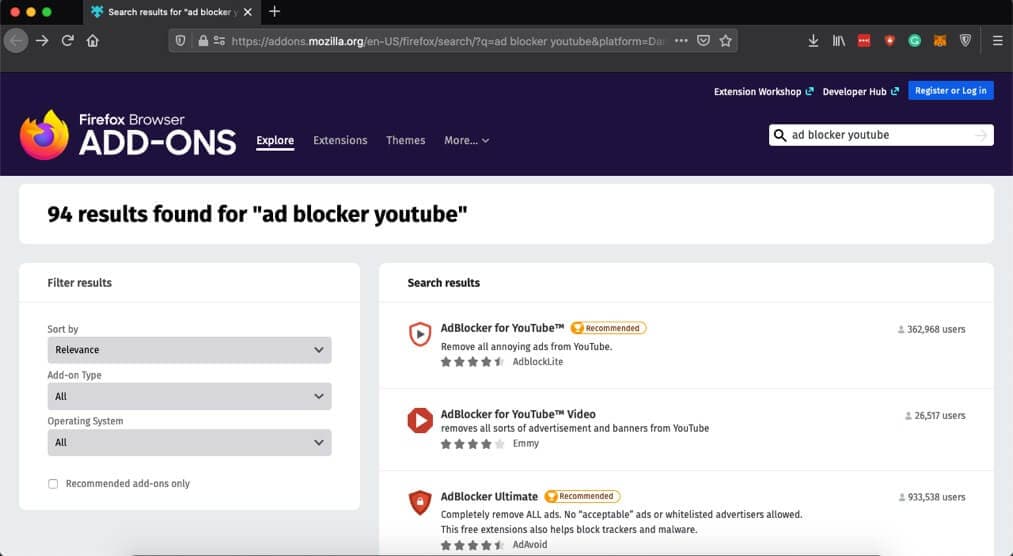
- 2. In the search bar “Find more extensions” type “ad blocker YouTube” and press enter.
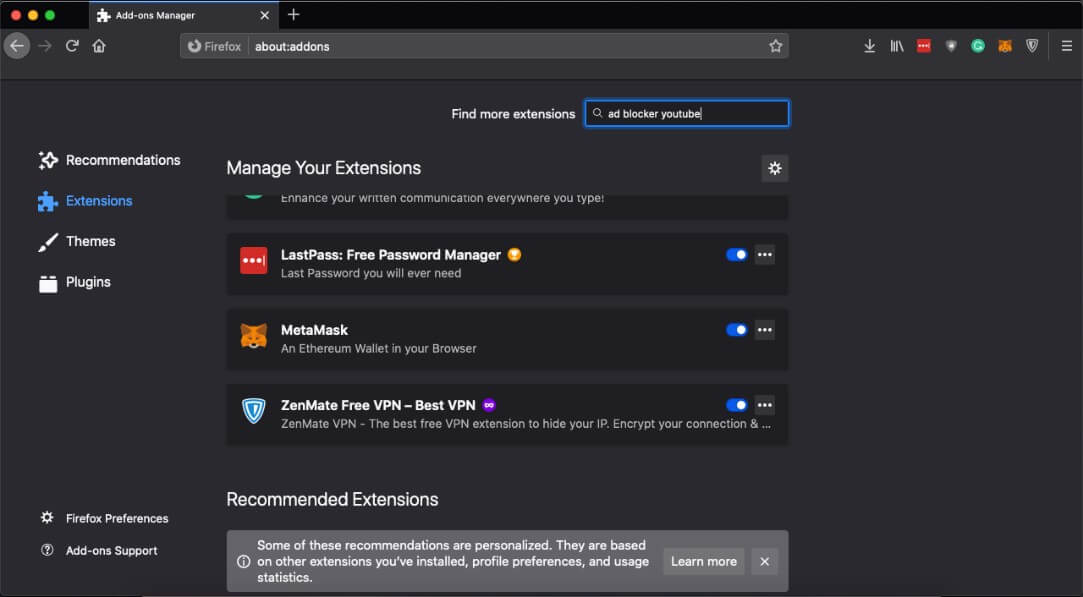
- 3. Select an appropriate ad blocker and it will protect you from the irritating ads.
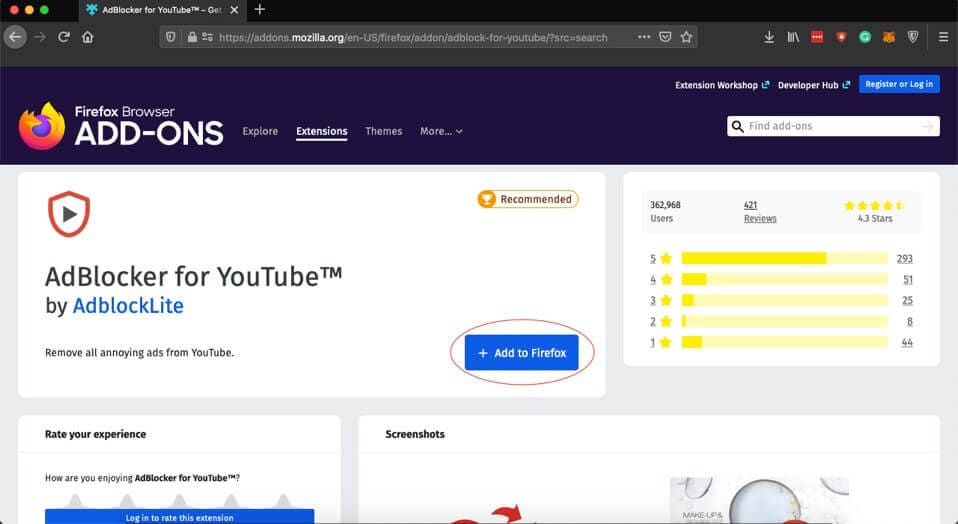
- 4. Tap the “Add to Firefox” to download the extension.
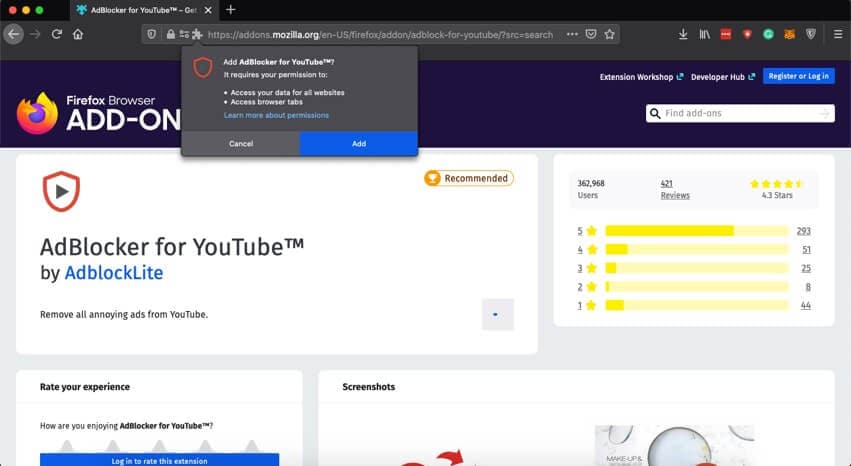
- 5. It will ask for permission, press “Add” again to grant the permissions.
Part 2: How to block YouTube ads on the mobile phone (Android & iPhone)
Ads can cause inconvenience and make YouTube watching a sour experience. To protect yourself from the constant nagging ads on mobile platforms both Android and iPhone you can utilize the numerous ad-blocking apps for Android and iOS. Though the simplest method of blocking the ads and watch YouTube content without ads is to use the Adblock Browser available both for both devices at Google Play Store and Apple Store. This technique won’t require you to root your Android phone or jailbreak the iPhone for watching ad-free YouTube videos.
1.Android
Android is pretty flexible and allows you to add many feature-rich third-party apps. Though there might be other options available to get rid of the irksome YouTube ads, the easiest and single app solution to remove ads is downloading an Adblock browser app that will act as your default browser when you try to want to watch YouTube videos. The steps to set up your Android to block YouTube ads are down here.
- 1. Click Here to install Adblock Browser on your Android device.
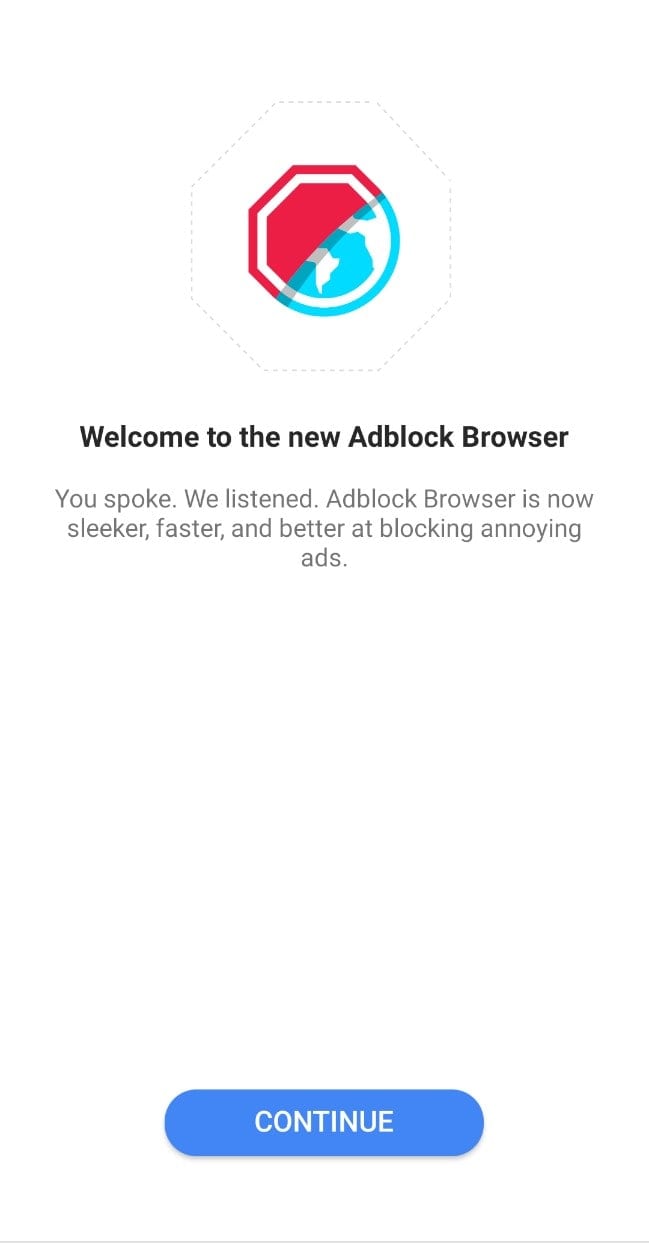
- 2. It is a full-fledged browser and can act as your primary browser for YouTube playback.

- 3. After installing the Adblock Browser your Android device may still try to play videos in the YouTube app.
- 4. To current that, open the “Settings” on your Android and go to “Apps & notifications” and press See all. In the apps find YouTube, tap in to see app info.
- 5. In the App info screen click “Storage & cache”.
- 6. Tap on “Clear storage”. This will clear all the cache and data of the app from the operating system.
- 7. Now your YouTube videos will be played in the Adblock Browser.
2.iPhone
On iOS, you can keep using the default iOS browser and still be able to block YouTube ads in the Safari browser app. You can add third-party ad blocker apps to disable YouTube ads on your iPhone and link it as the Content Blocker in the Safari settings. To activate the ad blocking feature, follow the steps.
- 1. Open Apple Store and download any ad blocker app you like.
- 2. Now come to the iPhone device Settings and go to Safari.
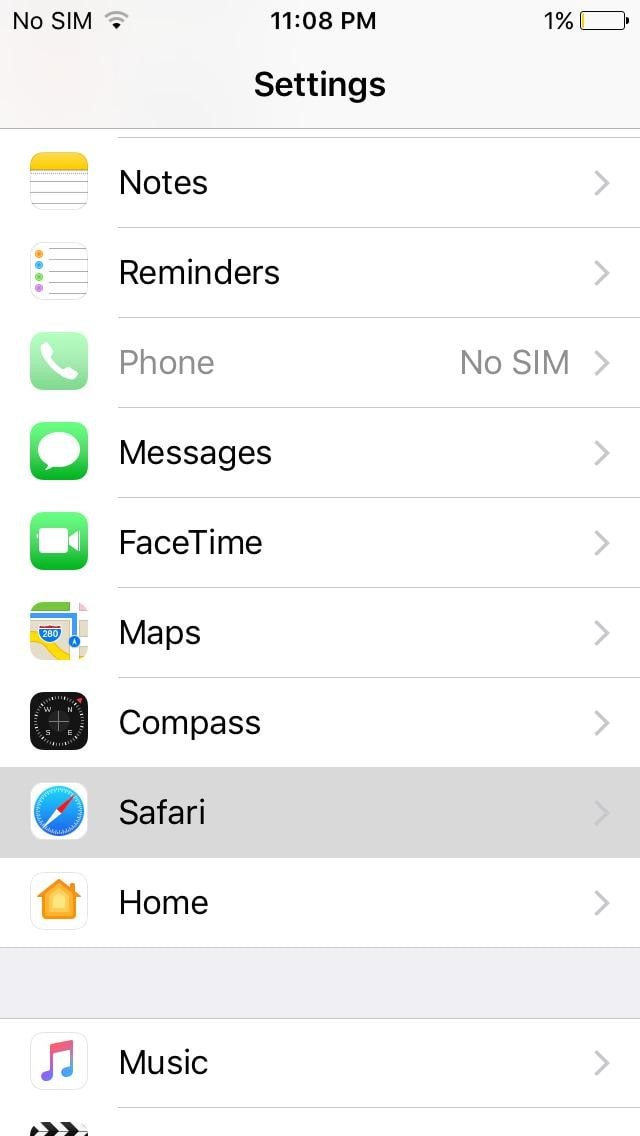
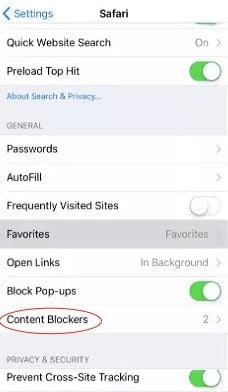
- 3. In the Safari settings, you will find a “Block Pop-ups” toggle button, activate it.
- 4. Right below the toggle button, you’ll see the “Content Blockers” tap to configure it.
- 5. The ad blocker app you just downloaded will be displaying under Allow these content blockers, enable it with the toggle button.
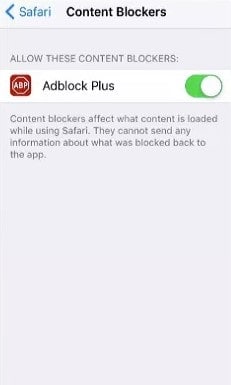
- 6. Now your Safari browser will block all YouTube ads during playback.
Conclusion
Ads can be annoying and time-wasting if you are being forced to watch them every other minute. YouTube is as addictive as its active userbase depict and during that addiction, anyone will not accept an interruption. To do away with the disruptive adds and block YouTube ads on any of your devices from PC to Mac, or mobile devices you need to have an adblocker application that will disable YouTube ads and make your video viewing experience smooth and relishing.
Richard Bennett
Richard Bennett is a writer and a lover of all things video.
Follow @Richard Bennett
Richard Bennett
Mar 27, 2024• Proven solutions
YouTube is unquestionably the world’s most popular video-sharing platform with a massive 2 billion active monthly users. With such a large audience, advertisers are pouring a lot of funds into Google’s video platform that makes up a big portion of the company’s advertising revenue. Unfortunately, according to the BI Intelligence Digital Trust Survey , YouTube serves up the most annoying ads with 43 percent of the respondents considering YouTube ads most irksome.
Every now and then you’ll get annoyed with the obtrusive ads and ask how to block YouTube ads. Getting away with the un-skippable and plagued 30-second ads during the playback or the onscreen pop-up ads that come suddenly on the playing screen will make your life miserable when watching a show or practicing a dance move. To help you escape the forced ads on YouTube we’ll go through the YouTube ad blocking techniques available. You will learn:
- Part 1: How to block YouTube ads on the computer (Chrome & Firefox)
- Part 2: How to block YouTube ads on the mobile phone (Android & iPhone)
Here is the video guide to help you block Youtube ads on the computer and mobile phone
Part 1: How to block YouTube ads on the computer (Chrome & Firefox)
In case you care about and want to support content creators on YouTube, you can buy the YouTube Premium which will also give you access to exclusive shows and will eliminate ads from your YouTube life.
However, as most of us won’t like the idea of paying for a free service, there are possible solutions of how to block YouTube ads in Chrome or Firefox. You will need to install a third-party browser extension proficient in blocking the annoying YouTube ads in Google Chrome or Mozilla Firefox.
1.Google Chrome
Chrome allows you to have extensions to enhance the browser features and interact more with the content presented to you. These third-party extensions or sometimes called Add-ons can help prevent the irritating YouTube ads to show up on the site. To install them, follow the steps.
- 1. Open Google Chrome browser and go to Menu.
- 2. In the Menu look for “More Tools” and in there tap the “Extensions”.
- 3. In the Extensions tap the “Main menu” at the left-hand side. It will show the menu here open the Chrome Web Store. Or you can simply open Chrome Web Store
- 4. You will need to sign in with your Google account if you’re not already signed in.
- 5. In the search box type “ad blocker YouTube” and tap enter. You’ll see a list of ad blockers available for chrome.
- 6. You will adblocker’s specifically for YouTube ads. Select whichever you like and it will block the YouTube ads on Chrome.
2.Mozilla Firefox
You can also install third-party extensions to block YouTube ads from popping up in the middle of the playback. To install the extensions, follow the steps.
- 1. Tap the Hamburger Menu on Firefox at the top-right corner and select Add-ons.
- 2. In the search bar “Find more extensions” type “ad blocker YouTube” and press enter.
- 3. Select an appropriate ad blocker and it will protect you from the irritating ads.
- 4. Tap the “Add to Firefox” to download the extension.
- 5. It will ask for permission, press “Add” again to grant the permissions.
Part 2: How to block YouTube ads on the mobile phone (Android & iPhone)
Ads can cause inconvenience and make YouTube watching a sour experience. To protect yourself from the constant nagging ads on mobile platforms both Android and iPhone you can utilize the numerous ad-blocking apps for Android and iOS. Though the simplest method of blocking the ads and watch YouTube content without ads is to use the Adblock Browser available both for both devices at Google Play Store and Apple Store. This technique won’t require you to root your Android phone or jailbreak the iPhone for watching ad-free YouTube videos.
1.Android
Android is pretty flexible and allows you to add many feature-rich third-party apps. Though there might be other options available to get rid of the irksome YouTube ads, the easiest and single app solution to remove ads is downloading an Adblock browser app that will act as your default browser when you try to want to watch YouTube videos. The steps to set up your Android to block YouTube ads are down here.
- 1. Click Here to install Adblock Browser on your Android device.
- 2. It is a full-fledged browser and can act as your primary browser for YouTube playback.
- 3. After installing the Adblock Browser your Android device may still try to play videos in the YouTube app.
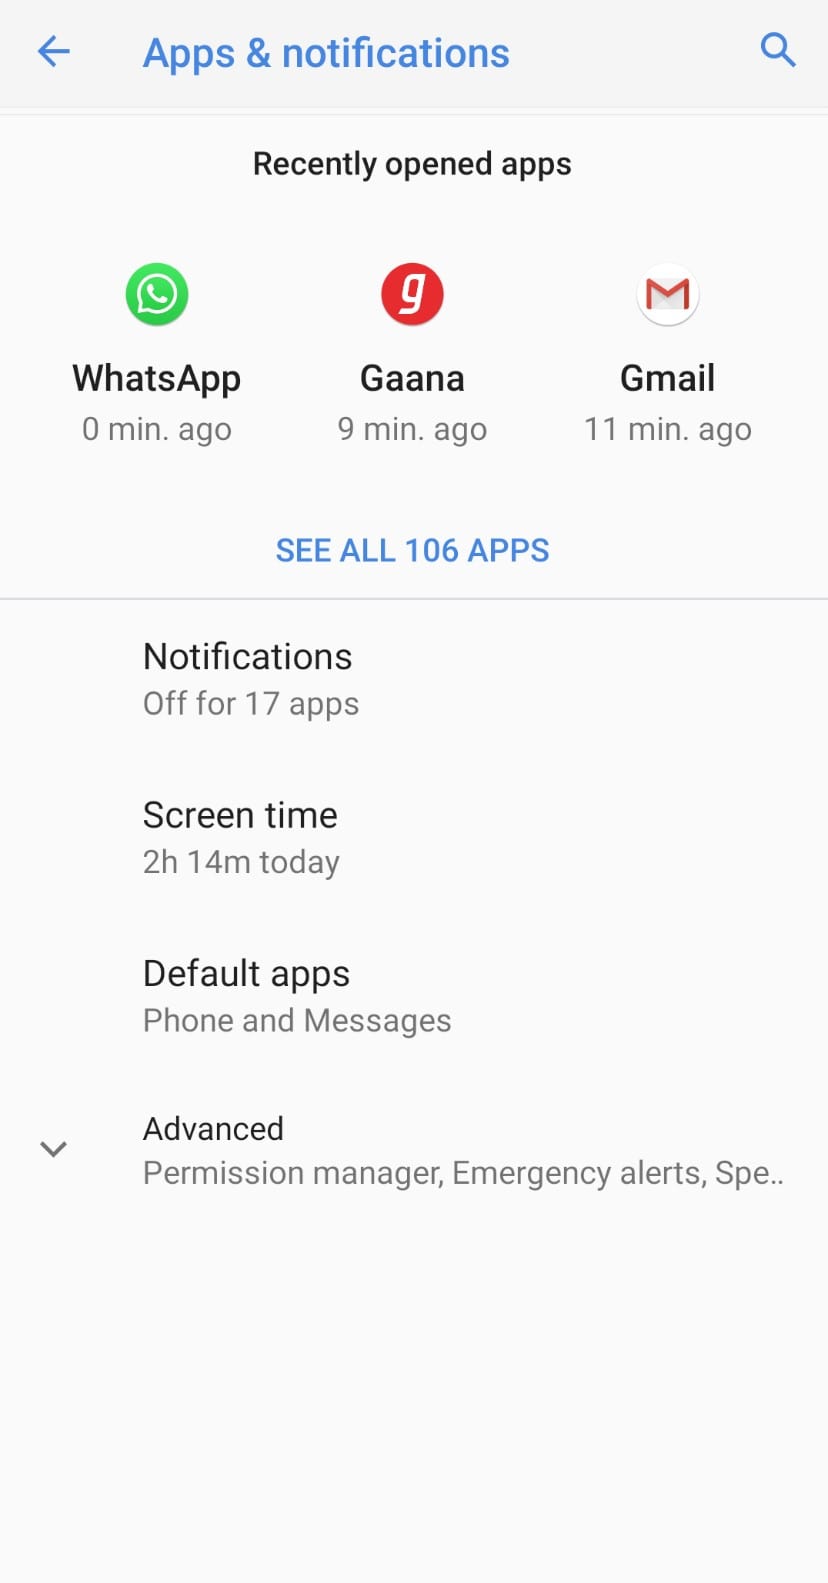
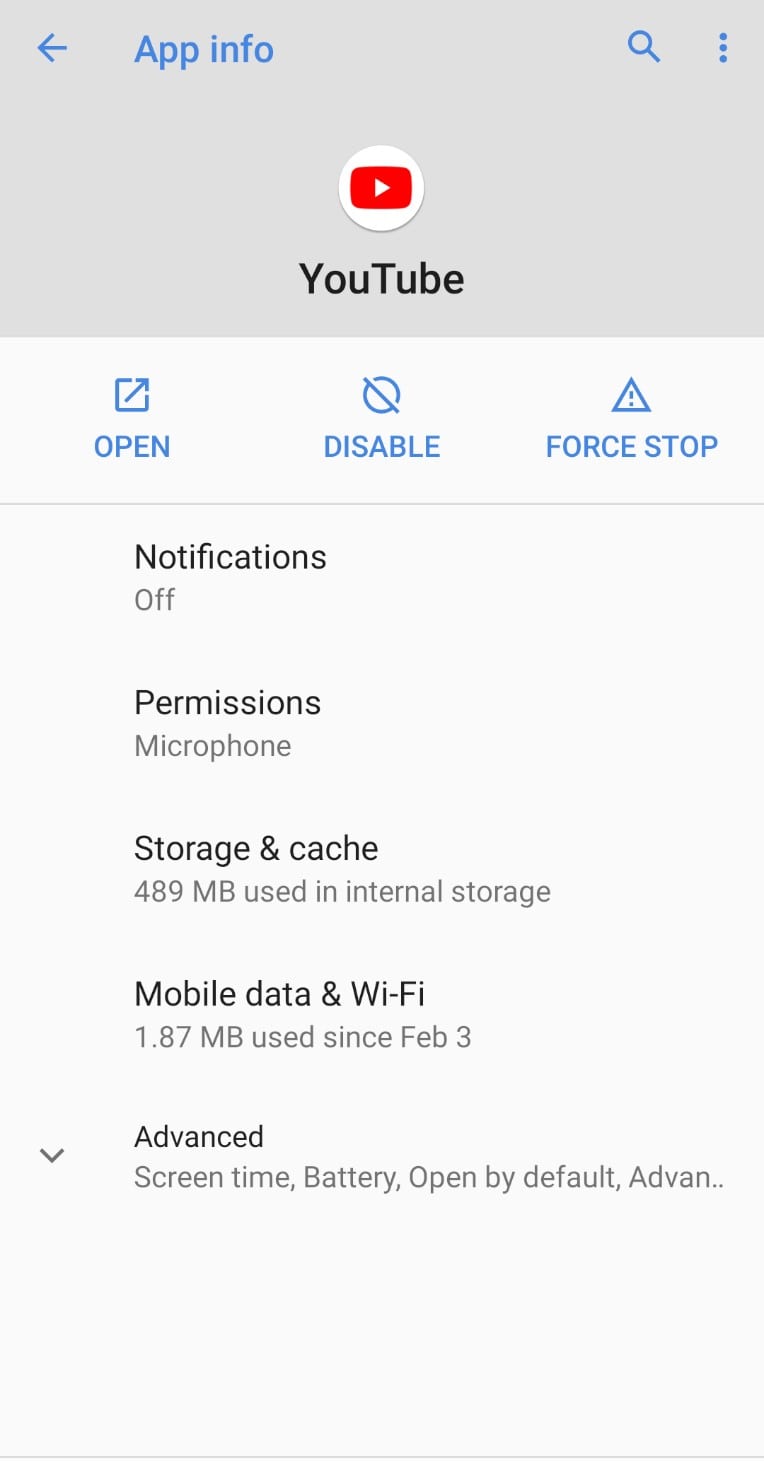
- 4. To current that, open the “Settings” on your Android and go to “Apps & notifications” and press See all. In the apps find YouTube, tap in to see app info.
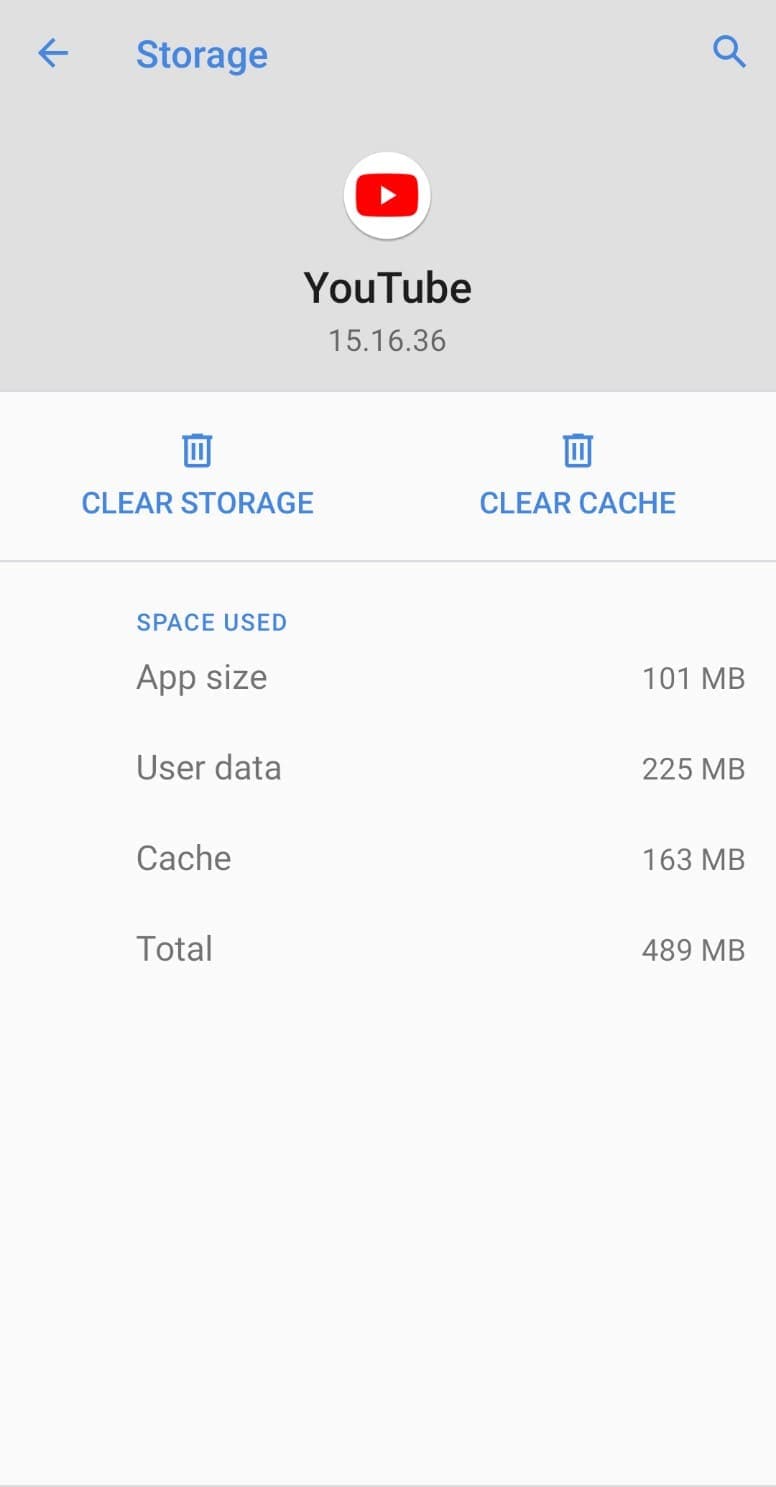
- 5. In the App info screen click “Storage & cache”.
- 6. Tap on “Clear storage”. This will clear all the cache and data of the app from the operating system.
- 7. Now your YouTube videos will be played in the Adblock Browser.
2.iPhone
On iOS, you can keep using the default iOS browser and still be able to block YouTube ads in the Safari browser app. You can add third-party ad blocker apps to disable YouTube ads on your iPhone and link it as the Content Blocker in the Safari settings. To activate the ad blocking feature, follow the steps.
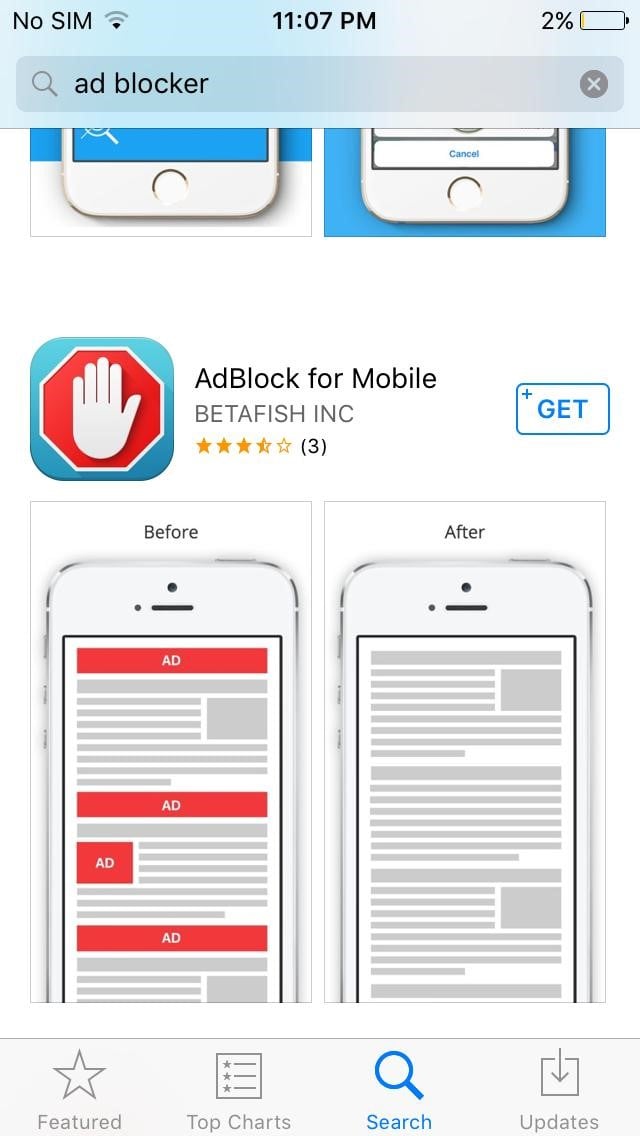
- 1. Open Apple Store and download any ad blocker app you like.
- 2. Now come to the iPhone device Settings and go to Safari.
- 3. In the Safari settings, you will find a “Block Pop-ups” toggle button, activate it.
- 4. Right below the toggle button, you’ll see the “Content Blockers” tap to configure it.
- 5. The ad blocker app you just downloaded will be displaying under Allow these content blockers, enable it with the toggle button.
- 6. Now your Safari browser will block all YouTube ads during playback.
Conclusion
Ads can be annoying and time-wasting if you are being forced to watch them every other minute. YouTube is as addictive as its active userbase depict and during that addiction, anyone will not accept an interruption. To do away with the disruptive adds and block YouTube ads on any of your devices from PC to Mac, or mobile devices you need to have an adblocker application that will disable YouTube ads and make your video viewing experience smooth and relishing.
Richard Bennett
Richard Bennett is a writer and a lover of all things video.
Follow @Richard Bennett
Richard Bennett
Mar 27, 2024• Proven solutions
YouTube is unquestionably the world’s most popular video-sharing platform with a massive 2 billion active monthly users. With such a large audience, advertisers are pouring a lot of funds into Google’s video platform that makes up a big portion of the company’s advertising revenue. Unfortunately, according to the BI Intelligence Digital Trust Survey , YouTube serves up the most annoying ads with 43 percent of the respondents considering YouTube ads most irksome.
Every now and then you’ll get annoyed with the obtrusive ads and ask how to block YouTube ads. Getting away with the un-skippable and plagued 30-second ads during the playback or the onscreen pop-up ads that come suddenly on the playing screen will make your life miserable when watching a show or practicing a dance move. To help you escape the forced ads on YouTube we’ll go through the YouTube ad blocking techniques available. You will learn:
- Part 1: How to block YouTube ads on the computer (Chrome & Firefox)
- Part 2: How to block YouTube ads on the mobile phone (Android & iPhone)
Here is the video guide to help you block Youtube ads on the computer and mobile phone
Part 1: How to block YouTube ads on the computer (Chrome & Firefox)
In case you care about and want to support content creators on YouTube, you can buy the YouTube Premium which will also give you access to exclusive shows and will eliminate ads from your YouTube life.
However, as most of us won’t like the idea of paying for a free service, there are possible solutions of how to block YouTube ads in Chrome or Firefox. You will need to install a third-party browser extension proficient in blocking the annoying YouTube ads in Google Chrome or Mozilla Firefox.
1.Google Chrome
Chrome allows you to have extensions to enhance the browser features and interact more with the content presented to you. These third-party extensions or sometimes called Add-ons can help prevent the irritating YouTube ads to show up on the site. To install them, follow the steps.
- 1. Open Google Chrome browser and go to Menu.
- 2. In the Menu look for “More Tools” and in there tap the “Extensions”.
- 3. In the Extensions tap the “Main menu” at the left-hand side. It will show the menu here open the Chrome Web Store. Or you can simply open Chrome Web Store
- 4. You will need to sign in with your Google account if you’re not already signed in.
- 5. In the search box type “ad blocker YouTube” and tap enter. You’ll see a list of ad blockers available for chrome.
- 6. You will adblocker’s specifically for YouTube ads. Select whichever you like and it will block the YouTube ads on Chrome.
2.Mozilla Firefox
You can also install third-party extensions to block YouTube ads from popping up in the middle of the playback. To install the extensions, follow the steps.
- 1. Tap the Hamburger Menu on Firefox at the top-right corner and select Add-ons.
- 2. In the search bar “Find more extensions” type “ad blocker YouTube” and press enter.
- 3. Select an appropriate ad blocker and it will protect you from the irritating ads.
- 4. Tap the “Add to Firefox” to download the extension.
- 5. It will ask for permission, press “Add” again to grant the permissions.
Part 2: How to block YouTube ads on the mobile phone (Android & iPhone)
Ads can cause inconvenience and make YouTube watching a sour experience. To protect yourself from the constant nagging ads on mobile platforms both Android and iPhone you can utilize the numerous ad-blocking apps for Android and iOS. Though the simplest method of blocking the ads and watch YouTube content without ads is to use the Adblock Browser available both for both devices at Google Play Store and Apple Store. This technique won’t require you to root your Android phone or jailbreak the iPhone for watching ad-free YouTube videos.
1.Android
Android is pretty flexible and allows you to add many feature-rich third-party apps. Though there might be other options available to get rid of the irksome YouTube ads, the easiest and single app solution to remove ads is downloading an Adblock browser app that will act as your default browser when you try to want to watch YouTube videos. The steps to set up your Android to block YouTube ads are down here.
- 1. Click Here to install Adblock Browser on your Android device.
- 2. It is a full-fledged browser and can act as your primary browser for YouTube playback.
- 3. After installing the Adblock Browser your Android device may still try to play videos in the YouTube app.
- 4. To current that, open the “Settings” on your Android and go to “Apps & notifications” and press See all. In the apps find YouTube, tap in to see app info.
- 5. In the App info screen click “Storage & cache”.
- 6. Tap on “Clear storage”. This will clear all the cache and data of the app from the operating system.
- 7. Now your YouTube videos will be played in the Adblock Browser.
2.iPhone
On iOS, you can keep using the default iOS browser and still be able to block YouTube ads in the Safari browser app. You can add third-party ad blocker apps to disable YouTube ads on your iPhone and link it as the Content Blocker in the Safari settings. To activate the ad blocking feature, follow the steps.
- 1. Open Apple Store and download any ad blocker app you like.
- 2. Now come to the iPhone device Settings and go to Safari.
- 3. In the Safari settings, you will find a “Block Pop-ups” toggle button, activate it.
- 4. Right below the toggle button, you’ll see the “Content Blockers” tap to configure it.
- 5. The ad blocker app you just downloaded will be displaying under Allow these content blockers, enable it with the toggle button.
- 6. Now your Safari browser will block all YouTube ads during playback.
Conclusion
Ads can be annoying and time-wasting if you are being forced to watch them every other minute. YouTube is as addictive as its active userbase depict and during that addiction, anyone will not accept an interruption. To do away with the disruptive adds and block YouTube ads on any of your devices from PC to Mac, or mobile devices you need to have an adblocker application that will disable YouTube ads and make your video viewing experience smooth and relishing.
Richard Bennett
Richard Bennett is a writer and a lover of all things video.
Follow @Richard Bennett
Master the Skill of Trimming YouTube Videos for Perfect Bites
How to Trim YouTube Videos?
Richard Bennett
Mar 27, 2024• Proven solutions
The world’s largest video sharing platform currently has nearly two billion active monthly users who upload over 400 hours of video content to their channels each minute. It is to see from these statistics why every video aspiring YouTubers post on their channels has to be perfect in every way in order to reach a wide audience. Fortunately, trimming a video even after you’ve uploaded it to YouTube is a quick and easy process, and in this article, we are going to show you a few different methods you can use to trim the videos you upload to YouTube. So, let’s get started.
In this article
- How to Trim a Video After You Upload it to Your YouTube Channel?
- Trimming a Video Before Posting On YouTube with Filmora Video Editor [4 Ways]
- Using Online Video Editing Platforms to Trim YouTube Videos
How to Trim a Video After You Upload it to Your YouTube Channel?
The YouTube Studio is no longer in beta phase, which means that the feature is here to stay. This is good news for all video creators who frequently update their YouTube videos after they upload them, as they no longer have to go through the endless uploads just because they wanted to trim a video.
Make sure that you’re signed into your YouTube channel, then click on your profile picture and select the YouTube Studio (Beta) option. On the left side of the screen, you’ll be able to see a menu that contains different subcategories like Analytics, Dashboard or Videos, so just click on the Videos option and proceed to select a video you’d like to trim. After the Videos submenu appears on the screen you should click on the Editor option and the video you selected will open in the YouTube’s video editor.

Click on the Trim button to start trimming the video and drag the blue bars located at the start and the end of the file to designate the portion of the video you’d like to remove. Preview the changes and confirm what you’ve made by clicking on the Save button located in the upper right corner of the screen and the new shortened version of the video will become available within a couple of hours.

In this way, you don’t need to take down the original video, edit it and re-upload. One of the benefits of trimming YouTube videos with the Trim feature in YouTube Editor is that this will keep your video URL and views and ranks etc.
Trimming a Video Before Posting On YouTube with Filmora Video Editor [4 Ways]
Method 1: Trim on Timeline
YouTubers who don’t want to rely on YouTube’s video editing capabilities can trim their footage with Filmora (to be honest, the Editor in YouTube platform has limited features). Filmora video editing software for PC and Mac computers offers a few different tools for trimming videos. After you’ve created a new project in Filmora, you should import a video clip into the editor by clicking on the Import drop-down menu and select the Import Media Files option. Each file you add to a project will be displayed in the Media tab, and you can just drag and drop it to a video track on the timeline.
All you have to do in order to trim a video after you’ve placed it on the timeline is drag one of its ends to the left or to the right. As you drag one of the clip’s edges the editor will only display the remaining footage while rendering the rest invisible. If at any point you want to access a portion of the video you’ve trimmed you just have to extend the file by dragging it until you’re able to see the segment you’re searching for.

Method 2: Using Filmora Split Tool
Filmora’s Split tool can help you separate the portion of the clip you want to remove from the segment you’d like to keep. Simply place the playhead at the exact location in the video clip where you want to make a cut, and click on the Split icon that looks like a pair of scissors. After the video is split, you should click on the clip you no longer need in order to select it and then hit the Delete button on your keyboard to remove it from the timeline.
Method 3: Using Scene Detection
Wondershare’s video editor also offers an automatic way to split a video clip into a number of separate scenes. Right-click on the video file located in the Filmora’s Media tab, and select the Scene Detection option from the menu and proceed to click on the Detect button, after the Scene Detection window pops up on the screen. The software will then automatically analyze the footage and divide it into separate scenes. Simply click on the Add to Timeline button once the process is completed to continue editing the video clip you’ve just split.

Method 4: Using Instant Cutter Tool
The Instant Cutter Tool enables you to quickly trim or merge high-resolution files recorded on action cameras as soon as you import them into a project in Filmora. Select the Import with Instant Cutter Tool option from the Import drop-down menu and wait for the Filmora Instant Cutter window to appear on the screen. In the upper left corner of this window, you will be able to see Trim and Merge tabs. Make sure that the Trim tab is selected and then click on the Open File button to import a video clip you’d like to trim. You can then use the trimming sliders to designate the parts of the video you’d like to remove or the set the In and Out points by clicking on the Set In Point or Set Out Point icons. Click on the Export button to save the new version of the video clip and click OK to complete the process.

Using Online Video Editing Platforms to Trim YouTube Videos
In case you’re looking for a tool that lets you save extracts of scenes from YouTube to your computer free of charge YT Cutter may be one of your best options.

This online video editing platform is remarkably easy to use since you just have to copy the link to the YouTube video you’d like to trim into YT Cutter’s URL box and then select how long the new video should be. Click on the Start and End buttons to set the duration of the video and click on the Download button to choose if you want to create a video, GIF or an audio file. The trimmed YouTube video will be available for download as soon as the platform processes it, and you just need to specify a folder on your hard drive before clicking on the Save button.
There’re many online video trimmers available on the market, some of them are totally free to use, check our guide about How to Trim Videos for Free Online .
Read More to Get : How to Download YouTube Videos without Any Software Easily >>
Conclusion
Trimming a video online or with a video editing software like Filmora is an effortless task that can be completed in just a couple of minutes. However, it is better to complete the entire video editing process before you upload a video to your YouTube channel because YouTube Studio and other online video editing platforms still offer only a limited amount of video editing tools. Which method of trimming YouTube videos do you like using the most? Leave a comment and share your opinions with us.
Richard Bennett
Richard Bennett is a writer and a lover of all things video.
Follow @Richard Bennett
Richard Bennett
Mar 27, 2024• Proven solutions
The world’s largest video sharing platform currently has nearly two billion active monthly users who upload over 400 hours of video content to their channels each minute. It is to see from these statistics why every video aspiring YouTubers post on their channels has to be perfect in every way in order to reach a wide audience. Fortunately, trimming a video even after you’ve uploaded it to YouTube is a quick and easy process, and in this article, we are going to show you a few different methods you can use to trim the videos you upload to YouTube. So, let’s get started.
In this article
- How to Trim a Video After You Upload it to Your YouTube Channel?
- Trimming a Video Before Posting On YouTube with Filmora Video Editor [4 Ways]
- Using Online Video Editing Platforms to Trim YouTube Videos
How to Trim a Video After You Upload it to Your YouTube Channel?
The YouTube Studio is no longer in beta phase, which means that the feature is here to stay. This is good news for all video creators who frequently update their YouTube videos after they upload them, as they no longer have to go through the endless uploads just because they wanted to trim a video.
Make sure that you’re signed into your YouTube channel, then click on your profile picture and select the YouTube Studio (Beta) option. On the left side of the screen, you’ll be able to see a menu that contains different subcategories like Analytics, Dashboard or Videos, so just click on the Videos option and proceed to select a video you’d like to trim. After the Videos submenu appears on the screen you should click on the Editor option and the video you selected will open in the YouTube’s video editor.
Click on the Trim button to start trimming the video and drag the blue bars located at the start and the end of the file to designate the portion of the video you’d like to remove. Preview the changes and confirm what you’ve made by clicking on the Save button located in the upper right corner of the screen and the new shortened version of the video will become available within a couple of hours.
In this way, you don’t need to take down the original video, edit it and re-upload. One of the benefits of trimming YouTube videos with the Trim feature in YouTube Editor is that this will keep your video URL and views and ranks etc.
Trimming a Video Before Posting On YouTube with Filmora Video Editor [4 Ways]
Method 1: Trim on Timeline
YouTubers who don’t want to rely on YouTube’s video editing capabilities can trim their footage with Filmora (to be honest, the Editor in YouTube platform has limited features). Filmora video editing software for PC and Mac computers offers a few different tools for trimming videos. After you’ve created a new project in Filmora, you should import a video clip into the editor by clicking on the Import drop-down menu and select the Import Media Files option. Each file you add to a project will be displayed in the Media tab, and you can just drag and drop it to a video track on the timeline.
All you have to do in order to trim a video after you’ve placed it on the timeline is drag one of its ends to the left or to the right. As you drag one of the clip’s edges the editor will only display the remaining footage while rendering the rest invisible. If at any point you want to access a portion of the video you’ve trimmed you just have to extend the file by dragging it until you’re able to see the segment you’re searching for.
Method 2: Using Filmora Split Tool
Filmora’s Split tool can help you separate the portion of the clip you want to remove from the segment you’d like to keep. Simply place the playhead at the exact location in the video clip where you want to make a cut, and click on the Split icon that looks like a pair of scissors. After the video is split, you should click on the clip you no longer need in order to select it and then hit the Delete button on your keyboard to remove it from the timeline.
Method 3: Using Scene Detection
Wondershare’s video editor also offers an automatic way to split a video clip into a number of separate scenes. Right-click on the video file located in the Filmora’s Media tab, and select the Scene Detection option from the menu and proceed to click on the Detect button, after the Scene Detection window pops up on the screen. The software will then automatically analyze the footage and divide it into separate scenes. Simply click on the Add to Timeline button once the process is completed to continue editing the video clip you’ve just split.
Method 4: Using Instant Cutter Tool
The Instant Cutter Tool enables you to quickly trim or merge high-resolution files recorded on action cameras as soon as you import them into a project in Filmora. Select the Import with Instant Cutter Tool option from the Import drop-down menu and wait for the Filmora Instant Cutter window to appear on the screen. In the upper left corner of this window, you will be able to see Trim and Merge tabs. Make sure that the Trim tab is selected and then click on the Open File button to import a video clip you’d like to trim. You can then use the trimming sliders to designate the parts of the video you’d like to remove or the set the In and Out points by clicking on the Set In Point or Set Out Point icons. Click on the Export button to save the new version of the video clip and click OK to complete the process.
Using Online Video Editing Platforms to Trim YouTube Videos
In case you’re looking for a tool that lets you save extracts of scenes from YouTube to your computer free of charge YT Cutter may be one of your best options.
This online video editing platform is remarkably easy to use since you just have to copy the link to the YouTube video you’d like to trim into YT Cutter’s URL box and then select how long the new video should be. Click on the Start and End buttons to set the duration of the video and click on the Download button to choose if you want to create a video, GIF or an audio file. The trimmed YouTube video will be available for download as soon as the platform processes it, and you just need to specify a folder on your hard drive before clicking on the Save button.
There’re many online video trimmers available on the market, some of them are totally free to use, check our guide about How to Trim Videos for Free Online .
Read More to Get : How to Download YouTube Videos without Any Software Easily >>
Conclusion
Trimming a video online or with a video editing software like Filmora is an effortless task that can be completed in just a couple of minutes. However, it is better to complete the entire video editing process before you upload a video to your YouTube channel because YouTube Studio and other online video editing platforms still offer only a limited amount of video editing tools. Which method of trimming YouTube videos do you like using the most? Leave a comment and share your opinions with us.
Richard Bennett
Richard Bennett is a writer and a lover of all things video.
Follow @Richard Bennett
Also read:
- UniquePC Vision Editing with Flawless Sound
- Paving the Way for Individuality in the Digital Age Your YouTube Journey
- Banner Bonanza Unlimited 50 FREE YouTube Designs
- Elevate Your Content Game Tactics for Optimal YouTube Featured Channels
- [Updated] A Deep Dive Into YouTube’s Income Models
- [New] Avoiding the Bottom Ranks Understanding Impactful Factors
- [Updated] Essential GIF Tool Guide Tips From the Experts
- Unshakeable Video Quality - Best Stabilizers
- [New] Craft Your Narrative Best Free Mobile Editors, Android Focus
- [New] Cutting Edge Capture Tips for Professional Sound Recording
- Splitting Screen Techniques for Engaging YouTube Content
- Unlock Content Insights 7 Premier Free Tag Extraction Tools
- 2024 Approved Efficient Processes for Uploading Videos From iOS Gadgets
- Quick Fixes Today's Rapidly Watched Videos
- Virtual Voyeurism World's Most Watched YouTubers
- The Ultimate Hack for Blocking YouTube Ads on All Browsers
- [Updated] Enlightenment in Education Top 10 History YouTube Channels
- Design Guide YouTube Banners & Thumbnail Creation for 2024
- [Updated] Brief but Impactful Which Social Platform Leads for Short Video Content?
- 2024 Approved Decoding the Revised YouTube Earnings Criteria
- 2024 Approved Elevating Your Content's Presence Perfecting YouTube Thumbnails Size
- 4 Creative Ways to Insert YouTube Content in Presentations for 2024
- Comedic Choreography Producing Funny Mock Films
- The Foundation for Success Equipping New Channels
- Enhance Visibility A Comprehensive Guide to Video Tagging for 2024
- Direct Conversion Convert & Upload MP3 Songs on YouTube
- [Updated] Characters That Captivate Key Growth Strategies
- No-Cost Video Looping Solutions for Everyone for 2024
- 2024 Approved Rhythm Without the Ruckus Zero-Cost, Digital Volume Reduction for Karaoke Maestros.
- Ultimate Guide to iPhone 7 Screen Recording
- In 2024, Make It a GIF 28 Recommended Video to GIF Converters
- Updated The Ultimate Guide to Funny Video Dubbing Apps (2023 Edition) for 2024
- [Updated] Achieving Professional Skype Recordings in OBS
- [New] In 2024, The Ultimate TikTok Toolkit Increase Views and Engagement
- Comparative Review Finding Your Team's Preferred Chat Application - Slack or Discord, In 2024
- [New] In 2024, Unlocking TikTok Potential How to Upload From PC/Mac
- [Updated] Keep Your Tweets Compliant with Aspect Ratio Requirements
- A Guide Lava Blaze 2 Pro Wireless and Wired Screen Mirroring | Dr.fone
- Updated Step-by-Step Apowersoft Recording Techniques with an Overview of 4 Other Solutions
- New 2024 Approved Facebook Video Cover Size Secrets Get It Right Every Time
- Catch or Beat Sleeping Snorlax on Pokemon Go For Infinix Smart 7 HD | Dr.fone
- [New] In 2024, Boosting Your Content's Impact on Instagram
- A Film Producer's Essential Guide to Color Grading with Standardized LUTs
- How to Check Distance and Radius on Google Maps For your Apple iPhone 15 | Dr.fone
- [Updated] 2024 Approved CaptureCast Unveiling 2023'S Best Recording Software
- [Updated] Fix YouTube Buffering on Mobile FB Content for 2024
- Updated 2024 Approved Unlock Seamless Music Conversion on Your Mac Top Software
- In 2024, Adding a Spooky Shadow Effect with Filmora
- New 2024 Approved S Top Free MKV Splitters No Watermarks or Trials
- Become a Reddit Star Detailed Steps for Share Success for 2024
- Updated In 2024, Evaluation Report on Sound Forges Audio Editing Tools
- New In 2024, The Ultimate Guide to Hand Drawing Whiteboard Animation Makers
- [New] 2024 Approved CameraHunt Finding Superior Substitutes
- Title: Achieve Uninterrupted YouTube Experience Across OS Platforms
- Author: Brian
- Created at : 2024-05-25 11:18:12
- Updated at : 2024-05-26 11:18:12
- Link: https://youtube-video-recordings.techidaily.com/achieve-uninterrupted-youtube-experience-across-os-platforms/
- License: This work is licensed under CC BY-NC-SA 4.0.
