
"Achieve Professional-Level YouTube Transcription Without Spending for 2024"
Achieve Professional-Level YouTube Transcription Without Spending
How to Transcribe a YouTube Video for FREE

Richard Bennett
Mar 27, 2024• Proven solutions
If you want to transcribe your videos to make the dialogs and speeches available in text format, you can use YouTube Transcribe feature that the streaming site offers for free. In this article, I’ll share with you a couple of methods to transcribe a YouTube video for free.
- Part 1: Transcribe YouTube Video Automatically for Free [2 Ways]
- Part 2: Transcribe YouTube Video to Text Online with Third-Party Service
- Part 3: Benefits of Transcribing YouTube Videos
- Part 4: YouTube Video Transcription FAQs
Part 1: How to Transcribe YouTube Video Automatically for Free [2 Ways]
Besides the basic video editing features on the YouTube platform, you can now quickly transcribe YouTube videos to the text as well. The good thing is, you can either use the automatic transcription feature that YouTube offers, or upload it manually while adjusting the timing as you go further.
Below are the two methods to transcribe your YouTube videos for free:
Method 1: Use the Automated Transcription Service on YouTube
As the name suggests, YouTube automatic transcription service works automatically. This means you don’t even have to click the ‘Transcribe’ button anymore to transcribe a YouTube video, and the website takes care of it on its own. All you need to do is, choose English as the language of the video when setting up subtitles. You can follow the instructions given below to do so:
Step 1 Upload a Video
Sign in to your YouTube account, click your profile picture from the top-right corner, and click YouTube Studio from the menu. Next, click CREATE from the upper-right corner, click Upload videos from the menu, and drag and drop a video from your computer to the Upload videos box that appears next.

Step 2 Select Transcription Language
On the Details page of the next box that appears, scroll down and click MORE OPTIONS, and select English in the Video language drop-down list under the Language, subtitles, and closed captions (CC) section.

Step 3 Publish the Video
Follow the on-screen instructions from this point to publish the video, and wait while YouTube automatically transcribes and adds the close captions to it.
Note: Depending on the duration of the clip, the time YouTube would take to transcribe may vary.
After YouTube has transcribed the video, you can download the transcription file in your preferred format. The instructions are given below explain how you can do so:
- Get to the Subtitles Window
While on the YouTube Studio page, click Subtitles from the left pane to go to the Channel subtitles page. And then click the video you want to modify.
- Get to Classic Studio
In the video subtitle page of the target video, hover mouse on the Published Automatic status under the Subtitles column, click the Options icon (with three vertical dots) that appears, and click Edit on Classic Studio.

- Download Transcription File
Click and open the Actions drop-down list from the top-left corner of the left pane, click your preferred transcription format including .vtt, .srt and .sbv from the list, and save the file on your local hard disk.

Method 2: Get YouTube Transcription when Watching
In addition, if you are watching any other video, you can make YouTube transcribe that for you as well. You can follow the instructions given below to get the YouTube video to text transcription:
Step 1: Play the Video
Go to the video on YouTube and start playing it. Make sure NOT to get to full-screen mode as doing so would hide the option to transcribe the clip.
Step 2: Enable Transcription
Click the More icon (with three horizontal dots) from under the bottom-right corner of the video player, and click Open transcript to see the video transcription in the Transcript pane that appears in the right.
Step 3: Manage Timestamps
Click the Options icon (with three vertical dots) from the top-right corner of the Transcript pane, and click Toggle timestamp to enable or disable the timestamps in the video transcription.
Limitations of Using YouTube Transcribe
Although YouTube’s automatic transcription is a decent feature that saves you a lot of time, since Google uses machine learning algorithms to convert the speech to text, the level of accuracy may vary depending on the accent of the speaker, and the clarity of the audio the video has. Also, even sometime you may not be satisfied with the end-results.
Alternatively, you can use Kapwing to transcribe a YouTube video and download the transcription file with the below step-by-step instructions:
Step 1: Add YouTube Video
Copy the URL of YouTube video you want to transcribe, go to https://www.kapwing.com/subtitles , paste the URL in the Paste a URL field, wait while Kapwing fetches the content of the video, and opens the Add subtitles to Video page.
Step 2: Transcribe the Video
Click Auto-generate from the right window, and follow the on-screen instructions to transcribe YouTube video to text.

Step 3: Download the Transcription File
Click Download SRT from the left pane, and follow the instructions from there to download the transcription file in *.srt format.

Pros
- Kapwing is free to use
- The auto-transcription process is quick and less tedious
- Kapwing also allows manual transcription and uploading of an existing *.srt file
Cons
- The auto-transcribed text might lack accuracy as the task is done by the speech-to-text tools that work in the background
You can follow the step-by-step instructions to transcribe a YouTube video and download the transcription file using Kapwing:
Step 1: Add YouTube Video
Copy the URL of YouTube video you want to transcribe, go to https://www.kapwing.com/subtitles , paste the URL in the Paste a URL field, wait while Kapwing fetches the content of the video, and opens the Add subtitles to Video page.
Step 2: Transcribe the Video
Click Auto-generate from the right window, and follow the on-screen instructions to transcribe YouTube video to text.
Step 3: Download the Transcription File
Click Download SRT from the left pane, and follow the instructions from there to download the transcription file in *.srt format.
Pros
- Kapwing is free to use
- The auto-transcription process is quick and less tedious
- Kapwing also allows manual transcription and uploading of an existing *.srt file
Cons
- The auto-transcribed text might lack accuracy as the task is done by the speech-to-text tools that work in the background
Part 3: Benefits of Transcribing YouTube Videos
You may need video transcriptions for several reasons, such as analyzing the summary of the entire speech in the video, extracting a single phrase or quote that was spoken in the clip, or making the video helpful even for those suffering from hearing impairment. When you transcribe a YouTube video, the transcript can be useful in many ways. Some of the most common benefits of transcribing a video include:
- Search Engine Optimization
When you add subtitles, the text can appear in Google search results when someone types a similar phrase in the search box. This helps get more views to your videos, thus giving your channel popularity, and you, monetary gains in the long run.
- Accent
If the speaker in the video is from a different region and is using an accent that you are not much comfortable with, you can turn on the subtitles and read the dialogs along with the video.
- Repurposing on Blogs
If you own a blog that you have embedded your video to, the transcription could be used to add text to it so the target audience can get a fair idea of what the video is all about. This is useful because many people prefer reading over watching.
YouTube Video Transcription FAQs
1. How to Transcribe YouTube Video to Text
Usually the transcription files have *.srt extension that are globally accepted and supported by almost all media players. However, there might be instances when you want to have the subtitles in plain text.
That said, to convert an SRT file to TXT, you can:
- Right-click the SRT file
- Go to Rename
- Replace srt with txt and press Enter
- Click OK on the confirmation box that appears next to convert SRT to TXT
After this, you can simply double-click the file, and read and modify the transcribed content as needed.
2. How to Edit and Upload Edited Transcript to YouTube
If you made any modifications to the transcript that was automatically generated by YouTube or any other third-party transcription tool, you can follow the steps given below to upload the new file to the YouTube video:
- Go to YouTube Studio and then to the Channel subtitles page as explained earlier
- Expand the Languages column of the target video
- Click the Options icon that appears under the Subtitles column when you hover mouse on to it
- Click Edit on Classic Studio
- On the next page, click Edit from the top-right corner

- Click to open the Actions drop-down list from the upper-left corner
- Click Upload a file
- Follow the on-screen instructions from there to upload the modified transcription file
- Click Save Changes from the top-right corner of the page when done
Conclusion
If you are looking for a quick and easy way of adding subtitles to your videos, letting YouTube transcribe for you could be a good approach. However, because these auto-generated transcriptions are created by machine learning algorithms, their accuracy cannot be counted on. Therefore, the best way to get the job done accurately is, let YouTube auto-transcribe your video, download the transcription file, make the necessary changes to it, and then upload the file back to the video.
Richard Bennett
Richard Bennett is a writer and a lover of all things video.
Follow @Richard Bennett
Richard Bennett
Mar 27, 2024• Proven solutions
If you want to transcribe your videos to make the dialogs and speeches available in text format, you can use YouTube Transcribe feature that the streaming site offers for free. In this article, I’ll share with you a couple of methods to transcribe a YouTube video for free.
- Part 1: Transcribe YouTube Video Automatically for Free [2 Ways]
- Part 2: Transcribe YouTube Video to Text Online with Third-Party Service
- Part 3: Benefits of Transcribing YouTube Videos
- Part 4: YouTube Video Transcription FAQs
Part 1: How to Transcribe YouTube Video Automatically for Free [2 Ways]
Besides the basic video editing features on the YouTube platform, you can now quickly transcribe YouTube videos to the text as well. The good thing is, you can either use the automatic transcription feature that YouTube offers, or upload it manually while adjusting the timing as you go further.
Below are the two methods to transcribe your YouTube videos for free:
Method 1: Use the Automated Transcription Service on YouTube
As the name suggests, YouTube automatic transcription service works automatically. This means you don’t even have to click the ‘Transcribe’ button anymore to transcribe a YouTube video, and the website takes care of it on its own. All you need to do is, choose English as the language of the video when setting up subtitles. You can follow the instructions given below to do so:
Step 1 Upload a Video
Sign in to your YouTube account, click your profile picture from the top-right corner, and click YouTube Studio from the menu. Next, click CREATE from the upper-right corner, click Upload videos from the menu, and drag and drop a video from your computer to the Upload videos box that appears next.
Step 2 Select Transcription Language
On the Details page of the next box that appears, scroll down and click MORE OPTIONS, and select English in the Video language drop-down list under the Language, subtitles, and closed captions (CC) section.
Step 3 Publish the Video
Follow the on-screen instructions from this point to publish the video, and wait while YouTube automatically transcribes and adds the close captions to it.
Note: Depending on the duration of the clip, the time YouTube would take to transcribe may vary.
After YouTube has transcribed the video, you can download the transcription file in your preferred format. The instructions are given below explain how you can do so:
- Get to the Subtitles Window
While on the YouTube Studio page, click Subtitles from the left pane to go to the Channel subtitles page. And then click the video you want to modify.
- Get to Classic Studio
In the video subtitle page of the target video, hover mouse on the Published Automatic status under the Subtitles column, click the Options icon (with three vertical dots) that appears, and click Edit on Classic Studio.
- Download Transcription File
Click and open the Actions drop-down list from the top-left corner of the left pane, click your preferred transcription format including .vtt, .srt and .sbv from the list, and save the file on your local hard disk.
Method 2: Get YouTube Transcription when Watching
In addition, if you are watching any other video, you can make YouTube transcribe that for you as well. You can follow the instructions given below to get the YouTube video to text transcription:
Step 1: Play the Video
Go to the video on YouTube and start playing it. Make sure NOT to get to full-screen mode as doing so would hide the option to transcribe the clip.
Step 2: Enable Transcription
Click the More icon (with three horizontal dots) from under the bottom-right corner of the video player, and click Open transcript to see the video transcription in the Transcript pane that appears in the right.
Step 3: Manage Timestamps
Click the Options icon (with three vertical dots) from the top-right corner of the Transcript pane, and click Toggle timestamp to enable or disable the timestamps in the video transcription.
Limitations of Using YouTube Transcribe
Although YouTube’s automatic transcription is a decent feature that saves you a lot of time, since Google uses machine learning algorithms to convert the speech to text, the level of accuracy may vary depending on the accent of the speaker, and the clarity of the audio the video has. Also, even sometime you may not be satisfied with the end-results.
Alternatively, you can use Kapwing to transcribe a YouTube video and download the transcription file with the below step-by-step instructions:
Step 1: Add YouTube Video
Copy the URL of YouTube video you want to transcribe, go to https://www.kapwing.com/subtitles , paste the URL in the Paste a URL field, wait while Kapwing fetches the content of the video, and opens the Add subtitles to Video page.
Step 2: Transcribe the Video
Click Auto-generate from the right window, and follow the on-screen instructions to transcribe YouTube video to text.
Step 3: Download the Transcription File
Click Download SRT from the left pane, and follow the instructions from there to download the transcription file in *.srt format.
Pros
- Kapwing is free to use
- The auto-transcription process is quick and less tedious
- Kapwing also allows manual transcription and uploading of an existing *.srt file
Cons
- The auto-transcribed text might lack accuracy as the task is done by the speech-to-text tools that work in the background
You can follow the step-by-step instructions to transcribe a YouTube video and download the transcription file using Kapwing:
Step 1: Add YouTube Video
Copy the URL of YouTube video you want to transcribe, go to https://www.kapwing.com/subtitles , paste the URL in the Paste a URL field, wait while Kapwing fetches the content of the video, and opens the Add subtitles to Video page.
Step 2: Transcribe the Video
Click Auto-generate from the right window, and follow the on-screen instructions to transcribe YouTube video to text.
Step 3: Download the Transcription File
Click Download SRT from the left pane, and follow the instructions from there to download the transcription file in *.srt format.
Pros
- Kapwing is free to use
- The auto-transcription process is quick and less tedious
- Kapwing also allows manual transcription and uploading of an existing *.srt file
Cons
- The auto-transcribed text might lack accuracy as the task is done by the speech-to-text tools that work in the background
Part 3: Benefits of Transcribing YouTube Videos
You may need video transcriptions for several reasons, such as analyzing the summary of the entire speech in the video, extracting a single phrase or quote that was spoken in the clip, or making the video helpful even for those suffering from hearing impairment. When you transcribe a YouTube video, the transcript can be useful in many ways. Some of the most common benefits of transcribing a video include:
- Search Engine Optimization
When you add subtitles, the text can appear in Google search results when someone types a similar phrase in the search box. This helps get more views to your videos, thus giving your channel popularity, and you, monetary gains in the long run.
- Accent
If the speaker in the video is from a different region and is using an accent that you are not much comfortable with, you can turn on the subtitles and read the dialogs along with the video.
- Repurposing on Blogs
If you own a blog that you have embedded your video to, the transcription could be used to add text to it so the target audience can get a fair idea of what the video is all about. This is useful because many people prefer reading over watching.
YouTube Video Transcription FAQs
1. How to Transcribe YouTube Video to Text
Usually the transcription files have *.srt extension that are globally accepted and supported by almost all media players. However, there might be instances when you want to have the subtitles in plain text.
That said, to convert an SRT file to TXT, you can:
- Right-click the SRT file
- Go to Rename
- Replace srt with txt and press Enter
- Click OK on the confirmation box that appears next to convert SRT to TXT
After this, you can simply double-click the file, and read and modify the transcribed content as needed.
2. How to Edit and Upload Edited Transcript to YouTube
If you made any modifications to the transcript that was automatically generated by YouTube or any other third-party transcription tool, you can follow the steps given below to upload the new file to the YouTube video:
- Go to YouTube Studio and then to the Channel subtitles page as explained earlier
- Expand the Languages column of the target video
- Click the Options icon that appears under the Subtitles column when you hover mouse on to it
- Click Edit on Classic Studio
- On the next page, click Edit from the top-right corner
- Click to open the Actions drop-down list from the upper-left corner
- Click Upload a file
- Follow the on-screen instructions from there to upload the modified transcription file
- Click Save Changes from the top-right corner of the page when done
Conclusion
If you are looking for a quick and easy way of adding subtitles to your videos, letting YouTube transcribe for you could be a good approach. However, because these auto-generated transcriptions are created by machine learning algorithms, their accuracy cannot be counted on. Therefore, the best way to get the job done accurately is, let YouTube auto-transcribe your video, download the transcription file, make the necessary changes to it, and then upload the file back to the video.
Richard Bennett
Richard Bennett is a writer and a lover of all things video.
Follow @Richard Bennett
How to Use Google Trends to Come up with Video Ideas?
How to Use Google Trends to Come up with Video Ideas [Easy Guide]
Richard Bennett
Oct 26, 2023• Proven solutions
There is always something to make a video about. It’s a big world where new things happen every day, in every YouTube niche . One of the best ways to climb to the top of YouTube’s search engine results is to be among the first creators to make a video about a trending topic.
But how do you know what’s trending? If you’re in a huge genre like beauty or technology then it’s not impossible to keep track of the latest news and trends, but you probably hear about things as other people start making videos and as websites start publishing articles. How do you get on top of trends just as they’re becoming trends?
Google Trends, of course!
Google Trends is a completely free tool you can use to determine what’s trending on YouTube or in Google’s search engine. Here’s how you can use Google Trends to figure out what’s trending in your niche and make a video before there’s tons of competition.
Part 1: Seeing The Big Picture
You’ll need to be signed into your Google account to use Google Trends.
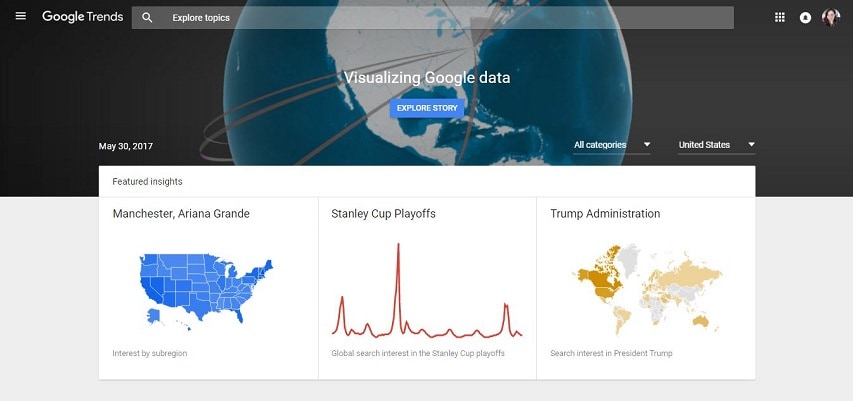
Start off at trends.google.com and you’ll see what’s trending in general – usually big news stories or things like sports finals. The data is laid out like this: at the top there are three ‘Featured Insights’. These are three of the most popular trending topics paired with graphs of their recent search traffic. Underneath these there will be a list of stories that are currently trending. You can click on them to see charts of their search data and links to where the stories are being covered online.
Unless you do news or political commentary on your channel these probably aren’t topics you want to cover, but if you like to insert some topical references into your other videos then it’s still good to be aware of these things.
To get information more relevant to your channel you’re going to have to do some filtering.
Part 2: Getting Results That Matter to You
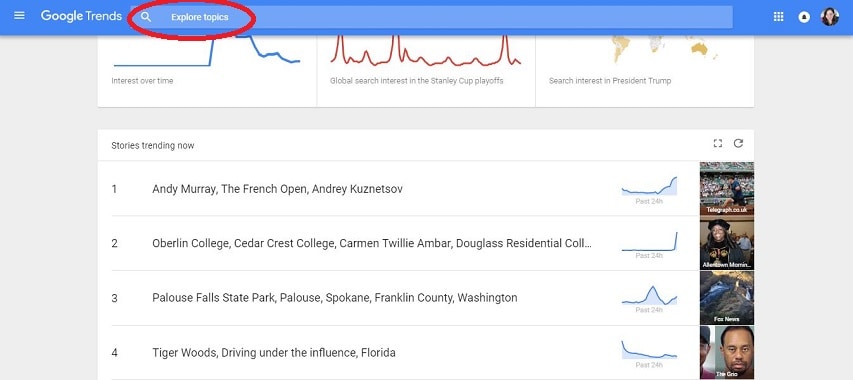
In the Google Trend home page, scroll down to the ‘Recently Trending’ section and click on ‘More Trending Searches’.
Then click from ‘Daily Search Trends’ to ‘Realtime Search Trends’.
On top you will see two drop-down menus, one is for the category and one is for location.
Under All categories select the general theme your channel falls under.
Your options are business, entertainment, health, Sci/Tech, sports, and top stories.
It might be the case that your channel doesn’t fall under any of these themes, but there could still be related stories for you in other categories. For example, if you have a beauty channel then there could be something that’d interest you under health, entertainment, or even business.
Under the location menu choose the region most of your viewers are from. This might not be the same as where you are from – you could be in Australia and most of your viewers could be in the U.S. If you’re not sure where your viewers are from you can find out in your Creator Studio under Analytics > Demographics.
Once you have narrowed down your results you can just scroll through and pick out a topic related to your channel’s theme that you have something to say about.
For example, if you have a gaming channel and you’re looking for a non-gameplay topic to make a video on, you would look under Sci/Tech. If I look under that category today (May 29, 2017) and specify that I want topics trending in the United States then these are my top 5 results:
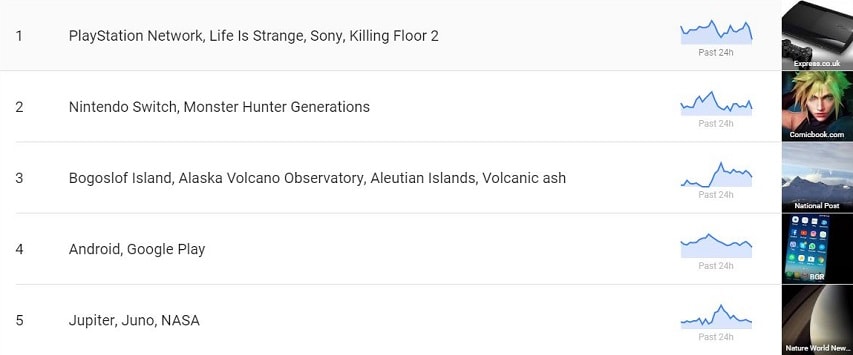
The first two happen to be about gaming. If you, as a gamer, had any strong reaction to either of these topics – whether it’s that you feel like you’re knowledgeable about them, or that you’re excited by something that’s coming up, or that something made you groan – then that would be a sign that you should make a video. Capitalizing on a trend while also covering a topic you have a lot to say about is always a good move.
Having something to say doesn’t have to mean having a strong opinion. If you just find something interesting and want to pass the information along to your viewers then that’s great too.
Clicking on these results will give you more specific data including how often the topic has been searched recently and links to recent news articles. These can give you a better idea of why it is trending and help you come up with what you want to say.
Part 3: Battle of the Keywords
Once you have a topic in mind for your next video – whether it came from Google Trends or your own noggin – think about what the most important keyword for that topic might be.
A keyword is a word or short phrase that people type into a search engine like Google or YouTube. In order for people to find your videos, you’ll have to include a keyword in your video’s title.
Once you have a keyword in mind, type it into the Explore bar at the top of your page in Google Trends.
What happens after you click enter is pretty much magic. Say I want to make a video on how to use Filmora. The first thing I’ll type into that Explore bar is ‘Filmora’.
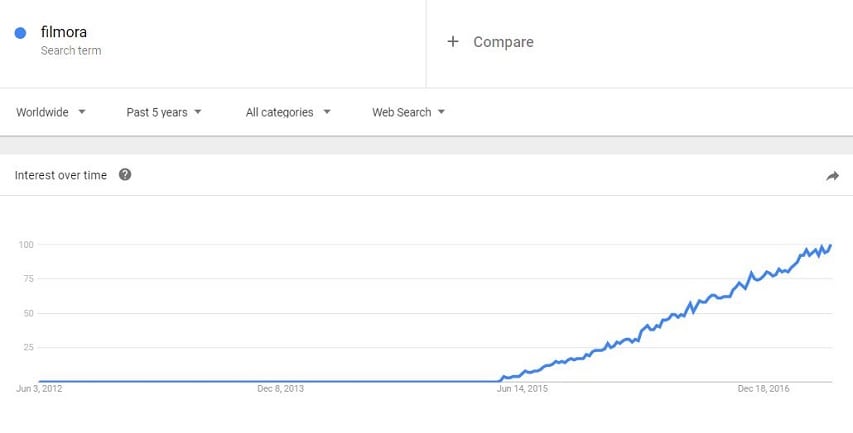
You can see near the top that this chart represents searches for the topic over the last 5 years, which isn’t necessarily useful (although it is sort of cool that you can see when Filmora was ‘born’). I’m going to narrow that down to results from the U.S in the last week.
There, now I can see how the popularity of Filmora as a search term has spiked on specific days and times (if you hover over a spike it tells you the time and day) and plan to post my video at a time that capitalizes on these trends.
Next, what other words do I want to include in my video title? Is this a review, a tutorial, or a how-to? By clicking on my search term Filmora, I can edit it to read ‘filmora review’. Then I can click + Compare and type in ‘filmora tutorial’ and ‘how to use Filmora’. Google Trends will create a chart comparing the popularity of those 3 terms.
I also ‘zoomed out’ to 90 days – if I’d only looked at how they compared over the last week my results could have been skewed.
It’s pretty clear from the chart that ‘filmora review’ is the strongest of those 3 search terms. The title of my video should definitely start with the words Filmora Review because that is what most people are searching for when they want information about Filmora. Putting your most important keyword/search term first in your video titles will help them rank better in the viewer’s search results.
Although, when you do a comparison like this you should also go to YouTube and search for each potential keyword/phrase individually. It might turn out that there is a ton of strong competition for the most popular search term, and not as much for the second or third most popular. Here’s a search for ‘Filmora Review’ on YouTube:
If my view of YouTube looks different from yours it’s because I’m using the VidIQ plugin for Chrome . It’s free and it gives you all kinds of extra info about videos and channels.
The second-highest ranked result is only 2 months old and isn’t from a huge channel. Although there is competition for this keyword, ranking for it is not impossible. It also helps that software reviews are a topic where people will always be looking for the latest information/newest videos.
If the search results for your keyword are dominated by monster channels with millions of subs, and you can’t think of an angle you can use to crack into those top results (i.e. having newer information people will be looking for, which the more established videos are lacking), then maybe try the search with your second best keyword and see if there’s a better opportunity for you to rank there.
One of the biggest benefits of identifying trends and making videos about them quickly is that you can get in before there’s a lot of competition for the first few pages of search results on YouTube or Google, and before larger channels start making videos of their own on the same topic.
Want to make coming up with YouTube video ideas a habit? This post here will help you develop a process to generate more ideas and properly evaluate them.
Making Better YouTube Videos with Filmora
As one of the most widely used video editing software among YouTubers, Filmora provides plentiful editing tools, such as cut, trim, video stabilization , noise removal , chroma key compositing , and color grading. Besides, there are royalty-free music track and sound effects available in the built-in Audio library, and title templates and presets, as well as elements and effects. Download the free trial version below and get started now.


Richard Bennett
Richard Bennett is a writer and a lover of all things video.
Follow @Richard Bennett
Richard Bennett
Oct 26, 2023• Proven solutions
There is always something to make a video about. It’s a big world where new things happen every day, in every YouTube niche . One of the best ways to climb to the top of YouTube’s search engine results is to be among the first creators to make a video about a trending topic.
But how do you know what’s trending? If you’re in a huge genre like beauty or technology then it’s not impossible to keep track of the latest news and trends, but you probably hear about things as other people start making videos and as websites start publishing articles. How do you get on top of trends just as they’re becoming trends?
Google Trends, of course!
Google Trends is a completely free tool you can use to determine what’s trending on YouTube or in Google’s search engine. Here’s how you can use Google Trends to figure out what’s trending in your niche and make a video before there’s tons of competition.
Part 1: Seeing The Big Picture
You’ll need to be signed into your Google account to use Google Trends.
Start off at trends.google.com and you’ll see what’s trending in general – usually big news stories or things like sports finals. The data is laid out like this: at the top there are three ‘Featured Insights’. These are three of the most popular trending topics paired with graphs of their recent search traffic. Underneath these there will be a list of stories that are currently trending. You can click on them to see charts of their search data and links to where the stories are being covered online.
Unless you do news or political commentary on your channel these probably aren’t topics you want to cover, but if you like to insert some topical references into your other videos then it’s still good to be aware of these things.
To get information more relevant to your channel you’re going to have to do some filtering.
Part 2: Getting Results That Matter to You
In the Google Trend home page, scroll down to the ‘Recently Trending’ section and click on ‘More Trending Searches’.
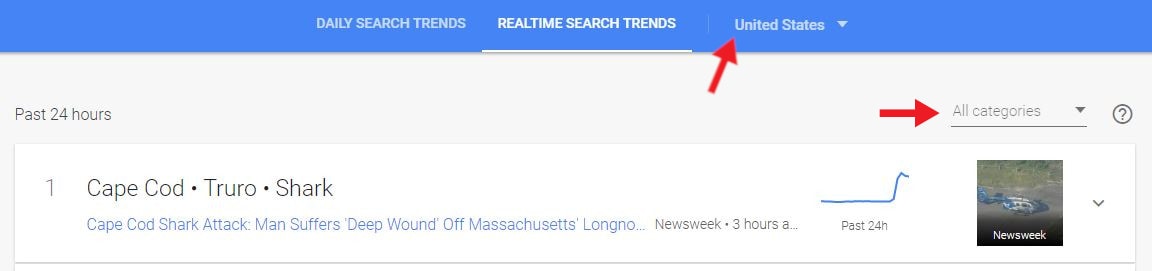
Then click from ‘Daily Search Trends’ to ‘Realtime Search Trends’.
On top you will see two drop-down menus, one is for the category and one is for location.
Under All categories select the general theme your channel falls under.
Your options are business, entertainment, health, Sci/Tech, sports, and top stories.
It might be the case that your channel doesn’t fall under any of these themes, but there could still be related stories for you in other categories. For example, if you have a beauty channel then there could be something that’d interest you under health, entertainment, or even business.
Under the location menu choose the region most of your viewers are from. This might not be the same as where you are from – you could be in Australia and most of your viewers could be in the U.S. If you’re not sure where your viewers are from you can find out in your Creator Studio under Analytics > Demographics.
Once you have narrowed down your results you can just scroll through and pick out a topic related to your channel’s theme that you have something to say about.
For example, if you have a gaming channel and you’re looking for a non-gameplay topic to make a video on, you would look under Sci/Tech. If I look under that category today (May 29, 2017) and specify that I want topics trending in the United States then these are my top 5 results:
The first two happen to be about gaming. If you, as a gamer, had any strong reaction to either of these topics – whether it’s that you feel like you’re knowledgeable about them, or that you’re excited by something that’s coming up, or that something made you groan – then that would be a sign that you should make a video. Capitalizing on a trend while also covering a topic you have a lot to say about is always a good move.
Having something to say doesn’t have to mean having a strong opinion. If you just find something interesting and want to pass the information along to your viewers then that’s great too.
Clicking on these results will give you more specific data including how often the topic has been searched recently and links to recent news articles. These can give you a better idea of why it is trending and help you come up with what you want to say.
Part 3: Battle of the Keywords
Once you have a topic in mind for your next video – whether it came from Google Trends or your own noggin – think about what the most important keyword for that topic might be.
A keyword is a word or short phrase that people type into a search engine like Google or YouTube. In order for people to find your videos, you’ll have to include a keyword in your video’s title.
Once you have a keyword in mind, type it into the Explore bar at the top of your page in Google Trends.
What happens after you click enter is pretty much magic. Say I want to make a video on how to use Filmora. The first thing I’ll type into that Explore bar is ‘Filmora’.
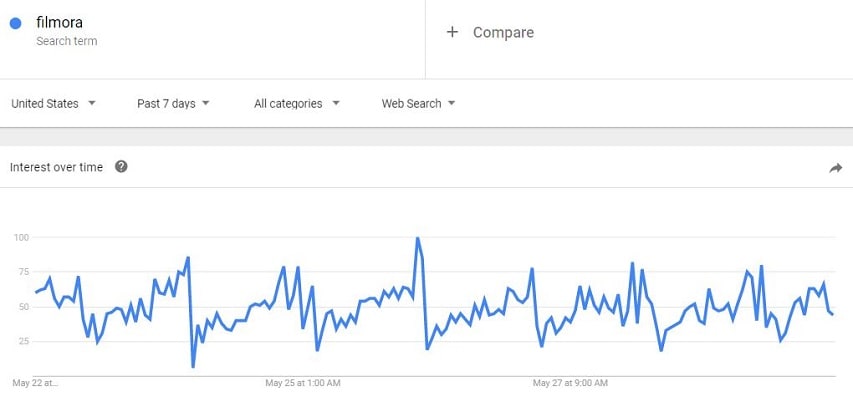
You can see near the top that this chart represents searches for the topic over the last 5 years, which isn’t necessarily useful (although it is sort of cool that you can see when Filmora was ‘born’). I’m going to narrow that down to results from the U.S in the last week.
There, now I can see how the popularity of Filmora as a search term has spiked on specific days and times (if you hover over a spike it tells you the time and day) and plan to post my video at a time that capitalizes on these trends.
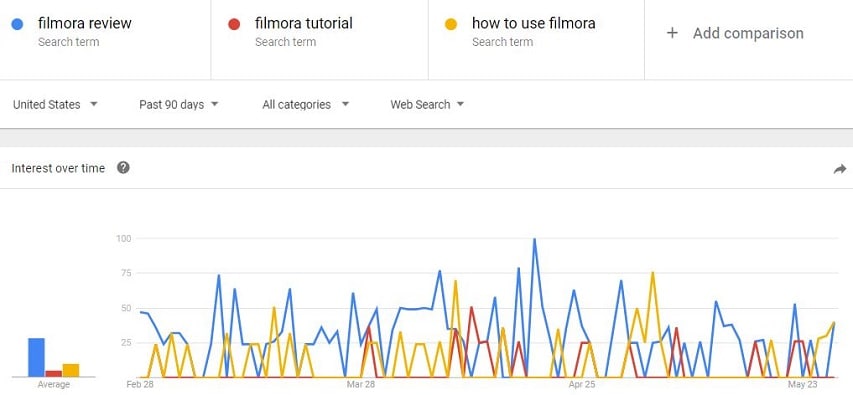
Next, what other words do I want to include in my video title? Is this a review, a tutorial, or a how-to? By clicking on my search term Filmora, I can edit it to read ‘filmora review’. Then I can click + Compare and type in ‘filmora tutorial’ and ‘how to use Filmora’. Google Trends will create a chart comparing the popularity of those 3 terms.
I also ‘zoomed out’ to 90 days – if I’d only looked at how they compared over the last week my results could have been skewed.
It’s pretty clear from the chart that ‘filmora review’ is the strongest of those 3 search terms. The title of my video should definitely start with the words Filmora Review because that is what most people are searching for when they want information about Filmora. Putting your most important keyword/search term first in your video titles will help them rank better in the viewer’s search results.
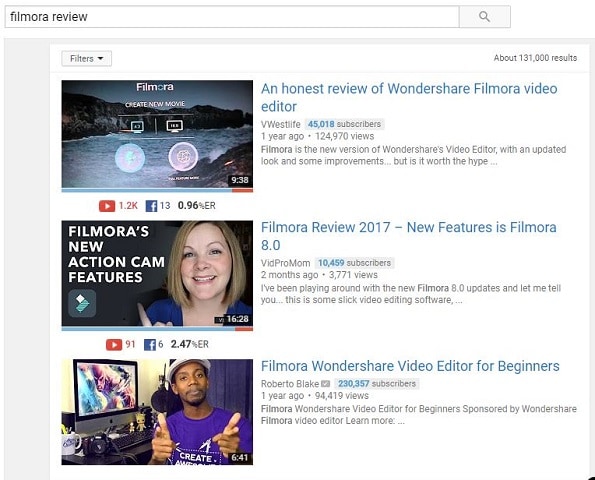
Although, when you do a comparison like this you should also go to YouTube and search for each potential keyword/phrase individually. It might turn out that there is a ton of strong competition for the most popular search term, and not as much for the second or third most popular. Here’s a search for ‘Filmora Review’ on YouTube:
If my view of YouTube looks different from yours it’s because I’m using the VidIQ plugin for Chrome . It’s free and it gives you all kinds of extra info about videos and channels.
The second-highest ranked result is only 2 months old and isn’t from a huge channel. Although there is competition for this keyword, ranking for it is not impossible. It also helps that software reviews are a topic where people will always be looking for the latest information/newest videos.
If the search results for your keyword are dominated by monster channels with millions of subs, and you can’t think of an angle you can use to crack into those top results (i.e. having newer information people will be looking for, which the more established videos are lacking), then maybe try the search with your second best keyword and see if there’s a better opportunity for you to rank there.
One of the biggest benefits of identifying trends and making videos about them quickly is that you can get in before there’s a lot of competition for the first few pages of search results on YouTube or Google, and before larger channels start making videos of their own on the same topic.
Want to make coming up with YouTube video ideas a habit? This post here will help you develop a process to generate more ideas and properly evaluate them.
Making Better YouTube Videos with Filmora
As one of the most widely used video editing software among YouTubers, Filmora provides plentiful editing tools, such as cut, trim, video stabilization , noise removal , chroma key compositing , and color grading. Besides, there are royalty-free music track and sound effects available in the built-in Audio library, and title templates and presets, as well as elements and effects. Download the free trial version below and get started now.
Richard Bennett
Richard Bennett is a writer and a lover of all things video.
Follow @Richard Bennett
Richard Bennett
Oct 26, 2023• Proven solutions
There is always something to make a video about. It’s a big world where new things happen every day, in every YouTube niche . One of the best ways to climb to the top of YouTube’s search engine results is to be among the first creators to make a video about a trending topic.
But how do you know what’s trending? If you’re in a huge genre like beauty or technology then it’s not impossible to keep track of the latest news and trends, but you probably hear about things as other people start making videos and as websites start publishing articles. How do you get on top of trends just as they’re becoming trends?
Google Trends, of course!
Google Trends is a completely free tool you can use to determine what’s trending on YouTube or in Google’s search engine. Here’s how you can use Google Trends to figure out what’s trending in your niche and make a video before there’s tons of competition.
Part 1: Seeing The Big Picture
You’ll need to be signed into your Google account to use Google Trends.
Start off at trends.google.com and you’ll see what’s trending in general – usually big news stories or things like sports finals. The data is laid out like this: at the top there are three ‘Featured Insights’. These are three of the most popular trending topics paired with graphs of their recent search traffic. Underneath these there will be a list of stories that are currently trending. You can click on them to see charts of their search data and links to where the stories are being covered online.
Unless you do news or political commentary on your channel these probably aren’t topics you want to cover, but if you like to insert some topical references into your other videos then it’s still good to be aware of these things.
To get information more relevant to your channel you’re going to have to do some filtering.
Part 2: Getting Results That Matter to You
In the Google Trend home page, scroll down to the ‘Recently Trending’ section and click on ‘More Trending Searches’.
Then click from ‘Daily Search Trends’ to ‘Realtime Search Trends’.
On top you will see two drop-down menus, one is for the category and one is for location.
Under All categories select the general theme your channel falls under.
Your options are business, entertainment, health, Sci/Tech, sports, and top stories.
It might be the case that your channel doesn’t fall under any of these themes, but there could still be related stories for you in other categories. For example, if you have a beauty channel then there could be something that’d interest you under health, entertainment, or even business.
Under the location menu choose the region most of your viewers are from. This might not be the same as where you are from – you could be in Australia and most of your viewers could be in the U.S. If you’re not sure where your viewers are from you can find out in your Creator Studio under Analytics > Demographics.
Once you have narrowed down your results you can just scroll through and pick out a topic related to your channel’s theme that you have something to say about.
For example, if you have a gaming channel and you’re looking for a non-gameplay topic to make a video on, you would look under Sci/Tech. If I look under that category today (May 29, 2017) and specify that I want topics trending in the United States then these are my top 5 results:
The first two happen to be about gaming. If you, as a gamer, had any strong reaction to either of these topics – whether it’s that you feel like you’re knowledgeable about them, or that you’re excited by something that’s coming up, or that something made you groan – then that would be a sign that you should make a video. Capitalizing on a trend while also covering a topic you have a lot to say about is always a good move.
Having something to say doesn’t have to mean having a strong opinion. If you just find something interesting and want to pass the information along to your viewers then that’s great too.
Clicking on these results will give you more specific data including how often the topic has been searched recently and links to recent news articles. These can give you a better idea of why it is trending and help you come up with what you want to say.
Part 3: Battle of the Keywords
Once you have a topic in mind for your next video – whether it came from Google Trends or your own noggin – think about what the most important keyword for that topic might be.
A keyword is a word or short phrase that people type into a search engine like Google or YouTube. In order for people to find your videos, you’ll have to include a keyword in your video’s title.
Once you have a keyword in mind, type it into the Explore bar at the top of your page in Google Trends.
What happens after you click enter is pretty much magic. Say I want to make a video on how to use Filmora. The first thing I’ll type into that Explore bar is ‘Filmora’.
You can see near the top that this chart represents searches for the topic over the last 5 years, which isn’t necessarily useful (although it is sort of cool that you can see when Filmora was ‘born’). I’m going to narrow that down to results from the U.S in the last week.
There, now I can see how the popularity of Filmora as a search term has spiked on specific days and times (if you hover over a spike it tells you the time and day) and plan to post my video at a time that capitalizes on these trends.
Next, what other words do I want to include in my video title? Is this a review, a tutorial, or a how-to? By clicking on my search term Filmora, I can edit it to read ‘filmora review’. Then I can click + Compare and type in ‘filmora tutorial’ and ‘how to use Filmora’. Google Trends will create a chart comparing the popularity of those 3 terms.
I also ‘zoomed out’ to 90 days – if I’d only looked at how they compared over the last week my results could have been skewed.
It’s pretty clear from the chart that ‘filmora review’ is the strongest of those 3 search terms. The title of my video should definitely start with the words Filmora Review because that is what most people are searching for when they want information about Filmora. Putting your most important keyword/search term first in your video titles will help them rank better in the viewer’s search results.
Although, when you do a comparison like this you should also go to YouTube and search for each potential keyword/phrase individually. It might turn out that there is a ton of strong competition for the most popular search term, and not as much for the second or third most popular. Here’s a search for ‘Filmora Review’ on YouTube:
If my view of YouTube looks different from yours it’s because I’m using the VidIQ plugin for Chrome . It’s free and it gives you all kinds of extra info about videos and channels.
The second-highest ranked result is only 2 months old and isn’t from a huge channel. Although there is competition for this keyword, ranking for it is not impossible. It also helps that software reviews are a topic where people will always be looking for the latest information/newest videos.
If the search results for your keyword are dominated by monster channels with millions of subs, and you can’t think of an angle you can use to crack into those top results (i.e. having newer information people will be looking for, which the more established videos are lacking), then maybe try the search with your second best keyword and see if there’s a better opportunity for you to rank there.
One of the biggest benefits of identifying trends and making videos about them quickly is that you can get in before there’s a lot of competition for the first few pages of search results on YouTube or Google, and before larger channels start making videos of their own on the same topic.
Want to make coming up with YouTube video ideas a habit? This post here will help you develop a process to generate more ideas and properly evaluate them.
Making Better YouTube Videos with Filmora
As one of the most widely used video editing software among YouTubers, Filmora provides plentiful editing tools, such as cut, trim, video stabilization , noise removal , chroma key compositing , and color grading. Besides, there are royalty-free music track and sound effects available in the built-in Audio library, and title templates and presets, as well as elements and effects. Download the free trial version below and get started now.
Richard Bennett
Richard Bennett is a writer and a lover of all things video.
Follow @Richard Bennett
Also read:
- Top 10 Gaming YouTubers You Should Know
- The Best 8 Free Editing Programs to Streamline Your YouTube Projects
- Discovering if Quick YouTube Subscriptions Really Work for 2024
- In 2024, Boosting Profitability in the World of Youtube Shorts
- Charting the Course to YouTube Livestream Mastery
- [Updated] Elevate Storytelling - Free Soundtrack Options Available
- 2024 Approved Budding Buyers Guide Monetization Platforms for Novice Channels
- YouTube Creators' Ultimate Playlist The Best Free Sound Sources
- Budget-Friendly Designs for YouTube Content Creators
- Investment Edutainment The Best Channels Reviewed
- [Updated] Charting a Path to Profit Calculating Video View Requirements
- Top Best Video Editor with Music For PC Users
- [New] Designing Short Trailers That Tell a Story
- Unleash More Views on YouTube with Pro Tag Optimization
- [New] Discover 8 Essential Sites for Pristine Green Screen Images
- How to Safely Extract YouTube Audio A Study of 3 Techniques
- [New] Boost Views Strategic Partnerships on YouTube for Rapid Growth
- [Updated] Captivate Crowds Mastering Hashtag Use in High-Traffic Short Videos
- Sparking Your Content Strategy Crafting a YouTube Channel From Scratch
- [New] Beginner's Guide to Crafting Trendy Mac Video Content
- Elite Edits The Best Video Editors Ranked for 2024
- [New] Effortless Audio Transfer on iPhone Pick Top 6 Tools to Convert YouTube
- [Updated] Double Delight Endless Looping of YouTube Videos for TVs
- In 2024, Top 4 SIM Location Trackers To Easily Find Your Lost Realme 12+ 5G Device
- [Updated] Guide Downloading Twitters Videos on Android Devices for 2024
- How To Transfer WhatsApp From Apple iPhone 11 Pro to other iPhone devices? | Dr.fone
- [Updated] ExploringExcellentCamerasPost-MyCam for 2024
- In 2024, How to Change Location on TikTok to See More Content On your Vivo Y77t | Dr.fone
- Streamline Multitasking Switch Between PIP and Normal Screen Mode (iOS)
- In 2024, Full Guide to Fix iToolab AnyGO Not Working On Vivo Y55s 5G (2023) | Dr.fone
- In 2024, Top 15 Apps To Hack WiFi Password On Vivo Y55s 5G (2023)
- [New] In 2024, From Unverified to Verified Amplifying Your Instagram Profile with Proven Strategies
- A Comprehensive Tutorial on Adding Dynamic Graphics (GIFs) to Discord Chats
- New 2024 Approved Twitch Green Screen Guide
- Title: "Achieve Professional-Level YouTube Transcription Without Spending for 2024"
- Author: Brian
- Created at : 2024-05-25 11:18:06
- Updated at : 2024-05-26 11:18:06
- Link: https://youtube-video-recordings.techidaily.com/achieve-professional-level-youtube-transcription-without-spending-for-2024/
- License: This work is licensed under CC BY-NC-SA 4.0.
