:max_bytes(150000):strip_icc()/JPEG-vs-TIFF-vs-RAW-fb85f34808b8471fb24a1e197c9d7ac3.jpg)
"Achieve Financial Insight The Simple Three Steps To Assess YouTube Earning Potential for 2024"
Achieve Financial Insight: The Simple Three Steps To Assess YouTube Earning Potential
There have been lots of user queries similar to the one above about how to check YouTube income lately. Honestly, YouTube has made it easy for users to track their revenue analytics on the platform, thus making it easy for creators to track how much they make and other revenue data.
So, if you don’t know how to check YouTube income, don’t worry, this article will teach you the simple steps to check your YouTube. Plus, you’ll find out how your YouTube earnings are calculated. Just stick with us.
Part 1: Follow the steps below to check your YouTube earnings
The process of checking YouTube income is pretty straightforward. So, regardless of what device you’re using to check, we’ve briefly explained the step-by-step instructions to carry out your YouTube income check within a few clicks.
Check on a computer
To check YouTube income on your PC or Mac, you just have to do the following;
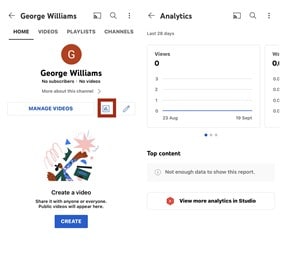
Step1 Open the browser app on your computer and sign in to your YouTube Studio .
Step2 Click Analytics from the left side of the screen.

Step3 On the Analytics screen, select Revenue from the top side of the screen to check your YouTube income.
There, you’ll find your YouTube income and other necessary data that you might need.
Check on a Mobile Device
The process of checking YouTube income on an Android or iOS device is also straightforward, and you can use either the YouTube app or the YouTube Studio app to perform the operation. The steps below explain the procedure;
YouTube App
Step1 Make sure you have the latest version of the YouTube app on your phone. If not, you can install it from Google Play Store or App Store.

Step2 Log in to your YouTube account and tap on the Profile icon at the top side. Then, select Your Channel.

Step3 Tap the Analytics icon from the middle menu. Your YouTube channel income and other data will be displayed on your phone screen.
YouTube Studio App
Step1 Launch the YouTube Studio app on your Android or iPhone.
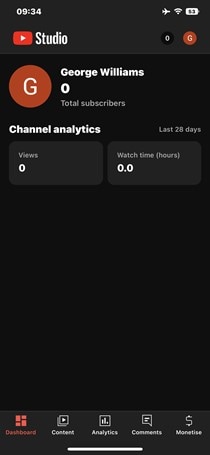
Step2 Tap Analytics from the bottom menu and select Revenue from the top of the screen.

The information that you’ll find in the YouTube revenue analytics includes the following;
- RPM (Revenue Per Mile); This is the metric that displays how much a creator has earned per 1000 video views.
- Playback-based CPM; This shows the average gross revenue per 1000 playbacks where an AD or more is displayed.
- Monthly Estimated Revenue; This report shows how much a YouTuber has earned from his/her channel in the last six months.
- Revenue Sources: Just as the name suggests, this shows you the data of how much is earned from each revenue source used on your YouTube channel.
- Transaction Revenue; The transaction revenue metric is a breakdown of how much a creator has earned from membership and merch.
- Top Earnings; It shows the data of the video with the highest estimated revenue.
- Ad Type; This displays the percentage of revenue earned from the different types of ads.
Part 2: How your YouTube earnings are calculated
Having known how to check YouTube income, if you’re still wondering how your earnings are calculated, here, we’ve discussed all the necessary information you need to know about how YouTube earnings are calculated.
YouTube earnings are calculated based on different factors. From CPC to CPM, estimated gross earnings per view, and more. Keep reading to find out more about how these factors affect your YouTube earnings;
CPM (Cost Per Mile): CPM is the amount an advertiser pays for every one thousand views of their ads. This means if an advertiser is paying you $10CPM, you’ll earn $10 on every 1000 views of their ads.
CPC (Cost Per Click): Most people think CPC is the same as CPM, but no they are not. Cost Per Click is the amount an advertiser pays for every viewer that clicks on their ads. If an advertiser is willing to pay $10, then you’ll earn $10 on every ad click.
Estimated Gross Earning Per Subscriber: You’ll notice whenever you watch a YouTube video, the creator always emphasizes you click the Subscribe button to get a notification on every new video he/she uploads. Well, they do this because the more subscribers they get, the more likely their videos appear in search results.
Also, if you have a huge Subscriber base, your videos tend to get more views, thereby increasing ad views, ad clicks, and your earnings.
All the factors explained above will determine how your YouTube earnings are calculated. However, keep in mind that you’ll receive only 55% of the total dollar advertisers pays while YouTube keeps the remaining 45%. If you get an average of $5 from an advertiser on every 1000 ad view, you’ll earn $5 x 55% which is approximately $2.75.
You can also calculate your YouTube channel total earnings by using the YouTube calculator .

Part 3: How do you increase your YouTube earnings?
1. Post quality videos
If your video is of low quality, then viewers might not find it interesting. For this reason, it’s important you post quality videos, and you need the Wondershare Filmora software for such an operation.
Filmora is one of the best video editing software that is trusted by millions of users globally because of its high efficiency. It supports lots of advanced tools that anyone can utilize to edit and spice up their videos. From adding transitions to applying effects, and more. It even offers a high-quality built-in preset that users can utilize for free to give their video the best quality they can ever think of.
Free Download For Win 7 or later(64-bit)
Free Download For macOS 10.14 or later
Step1 Install Filmora software on your computer.
Step2 Use the Import button to upload the video you created for your YouTube channel. You can also drag-n-drop it to the interface of the software.
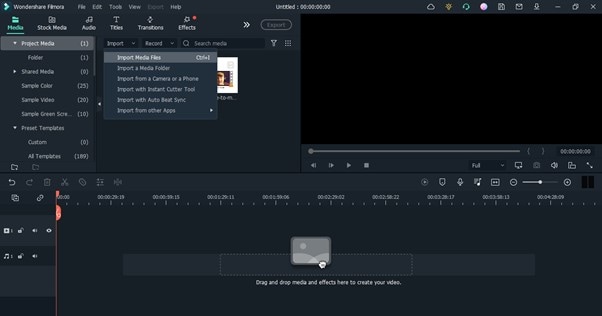
Step3 Drag-n-drop the video you uploaded to the Timeline.

Step4 To remove unwanted background from your video, click Effects from the top side of the screen. Select AI Portrait from the left side of the screen and select a preferred AI Portrait effect that you’ll like to use in the video.

Step5 Next, drag-n-dop the chosen AI Portrait effect to the timeline. After that, adjust the AI Portrait effect from the timeline. You can also add multiple effects by dragging and dropping them to the timeline.
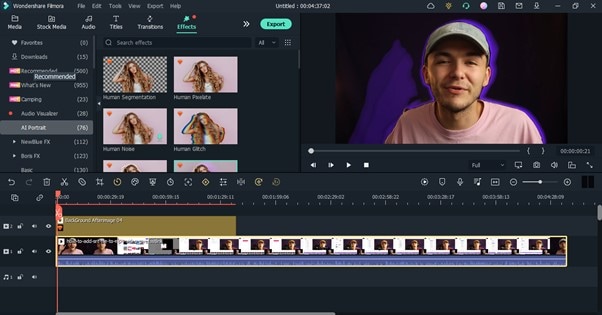
Step6 Double-click the AI Portrait effect from the Timeline. From the pop-up that appears, adjust the settings according to your requirements.

Step7 You can add Subscribe watermark by clicking the >> icon at the top of the screen, then select Element.

Choose the ‘Social Media Show Element 07’ Effects. Drag-n-drop the selected effect to the Timeline.

Step8 Preview the edited video. If you’re satisfied with the output, click the Export button at the top bar and choose Burn DVD from the drop-down list.

Step9 Enter file name in the box next to Label. Then, navigate to Folder Path and choose where you want the file to be saved. Afterward, click Export to Finish.

2. Upload videos regularly
Starting a YouTube channel can be quite hard from start, but make it a priority to upload at least two quality videos every week. Yes, the more quality videos you post, the more you attract the viewer to like your videos, and the higher your chances of getting new subscribers, thereby increasing your YouTube earnings.
3. Promote your Videos
Promoting your YouTube videos is a great way to increase your YouTube earnings. Once you post a new video on YouTube, you can share it to your other social media profiles or websites to increase views and attract new folks to watch the video. The more views you get the more money you’ll make.
Part 4: Hot FAQs on YouTube channel earnings check
Let’s take a look at some frequently asked questions from users like you.
1. Is monetizing on YouTube different from Google AdSense?
YouTube monetization involves making money from videos you upload on your YouTube channel. And Google AdSense is a means of monetizing your YouTube channel.
2. Why should you consider monetizing on YouTube creator?
Monetizing YouTube as a creator is a great way to earn passive income just by uploading videos. Research shows that an average YouTuber has the potential of earning $10,000 in revenue per year.
3. Which category is best for YouTube earnings?
The average CPM you earn from videos you upload on YouTube all depends on the niche of your video. The following are the best 5 categories best for YouTube earnings in 2022;
Make Money Online - $13.52
Social Media Marketing - $12.41
Finance & Investing - $12.25
Educational Videos - $9.89
Photography & Film Making - $7.31
Final Words
Checking YouTube income is not a big deal. This article has covered every necessary detail you need to know about checking your YouTube income on a PC or mobile phone. Also, if you don’t understand how YouTube earnings are calculated, we touched on that, and don’t hesitate to employ the tips discussed to increase your YouTube earnings.
Free Download For Win 7 or later(64-bit)
Free Download For macOS 10.14 or later
Part 1: Follow the steps below to check your YouTube earnings
The process of checking YouTube income is pretty straightforward. So, regardless of what device you’re using to check, we’ve briefly explained the step-by-step instructions to carry out your YouTube income check within a few clicks.
Check on a computer
To check YouTube income on your PC or Mac, you just have to do the following;
Step1 Open the browser app on your computer and sign in to your YouTube Studio .
Step2 Click Analytics from the left side of the screen.
Step3 On the Analytics screen, select Revenue from the top side of the screen to check your YouTube income.
There, you’ll find your YouTube income and other necessary data that you might need.
Check on a Mobile Device
The process of checking YouTube income on an Android or iOS device is also straightforward, and you can use either the YouTube app or the YouTube Studio app to perform the operation. The steps below explain the procedure;
YouTube App
Step1 Make sure you have the latest version of the YouTube app on your phone. If not, you can install it from Google Play Store or App Store.
Step2 Log in to your YouTube account and tap on the Profile icon at the top side. Then, select Your Channel.
Step3 Tap the Analytics icon from the middle menu. Your YouTube channel income and other data will be displayed on your phone screen.
YouTube Studio App
Step1 Launch the YouTube Studio app on your Android or iPhone.
Step2 Tap Analytics from the bottom menu and select Revenue from the top of the screen.
The information that you’ll find in the YouTube revenue analytics includes the following;
- RPM (Revenue Per Mile); This is the metric that displays how much a creator has earned per 1000 video views.
- Playback-based CPM; This shows the average gross revenue per 1000 playbacks where an AD or more is displayed.
- Monthly Estimated Revenue; This report shows how much a YouTuber has earned from his/her channel in the last six months.
- Revenue Sources: Just as the name suggests, this shows you the data of how much is earned from each revenue source used on your YouTube channel.
- Transaction Revenue; The transaction revenue metric is a breakdown of how much a creator has earned from membership and merch.
- Top Earnings; It shows the data of the video with the highest estimated revenue.
- Ad Type; This displays the percentage of revenue earned from the different types of ads.
Part 2: How your YouTube earnings are calculated
Having known how to check YouTube income, if you’re still wondering how your earnings are calculated, here, we’ve discussed all the necessary information you need to know about how YouTube earnings are calculated.
YouTube earnings are calculated based on different factors. From CPC to CPM, estimated gross earnings per view, and more. Keep reading to find out more about how these factors affect your YouTube earnings;
CPM (Cost Per Mile): CPM is the amount an advertiser pays for every one thousand views of their ads. This means if an advertiser is paying you $10CPM, you’ll earn $10 on every 1000 views of their ads.
CPC (Cost Per Click): Most people think CPC is the same as CPM, but no they are not. Cost Per Click is the amount an advertiser pays for every viewer that clicks on their ads. If an advertiser is willing to pay $10, then you’ll earn $10 on every ad click.
Estimated Gross Earning Per Subscriber: You’ll notice whenever you watch a YouTube video, the creator always emphasizes you click the Subscribe button to get a notification on every new video he/she uploads. Well, they do this because the more subscribers they get, the more likely their videos appear in search results.
Also, if you have a huge Subscriber base, your videos tend to get more views, thereby increasing ad views, ad clicks, and your earnings.
All the factors explained above will determine how your YouTube earnings are calculated. However, keep in mind that you’ll receive only 55% of the total dollar advertisers pays while YouTube keeps the remaining 45%. If you get an average of $5 from an advertiser on every 1000 ad view, you’ll earn $5 x 55% which is approximately $2.75.
You can also calculate your YouTube channel total earnings by using the YouTube calculator .
Part 3: How do you increase your YouTube earnings?
1. Post quality videos
If your video is of low quality, then viewers might not find it interesting. For this reason, it’s important you post quality videos, and you need the Wondershare Filmora software for such an operation.
Filmora is one of the best video editing software that is trusted by millions of users globally because of its high efficiency. It supports lots of advanced tools that anyone can utilize to edit and spice up their videos. From adding transitions to applying effects, and more. It even offers a high-quality built-in preset that users can utilize for free to give their video the best quality they can ever think of.
Free Download For Win 7 or later(64-bit)
Free Download For macOS 10.14 or later
Step1 Install Filmora software on your computer.
Step2 Use the Import button to upload the video you created for your YouTube channel. You can also drag-n-drop it to the interface of the software.
Step3 Drag-n-drop the video you uploaded to the Timeline.
Step4 To remove unwanted background from your video, click Effects from the top side of the screen. Select AI Portrait from the left side of the screen and select a preferred AI Portrait effect that you’ll like to use in the video.
Step5 Next, drag-n-dop the chosen AI Portrait effect to the timeline. After that, adjust the AI Portrait effect from the timeline. You can also add multiple effects by dragging and dropping them to the timeline.
Step6 Double-click the AI Portrait effect from the Timeline. From the pop-up that appears, adjust the settings according to your requirements.
Step7 You can add Subscribe watermark by clicking the >> icon at the top of the screen, then select Element.
Choose the ‘Social Media Show Element 07’ Effects. Drag-n-drop the selected effect to the Timeline.
Step8 Preview the edited video. If you’re satisfied with the output, click the Export button at the top bar and choose Burn DVD from the drop-down list.
Step9 Enter file name in the box next to Label. Then, navigate to Folder Path and choose where you want the file to be saved. Afterward, click Export to Finish.
2. Upload videos regularly
Starting a YouTube channel can be quite hard from start, but make it a priority to upload at least two quality videos every week. Yes, the more quality videos you post, the more you attract the viewer to like your videos, and the higher your chances of getting new subscribers, thereby increasing your YouTube earnings.
3. Promote your Videos
Promoting your YouTube videos is a great way to increase your YouTube earnings. Once you post a new video on YouTube, you can share it to your other social media profiles or websites to increase views and attract new folks to watch the video. The more views you get the more money you’ll make.
Part 4: Hot FAQs on YouTube channel earnings check
Let’s take a look at some frequently asked questions from users like you.
1. Is monetizing on YouTube different from Google AdSense?
YouTube monetization involves making money from videos you upload on your YouTube channel. And Google AdSense is a means of monetizing your YouTube channel.
2. Why should you consider monetizing on YouTube creator?
Monetizing YouTube as a creator is a great way to earn passive income just by uploading videos. Research shows that an average YouTuber has the potential of earning $10,000 in revenue per year.
3. Which category is best for YouTube earnings?
The average CPM you earn from videos you upload on YouTube all depends on the niche of your video. The following are the best 5 categories best for YouTube earnings in 2022;
Make Money Online - $13.52
Social Media Marketing - $12.41
Finance & Investing - $12.25
Educational Videos - $9.89
Photography & Film Making - $7.31
Final Words
Checking YouTube income is not a big deal. This article has covered every necessary detail you need to know about checking your YouTube income on a PC or mobile phone. Also, if you don’t understand how YouTube earnings are calculated, we touched on that, and don’t hesitate to employ the tips discussed to increase your YouTube earnings.
Free Download For Win 7 or later(64-bit)
Free Download For macOS 10.14 or later
Crafting Timeless Videos with Retro Filmmaking Skills
How to Create Vintage Videos: A Comprehensive Tutorial

Richard Bennett
Mar 27, 2024• Proven solutions
“Every accomplishment starts with a decision to try.” – A Vintage Thought

Vintage videos are ultimately the retro videos you have ever imagined. The look is highly inspirational in itself. The vintage effect in photography and videos results in a must-see look that everyone wants to capture all day long. The meaning of vintage is ‘the time when something of quality was produced.’ When something is called retro, it means old, recognized, and essential. Vintage also resembles love apart from videos and photos. All in all, it’s a positive and result-oriented thing to carry on in your videos. And this is what we want to mention in this post relating to the creation of vintage videos.
Here are some vintage-style video ideas for you to have a look at.
- Part 1: What to Consider When Shooting a Vintage Video?
- Part 2: How to Create a Stunning Vintage Video?
- Part 3: Tips to Make Your Vintage Videos Stand Out
What to Consider When Shooting a Vintage Video?
Vintage videos are kind of old school vibes and must be shooting accordingly by keeping in mind the following points. These are a sort of expert tips given by photographers based on their practical experience. First of all, you have to understand that a video can be made vintage, but you can’t change the actual environment of shooting. Some editing always involves there in every project out there. Still, the tips given below will help you a lot in creating a retro look.
Use Vintage Lenses
The very first helpful tip is to use a vintage lens. They allow chromatic aberration by distorting colors around the frame. Furthermore, you can find various kinds of lenses in terms of a vintage effect.
Decrease Contrast
Do the correct color grading by reducing the contrast a little bit. You must not level the retro videos in black or white or like-new videos. You can simply add a contrasting effect and then reduce it to have that vintage look.
Keep it a little soft
If you have ever noticed, the vintage videos are a little soft and look like degraded with time. It’s a result of decreased sharpness in the camera’s menu settings. You can even add a slight blur to the final video or simply use recognized software made for video editing .
Brighten up the black levels
Lots of black points in the video are not ideal for a vintage effect. The suitable approach is to bring up black levels and make it dark gray instead of inky black. This look can be achieved either by levels effect or curves effect in your editing software.
Reduce Saturation levels
Bringing down the saturation levels is another tip to create a vintage effect. The old videos are also absent in bright colors. Don’t go too crazy about reduction as 20%-30% saturation level is more than enough.
How to Create a Stunning Vintage Video?
What you need to get started as both beginner and professional is Wondershare Filmora Video Editor. It is a highly recommended software to create vintage videos. The intuitive user interface and lots of editing functions are helpful for a video editor. It has both primary as well as advanced editing programs to check. It has various advanced color tuning tools to promote the making of original videos. It features tint, temperature, Vignette, 3D Luts, Lights, and so on.


Steps for the vintage effect to videos on Wondershare Filmora Video Editor
Step 1: Upload video & make specific changes

The very step is to add the video by clicking the + icon. We have added the three sample videos from the library of Wondershare Filmora itself. Adjust them in the timeline as per your requirements.
After doing all the essential editing functions, click on the Effects tab given at the upper-left corner. Simply type the word Old in the Search tab.
The Old Video filter will immediately appear in the list of filters. Tap the “+” icon in Old Video filter to add to the timeline. Drag its ends right or left to adjust the duration.
Step 2: Apply White & Black Filters

The second step is to apply the Black & White filters. Go to the Effects tab and explore five Black & White filters available. Each of these filters is quite different and must be applied accordingly. Check the aesthetic of your video clip before any filter application to retro videos.
Step 3: Add the Sun Kissed or Sepia Tone Rise Filters to the video clip

There are various other categories of filters you can apply, such as Retro, Sun Kissed, and Sepia Tone, etc. The features of Filmora also present several subcategories such as Faux Film or Shake.

On the other hand, the subcategory of Sepia Tone features Sun-Kissed & Rise Filters to stimulate sepia-tinted texture and recreate the old visual style. The Sun Kissed filter presents brown and red colors to give that warm image atmosphere.
Step 4: Desaturate Video Clip

Now, you need to desaturate the video clip with Ash & Willow filters. We have typed Ash in the Search bar, and you can see the filter below. These filters are essential to desaturate the video with preset contrast, brightness, or exposure values.

Then, we have combined the black & white filter with an overlay of Film Reel Horizontal. It will help you sell the effect and make the video look more authentic. However, the only application of Black & White or Ash & Willow filters is not going to make any creative thing in terms of vintage videos. You have to mix overlays with features such as Random Dust or Film Reel Horizontal.
Step 5: Apply Black & White and Old Film Color Correction Presets to the video
You can also access the Advanced color correction Tab of Filmora from the Color button. It also features Preset and Adjusts Tabs to desaturate footage. The Preset presents a variety of options, including Black & White and Old Film. You just need to right-click the particular preset and select the Apply option.

Tips to Make Your Vintage Videos Stand Out
Following the helpful tips would assist you in creating awesome retro videos.
- You can use various vintage apps such as Retro VHS, RTRO Camera, 8mm, Camcorder, VSCO, etc. Or, despite using these limited apps, you can directly use our preferred video editing software called Wondershare Filmora.
- If you use a specific vintage camera, keep it on low highlights and low contrasts. Use color grading, as we have discussed above. They help to provide the ultimate old-school effect.
- Always keep low saturation settings for shooting vintage videos. Take control over Saturation, Hue, and Luminance of video.
- Add overlays and respective filters to recreate a required vintage look. You must add things that dust, scratch, and grain the heck out from the video that you have created.
- Lower the frame rate or FPS to create an excellent vintage look. You can make it to 18 or 14 FPS depending upon the aesthetic requirements.
- Keep an eye on black and white filters you have used. It’s because more of a black and white can ruin the actual vintage experience.
Conclusion
So, this is an ultimate tutorial on the creation of vintage videos. We Hope you have admired the steps and our recommended video editing software. Vintage means grand, and thus you should make it amazing as well. It is the reason we have stated all facts regarding the vintage effect in our post above. Wondering how to add such effect in FCPX? check this article:How to Create a Vignette in Final Cut Pro X?
Surely give a read and thank us later!
Richard Bennett
Richard Bennett is a writer and a lover of all things video.
Follow @Richard Bennett
Richard Bennett
Mar 27, 2024• Proven solutions
“Every accomplishment starts with a decision to try.” – A Vintage Thought
Vintage videos are ultimately the retro videos you have ever imagined. The look is highly inspirational in itself. The vintage effect in photography and videos results in a must-see look that everyone wants to capture all day long. The meaning of vintage is ‘the time when something of quality was produced.’ When something is called retro, it means old, recognized, and essential. Vintage also resembles love apart from videos and photos. All in all, it’s a positive and result-oriented thing to carry on in your videos. And this is what we want to mention in this post relating to the creation of vintage videos.
Here are some vintage-style video ideas for you to have a look at.
- Part 1: What to Consider When Shooting a Vintage Video?
- Part 2: How to Create a Stunning Vintage Video?
- Part 3: Tips to Make Your Vintage Videos Stand Out
What to Consider When Shooting a Vintage Video?
Vintage videos are kind of old school vibes and must be shooting accordingly by keeping in mind the following points. These are a sort of expert tips given by photographers based on their practical experience. First of all, you have to understand that a video can be made vintage, but you can’t change the actual environment of shooting. Some editing always involves there in every project out there. Still, the tips given below will help you a lot in creating a retro look.
Use Vintage Lenses
The very first helpful tip is to use a vintage lens. They allow chromatic aberration by distorting colors around the frame. Furthermore, you can find various kinds of lenses in terms of a vintage effect.
Decrease Contrast
Do the correct color grading by reducing the contrast a little bit. You must not level the retro videos in black or white or like-new videos. You can simply add a contrasting effect and then reduce it to have that vintage look.
Keep it a little soft
If you have ever noticed, the vintage videos are a little soft and look like degraded with time. It’s a result of decreased sharpness in the camera’s menu settings. You can even add a slight blur to the final video or simply use recognized software made for video editing .
Brighten up the black levels
Lots of black points in the video are not ideal for a vintage effect. The suitable approach is to bring up black levels and make it dark gray instead of inky black. This look can be achieved either by levels effect or curves effect in your editing software.
Reduce Saturation levels
Bringing down the saturation levels is another tip to create a vintage effect. The old videos are also absent in bright colors. Don’t go too crazy about reduction as 20%-30% saturation level is more than enough.
How to Create a Stunning Vintage Video?
What you need to get started as both beginner and professional is Wondershare Filmora Video Editor. It is a highly recommended software to create vintage videos. The intuitive user interface and lots of editing functions are helpful for a video editor. It has both primary as well as advanced editing programs to check. It has various advanced color tuning tools to promote the making of original videos. It features tint, temperature, Vignette, 3D Luts, Lights, and so on.
Steps for the vintage effect to videos on Wondershare Filmora Video Editor
Step 1: Upload video & make specific changes
The very step is to add the video by clicking the + icon. We have added the three sample videos from the library of Wondershare Filmora itself. Adjust them in the timeline as per your requirements.
After doing all the essential editing functions, click on the Effects tab given at the upper-left corner. Simply type the word Old in the Search tab.
The Old Video filter will immediately appear in the list of filters. Tap the “+” icon in Old Video filter to add to the timeline. Drag its ends right or left to adjust the duration.
Step 2: Apply White & Black Filters
The second step is to apply the Black & White filters. Go to the Effects tab and explore five Black & White filters available. Each of these filters is quite different and must be applied accordingly. Check the aesthetic of your video clip before any filter application to retro videos.
Step 3: Add the Sun Kissed or Sepia Tone Rise Filters to the video clip
There are various other categories of filters you can apply, such as Retro, Sun Kissed, and Sepia Tone, etc. The features of Filmora also present several subcategories such as Faux Film or Shake.
On the other hand, the subcategory of Sepia Tone features Sun-Kissed & Rise Filters to stimulate sepia-tinted texture and recreate the old visual style. The Sun Kissed filter presents brown and red colors to give that warm image atmosphere.
Step 4: Desaturate Video Clip
Now, you need to desaturate the video clip with Ash & Willow filters. We have typed Ash in the Search bar, and you can see the filter below. These filters are essential to desaturate the video with preset contrast, brightness, or exposure values.
Then, we have combined the black & white filter with an overlay of Film Reel Horizontal. It will help you sell the effect and make the video look more authentic. However, the only application of Black & White or Ash & Willow filters is not going to make any creative thing in terms of vintage videos. You have to mix overlays with features such as Random Dust or Film Reel Horizontal.
Step 5: Apply Black & White and Old Film Color Correction Presets to the video
You can also access the Advanced color correction Tab of Filmora from the Color button. It also features Preset and Adjusts Tabs to desaturate footage. The Preset presents a variety of options, including Black & White and Old Film. You just need to right-click the particular preset and select the Apply option.
Tips to Make Your Vintage Videos Stand Out
Following the helpful tips would assist you in creating awesome retro videos.
- You can use various vintage apps such as Retro VHS, RTRO Camera, 8mm, Camcorder, VSCO, etc. Or, despite using these limited apps, you can directly use our preferred video editing software called Wondershare Filmora.
- If you use a specific vintage camera, keep it on low highlights and low contrasts. Use color grading, as we have discussed above. They help to provide the ultimate old-school effect.
- Always keep low saturation settings for shooting vintage videos. Take control over Saturation, Hue, and Luminance of video.
- Add overlays and respective filters to recreate a required vintage look. You must add things that dust, scratch, and grain the heck out from the video that you have created.
- Lower the frame rate or FPS to create an excellent vintage look. You can make it to 18 or 14 FPS depending upon the aesthetic requirements.
- Keep an eye on black and white filters you have used. It’s because more of a black and white can ruin the actual vintage experience.
Conclusion
So, this is an ultimate tutorial on the creation of vintage videos. We Hope you have admired the steps and our recommended video editing software. Vintage means grand, and thus you should make it amazing as well. It is the reason we have stated all facts regarding the vintage effect in our post above. Wondering how to add such effect in FCPX? check this article:How to Create a Vignette in Final Cut Pro X?
Surely give a read and thank us later!
Richard Bennett
Richard Bennett is a writer and a lover of all things video.
Follow @Richard Bennett
Also read:
- [New] Decoding YouTube's Legal Framework for Video Creators for 2024
- [New] Expert 6 Tech for Cross-Lingual Content Shift
- [Updated] Glacial Glory Spectacous Moments From 2022'S Olympic Snowboard Races
- [Updated] Photo Frenzy Stories of Popularity for 2024
- 2024 Approved 10 Best Sites to Download Free Slideshow Templates - Filmora
- 2024 Approved Beginner's Guide Adding Text Overlays on YouTube
- Accelerate Audience Engagement with High-Impact Hash Tags
- Acquire Unlimited Stock Images via Top 4 YouTube Sources
- Elevate Your Channels - Templates at No Charge!
- In 2024, Essential Tips for FLV File Fusion on YouTube
- In 2024, Maximizing Movie File Saving 6 Methods for Win 11
- ScreenCapture Pro Latest 2023 Edition Review
- Skyrocket Viewer Count Efficient Templated Content Creation in YouTube Descs
- Solo Shots Showmanship Elevate Your YouTube Persona
- Step-by-Step Strategy for Unearthing Secret YouTube Videos
- Title: Achieve Financial Insight The Simple Three Steps To Assess YouTube Earning Potential for 2024
- Author: Brian
- Created at : 2024-12-21 08:51:11
- Updated at : 2024-12-24 19:07:36
- Link: https://youtube-video-recordings.techidaily.com/achieve-financial-insight-the-simple-three-steps-to-assess-youtube-earning-potential-for-2024/
- License: This work is licensed under CC BY-NC-SA 4.0.