
Accelerated Learning for Chromakey Artistry
Accelerated Learning for Chromakey Artistry
The world of video-making owes much of its magic to small leaps of innovation. One of these leaps is the use of the chroma key background, which most people know by the more colloquial term—green screen.

Chroma key, also known as green screen or blue screen, is a cool hack for seamless visual storytelling, allowing content creators to replace backgrounds with any image or video they want. This technique is widely embraced in film, television, and online content, and has opened the door to limitless creative possibilities. Aside from its ability to maximize creativity, it is also cheap to employ and convenient to set up, which has made it a staple for everyone who works with visuals.
In this simple guide, we’ll delve into the fundamentals of the chroma key effect, how it is used for video making, and how to leverage that as you perfect your visual content.
YouTube Video Background Creating realistic video scenes at your will is easy to complete with Filmora green screen removal.
Create Video Backgrounds Create Video Backgrounds Learn Green Screen

How Does Chroma Key Work?

Chroma Keying is done by singling out a specific color (usually green or blue) from the foreground, removing it, and replacing it with a different background (for example, a sunset). This process typically follows a series of steps:
- Background Selection:
A solid, single-color background, often green or blue, that contrasts well with the subject must be used. The color chosen should not be present in the subject or any props in the camera field to avoid unintentional transparency.
- Color Keying:
This requires the use of specialized visual effects software to key out the chosen color. The green or blue background is designated as transparent, making everything of that color see-through. The software distinguishes between the keyed color and the subject, creating a mask for the transparent areas.
- Foreground Filming:
This involves filming the subject against the live chroma key background. During filming, the chosen background color (green or blue) won’t appear in the final result due to its transparency. The subject is captured as if separately from the isolated background.
- Post-Processing:
In post-production processing, the editor takes the keyed-out color and replaces it with the new background of their choice. This step creates the illusion that the subject is in a different setting or environment. The transparent areas become filled with the chosen background which, if done right, results in a cohesive and visually appealing composition.
Why Green?
Theoretically, the chroma key background can be any solid color. However, the most commonly used colors are studio blue and bright green, with the latter far more common.
The choice of background color depends on the specific requirements of the production and the colors present in the scenes being filmed.
Free Download For Win 7 or later(64-bit)
Free Download For macOS 10.14 or later
Contrast
The less similar your chosen background color is to natural skin tones, the easier to isolate and replace in your footage. Bright green provides a strong contrast to most human skin tones and is less likely to be present in costumes or natural surroundings, making it easier to isolate subjects during the color separation.
Luminance
The color green emits light with greater intensity than blue, allowing for far more effective isolation by cameras during filming. This also means that blue screens demand increased lighting for proper exposure compared to green. This situation may be less than ideal if you lack powerful lighting or you don’t have the big bucks for them.
Digital Sensors
Many digital cameras and sensors are more sensitive to green wavelengths, resulting in cleaner and more accurate color keying during post-processing. Modern technology has also evolved to optimize for a green background, making it a more practical choice for the chroma key effect.
Wardrobe and Set Design
Bright green occurs less naturally in costumes and set designs than other colors, making green the optimal choice for reducing the likelihood of color spill and keying issues. However, if you know your scene will have lots of green, it is probably best to film with a blue screen, so there’s less risk of color spill and less post-production work.
Setting up Your Own Chroma Key Studio
Setting up your chroma key is convenient and straightforward, but there are some key factors to consider while setting up to ensure maximal performance.
Choosing the Right Background Color
The first step in the chroma key setup is selecting the right background color to be keyed out. This choice determines your effective color separation and ensures a smooth keying process during editing. Choosing a chroma-key background color that contrasts distinctly with the subject’s colors is essential for effective color separation. This prevents unintentional transparency, color spill, and ensures a polished final result.
Lighting Considerations
Lighting is an important part of the chroma-keying process. Bold, uniform, and consistent lighting on both the subject and the background makes it easy to delineate one from the other fully. This minimizes shadows and variations in color, creating a smooth and seamless keying process. Multiple diffuse lights from different angles are often used to illuminate the green screen evenly.
Positioning/Camera
Proper subject and camera placement are necessary to ensure an even color-keying process during post-production. To prevent shadow interference, the green screen should be smooth, tense, and without wrinkles or shadows.
High-quality cameras are essential every time, especially for chroma keying. Images with better definition are easier to key, so camera quality significantly affects the outcome. Even if your camera isn’t the best, merely shooting well can ensure a clean color-keying process during editing, resulting in professional-looking visuals.
Recording Tips for Chroma Key
- Proper Lighting
Maintaining uniform and well-defined lighting during recording is essential for a successful chroma-keying process. This consistency ensures a seamless keying process during post-production.
- Keep Distance from the Green Screen
The optimal distance between the subject and the green screen minimizes color spill and allows for natural movements. Proper distance between subject and background allows for easier isolation of the background and much smoother post-editing. A recommended starting point for the issue is around 6 to 10 feet from the background.
- Subjects and Clothing
As mentioned before, the choice of costume for Selecting appropriate clothing that doesn’t match the chroma key color prevents transparency issues. Subjects also have to be positioned in such a way that there is minimal light interference and reflection. These contribute to a flawless chroma key outcome.
3 Basic Troubleshooting Strategies
- Color Spill
Sometimes, reflected light from your green background can be cast on your subject and may remain so when the background light is keyed out. This phenomenon is known as a color spill. It is usually because of uneven lighting or shooting around reflecting surfaces. Avoiding spill can differentiate between good and lousy chroma key aftereffects.
Human hair is one area where color spill can show up unsuspectingly. Due to the translucency of hair, it is common for some unintended light to seep through. This allows some background visibility, which you do not want with a chroma key. This is especially notable with lighter hair colors like blond hair.
There are ways to account for this. Many video-editing software have features such as spill suppression and screen matte adjustments that can enhance the final footage. Specialized plugins also go a long way in ensuring minimizing spill. Addressing spill correction tackles unwanted green artifacts and ensures a clean keying process.
- Poor Lighting
Suboptimal green screen lighting can lead to inconsistencies in keying and editing, undermining your product. One way to avoid this is to light the screen and subject separately. Another tip, although expensive, is using multiple diffuse light sources and trying to maintain even lighting across every square foot of your scene. Super bright or dark spots can ruin your output, so it’s worth the extra effort if you don’t want to deal with problematic post-production.
- Poorly Refined Edges
Chroma keying should leave your videos with crisp, defined, natural-looking edges. But post-production editing can make all the difference if it doesn’t come out to your taste. Softening and refining edges make a smoother transition between the foreground object and the new background. Light adjustments to edge thickness and screen matte settings can also help enhance overall visual quality and add finesse to your work.
Conclusion
Green screen photography produces excellent results, and its ease of use makes it indispensable for videographers of all levels. In this guide, we’ve discussed chroma key technology, its role in the industry, and how to apply it to your craft to elevate visual content.
Chroma key, also known as green screen or blue screen, is a cool hack for seamless visual storytelling, allowing content creators to replace backgrounds with any image or video they want. This technique is widely embraced in film, television, and online content, and has opened the door to limitless creative possibilities. Aside from its ability to maximize creativity, it is also cheap to employ and convenient to set up, which has made it a staple for everyone who works with visuals.
In this simple guide, we’ll delve into the fundamentals of the chroma key effect, how it is used for video making, and how to leverage that as you perfect your visual content.
YouTube Video Background Creating realistic video scenes at your will is easy to complete with Filmora green screen removal.
Create Video Backgrounds Create Video Backgrounds Learn Green Screen
How Does Chroma Key Work?
Chroma Keying is done by singling out a specific color (usually green or blue) from the foreground, removing it, and replacing it with a different background (for example, a sunset). This process typically follows a series of steps:
- Background Selection:
A solid, single-color background, often green or blue, that contrasts well with the subject must be used. The color chosen should not be present in the subject or any props in the camera field to avoid unintentional transparency.
- Color Keying:
This requires the use of specialized visual effects software to key out the chosen color. The green or blue background is designated as transparent, making everything of that color see-through. The software distinguishes between the keyed color and the subject, creating a mask for the transparent areas.
- Foreground Filming:
This involves filming the subject against the live chroma key background. During filming, the chosen background color (green or blue) won’t appear in the final result due to its transparency. The subject is captured as if separately from the isolated background.
- Post-Processing:
In post-production processing, the editor takes the keyed-out color and replaces it with the new background of their choice. This step creates the illusion that the subject is in a different setting or environment. The transparent areas become filled with the chosen background which, if done right, results in a cohesive and visually appealing composition.
Why Green?
Theoretically, the chroma key background can be any solid color. However, the most commonly used colors are studio blue and bright green, with the latter far more common.
The choice of background color depends on the specific requirements of the production and the colors present in the scenes being filmed.
Free Download For Win 7 or later(64-bit)
Free Download For macOS 10.14 or later
Contrast
The less similar your chosen background color is to natural skin tones, the easier to isolate and replace in your footage. Bright green provides a strong contrast to most human skin tones and is less likely to be present in costumes or natural surroundings, making it easier to isolate subjects during the color separation.
Luminance
The color green emits light with greater intensity than blue, allowing for far more effective isolation by cameras during filming. This also means that blue screens demand increased lighting for proper exposure compared to green. This situation may be less than ideal if you lack powerful lighting or you don’t have the big bucks for them.
Digital Sensors
Many digital cameras and sensors are more sensitive to green wavelengths, resulting in cleaner and more accurate color keying during post-processing. Modern technology has also evolved to optimize for a green background, making it a more practical choice for the chroma key effect.
Wardrobe and Set Design
Bright green occurs less naturally in costumes and set designs than other colors, making green the optimal choice for reducing the likelihood of color spill and keying issues. However, if you know your scene will have lots of green, it is probably best to film with a blue screen, so there’s less risk of color spill and less post-production work.
Setting up Your Own Chroma Key Studio
Setting up your chroma key is convenient and straightforward, but there are some key factors to consider while setting up to ensure maximal performance.
Choosing the Right Background Color
The first step in the chroma key setup is selecting the right background color to be keyed out. This choice determines your effective color separation and ensures a smooth keying process during editing. Choosing a chroma-key background color that contrasts distinctly with the subject’s colors is essential for effective color separation. This prevents unintentional transparency, color spill, and ensures a polished final result.
Lighting Considerations
Lighting is an important part of the chroma-keying process. Bold, uniform, and consistent lighting on both the subject and the background makes it easy to delineate one from the other fully. This minimizes shadows and variations in color, creating a smooth and seamless keying process. Multiple diffuse lights from different angles are often used to illuminate the green screen evenly.
Positioning/Camera
Proper subject and camera placement are necessary to ensure an even color-keying process during post-production. To prevent shadow interference, the green screen should be smooth, tense, and without wrinkles or shadows.
High-quality cameras are essential every time, especially for chroma keying. Images with better definition are easier to key, so camera quality significantly affects the outcome. Even if your camera isn’t the best, merely shooting well can ensure a clean color-keying process during editing, resulting in professional-looking visuals.
Recording Tips for Chroma Key
- Proper Lighting
Maintaining uniform and well-defined lighting during recording is essential for a successful chroma-keying process. This consistency ensures a seamless keying process during post-production.
- Keep Distance from the Green Screen
The optimal distance between the subject and the green screen minimizes color spill and allows for natural movements. Proper distance between subject and background allows for easier isolation of the background and much smoother post-editing. A recommended starting point for the issue is around 6 to 10 feet from the background.
- Subjects and Clothing
As mentioned before, the choice of costume for Selecting appropriate clothing that doesn’t match the chroma key color prevents transparency issues. Subjects also have to be positioned in such a way that there is minimal light interference and reflection. These contribute to a flawless chroma key outcome.
3 Basic Troubleshooting Strategies
- Color Spill
Sometimes, reflected light from your green background can be cast on your subject and may remain so when the background light is keyed out. This phenomenon is known as a color spill. It is usually because of uneven lighting or shooting around reflecting surfaces. Avoiding spill can differentiate between good and lousy chroma key aftereffects.
Human hair is one area where color spill can show up unsuspectingly. Due to the translucency of hair, it is common for some unintended light to seep through. This allows some background visibility, which you do not want with a chroma key. This is especially notable with lighter hair colors like blond hair.
There are ways to account for this. Many video-editing software have features such as spill suppression and screen matte adjustments that can enhance the final footage. Specialized plugins also go a long way in ensuring minimizing spill. Addressing spill correction tackles unwanted green artifacts and ensures a clean keying process.
- Poor Lighting
Suboptimal green screen lighting can lead to inconsistencies in keying and editing, undermining your product. One way to avoid this is to light the screen and subject separately. Another tip, although expensive, is using multiple diffuse light sources and trying to maintain even lighting across every square foot of your scene. Super bright or dark spots can ruin your output, so it’s worth the extra effort if you don’t want to deal with problematic post-production.
- Poorly Refined Edges
Chroma keying should leave your videos with crisp, defined, natural-looking edges. But post-production editing can make all the difference if it doesn’t come out to your taste. Softening and refining edges make a smoother transition between the foreground object and the new background. Light adjustments to edge thickness and screen matte settings can also help enhance overall visual quality and add finesse to your work.
Conclusion
Green screen photography produces excellent results, and its ease of use makes it indispensable for videographers of all levels. In this guide, we’ve discussed chroma key technology, its role in the industry, and how to apply it to your craft to elevate visual content.
The Art of Profit From 20-Second Videography: A Guide for Creators
YouTube Shorts have grown in popularity since the launch of the platform in 2021. At first, they offered a way for creators to share their content in a vertical format. However, YouTube Shorts monetization is also a great way for creators to earn money. When you monetize YouTube shorts, you increase the potential of earning more income on the platform. In this article, we explore what entails monetized YouTube shorts and how to increase your YT shorts earnings.
YouTube Shorts Monetization A cross-platform offers useful features for making your YouTube videos stand out to earn more revenue!
Free Download Free Download Learn More
Part 1. YouTube Shorts Monetization: Eligibility Criteria
With short monetization options, you can monetize your short-firm content by joining the YouTube Partner Program (YPP). Being a member of this program gives you access to all tools for making money on YouTube. This includes the ability to place ads on your videos or make money directly from your audience through fan funding.
Eligibility Requirements for Monetizing Shorts
The easiest way to monetize Shorts on YouTube is to access the fan-funding program. This program gives you access to special tools that you can use to generate revenue by interacting with views. This is a great option for creators who primarily make short-form videos. The requirements for this option are as follows:
- At least 500 subscribers to your channels
- At least 3 public video uploads in the last 90 days
- At least 3,000 public watch hours in the last 365 days, or
- At least 3 million public Shorts views in the last 90 days

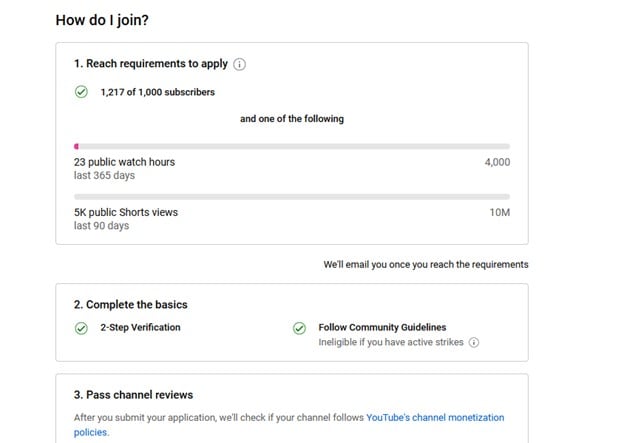
Eligibility for Monetizing Shorts and Videos
The other way you can monetize shorts is by accessing ad revenue and fan-funding. With this option, you will generate income from ads that appear between Shorts in addition to interacting with viewers. This is a great option for creators who make long and short videos. The requirements for this include:
- At least 1,000 subscribers to your channels
- At least 4,000 public watch hours in the last 365 days, or
- At least 10 million valid public Shorts views in the last 90 days
Additional Guidelines for Creators
Once you meet the eligibility criteria, you will be required to follow certain guidelines or policies to continue earning. The additional guidelines include:
- Follow YouTube’s Advertiser-Friendly Content Guidelines
- Make sure your channel does not have active Community Guidelines Strikes
- Live in a region where the program is available
- Avoid uploading another creator’s content by transforming the content or adding a new perspective to it
- Avoid using unedited clips from TV shows or movies that you don’t have rights to
- Don’t pay for fake or automated views
- Turn on 2-Step verification for your Google Account
- Have an active AdSense account
- Have access to advanced YouTube features by verifying your identity
Part 2. Monetizing YouTube Shorts: Step-by-Step Guide
Can you monetize YouTube shorts? Yes, in more than one way. The easiest is through the ad-revenue sharing model. Follow these steps to become part of the YPP and start monetizing your Shorts on YouTube:
Step 1Sign in to YouTube

Step 2Select YouTube Studio
In the top right of the YouTube page, click on your profile picture. From the pop-up menu that appears, select YouTube Studio.

Step 3In the left menu, Click on Earn

Step 4
If you are eligible for the YPP, you will see an Apply Click on it to go to the next step. If you are not yet eligible, click the Get Notified button to be notified once your channel becomes eligible. That’s when you will have the opportunity to finish the application process.
Step 5
Click Start to review and accept YouTube’s Base terms.

Step 6
Link your existing AdSense account if you have one. If not. Click Start to set up a new one.

Step 7
Wait for YouTube to review and approve your application. The process will normally take a month. Once you are approved for the YPP, go to the Earn section in YouTube Studio. Then accept the Shorts Monetization Module. This will allow you to access ads and other money-making tools on YouTube.

The instructions shared above are for applying for the YPP using a computer or desktop. You will still follow the same steps when using a mobile device, but you will do so using the YouTube Studio app.
The money-making feature monetizes Shorts in exciting ways. To start monetizing with Super Thanks fan funding, click Supers on the Earn tab in YouTube Studio. Then click Get Started, and follow the presented prompts. The same process is applicable for Channel Memberships, and other fan-funding options.
Part 3. YouTube Shorts Monetization: A Realistic Look at Earnings Potential
Monetizing YouTube Shorts has the potential to make decent earnings. Although the amount is not as much as a long-form videos, it is a great way of making money on YouTube quickly. Most YouTube Shorts creators agree that the revenue per thousand views (RPM) for short-form content is currently around $0.05 - $0.07. This means that for a million Shorts views, you will make $50 - $70.
Factors That Influence Earnings
The amount of money you make on YouTube Shorts is not fixed. It will depend on several factors, including the revenue channel and your interactions with viewers
- Ad revenue: A higher view count on Shorts increases ad revenue from the ads that are between Shorts on the platform.
- Viewer engagement: Viewer engagement brings in additional revenue through features like Super Thanks.
- Number of monetized Shorts: Monetizing most of your short-form videos will increase the revenue generated.
- Shopping Revenue: How well you promote your products and the set price point of the products will determine the shopping revenue generated.
Examples of Creators Who Have Earned from Shorts
The revenue-sharing program is the easiest way for creators to earn money on YouTube. Since monetizing their Shorts, these creators earned some decent bonus amounts:
- Hassan Khadair (2.1 million subscribers) - Earned $872.14 in ads from 22 million Shorts views
- Riley Lemon (84,000 subscribers) - Earned $76.23 in ads from 1.9 million Shorts views
- James Seo (573,000 subscribers) - Earned $445.09 in ads from 10.3 million Shorts views
- Matthew King (212,000 subscribers) - Earned $163.73 in ads from 4.2 million Shorts views
Part 4. Editing YouTube Shorts with WonderShare to Boost Revenue Potential
The best way to reap big from Shorts YouTube monetization is to make quality videos that will go viral easily. Videos that generate more views will earn you more revenue and increase the number of subscribers within a short time. With Wondershare Filmora, making such videos is easy. The video editing software offers useful features for making your videos stand out. From jaw-dropping sports videos to cinema-like production, the choice of options is endless.
Free Download For Win 7 or later(64-bit)
Free Download For macOS 10.14 or later
The choice of Filmora features you use on your editing projects will depend on your goals. Here are a few favorites to get you started:
1. Auto Reframe
Before uploading a short-form video on YouTube, you want to make sure it is of the right resolution. The Auto Reframe feature on Filmora allows you to instantly resize your videos while keeping all the important details. You only need to record one video for all platforms, and edit to fit with auto reframe.
2. Text to Speech
Narration is an important aspect of YouTube Shorts. You can tell what is happening in the clip in the simplest way for your audience to understand. The Text to Speech (TTS) feature on Filmora allows you to convert your text files to voice-over. This makes your Shorts video more entertaining and enriched with more elements.
3. AI Portrait
Just like other vertical social media videos, Shorts require some bit of personalization. You may want to add a bit of elements or filters. The AI Portrait feature automatically removes background with high accuracy to further enhance your videos. It also comes with over 70 portrait and sticker effects to bring out the mood you are going after. Automatically recognize the faces of your subjects and add AR stickers on the go.
Conclusion
YouTube Shorts have become immensely popular. They tend to have a higher ROI and receive more engagement compared to long-form video content. This makes vertical short-form videos more important and lucrative for content creators. When it comes to YouTube short video monetization, posting quality videos is the key ingredient. We recommend using Wondershare FIlmora to edit your videos. This will make sure they are more entertaining and keep more people engaged.
Free Download Free Download Learn More
Part 1. YouTube Shorts Monetization: Eligibility Criteria
With short monetization options, you can monetize your short-firm content by joining the YouTube Partner Program (YPP). Being a member of this program gives you access to all tools for making money on YouTube. This includes the ability to place ads on your videos or make money directly from your audience through fan funding.
Eligibility Requirements for Monetizing Shorts
The easiest way to monetize Shorts on YouTube is to access the fan-funding program. This program gives you access to special tools that you can use to generate revenue by interacting with views. This is a great option for creators who primarily make short-form videos. The requirements for this option are as follows:
- At least 500 subscribers to your channels
- At least 3 public video uploads in the last 90 days
- At least 3,000 public watch hours in the last 365 days, or
- At least 3 million public Shorts views in the last 90 days
Eligibility for Monetizing Shorts and Videos
The other way you can monetize shorts is by accessing ad revenue and fan-funding. With this option, you will generate income from ads that appear between Shorts in addition to interacting with viewers. This is a great option for creators who make long and short videos. The requirements for this include:
- At least 1,000 subscribers to your channels
- At least 4,000 public watch hours in the last 365 days, or
- At least 10 million valid public Shorts views in the last 90 days
Additional Guidelines for Creators
Once you meet the eligibility criteria, you will be required to follow certain guidelines or policies to continue earning. The additional guidelines include:
- Follow YouTube’s Advertiser-Friendly Content Guidelines
- Make sure your channel does not have active Community Guidelines Strikes
- Live in a region where the program is available
- Avoid uploading another creator’s content by transforming the content or adding a new perspective to it
- Avoid using unedited clips from TV shows or movies that you don’t have rights to
- Don’t pay for fake or automated views
- Turn on 2-Step verification for your Google Account
- Have an active AdSense account
- Have access to advanced YouTube features by verifying your identity
Part 2. Monetizing YouTube Shorts: Step-by-Step Guide
Can you monetize YouTube shorts? Yes, in more than one way. The easiest is through the ad-revenue sharing model. Follow these steps to become part of the YPP and start monetizing your Shorts on YouTube:
Step 1Sign in to YouTube
Step 2Select YouTube Studio
In the top right of the YouTube page, click on your profile picture. From the pop-up menu that appears, select YouTube Studio.
Step 3In the left menu, Click on Earn
Step 4
If you are eligible for the YPP, you will see an Apply Click on it to go to the next step. If you are not yet eligible, click the Get Notified button to be notified once your channel becomes eligible. That’s when you will have the opportunity to finish the application process.
Step 5
Click Start to review and accept YouTube’s Base terms.
Step 6
Link your existing AdSense account if you have one. If not. Click Start to set up a new one.
Step 7
Wait for YouTube to review and approve your application. The process will normally take a month. Once you are approved for the YPP, go to the Earn section in YouTube Studio. Then accept the Shorts Monetization Module. This will allow you to access ads and other money-making tools on YouTube.
The instructions shared above are for applying for the YPP using a computer or desktop. You will still follow the same steps when using a mobile device, but you will do so using the YouTube Studio app.
The money-making feature monetizes Shorts in exciting ways. To start monetizing with Super Thanks fan funding, click Supers on the Earn tab in YouTube Studio. Then click Get Started, and follow the presented prompts. The same process is applicable for Channel Memberships, and other fan-funding options.
Part 3. YouTube Shorts Monetization: A Realistic Look at Earnings Potential
Monetizing YouTube Shorts has the potential to make decent earnings. Although the amount is not as much as a long-form videos, it is a great way of making money on YouTube quickly. Most YouTube Shorts creators agree that the revenue per thousand views (RPM) for short-form content is currently around $0.05 - $0.07. This means that for a million Shorts views, you will make $50 - $70.
Factors That Influence Earnings
The amount of money you make on YouTube Shorts is not fixed. It will depend on several factors, including the revenue channel and your interactions with viewers
- Ad revenue: A higher view count on Shorts increases ad revenue from the ads that are between Shorts on the platform.
- Viewer engagement: Viewer engagement brings in additional revenue through features like Super Thanks.
- Number of monetized Shorts: Monetizing most of your short-form videos will increase the revenue generated.
- Shopping Revenue: How well you promote your products and the set price point of the products will determine the shopping revenue generated.
Examples of Creators Who Have Earned from Shorts
The revenue-sharing program is the easiest way for creators to earn money on YouTube. Since monetizing their Shorts, these creators earned some decent bonus amounts:
- Hassan Khadair (2.1 million subscribers) - Earned $872.14 in ads from 22 million Shorts views
- Riley Lemon (84,000 subscribers) - Earned $76.23 in ads from 1.9 million Shorts views
- James Seo (573,000 subscribers) - Earned $445.09 in ads from 10.3 million Shorts views
- Matthew King (212,000 subscribers) - Earned $163.73 in ads from 4.2 million Shorts views
Part 4. Editing YouTube Shorts with WonderShare to Boost Revenue Potential
The best way to reap big from Shorts YouTube monetization is to make quality videos that will go viral easily. Videos that generate more views will earn you more revenue and increase the number of subscribers within a short time. With Wondershare Filmora, making such videos is easy. The video editing software offers useful features for making your videos stand out. From jaw-dropping sports videos to cinema-like production, the choice of options is endless.
Free Download For Win 7 or later(64-bit)
Free Download For macOS 10.14 or later
The choice of Filmora features you use on your editing projects will depend on your goals. Here are a few favorites to get you started:
1. Auto Reframe
Before uploading a short-form video on YouTube, you want to make sure it is of the right resolution. The Auto Reframe feature on Filmora allows you to instantly resize your videos while keeping all the important details. You only need to record one video for all platforms, and edit to fit with auto reframe.
2. Text to Speech
Narration is an important aspect of YouTube Shorts. You can tell what is happening in the clip in the simplest way for your audience to understand. The Text to Speech (TTS) feature on Filmora allows you to convert your text files to voice-over. This makes your Shorts video more entertaining and enriched with more elements.
3. AI Portrait
Just like other vertical social media videos, Shorts require some bit of personalization. You may want to add a bit of elements or filters. The AI Portrait feature automatically removes background with high accuracy to further enhance your videos. It also comes with over 70 portrait and sticker effects to bring out the mood you are going after. Automatically recognize the faces of your subjects and add AR stickers on the go.
Conclusion
YouTube Shorts have become immensely popular. They tend to have a higher ROI and receive more engagement compared to long-form video content. This makes vertical short-form videos more important and lucrative for content creators. When it comes to YouTube short video monetization, posting quality videos is the key ingredient. We recommend using Wondershare FIlmora to edit your videos. This will make sure they are more entertaining and keep more people engaged.
Also read:
- [Updated] Skaldic Epic Odin's Final Stand
- 1. Solutions to Restart Your PC: A Comprehensive Guide - YL Computing
- 2024 Approved Enhancing YouTube Beauty Mastering Video Color Dynamics
- 9 Quick Fixes to Unfortunately TouchWiz has stopped Of Realme C67 4G | Dr.fone
- Complete Guide to Canon Scanner Driver Downloads on Windows - No Cost, Hassle-Free Process
- Discover the Future of Gaming: Streamline Your Experience with Steam and Meta Quest
- Getting the Pokemon Go GPS Signal Not Found 11 Error in Motorola Moto G13 | Dr.fone
- In 2024, How To Enable USB Debugging on a Locked Motorola Moto E13 Phone
- Installing NVMe Drivers on Windows: A Comprehensive Tutorial Guide
- Learn to Record, Save, & Share YouTube Content A Cost-Free Approach
- Steps to Sign-In with Google Meet (Laptop & Mobile) for 2024
- The Essential Guide to Professional-Level Video Editing
- YouTube Channels for Filmmakers to Learn Filmmaking Tips and Tutorials
- Title: Accelerated Learning for Chromakey Artistry
- Author: Brian
- Created at : 2024-12-20 00:43:31
- Updated at : 2024-12-25 04:38:08
- Link: https://youtube-video-recordings.techidaily.com/accelerated-learning-for-chromakey-artistry/
- License: This work is licensed under CC BY-NC-SA 4.0.