
:max_bytes(150000):strip_icc()/Nintendo-Switch-Home-5114442-25bf44243afc4997adbcbb5b7db8587e.jpg)
"A Vlogger's Dream Exploring the Best 12 Video Capture Devices"
A Vlogger’s Dream: Exploring the Best 12 Video Capture Devices
Best Cameras for Vlogging

Liza Brown
Jan 10, 2024• Proven solutions
It can be challenging to make a decision on purchasing a camera when there’s just so many on the market. Camera manufacturers are racing to update their product line with all the new camera technology advancements. To simplify your search for the ultimate vlogging camera, we’ve come up with a top twelve list.
If you’re looking for a specific type of vlogging camera, check out our other posts on vlogging cameras:
Top 11 Cheap Vlogging Cameras (2024)
7 Best DSLR Cameras For Vlogging (2024)
8 Best Mirrorless Cameras For Vlogging (2024)
12 Best Vlogging Cameras With A Flip Screen (2024)
WHAT TO LOOK FOR IN A VLOGGING CAMERA
1. Fully articulated screen (flip screen)
2. Good continual autofocus while recording video
3. Good focus priority through face recognition
4. Touch to focus
5. Good low-light performance
6. external mic jack, hot/cold shoe bracket
7. optical image stabilization
8. good battery life
Check out my full list of 10 Things To Look For In A Vlogging Camera to understand the importance of these camera features.
12 BEST VLOGGING CAMERAS (2024)
| Camera | Release Date | Camera Type | Flip Screen | Mic Port | Price | |
|---|---|---|---|---|---|---|
| CanonEOSM50 |  |
February2018 | Mirrorless | Fully Articulated | Yes | $- |
| PanasonicLumixDC-GH5S | 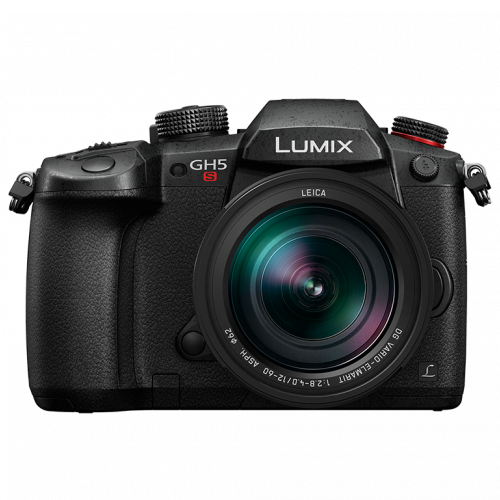 |
January2018 | Mirrorless | Fully Articulated | Yes | $$$ |
| SonyAlphaa7R III |  |
October2017 | Mirrorless | Tilting | Yes | $$$ |
| CanonEOSM100 | 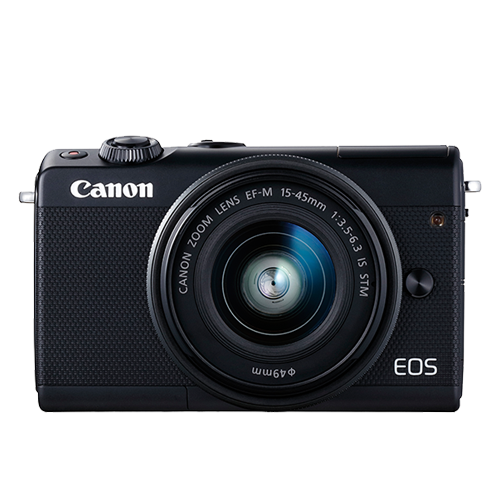 |
August2017 | Mirrorless | Flip Up | No | $ |
| CanonEOS6D Mark II | 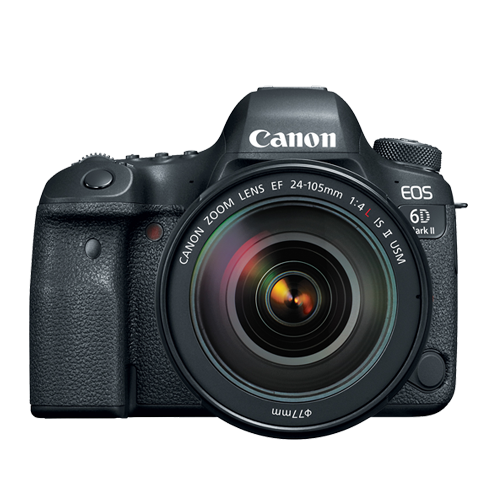 |
June2017 | Mid-size SLR | Fully Articulated | Yes | $$ |
| CanonEOS RebelSL2 | 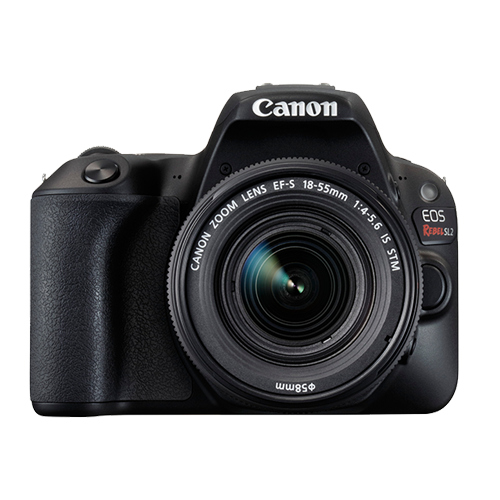 |
June2017 | Compact SLR | Fully Articulated | Yes | $ |
| CanonEOSM6 |  |
February2017 | Mirrorless | Flip Up | Yes | $ |
| SonyCyber-Shot DSCRX 100 V | 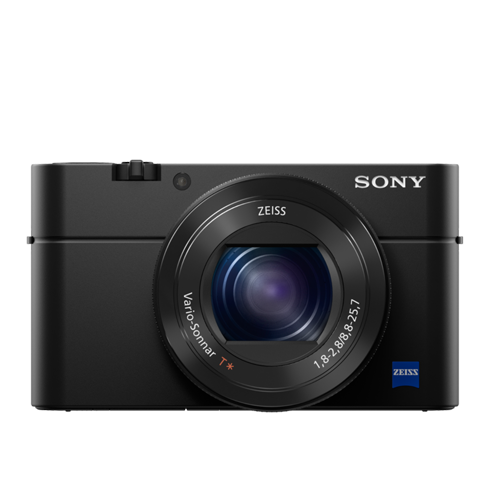 |
October2016 | Compact | Flip Up | No | $- |
| SonyAlphaa6500 |  |
October2016 | Mirrorless | Tilting | Yes | $$- |
| PanasonicLumix DMCLX10 | 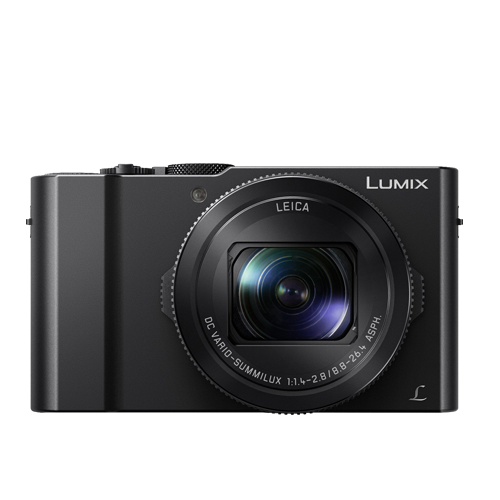 |
September2016 | Compact | Flip Up | No | $ |
| CanonEOS80D | 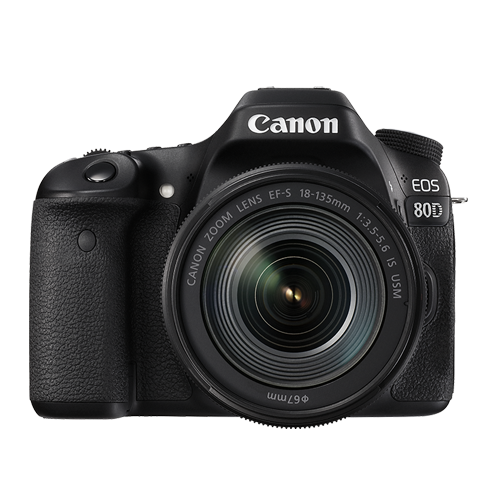 |
February2016 | Mid-size SLR | Fully Articulated | Yes | $$ |
| CanonPowerShotG7 X Mark II | 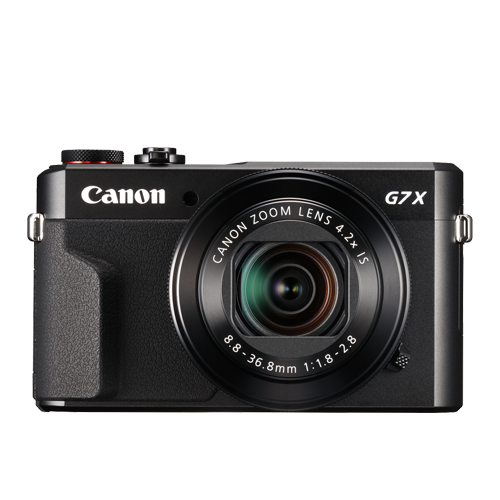 |
February2016 | Compact | Flip Up | No | $ |
At first, you can have a look at the below video.
What Gear Do Creators Actually Use | Vidcon 2023 | Sony vs Canon
|
Best daily vlogging camera: Sony Cyber-Shot DSC-RX 100 V You don’t have to be a filmmaking pro if you want to use a compact camera to record all sorts of videos. Sony’s Cyber-shot series is famous for its cutting-edge features and the DSC-RX 100 V model is not an exception. This camera is equipped with a 20.1 MP Exmor RS BSI CMOS Sensor that supports ISO sensitivities up to ISO 12800. You can record footage in UHD 4K at 30 or 24 fps, although with a five-minute limit, as well as Full HD videos at a maximum of 960 fps when recording in the HFR mode. The Sony Cyber-shot DSC-RX 100 V ships with a non-interchangeable Carl Zeiss Vario Sonnar T lens that performs well under low-light conditions and in broad daylight. The camera features a fast hybrid AF system with 315 phase-detection points and an anti-motion blur mode that allows you to keep the subjects of your vlogs in focus throughout your recording. DSC RX-100 V’s multi-functionality makes it one of the best cameras for daily vlogging, especially for vloggers who are planning on shooting vlogs in various locations. PROS - Light and easy to carry around - Produces high-res videos CONS - Short battery life - Lacking a touchscreen |
|---|---|
|
Best cheap vlogging camera: Canon EOS M100 Canon’s EOS M100 is small and powerful. This mirrorless camera produces full HD videos at 60 fps. It doesn’t, however, shoot 4K footage. The 24.2 MP APS-C CMOS sensor and the DIGIC 7 image processor ensure that your vlogs are always in focus and rich in detail. The Canon EOS M100 provides great ISO sensitivity options, offering ISO values as high as 25600, making it a great option for vloggers that often shoot their videos under difficult light conditions. The 3-inch touchscreen LCD lets you control focus points, navigate through the camera’s menu, or watch videos you’ve created. The screen can also be tilted in the upward direction to provide you a better preview of the shot you’re recording. The camera has a built-in Wi-Fi with NFC so you can transfer your videos seamlessly to a computer and have fun in the process. The Canon EOS M100 is currently one of the best entry-level cameras for daily vlogging on the market because it produces videos in great picture quality that you don’t have to spend a fortune for. PROS - Affordable - Great connectivity options CONS - Lacks advanced video recording features - No viewfinder |
|
Best entry-level mirrorless camera for vlogging: Canon EOS M100 The Canon EOS M100 wins this category as well in our books because it’s a powerful, feature-rich camera that’s also very affordable. In case you missed it, check out my review on the Canon EOS M100. |
|
Best mid-range mirrorless camera for vlogging: Canon EOS M50 The EOS M50 has been on the market for just a few months and it is already regarded as one of the best mirrorless cameras for vlogging. Its 24.1 MP APS-C CMOS sensor and DIGIC 8 Image Processor are improved versions of those in the Canon EOS M100 model. With the Canon EOS M50, you can crank up the ISO sensitivity to 51200. This camera uses the Canon EF lens mount, so you can choose the lens that best suits your needs. The Canon EOS M50 can capture UHD 4K videos at 23.98 fps, and it also lets you record 120 fps slow-motion videos at 720p. PROS - Has an external microphone port - Has a 2.36m-dot OLED electronic viewfinder CONS - No image stabilization - Battery life could be longer |
|
Best professional mirrorless camera for vlogging: Panasonic Lumix DC-GH5S The Panasonic’s GH series was made famous by the LUMIX DMC-GH4 model that will be remembered as the world’s first mirrorless interchangeable lens camera to offer the 4K video recording option. That’s why it comes as no surprise that the GH5S mirrorless micro four-thirds camera can record UHD 4K as well as DCI videos at 60 fps, and 150 Mbps. The full HD 1080p at 240 fps video recording option is also available if you want to capture slow-motion footage for your vlogs. The camera’s 10.28MP multi-aspect ratio MOS sensor enhances its low-light performance and produces high-quality videos even under very challenging lighting conditions. Recording the audio with an external microphone is one of the many advantages offered by the Lumix DC-GH5S, while the Advanced Depth-From-Focus technology is used to automatically focus the video in a fraction of a second. The GH5S’ touchscreen can be rotated in any direction, so you can clearly see your shot no matter where you are. There’s very little doubt that the GH5S is the best professional-level mirrorless camera for vlogging that will help you capture stunning vlogs. PROS - ISO sensitivity goes up to 204800 - High video bit rates CONS - Expensive - The camera body weighs about 1.5 lbs |
|
Best entry-level DSLR camera for vlogging: Canon EOS SL2 The Canon EOS Rebel SL2 is a great entry-level vlogging camera that delivers great power at a low price. The Canon EOS Rebel SL2 has a DIGIC 7 image processor and a 24.2 MP APS-C CMOS sensor that lets you extend the ISO value to 51200 and shoot your vlogs even under low light conditions. This camera can capture full HD 1080p videos at 60 fps, and it features a 9-point AF system and dual pixel CMOS AF technologies that provide precise and quick focusing even when there is not much light. The SL2 also has a microphone jack you can connect an external microphone too for better audio. PROS - Microphone jack - Wi-Fi connectivity CONS - No 4K video support - Optical image stabilizer could be better |
|
Best mid-range DSLR camera for vlogging: Canon EOS 80D The Canon EOS 80D is a feature-rich, mid-range DSLR camera great for vlogging. The 80D lets you capture full HD 1080p videos at 60 fps. It doesn’t provide support for 4K videos, though. The ISO on this camera can be set up to 25600. The 24.2 MP APS-C CMOS sensor and the DIGIC 6 image processor reduce the need for high ISO values, though, as they enable the camera to capture visually stunning footage even when the light in the shot is far from perfect. The 80D’s 45-point all cross phase detection autofocus system and its dual pixel CMOS AF system enable you to produce sharp images without having to pull-focus yourself. The various-angle 3-inch 1.04M-dot ClearView II LCD touchscreen display, as well as the pentaprism type intelligent viewfinder, let you compose shots effortlessly. PROS - Feature-rich - Continuous AF feature performs beautifully while recording high-res videos CONS - Just one SD card slot - PC sync connection features could be better |
|
Best professional DSLR camera for vlogging: Canon 6D Mark II The Canon EOS 6D Mark II is the best professional DSLR camera for vlogging. It is the only DSLR camera on the market (as of writing this review) that comes with a full-frame sensor along with a fully-articulated screen and a microphone jack. The camera’s 26.2 MP full-frame CMOS sensor can take in much more light, giving you the option to shoot with higher quality bokeh (unfocused areas appearing more blurry) and find focus much more quickly and accurately in more challenging lighting conditions. With this camera, you can shoot up to full HD 1080p videos at a maximum of 60 fps. Although the 6D Mark II comes with the same 45-point all cross-type autofocusing system as Canon’s crop sensor 80D camera, the 6D Mark II is equipped with the improved DIGIC 7 image processor unlike the 80D’s DIGIC 6 image processor. If you’re wanting to shoot your vlogs with a full-frame, The 6D Mark II is a great option. PROS - ISO sensitivity goes up to 102400 - Amazing touchscreen controls CONS - No 4K video recording option - No USB 3.0 |
Liza Brown
Liza Brown is a writer and a lover of all things video.
Follow @Liza Brown
Liza Brown
Jan 10, 2024• Proven solutions
It can be challenging to make a decision on purchasing a camera when there’s just so many on the market. Camera manufacturers are racing to update their product line with all the new camera technology advancements. To simplify your search for the ultimate vlogging camera, we’ve come up with a top twelve list.
If you’re looking for a specific type of vlogging camera, check out our other posts on vlogging cameras:
Top 11 Cheap Vlogging Cameras (2024)
7 Best DSLR Cameras For Vlogging (2024)
8 Best Mirrorless Cameras For Vlogging (2024)
12 Best Vlogging Cameras With A Flip Screen (2024)
WHAT TO LOOK FOR IN A VLOGGING CAMERA
1. Fully articulated screen (flip screen)
2. Good continual autofocus while recording video
3. Good focus priority through face recognition
4. Touch to focus
5. Good low-light performance
6. external mic jack, hot/cold shoe bracket
7. optical image stabilization
8. good battery life
Check out my full list of 10 Things To Look For In A Vlogging Camera to understand the importance of these camera features.
12 BEST VLOGGING CAMERAS (2024)
| Camera | Release Date | Camera Type | Flip Screen | Mic Port | Price | |
|---|---|---|---|---|---|---|
| CanonEOSM50 | |
February2018 | Mirrorless | Fully Articulated | Yes | $- |
| PanasonicLumixDC-GH5S | |
January2018 | Mirrorless | Fully Articulated | Yes | $$$ |
| SonyAlphaa7R III | |
October2017 | Mirrorless | Tilting | Yes | $$$ |
| CanonEOSM100 | |
August2017 | Mirrorless | Flip Up | No | $ |
| CanonEOS6D Mark II | |
June2017 | Mid-size SLR | Fully Articulated | Yes | $$ |
| CanonEOS RebelSL2 | |
June2017 | Compact SLR | Fully Articulated | Yes | $ |
| CanonEOSM6 | |
February2017 | Mirrorless | Flip Up | Yes | $ |
| SonyCyber-Shot DSCRX 100 V | |
October2016 | Compact | Flip Up | No | $- |
| SonyAlphaa6500 | |
October2016 | Mirrorless | Tilting | Yes | $$- |
| PanasonicLumix DMCLX10 | |
September2016 | Compact | Flip Up | No | $ |
| CanonEOS80D | |
February2016 | Mid-size SLR | Fully Articulated | Yes | $$ |
| CanonPowerShotG7 X Mark II | |
February2016 | Compact | Flip Up | No | $ |
At first, you can have a look at the below video.
What Gear Do Creators Actually Use | Vidcon 2023 | Sony vs Canon
|
Best daily vlogging camera: Sony Cyber-Shot DSC-RX 100 V You don’t have to be a filmmaking pro if you want to use a compact camera to record all sorts of videos. Sony’s Cyber-shot series is famous for its cutting-edge features and the DSC-RX 100 V model is not an exception. This camera is equipped with a 20.1 MP Exmor RS BSI CMOS Sensor that supports ISO sensitivities up to ISO 12800. You can record footage in UHD 4K at 30 or 24 fps, although with a five-minute limit, as well as Full HD videos at a maximum of 960 fps when recording in the HFR mode. The Sony Cyber-shot DSC-RX 100 V ships with a non-interchangeable Carl Zeiss Vario Sonnar T lens that performs well under low-light conditions and in broad daylight. The camera features a fast hybrid AF system with 315 phase-detection points and an anti-motion blur mode that allows you to keep the subjects of your vlogs in focus throughout your recording. DSC RX-100 V’s multi-functionality makes it one of the best cameras for daily vlogging, especially for vloggers who are planning on shooting vlogs in various locations. PROS - Light and easy to carry around - Produces high-res videos CONS - Short battery life - Lacking a touchscreen |
|---|---|
|
Best cheap vlogging camera: Canon EOS M100 Canon’s EOS M100 is small and powerful. This mirrorless camera produces full HD videos at 60 fps. It doesn’t, however, shoot 4K footage. The 24.2 MP APS-C CMOS sensor and the DIGIC 7 image processor ensure that your vlogs are always in focus and rich in detail. The Canon EOS M100 provides great ISO sensitivity options, offering ISO values as high as 25600, making it a great option for vloggers that often shoot their videos under difficult light conditions. The 3-inch touchscreen LCD lets you control focus points, navigate through the camera’s menu, or watch videos you’ve created. The screen can also be tilted in the upward direction to provide you a better preview of the shot you’re recording. The camera has a built-in Wi-Fi with NFC so you can transfer your videos seamlessly to a computer and have fun in the process. The Canon EOS M100 is currently one of the best entry-level cameras for daily vlogging on the market because it produces videos in great picture quality that you don’t have to spend a fortune for. PROS - Affordable - Great connectivity options CONS - Lacks advanced video recording features - No viewfinder |
|
Best entry-level mirrorless camera for vlogging: Canon EOS M100 The Canon EOS M100 wins this category as well in our books because it’s a powerful, feature-rich camera that’s also very affordable. In case you missed it, check out my review on the Canon EOS M100. |
|
Best mid-range mirrorless camera for vlogging: Canon EOS M50 The EOS M50 has been on the market for just a few months and it is already regarded as one of the best mirrorless cameras for vlogging. Its 24.1 MP APS-C CMOS sensor and DIGIC 8 Image Processor are improved versions of those in the Canon EOS M100 model. With the Canon EOS M50, you can crank up the ISO sensitivity to 51200. This camera uses the Canon EF lens mount, so you can choose the lens that best suits your needs. The Canon EOS M50 can capture UHD 4K videos at 23.98 fps, and it also lets you record 120 fps slow-motion videos at 720p. PROS - Has an external microphone port - Has a 2.36m-dot OLED electronic viewfinder CONS - No image stabilization - Battery life could be longer |
|
Best professional mirrorless camera for vlogging: Panasonic Lumix DC-GH5S The Panasonic’s GH series was made famous by the LUMIX DMC-GH4 model that will be remembered as the world’s first mirrorless interchangeable lens camera to offer the 4K video recording option. That’s why it comes as no surprise that the GH5S mirrorless micro four-thirds camera can record UHD 4K as well as DCI videos at 60 fps, and 150 Mbps. The full HD 1080p at 240 fps video recording option is also available if you want to capture slow-motion footage for your vlogs. The camera’s 10.28MP multi-aspect ratio MOS sensor enhances its low-light performance and produces high-quality videos even under very challenging lighting conditions. Recording the audio with an external microphone is one of the many advantages offered by the Lumix DC-GH5S, while the Advanced Depth-From-Focus technology is used to automatically focus the video in a fraction of a second. The GH5S’ touchscreen can be rotated in any direction, so you can clearly see your shot no matter where you are. There’s very little doubt that the GH5S is the best professional-level mirrorless camera for vlogging that will help you capture stunning vlogs. PROS - ISO sensitivity goes up to 204800 - High video bit rates CONS - Expensive - The camera body weighs about 1.5 lbs |
|
Best entry-level DSLR camera for vlogging: Canon EOS SL2 The Canon EOS Rebel SL2 is a great entry-level vlogging camera that delivers great power at a low price. The Canon EOS Rebel SL2 has a DIGIC 7 image processor and a 24.2 MP APS-C CMOS sensor that lets you extend the ISO value to 51200 and shoot your vlogs even under low light conditions. This camera can capture full HD 1080p videos at 60 fps, and it features a 9-point AF system and dual pixel CMOS AF technologies that provide precise and quick focusing even when there is not much light. The SL2 also has a microphone jack you can connect an external microphone too for better audio. PROS - Microphone jack - Wi-Fi connectivity CONS - No 4K video support - Optical image stabilizer could be better |
|
Best mid-range DSLR camera for vlogging: Canon EOS 80D The Canon EOS 80D is a feature-rich, mid-range DSLR camera great for vlogging. The 80D lets you capture full HD 1080p videos at 60 fps. It doesn’t provide support for 4K videos, though. The ISO on this camera can be set up to 25600. The 24.2 MP APS-C CMOS sensor and the DIGIC 6 image processor reduce the need for high ISO values, though, as they enable the camera to capture visually stunning footage even when the light in the shot is far from perfect. The 80D’s 45-point all cross phase detection autofocus system and its dual pixel CMOS AF system enable you to produce sharp images without having to pull-focus yourself. The various-angle 3-inch 1.04M-dot ClearView II LCD touchscreen display, as well as the pentaprism type intelligent viewfinder, let you compose shots effortlessly. PROS - Feature-rich - Continuous AF feature performs beautifully while recording high-res videos CONS - Just one SD card slot - PC sync connection features could be better |
|
Best professional DSLR camera for vlogging: Canon 6D Mark II The Canon EOS 6D Mark II is the best professional DSLR camera for vlogging. It is the only DSLR camera on the market (as of writing this review) that comes with a full-frame sensor along with a fully-articulated screen and a microphone jack. The camera’s 26.2 MP full-frame CMOS sensor can take in much more light, giving you the option to shoot with higher quality bokeh (unfocused areas appearing more blurry) and find focus much more quickly and accurately in more challenging lighting conditions. With this camera, you can shoot up to full HD 1080p videos at a maximum of 60 fps. Although the 6D Mark II comes with the same 45-point all cross-type autofocusing system as Canon’s crop sensor 80D camera, the 6D Mark II is equipped with the improved DIGIC 7 image processor unlike the 80D’s DIGIC 6 image processor. If you’re wanting to shoot your vlogs with a full-frame, The 6D Mark II is a great option. PROS - ISO sensitivity goes up to 102400 - Amazing touchscreen controls CONS - No 4K video recording option - No USB 3.0 |
Liza Brown
Liza Brown is a writer and a lover of all things video.
Follow @Liza Brown
BriefClip Artist
In today’s world where businesses are going digital, it is very important to think of how you are going to get your products in front of many customers as possible without having to spend a fortune. That’s where YouTube Clip Maker comes in. It is an effective way for making YouTube videos that you can use for your business advertisements.
If you are a budding YouTuber or just looking at starting to make YouTube videos, you should consider among your editing tools a YouTube Clip Maker. It is an application that has all the tools necessary for you to edit videos in a fast and convenient way and enables you to upload the completed videos to YouTube. It is a simple tool with a friendly-to-use interface for editing videos, it should be a must-have for all users.
Part 1. Best YouTube Clip Maker Filmora
Filmora is a feature-rich audio and video editor that helps beginners with the editing of their audio and video files. The designers did their job with the armature editors in mind. It gives them a simple and easy-to-use layout that makes the work less complicated. Filmora has a built-in feature that lets you record your music and voice and also trim, merge, and cut a split your mp3 files.
Besides all the wonderful features, Filmora lets you make adjustments to speed, pitch, and volume, this makes you improve the clarity of your audio file. The app can be used to customize ringtones and specialized sound effects for your presentation.

For Win 7 or later (64-bit)
For macOS 10.12 or later
Steps on How to Use Filmora
This is an app that is best suited to those starting in video editing and requires the use of an easy-to-use app that can as well deliver quality work. Filmora is an application that was made with the armature editors in mind and is one they should consider while looking for a program to work with. It features some of the essential tools one would require and it is easy to learn how to navigate through it.
Installation Steps
- Click the icon in the center of the Media Library to add files directly.
- Go File > Import Media > Import Media Files.
- Drag and drop to the ‘media library’ directly.
When importing a media file and Filmora asks you to create a proxy file to speed up the editing process. Select “Yes” to have a fast video editing experience.
You can also import video clips using your Touch Bar controls if your computer has Touch Bar.
Record a media file
Apart from the videos shot by your digital devices, you can also directly import media files by recording video from your webcam, screen recording your computer, and a voice-over recording.
Computer screen recording:
Click the “Record” option, and choose “Record PC Screen” to get the built-in Wondershare Screen Recorder. Hit the red button to get started. To finish recording click on F9
Record videos from webcam:
Also, click the “Record” option, and choose “Record from Webcam”. In the recording pop-up window, select the red button, it will start the recording process and is also the button to choose when you want to stop recording. You will then select OK to save the recorded video clip.
Record voice-over:
Choose “Record a voiceover” on the Record menu. It would be better to connect a microphone to your Mac for a better result. Hit the Record button, and it leaves you 3 seconds to get ready.
All media files recorded are automatically saved in the “Media Library”, in case of further editing, you can drag them to the timeline.
Part 2. How to Make YouTube Clip Online
The application lets you trim your YouTube videos without having to have an account. It provides you with a quick way to either cut the beginning or end of a YouTube video. YouTube Trimmer will let you trim the video in a couple of seconds with just a few clicks. To use the app, you just need to copy and paste the earl and you are on your way to editing. You don’t have to be worried about downloading or installing the application for you to use it.
Steps on How to Use YouTube Trimmer
Step 1:
Import
Copy the YouTube link that you want to work on and paste it into the field indicated on the application.
Step 2:
Trim and Edit
You can drag the video at the edges to trim it. You can also move the playhead with your mouse and manually make cuts by clicking on the cut button.
Step 3:
Export
Once you are done editing and happy with the outcome, select the Export button to start rendering the video. Here you can choose to publish it on YouTube or save it for other uses.
Part 3. YouTube Clip Maker for Android and iPhone
KineMaster
It is a simple-to-use application that lets you create professional-quality videos in very short minutes. It enables you to edit pre-made videos or lets you make fresh ones by combining your video with several visual and sound effects. After you are done with the editing, you can save your video or share it out there.
Steps on How to Use Kinemater
Step 1:Create
It lets you import videos, audio, and images from your device. After which you can cut, rearrange, and transition between your images and videos using the KineMaster’s video layering support. This is highly dependent on your computer’s hardware capabilities.
Step 2:Edit
Adjust your video’s appearance parameters by blending color modes, adding light and sound effects, overlaying graphics, and text, or rather directly drawing on the video by using the handwriting layers.
Step 3:Share
You can export your project up to 4k and 60fps. The app saves directly to your camera’s roll besides letting you share to social media.
Part 4: Related FAQs
**How to Make a Clip from a YouTube Video ?
First, sign in to YouTube and start playing a video. Under the video click on the Clip, this will create a clip box after which you will select the part of the video that you want to clip. Give the clip a title then click share after which you will be prompted to choose an option for sharing.
**How to Clip Parts of a YouTube Video ?
Start by sign-in and opening YouTube then proceed by watching a video. If clips are available, you will see a clips icon in the bar at the bottom of the video. Click on the clip icon and select that part of the video you are interested in, give the clip a title, and select Share Clip. Choose whether you want to share the clip or save it for later use.
**What YouTubers Use to Get Clips ?
YouTubers use several video editors for their work. Some of the most popular editors are iMovie, Final Cut Pro X, and Premier Pro CC. These YouTube editing apps vary in technicalities of use and features whereby you will find that some are easy to use and have varying features. Some of the editors are free while others require payments for one to use.
Also read:
- The Ultimate Blueprint for Exceptional Product Unboxings
- [Updated] Crafting the Quintessential Thumbnails for Live Video Success
- [Updated] Affordable Online Education Hosting on YouTube
- In 2024, Create Harmonious Hits A Step-by-Step Guide to Making YouTube Playlists Online & App
- Engineering Echoing Edits
- Branding Excellence YouTube Naming Masterclass for 2024
- 2024 Approved Bridging Platforms Loop-Ready Setups for YouTube and TV
- Collaborative Video Creation & Growth Tips for 2024
- 2024 Approved Elevating Your Channel's Identity with Titles
- A Taste of Film Home Cook's Visual Journey for 2024
- [Updated] Crafting a Hit on YouTube Name Generation Insights
- 10 Superior YouTube Mp3 Extractors
- 2024 Approved Effortless Estimation of Digital Gains
- [Updated] Demystifying Mukbang A Comprehensive Production Guide
- Supercharge Your Channels A Guide to the Best Keyword Research Software
- Unleashing Your Creative Spark Stylistic Self-Discovery [High CTR]
- 2024 Approved Decoding Your YouTube's View-Zero Dilemma 10 Insights
- Sourav Joshi's Income Tactics The Future of Monetizing Content
- From YouTube Watch Parties to Home Auditory Archives
- Building Your Own YouTube Organization Toolkit The Watch Later Way for 2024
- [Updated] Behind the Scenes of Online Content Monetization
- In 2024, Charting New Heights with Popular YouTube Content
- In 2024, Elevate Vlogging Quality - The Ultimate 12 Recommended Cam Picks
- [New] Decoding YouTube’s Operations Following Uploads
- A Compreayer's Guide to Polishing YouTube Content via iMovie Editing Techniques
- 2024 Approved Constructing Captivating YouTube Music Selections
- A Detailed VPNa Fake GPS Location Free Review On Vivo Y100 5G | Dr.fone
- Navigating Through Free2X's Camera Capturing Features
- [New] Forward Thinking Facebook Ad Strategies – The 2024 Guide
- How to Remove a Previously Synced Google Account from Your Tecno Spark 20 Pro+
- How to Bypass Android Lock Screen Using Emergency Call On Samsung Galaxy Z Fold 5?
- 2024 Approved Audio Mastery Top Strategies for Win10 Users
- Bring Life to Graphics Adobe Blur Masterclass for 2024
- [New] Android/iOS Resolve YouTube Freezing
- [New] How To Prominently Display Messages on Discord for 2024
- 2024 Approved Choreographed Combat Selecting Superior Fighting Titles
- 2024 Approved Navigating IGTV A Video Uploading Handbook
- How To Fix OEM Unlock Missing on Oppo Reno 9A?
- Real-Time FBX Filming Tips for 2024
- Unleash the Potential of Your Webcam for Slideshows for 2024
- New In 2024, Orchestrating Artificial Intelligence Spotlight on Future Musical Innovators
- Title: "A Vlogger's Dream Exploring the Best 12 Video Capture Devices"
- Author: Brian
- Created at : 2024-05-25 11:17:33
- Updated at : 2024-05-26 11:17:33
- Link: https://youtube-video-recordings.techidaily.com/a-vloggers-dream-exploring-the-best-12-video-capture-devices/
- License: This work is licensed under CC BY-NC-SA 4.0.
