
:max_bytes(150000):strip_icc()/LogitechG604LightspeedWirelessGamingMouse-a1c397211af7489f8408eed0ff759b55.jpeg)
A Stepwise Approach to Add YouTube Videos Into Slate for 2024
A Stepwise Approach to Add YouTube Videos Into Slate
Create High-Quality Video - Wondershare Filmora
An easy and powerful YouTube video editor
Numerous video and audio effects to choose from
Detailed tutorials provided by the official channel
Google Slide presentation is a powerful tool for creators to keep their audience engaged. This online platform lets you create and demonstrate your ideas. It will capture your viewers’ attention from the very beginning. It also doesn’t matter whatever learning style you engage. Adding YouTube videos to Google Slide will appeal to all levels of individuals.
More so, it is the best way to provide a break for both the audience and the creator. You can break Google Slide presentations with videos to offer some break. Viewers and the presenter get a breather in the process. The presenter can take a short break from speaking while the video plays. Let’s now dive into how to embed a YouTube video in Google Slides.

In this article
01 Why should we add a video to Google Slides?
02 How to add a YouTube video to Google Slide
03 How to choose the right video for your Slides?
Why should we add a video to Google Slides?
There is a great impact of adding video to Google Slides.
For attention
Videos will automatically awaken you, especially if your thoughts have started to sway during a presentation. A video has a direct way of showing creativity. The audience automatically connects the dots between the video and the presentation lines alike.
To stimulate discussion
A picture is worth a thousand words. There is a way that an added video will help the audience connect to the day’s topic. It will bring up several ideas and stir up discussion with the presenter.
Easy following
With videos embedded in Google Slide, viewers will find it easy to understand and digest. Videos automatically eliminate boredom and make any topic interesting.
How to add a YouTube video to Google Slide
Use these two methods to add a YouTube video to Google Slides. Via the Search and Direct link.
Method 1. Embed YouTube video to Google Slide by search and selection
Google has owned YouTube since the year 2006. You can, therefore, integrate Google’s products with YouTube easily.
Step 1. First, go to the slide where you want to embed your video.
Step 2. Then choose the “Insert” option from the menu bar and hit the “Video” option.

Step 3. It would be best if you now viewed the “YouTube” search bar to type in the video you want to embed. You can use keywords to search for the video in question and view instant search results.
Step 4. Then select the video you want to embed, and you’ll see it appear on the “Slide.”

Step 5. Format your video. Remember that the entire video will be embedded. You don’t necessarily need the whole video. It is time to select just a brief but relevant clip from the video to use. Then position your video to the right point using the axes from the exact starting point to the finished part you want the video to appear in.
Method 2. Embed YouTube video to Google Slide by direct link
You can engage this method if you want to include the entire video.
Step 1. Get the URL of the specific YouTube video that you want to use.

Step 2. Then go to your browser’s “Address bar” to copy the YouTube link.
Step 3. Next, open the “Presentation” slide to put your video to.
Step 4. Choose the “Insert” tab from the menu bar.
Step 5. Then hit on the “Video” option from the drop-down menu that appears.
Step 6. A new window will open automatically. Choose the “By URL” tab.
Step 7. Then paste the YouTube video URL in the “Paste YouTube URL Here” bar section.

Step 8. Wait for the video file to load and press the “Select” option. The video will immediately appear in the presentation slide. Just drag and drop the video in your preferred position.
Note: You can do a few edits inside the application. Set the timer when your video should start and when to stop. You can also adjust the video player size.
How to choose the right video for your Slides?
Not all videos will make an impact on your Google Slide. You need to use the best shot that adds value to your presentation. These guidelines will help you to settle on the best video.
Be Professional – choose the best video for your presentation. Remember that the video is part of the presentation and carries more weight. Settling for quality video will bring out the professionalism in you.
Relevant – how do you know that what you are showing your audience corresponds to the presentation piece? Ensure that the video you add has something to do with the Google Slide presentation topic. The two should naturally flow to make it easy to understand the whole concept.
Precise – your presentation is not about the video. The ideal length should not exceed 60 seconds. The longer the video, the greater the chance for your audience to lose track along the way.
Know every footage you are working with – this will help you pick the best shots for your presentation. So, learn every aspect of the video before settling down to use it.
Add new content – even though one content may suit several presentations, don’t rely on the same piece each time. Your audience will want to feel something fresh each time you are presenting. So, compose different videos for different scenarios to make that big impact.
Create an eye-catching video for your Slides with Filmora
The video quality matters when it comes to creating your Slides. The best video creator – Filmora – works in simple steps to give you an eye-catching video. It will create videos for all scenarios like marketing, tutorial, gaming, etc.
Key features of Filmora
- It offers you advanced video effects like filters, motion elements, etc
- You can multiply your fun with multiple screens with the Split Screen feature
- Easily change backgrounds using the Green Screen feature
- The speed control lets you fast forward or slow down a special moment
- Import your video clips to social media platforms
- You can also adjust the audio of your tracks using the Audio Mixer feature
Follow this guide to create a video for your slide with Filmora
Step 1. Launch Filmora
First, begin by downloading and installing Filmora on your computer device. Once installed, launch it and allow it to run. You can either create a new project or open an existing project to work on.
Step 2. Create a new project
Here, click on the “New Project” tab on the app’s welcome screen. The editor should load immediately. Then proceed to register the product. Just hit on the “Register” tab.
Step 3. Import video
Check the upper left corner of your screen to see the “Import” tab. Click on it and choose the “Import Media Files” option. Next, navigate to the location of your computer’s local list to select the clip or video you want to edit. Then, hit the “Import” button to add the video to the timeline for editing.
Step 4. Edit video
Drag and drop the raw footage to Filmora’s timeline to begin editing. Here, you can trim, add other video clips, merge, and add effects as you wish. Likewise, you can add opening titles, subtitles, and end credits to your video. More so, this tool offers different templates to use. Just drag and drop the templates you wish to use to a specific location on the timeline.
Step 5. Preview your file
Last but not least, you can preview your files. Click on the “Play” tab to start previewing your video clips. The main essence of this part is to allow you to make the necessary changes to your clips if there is a need.
Step 6. Export and Share
With Filmora, you can export your file to various social media platforms. But first, go to the “Output window” and select the video file format to use. This software supports several output formats to apply to any platform and device. Just click on the “Format” tab and choose the file format to use. Then also change the resolution and other parameters like frame rate and channel of your video in the “Settings” section. Finally, share your video to your YouTube channel and get ready to add the video to the Google Slide presentation.
For Win 7 or later (64-bit)
For macOS 10.12 or later
Conclusion
● You now know how to put a YouTube video in Google Slides the simple way. You can search for your YouTube videos or directly use the URL link. Whatever the case, remember that it’s the quality of your video that carries more weight. Thanks to the availability of third-party apps that you can use to create and improve the quality of your videos.
● Filmora is at your service to create high-resolution videos that you can export in any format to your YouTube channel. The tool is intuitive, and it won’t matter whether you haven’t tried it before. It is a perfect choice for both professionals and first-time users.
Google Slide presentation is a powerful tool for creators to keep their audience engaged. This online platform lets you create and demonstrate your ideas. It will capture your viewers’ attention from the very beginning. It also doesn’t matter whatever learning style you engage. Adding YouTube videos to Google Slide will appeal to all levels of individuals.
More so, it is the best way to provide a break for both the audience and the creator. You can break Google Slide presentations with videos to offer some break. Viewers and the presenter get a breather in the process. The presenter can take a short break from speaking while the video plays. Let’s now dive into how to embed a YouTube video in Google Slides.
In this article
01 Why should we add a video to Google Slides?
02 How to add a YouTube video to Google Slide
03 How to choose the right video for your Slides?
Why should we add a video to Google Slides?
There is a great impact of adding video to Google Slides.
For attention
Videos will automatically awaken you, especially if your thoughts have started to sway during a presentation. A video has a direct way of showing creativity. The audience automatically connects the dots between the video and the presentation lines alike.
To stimulate discussion
A picture is worth a thousand words. There is a way that an added video will help the audience connect to the day’s topic. It will bring up several ideas and stir up discussion with the presenter.
Easy following
With videos embedded in Google Slide, viewers will find it easy to understand and digest. Videos automatically eliminate boredom and make any topic interesting.
How to add a YouTube video to Google Slide
Use these two methods to add a YouTube video to Google Slides. Via the Search and Direct link.
Method 1. Embed YouTube video to Google Slide by search and selection
Google has owned YouTube since the year 2006. You can, therefore, integrate Google’s products with YouTube easily.
Step 1. First, go to the slide where you want to embed your video.
Step 2. Then choose the “Insert” option from the menu bar and hit the “Video” option.
Step 3. It would be best if you now viewed the “YouTube” search bar to type in the video you want to embed. You can use keywords to search for the video in question and view instant search results.
Step 4. Then select the video you want to embed, and you’ll see it appear on the “Slide.”
Step 5. Format your video. Remember that the entire video will be embedded. You don’t necessarily need the whole video. It is time to select just a brief but relevant clip from the video to use. Then position your video to the right point using the axes from the exact starting point to the finished part you want the video to appear in.
Method 2. Embed YouTube video to Google Slide by direct link
You can engage this method if you want to include the entire video.
Step 1. Get the URL of the specific YouTube video that you want to use.
Step 2. Then go to your browser’s “Address bar” to copy the YouTube link.
Step 3. Next, open the “Presentation” slide to put your video to.
Step 4. Choose the “Insert” tab from the menu bar.
Step 5. Then hit on the “Video” option from the drop-down menu that appears.
Step 6. A new window will open automatically. Choose the “By URL” tab.
Step 7. Then paste the YouTube video URL in the “Paste YouTube URL Here” bar section.
Step 8. Wait for the video file to load and press the “Select” option. The video will immediately appear in the presentation slide. Just drag and drop the video in your preferred position.
Note: You can do a few edits inside the application. Set the timer when your video should start and when to stop. You can also adjust the video player size.
How to choose the right video for your Slides?
Not all videos will make an impact on your Google Slide. You need to use the best shot that adds value to your presentation. These guidelines will help you to settle on the best video.
Be Professional – choose the best video for your presentation. Remember that the video is part of the presentation and carries more weight. Settling for quality video will bring out the professionalism in you.
Relevant – how do you know that what you are showing your audience corresponds to the presentation piece? Ensure that the video you add has something to do with the Google Slide presentation topic. The two should naturally flow to make it easy to understand the whole concept.
Precise – your presentation is not about the video. The ideal length should not exceed 60 seconds. The longer the video, the greater the chance for your audience to lose track along the way.
Know every footage you are working with – this will help you pick the best shots for your presentation. So, learn every aspect of the video before settling down to use it.
Add new content – even though one content may suit several presentations, don’t rely on the same piece each time. Your audience will want to feel something fresh each time you are presenting. So, compose different videos for different scenarios to make that big impact.
Create an eye-catching video for your Slides with Filmora
The video quality matters when it comes to creating your Slides. The best video creator – Filmora – works in simple steps to give you an eye-catching video. It will create videos for all scenarios like marketing, tutorial, gaming, etc.
Key features of Filmora
- It offers you advanced video effects like filters, motion elements, etc
- You can multiply your fun with multiple screens with the Split Screen feature
- Easily change backgrounds using the Green Screen feature
- The speed control lets you fast forward or slow down a special moment
- Import your video clips to social media platforms
- You can also adjust the audio of your tracks using the Audio Mixer feature
Follow this guide to create a video for your slide with Filmora
Step 1. Launch Filmora
First, begin by downloading and installing Filmora on your computer device. Once installed, launch it and allow it to run. You can either create a new project or open an existing project to work on.
Step 2. Create a new project
Here, click on the “New Project” tab on the app’s welcome screen. The editor should load immediately. Then proceed to register the product. Just hit on the “Register” tab.
Step 3. Import video
Check the upper left corner of your screen to see the “Import” tab. Click on it and choose the “Import Media Files” option. Next, navigate to the location of your computer’s local list to select the clip or video you want to edit. Then, hit the “Import” button to add the video to the timeline for editing.
Step 4. Edit video
Drag and drop the raw footage to Filmora’s timeline to begin editing. Here, you can trim, add other video clips, merge, and add effects as you wish. Likewise, you can add opening titles, subtitles, and end credits to your video. More so, this tool offers different templates to use. Just drag and drop the templates you wish to use to a specific location on the timeline.
Step 5. Preview your file
Last but not least, you can preview your files. Click on the “Play” tab to start previewing your video clips. The main essence of this part is to allow you to make the necessary changes to your clips if there is a need.
Step 6. Export and Share
With Filmora, you can export your file to various social media platforms. But first, go to the “Output window” and select the video file format to use. This software supports several output formats to apply to any platform and device. Just click on the “Format” tab and choose the file format to use. Then also change the resolution and other parameters like frame rate and channel of your video in the “Settings” section. Finally, share your video to your YouTube channel and get ready to add the video to the Google Slide presentation.
For Win 7 or later (64-bit)
For macOS 10.12 or later
Conclusion
● You now know how to put a YouTube video in Google Slides the simple way. You can search for your YouTube videos or directly use the URL link. Whatever the case, remember that it’s the quality of your video that carries more weight. Thanks to the availability of third-party apps that you can use to create and improve the quality of your videos.
● Filmora is at your service to create high-resolution videos that you can export in any format to your YouTube channel. The tool is intuitive, and it won’t matter whether you haven’t tried it before. It is a perfect choice for both professionals and first-time users.
Supercharge Your Channels: A Guide to the Best Keyword Research Software
10 Best YouTube Keyword Tools to Get More Views

Richard Bennett
Mar 27, 2024• Proven solutions
If we asked you to name the world’s biggest search engines, undoubtedly you’d come up with Google, but what would be number two? Bing? Yahoo? The truth might surprise you.
According to figures, the world’s second biggest search engine is actually YouTube. Millions of people are using it everyday to search for videos about fitness, hair, marketing and more. With such a large audience already searching directly on the platform, doesn’t it make sense that when we use YouTube keyword research and SEO should be as important as it is on our website?
Luckily, we can use YouTube keyword tools to analyze YouTube keywords. Here we’re going to take a look at 10 best YouTube keyword tools out there, which can help you identify and optimize for the highest traffic keywords for your videos. By optimizing your videos, you can rank higher, get more views and enjoy a larger audience on YouTube.
- Part 1: 10 Best YouTube Keyword Tools Recommendation
- Part 2: Bonues Tips - Google video result keywords
You May Also Like:
YouTube SEO Complete Guide >>
How to Edit and Optimize YouTube Title, Description, and Tags >>
Do you want to edit YouTube video easily? Filmora is a YouTube editor that you should have a try. As a YouTube video editing tool, it is simple to use with dragging and dropping. You can add various video effects, filters and transition to make your video better. Besides, titles and texts are also available to use. After editing, you can directly upload video to YouTube plactform. Now, download it to have a try!
 Download Mac Version ](https://tools.techidaily.com/wondershare/filmora/download/ )
Part 1: 10 Best YouTube Keyword Tools Recommendation
Before you can get into using any YouTube SEO tool, you’ll need to identify what the best keywords for your videos are. Let’s start by taking a look at the best YouTube keyword tools available.
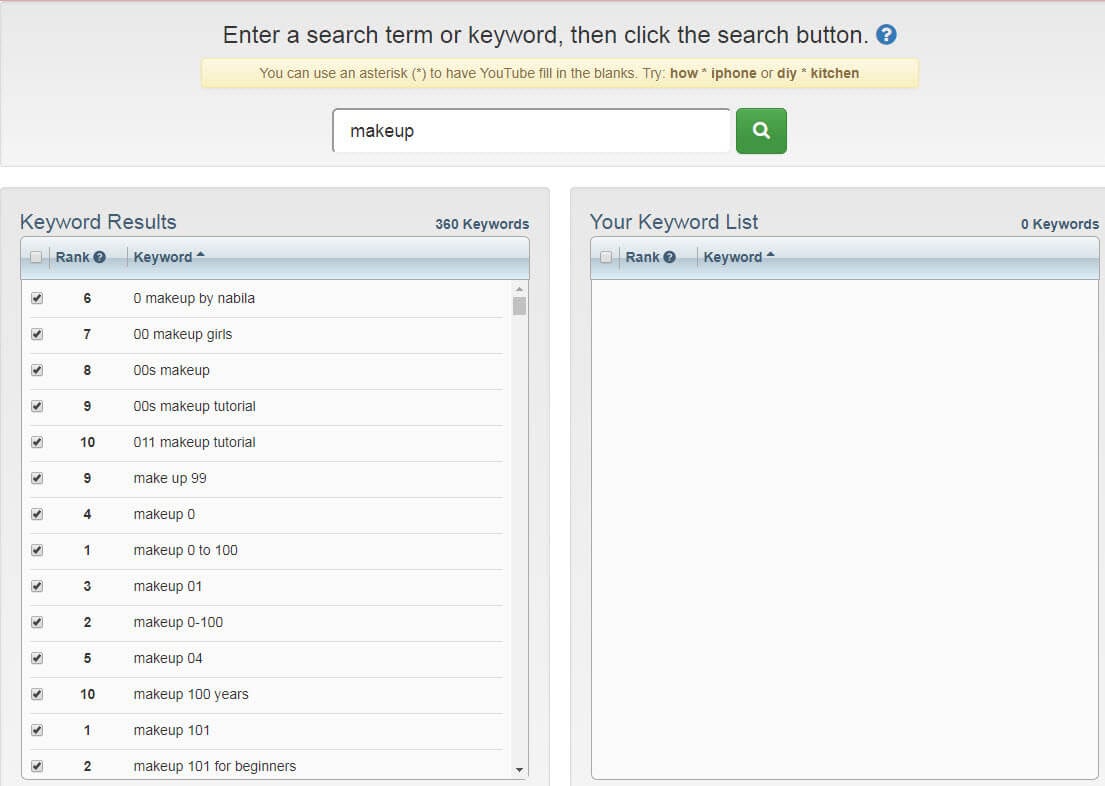
1. YouTube autocomplete
When you start to search for something on YouTube, you’ll probably notice that YouTube suggests some keywords to finish your search. This is called autocomplete, and it works by suggesting the most popular keywords that start with the letters you’ve typed so far. What it is essentially saying is that those are the most frequently searched for terms that use the words you’ve already typed.
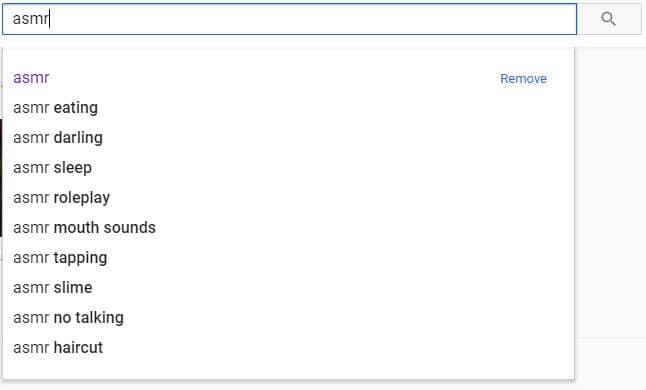
This means it’s a great place to start building your keywords, and a fantastic YouTube keyword tool for your videos. Just start your search for your video (e.g. shoes for…) and see what comes up. In this case, we can see that the most popular keywords are ‘girls’, ‘men’, ‘kids’, ‘summer’ and ‘boys’.
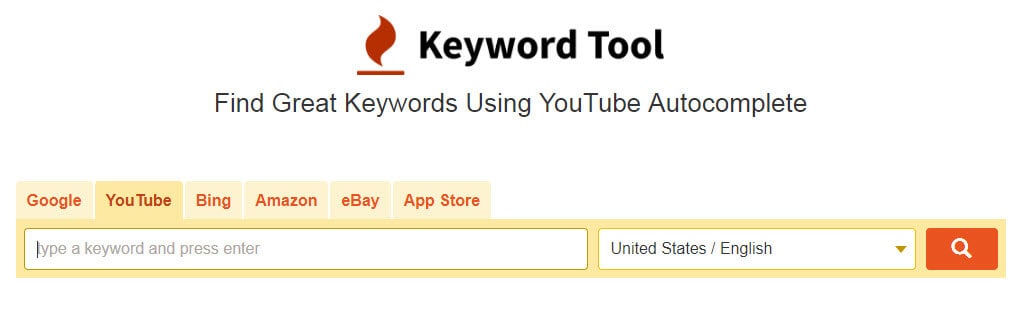
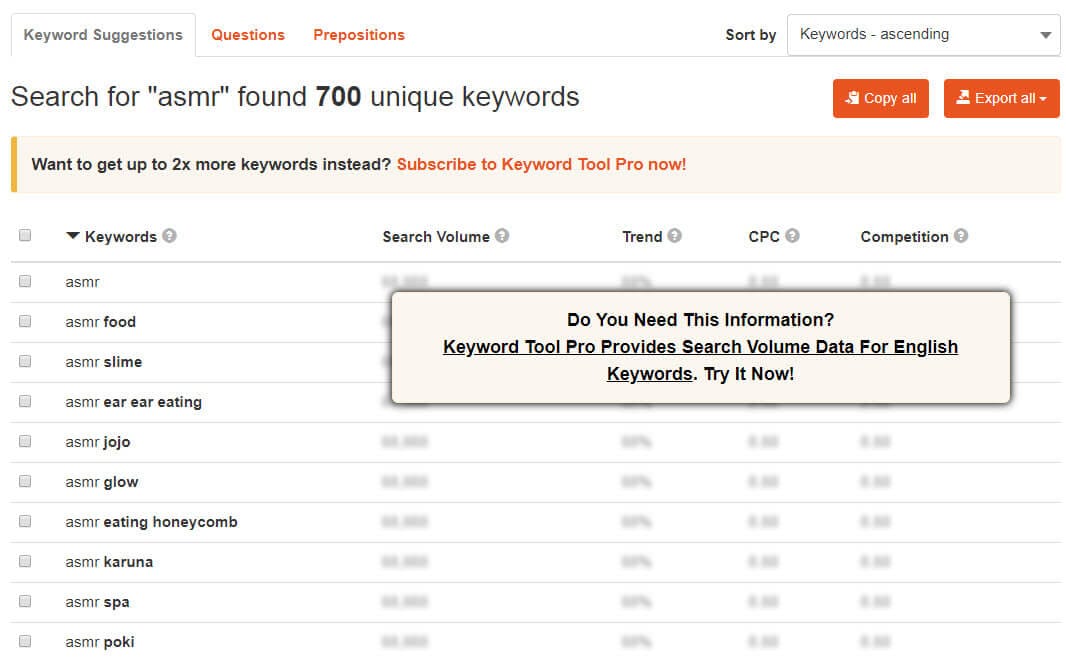
2. Keywordtool.io
Without doubt, this is one of the most powerful YouTube keyword tools out there, ranking hundreds of keywords by popularity. It captures data from YouTube autocomplete and allows you to create lists of keywords from that data. As well as autocompete data, you can also search for questions people are asking, which makes it highly beneficial as a YouTube SEO tool.
The downside to this particular tool is that it’s fairly limited on the free version. Upgrading to Pro Basic will give you almost double the keyword results and will let you compare the volume of searches made for those terms too. However, this will set you back around $68 a year, so it’s going to be something of an investment if you go for it.
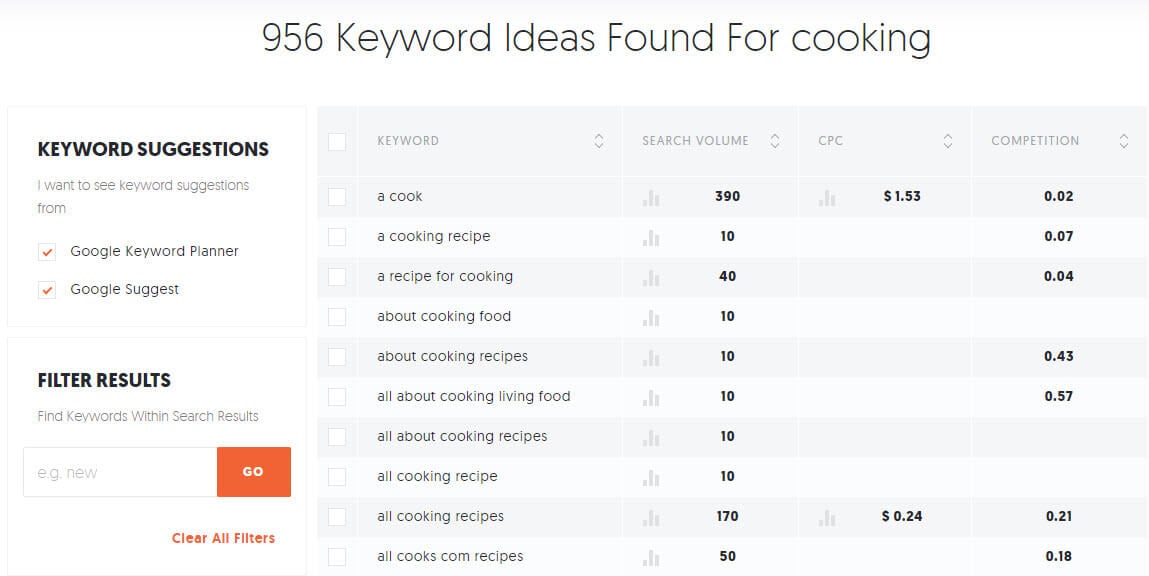
3. SEOChat
SEO Chat is an amazing free tool that can generate keyword ideas from Google, Amazon, Bing and YouTube. You can search for keywords from all of those sources or can just search YouTube alone to find your keyword lists. You’ll need a ‘seed’ keyword, such as ‘shoes’, ‘make up’ or ‘marketing’, and then organizes results alphabetically with other letters following your seed keyword.

Simply scrolling through the results is going to give you loads of ideas for keywords and possibly content too. The tool also allows you to further expand your results by selecting a keyword and running ‘part two’ of the process, which expands those phrases even further. Your chosen keywords can be exported from the software, ready for use in your YouTube SEO tool.
4. Gather keywords from your competitor
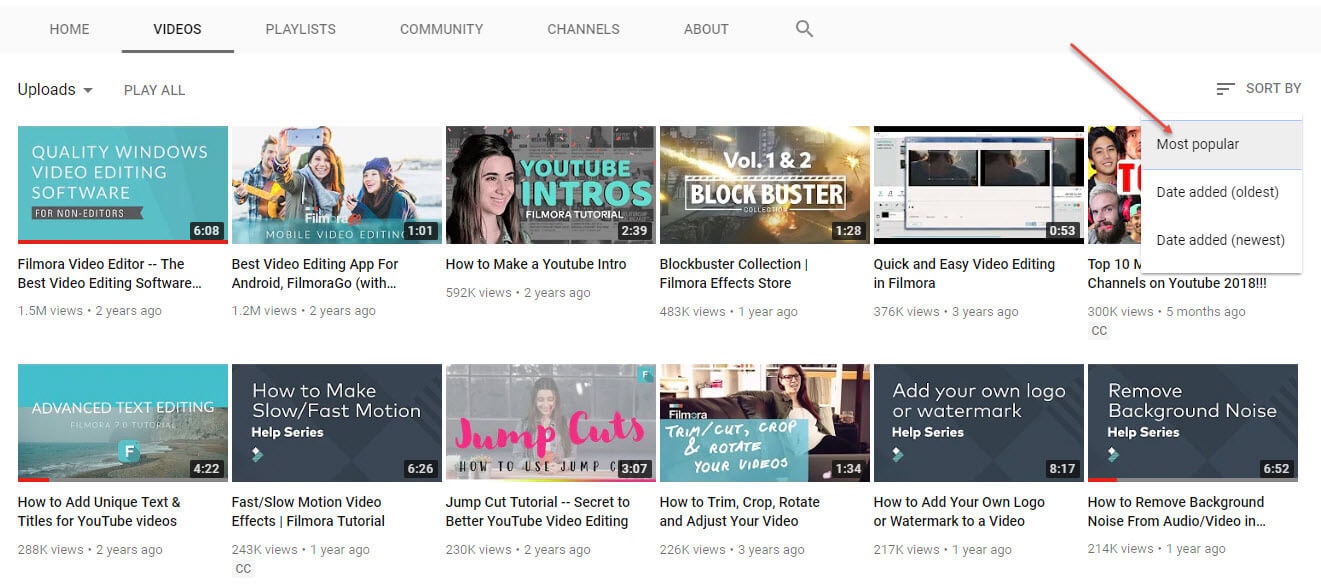
Why not learn from the best and see what’s already working for your competitors? Finding their high traffic keywords is easy and can save a lot of time and energy. To do this, pick a channel that is around your size, as they’re your nearest competitors. Steer clear of the huge channels, as you’ll find it hard to rank next to them.
Click the videos tab to see their content, and sort them by ‘most popular’ to see the ones which got the most views. Take a look at the title and the description of those videos, and you’ll find a good fistful of proven keywords that you can start using yourself.
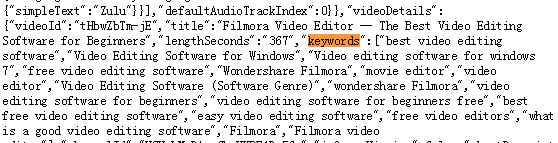
That’s not all though. To maximize your competitor research, let’s dig a little deeper into the tags they have used for their videos too. Unfortunately, these are hidden on YouTube, but are easily seen using the page’s HTML. Simply right click on the page and select ‘view source’. Don’t be alarmed at the great stream of HTML that pops up, it’s easy to search using your search function (press ctrl + f on Windows or ⌘ + f on iOS) by typing in ‘keywords’ to the search box. The following terms are the tags used in the video.
If ploughing through HTML sounds somewhat taxing, there is a handy YouTube SEO tool you can use to display the tags on page. It’s called TubeBuddy and is a Chrome extension which you’ll find in the Chrome store for free.
5. Keyword Tool Dominator
It’s got a grand name, but it’s actually really easy to use and a great place to start if you’re new to YouTube keyword research. Pop in your seed keywords and the Dominator will produce a list of relevant keywords related to those terms. You can then select the most useful and download them to your device.
The drawback with this is that you can only perform three searches a day on the free version. Perhaps that’s enough for you to begin with, but if you want to upgrade to the unlimited version, which will also give you search volumes, it’s a one-off fee of $39.99.
6. Ubersuggest
For getting more data on specific keywords, Ubersuggest from the SEO guru that is Neil Patel is one of the best tools out there. As well as showing search volume and competition, you can see other information such as cost per click and the seasonality of the keyword. It’s free to use with no limitations at all, so is well worth checking out.
7. Google trends
We would highly recommend investigating Google Trends as part of your YouTube keyword research, as it is powerful, accurate and, best of all, free! The options let you narrow down the trend results to just YouTube searches, which is great for gaining insights to your search terms. You can narrow down the results to a specific country too, helping you to gain insight into what your target demographic is currently interested in.
8. VidIQ
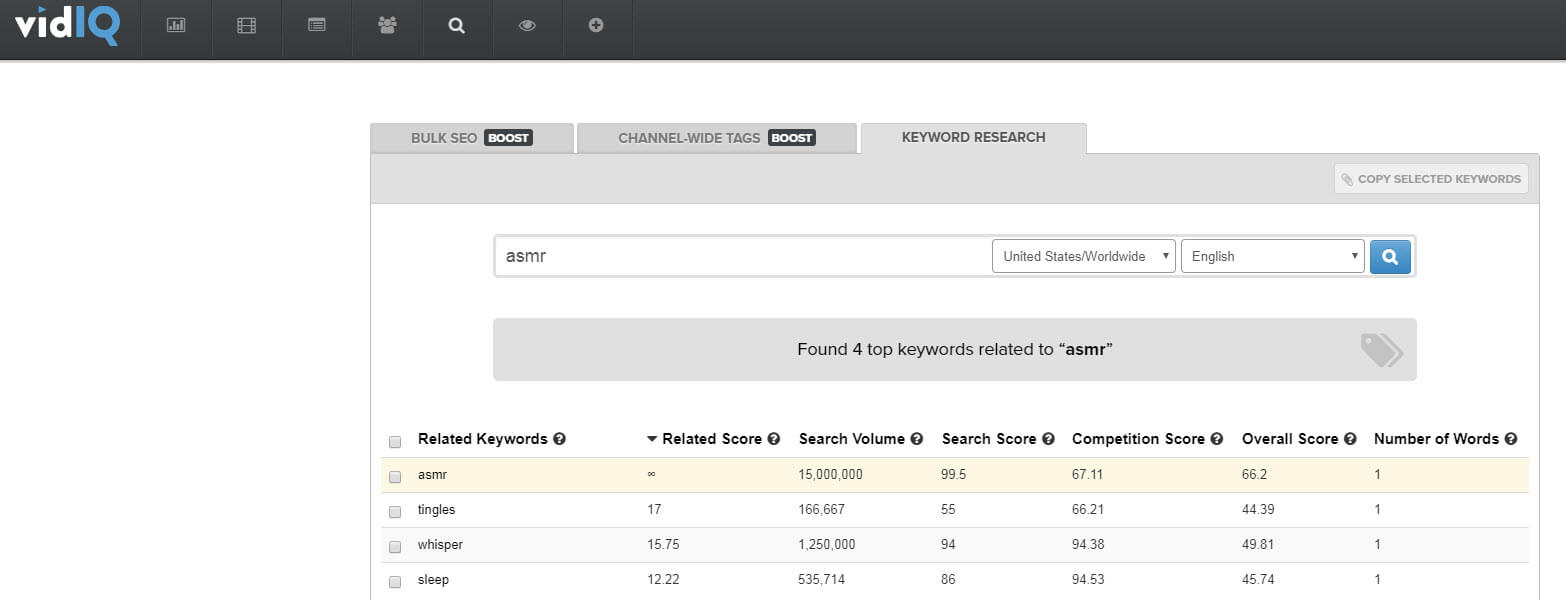
The keyword tool in VidIQ is one of very few research tools that has a function for just YouTube built in. You can paste in the keywords you want to research, choose the country you wish to target, and it will return all the search volumes and amount of competition, and will score your keywords based on these figures.
On the downside, there is a fairly complicated subscription process to go through if you want to upgrade from the free version. To be honest, the free version is OK for new users, but for in depth analytics you’re going to want to upgrade eventually.
9. Keyword Keg
Keyword Keg is definitely one of the most powerful YouTube keyword research tools out there. It offers lots of data, drawn from a variety of data sources including Wikipedia, Alibaba, Playstore and more. There are filters for country and language and you can drill down into issues like buyer intent and product info. However, as with most free YouTube keyword tools, there is a strict limit on what you can do before you pay. In this case, you only get to see the first five results unless you want to upgrade.

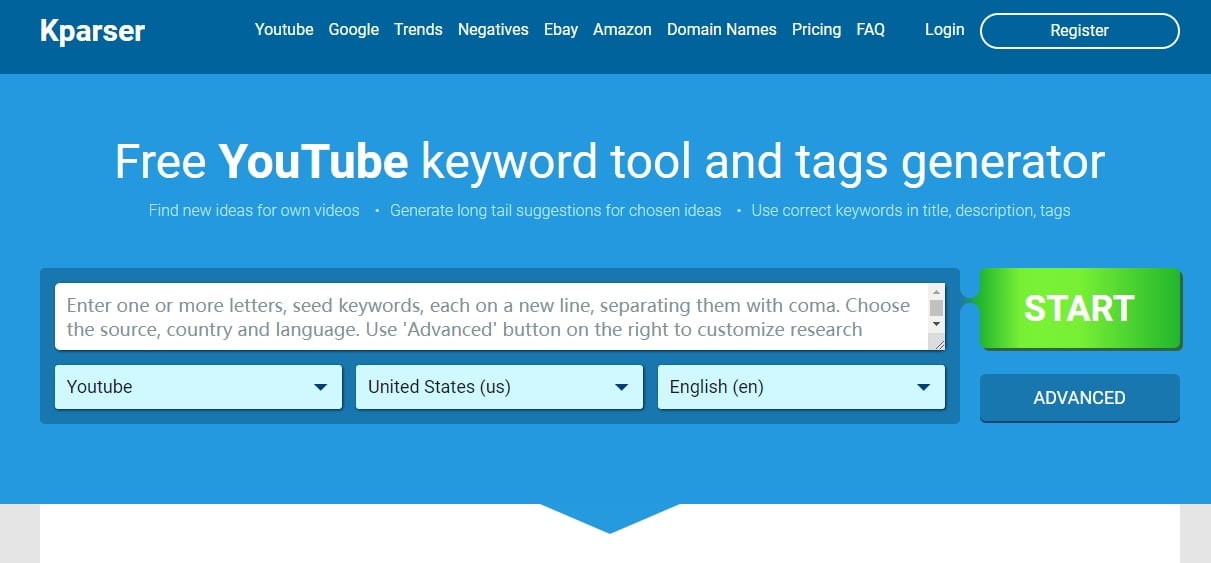
10. Kparser
Kparser is a YouTube keyword tool that you should notice. You can use it to find YouTube keywords free to use. More than finding the best core keywords, this tool can also give you suggestions on long tail keywords in every field. By use this, you don’t need to worry that you can’t the right keywords to use in title, description and tags. You also can selcet country and language when searching a YouTube keyword. For searching more than one keyword, remember to seperate them with coma.
Part 2: Bonus Tips - Google Video Result Keywords
Getting your video ranking highly on YouTube is excellent and will certainly bring you more traffic. But, do you know what would be even better than that? Getting your video ranking on Google as well.
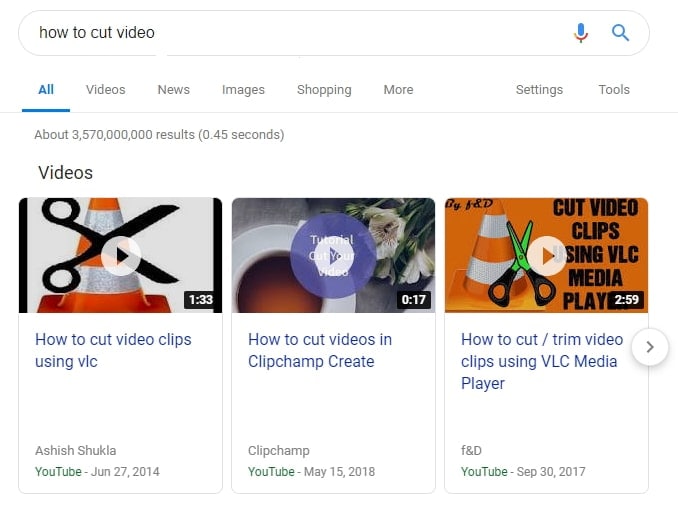
To do this you’ll need to find ‘video result keywords’ in Google, so that yours can be one of the selected videos that sometimes show up in search. Google decides what should and shouldn’t trigger a video result, and usually shows them when a video would make sense, for example when someone asks ‘how to’ or searches for ‘cute’ or ‘funny’ things.
There’s a bit of trial and error involved as there is no YouTube keyword tool to find video result keywords… yet. But you can use Google to search your keywords and see if they are video result keywords. Just type them in, and if a video appears in the listings below, you’ve discovered a video result keyword that is well worth optimizing for.
Richard Bennett
Richard Bennett is a writer and a lover of all things video.
Follow @Richard Bennett
Richard Bennett
Mar 27, 2024• Proven solutions
If we asked you to name the world’s biggest search engines, undoubtedly you’d come up with Google, but what would be number two? Bing? Yahoo? The truth might surprise you.
According to figures, the world’s second biggest search engine is actually YouTube. Millions of people are using it everyday to search for videos about fitness, hair, marketing and more. With such a large audience already searching directly on the platform, doesn’t it make sense that when we use YouTube keyword research and SEO should be as important as it is on our website?
Luckily, we can use YouTube keyword tools to analyze YouTube keywords. Here we’re going to take a look at 10 best YouTube keyword tools out there, which can help you identify and optimize for the highest traffic keywords for your videos. By optimizing your videos, you can rank higher, get more views and enjoy a larger audience on YouTube.
- Part 1: 10 Best YouTube Keyword Tools Recommendation
- Part 2: Bonues Tips - Google video result keywords
You May Also Like:
YouTube SEO Complete Guide >>
How to Edit and Optimize YouTube Title, Description, and Tags >>
Do you want to edit YouTube video easily? Filmora is a YouTube editor that you should have a try. As a YouTube video editing tool, it is simple to use with dragging and dropping. You can add various video effects, filters and transition to make your video better. Besides, titles and texts are also available to use. After editing, you can directly upload video to YouTube plactform. Now, download it to have a try!
Download Mac Version ](https://tools.techidaily.com/wondershare/filmora/download/ )
Part 1: 10 Best YouTube Keyword Tools Recommendation
Before you can get into using any YouTube SEO tool, you’ll need to identify what the best keywords for your videos are. Let’s start by taking a look at the best YouTube keyword tools available.
1. YouTube autocomplete
When you start to search for something on YouTube, you’ll probably notice that YouTube suggests some keywords to finish your search. This is called autocomplete, and it works by suggesting the most popular keywords that start with the letters you’ve typed so far. What it is essentially saying is that those are the most frequently searched for terms that use the words you’ve already typed.
This means it’s a great place to start building your keywords, and a fantastic YouTube keyword tool for your videos. Just start your search for your video (e.g. shoes for…) and see what comes up. In this case, we can see that the most popular keywords are ‘girls’, ‘men’, ‘kids’, ‘summer’ and ‘boys’.
2. Keywordtool.io
Without doubt, this is one of the most powerful YouTube keyword tools out there, ranking hundreds of keywords by popularity. It captures data from YouTube autocomplete and allows you to create lists of keywords from that data. As well as autocompete data, you can also search for questions people are asking, which makes it highly beneficial as a YouTube SEO tool.
The downside to this particular tool is that it’s fairly limited on the free version. Upgrading to Pro Basic will give you almost double the keyword results and will let you compare the volume of searches made for those terms too. However, this will set you back around $68 a year, so it’s going to be something of an investment if you go for it.
3. SEOChat
SEO Chat is an amazing free tool that can generate keyword ideas from Google, Amazon, Bing and YouTube. You can search for keywords from all of those sources or can just search YouTube alone to find your keyword lists. You’ll need a ‘seed’ keyword, such as ‘shoes’, ‘make up’ or ‘marketing’, and then organizes results alphabetically with other letters following your seed keyword.
Simply scrolling through the results is going to give you loads of ideas for keywords and possibly content too. The tool also allows you to further expand your results by selecting a keyword and running ‘part two’ of the process, which expands those phrases even further. Your chosen keywords can be exported from the software, ready for use in your YouTube SEO tool.
4. Gather keywords from your competitor
Why not learn from the best and see what’s already working for your competitors? Finding their high traffic keywords is easy and can save a lot of time and energy. To do this, pick a channel that is around your size, as they’re your nearest competitors. Steer clear of the huge channels, as you’ll find it hard to rank next to them.
Click the videos tab to see their content, and sort them by ‘most popular’ to see the ones which got the most views. Take a look at the title and the description of those videos, and you’ll find a good fistful of proven keywords that you can start using yourself.
That’s not all though. To maximize your competitor research, let’s dig a little deeper into the tags they have used for their videos too. Unfortunately, these are hidden on YouTube, but are easily seen using the page’s HTML. Simply right click on the page and select ‘view source’. Don’t be alarmed at the great stream of HTML that pops up, it’s easy to search using your search function (press ctrl + f on Windows or ⌘ + f on iOS) by typing in ‘keywords’ to the search box. The following terms are the tags used in the video.
If ploughing through HTML sounds somewhat taxing, there is a handy YouTube SEO tool you can use to display the tags on page. It’s called TubeBuddy and is a Chrome extension which you’ll find in the Chrome store for free.
5. Keyword Tool Dominator
It’s got a grand name, but it’s actually really easy to use and a great place to start if you’re new to YouTube keyword research. Pop in your seed keywords and the Dominator will produce a list of relevant keywords related to those terms. You can then select the most useful and download them to your device.
The drawback with this is that you can only perform three searches a day on the free version. Perhaps that’s enough for you to begin with, but if you want to upgrade to the unlimited version, which will also give you search volumes, it’s a one-off fee of $39.99.
6. Ubersuggest
For getting more data on specific keywords, Ubersuggest from the SEO guru that is Neil Patel is one of the best tools out there. As well as showing search volume and competition, you can see other information such as cost per click and the seasonality of the keyword. It’s free to use with no limitations at all, so is well worth checking out.
7. Google trends
We would highly recommend investigating Google Trends as part of your YouTube keyword research, as it is powerful, accurate and, best of all, free! The options let you narrow down the trend results to just YouTube searches, which is great for gaining insights to your search terms. You can narrow down the results to a specific country too, helping you to gain insight into what your target demographic is currently interested in.
8. VidIQ
The keyword tool in VidIQ is one of very few research tools that has a function for just YouTube built in. You can paste in the keywords you want to research, choose the country you wish to target, and it will return all the search volumes and amount of competition, and will score your keywords based on these figures.
On the downside, there is a fairly complicated subscription process to go through if you want to upgrade from the free version. To be honest, the free version is OK for new users, but for in depth analytics you’re going to want to upgrade eventually.
9. Keyword Keg
Keyword Keg is definitely one of the most powerful YouTube keyword research tools out there. It offers lots of data, drawn from a variety of data sources including Wikipedia, Alibaba, Playstore and more. There are filters for country and language and you can drill down into issues like buyer intent and product info. However, as with most free YouTube keyword tools, there is a strict limit on what you can do before you pay. In this case, you only get to see the first five results unless you want to upgrade.
10. Kparser
Kparser is a YouTube keyword tool that you should notice. You can use it to find YouTube keywords free to use. More than finding the best core keywords, this tool can also give you suggestions on long tail keywords in every field. By use this, you don’t need to worry that you can’t the right keywords to use in title, description and tags. You also can selcet country and language when searching a YouTube keyword. For searching more than one keyword, remember to seperate them with coma.
Part 2: Bonus Tips - Google Video Result Keywords
Getting your video ranking highly on YouTube is excellent and will certainly bring you more traffic. But, do you know what would be even better than that? Getting your video ranking on Google as well.
To do this you’ll need to find ‘video result keywords’ in Google, so that yours can be one of the selected videos that sometimes show up in search. Google decides what should and shouldn’t trigger a video result, and usually shows them when a video would make sense, for example when someone asks ‘how to’ or searches for ‘cute’ or ‘funny’ things.
There’s a bit of trial and error involved as there is no YouTube keyword tool to find video result keywords… yet. But you can use Google to search your keywords and see if they are video result keywords. Just type them in, and if a video appears in the listings below, you’ve discovered a video result keyword that is well worth optimizing for.
Richard Bennett
Richard Bennett is a writer and a lover of all things video.
Follow @Richard Bennett
Also read:
- [Updated] Choosing the Right Format – Boosting Your YouTube Videos’ Performance
- 2024 Approved Boosting Engagement with Effective YouTube Banners & Thumbnails
- [Updated] Auditing for Accuracy YouTube Monetization Compliance
- End Screen Creation Made Simple - Free Templates & Guides for 2024
- Cultivating Your Persona in the World of Gamers
- Adjust Cutting Room Time for YouTube for 2024
- [Updated] Conquer Your Screen Top 10 Simple YouTube Projects for All Creators
- Channel King & Queen Academy YouTube Excellence for 2024
- [New] Drive Engagement, Not Farewells Top Strategies to Keep Your Audience Hooked on YouTube
- Content Creation Evolution Studio Vs. Innovative Beta
- The Ultimate Route From YouTube to IGTV Adoption
- Elevate Your Content YouTube Video Editing Secrets Revealed for 2024
- YouTube Shorts Guide What Is It and How To Make Shorts Video?
- Mastering YouTube Shorts A Step-by-Step Creation Guide
- In 2024, Discover the Leading Free iOS Video Editor A Comprehensive Guide
- Leading Websites' Guide to Extracting Youtube Template Videos
- 2024 Approved Diversifying Audience Across 30+ Online Venues
- Generating Auto-Subscribe Hyperlinks to Your Channel's YT
- Epic Entertainment A Rundown of Hilarious YouTuber Hits
- Crafting Animation Dynamic, Bouncy Text Techniques
- [New] Essential Free Apps for YouTube to WAV Transformation
- A Closer Look at YouTube's Payment System and Its Potential
- [New] Channel Conversion Secrets YT Vs IGTV
- In 2024, Achieving Visual Excellence ASPECT RATIO Mastery on YOUTUBE
- Your First Steps for YouTube Earning - 8 Methods
- Selecting Android's Best YouTube Video Extractors
- In 2024, Crafting the Perfect Pitch Inviting Listeners to Join Us
- [Updated] Evaluating the Financial Giants Mr. Beast
- Expertise in Editing The Leading Online Video Length Reducers
- Configuring Who Can See Your YouTube Clips
- 2024 Approved Elevate Your YouTube Presence Strategic Tagging and Titling Techniques
- Viral Video Stars The Highest Subscriber Count
- Time Traveling Through Retro Filmmaking Techniques
- 2024 Approved Essential Recording Steps for YouTube Audio Extraction
- [Updated] Dissecting Mr. Beast's Fortune Portfolio
- Elevate Your Filming Flair with Free Green Screen Insights From 4 YouTube Authorities
- Advanced Filmmaking Techniques Selecting Top-Notch Lenses for 2024
- In 2024, 7 Insider Tips to Make Money Quickly on YouTube Shorts
- [Updated] Earning as a Video Game Geek
- In 2024, Crafting Success Leading Business Channels for Professionals
- Dissecting Mr. Beast's Fortune Portfolio
- In 2024, Essential Techniques to Elevate Your Channel's Visibility
- [New] Best iPhone & Android Photo & Video Capture Applications Reviewed
- In 2024, Elevate Your YouTube Livestream Game Plan
- The Ultimate Blueprint for Exceptional Product Unboxings
- Awe-Inspiring Allure Top YouTube Magic Editing Wonders
- Regulatory Views on Screenshots From YouTube Streaming
- In 2024, Enhancing YouTube Content via FinalCut Pro Techniques
- [Updated] In 2024, Ploughing Through the Past Top Farming Games Follow
- [New] Auto-Enhancing Shots with Innovative Exposure Algorithms
- Updated Cable vs Streaming TiVo and Comcast Duke It Out for DVR Supremacy for 2024
- [New] Snatching the Best Videos From Facebook Feed
- In 2024, Stream-to-File Conversion Effortless Archive Creation
- Updated Denoise a Video in Adobe Premiere Pro – Audio and Video Noise Removal for 2024
- [Updated] Unlocking the Secrets of iPhone Recording
- How to Rescue Lost Messages from Honor
- In 2024, How Tecno Spark Go (2023) Mirror Screen to PC? | Dr.fone
- Directly Delivering TikTok Videos to Twitter's Feed
- [Updated] 2024 Approved Ornate Asian Dwellings for Your Next Build-Off
- 2024 Approved FCPX Training Academy Top Online Courses and Tutorials
- How to Unlock Disabled iPhone XS Max/iPad Without Computer | Dr.fone
- Oceanic Visionaries Selecting the Top 5 Cameras
- The Art of Sound Visualization Combining Waveform Graphics & Animation Techniques in Premiere Pro
- [Updated] From Novice to Expert Advanced Screencasting Steps for 2024
- 2024 Approved Mastering Video Capture Proven Methods for Success
- In 2024, Where Is the Best Place to Catch Dratini On Apple iPhone 6s Plus | Dr.fone
- [Updated] In 2024, Essential Knowledge Zooming Into Clustered Rooms
- In 2024, How to Transfer Contacts from Xiaomi Redmi 13C to Other Android Devices Using Bluetooth? | Dr.fone
- In 2024, Dollars and Sense Profit-Driven Techniques for FB Video Content
- Title: A Stepwise Approach to Add YouTube Videos Into Slate for 2024
- Author: Brian
- Created at : 2024-05-25 11:17:25
- Updated at : 2024-05-26 11:17:25
- Link: https://youtube-video-recordings.techidaily.com/a-stepwise-approach-to-add-youtube-videos-into-slate-for-2024/
- License: This work is licensed under CC BY-NC-SA 4.0.
